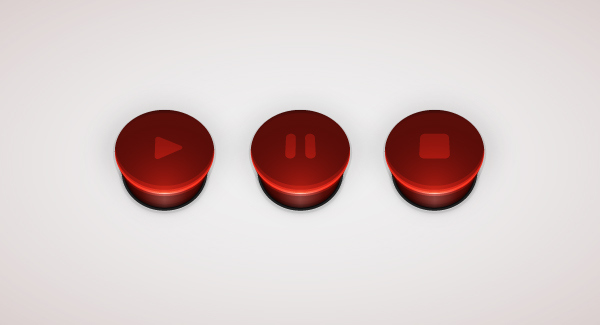
In the following Illustrator tutorial you will learn how to create a simple set of 3D player buttons.
For starters you will learn how to create a set of symbols using the Rectangle Tool and the Direct Selection Tool along with Average options and the Rouned Corners effect. Next, using the 3D Extrude & Bevel effect and its Mapping options along with those saved symbols you will learn how to create the rough 3D effect.
Finally, using basic blending and vector shape building techniques along with the Appearance panel and some simple effects you will learn how to add colors, shading and highlights for your button.
Final Image
As always, this is the final image that we’ll be creating:

Tutorial Details
- Program: Adobe Illustrator CS5
- Estimated Completion Time: 45 minutes
- Difficulty: Beginner-Intermediate
Step 1
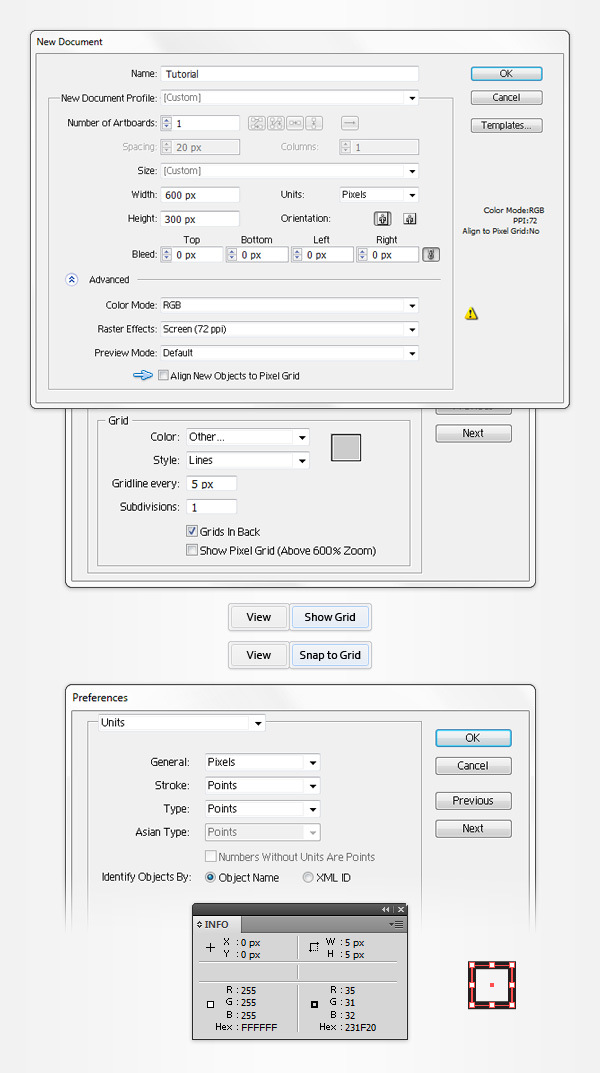
Hit Command + N to create a new document. Enter 600 in the width box and 300 in the height box then click on the Advanced button. Select RGB, Screen (72ppi) and make sure that the Align New Objects to Pixel Grid box is unchecked before you click OK.
Enable the Grid (View > Show Grid) and the Snap to Grid (View > Snap to Grid). For starters you will need a grid every 5px, so simply go to Edit > Preferences > Guides > Grid, enter 5 in the Gridline every box and 1 in the Subdivisions box.
You should also open the Info panel (Window > Info) for a live preview with the size and position of your shapes. Do not forget to set the unit of measurement to pixels from Edit > Preferences > Units > General.
All these options will significantly increase your work speed.
Step 2
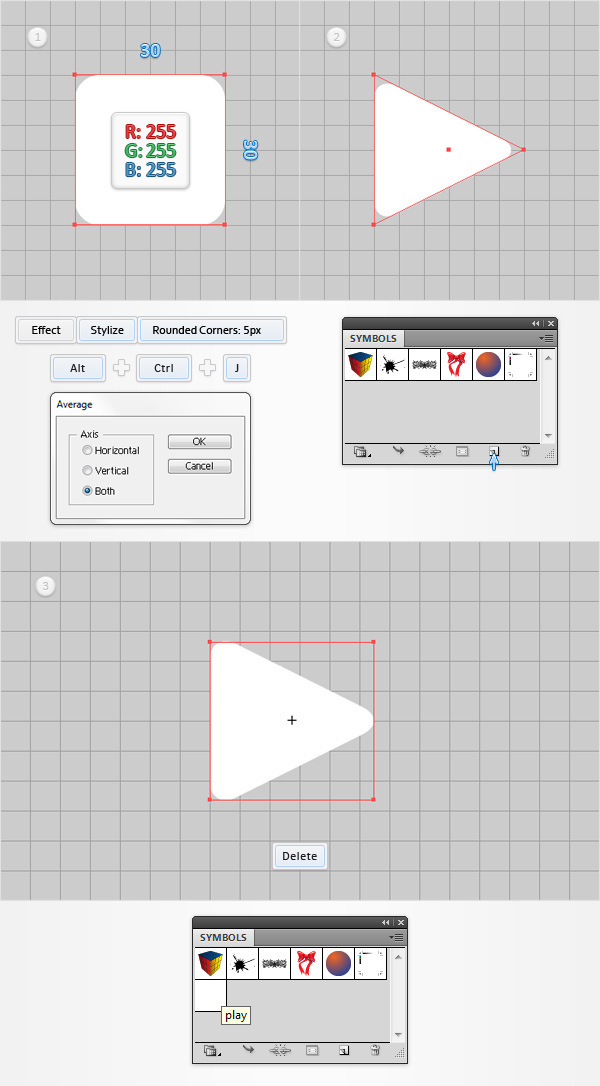
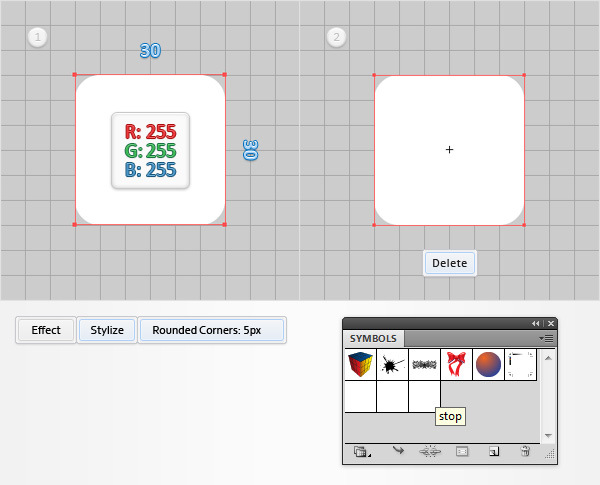
Pick the Rectangle Tool (M) and focus on your Toolbar. Remove the color from the stroke then select the fill and set its color to white. Move to your Artboard and simply create a 30px square, the Snap to Grid should ease your work. Make sure that this new shape is selected and go to Effect > Stylize > Rounded Corners. Enter a 5px radius, click OK and switch to the Direct Selection Tool (A).
Focus on the right side of this white rounded rectangle, select both anchor points and hit Alt + CTRL + J (or go to Object > Path > Average). Check the Both box and click the OK button. This should turn your rounded rectangle into a triangle with rounded corners as shown in the second image. Make sure that this shape stays selected, open the Symbols panel (Window > Symbols) and click the New Symbol button (indicated by the little, blue arrow in the following image). Enter "play" in the name box then click the OK button.
Once you can see your new symbol inside the Symbols panel you can remove the one from your Artboard.
Step 3
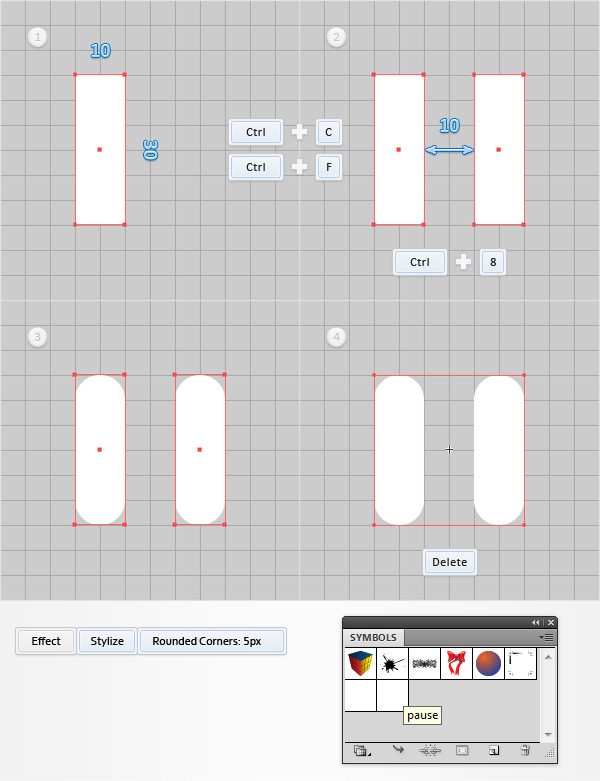
Using the Rectangle Tool (M), create a 10 x 30px shape and fill it with white.
Duplicate this new rectangle (CTRL + C > CTRL + F), select the copy and drag it 20px to the right. Reselect both rectangles, turn them into a compound path (CTRL + 8 or Object > Compound Path > Make) and go to Effect > Stylize > Rounded Corners. Enter a 5px radius and click OK. Turn this white compound path into a new symbol and name it "pause".
Once you can see this new symbol inside your Symbols panel return to the Artboard and remove the existing symbol.
Step 4
Using the Rectangle Tool (M), create a 30px square, fill it with white and go to Effect > Stylize > Rounded Corners. Enter a 5px radius and click OK. Turn this white rounded rectangle into a new symbol and name it "stop".
Once you can see this new symbol inside your Symbols panel return to the Artboard and remove the existing symbol.
Step 5
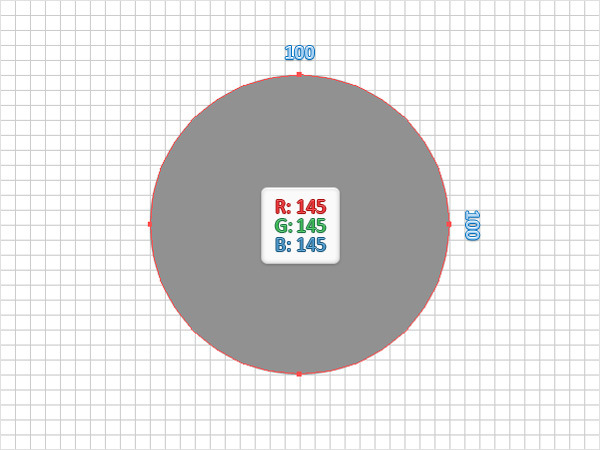
Using the Ellipse Tool (L), create a 100px circle, fill it with R=145 G=145 B=145 and make sure that it has no color set for the stroke.
Step 6
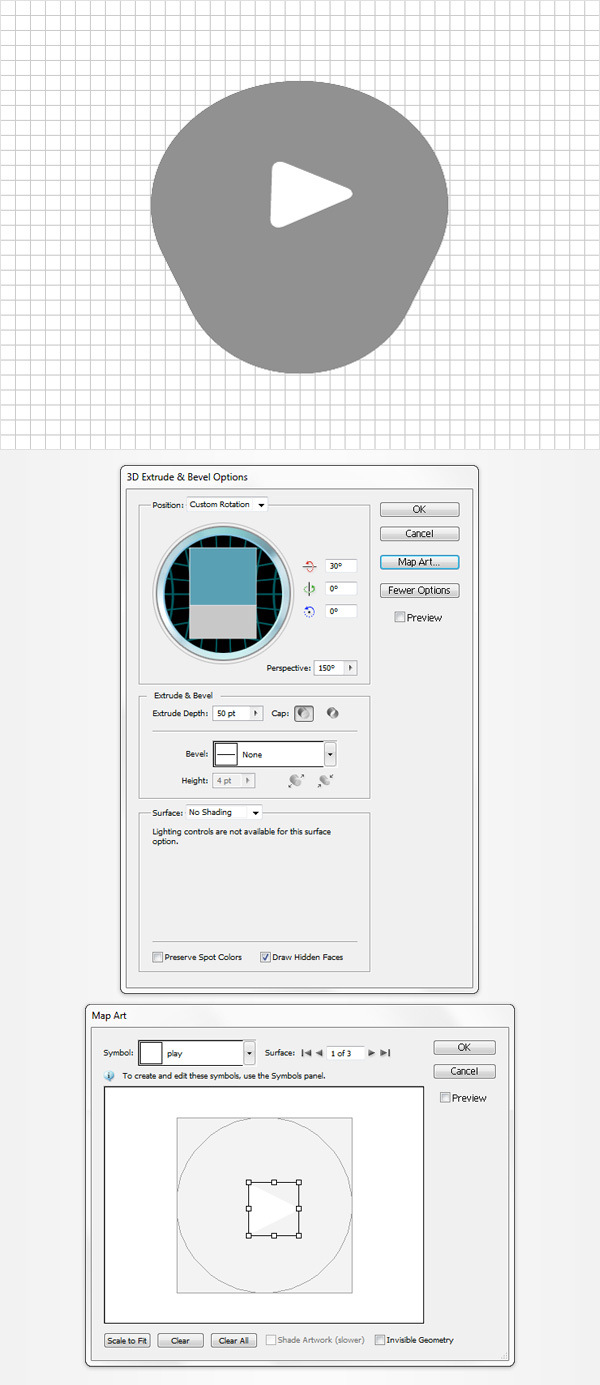
Select your grey circle and go to Effect > 3D > Extrude & Bevel. Click the More Options button, enter all the properties shown in the following image, make sure that you check the Draw Hidden Face box then hit the Map Art button.
Make sure that "Surface 1" is active, select your "play" symbol from the Symbol drop down menu, place it as shown below and then click the OK button. In the end things should look like in the following image.
Step 7
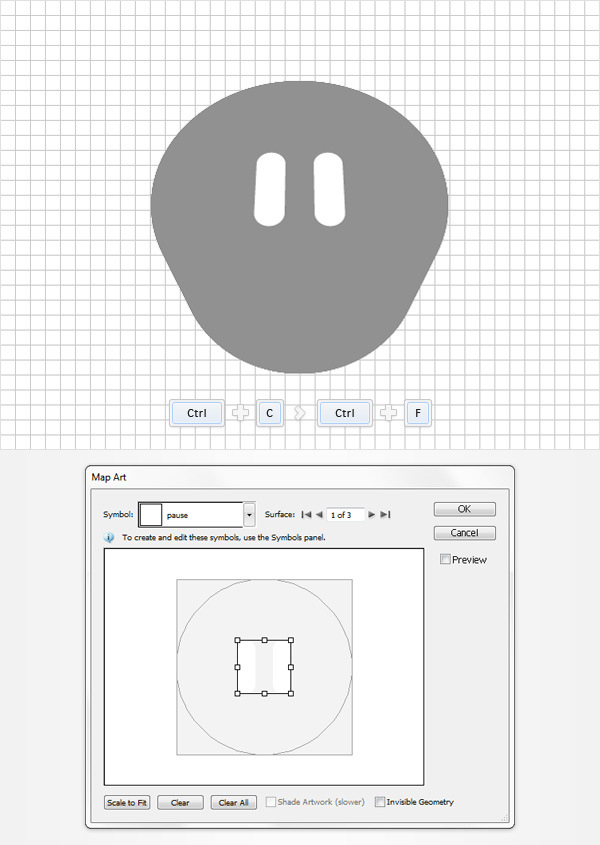
Make sure that your grey circle is still selected and make a copy in front (CTRL + C > CTRL + F). Select this copy, focus on the Appearance panel (Window > Appearance) and open the existing 3D Extrude & Bevel effect. Click the Map Art button and simply replace the "play" symbol with the "pause" symbol.
In the end things should look like in the following image.
Step 8
Make sure that the shape made in the previous step is still selected and make a copy in front (CTRL + C > CTRL + F). Select this copy, focus on the Appearance panel (Window > Appearance) and open the existing 3D Extrude & Bevel effect. Click the Map Art button and simply replace the "pause" symbol with the "stop" symbol.
In the end things should look like in the following image.
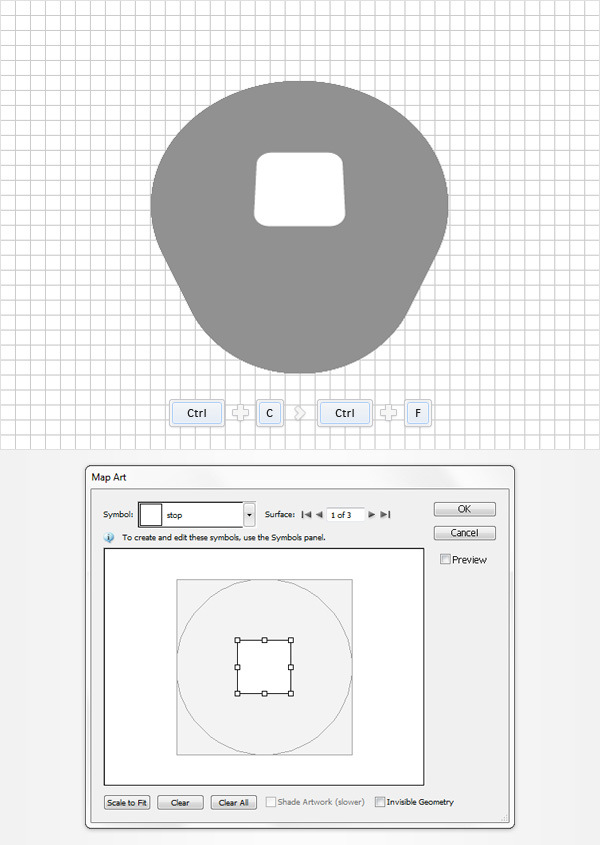
Step 9
Disable the Grid (View > Hide Grid) and the Snap to Grid (View > Snap to Grid).
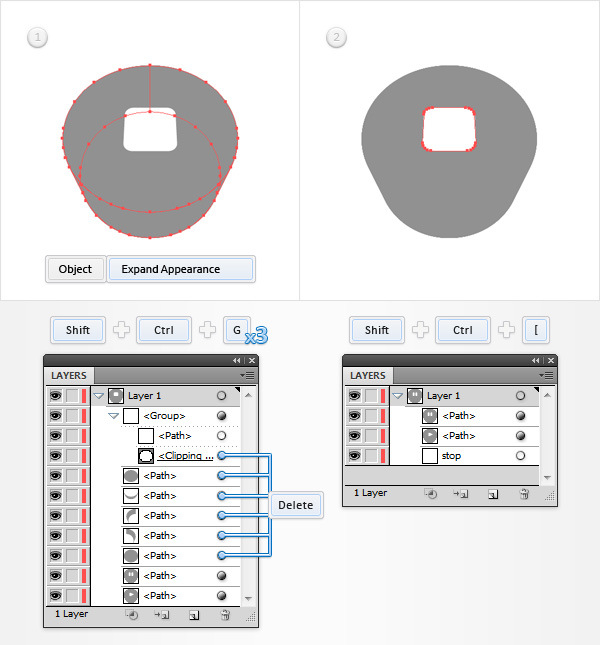
Select the 3D shape with the "stop" symbol and go to Object > Expand Appearance. Move to the Layers panel, select the resulting group and hit Shift + CTRL + G three times to ungroup all those groups/subgroups.
Keep focusing on the Layers panel, open the remaining group and remove the Clipping Mask along with the five grey shapes indicated in the following image. Select the remaining group and hit Shift + CTRL + G to Ungroup that stop symbol shape. Double click on this white shape, name it "stop" and send it to the back (Shift + CTRL + [ ).
Step 10
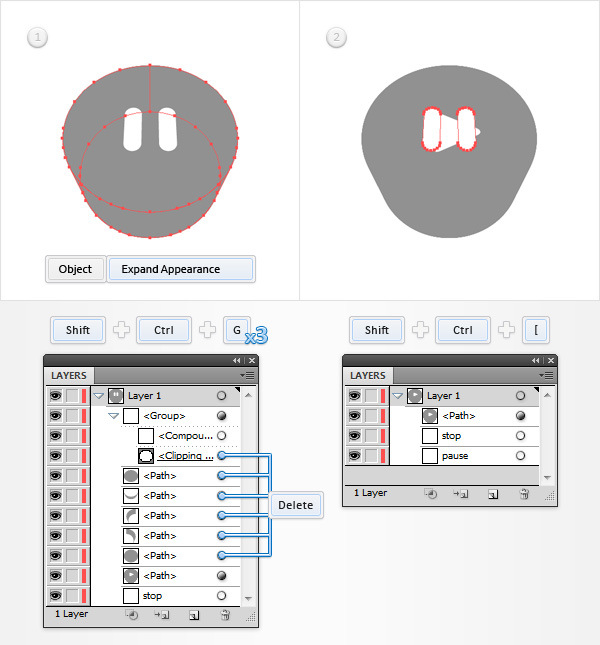
Select the 3D shape with the "pause" symbol and go to Object > Expand Appearance. Again, select the resulting group and hit Shift + CTRL + G three times.
Focus on the Layers panel, open the remaining group and remove the Clipping Mask along with the five grey shapes indicated in the following image. Select the remaining group and hit Shift + CTRL + G to Ungroup that pause symbol shape.
Double click on this white shape, name it "pause" and send it to the back (Shift + CTRL + [ ).
Step 11
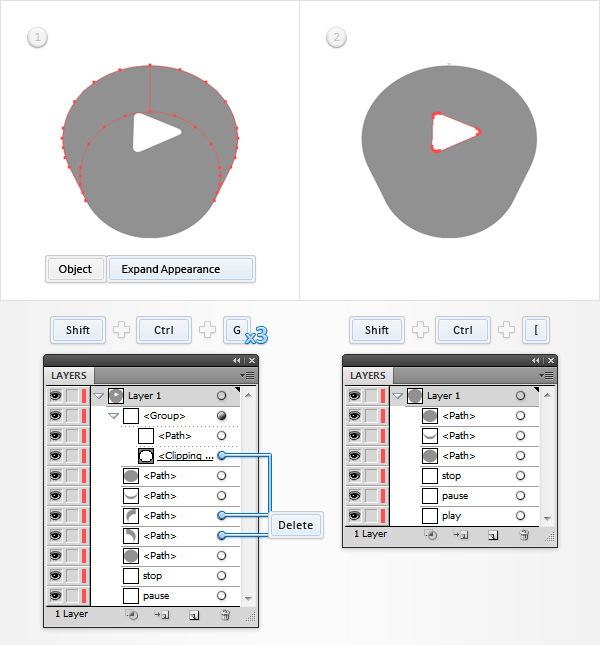
Select the 3D shape with the "pause" symbol and go to Object > Expand Appearance. Once again, select the resulting group and hit Shift + CTRL + G three times.
Focus on the Layers panel, open the remaining group and remove the Clipping Mask along with the two grey shapes pointed in the following image. Select the remaining group and hit Shift + CTRL + G to Ungroup that play symbol shape. Double click on that white shape, name it "play" and send it to the back (Shift + CTRL + [ ).
Now, have a look inside your Layers panel and you should find three grey shapes and three three symbol shapes.
Step 12
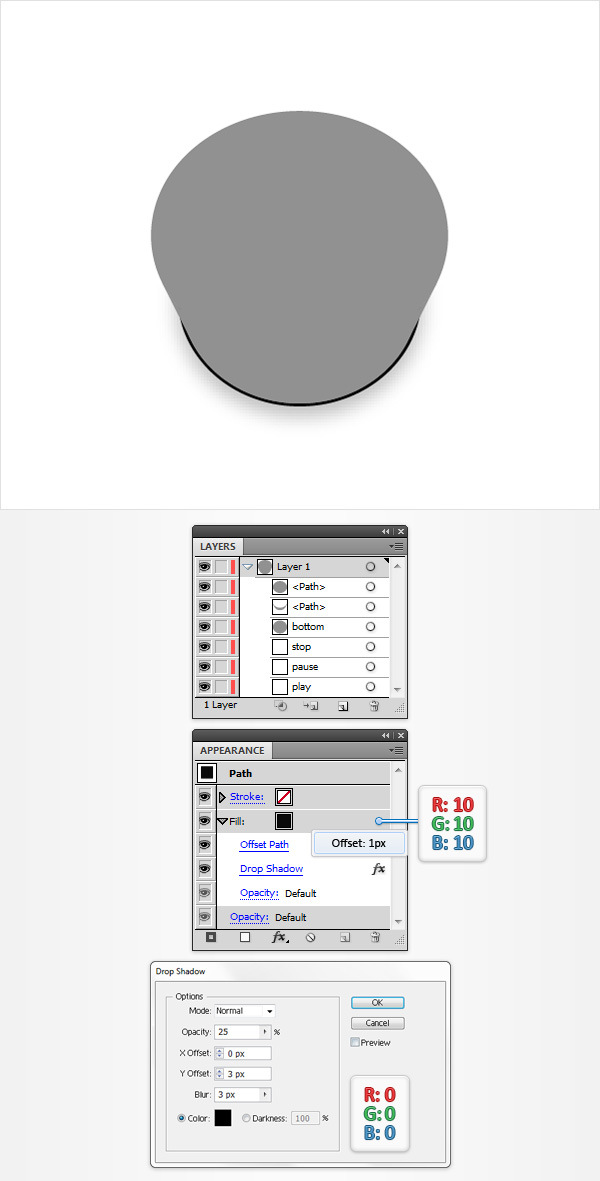
Focus on the Layers panel, double click on the bottom, grey shape and simply name it "bottom". Make sure that it stays selected and focus on the Appearance panel. Select the existing fill, replace the grey with R=10 G=10 B=10 and go to Effect > Path > Offset Path. Enter a 1px Offset, click OK and go to Effect > Stylize > Drop Shadow. Enter the properties shown in the following image and click OK.
Step 13
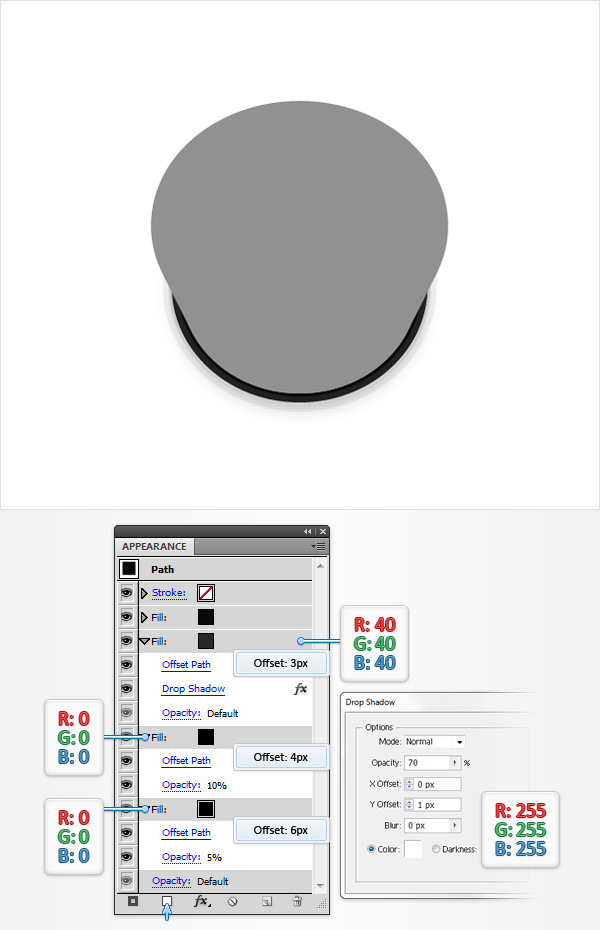
Make sure that "bottom" stays selected, focus on the Appearance panel and add a second fill using the Add New Fill button (indicated by the little, blue arrow in the following image).
Select this new fill, drag it in the bottom of the Appearance panel, set the color at R=40 G=40 B=40 and go to Effect > Path > Offset Path. Enter a 3px Offset, click OK and go to Effect > Stylize > Drop Shadow. Enter the properties shown in the following image and click OK.
Return to the Appearance panel and add a third fill for your "bottom" shape using that same Add New Fill button. Select this new fill, drag it in the bottom of the Appearance panel, set the color to black, lower its Opacity to 10% and go to Effect > Path > Offset Path. Enter a 4px Offset and click OK.
Keep focusing on the Appearance panel and add a fourth fill for this shape. Drag it in the bottom of the Appearance panel, set the color at black, lower its Opacity to 5% and go to Effect > Path > Offset Path. Enter a 6px Offset and click OK.
Step 14
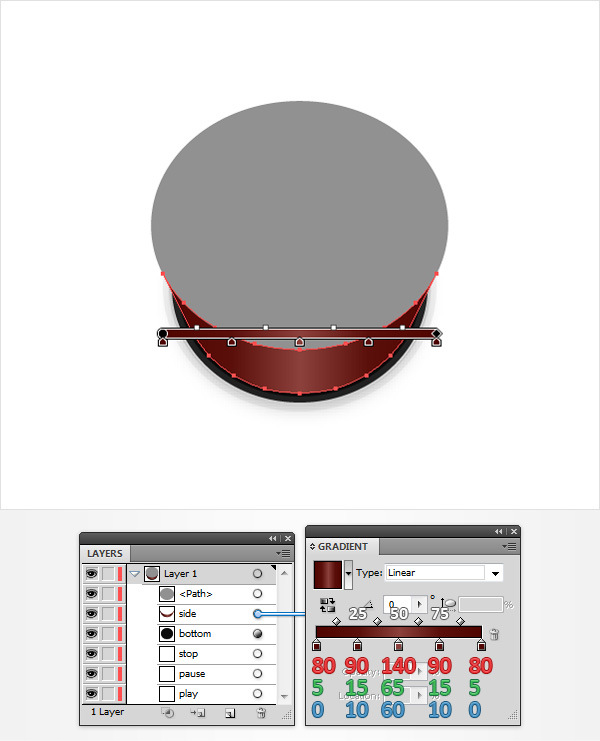
Focus on the Layers panel, double click on the grey shape positioned above the "bottom" shape and name it "side".
Make sure that "side" is selected, focus on the Appearance panel and replace the grey with the linear gradient shown in the following image. The white numbers from the Gradient image stand for Location percentage.
Step 15
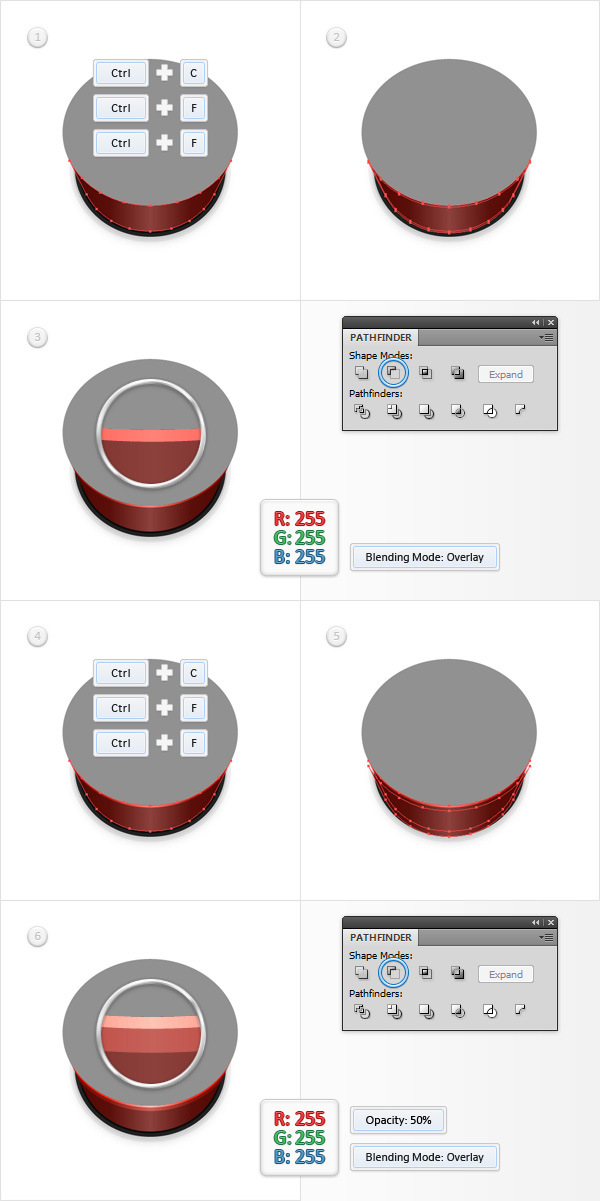
Go to Edit > Preferences > General and make sure that the Keyboard Increment is set at 1px. Select "side" and make two copies in front (CTRL + C > CTRL + F > CTRL + F). Select the top copy and move it 1px down using the down arrow from your keyboard. Reselect both copies, open the Pathfinder panel (Window > Pathfinder) and click the Minus Front button.
Fill the resulting shape with white and change its Blending Mode to Overlay. Select "side" and make another two copies in front (CTRL + C > CTRL + F > CTRL + F).
Select the top copy and move it 3px down using the down arrow from your keyboard. Reselect both copies and click the Minus Front button from the Pathfinder panel. Fill the resulting shape with white, lower its Opacity to 50% and change the Blending Mode to Overlay.
Step 16
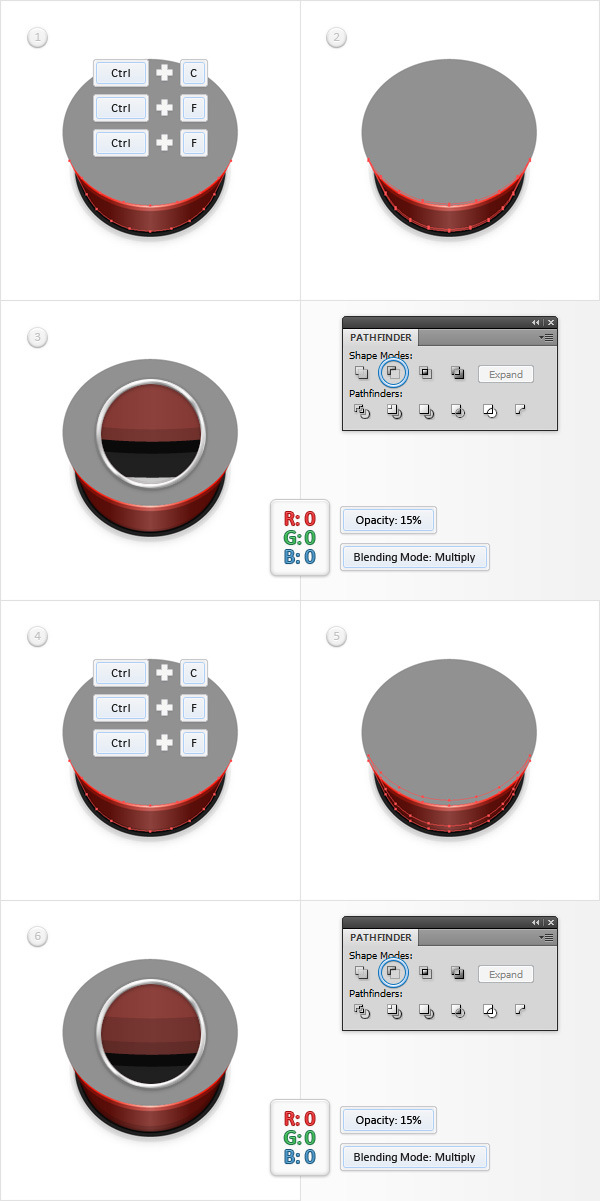
Select "side" and make two copies in front (CTRL + C > CTRL + F > CTRL + F).
Select the top copy and move it 1px up using the up arrow from your keyboard. Reselect both copies and click the Minus Front button from the Pathfinder panel.
Fill the resulting shape with black, lower its Opacity to 15% and change its Blending Mode to Multiply. Reselect "side" and make another two copies in front (CTRL + C > CTRL + F > CTRL + F). Select the top copy and move it 3px up using the up arrow from your keyboard.
Reselect both copies and click the Minus Front button from the Pathfinder panel. Fill the resulting shape with black, lower its Opacity to 15% and change the Blending Mode to Multiply.
Step 17
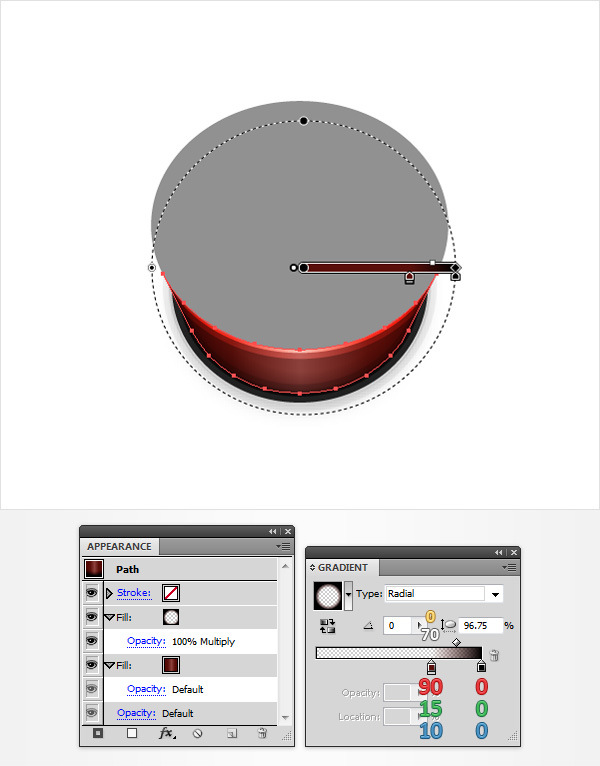
Reselect that "side" shape, focus on the Appearance panel and add a second fill.
Select it, change the Blending Mode to Multiply and use the radial gradient shown in the following image.
Remember that the white numbers from the Gradient image stand for Location percentage while the yellow zero stands for Opacity percentage.
Step 18
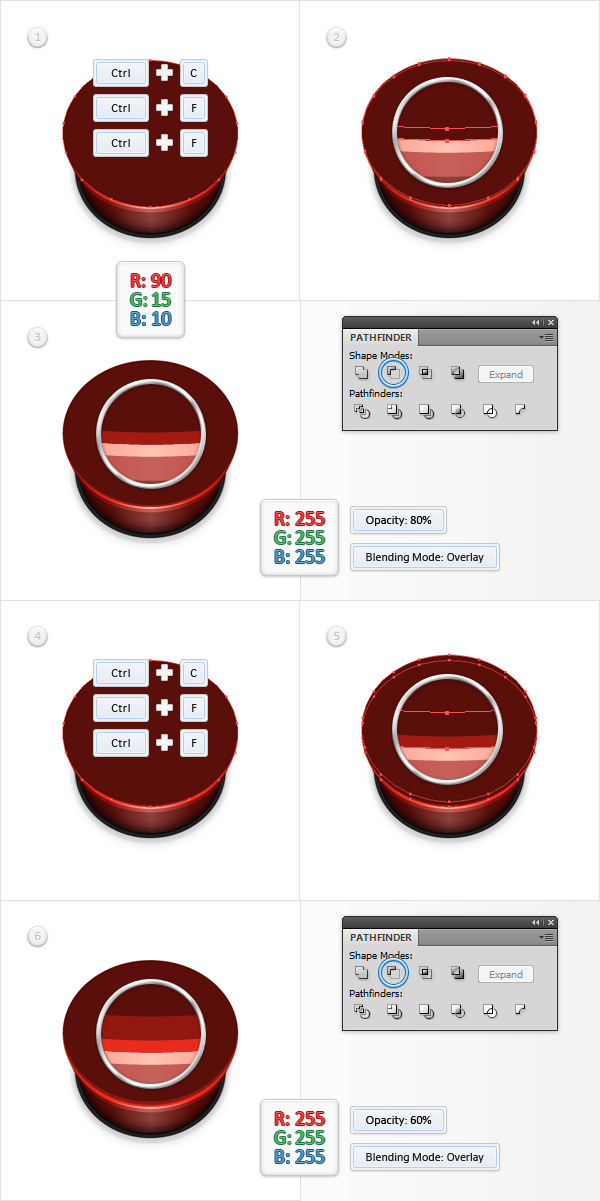
Focus on the Layers panel, double click on the remaining grey shape and name it "top".
Keep focusing on this shape, replace the grey with R=90 G=15 B=10 then make two copies in front (CTRL + C > CTRL + F > CTRL + F). Select the top copy and move it 1px up. Reselect both copies and click the Minus Front button from the Pathfinder panel.
Fill the resulting shape with white, lower its Opacity to 80% and change the Blending Mode to Overlay. Reselect "top" and make another two copies in front (CTRL + C > CTRL + F > CTRL + F).
Select the top copy and move it 3px up using the up arrow from your keyboard. Reselect both copies and click the Minus Front button from the Pathfinder panel. Fill the resulting shape with white, lower its Opacity to 60% and change the Blending Mode to Overlay.
Step 19
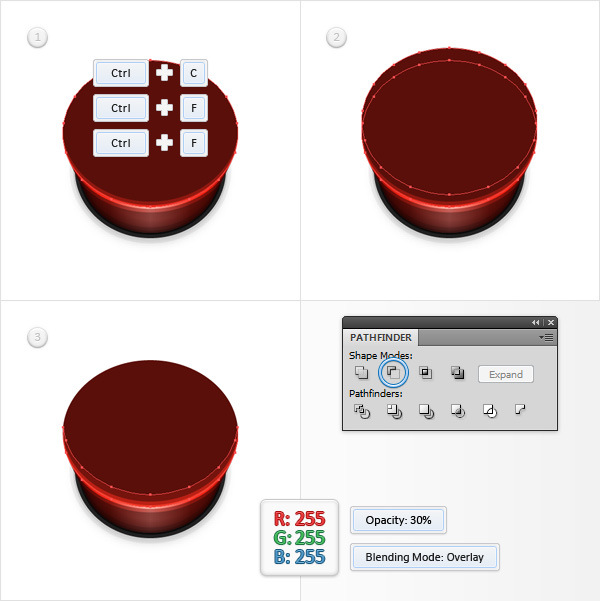
Reselect "top" and make two copies in front (CTRL + C > CTRL + F > CTRL + F). Select the top copy and move it 7px up using the up arrow from your keyboard. Reselect both copies and click the Minus Front button from the Pathfinder panel.
Fill the resulting shape with white, lower its Opacity to 30% and change the Blending Mode to Overlay.
Step 20
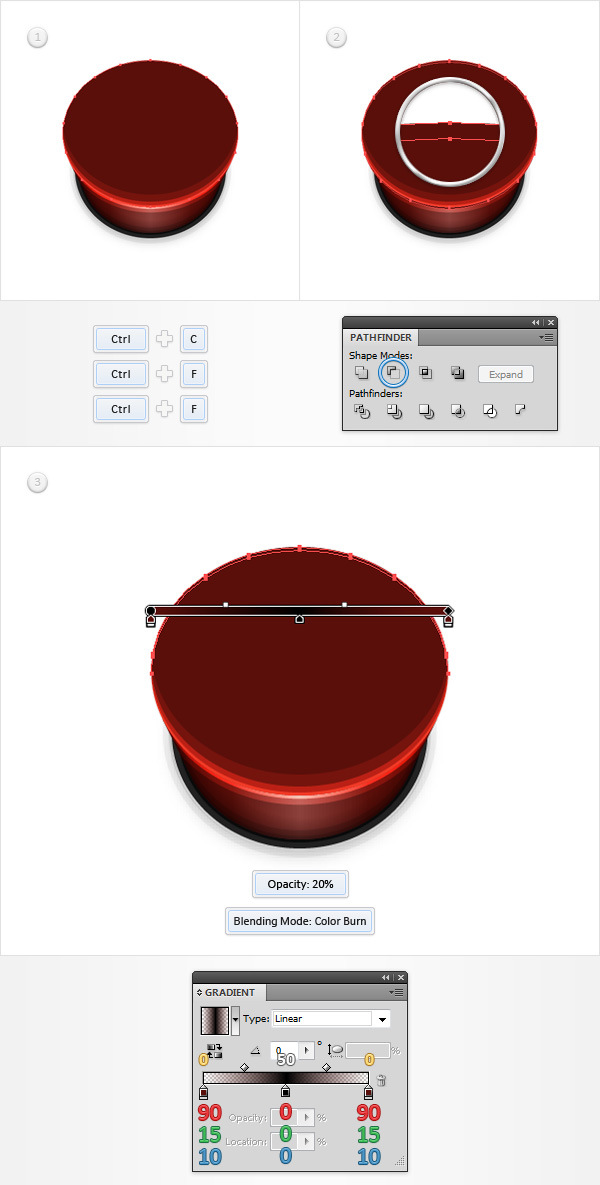
Reselect "top" and make two copies in front (CTRL + C > CTRL + F > CTRL + F). Select the top copy and move it 1px down using the down arrow from your keyboard. Reselect both copies and click the Minus Front button from the Pathfinder panel.
Fill the resulting shape with the linear gradient shown in the following image, lower its Opacity to 20% and change the Blending Mode to Color Burn.
Step 21
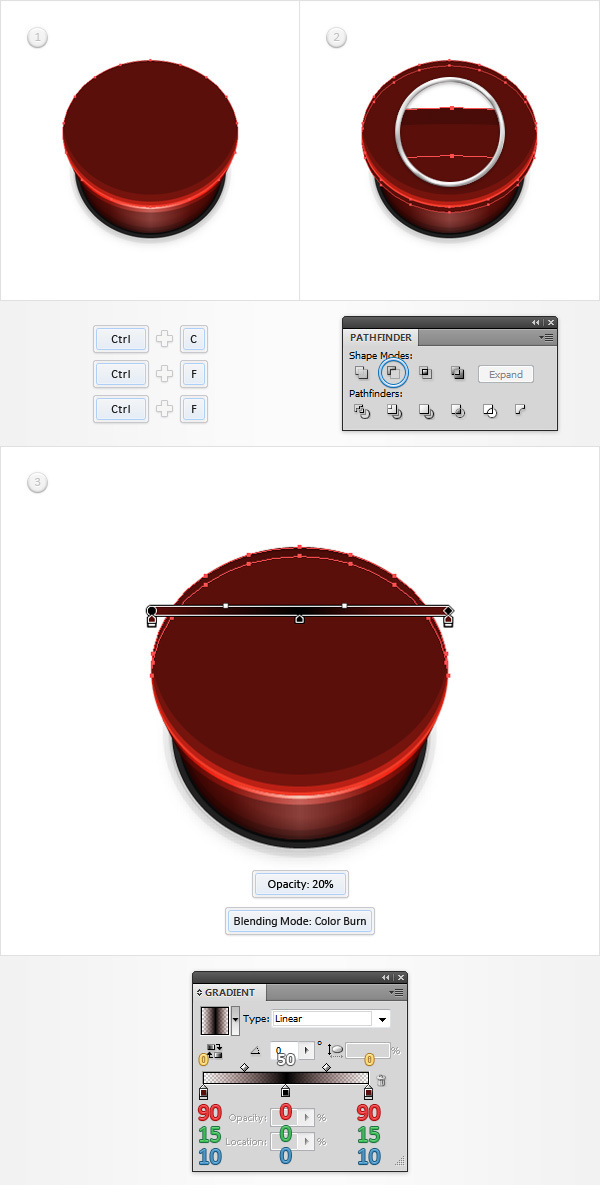
Reselect "top" and make two new copies in front (CTRL + C > CTRL + F > CTRL + F). Select the top copy and move it 3px down using the down arrow from your keyboard. Reselect both copies and click the Minus Front button from the Pathfinder panel.
Fill the resulting shape with the linear gradient shown in the following image, lower its Opacity to 20% and change the Blending Mode to Color Burn.
Step 22
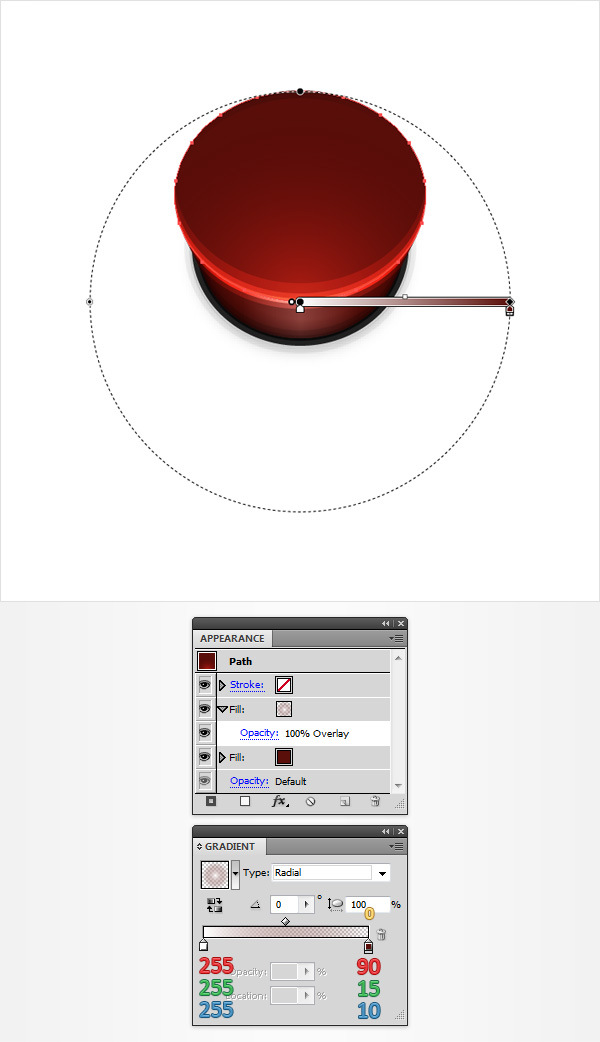
Make sure that "top" is still selected, focus on the Appearance panel and add a second fill. Select it, change the Blending Mode to Overlay and use the radial gradient shown in the following image.
Remember that the yellow zero from the Gradient image stands for Opacity percentage.
Step 23
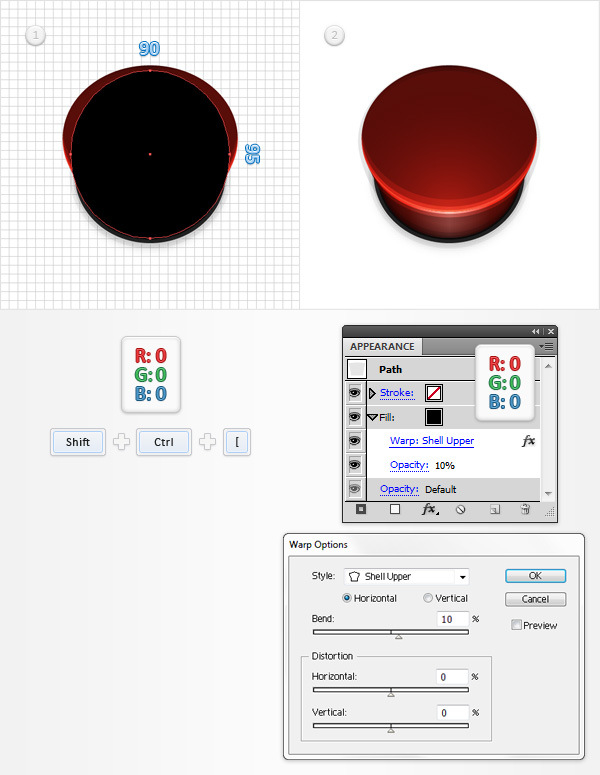
Enable the Grid (View > Show Grid) and the Snap to Grid (View > Snap to Grid). Using the Ellipse Tool (L), create a 90 x 95px shape, fill it with black and place it as shown in the first image.
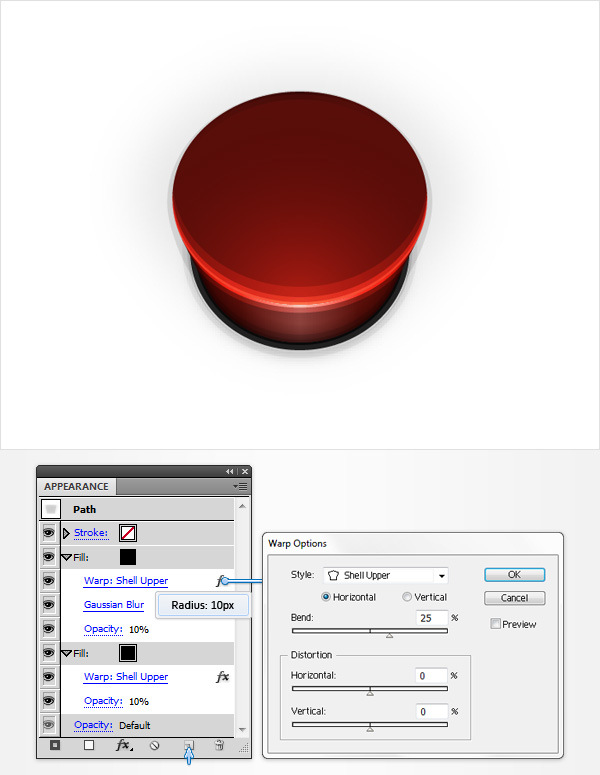
Move to the Layers panel, name this new shape "shadow", send it to back (Shift + CTRL + [ ) and focus on the Appearance panel. Select the existing fill, lower its Opacity to 10% and go to Effect > Warp > Shell Upper. Enter the properties shown in the following image and click OK.
Step 24
Make sure that "shadow" is still selected, focus on the Appearance panel, select the existing fill and hit the Duplicate Selected Item button (indicated by the little, blue arrow in the following image).
Focus on this new fill and open the existing Shell Upper effect. Enter the properties shown in the following image, click OK and go to Effect > Blur > Gaussian Blur. Enter a 10px radius and click OK.
Step 25
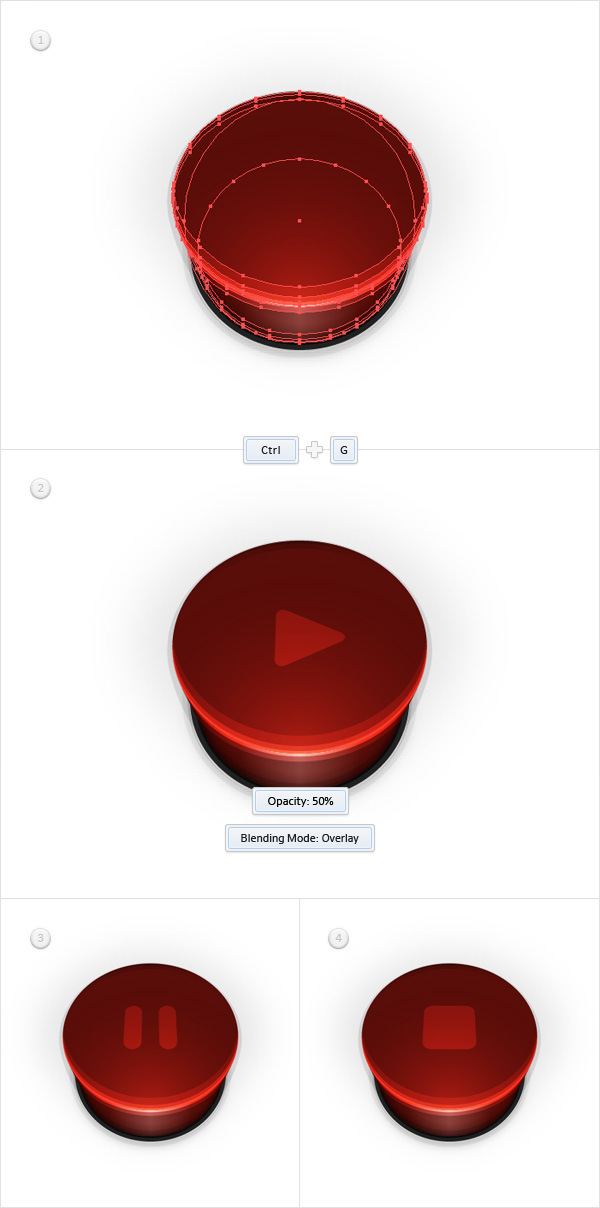
Select all the shapes that make up the button and simply Group them (CTRL + G). Move to the Layers panel, name this new group "button" then select the play symbol shape and bring it to front (Shift + CTRL + ] ).
Make sure that this white shape is selected, lower its Opacity to 50% and change the Blending Mode to Overlay.
Finally, repeat the same techniques for the "pause" and the "stop" symbol shapes.
And We’re Done!
Here is how it should look. I hope you’ve enjoyed this tutorial and can apply these techniques in your future projects.
