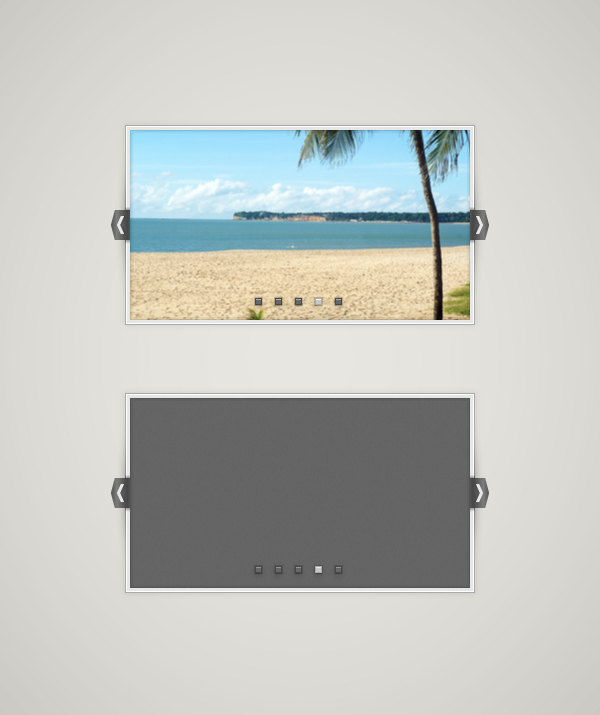
In the following tutorial you will learn how to create a simple image slider in Adobe Illustrator.
For starters you will learn how to set up a simple grid and how to create pixel perfect shapes. Taking full advantage of the Appearance we will create the main image frame. Next, you will learn how to easily mask an image and how to add subtle shading. For the final touches we will use basic blending and vector shape building techniques along with simple Transform effects.
Final Image
As always, this is the final image that we’ll be creating:

Tutorial Details
- Program: Adobe Illustrator CS5
- Estimated Completion Time: 45 minutes
- Difficulty: Beginner-Intermediate
Resources
Step 1
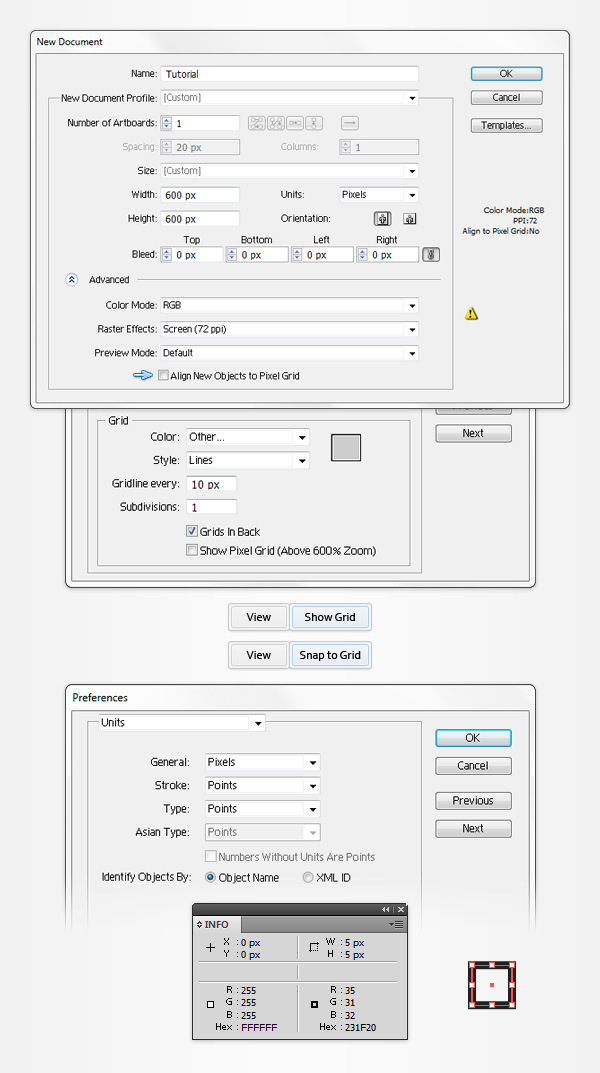
Hit Command + N to create a new document. Select Pixels from the Units drop-down menu, enter 600 in the width and height boxes then click on the Advanced button. Select RGB, Screen (72ppi) and make sure that the Align New Objects to Pixel Grid box is unchecked before you click OK. Enable the Grid (View > Show Grid) and the Snap to Grid (View > Snap to Grid).
For starters you will need a grid every 10px, so simply go to Edit > Preferences > Guides > Grid, enter 10 in the Gridline every box and 1 in the Subdivisions box. You should also open the Info panel (Window > Info) for a live preview with the size and position of your shapes.
Do not forget to set the unit of measurement to pixels from Edit > Preferences > Units > General. All these options will significantly increase your work speed.
Step 2
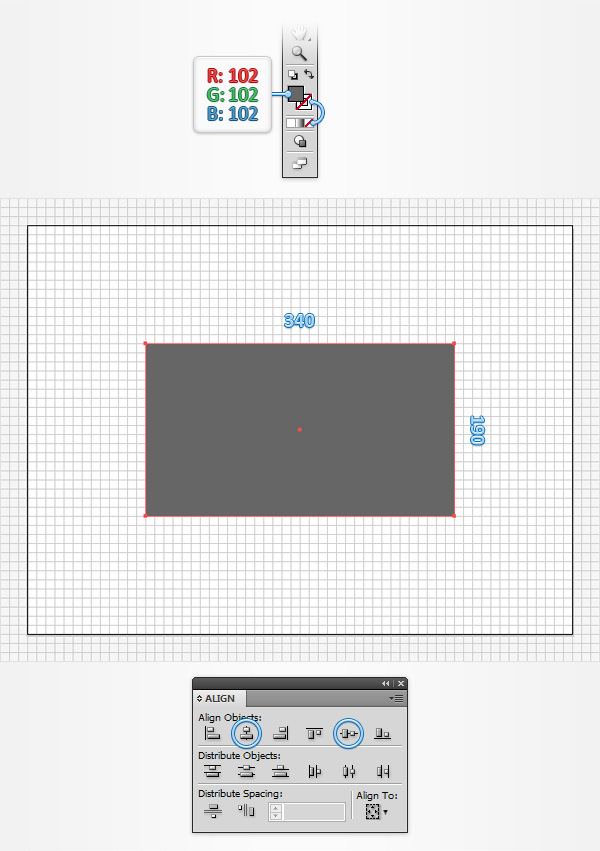
Pick the Rectangle Tool (M) and focus on your Toolbar. Remove the color from the stroke then select the fill and set its color to R=102 G=102 B=102.
Move to your Artboard and simply create a 340 x 190px rectangle, the Snap to Grid should ease your work. Make sure that this grey rectangle is selected, open the Align panel (Window > Align) and click the Vertical Align Center and Horizontal Align Center buttons.
Step 3
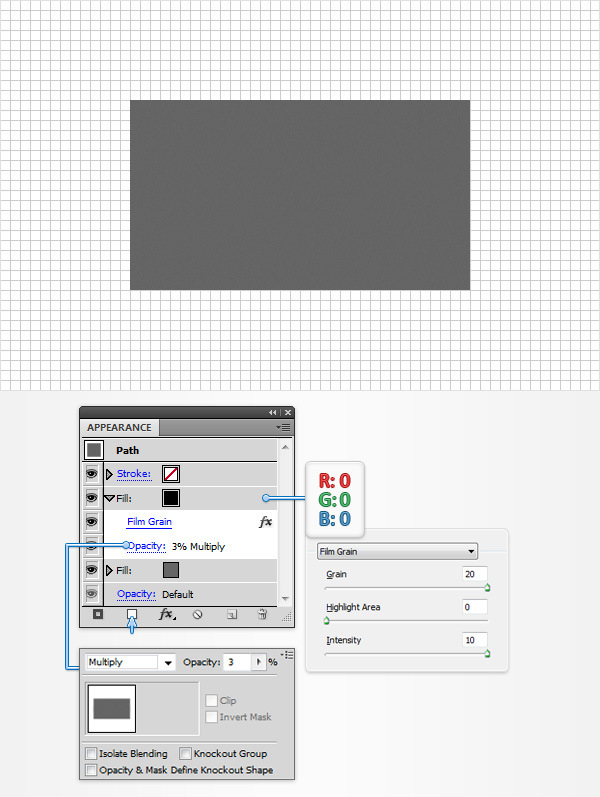
Make sure that your grey rectangle stays selected, open the Appearance panel and add a second fill using the Add New Fill button (indicated by the little, blue arrow in the following image).
Select this new fill, set the color to black and go to Effect > Artistic > Film Grain. Enter the properties shown in the following image and click OK.
Get back to the Appearance panel, make sure that your black fill is still selected and open the Transparency panel (Window > Transparency). Simply set the Blending Mode to Multiply and the Opacity to 3%.
Step 4
Make sure that your rectangle is still selected and keep focusing on the Appearance panel. Add a third fill and drag it below the existing fills, in the bottom of the Appearance panel.
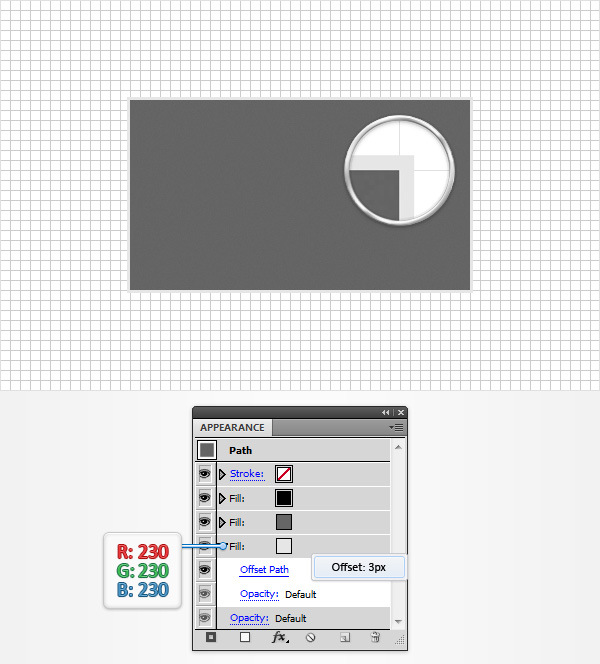
Select this new fill, set its color to R=230 G=230 B=230 and go to Effect > Path > Offset Path. Enter a 3px offset and click OK.
Step 5
Make sure that your rectangle is still selected and focus on the Appearance panel. Add a fourth fill and drag it in the bottom of the Appearance panel.
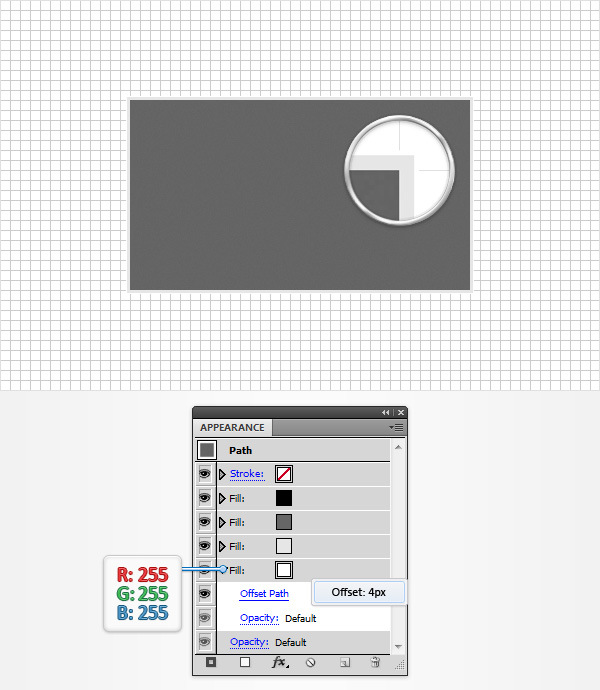
Select this new fill, set its color to white (R=255 G=255 B=255) and go to Effect > Path > Offset Path. Enter a 4px offset and click OK.
Step 6
Make sure that your rectangle is still selected and focus on the Appearance panel. Add a fifth fill and drag it in the bottom of the Appearance panel.
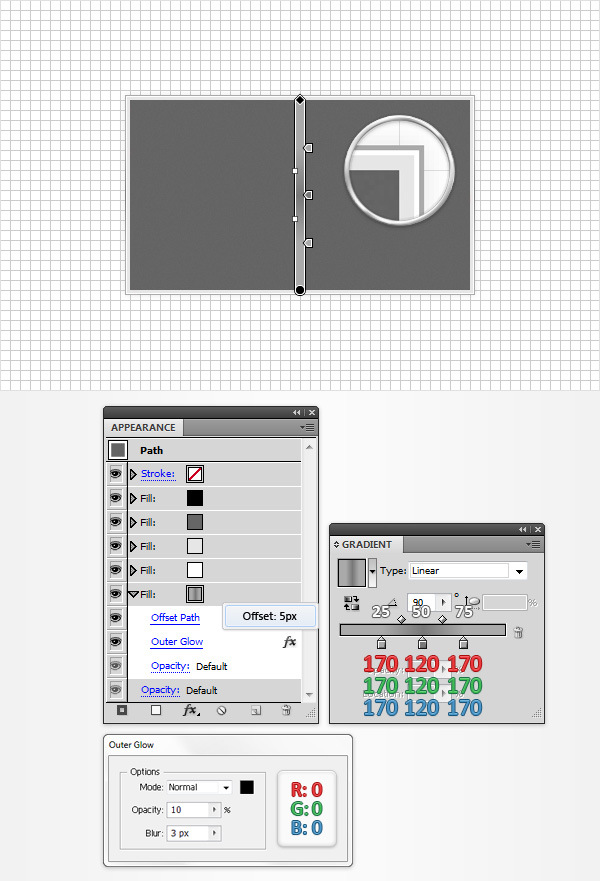
Select this new fill, open the Gradient panel and simply click on the gradient thumbnail to replace the existing color with the default black to white linear gradient. Make sure that your shape stays selected and keep focusing on the Gradient panel.
First, set the Angle to 90 degrees.
Next, select the left gradient slider, set the color to R=170 G=170 B=170 then focus on the Location box and set it to 25%.
Move to the right gradient slider, select it, set the color to R=120 G=120 B=120 and the Location to 50%.
Focus on the gradient bar and simply click on it to add a third gradient slider. Select it, set the color to R=170 G=170 B=170 and the Location to 75%.
Get back to the Appearance panel, make sure that your bottom fill is still selected and go to Effect > Path > Offset Path. Enter a 5px Offset, click OK.
Go to Effect > Stylize > Outer Glow. Enter the properties shown in the following image and click OK. Keep in mind that the white numbers from the Gradient image stand for Location percentage.
Step 7
Make sure that your rectangle is still selected and focus on the Appearance panel. Add a sixth fill and drag it in the bottom of the Appearance panel.
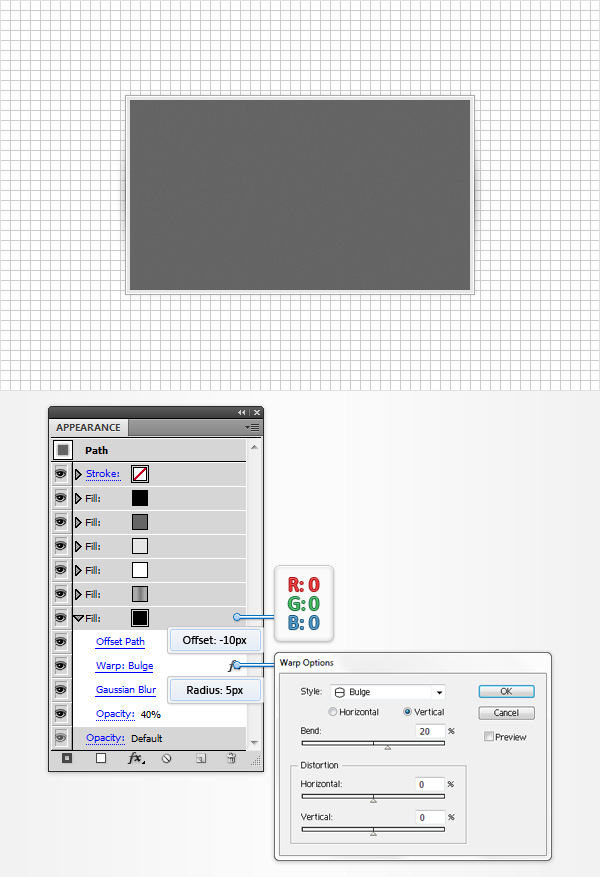
Select this new fill, set the color to black, lower its Opacity to 40%.
Go to Effect > Path > Offset Path. Enter a -10px offset, click OK and go to Effect > Warp > Bulge. Enter the properties shown in the following image, click OK.
Go to Effect > Blur > Gaussian Blur. Enter a 5px radius and click OK.
Step 8
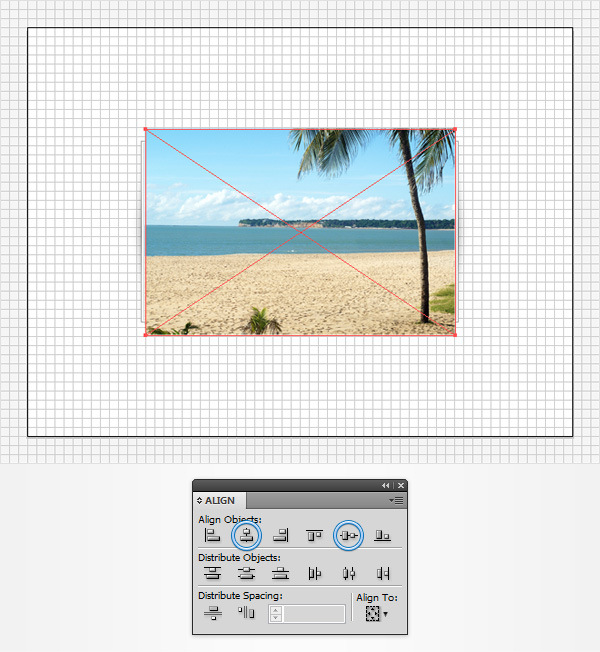
Open “Praia do Cabo Branco” image and drag it inside your Ai document. Resize it roughly as shown in the following image then click the Horizontal Align Center and Vertical Align Center buttons from the Align panel.
Step 9
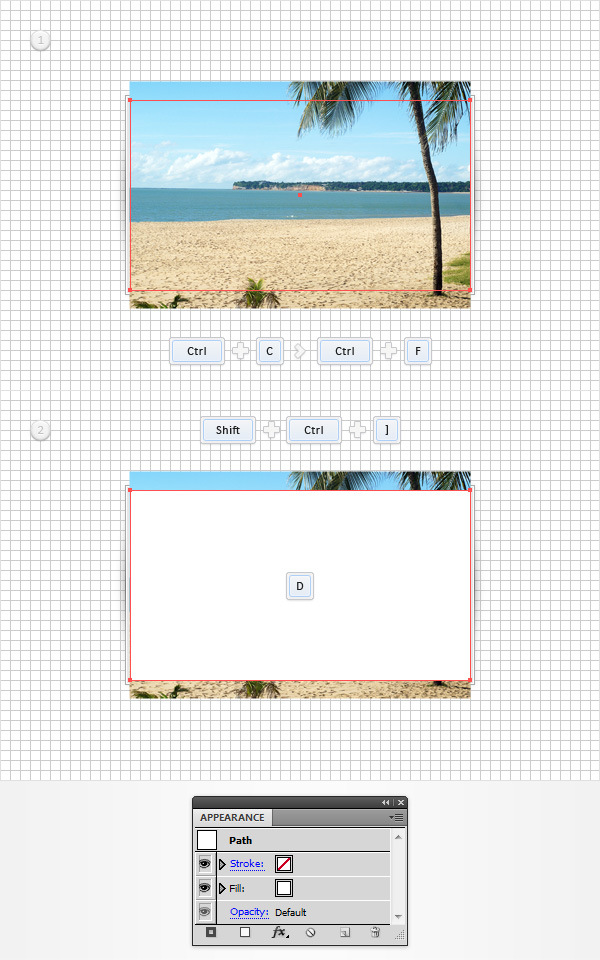
Reselect your rectangle, make a copy in front (CTRL + C > CTRL + F) and bring it to front (Shift + CTRL + ] ).
Make sure that this copy is selected and hit the D key from your keyboard to replace the existing Appearance attributes with the default ones (white fill and 1pt, black stroke).
Move to the Appearance panel and simply remove the color from the stroke.
Step 10
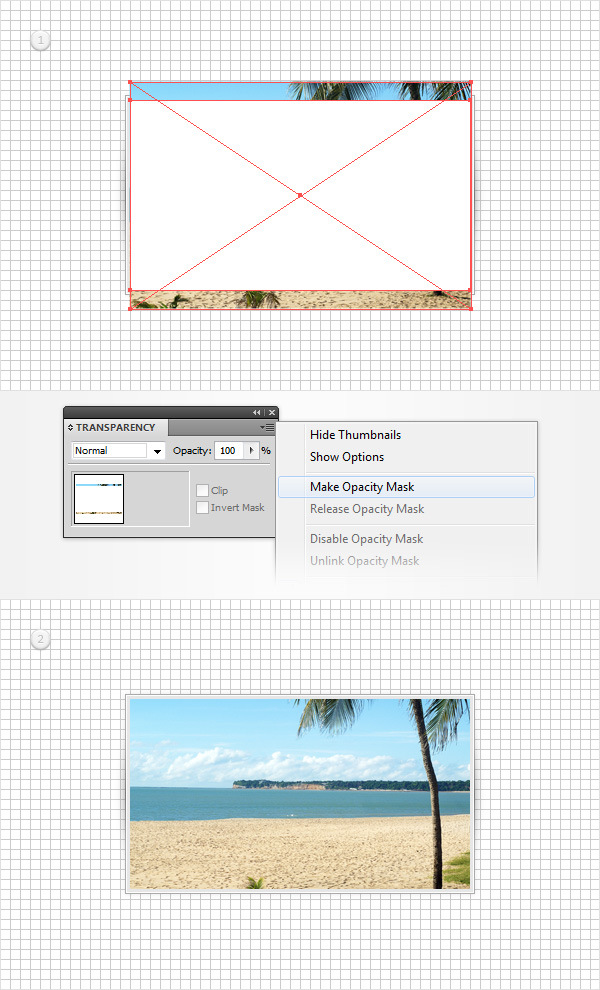
Open the Transparency panel (Window > Transparency). Select your white rectangle along with the image, open the fly-out menu of the Transparency panel and go to Make Opacity Mask.
Step 11
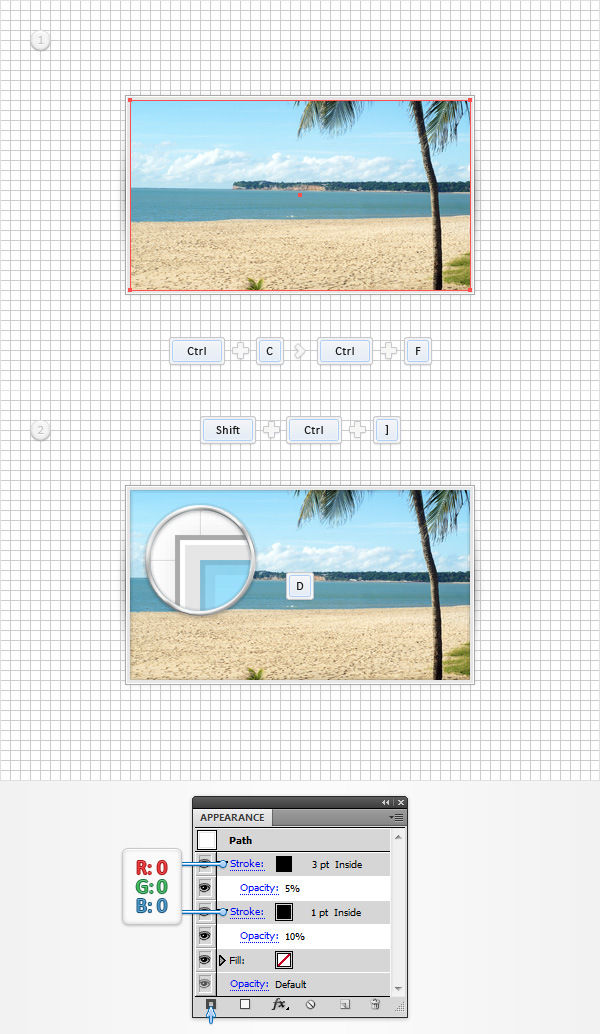
Reselect your 340 x 190px rectangle, make a copy in front (CTRL + C > CTRL + F), bring it to front (Shift + CTRL + ] ) and hit the D key from your keyboard.
Make sure that this new shape stays selected and focus on the Appearance panel. Remove the color from the fill and select the stroke. Make sure that the color is set to black, set the weight to 1pt, align it to inside and lower the Opacity to 10%.
Keep focusing on the Appearance panel and add a second stroke for this rectangle using the Add New Stroke button (indicated by the little, blue arrow in the following image).
Select this new stroke, make sure that the color is set to black, set the weight to 3pt, align it to inside and lower the Opacity to 5%.
Step 12
For this step you will need a grid every 5px, so go to Edit > Preferences > Guides & Grid and enter 5 in the Gridline every box.
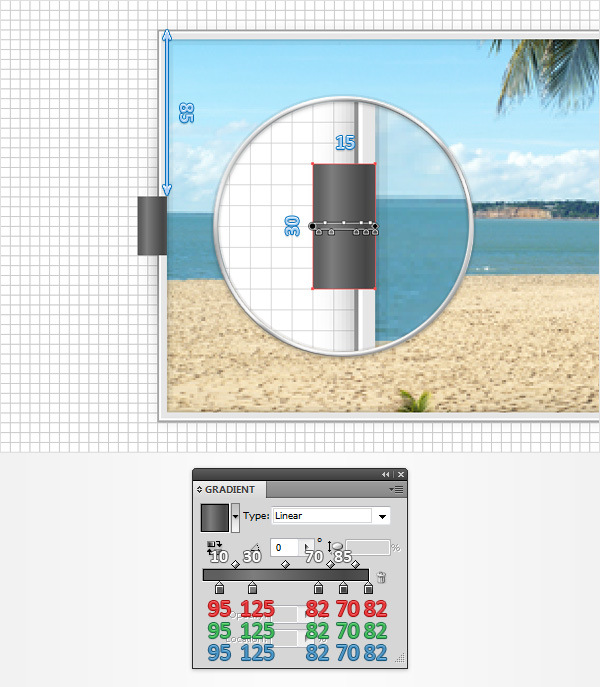
Using the Rectangle Tool (M), create a 15 x 30px shape, fill it with the linear gradient shown below and place it as shown in the following image. Remember that the white numbers from the Gradient image stand for Location percentage.
Step 13
For this step you will need a grid every 1px, so go to Edit > Preferences > Guides & Grid and enter 1 in the Gridline every box.
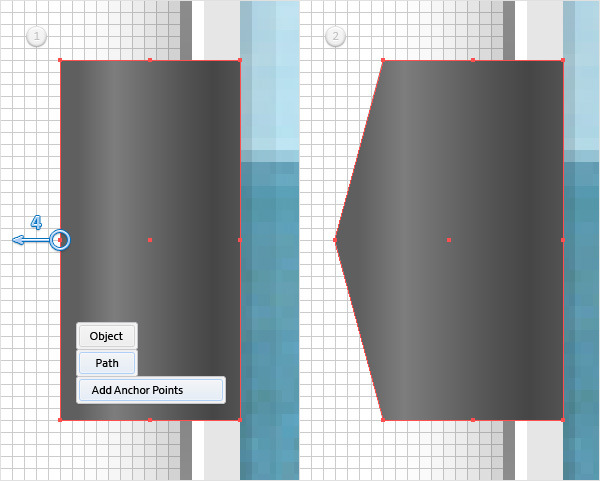
Make sure that your 15 x 30px rectangle is still selected and go to Object > Path > Add Anchor Points. Switch to the Direct Selection Tool (A), select the anchor point highlighted in the first image and simply drag it 4px to the left. Again, the Snap to Grid will ease your work.
Step 14
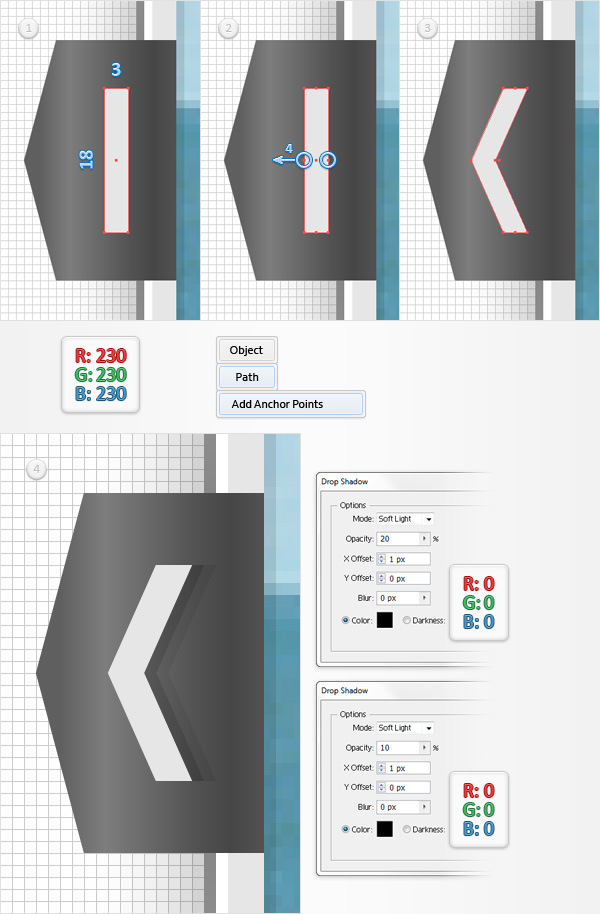
Using the Rectangle Tool (M), create a 3 x 18px shape and set the fill color to R=230 G=230 B=230. Place this new rectangle as shown in the first image.
Go to Object > Path > Add Anchor Points. Switch to the Direct Selection Tool (A), select both anchor points highlighted in the second image and simply drag them 4px to the left. In the end things should look like in the third image.
Make sure that this arrow shape stays selected and go to Effect > Stylize > Drop Shadow. Enter the properties shown in the top window (in the following image), click OK.
Go again to Effect > Stylize > Drop Shadow. Enter the properties shown in the bottom window and click OK.
Step 15
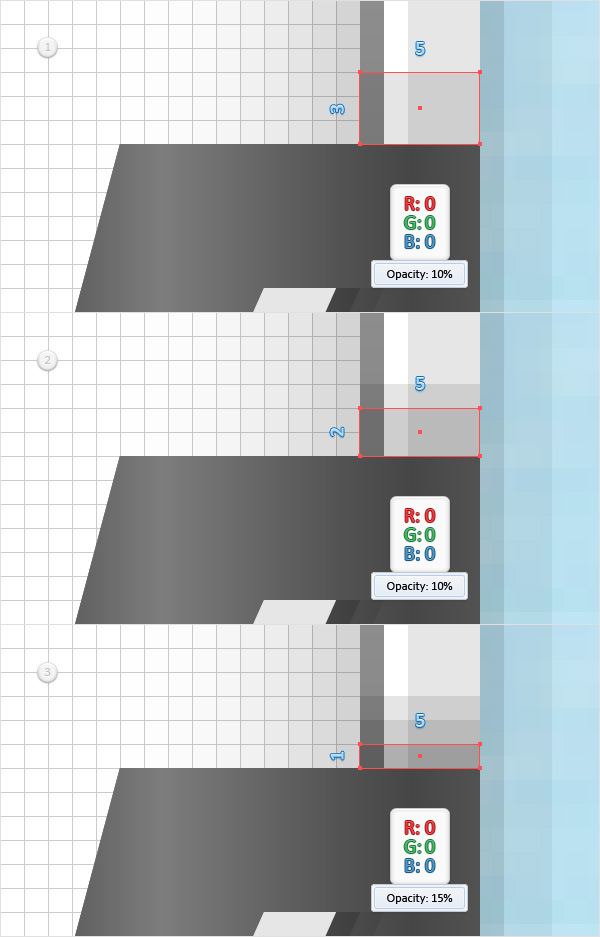
Using the Rectangle Tool (M), create a 5 x 3px shape, set the fill color to black, lower its Opacity to 10% and place it as shown in the first image.
Continue with the Rectangle Tool (M), create a 5 x 2px shape, set the fill color to black, lower its Opacity to 10% and place it as shown in the second image.
Make sure that the Rectangle Tool (M) is still active, create a 5 x 1px shape, set the fill color to black, lower its Opacity to 15% and place it as shown in the third image.
Step 16
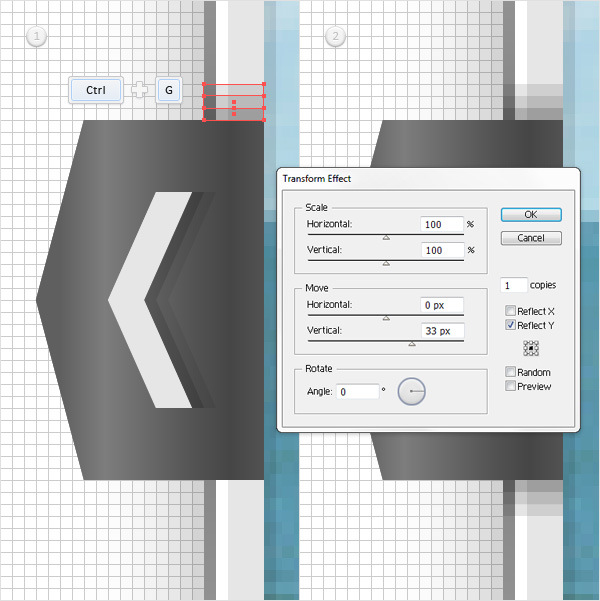
Reselect the three black shapes made in the previous step and Group them (CTRL + G).
Make sure that this new group is selected and go Effect > Distort & Transform > Transform. Enter the properties shown in the following image and click OK.
Step 17
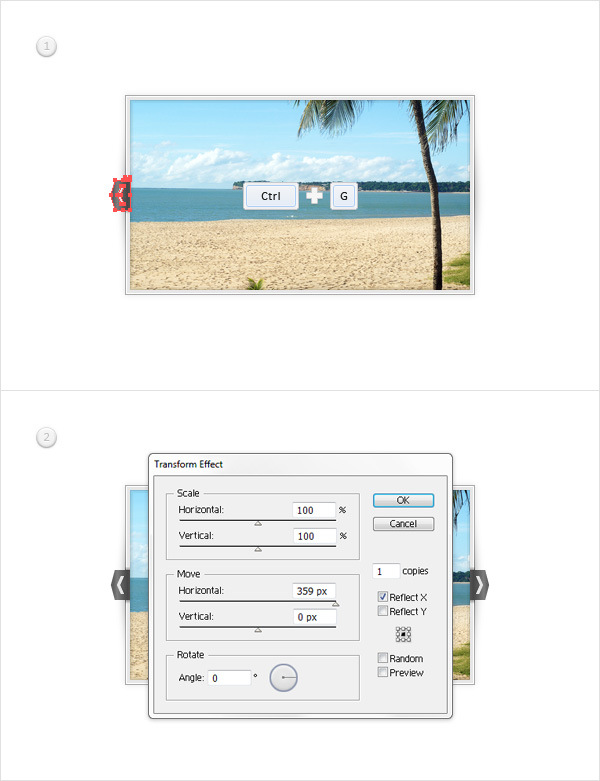
Reselect the group made in the previous step along with the other two shapes that make up your arrow and Group them (CTRL + G).
Make sure that this new group is selected and go Effect > Distort & Transform > Transform. Enter the properties shown in the following image and click OK.
Step 18
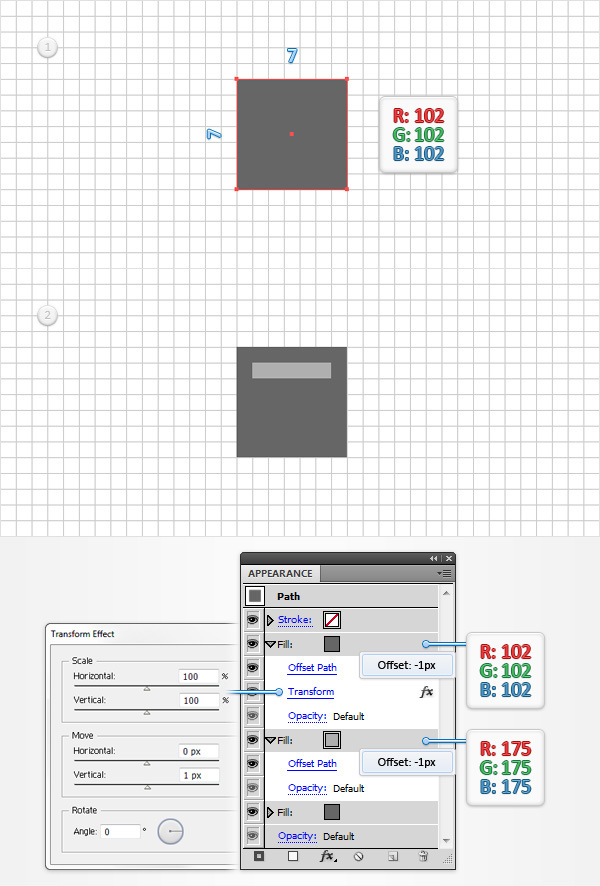
Using the Rectangle Tool (M), create a 7px square and set its fill color to R=102 G=102 B=102.
Make sure that this tiny shape stays selected, focus on the Appearance panel and add a second fill. Select it, set the color to R=175 G=175 B=175.
Go to Effect > Path > Offset Path. Enter a -1px offset, click OK
Return to the Appearance panel. Add a third fill for this shape and select it. Set the color to R=102 G=102 B=102.
Go to Effect > Path > Offset Path. Enter a -1px offset, click OK.
Go to Effect > Distort & Transform > Transform. Enter the properties shown in the following image and click OK.
Step 19
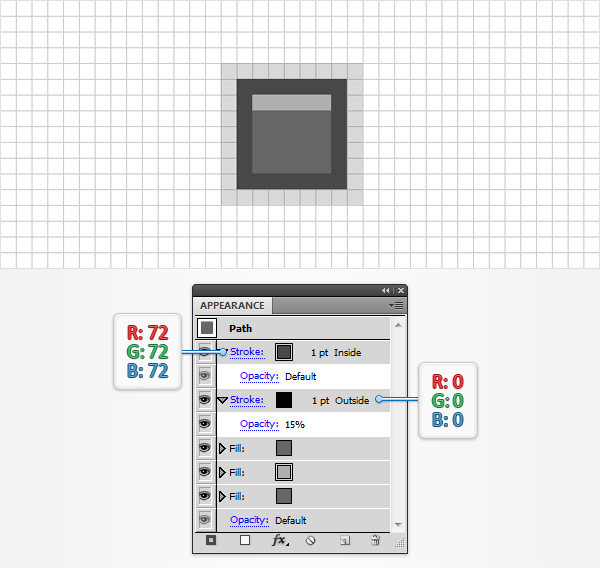
Make sure that your 7px square is still selected and keep focusing on the Appearance panel. Select the existing stroke, set the color to black and the weight tp 1pt, align it to outside and then lower the Opacity to 15%.
Add a second stroke for this shape and select it. Set the color to R=72 G=72 B=72, make it 1pt wide and align it to inside.
Step 20
Make sure that your 7px square is still selected and keep focusing on the Appearance panel. Select the bottom fill and simply add the three Drop Shadow effects (Effect > Stylize > Drop Shadow) shown in the following image.
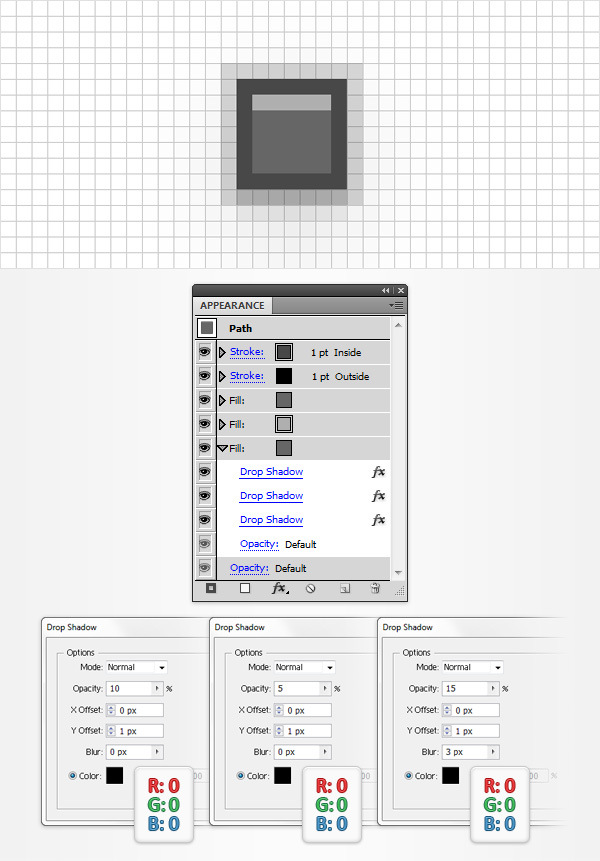
Step 21
Reselect your 7px square, place it as shown in the first image then go to Effect > Distort & Transform > Transform. Enter the properties shown in the following image and click OK.
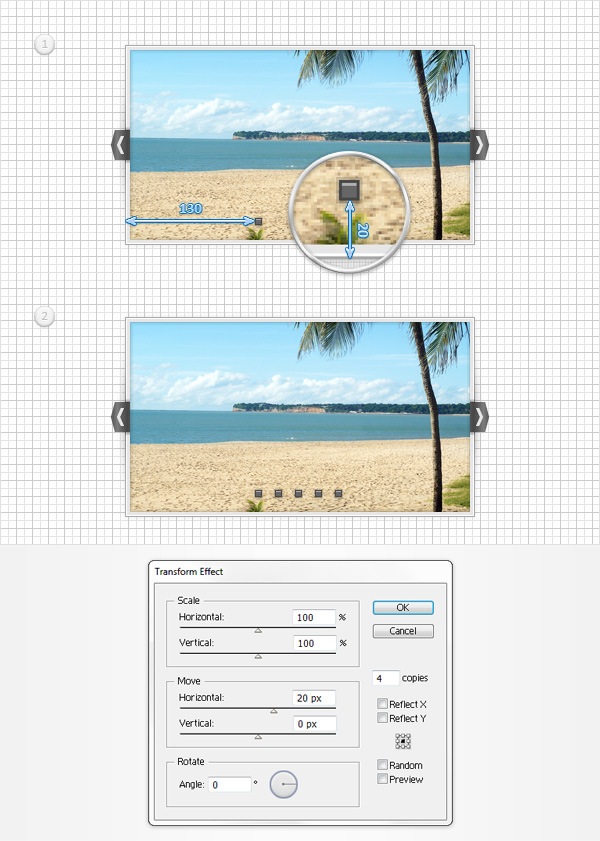
Step 22
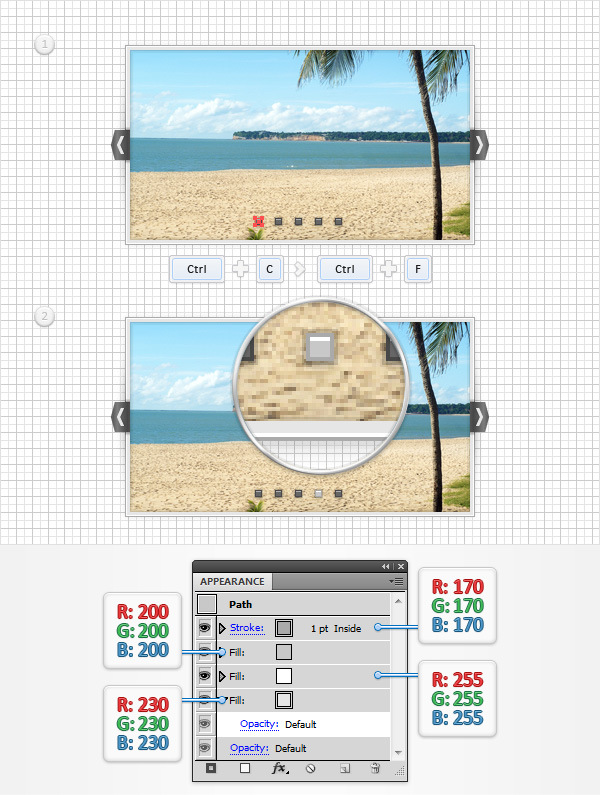
Reselect that 7px square and make a copy in front (CTRL + C > CTRL + F). Select this copy and focus on the Appearance panel.
First, remove the black stroke and the three Drop Shadow effects used for the bottom fill.
Next, select the bottom fill and replace the existing color with R=230 G=230 B=230.
Move up to the next fill, select it and replace the existing color with white (R=255 G=255 B=255).
Continue with the next fill, select it and replace the existing color with R=200 G=200 B=200.
Finally, select the stroke and replace the existing color with R=170 G=170 B=170.
Get back to your artboard, make sure that this grey square is still selected, drag it to the right and place it as shown in the second image.
And We’re Done!
Here is how it should look. I hope you’ve enjoyed this tutorial and can apply these techniques in your future projects.
