In this Illustrator tutorial, you will learn how to create a watercolor floral wreath.
We’ll be working with various drawing tools and using some art brushes to create flowers, stems, leaves, and floral elements.
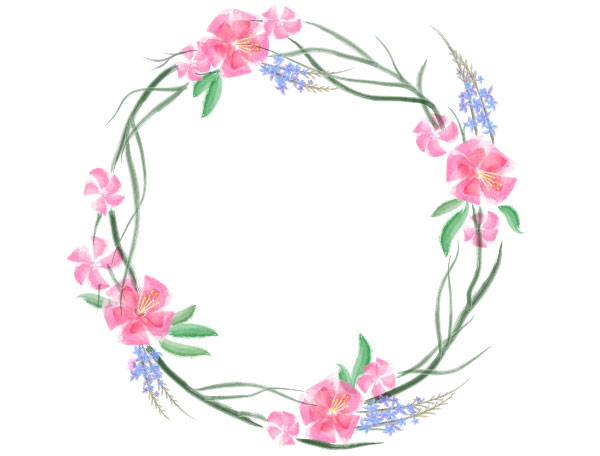
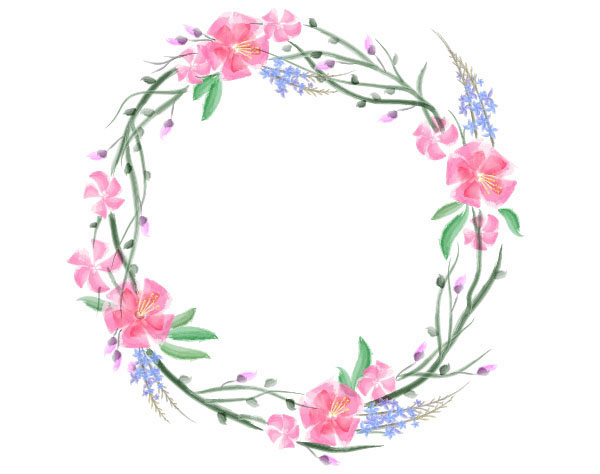
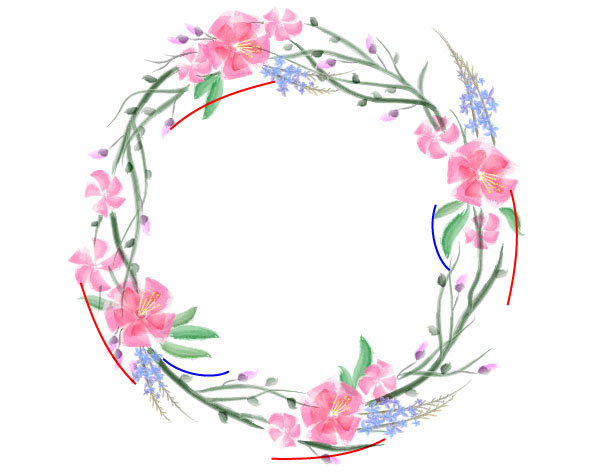
Final Image
As always, this is the final image that we’ll be creating:

Tutorial Details
- Program: Adobe Illustrator CS6
- Estimated Completion Time: 120 minutes
- Difficulty: Beginner-Intermediate
Step 1
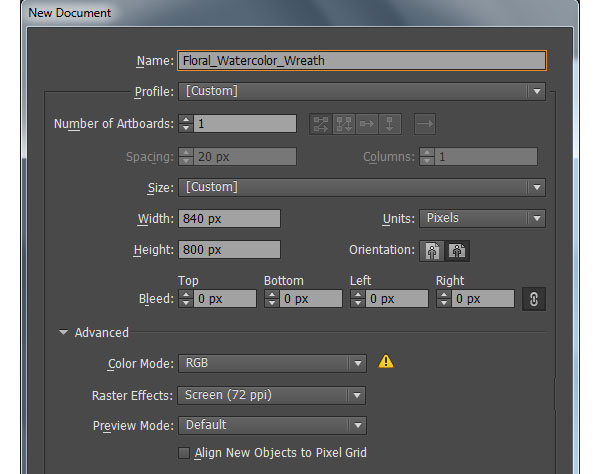
Launch Illustrator and then press (Ctrl + N) to create a New document.
Select Pixels from the Units drop-down menu, enter 840 in the width box and 800 in the height box then click on the Advanced button.
Select RGB, Screen (72ppi) and make sure that the Align New Objects to Pixel Grid box is unchecked before you click OK
Step 2
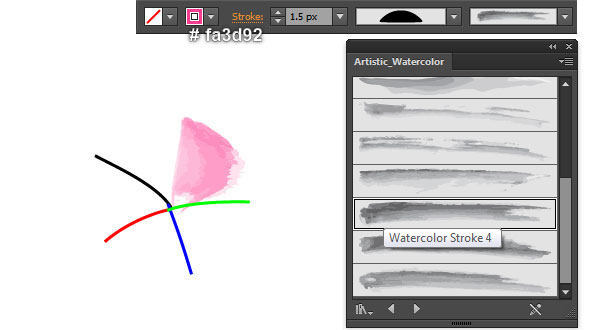
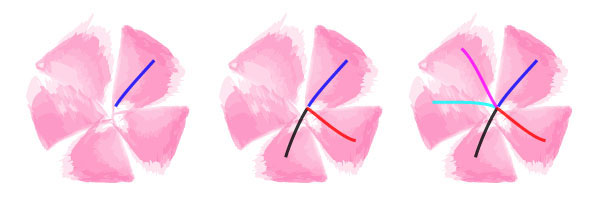
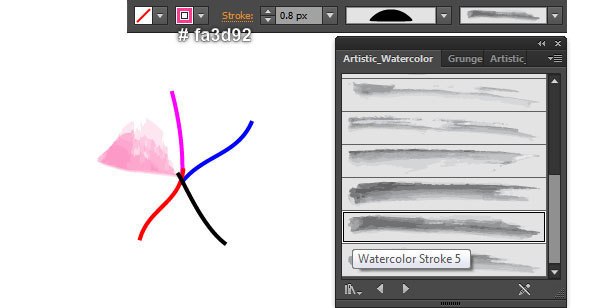
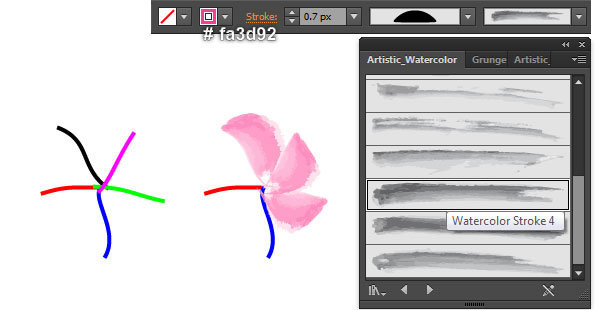
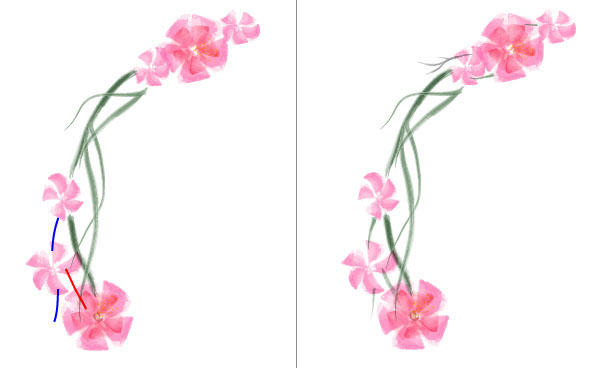
First of all, we’ll create the pink flower. Pick the Pen Tool (P) and create five curved paths as you see in the images below.
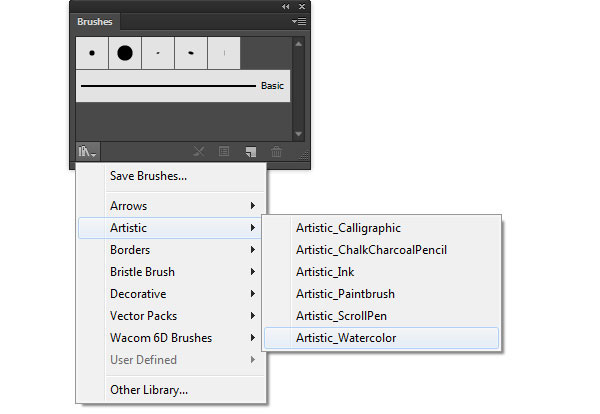
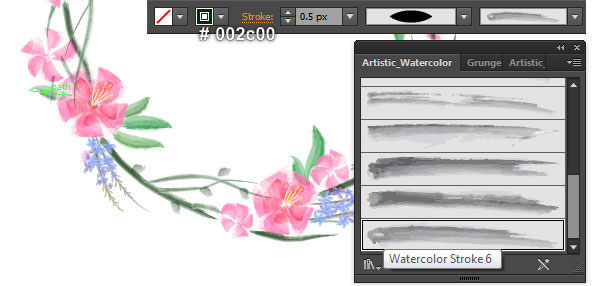
Before you continue, open the Brushes palette (Window > Brushes). In the Brushes palette, click on the “Brushes Libraries Menu” button (at the left-bottom corner of the Brushes palette) and you will get brush sets in various categories. Open the Artistic category and select the Artistic_Watercolor subcategory.
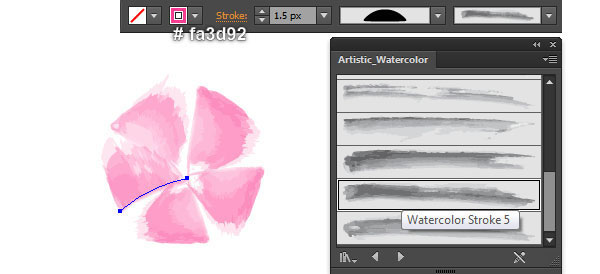
Now select the magenta path created in this step, replace the existing stroke color with bright pink (# fa3d92) and change the stroke weight to 1.5px.
Keep the resulting path selected, move to the Artistic_Watercolor subcategory and click on the brush labeled as Watercolor Stroke 4.
Then apply the Width Profile 6 for the resulting path. The petal is ready and looks like in the next to last image.
We will continue with the remaining petals. Select the green and the blue paths, then pick the Eyedropper Tool (I) and click on the bright pink petal created in this step.


Step 3
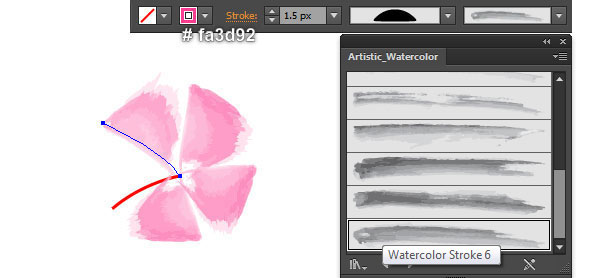
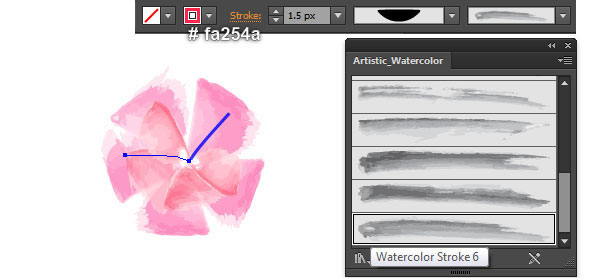
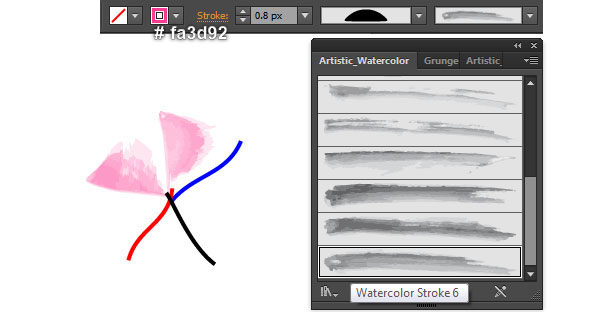
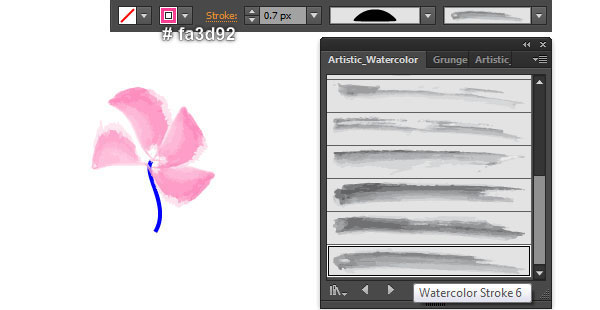
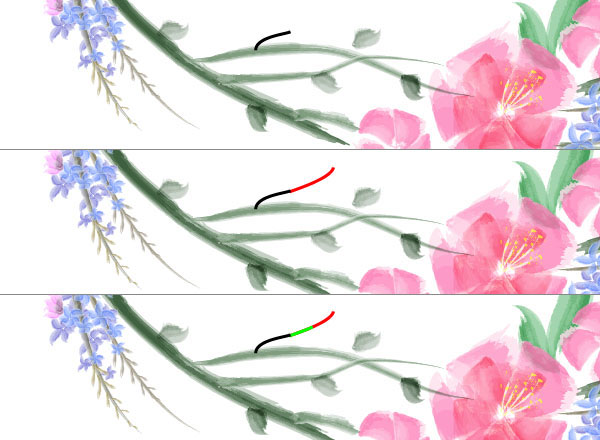
Select the black path created in step 2, replace the existing stroke color with bright pink (# fa3d92) and change the stroke weight to 1.5px.
Keep the resulting path selected, move to the Artistic_Watercolor subcategory and click on the brush labeled Watercolor Stroke 6. Then apply the Width Profile 6 for the resulting path.
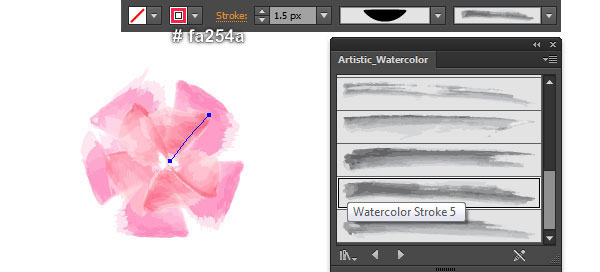
Likewise, repeat the same process for the red path (but apply the Watercolor Stroke 5 from the Artistic_Watercolor subcategory).
In the end it should look like the last image shown.
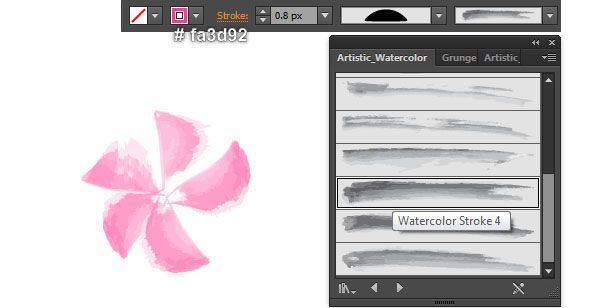
Step 4
Continue with the Pen Tool (P), create five slightly curved paths as you see in the images below.
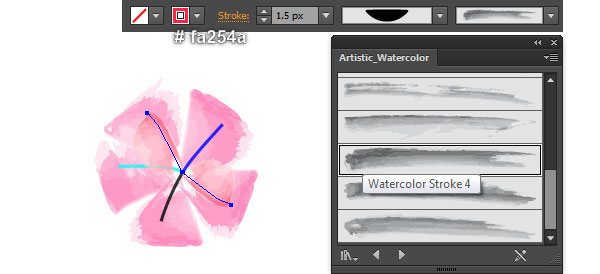
Once your paths are drawn, reselect the magenta and the red paths, replace the existing stroke colors with vivid red (# fa254a) and change the stroke weight to 1.5px.
Keep the resulting paths selected, move to the Artistic_Watercolor subcategory and click on the brush labeled Watercolor Stroke 4.
Then apply Width Profile 6 for the resulting paths.
Step 5
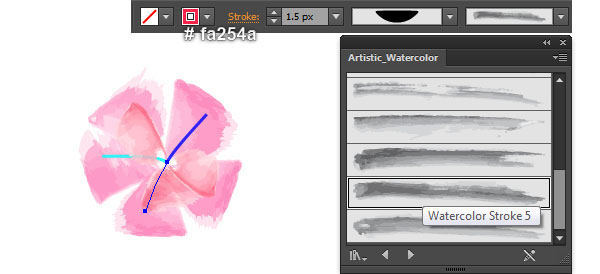
Now, follow the sequence of images and repeat the same process as in step 4 for the remaining three paths.
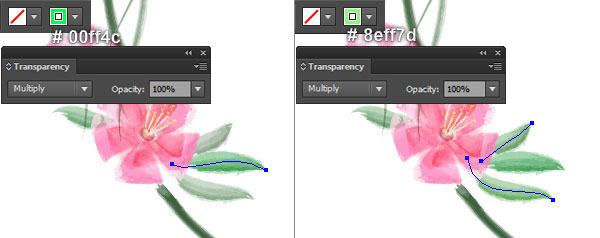
Step 6
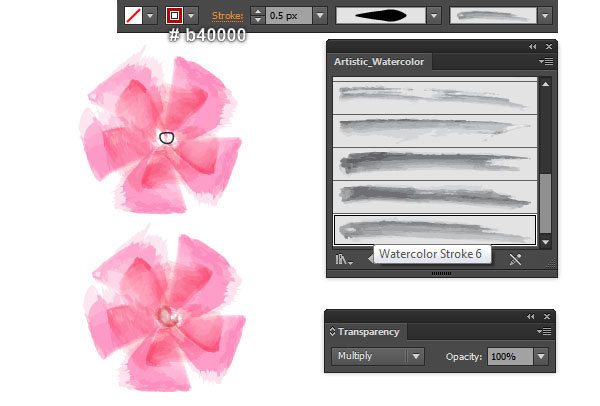
Select five petals created in step 4 and step 5, then change the Blending Mode to Multiply.
With the Pen Tool (P), create a black object as you see in the second image.
Reselect the newly created object, replace the existing stroke color with strong red (# b40000) and change the stroke weight to 0.5px.
Keep the resulting object selected, move to the Artistic_Watercolor subcategory and click on the brush labeled Watercolor Stroke 6.
Finally apply Width Profile 5 for the resulting object.

Step 7
With the Pen Tool (P), create five slightly curved paths as shown below.
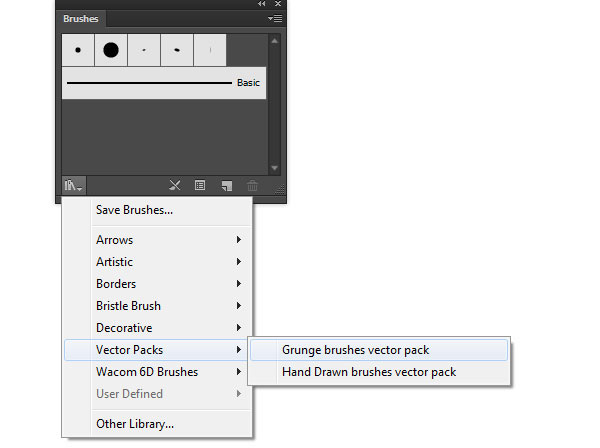
Once your paths are drawn, open the Brushes palette (Window > Brushes). In the Brushes palette, click on the “Brushes Libraries Menu” button (at the left-bottom corner of the Brushes palette) and you will get brush sets in various categories. Open the Vector Packs category, and select the Grunge brushes vector packs subcategory.
Now select and group (Ctrl +G) all paths created in this step. Having the newly created group selected, replace the existing stroke color with white (# faffff) and change the stroke weight to 0.1px.
Keep the resulting group selected, move to the Grunge brushes vector packs subcategory and click on the brush labeled Grunge Brush Vector Pack 05. Then apply Width Profile 4 for the resulting group.


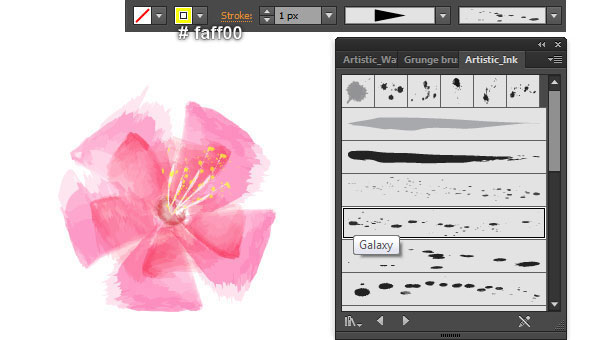
Step 8
Reselect the group created in step 7 and make a copy (Ctrl +C, Ctrl +F) of it.
Replace the existing stroke color of the copy with yellow (# faff00) and then change the stroke weight to 1px.
Before you continue, open the Brushes palette (Window > Brushes). In the Brushes palette, click on the “Brushes Libraries Menu” button (at the left-bottom corner of the Brushes palette). Open the Artistic category, and select the Artistic_Ink subcategory.
Reselect the group created in this step, move to the Artistic_Ink subcategory and click on the brush labeled Galaxy. Finally apply Width Profile 4 for the resulting group.
Now select and group (Ctrl +G) all objects created from the beginning of step 2 to this time.
The pink flower is ready and looks like in the last image.
Step 9
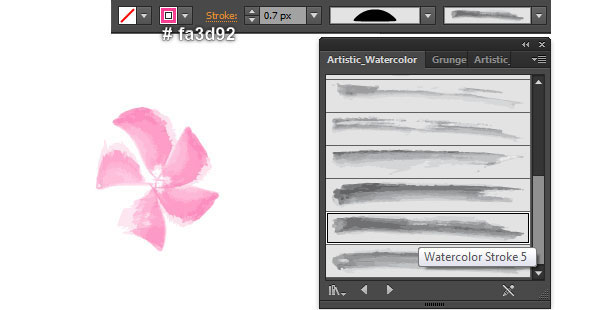
We will continue with the second flower. Pick the Pen Tool (P) and create five slightly curved paths as you see in the images below.
Once your paths are drawn, reselect the green path, replace the existing stroke color with bright pink (# fa3d92) and change the stroke weight to 0.8px.
Keep the resulting path selected, open the Artistic_Watercolor subcategory and click on the brush labeled Watercolor Stroke 5. Then apply Width Profile 6 for the resulting path.
Likewise, repeat the same process for the four remaining paths as shown in the last two images.
Finally select and group (Ctrl +G) all objects created in this step.
The second flower is done!

Step 10
Now, follow the sequence of images and repeat the same process as step 9 to draw the third flower.
Step 11
Here we have the flowers ready.

Step 12
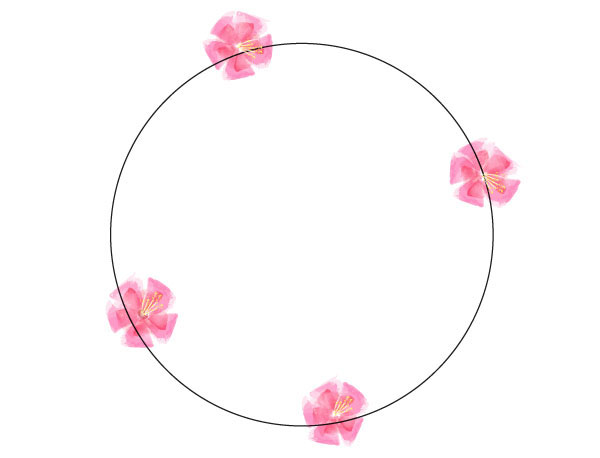
Before you continue, pick the Ellipse Tool (L) and create a 574 by 574px ellipse.
Next, make some copies of the flowers created in the previous steps and place them in the positions shown in the second and the third images.
Then scale and rotate these flowers as needed. Finally select and remove the black ellipse created in this step.


Step 13
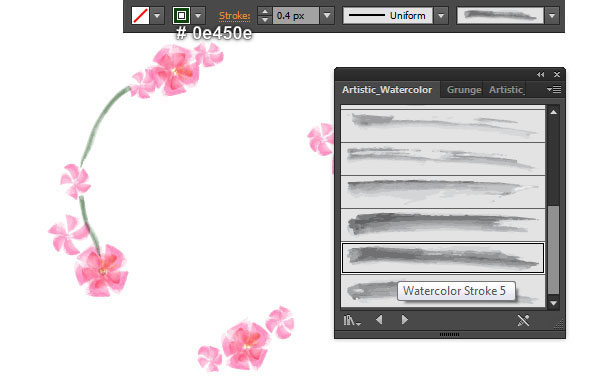
We are going to create the stems. Pick the Pencil Tool (N) and create two curved paths as you see in the first image.
Once your paths are drawn, reselect them, replace the existing stroke colors with dark green (# 0e450e) and change the stroke weight to 0.4px.
Keep the resulting paths selected, open the Artistic_Watercolor subcategory and click on the brush labeled Watercolor Stroke 5.
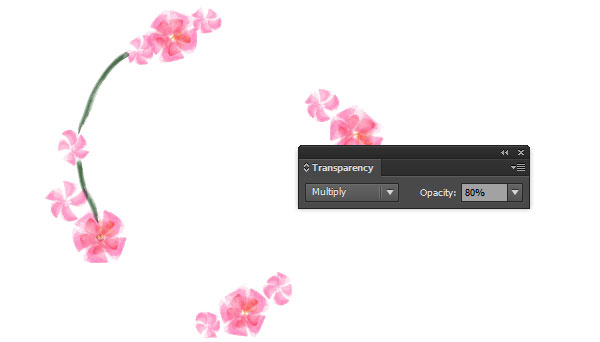
Then make a copy (Ctrl +C, Ctrl +F) of the resulting paths. Still having the newly created paths selected, change the Blending Mode to Multiply and reduce the Opacity of them to 80%.

Step 14
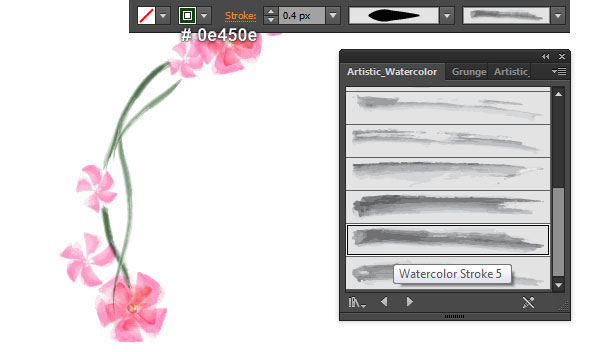
With the Pen Tool (P), create two curved paths as you see in the first image.
Once your paths are drawn, reselect them, replace the existing stroke colors with dark green (# 0e450e) and change the stroke weight to 0.4px.
Keep the resulting paths selected, open the Artistic_Watercolor subcategory and click on the brush labeled Watercolor Stroke 5. Then apply Width Profile 6 for the resulting paths.
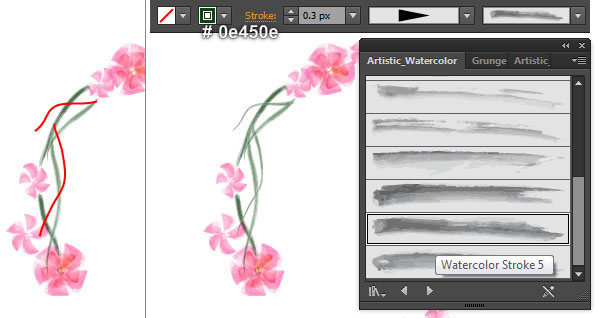
Likewise, repeat the same process to draw more stems as shown in the last four images.
You should end up with something like in the last image below.

Step 15
Likewise, repeat the same process as the previous step to add the stems to the remaining parts of the wreath.
In the end your illustration should look roughly like the last image shown.


Step 16
We will continue with the leaves.
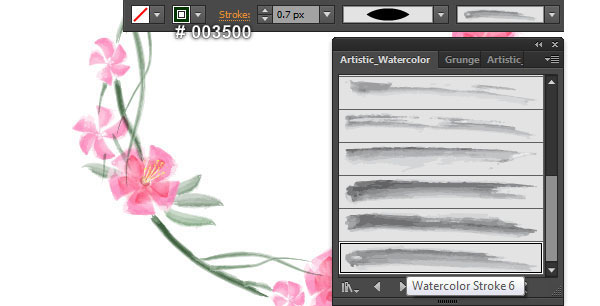
Start by drawing four curved paths using the Pencil Tool (N) as in the first image.
Once your paths are drawn, reselect them, replace the existing stroke colors with dark green (# 003500) and change the stroke weight to 0.7px.
Keep the resulting paths selected, open the Artistic_Watercolor subcategory and click on the brush labeled Watercolor Stroke 6. Then apply Width Profile 1 for the resulting paths.
Finally hide these leaves behind the pink flowers.
Step 17
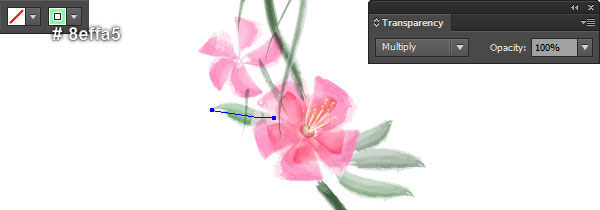
Select the left leaf created in step 16 and make a copy (Ctrl +C, Ctrl +F) of it. Still having the copy selected, replace the existing stroke color with light green (# 8effa5) and then change the Blending Mode to Multiply.
Likewise, repeat the same techniques for the remaining three leaves created in step 16.
Step 18
Now, follow the sequence of images and repeat the same process as the previous steps to draw some leaves as shown in the images below.

Step 19
At this point your wreath should look like in the next image:

Step 20
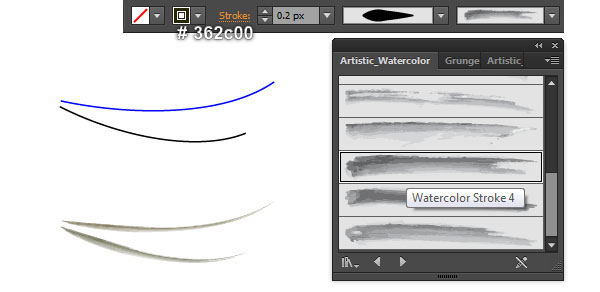
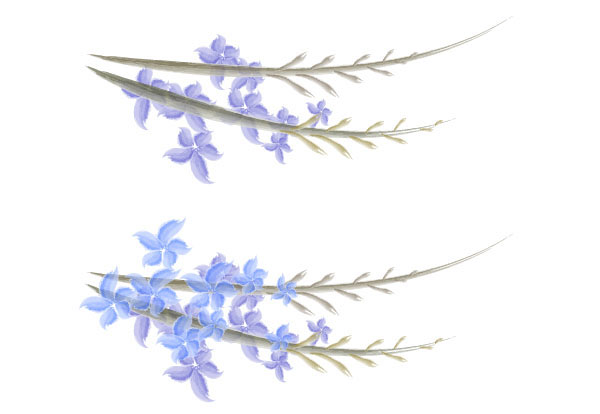
Next come the branches with blue flowers. Pick the Pen Tool (P) and create two curved paths as you see in the first image.
Reselect the newly created paths, then replace the existing stroke colors with very dark yellow (# 362c00) and change the stroke weight to 0.2px.
Keep the resulting paths selected, open the Artistic_Watercolor subcategory and click on the brush labeled Watercolor Stroke 4. Then apply Width Profile 5 for the resulting paths.
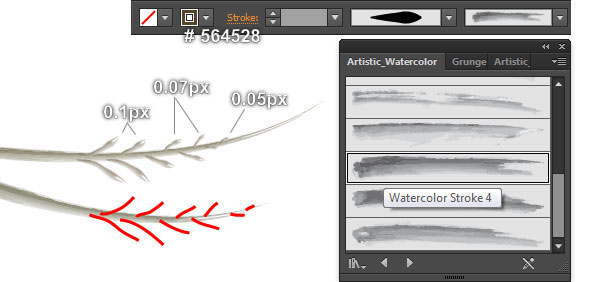
Now focus on the third image, create some slightly curved paths with the Pencil Tool (N).
Once your paths are drawn, reselect all magenta paths and replace the existing stroke color with very dark orange (# 564528). Still having the resulting paths selected, click on the
brush labeled Watercolor Stroke 4 from the Artistic_Watercolor subcategory.
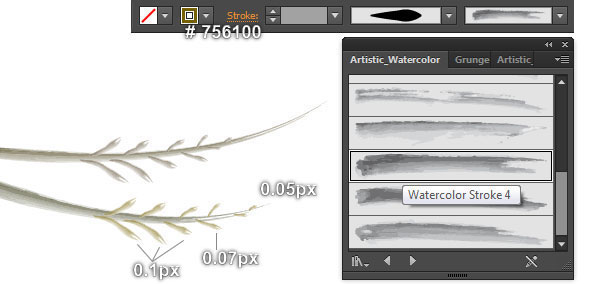
Keep the resulting paths selected and apply Width Profile 5 for it. Next change the stroke weight of these paths as you see in the fourth image.
Now select and group (Ctrl +G) all objects of the upper branch.
Likewise, repeat the same techniques for the lower branch. In the end it should look like the last image shown.

Step 21
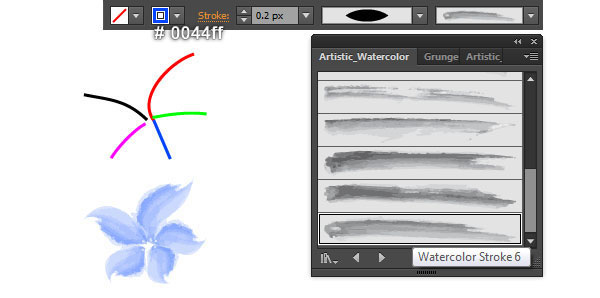
Let’s work on the creation of blue flowers on our branches. Pick the Pencil Tool (N) and create five slightly curved paths as you see in the first image.
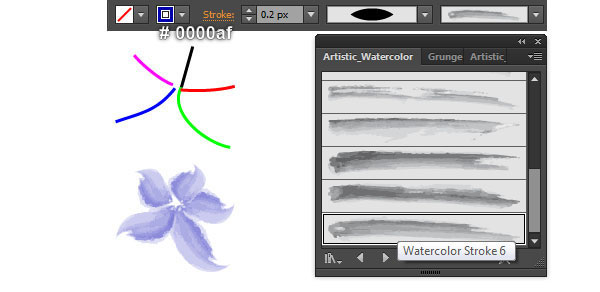
Once your paths are drawn, reselect them, replace the existing stroke colors with pure blue (# 0044ff) and change the stroke weight to 0.2px.
Keep the resulting paths selected, click on the brush labeled Watercolor Stroke 6 from the Artistic_Watercolor subcategory. Then apply Width Profile 1 for the resulting paths.
Now select and group (Ctrl +G) all objects created in this step.
The blue flower is done!
Likewise, repeat the same process as this step to draw the second flower as shown in the fourth image.
Now make some copies of the two newly created flowers, then scale and rotate them as needed. Finally place these flowers to the positions as you see in the last image.
Step 22
Make some copies of the two branches of blue flowers and then place them in the positions as shown below.
Step 23
Now let’s add those dark green branches with leaves.
Pick the Pencil Tool (N) and create some slightly curved paths like you see in the first image.
Reselect the newly created paths, then replace the existing stroke color with very dark green (# 002c00) and change the stroke weight to 0.5px.
Keep the resulting paths selected, open the Artistic_Watercolor subcategory and click on the brush labeled Watercolor Stroke 6. Then apply Width Profile 1 for the resulting paths.
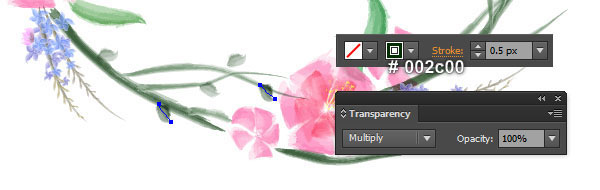
Now select the two paths as shown in the last image and make a copy (Ctrl +C, Ctrl +F) of them.
Keep the copies selected and change the Blending Mode to Multiply.

Step 24
Likewise, repeat the same process as in step 23 to add the leaves to the other positions of the dark green stems.
In the end your wreath should look like in the next image:

Step 25
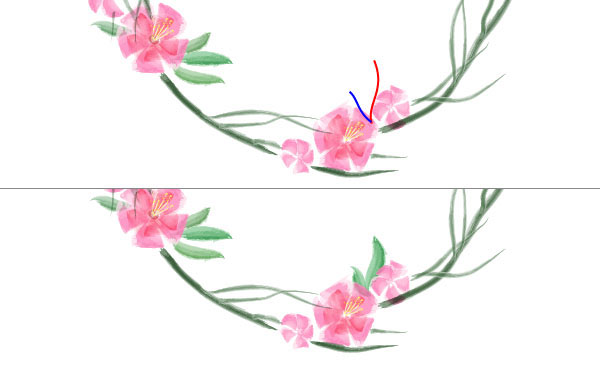
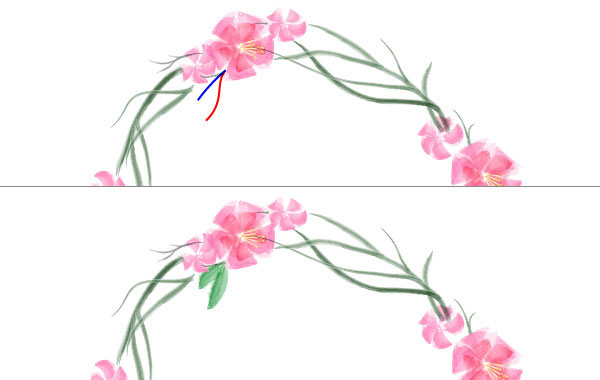
We will continue with the flower buds.
First, draw three slightly curved paths with the Pencil Tool (N) as shown in the images below.
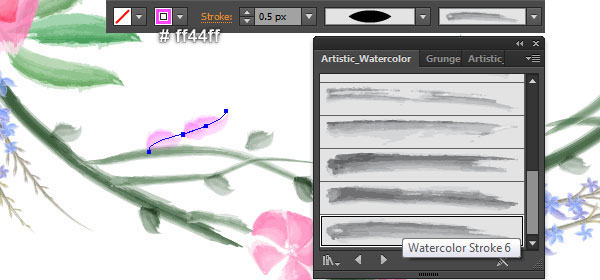
Reselect the newly created paths, change the stroke weight to 0.5px and replace the existing stroke colors with light magenta (# ff44ff).
Keep the resulting paths selected, open the Artistic_Watercolor subcategory and click on the brush labeled Watercolor Stroke 6. Then apply Width Profile 1 for the resulting paths.
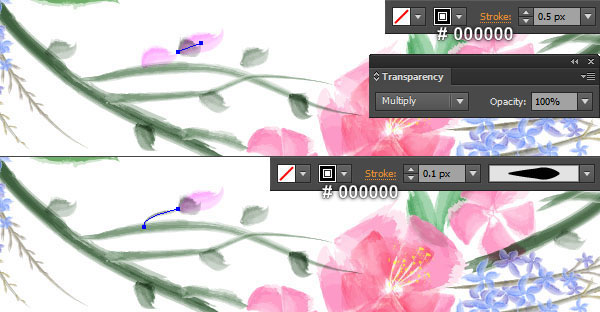
Now select the path as shown in the next to last image and replace the existing stroke color with black (# 000000).
Still having the resulting path selected, change the Blending Mode to Multiply.
Select the path as shown in the last image and replace the existing stroke color with black (# 000000).
Next change the stroke weight of the resulting path to 0.1px and apply Width Profile 5 to it.
Finally select and group (Ctrl +G) all paths created in this step.
The flower bud is ready and looks like in the last image.
Step 26
Now make some copies of the flower bud created in step 25.
Scale and rotate these flower buds as needed, then place them in the positions shown in the next image:
Step 27
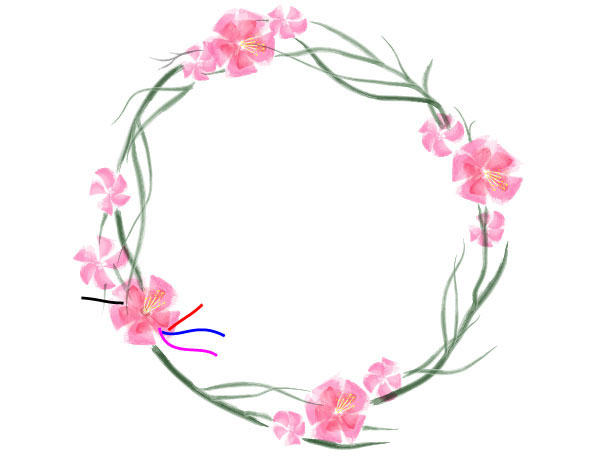
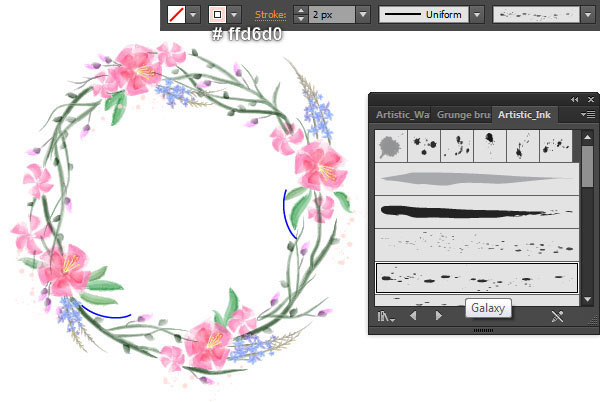
To add some details, first draw curved paths as you see in the image below.
Reselect the red paths, replace the existing stroke color with light pink (# ffd6d0) and then change the stroke weight to 2px.
Keep the resulting paths selected, move to the Artistic_Ink subcategory and click on the brush labeled Galaxy.
Next select the blue paths, replace the existing stroke color with green (# 419b47) and then change the stroke weight to 2px.
Still having the resulting paths selected, move to the Artistic_Ink subcategory and click on the brush labeled Fire Ash.

Step 28
To make our wreath look complete, let’s place a congratulatory message or some warm wishes in the center of our wreath. Using the Pen Tool (P), draw some smooth paths roughly as shown below.
Create each letter separately, since it will be easier for you to manipulate the letters later. You should end up with something like in the next to last image.
Finally, place the newly created paths in the center of the wreath.


Step 29
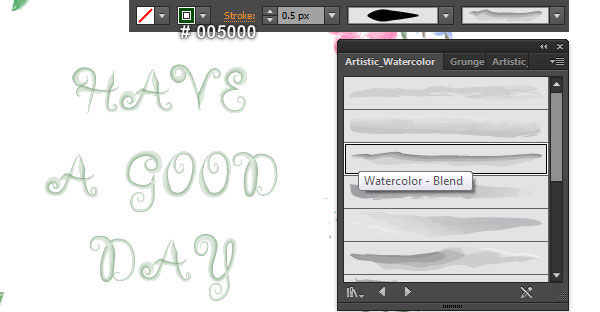
Select and group (Ctrl +G) all paths created in step 28. Then replace the existing stroke color of the newly created group with dark green (# 005000) and change the stroke weight to 0.5px.
Keep the resulting group selected, move to the Artistic_Watercolor subcategory and click on the brush labeled Watercolor – Blend.
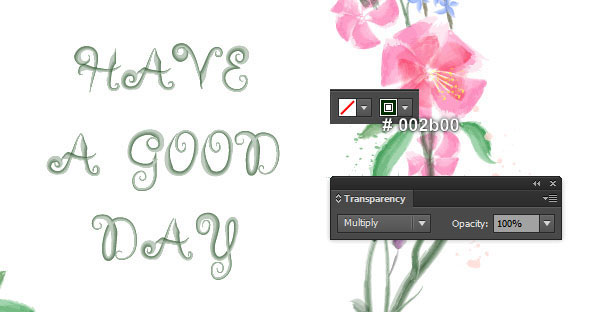
Next apply Width Profile 5 for this group. Make sure that the resulting group is still selected, make a copy (Ctrl +C, Ctrl +F) of it.
Replace the existing stroke color of the copy with very dark green (# 002b00).
Finally change the Blending Mode of the newly created group to Multiply.
And We’re Done!