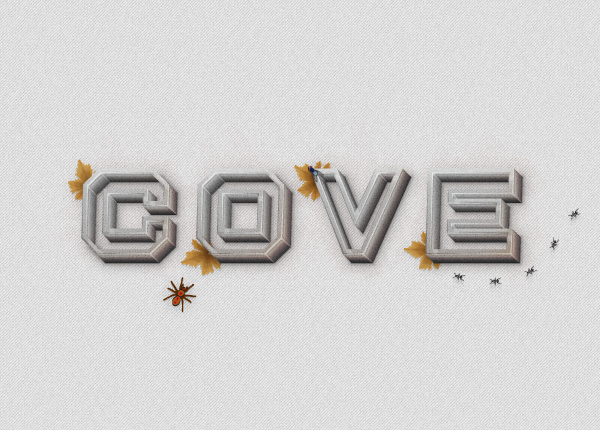
In the following tutorial you will learn how to create a detailed concrete text effect in Adobe Illustrator.
Final Image
As always, this is the final image that we’ll be creating:

Tutorial Details
- Program: Adobe Illustrator CC
- Estimated Completion Time: 2 hours
- Difficulty: Intermediate-Advanced
Step 1
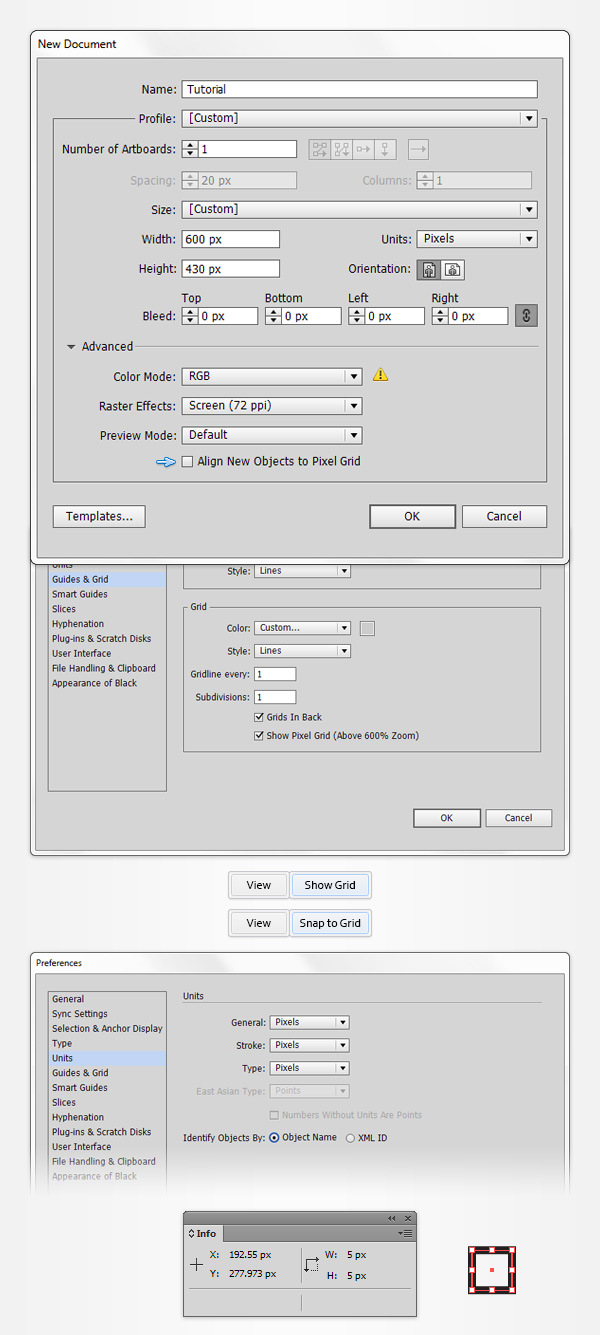
Hit CTRL + N to create a new document. Select Pixels from the Units drop-down menu, enter 600 in the width box and 430 in the height box then click on the Advanced button. Select RGB, Screen (72ppi) and make sure that the Align New Objects to Pixel Grid box is unchecked before you click OK.
Enable the Grid (View > Show Grid) and the Snap to Grid (View > Snap to Grid). You will need a grid every 1px, so simply go to Edit > Preferences > Guides > Grid, enter 1 in the Gridline every box and 1 in the Subdivisions box. Try not to get discouraged by all that grid, it will ease your work and keep in mind that you can easily enable or disable it using the Control + " keyboard shortcut.
You should also open the Info panel (Window > Info) for a live preview with the size and position of your shapes. Do not forget to set the unit of measurement to pixels from Edit > Preferences > Units > General. All these options will significantly increase your work speed.
Step 2
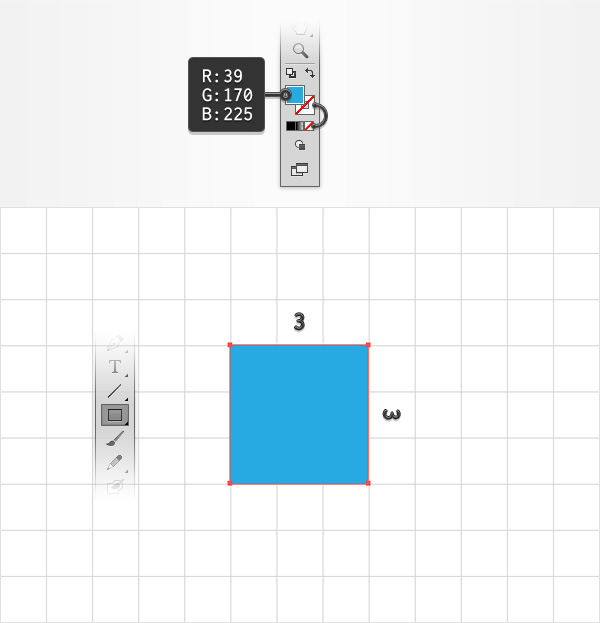
Pick the Rectangle Tool (M) and focus on your Toolbar. Remove the color from the stroke then select the fill and set its color to R=39 G=170 B=225. Move to your artboard and simply create a 3px square, the Snap to Grid feature should ease your work.
Step 3
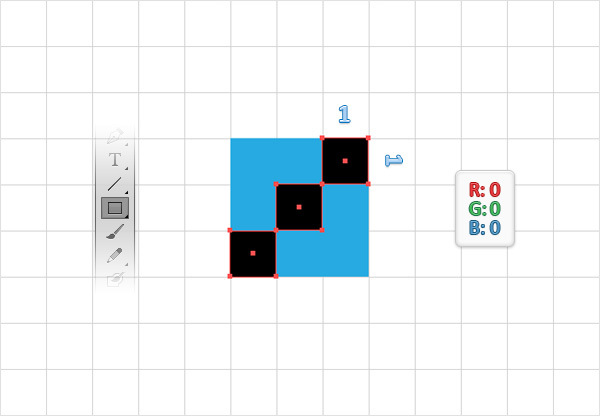
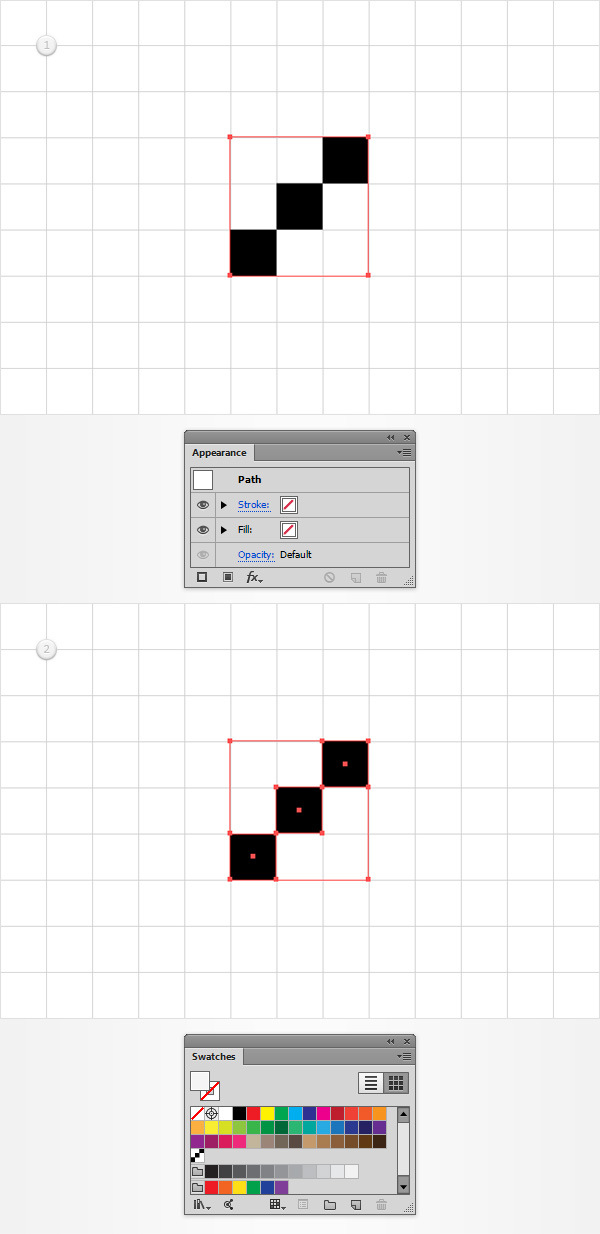
Make sure that the Rectangle Tool (M) is still active and set the fill color to black (R=0 G=0 B=0). Create three, 1px squares and place them exactly as shown in the following image.
Step 4
Reselect your blue rectangle and remove that blue from the fill color.
Select all the shapes made so far and simply drag them inside the Swatches panel (Window > Swatches) to save them as a simple pattern which you will need later. Once you can see this pattern in the Swatches panel you can get rid of those tiny shapes from your artboard.
Step 5
Disable the Grid (View > Hide Grid) and the Snap to Grid (View > Snap to Grid).
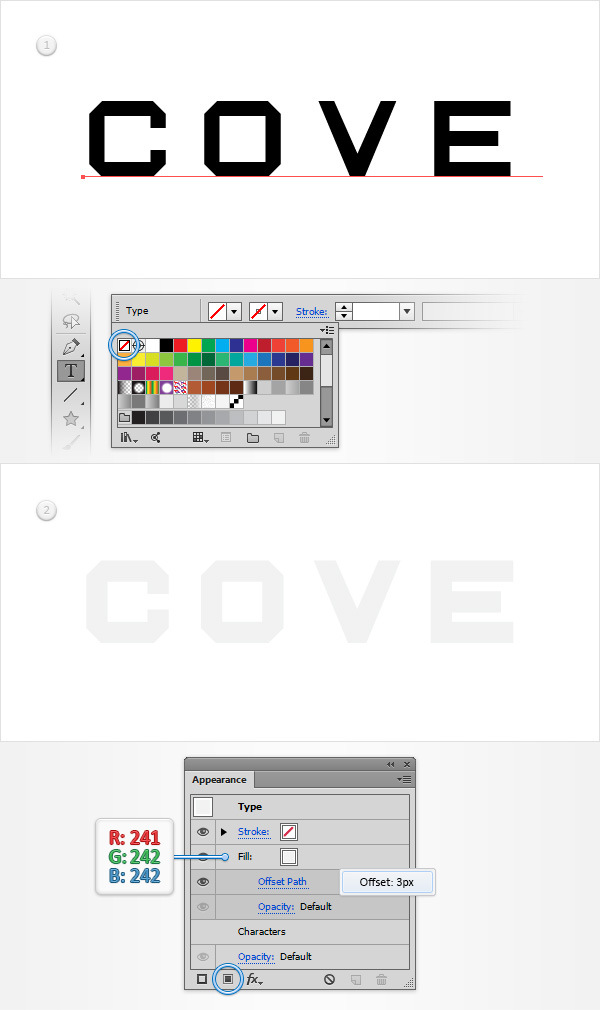
Grab the Type Tool (T), simply click on your artboard and add your black piece of text. Select it, focus on the control panel and simply remove the color used for your text.
Make sure that your piece of text remains selected, focus on the Appearance panel (Window > Appearance) and simply add a fill using the Add New Fill button.
Select this fresh fill, set its color to R=241 G=242 B=242 and go to Effect > Path > Offset Path. Enter a 3px Offset and click OK.
Step 6
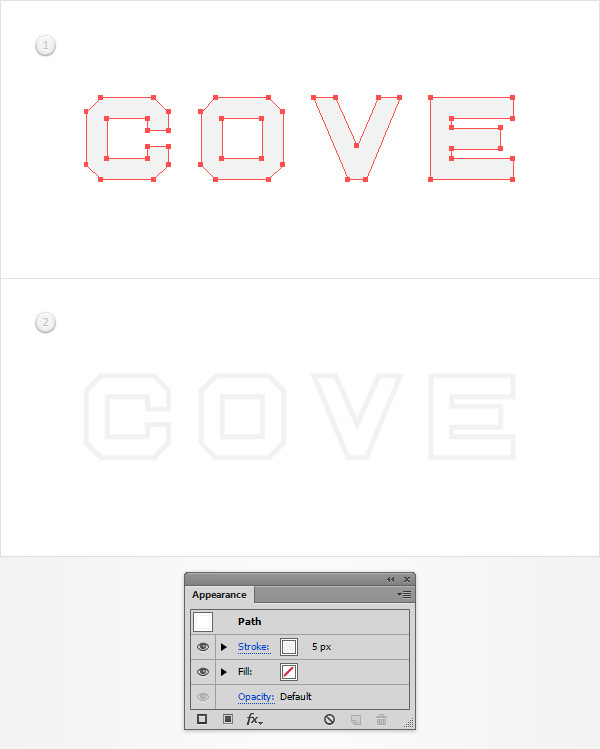
Reselect your piece of text and go to Object > Expand Appearance. Select the resulting group of shapes and hit Shift + Control + G to Ungroup it.
Make sure that your letter shapes stay selected and simply hit Shift + X to transfer the color properties from the fill to the stroke.
Move to the Appearance panel, focus on the stroke and increase its Width to 5px.
Step 7
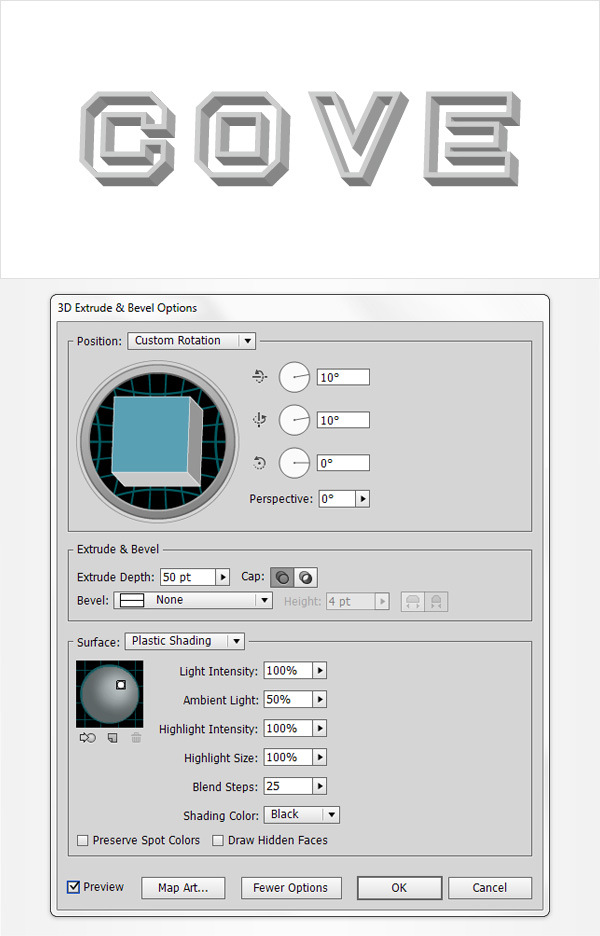
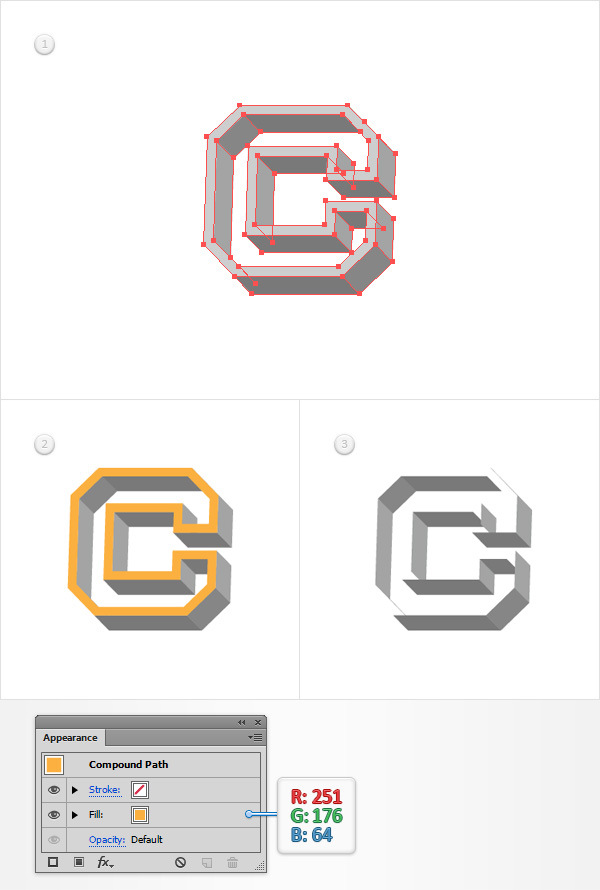
Make sure that your letter shapes are still selected and go to Effect > 3D > Extrude & Bevel. Click the More Options button, make sure that you enter all the properties shown in the following image and click OK.
Step 8
Focus on the first letter shape. Select it, go to Object > Expand Appearance and Ungroup the resulting group (Shift + Control + G).
Select the shape that makes up the front side of your letter and replace the existing fill color with R=251 G=176 B=64.
Move to the Layers panel, double click on this orange shape and rename it "frontSide".
Keep focusing on the Layers panel and simply cllick on that little eye icon that stands for your "frontSide" shape to make it invisible.
Step 9
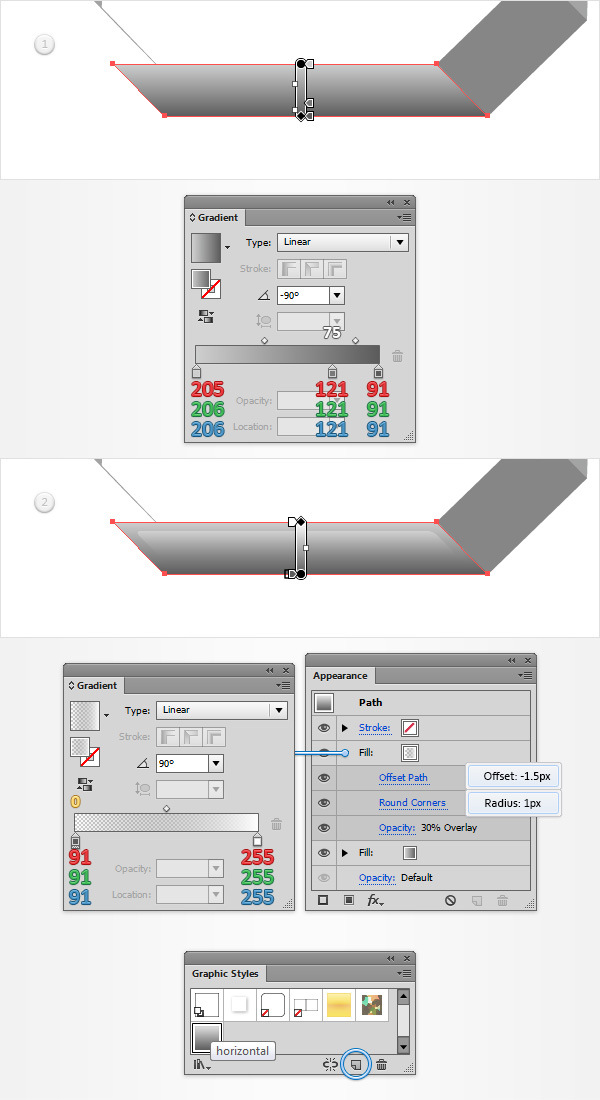
Select the bottom shape with the fill color set at R=121 G=121 B=121 and simply replace that flat color with the linear gradient shown in the first image.
Make sure that this shape stays selected, focus on the Appearance panel and add a second fill using that same Add New Fill button.
Select this fresh fill, lower its Opacity to 30%, change the Blending Mode to Overlay and add the linear gradient shown in the second image. Keep in mind that the white number from the first Gradient image stands for Location percentage while the yellow zero from the second Gradient stands for Opacity percentage.
Keep focusing on this second fill and go to Effect > Path > Offset Path. Enter a -1.5px Offset, click OK and go to Effect > Stylize > Rounded Corners. Enter a 3px Radius and click OK.
Make sure that the shape edited in this step is still selected, open the Graphic Styles panel (Window > Graphic Styles) and click the New Graphic Style button to save a new graphic style. Simply double click on this new graphic style and rename it "horizontal".
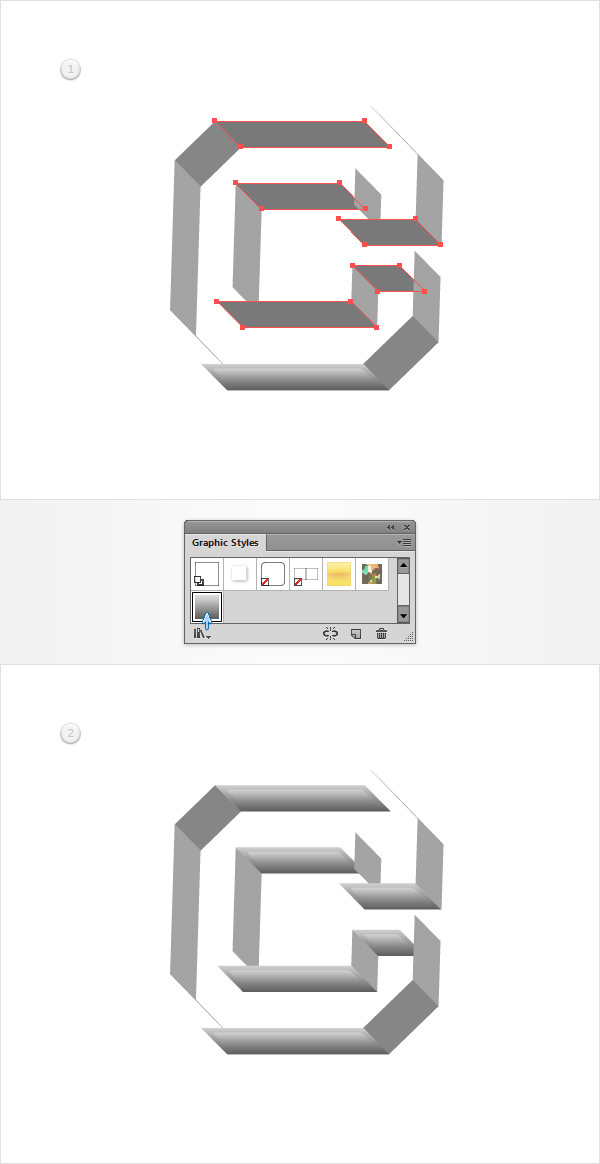
Step 10
Select the rest of the shapes that have the fill color set at R=121 G=121 B=121 and simply add your "horizontal" graphic style.
Step 11
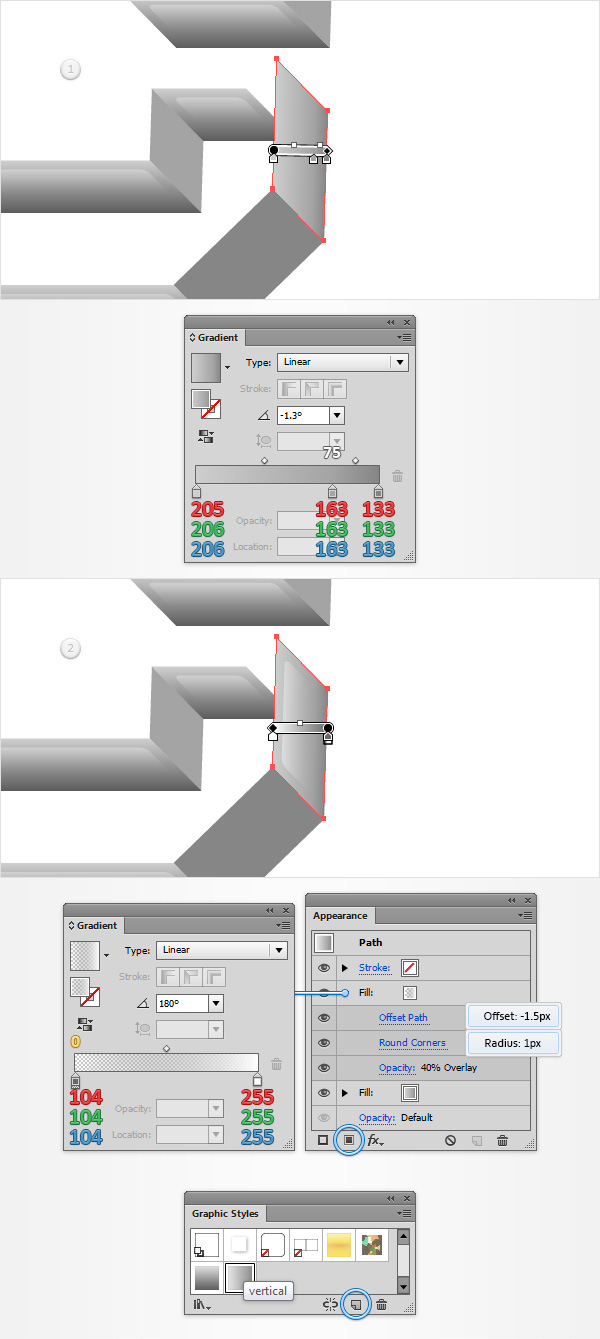
Select the shape highlighted in the first image and replace that flat color with the linear gradient shown in the first image.
Make sure that this shape stays selected, focus on the Appearance panel and add a second fill using that same Add New Fill button.
Select this fresh fill, lower its Opacity to 40%, change the Blending Mode to Overlay and add the linear gradient shown in the second image. Don’t forget that the white number from the Gradient image stands for Location percentage while the yelow zero stands for Opacity percentage.
Keep focusing on this second fill and go to Effect > Path > Offset Path. Enter a -1.5px Offset, click OK and go to Effect > Stylize > Rounded Corners. Enter a 1px Radius and click OK.
Make sure that the shape edited in this step is still selected, focus on the Graphic Styles panel, save a new graphic style and name it "vertical".
Step 12
Select the rest of the shapes that have the fill color set at R=163 G=164 B=164 and add your "vertical" graphic style.
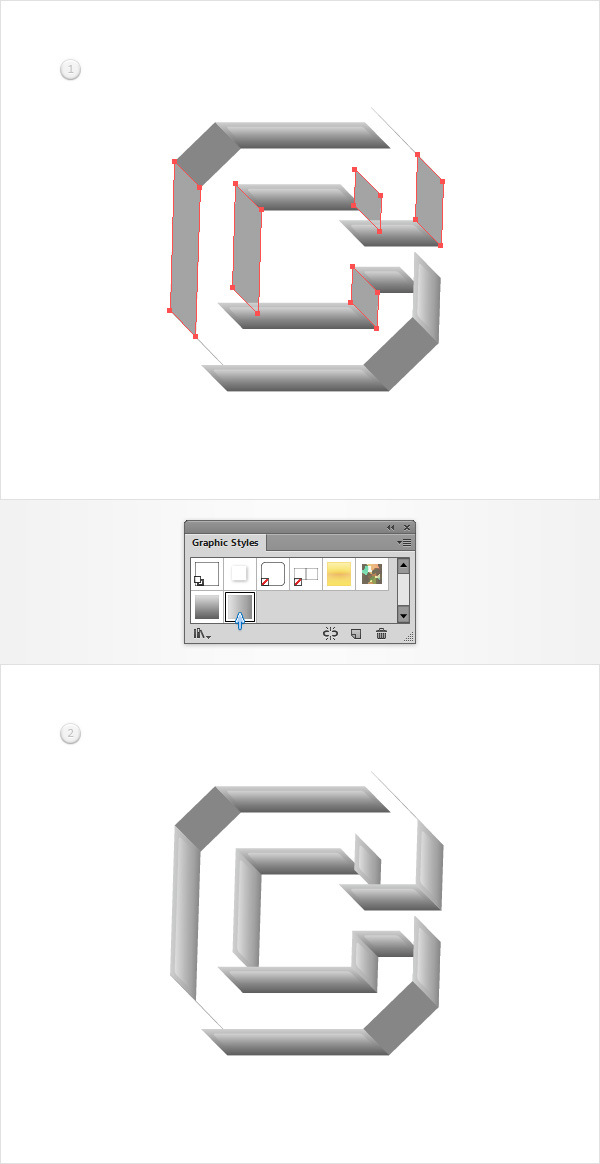
Step 13
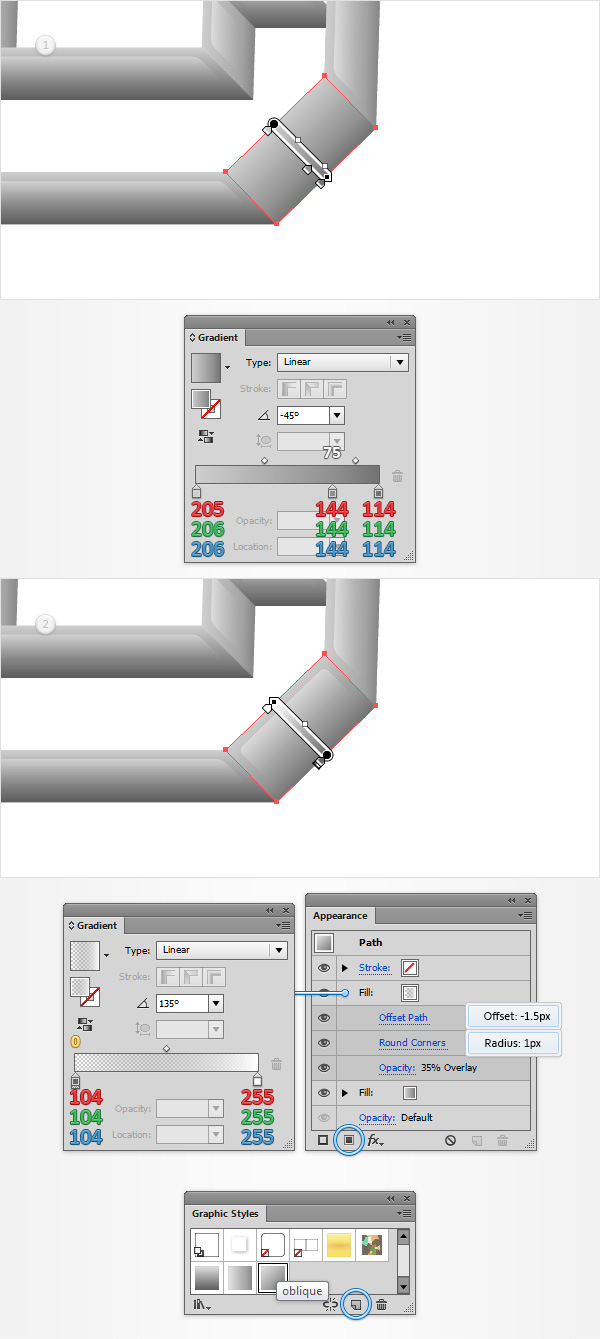
Select the shape highlighted in the first image and replace that flat color with the linear gradient shown in the first image.
Make sure that this shape stays selected, focus on the Appearance panel and add a second fill using that same Add New Fill button.
Select this fresh fill, lower its Opacity to 35%, change the Blending Mode to Overlay and add the linear gradient shown in the second image.
Keep focusing on this second fill and go to Effect > Path > Offset Path. Enter a -1.5px Offset, click OK and go to Effect > Stylize > Rounded Corners. Enter a 1px Radius and click OK.
Make sure that the shape edited in this step is still selected, focus on the Graphic Styles panel, save a new graphic style and name it "oblique".
Step 14
Select the other shapes that have the fill color set at R=134 G=134 B=134 and add your "oblique" graphic style.
Reselect all the shapes that make up the lateral sides of your first letter and hit Control + G to Group them.
Move to the Layers panel and rename this new group "lateralSides".
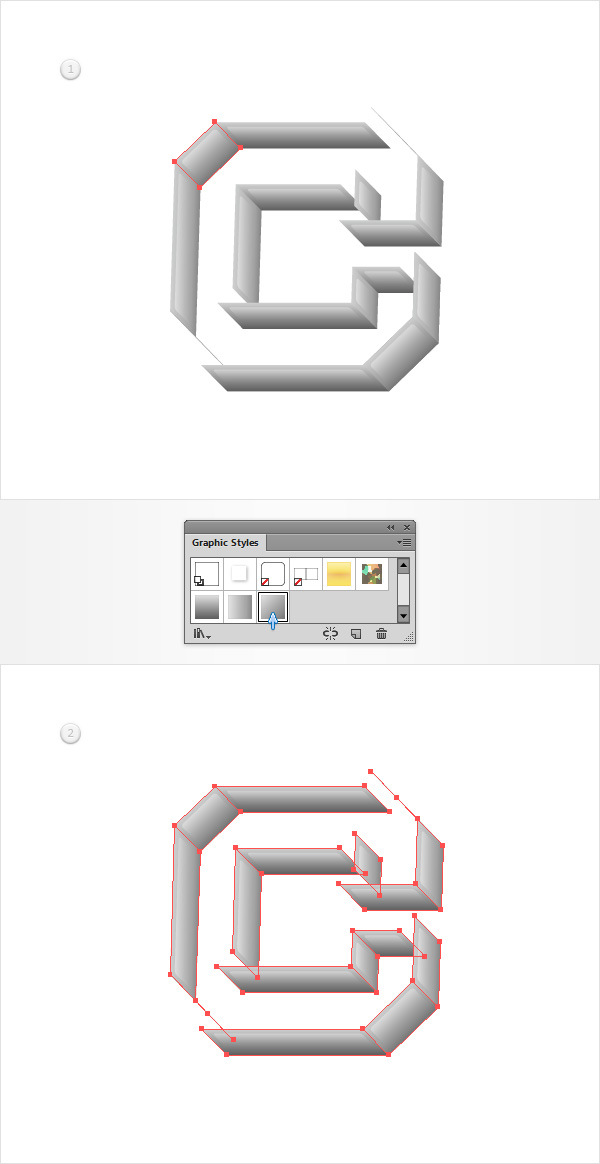
Step 15
Enable the Smart Guides (Control + U), pick the Pen Tool (P) and draw a simple path as shown in the following image, the Smart Guides feature should ease your work.
Add a 1px, black stroke for this oblique path and make sure that there is no fill color.
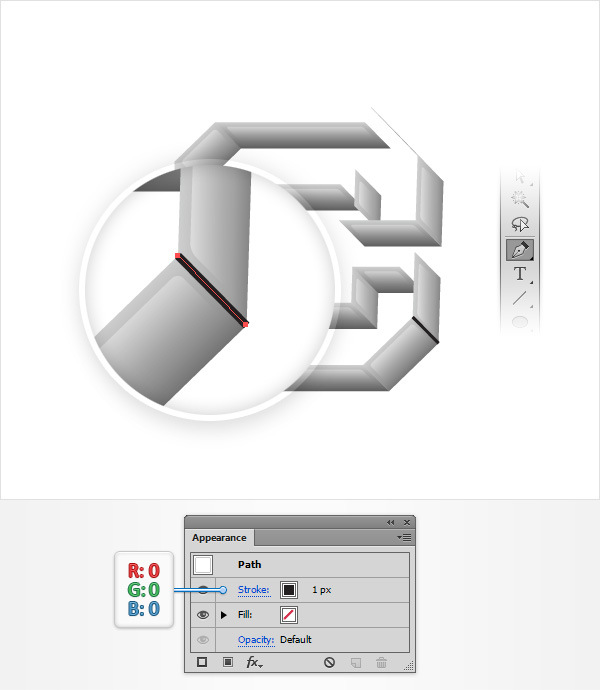
Step 16
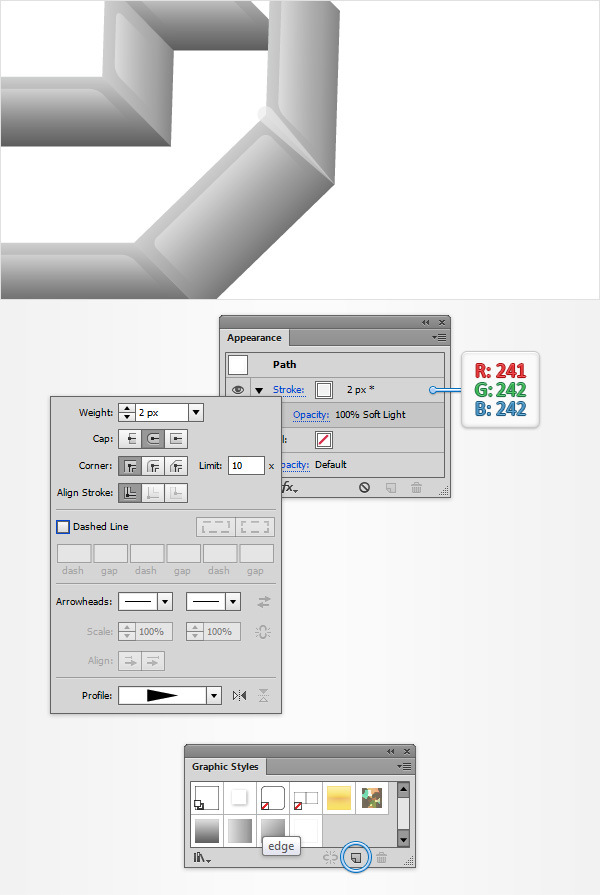
Reselect the path made in the previous step and focus on the Appearance panel. Select the stroke, change its Blending Mode to Soft Light, replace the existing color with R=241 G=242 B=242 then open the Stroke panel. Increase the Weight to 2px, check the Round Cap button then select the "Width Profile 4" from the Profile drop-down menu.
Make sure that your oblique path stays selected, focus on the Graphic Styles panel, save a new graphic style and rename it "edge".
Step 17
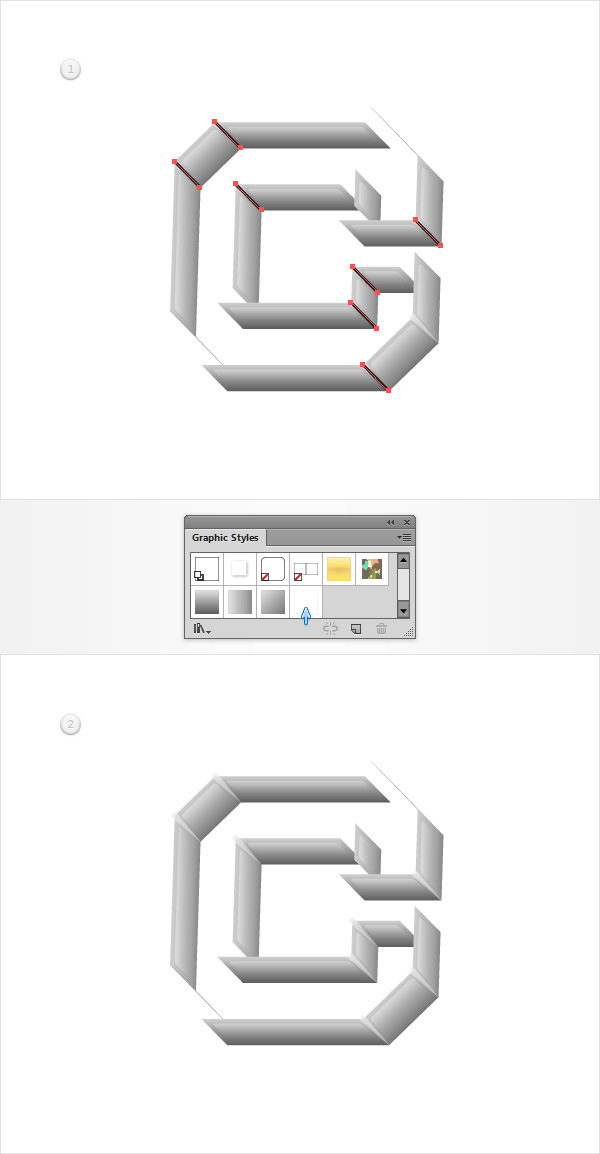
Reselect the Pen Tool (P) and create some new paths as shown in the following image.
Make sure that all these paths are selected and add your "edge" graphic style.
Once you’re done disable the Smart Guides (Control + U).
Step 18
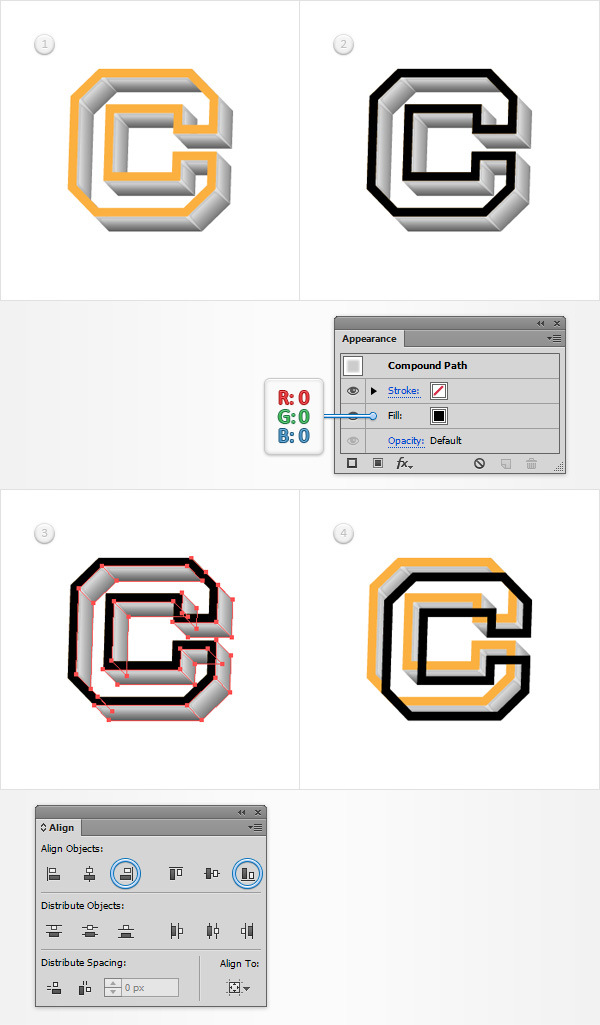
Focus on the Layers panel, turn on the visibility of your "frontSide" shape, select it and simply hit Shift + Control + ] to bring it to front.
Make sure that this orange shape is still selected, make a copy in front (Control + C > Control + F), select it and replace the existing fill color with black (R=0 G=0 B=0).
Select this black shape along with your "lateralSides’ group and open the Align panel (Window > Align). Using the Selection Tool (V), click on the border of the group (it should become emphasized) then click the Horizontal Align Right and Vertical Align Bottom buttons from the Align panel.
Move to the Layers panel and rename your black shape "backSide".
Step 19
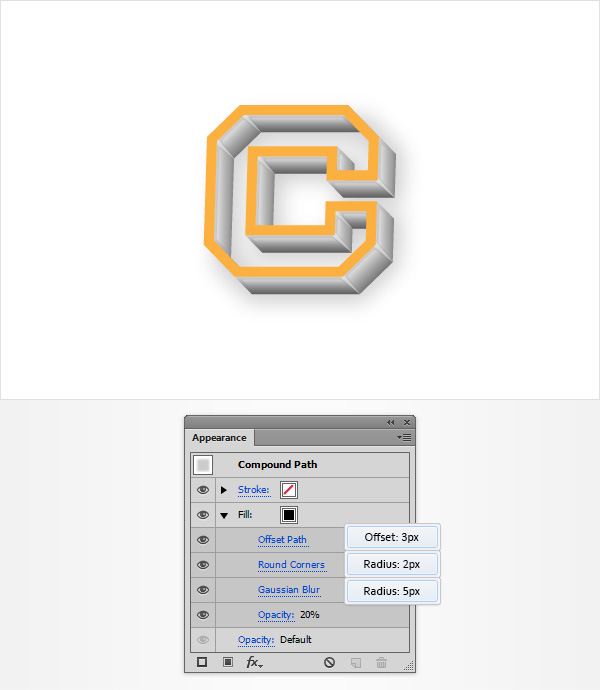
Make sure that your "backSide" shape stays selected, send it to back (Shift + Control + [ ) and focus on the Appearance panel.
Select the existing fill, lower its Opacity to 20% and go to Effect > Path > Offset Path.
Enter a 3px Offset, click OK and go to Effect > Stylize > Rounded Corners. Enter a 2px Radius, click OK and go to Effect > Blur > Gaussian Blur. Enter a 5px Radius and click OK.
Step 20
Go to Edit > Preferences > General and make sure that the Keyboard Increment is set at 1px. Make sure that your "frontSide" shape is selected and make two copies in front (Control + C > Control + F > Control + F).
Select the top copy and move it 1px up and 1px to the right using the arrow buttons on your keyboard.
Reselect both copies made in this step, open the Pathfinder panel and click the Minus Front button.
Make sure that the resulting group of shapes is selected and hit Control + 8 to turn it into a compound path. Set its fill color to black.
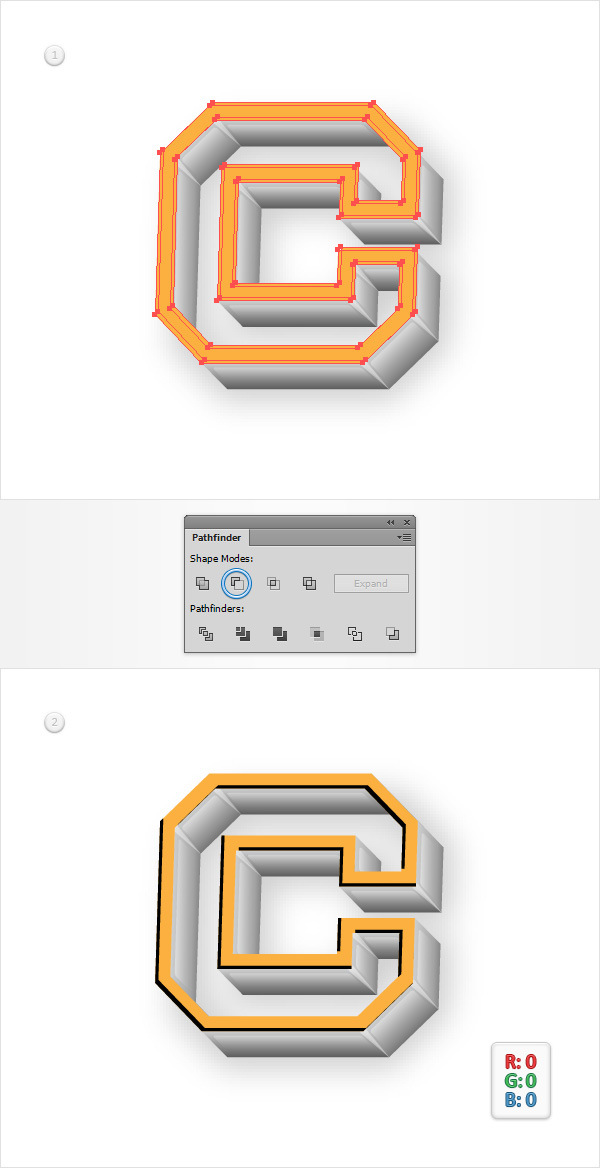
Step 21
Now you need to make your black compound path a bit sharper. Select the Delete Anchor Point Tool (-) and click on the anchor points that you need to remove in order to make those black paths look roughly as shown in the second image.
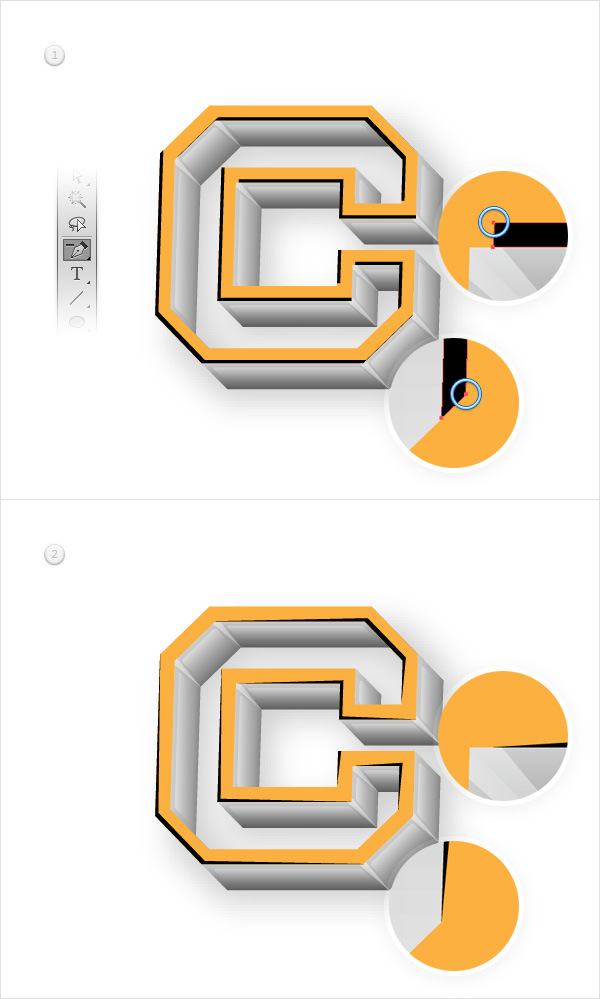
Step 22
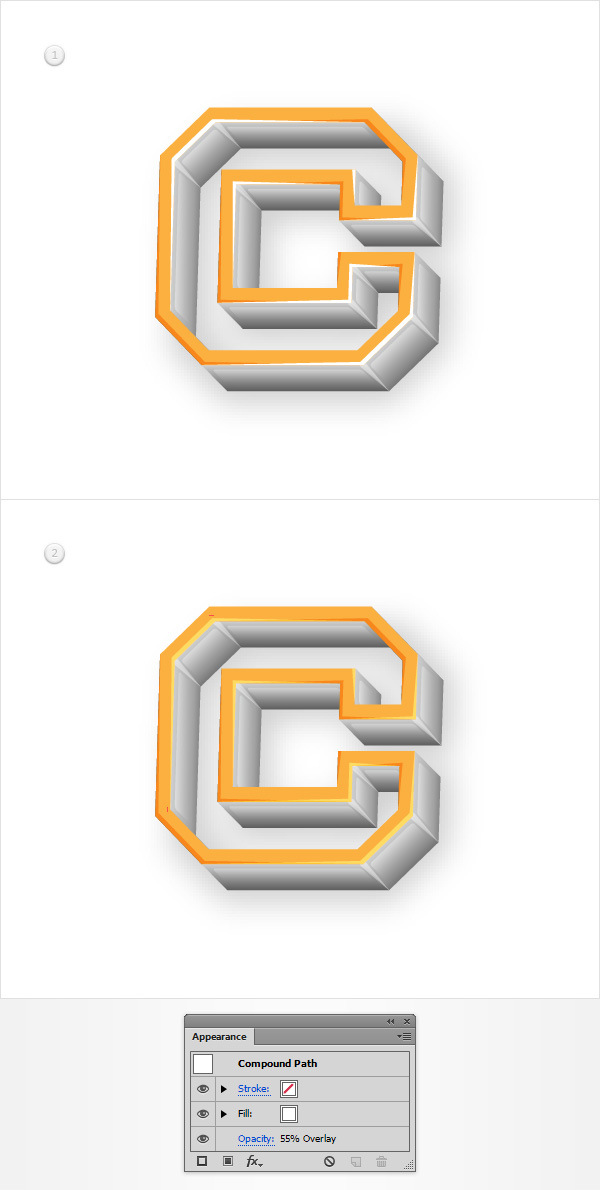
Make sure that your black compound path is still selected, lower its Opacity to 75% and change the Blending Mode to Soft Light.
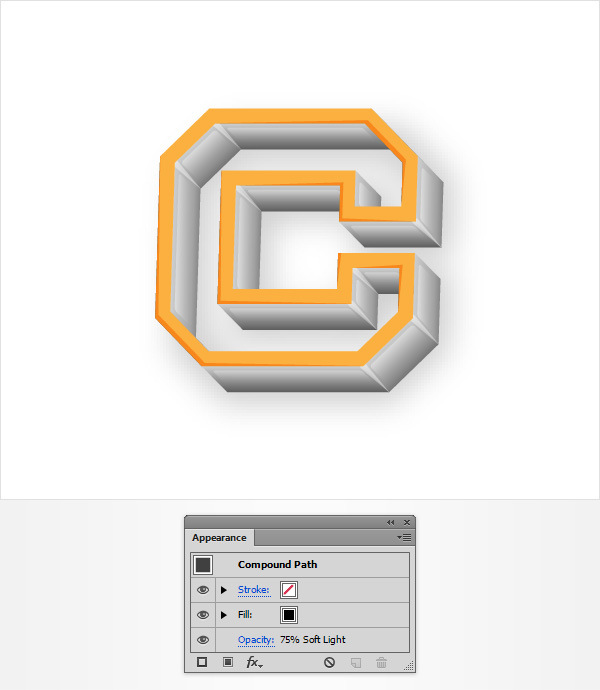
Step 23
Make sure that your "frontSide" shape is selected and make two copies in front (Control + C > Control + F > Control + F).
Select the top copy and move it 1px up and 1px to the left.
Reselect both copies made in this step and click the Minus Front button from the Pathfinder panel. Turn the resulting group of shapes into a compound path (Control + 8) and set its fill color to white (R=255 G=255 B=255).
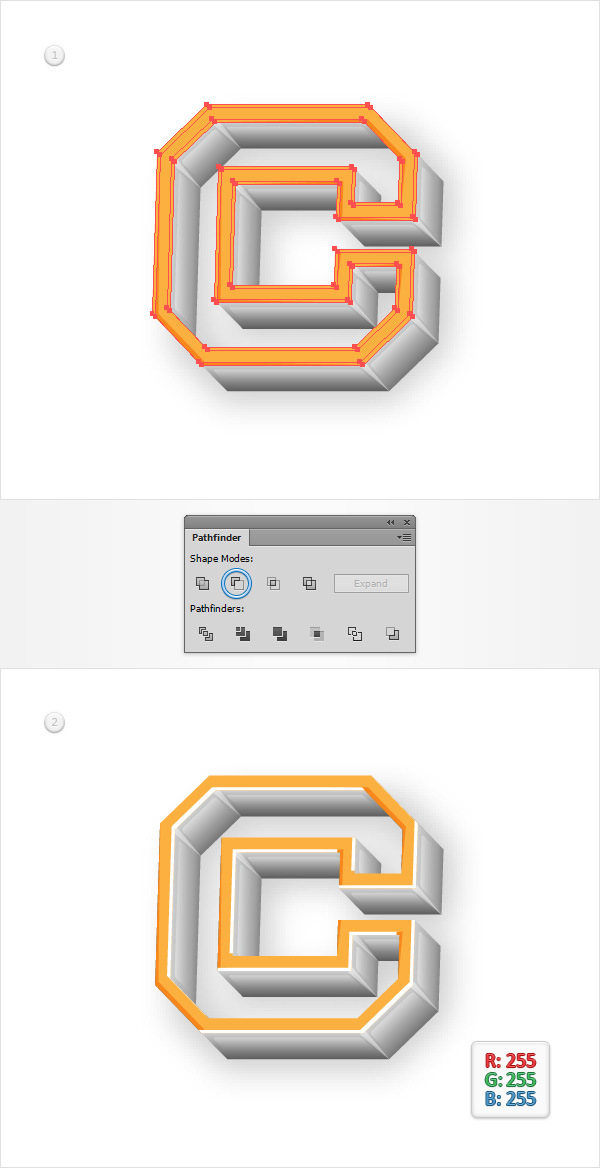
Step 24
Use the Delete Anchor Point Tool (-) to make your white compound path look a bit sharper like you did with the black one. Once you’re done, lower its Opacity to 55% and change the Blending Mode to Soft Light.
Step 25
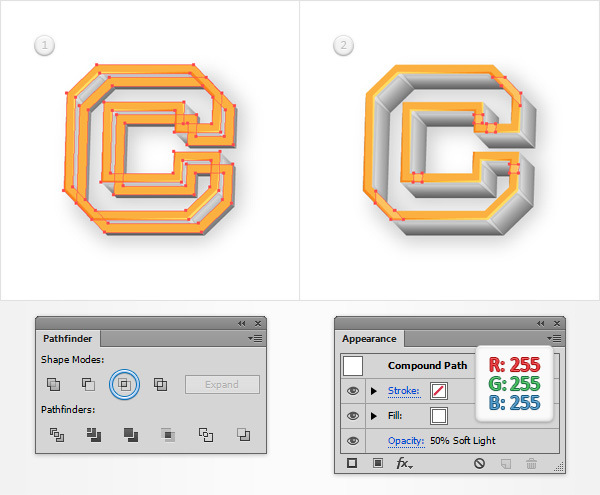
Make sure that your "frontSide" shape is selected and make two copies in front (Control + C > Control + F > Control + F).
Select the top copy and move it 7px down and 7px to the right.
Reselect both copies made in this step and click the Intersect button from the Pathfinder panel. Turn the resulting group of shapes into a compound path (Control + 8), set the fill color to white, lower its Opacity to 50% and change the Blending Mode to Soft Light.
Step 26
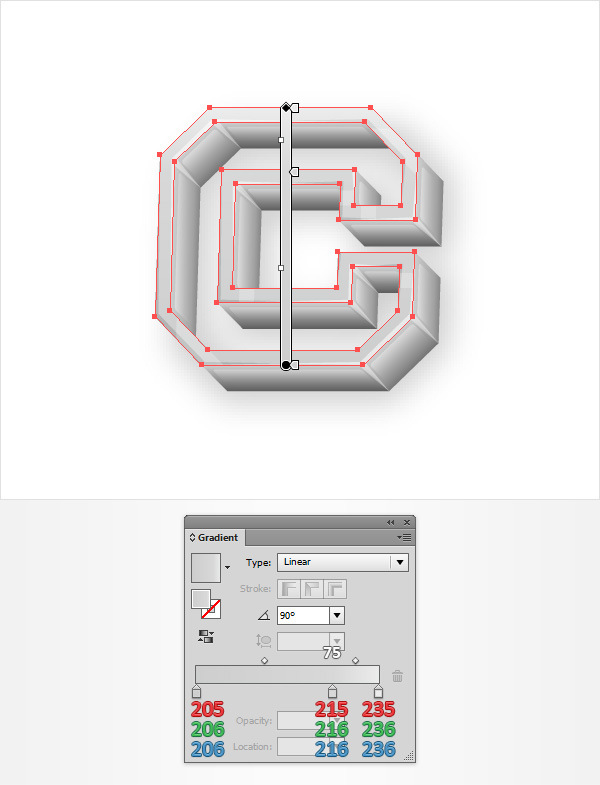
Make sure that your "frontSide" shape is selected and replace the existing fill color with the linear gradient shown in the following image.
Step 27
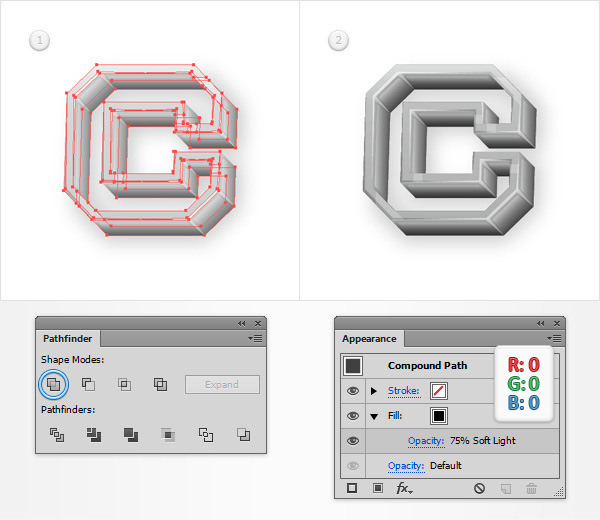
Reselect all the shapes that make up your first letter and duplicate them (Control + C > Control + F).
Select only the copies and click the Unite button from the Pathfinder panel.
Make sure that the resulting shape stays selected and focus on the Appearance panel. Select the existing fill, set the color to black, lower its Opacity to 75% and change the Blending Mode to Soft Light.
Move to the Layers panel and rename the shape made in this step "texture".
Step 28
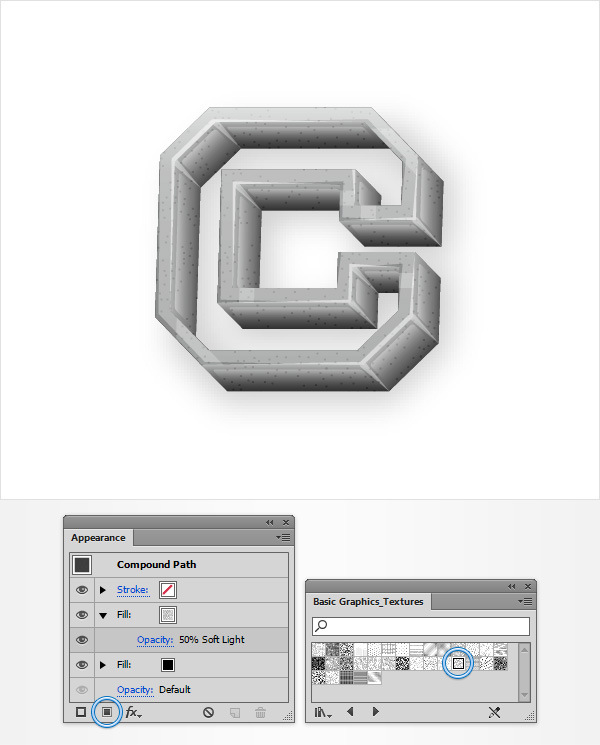
Make sure that your "texture" shape is still selected, focus on the Appearance panel and add a second fill using that same Add New Fill button. You will need a built-in pattern for this new fill, so go to the Swatches panel, open the fly-out menu and go to Open Swatch Library > Patterns > Basic Graphics > Basic Graphics_Textures. A new window with a set of built-in patterns should open. Make sure that the second fill is still selected, add the “USGS 17A Shifting Sands” pattern, lower its opacity to 50% and change the blending mode to Soft Light.
Step 29
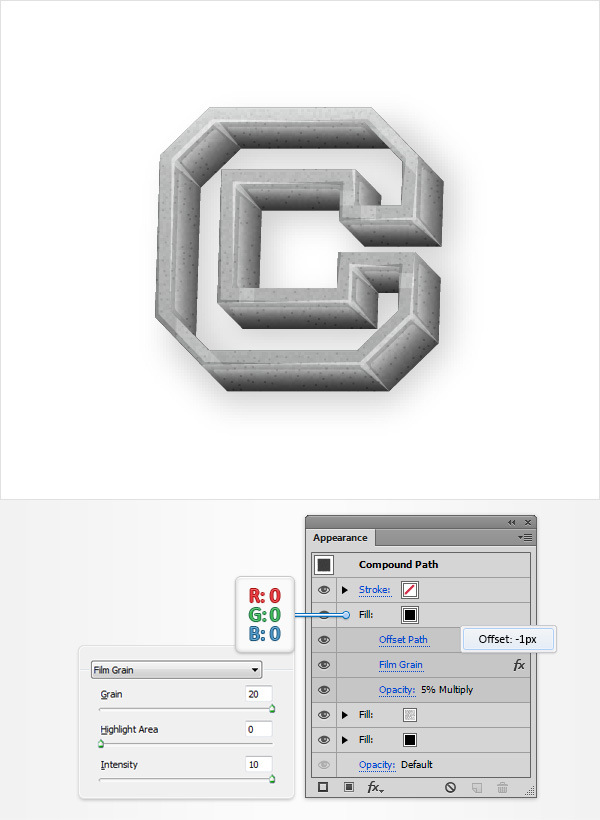
Make sure that your "texture" shape is still selected, focus on the Appearance panel and add a third fill. Select this new fill, set the fill color to black, lower its Opacity to 5%, change the Blending Mode to Multiply.
Go to Effect > Path > Offset Path. Enter a -1px Offset, click OK and go to Effect > Artistic > Film Grain. Enter the properties shown in the following image and click OK.
Step 30
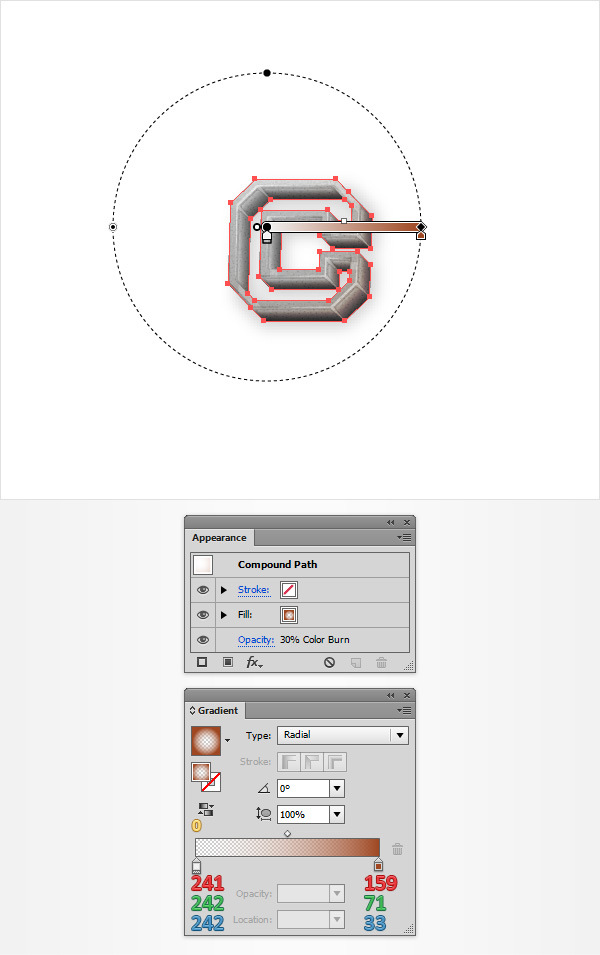
Duplicate your "texture" shape (Control + C > Control + F), select the copy and hit the D button on your keyboard to replace the existing Appearance attributes with the default ones (white fill and black stroke).
Remove the stroke then focus on the fill. Lower its Opacity to 30%, change the Blending Mode to Color Burn and add the radial gradient shown in the following image. Don’t forget that the yellow zero from the Gradient image stands for Opacity percentage.
Step 31
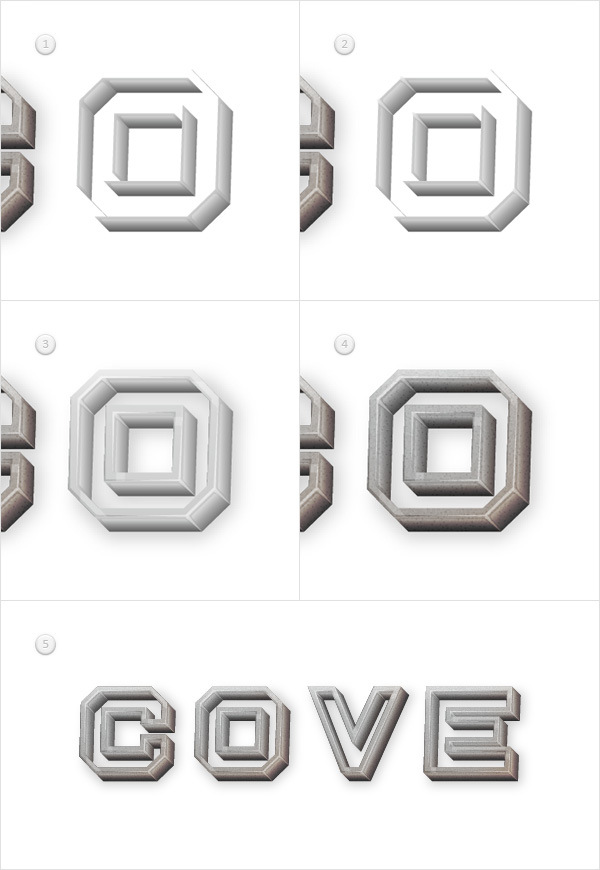
Move to your next letter shapes and repeat the techniques and the effects used for the first letter.
Step 32
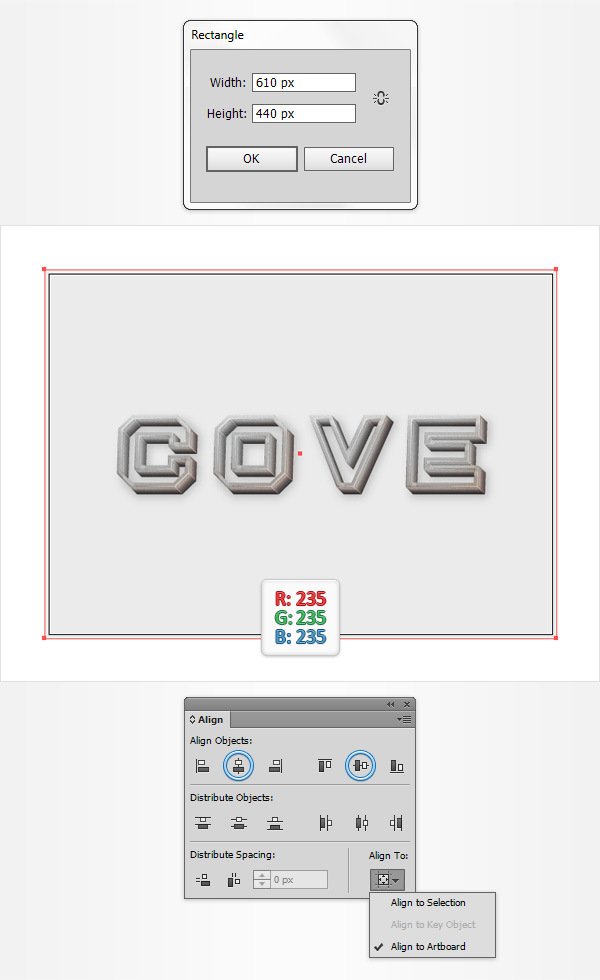
Pick the Rectangle Tool (M) and click on your artboard to open the Rectangle window. Enter 610 in the Width box and 440 in the Height box then click the OK button.
Make sure that the resulting shape stays selected, send it to back (Shift-Control-[ ) and set the fill color to R=235 G=235 B=235.
Next, you will need to center it, so open the Align panel (Window > Align). Set the aligning to Artboard (open the fly out menu and go to Show Options if you can’t see the Align To section as shown in the following image), make sure that your shape is selected then click the Horizontal Align Center and Vertical Align Center buttons.
In the end your rectangle should cover the entire artboard as shown in the following image.
Step 33
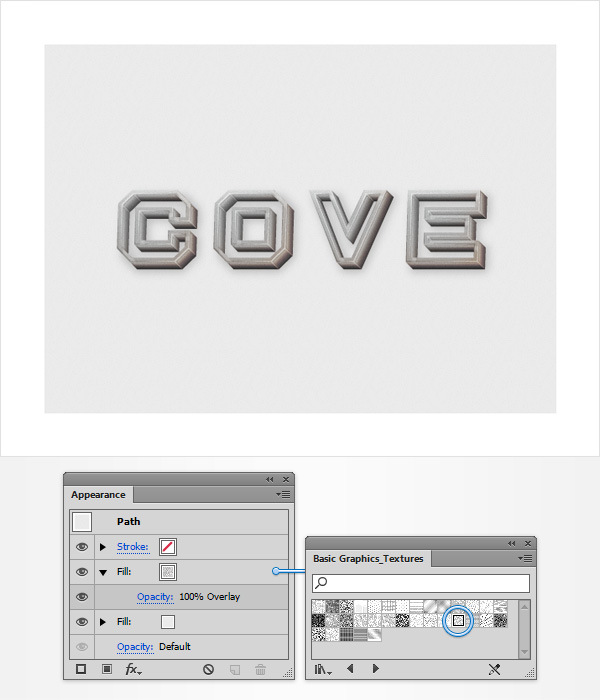
Make sure that your background rectangle is still selected, focus on the Appearance panel and add a second fill. You will need again that built-in pattern for this new fill.
Return to that Basic Graphics_Textures panel, make sure that the fill added in this step is still selected, add the "USGS 17A Shifting Sands" pattern and change its blending mode to Overlay.
Step 34
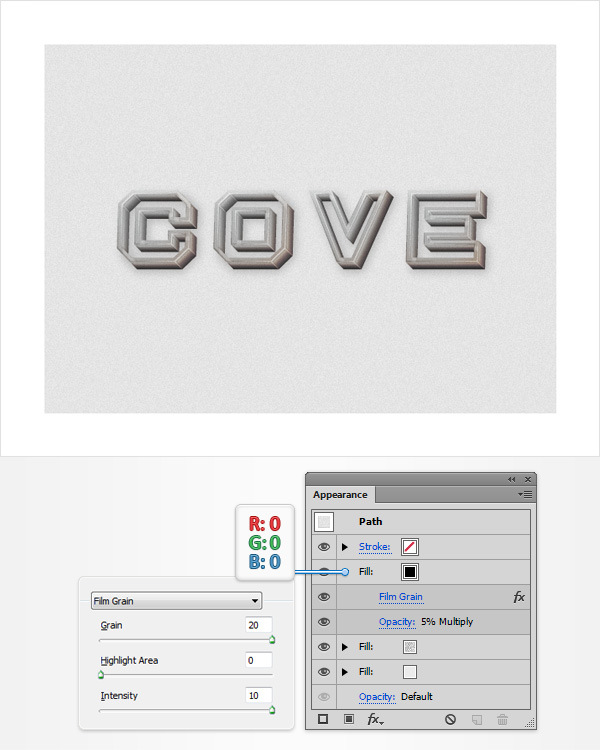
Make sure that your background rectangle is still selected, focus on the Appearance panel and add a third fill. Select it, set the color to black, lower its Opacity to 5%, change the Blending Mode to Multiply and go to Effect > Artistic > Film Grain. Enter the properties shown in the following image and click OK.
Step 35
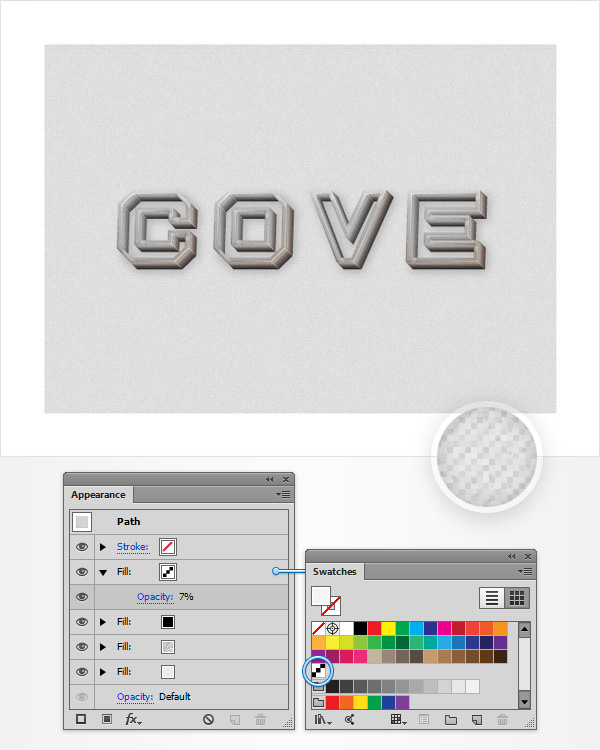
Make sure that your background rectangle is still selected, focus on the Appearance panel and add a fourth fill. Select it, add the pattern saved in the beginning of the tutorial and lower its Opacity to 7%.
Step 36
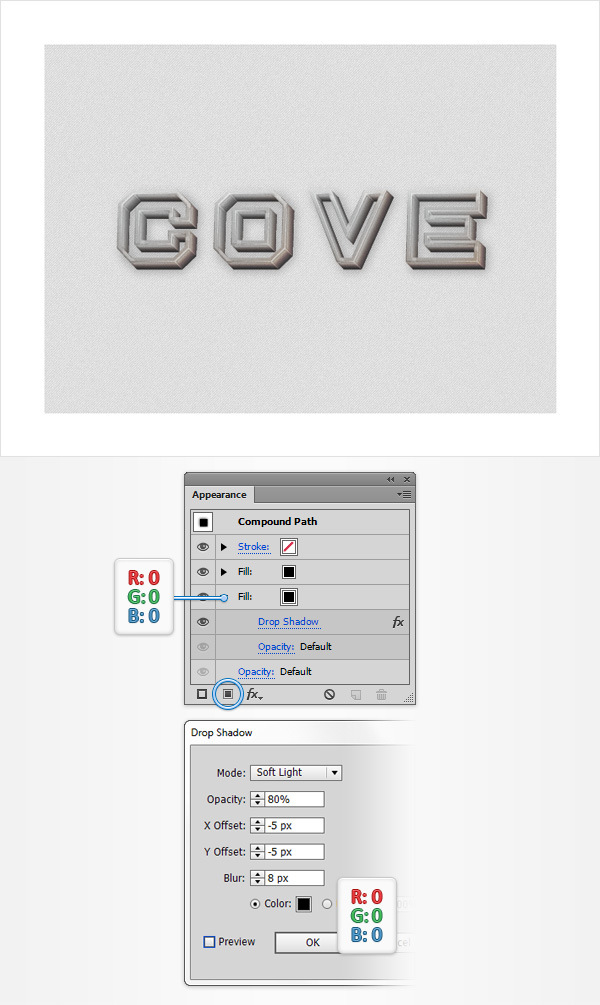
Focus on the Layers, select all your "backSide" shapes, move to the Appearance panel and add a second fill. Drag it below the existing fill, make sure that the color is set to black and go to Effect > Stylize > Drop Shadow. Enter the properties shown in the following image and click OK.
Step 37
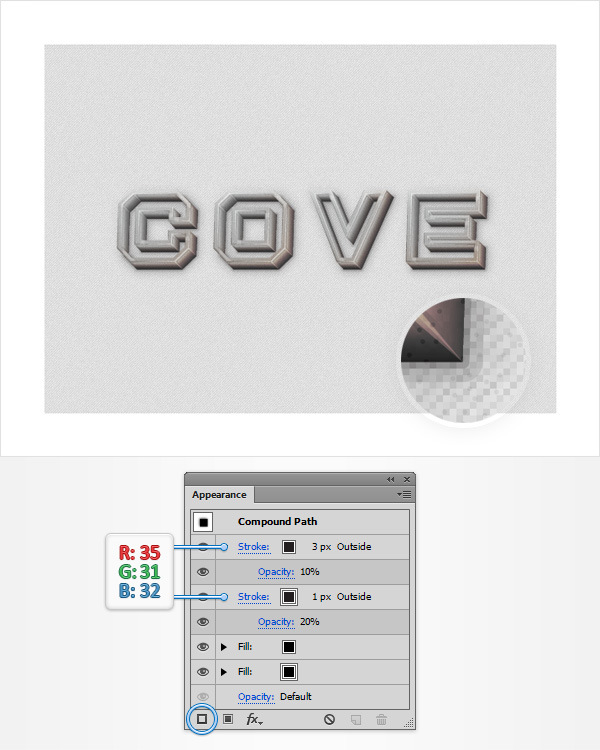
Make sure that all your "backSide" shapes are still selected and focus on the Appearance panel. Select the existing stroke, set the size at 1px and color to R=35 G=31 B=32, lower its Opacity to 20% then open the Stroke panel and check the Align Stroke to Outside button.
Return to the Appearance panel and add a second stroke for these shapes using the Add New Stroke button. Select the new stroke, set the size at 3px and color to R=35 G=31 B=32, lower its Opacity to 10% then open the Stroke panel and check the Align Stroke to Outside button.
Step 38
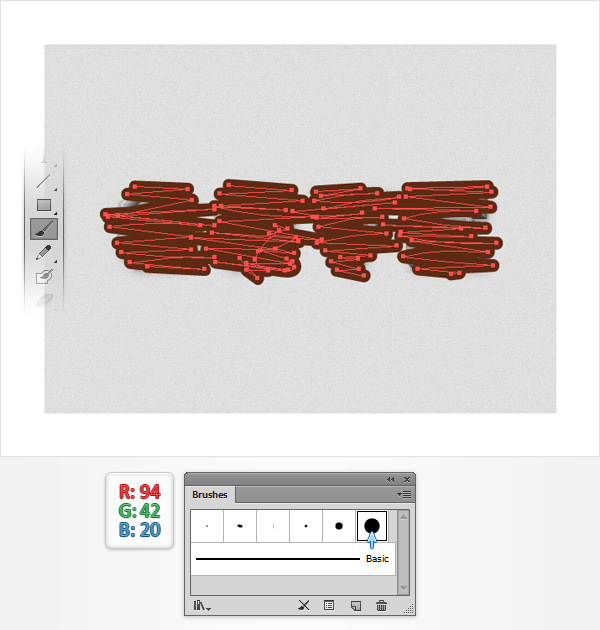
Open the Brushes panel (Window > Brushes) and pick the Brush Tool (B). Select the 15pt. Round brush, draw some simple paths as shown in the following image and set their color to R=94 G=42 B=20.
Step 39
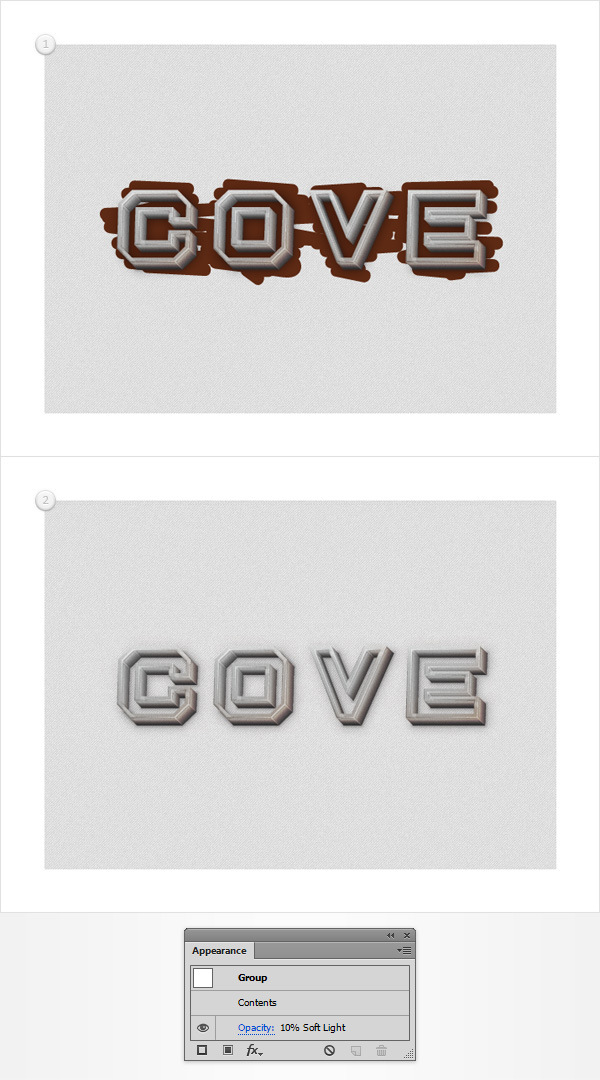
Select the brown paths made in the previous step and Group them (Control + G).
Move to the Layers panel and drag this new group behind the shapes that make up the letters. Make sure that your group is still selected, lower its Opacity to 10% and change the Blending Mode to Soft Light.
Step 40
Reselect the Brush Tool (B) and the 15pt. Round brush, draw some new paths as shown in the following image and use the same color (R=94 G=42 B=20).
Group these fresh paths (Control + G), drag the group behind the letters then lower its Opacity to 10% and change the Blending Mode to Soft Light.
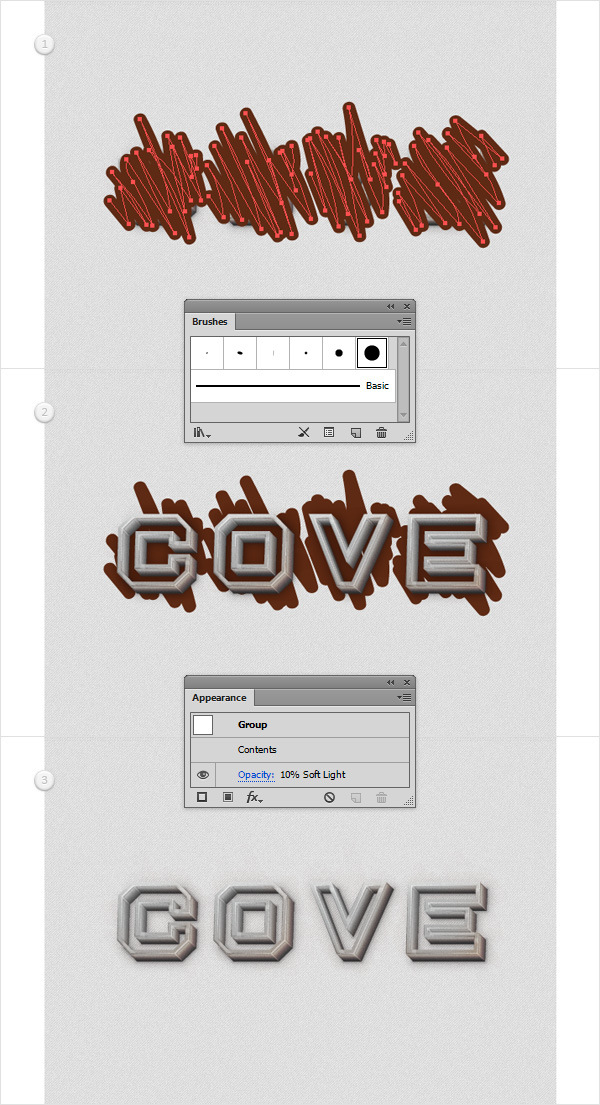
Step 41
Make sure that the Brush Tool (B) and the 15pt. Round brush are still selected, draw some new paths as shown in the following image and use that same color (R=94 G=42 B=20).
Group these fresh paths (Control + G), drag the group behind the letters then lower its Opacity to 10% and change the Blending Mode to Soft Light.
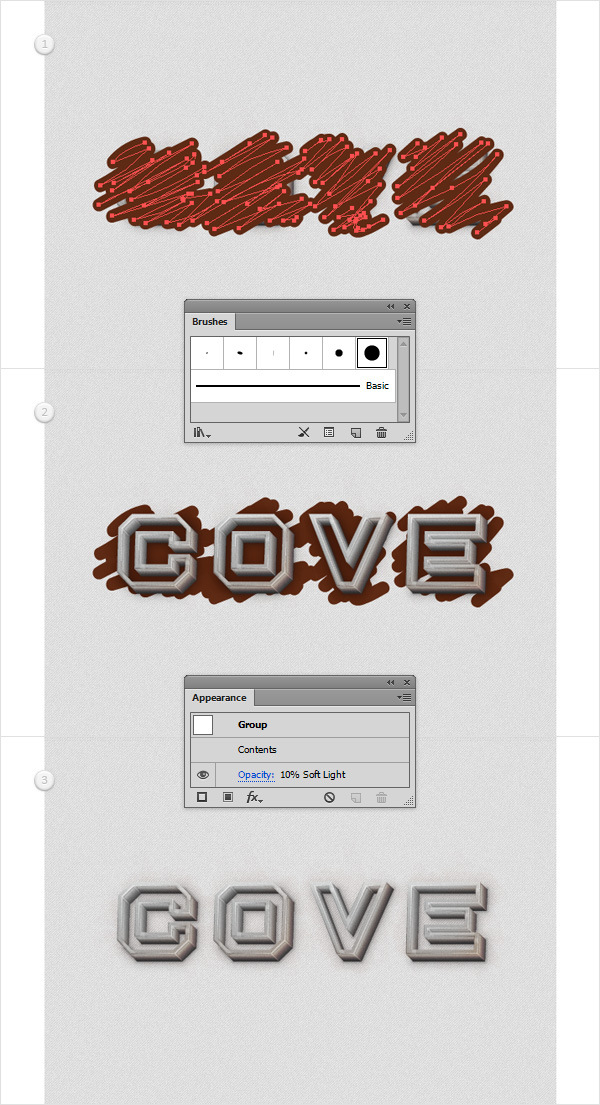
Step 42
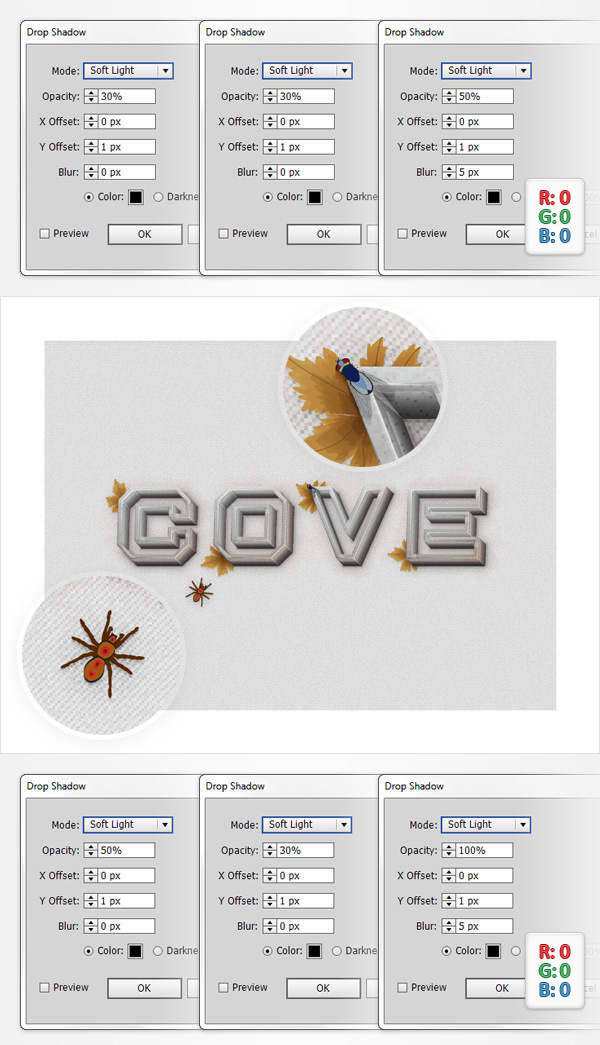
For the final steps you will need some built-in symbols. First, open the Symbols panel (Window > Symbols). Next, open the fly-out menu of this panel and go to Open Symbol Library > Nature. Select the "Maple Leaf Large" symbol and drag it onto your artboard. Make sure that it stays selected and add the three Drop Shadow effects shown in the following image.
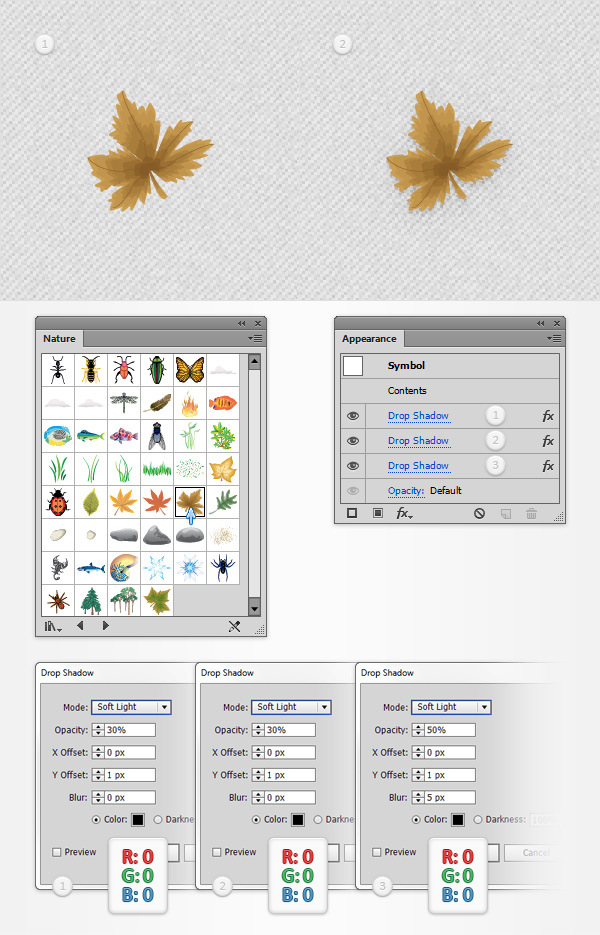
Step 43
Multiply your leaf (Control + C > Control + F) then rotate, resize and spread the copies roughly as shown in the following image. Make sure that you drag them behind the letters.
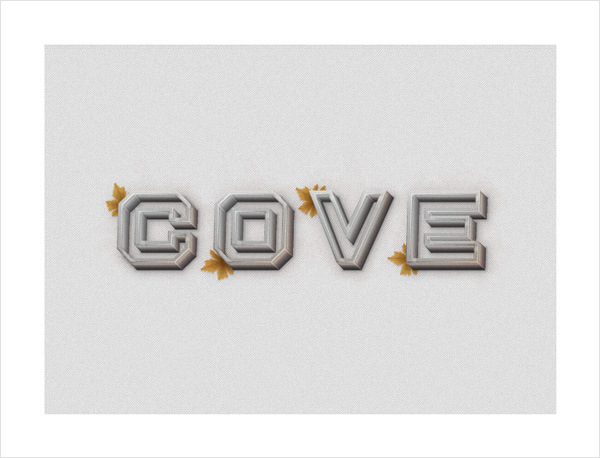
Step 44
Return to your Nature set of symbols, select the "Fly" and the "Tarantula" symbols and drag them on your artboad. Resize, rotate and spread the copies roughly as shown in the following image then add the Drop Shadow effects shown in the following image. The top ones should go for the fly and the other ones should go for the tarantula.
Step 45
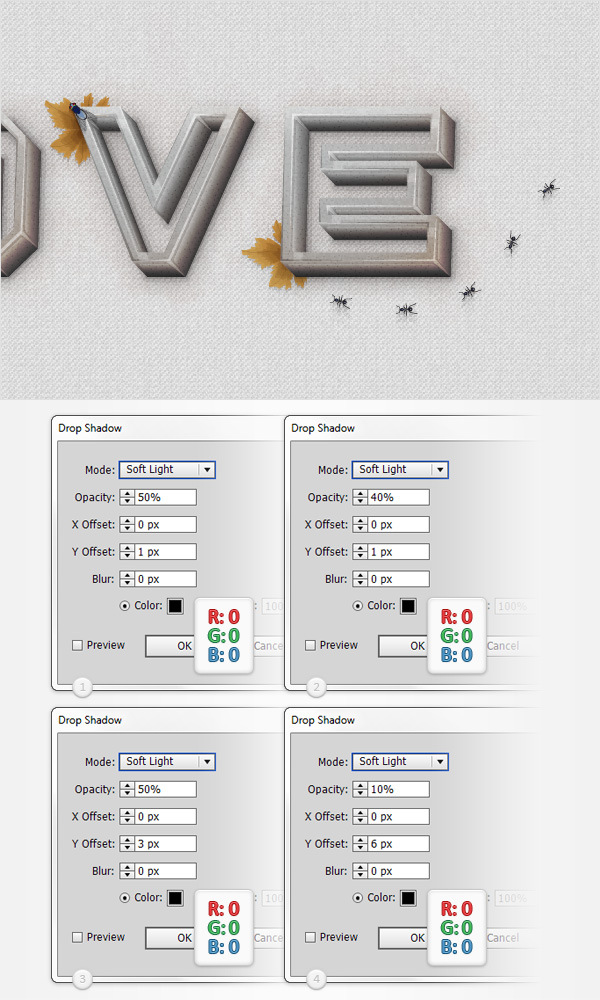
Finally, add some "Ant" symbols and place them roughly as shown in the following image. Make sure that all your ants are selected and add the four Drop Shadow effects shown in the following image.
And We’re Done!
Here is how it should look. I hope you’ve enjoyed this tutorial and can apply these techniques in your future projects.
