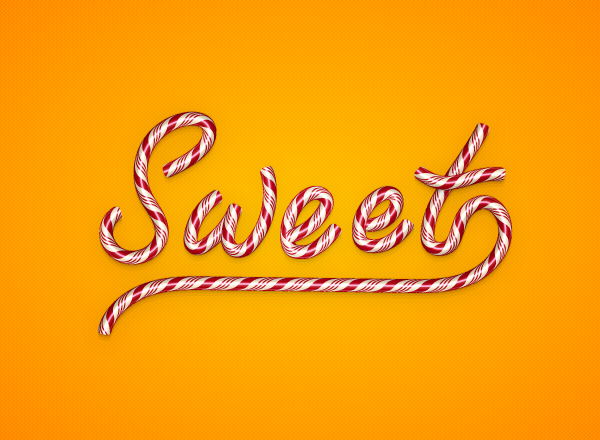
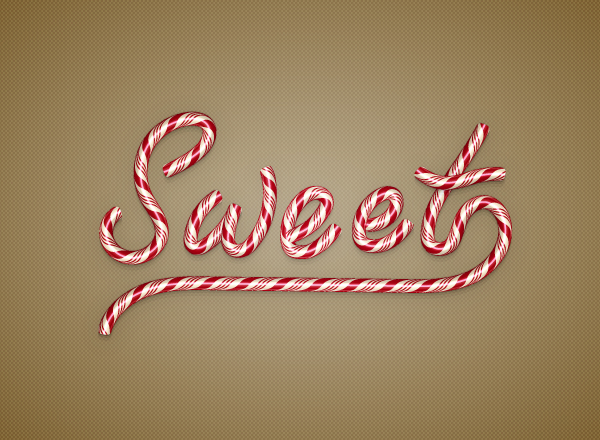
In the following Illustrator tutorial you will learn how to create a detailed candy pattern brush and how to cleverly use it to create a sweet text effect.
For starters you will learn how to set up a simple grid and how to create a bunch of simple shapes using basic tools and the Appearance panel. Next, you will learn how to save two simple patterns and how to create your own pattern brush. Finally, you will learn how easily use this pattern brush, how to add some subtle shading and highlights and how to create a simple, patterned background.
Final Image
As always, this is the final image that we’ll be creating:

Tutorial Details
- Program: Adobe Illustrator CC
- Estimated Completion Time: 1 hour 30 minutes
- Difficulty: Intermediate-Advanced
Step 1
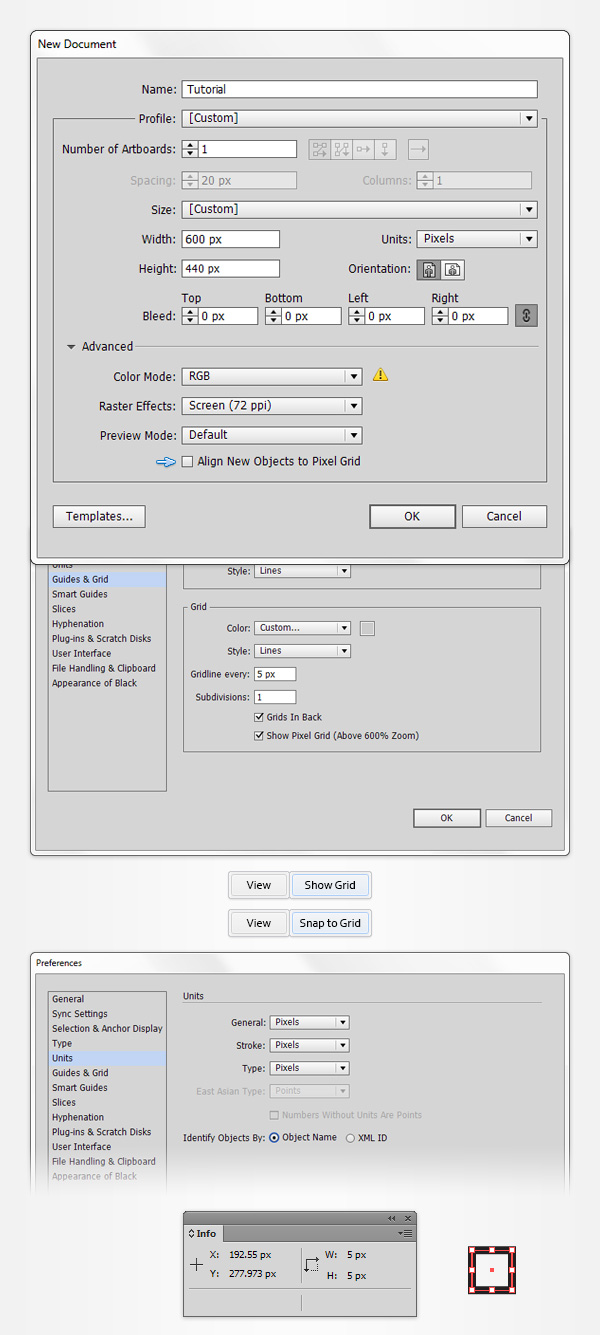
Hit Control + N to create a new document. Select Pixels from the Units drop-down menu, enter 600 in the width box and 440 in the height box then click on the Advanced button. Select RGB, Screen (72ppi) and make sure that the Align New Objects to Pixel Grid box is unchecked before you click OK.
Enable the Grid (View > Show Grid) and the Snap to Grid (View > Snap to Grid). For starters you will need a grid every 5px, so simply go to Edit > Preferences > Guides > Grid, enter 5 in the Gridline every box and 1 in the Subdivisions box. Try not to get discouraged by all that grid, it will ease your work and keep in mind that you can easily enable or disable it using the Control + “ keyboard shortcut.
You should also open the Info panel (Window > Info) for a live preview with the size and position of your shapes. Do not forget to set the unit of measurement to pixels from Edit > Preferences > Units > General. All these options will significantly increase your work speed.
Step 2
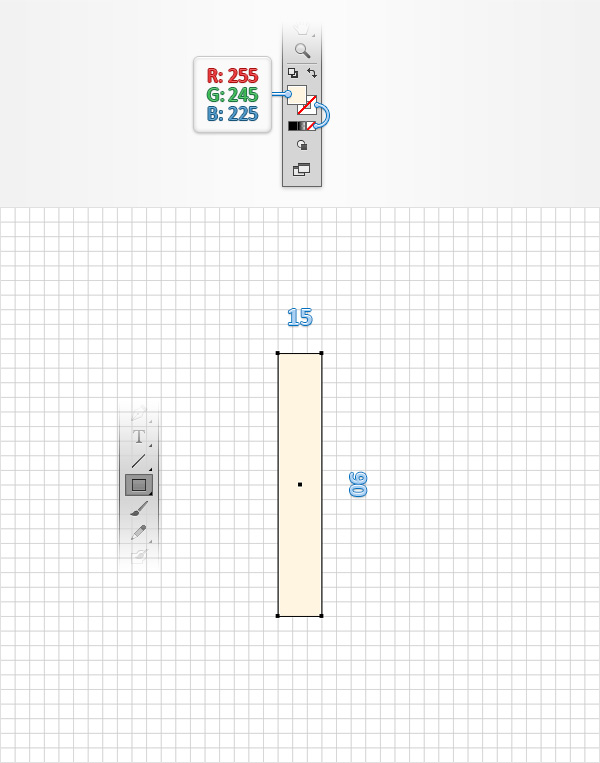
Pick the Rectangle Tool (M) and focus on your Toolbar. Remove the color from the stroke then select the fill and set its color at R=255 G=245 B=225. Move to your Artboard and simply create a 15 x 90px rectangle, the grid and the Snap to Grid feature should ease your work.
Step 3
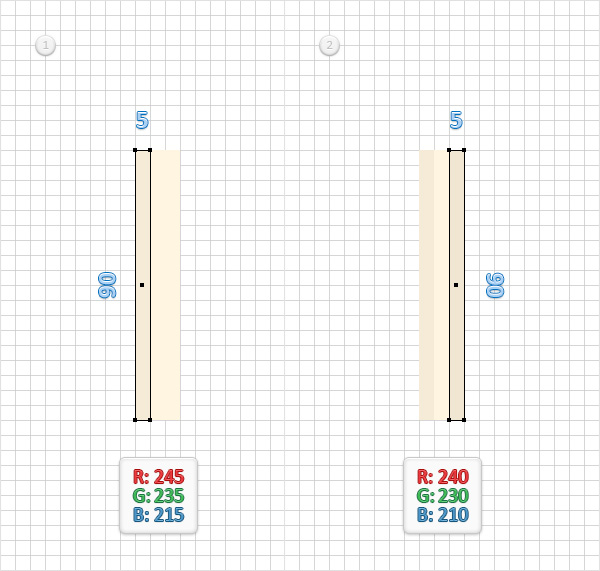
Replace the existing fill color with R=245 G=235 B=215, make sure that the Rectangle Tool (M) is still active, create a 5 x 90px shape and place it as shown in the first image. Create a second 5 x 90px shape, place it as shown in the second image and set the fill color at R=240 G=230 B=210.
Step 4
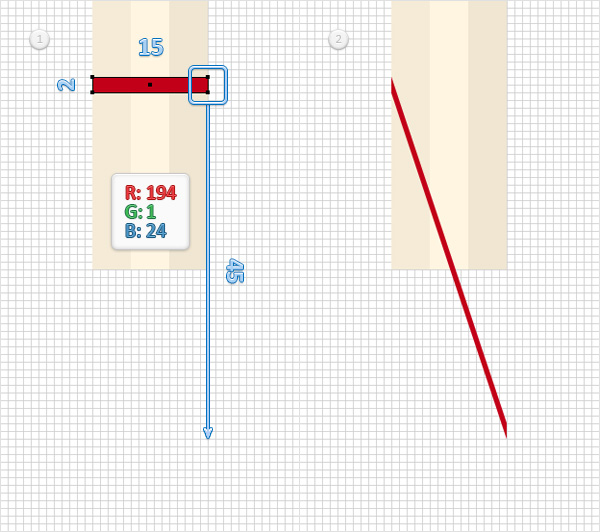
For this step you will need a grid every 1px, so go to Edit > Preferences > Guides & Grid and enter 1 in the Gridline every box. Using that same Rectangle Tool (M), create a 15 x 2px shape, set the fill color at R=194 G=1 B=24 and place it as shown in the first image. Focus on the right side of this red rectangle and switch to the Direct Selection Tool (A). Select both anchor points and drag them 45px down as shown in the second image.
Step 5
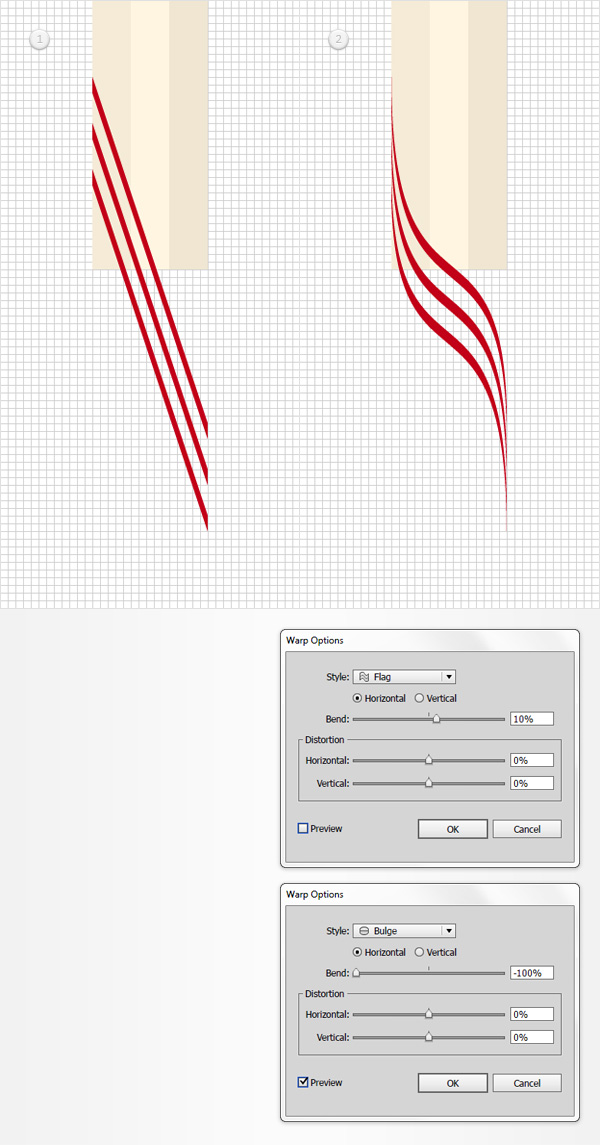
Make sure that your red shape is still selected and use the Control + C > Control + F keyboard shortcuts to duplicate it. Make two copies and place them exactly as shown in the first image, use the grid as a reference. Select all your red shapes and simply hit Control + G to Group them.
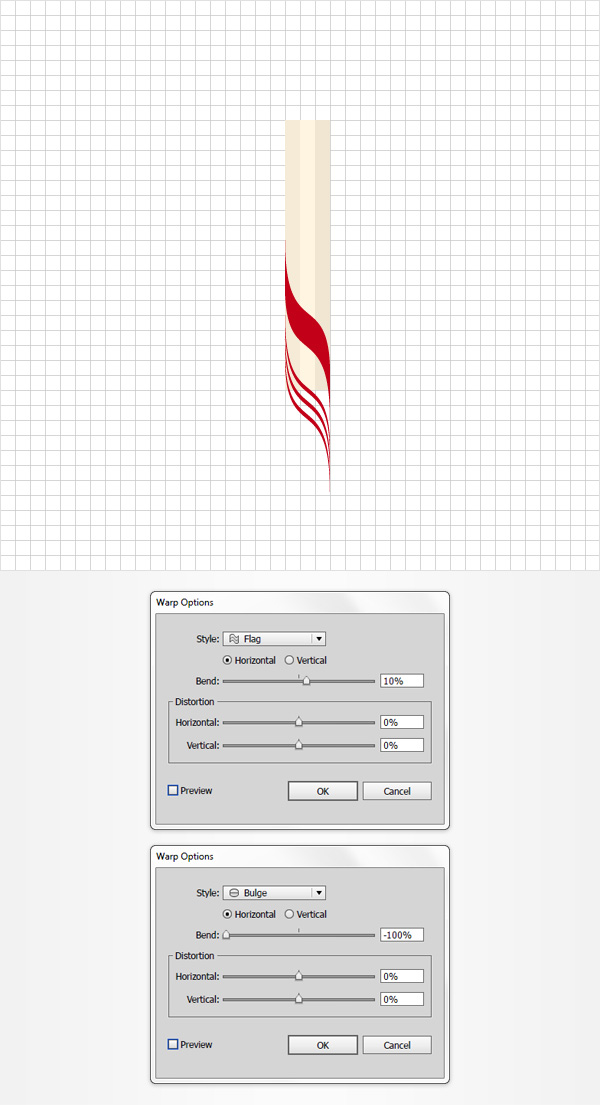
Make sure that your group stays selected and go to Effect > Warp > Flag. Enter the properties shown in the following image, click OK and go to Effect > Warp > Bulge. Enter the properties shown below and click OK.
Step 6
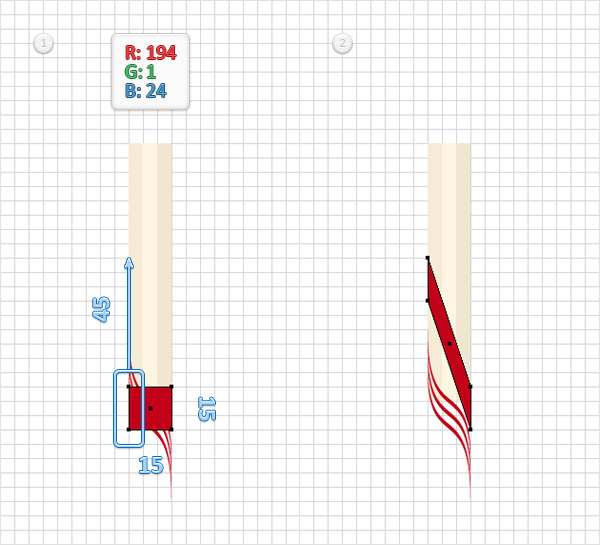
Using that same Rectangle Tool (M), create a 15px square, make sure that the fill color is set at R=194 G=1 B=24 and place it as shown in the first image. Focus on the left side of this red rectangle and switch to the Direct Selection Tool (A). Select both anchor points and drag them 45px up as shown in the second image.
Step 7
Make sure that the red shape made in the previous step is still selected and go to Effect > Warp > Flag. Enter the properties shown in the following image, click OK and go to Effect > Warp > Bulge. Enter the properties shown below and click OK.
Step 8
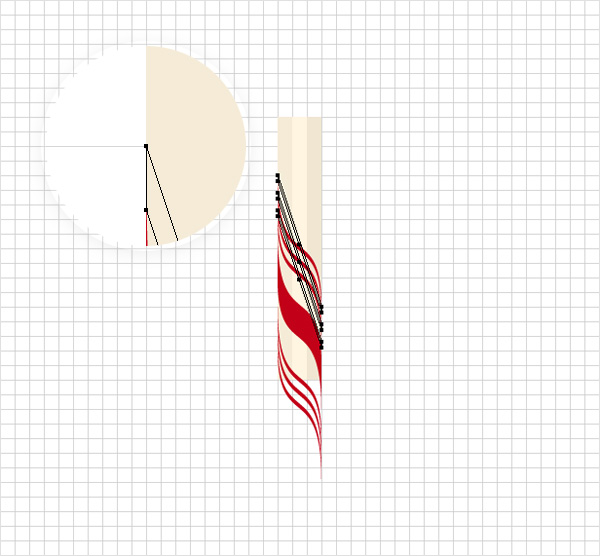
Return to gridline every 5px, so simply go to Edit > Preferences > Guides & Grid and enter 5 in the Gridline every box. Duplicate (Control + C > Control + F) your group of red shapes, select the newly made group and place it exactly as shown in the following image.
Step 9
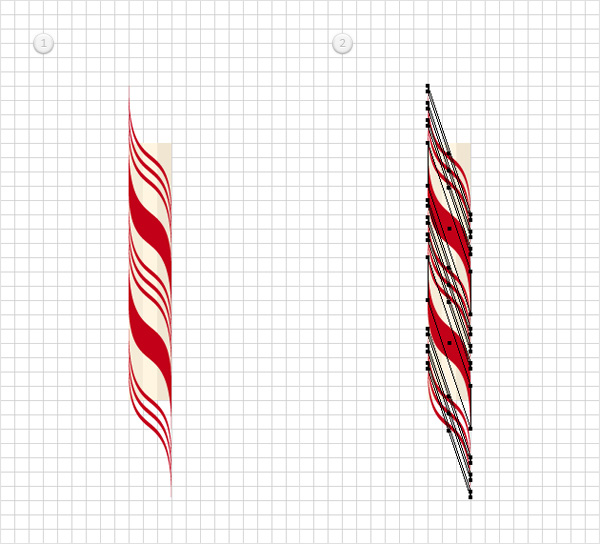
Again, duplicate your group of red shapes and that solo red shapes and then place the copies as shown in the first image. Now, select all your red shapes, go to Object > Expand Appearance and then simply hit Shift + Control + G to Ungroup the resulting group of shapes.
Step 10
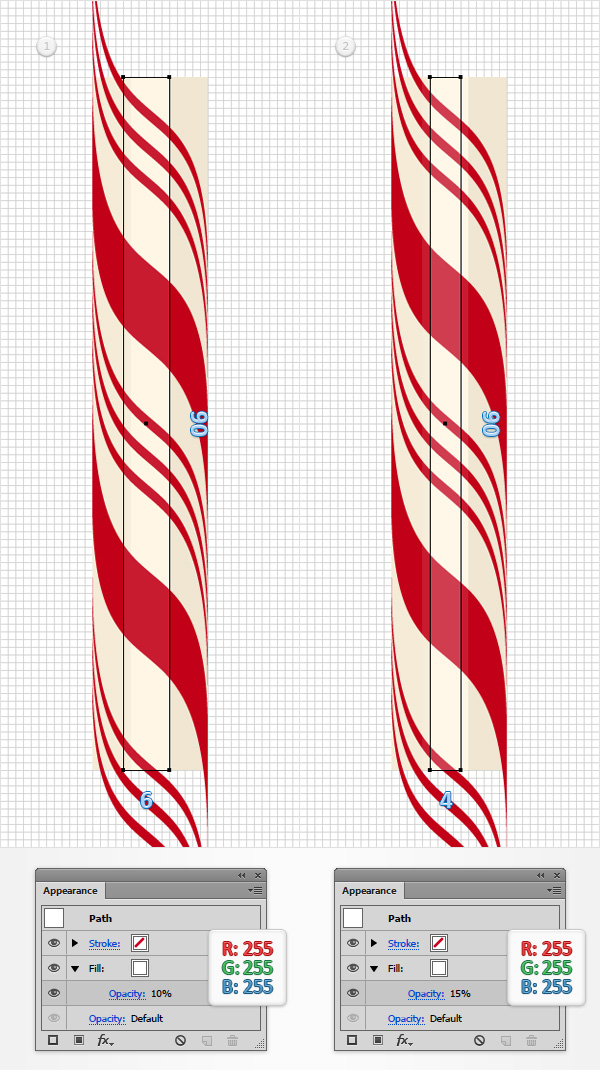
Switch to gridline every 1px, so go to Edit > Preferences > Guides & Grid and enter 1 in the Gridline every box. Pick the Rectangle Tool (M), create a 6 x 90px shape and place it as shown in the first image. Set the fill color at at white (R=255 G=255 B=255) and lower the Opacity to 10%.
Using the same tool, create a 4 x 90px shape and place it as shown in the second image. Make sure that the fill color is set at white and then lower its Opacity to 15%.
Step 11
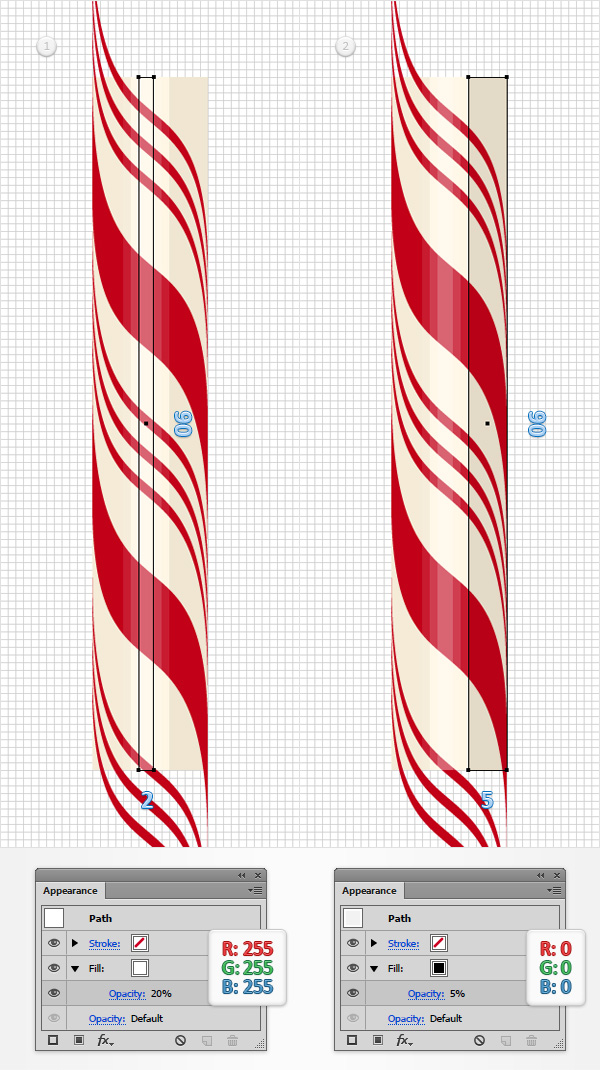
Make sure that the Rectangle Tool (M) is still active, create a 2 x 90px shape and place it as shown in the first image. Set its fill color at white and lower the Opacity to 20%. Using the same tool, create a 5 x 90px shape and place it as shown in the second image. Lower its Opacity to 5% and set the fill color at black (R=0 G=0 B=0).
Step 12
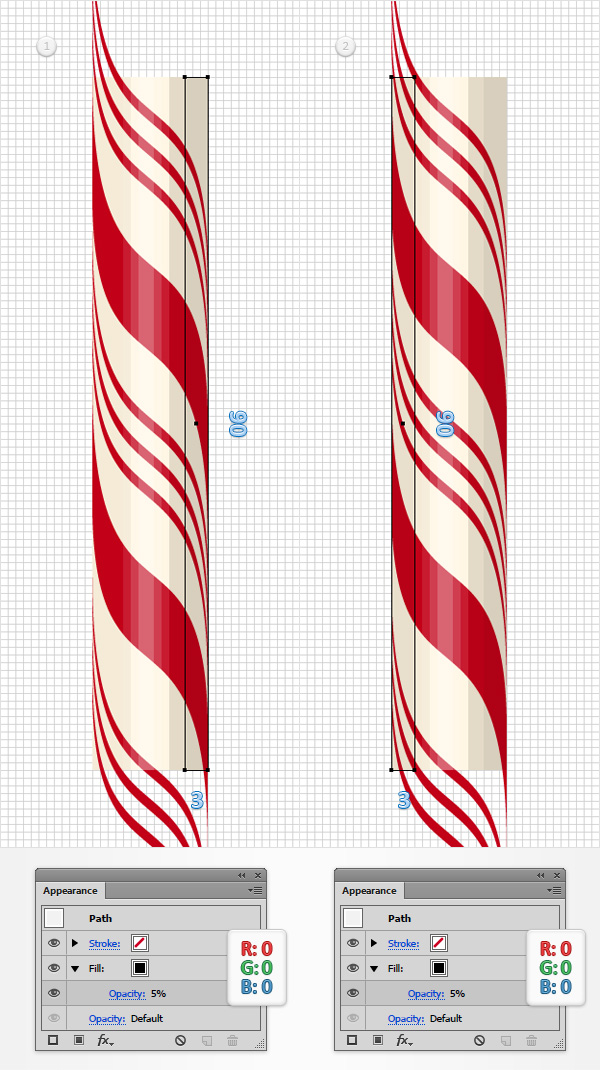
Make sure that the Rectangle Tool (M) is still active, create a 3 x 90px shape and place it as shown in the first image. Set its fill color at black and lower the Opacity to 5%. Duplicate this new rectangle, select the copy and place it as shown in the second image.
Step 13
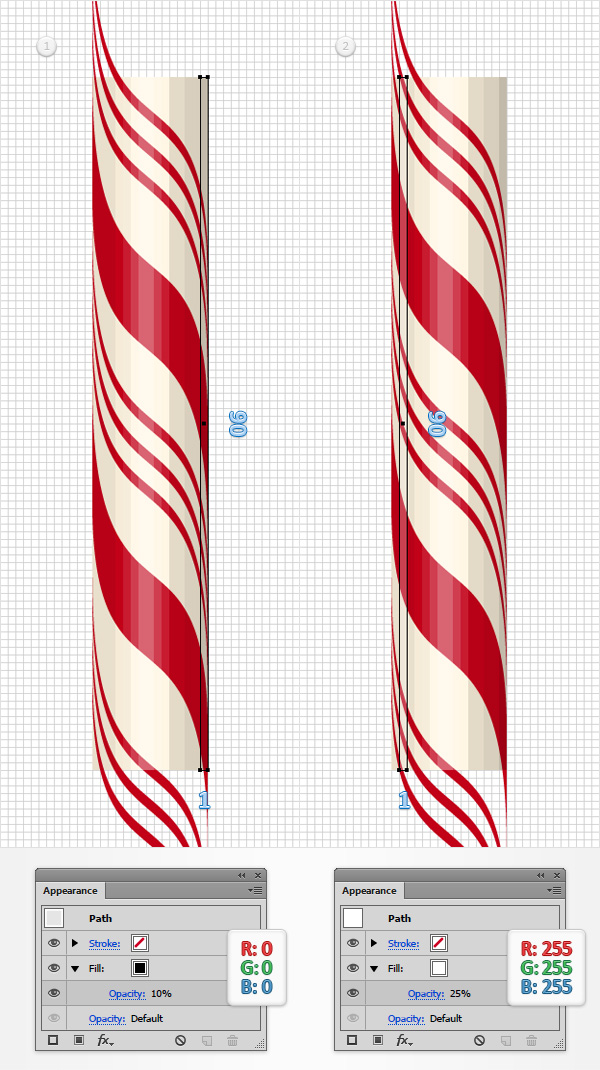
Make sure that the Rectangle Tool (M) is still active, create a 1 x 90px shape and place it as shown in the first image. Set its fill color at black and lower the Opacity to 10%. Using the same tool, create another 1 x 90px shape and place it as shown in the second image. Lower its Opacity to 25% and set the fill color at white.
Step 14
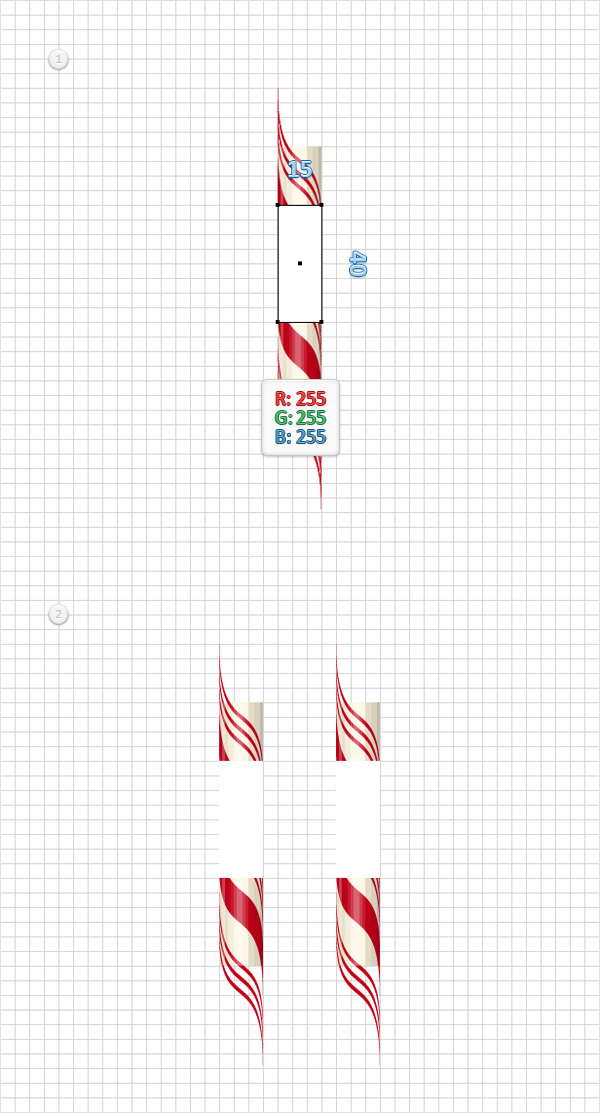
Return to gridline every 5px, so simply go to Edit > Preferences > Guides & Grid and enter 5 in the Gridline every box. Using the Rectangle Tool (M), create a 15 x 40px shape, set the fill color at white and place it as shown in the following image. Duplicate all the shapes made so far, select the copies and drag them to the right as shown in the second image.
Step 15
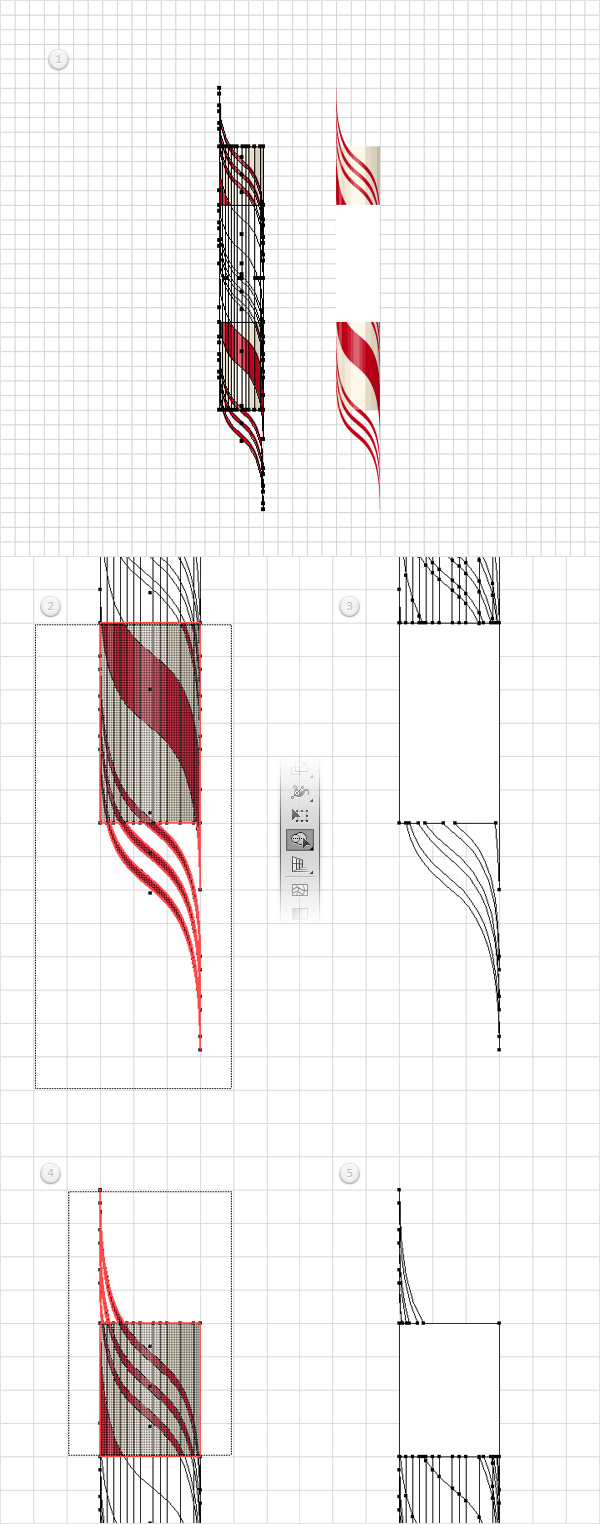
Focus on your left set of shapes and pick the Shape Builder Tool (Shift + M). Hold the Shift button from your keyboard then simply drag a selection along the bottom side of your shapes as shown in the second image. You might have to repeat this technique once or twice to make sure that you get rid of the really tiny shapes. Just make sure that you don’t drag that selection over the edge of your white rectangle.
Move to the top side of your shapes and repeat this technique. Take a closer look at the edge, it’s very important to make sure that you get rid of the really tiny shapes.
Step 16
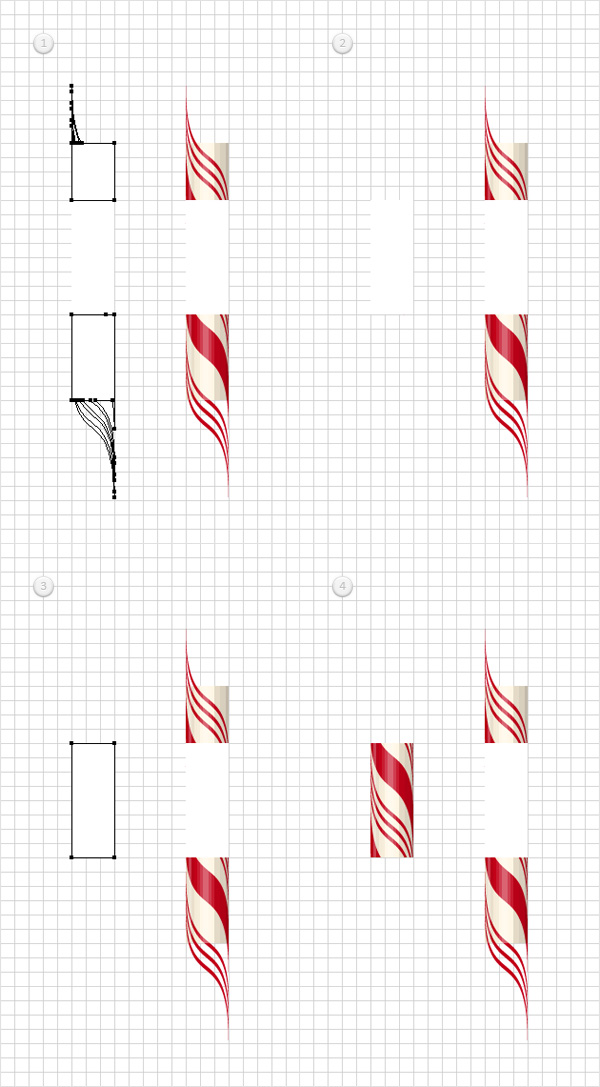
Using the Selection Tool (V), select the white shapes highlighted in the first image and simply hit the Delete button from your keyboard to get rid of them. Switch to the Direct Selection Tool (A), select the remaining white shape (highlighted in the third image) and remove it using that same Delete button. In the end things should look like in the following image.
Step 17
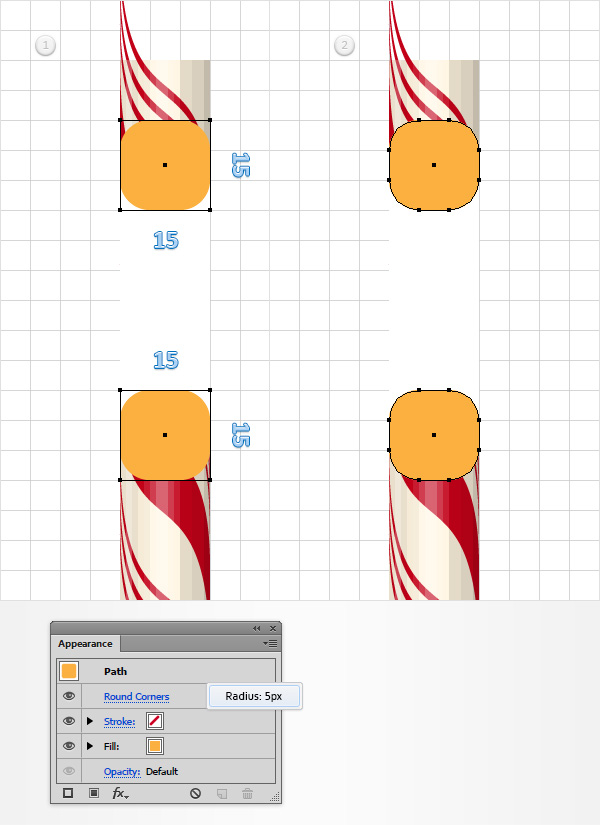
Focus on the right set of shapes. Using the Rectangle Tool (M), create two, 15px squares and place them as shown in the first image. Make sure that that these new shapes remain selected, pick a random orange for the fill color and go to Effect > Stylize > Rounder Corners. Enter a 5px Radius, click OK and then go to Object > Expand Appearance.
Finally, turn these orange shapes into a simply compound path using the Control + 8 keyboard shortcut.
Step 18
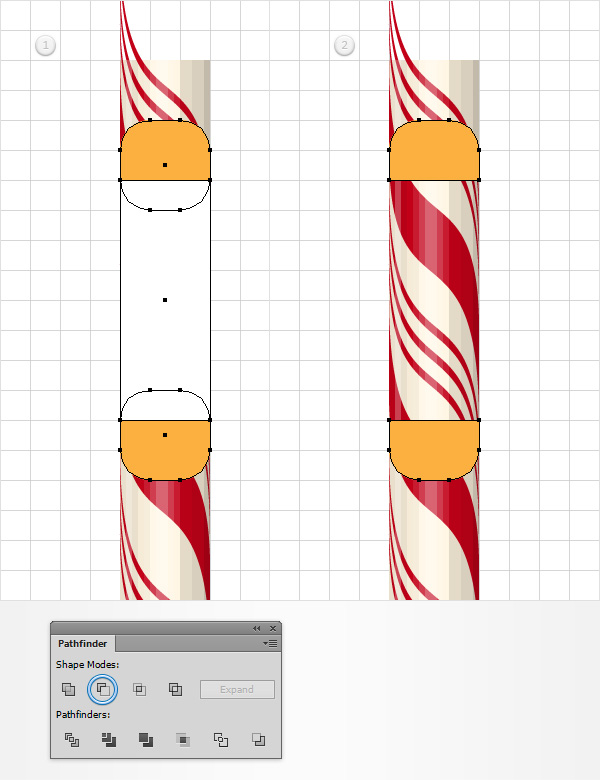
Select your white rectangle and simply hit Shift + Control + ] to bring it to front. Now, reselect this shape along with the orange compound path made in the previous step and click the Minus Front button from the Pathfinder panel.
Step 19
Select all the shapes that make up your right set of shapes, pick that Shape Builder Tool (Shift + M) and cut your selected shapes as shown in the following image. Again, make sure that you’re not missing the tiny shapes.
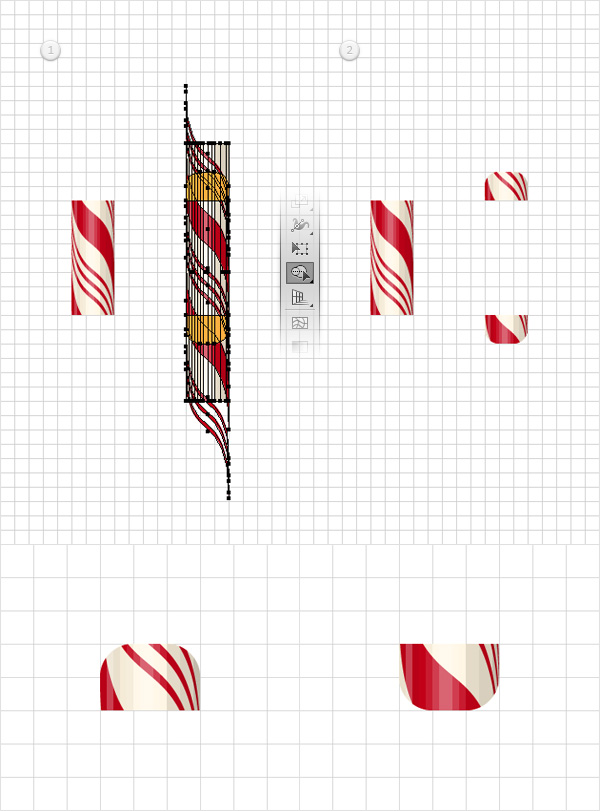
Step 20
Focus on the shapes made so far and move them as shown in the first image. Select all these path and go to Object > Transform > Rotate. Enter a -90 degrees angle and simply click OK.
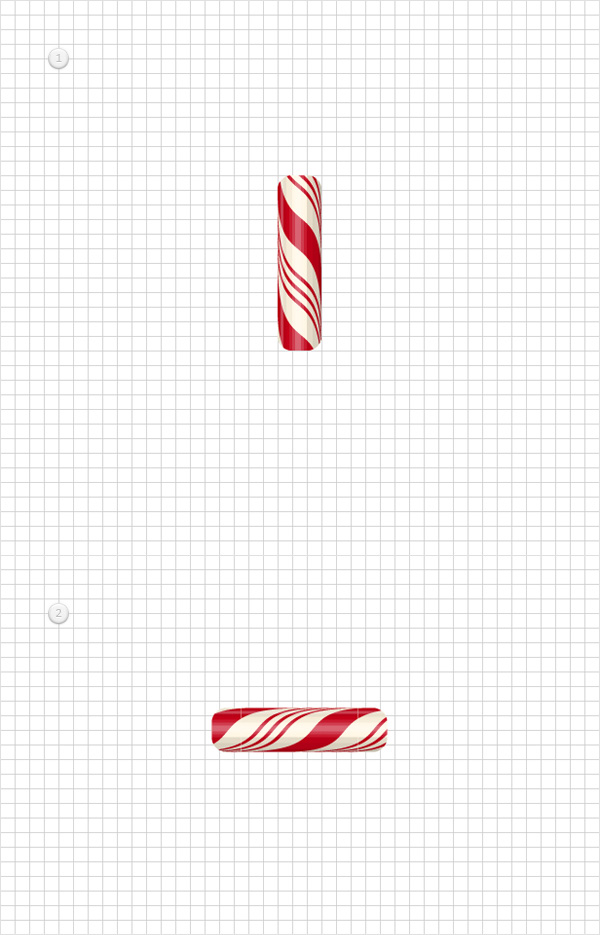
Step 21
Select the shapes that make up the left end of your candy (highlighted in the following image) and simply drag them inside the Swatches panel to save them as a simply pattern. Double click on this new pattern, rename it “startTile” and then make sure that you hit that Cancel button.
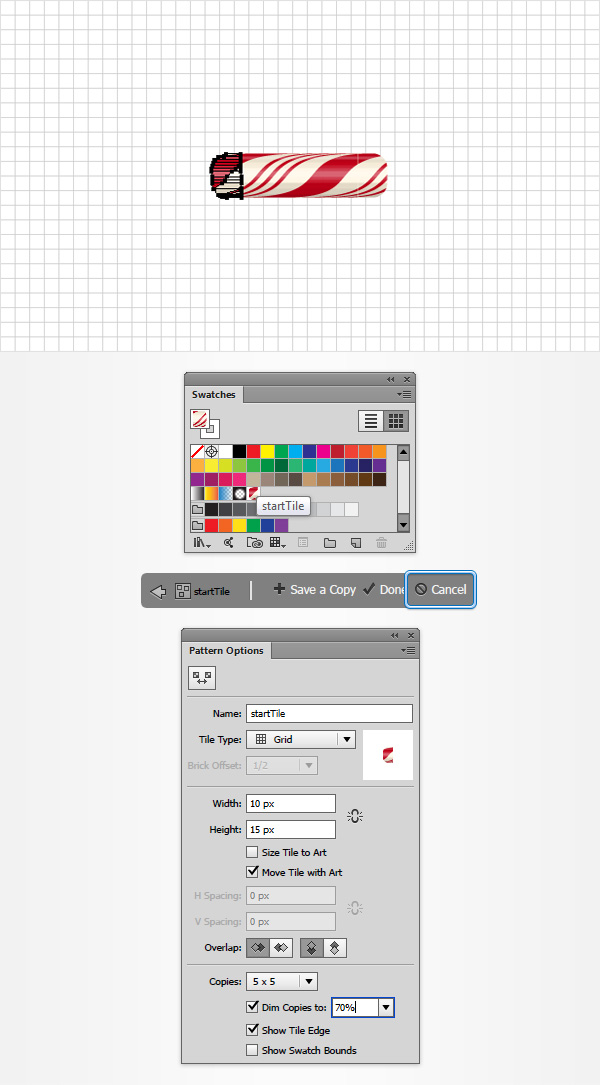
Step 22
Select the shapes that make up the right end of your candy (highlighted in the following image) and save them as a new pattern. Double click on this second pattern, rename it “endTile” and then make sure that you hit that Cancel button.
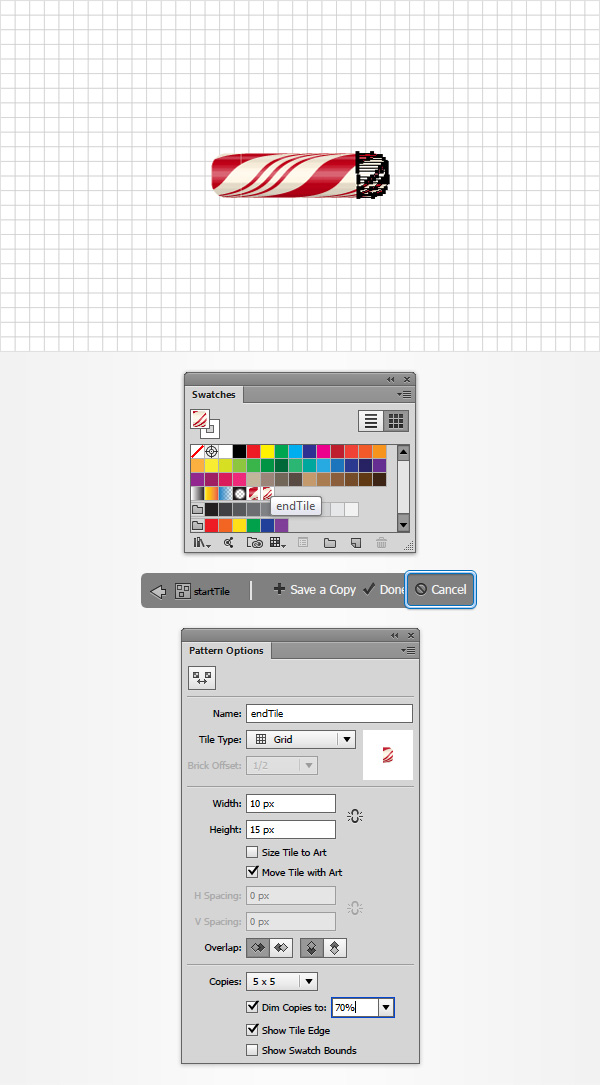
Step 23
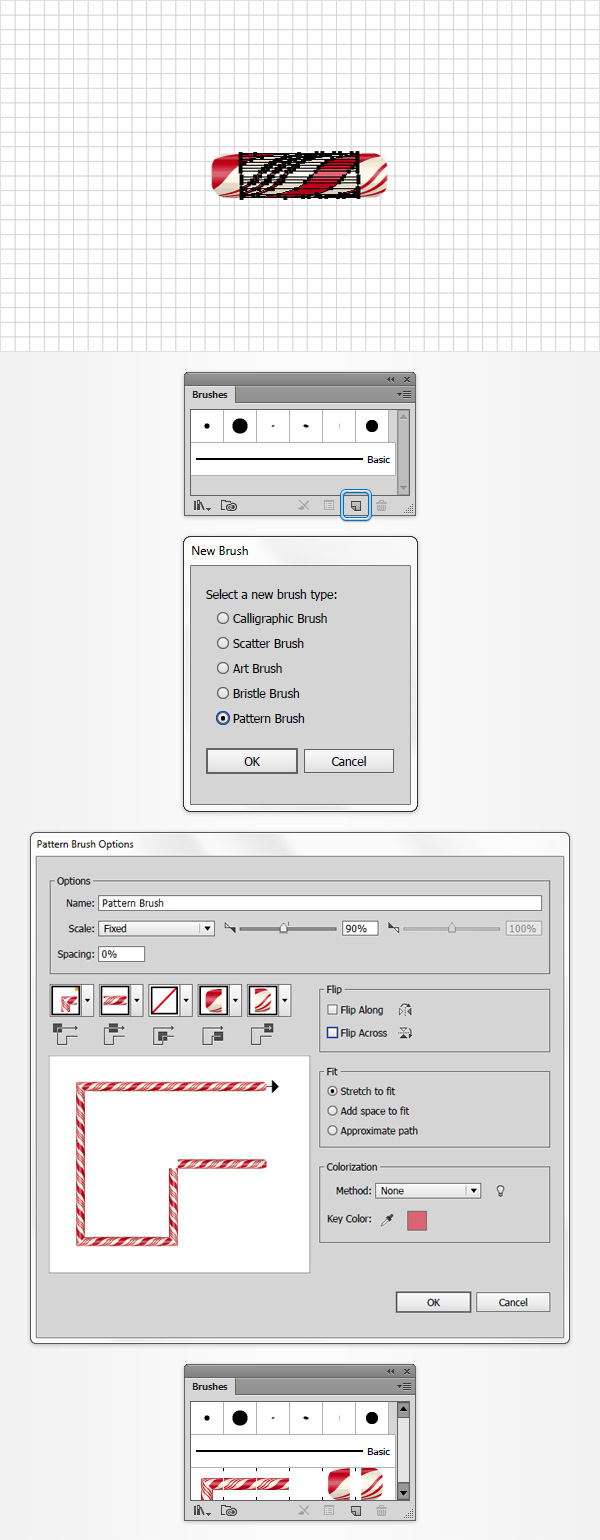
Select the shapes that make up the body of your candy (highlighted in the following image) and click the New Brush button from the Brushes panel. Check the Pattern Brush box then click OK to open the Pattern Brush Options window. Pick a name for your brush, drag the Scale slider at 90% then move down to the Tile boxes.
Open the Start Tile drop down window and add the “startTile” pattern from that list then open the End Tile drop down window and add the “endTile” pattern. Finally, click OK and you should find your new pattern brush inside the Brushes panel.
Step 24
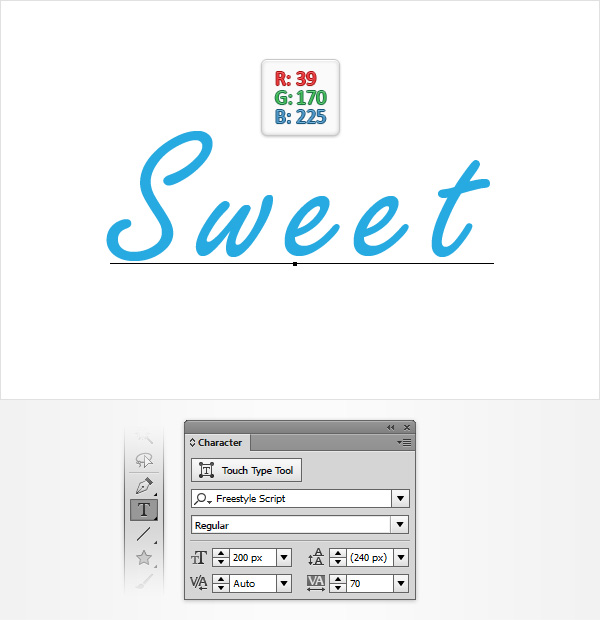
Pick the Type Tool (T), simply click on your artboard and add your blue (R=39 G=170 B=225) piece of text. Make sure that it stays selected and open the Character panel. Use the Freestyle Script font then set the size at 200pt. Move to the Layers panel and simply lock this piece of text to make sure that you won’t accidentally select/move it.
Step 25
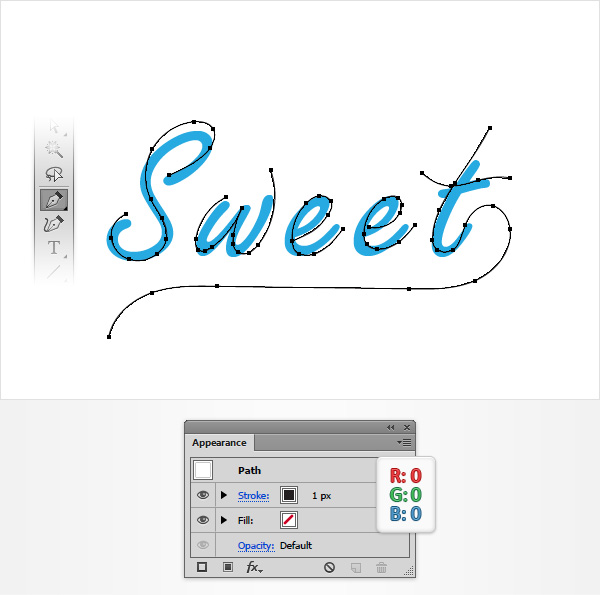
Using the Pen Tool (P) (or the Brush Tool (B)), draw some smooth paths as shown below and try to use the text that lies in the back as a rough reference.
Step 26
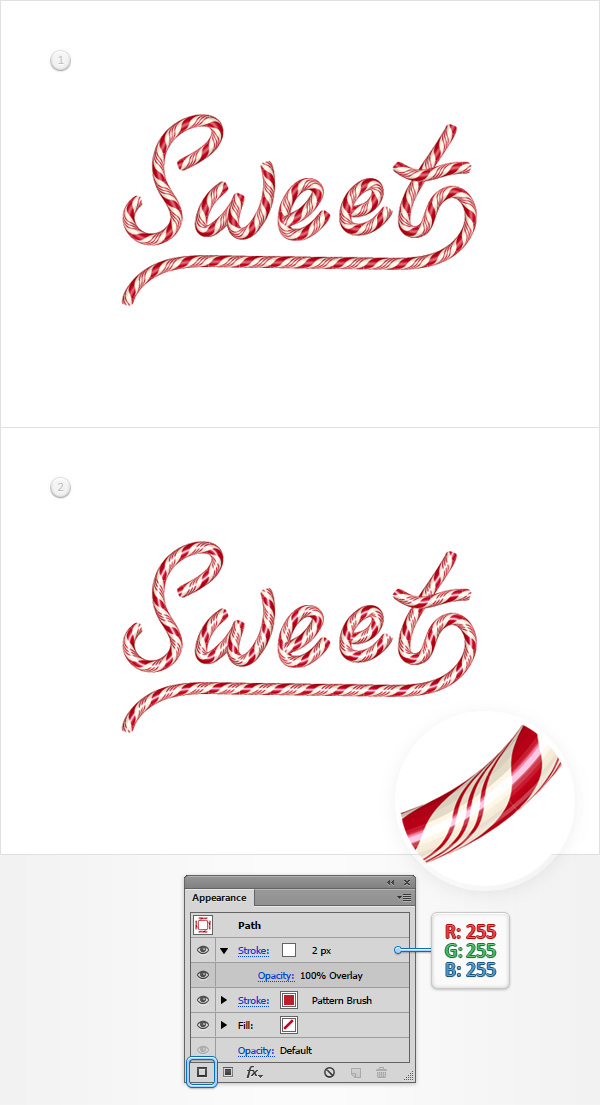
Return to the Layers panel and get rid of your blue piece of text. Now, select those smooth paths and simply replace the existing stroke with your pattern brush from the Brushes panel. Make sure that all your paths remain selected, focus on the Appearance panel and add a second Stroke using the Add New Stroke button. Select this new stroke, set the color at white, make it 2px wide and change the Blending Mode to Overlay.
Step 27
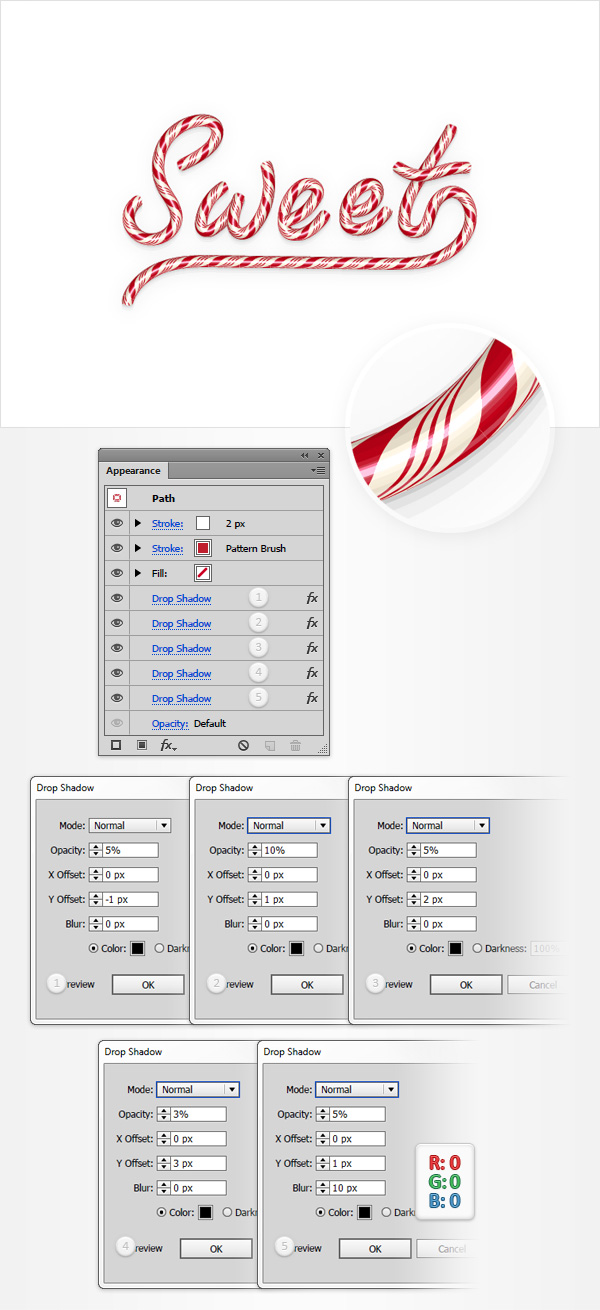
Reselect all your paths, focus on the Appearance panel, make sure that your entire path is selected (simply click on that “Path” piece of text from the top of the panel) and go to Effect > Stylize > Drop Shadow. Enter the properties shown in the top, left window (in the following image), click OK and then add the other four Drop Shadow effects shown in the following image.
Step 28
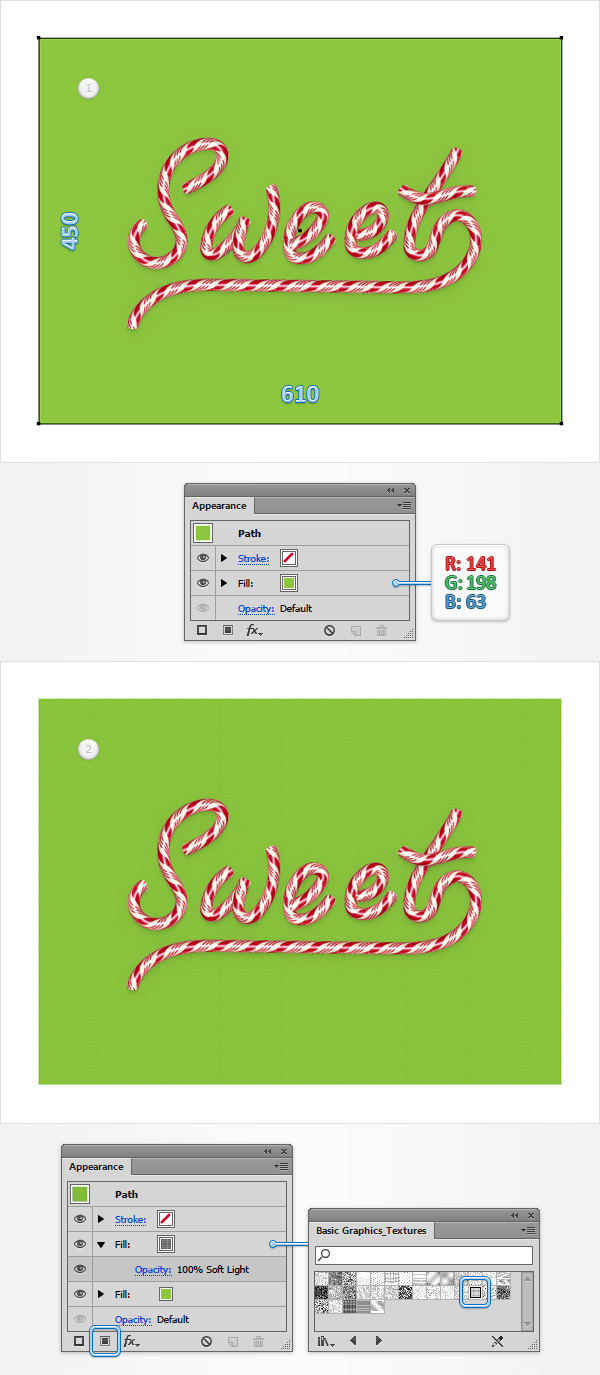
Using the Rectangle Tool (M), create a 610 x 450px shape, make sure that it covers your entire artboard, send it to back and set the fill color at R=141 G=198 B=63. Make sure that this new rectangles stays selected, focus on the Appearance panel and add a second Fill using the Add New Fill button.
You will need a built-in pattern for this final fill, so go to the Swatches panel, open the fly-out menu and go to Open Swatch Library > Patterns > Basic Graphics > Basic Graphics_Textures. A new window with a set of built-in patterns should open. Return to the Appearance panel, make sure that the second fill is still selected, add the “USGS 19 Land Inundation” pattern, and change the blending mode to Soft Light.
Step 29
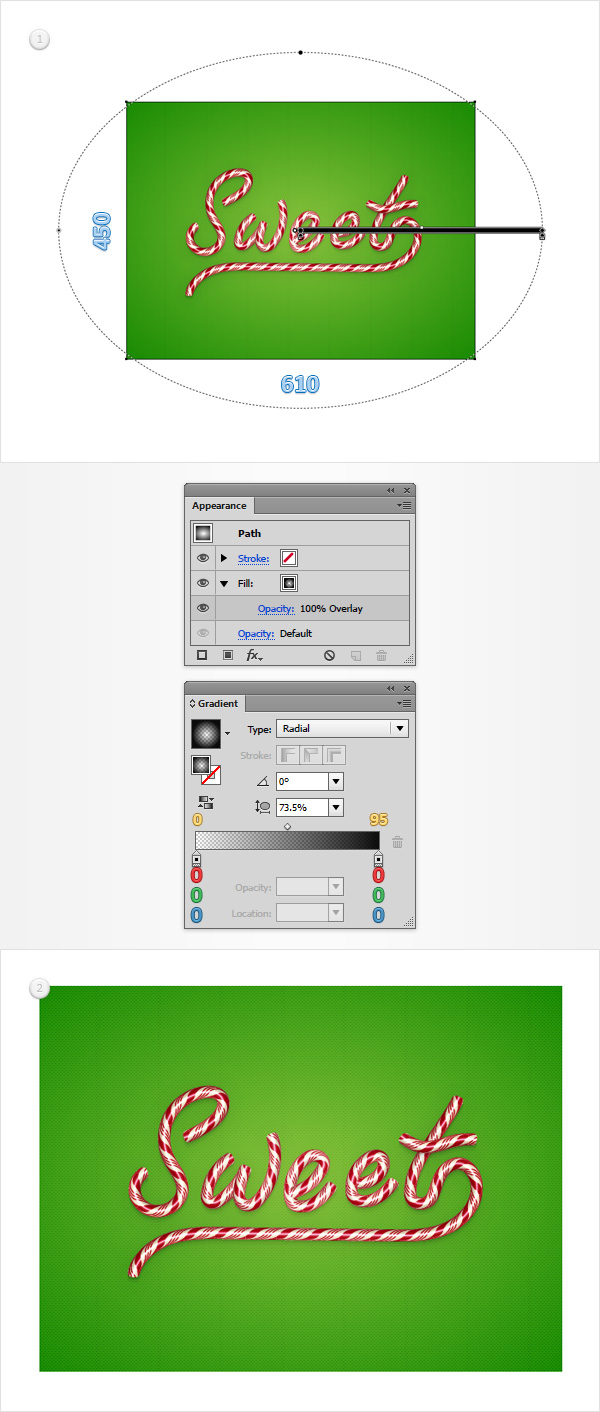
Using the Rectangle Tool (M), create a new 610 x 450px shape, make sure that it covers your entire artboard, fill it with the radial gradient shown below and change the Blending Mode to Overlay.
Step 30
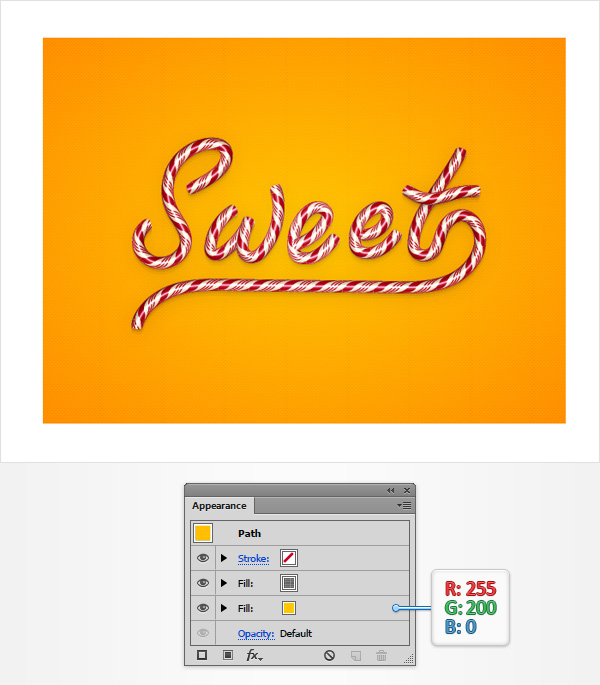
Finally, feel free to use a different color for your background. Focus on the Layers panel, select that green rectangle, move to the Appearance panel and simply replace that green with the color that you prefer.
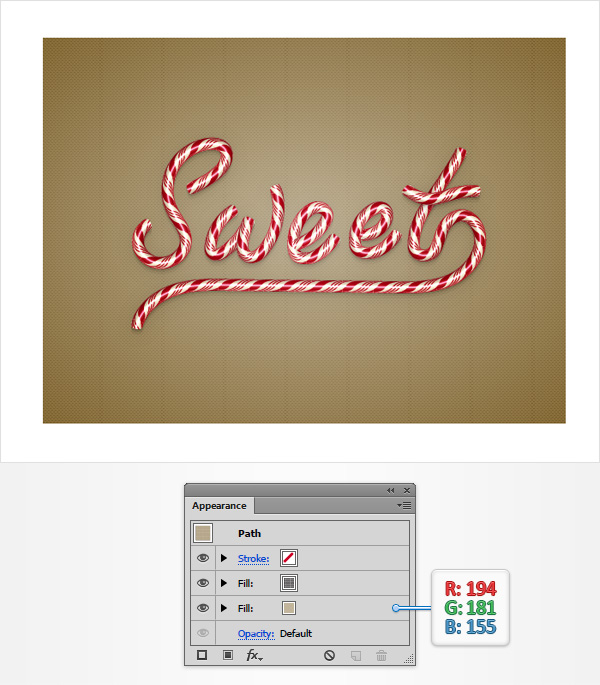
And We’re Done!
Here is how it should look. I hope you’ve enjoyed this tutorial and can apply these techniques in your future projects.
