In the following tutorial you will learn how to create the simple Google Chrome icon in Adobe Illustrator.
Final Image
As always, this is the final image that we’ll be creating:

Tutorial Details
- Program: Adobe Illustrator CS5
- Estimated Completion Time: 1 hour 30 minutes
- Difficulty: Intermediate
Step 1
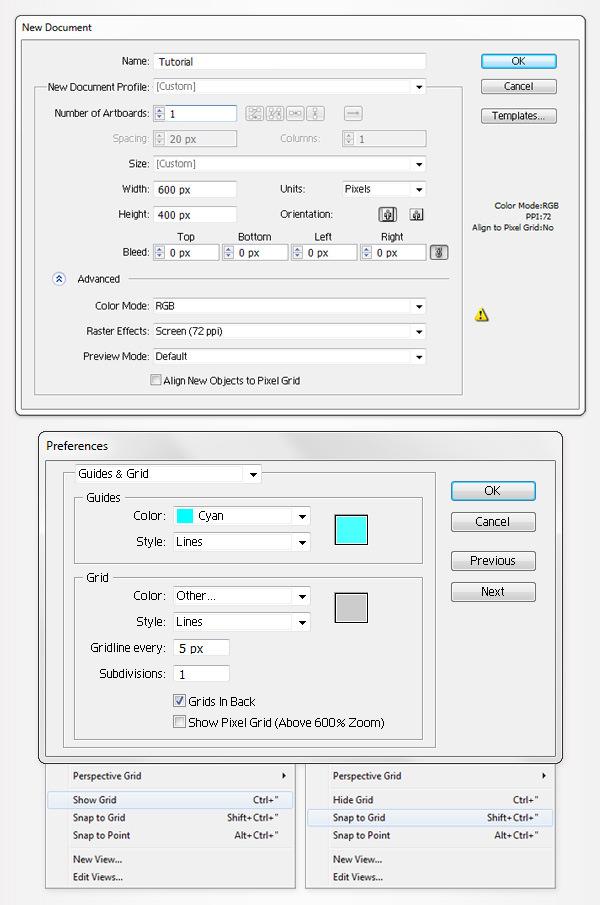
Hit Control + N to create a new document. Enter 600 in the width box and 400 in the height box then click on the Advanced button. Select RGB, Screen (72ppi) and make sure that the "Align New Objects to Pixel Grid" box is unchecked before your click OK. Now, turn on the Grid (View > Grid) and the Snap to Grid (View > Snap to Grid). Next, you’ll need a grid every 5px. Go to Edit > Preferences > Guides & Grid, enter 5 in the Gridline every box and 1 in the Subdivisions box. You can also open the Info panel (Window > Info) for a live preview with the size and position of your shapes. Do not forget to set the unit of measurement to pixels from Edit > Preferences > Unit > General. Al these options will significantly increase your work speed.
Step 2
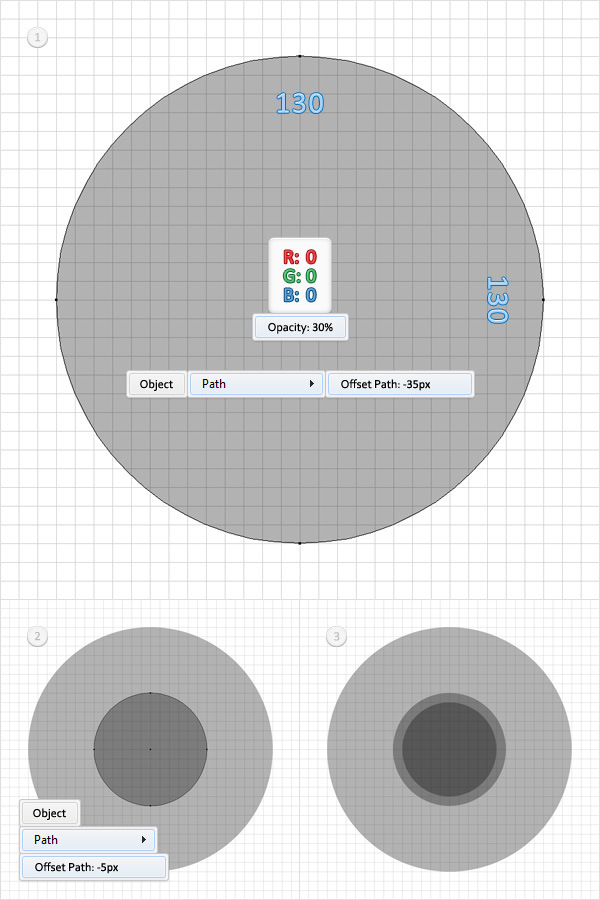
Start with the Ellipse Tool(L). Create a 130px circle, fill it with black, lower its opacity to 30% and make sure that there’s no color set for the stroke. Select this new shape and go to Object > Path > Offset Path. Enter a -35px Offset and click OK. Select the resulting shape and go again to Object > Path > Offset Path. This time enter a -5px Offset and click OK. In the end you should have three concentric circle in your Layers panel (Window > Layers).
Step 3
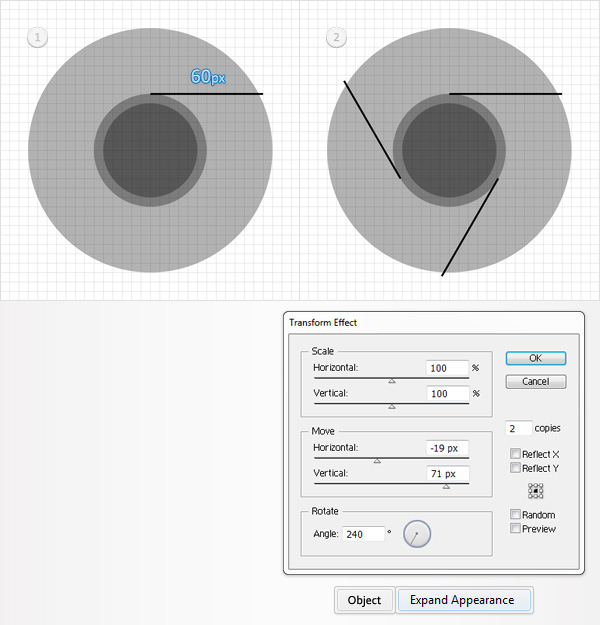
Pick the Pen Tool(P) and draw a 60px, horizontal path. Select it, add a 1pt, black stroke and place it as shown in the following image. Make sure that this horizontal path is still selected and go to Effect > Distort&Transform > Transform. Enter the data shown below, click OK and go to Object > Expand Appearance.
Step 4
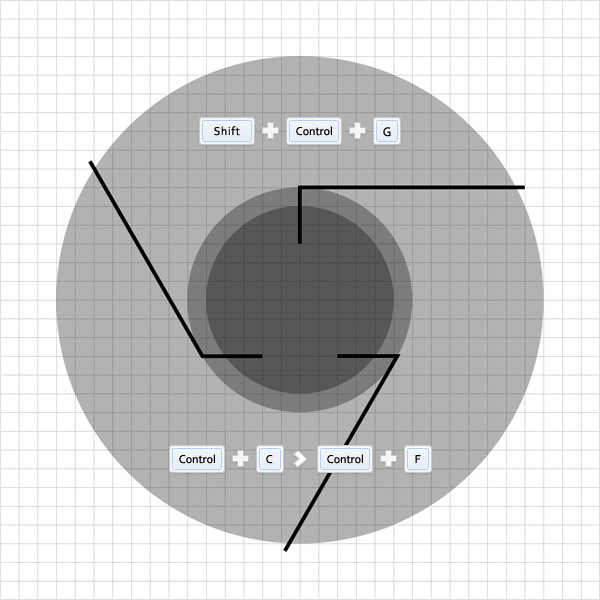
Move to the Layers panel and you will find a new group with the three simple paths created in the previous step. Select it and hit Shift + Control + G twice to get rid of all those groups/subgroups. Now, pick the Pen Tool and focus on the top, horizontal path. Simply click on the left anchor point (to reconnect with the path) and continue drawing a 15px vertical path. Make sure that the Pen Tool(P) is still selected, focus on the two oblique paths and add some extra paths as shown below. The Snap to Grid will ease your work. In the end your three paths should look like in the following image. Select them and make a copy in front (Control + C > Control + F).
Step 5
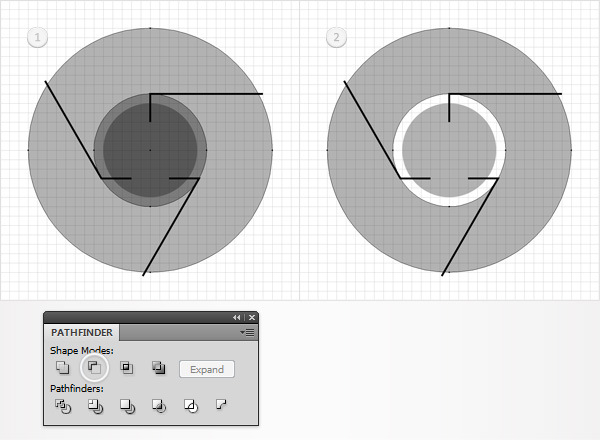
Select the first two circles created in the second step, open the Pathfinder panel (Window > Pathfinder) and click on the Minus Front button. The resulting compound path should look like in the second image.
Step 6
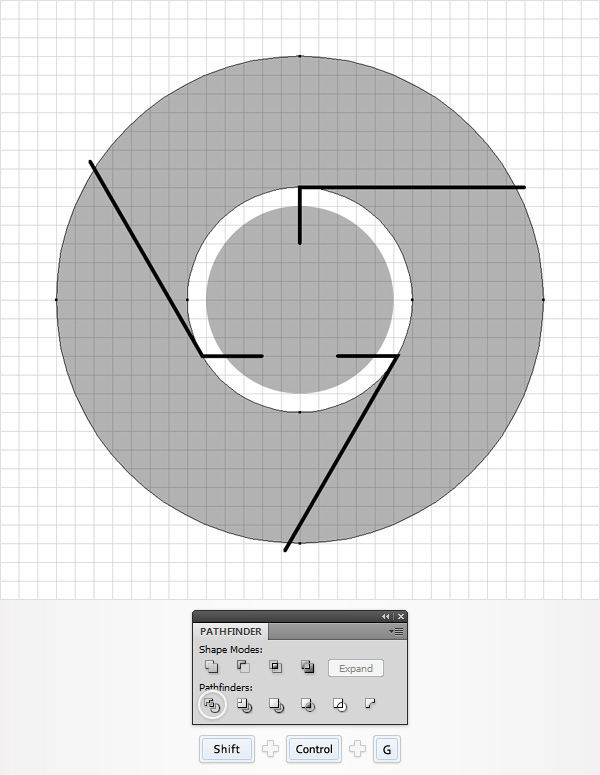
Reselect the three copies created in the end of the fourth step along with the compound path made in the previous step and click on the Divide button from the Pathfinder panel. Move to the Layers panel and you will find a group with four new shapes. Open it, delete the bottom shape (the one with no color set for fill) then ungroup the remaining three shapes (Shift + Control + G).
Step 7
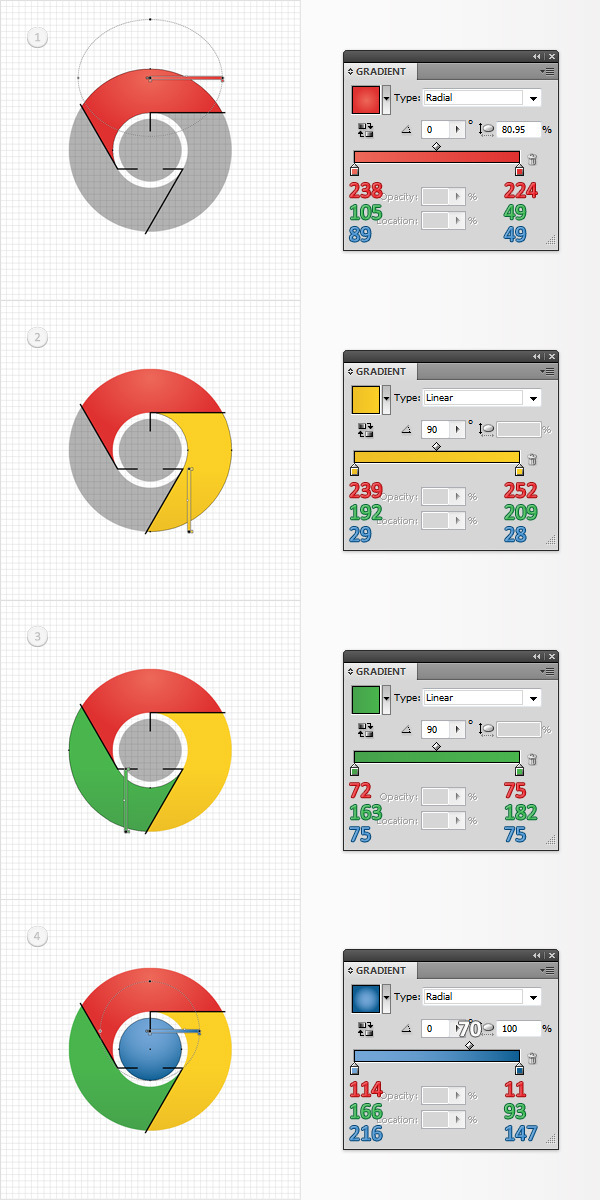
Next, you need to add some color for the three shapes created in the previous step. Select them on by one and fill them with the gradient shown below. Also, select the remaining circle and fill it with the radial gradient shown in the final image. The white number (70) from the final gradient image stands for location percentage. This means that you need to select that little diamond icon from the gradient slider and set its location at 70%.
Step 8
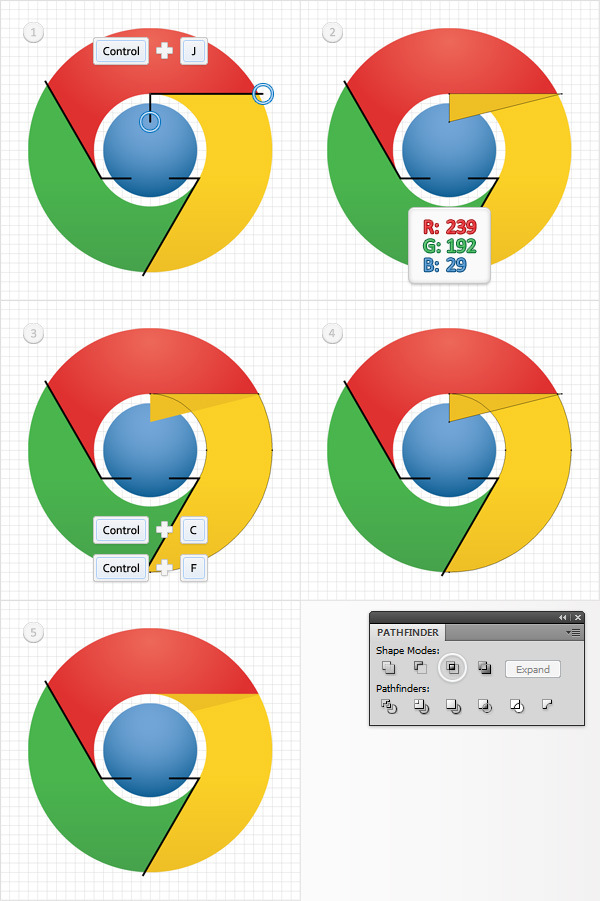
Focus on the top, right path with the black stroke. Pick the Direct Selection Tool(A), select the two anchor points circled in the first image and hit Control + J to close your path. Select it, remove the color from the stroke and fill it with R=239 G=192 B=29. Reselect the yellow shape edited in the previous step and make a copy in front (Control + C > Control + F). Select this copy along with the other yellow shape created in the beginning of this step and click on the Intersect button from the Pathfinder panel. In the end your shape should look like in the fifth image.
Step 9
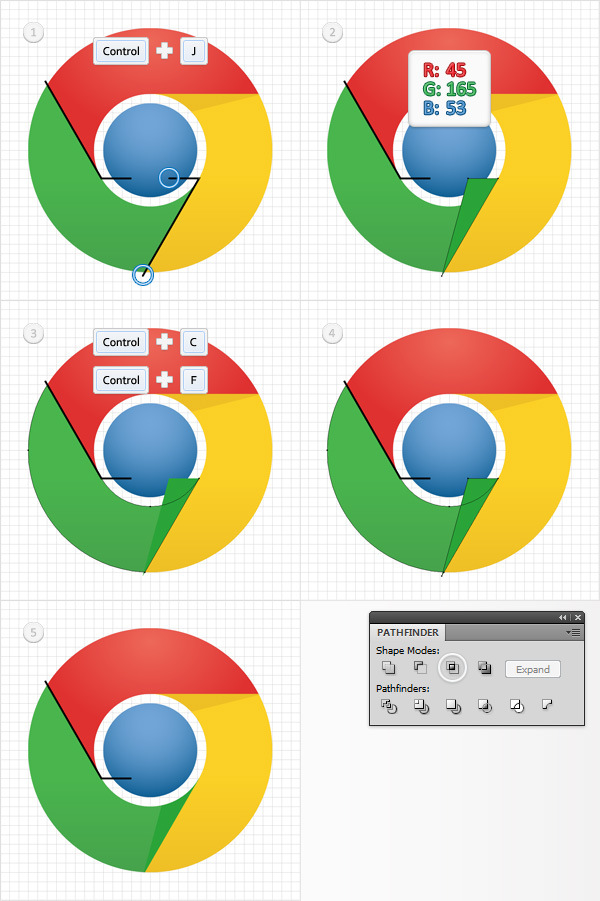
Focus on the bottom path with the black stroke. Pick the Direct Selection Tool(A), select the two anchor points circled in the first image and hit Control + J to close your path. Select it, remove the color from the stroke and fill it with R=45 G=165 B=53. Reselect the green shape edited in the seventh step and make a copy in front (Control + C > Control + F). Select this copy along with the other green shape created in the beginning of this step and click on the Intersect button from the Pathfinder panel. In the end your shape should look like in the fifth image.
Step 10
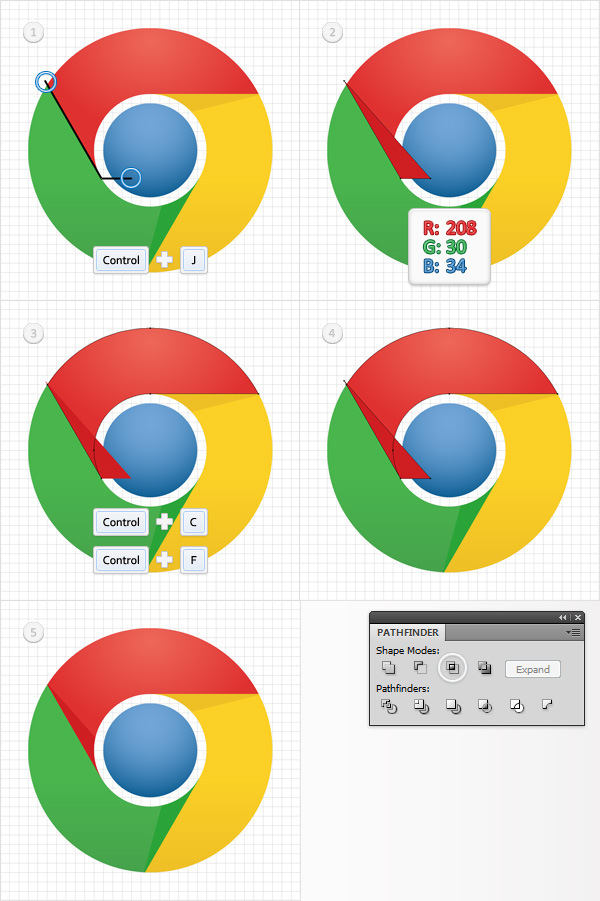
Focus on the remaining path with the black stroke. Pick the Direct Selection Tool(A), select the two anchor points circled in the first image and hit Control + J to close your path. Select it, remove the color from the stroke and fill it with R=208 G=30 B=34. Reselect the red shape edited in the seventh step and make a copy in front (Control + C > Control + F). Select this copy along with the other red shape created in the beginning of this step and click on the Intersect button from the Pathfinder panel. In the end your shape should look like in the fifth image.
Step 11
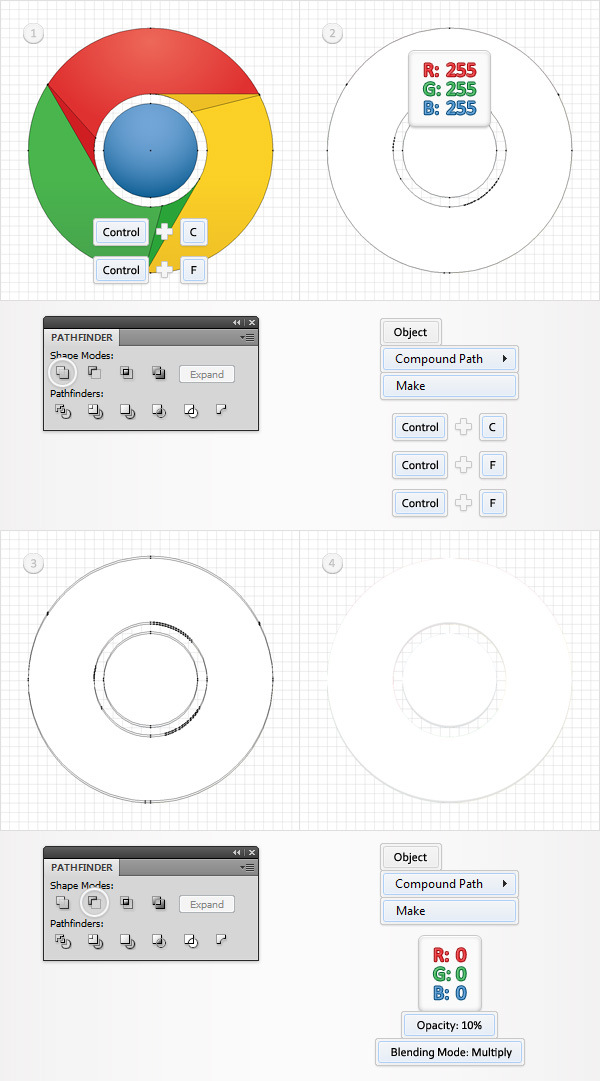
Disable the Snap to Grid (View > Snap to Grid) then go to Edit > Preferences > General and make sure that the Keyboard Increment is set at 1px. Select all the shapes created so far and duplicate them (Control + C > Control + F). Select these copies and click on the Unite button from the Pathfinder panel. Fill the resulting shapes with white and turn them into a compound path (Object > Compound Path > Make). Select it and make two copies in front (Control + C > Control + F > Control + F). Select the top copy and hit the up arrow once to move it 1px up. Reselect both copies and click on the Minus Front button from the Pathfinder panel. Select the resulting group of shapes and turn it into a compound path (Object > Compound Path > Make). Fill it with black, lower its opacity to 10% and change the blending mode to Multiply.
Step 12
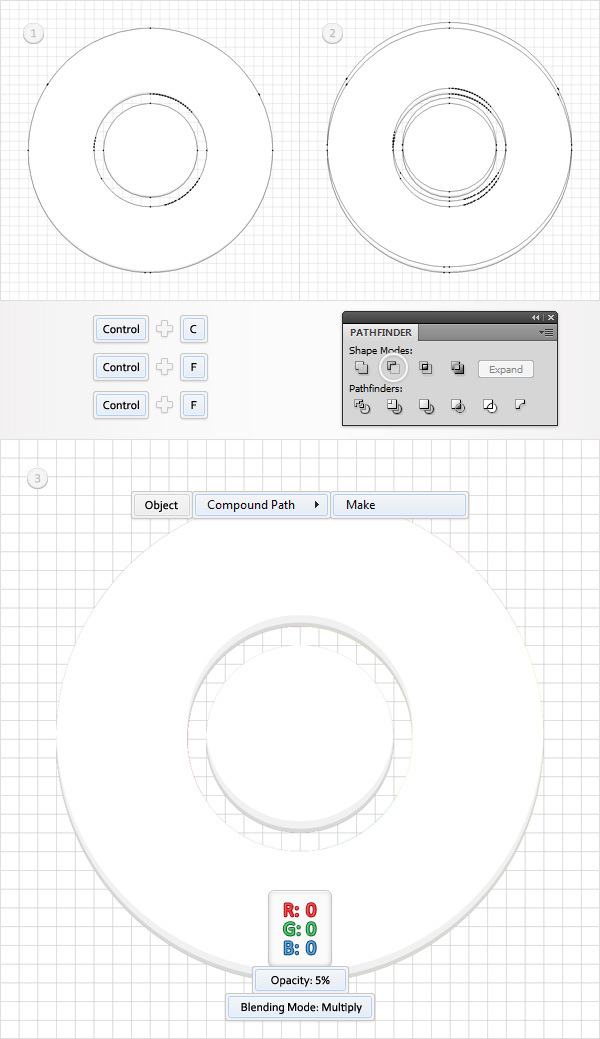
Reselect then white compound path created in the previous step and make two copies in front (Control + C > Control + F > Control + F). Select the top copy and move it 3px up. Reselect both copies and click on the Minus Front button from the Pathfinder panel. Select the resulting group of shapes and turn it into a compound path (Object > Compound Path > Make). Fill it with black, lower its opacity to 5% and change the blending mode to Multiply.
Step 13
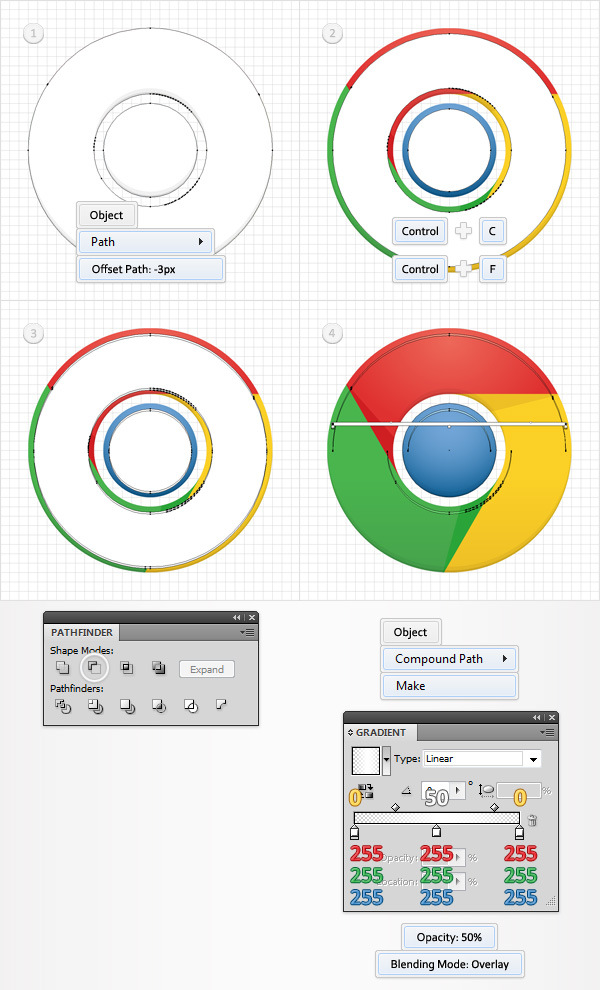
Reselect then white compound path and go to Object > Path > Offset Path. Enter a -3px Offset and click OK. Select the resulting shape, make a copy in front and delete the original, white compound path. Select the copy and move it 1px down. Reselect both copies and click on the Minus Front button from the Pathfinder panel. Select the resulting group of shapes and turn it into a compound path (Object > Compound Path > Make). Fill it with the linear gradient shown below, lower its opacity to 50% and change the blending mode to Overlay. Remember that the white numbers from the gradient image stand for location percentage while the yellow zeros stand for opacity percentage.
Step 14
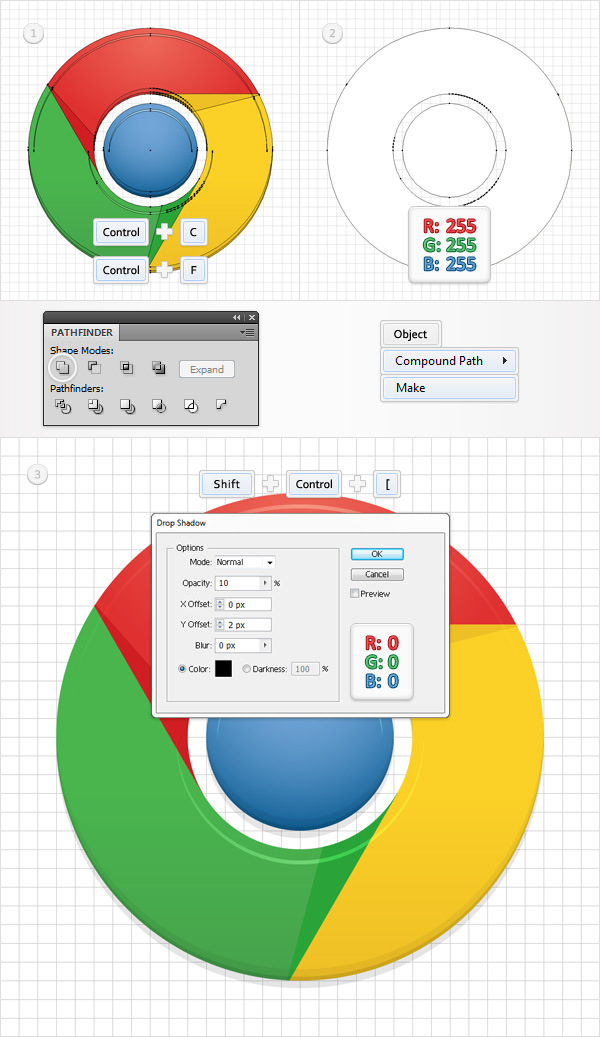
Again, select all the shapes created so far and duplicate them (Control + C > Control + F). Select the copies and click on the Unite button from the Pathfinder panel. Fill the resulting shapes with white and turn them into a compound path (Object > Compound Path > Make). Select it, send it to back (Shift + Control + [ ) and go to Effect > Stylize > Drop Shadow. Enter the data shown below, click OK and you’re done.
Conclusion
Here is how your final result should look.
