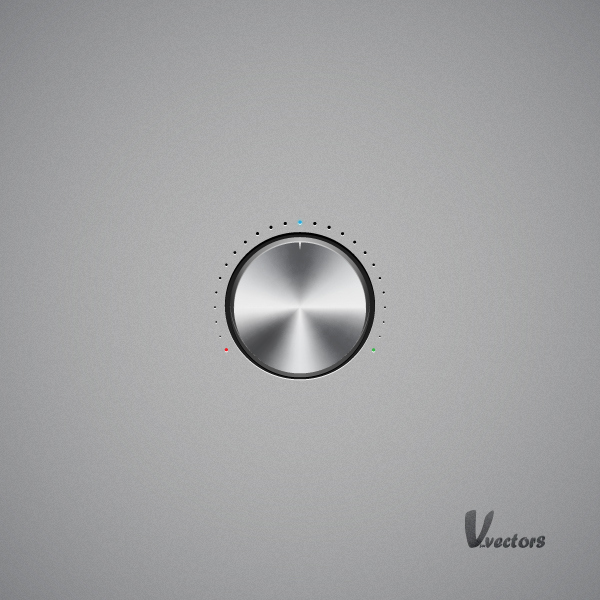
In the following tutorial you will learn how to create a simple steel volume knob.
Final Image
As always, this is the final image that we’ll be creating:

Tutorial Details
- Program: Adobe Illustrator CS5
- Estimated Completion Time: 1 hour 30 minutes
- Difficulty: Intermediate
Step 1
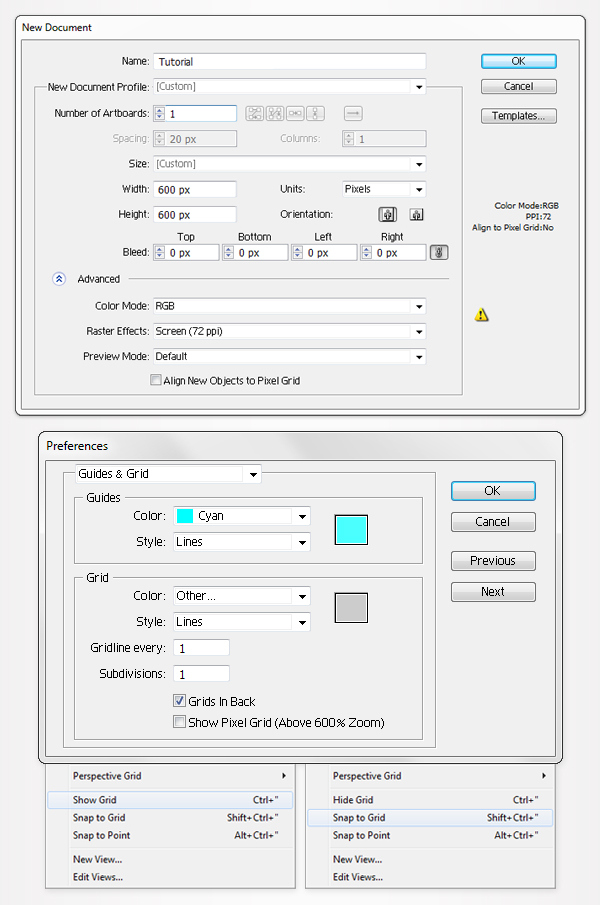
Hit Control + N to create a new document. Enter 600 in the width and height boxes then click on the Advanced button. Select RGB, Screen (72ppi) and make sure that the “Align New Objects to Pixel Grid” box is unchecked before you click OK. Now, turn on the Grid (View > Grid) and the Snap to Grid (View > Snap to Grid).
Next, you’ll need a grid every 1px. Go to Edit > Preferences > Guides & Grid, enter 1 in the Gridline every box and 1 in the Subdivisions box. You can also open the Info panel (Window > Info) for a live preview with the size and position of your shapes. Do not forget to set the unit of measurement to pixels from Edit > Preferences > Unit > General. Setting these options will significantly increase your work speed.
Step 2
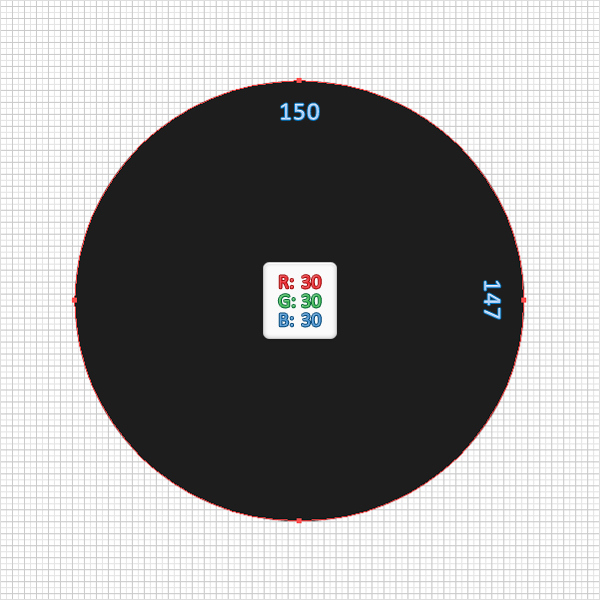
Pick the Ellipse Tool (L) and create a 150 by 147px shape. Fill it with R=30 G=30 B=30 and make sure that there’s no color set for the stroke.
Step 3
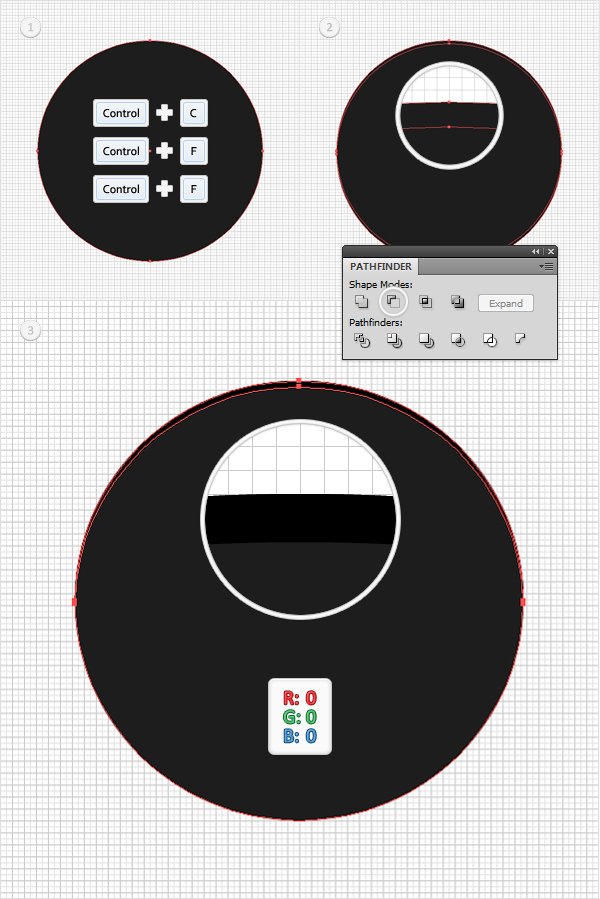
Reselect the shape created in the previous step and make two copies in front (Control + C > Control + F > Control + F). Select the top copy and hit the down arrow twice to move it 2px down. Reselect both copies, open the Pathfinder panel (Window > Pathfinder) and click on the Minus Front button. Fill the resulting shape with black.
Step 4
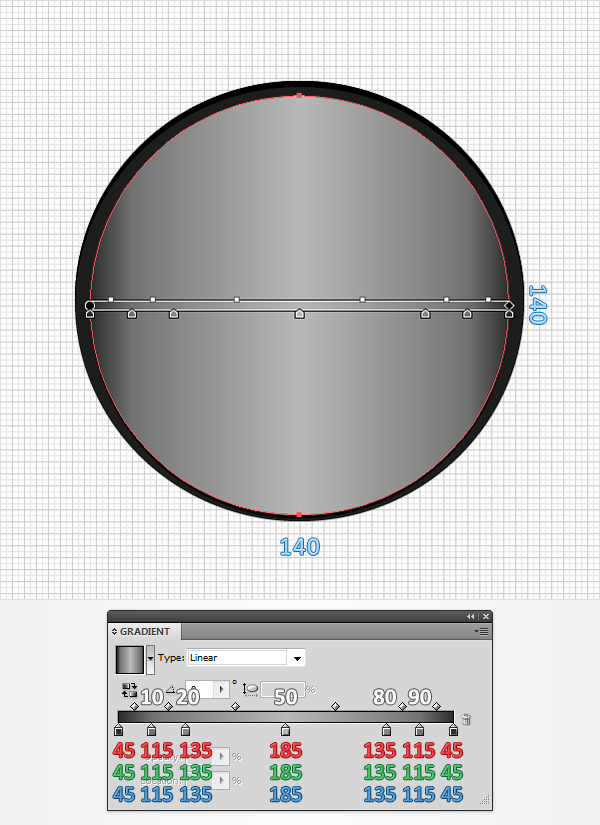
Pick the Ellipse Tool(L) and create a 140px circle. Fill it with the linear gradient shown below and place it as shown in the following image.
Step 5
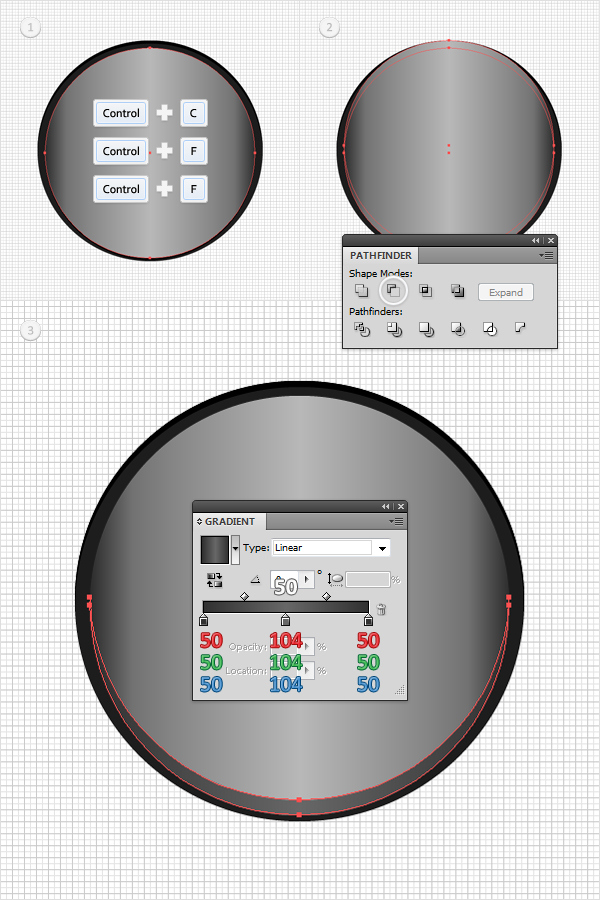
Reselect the shape created in the previous step and make two copies in front (Control + C > Control + F > Control + F). Select the top copy and move it 5px up. Reselect both copies and click on the Minus Front button from the Pathfinder panel. Fill the resulting shape with the linear gradient shown in the following image.
Step 6
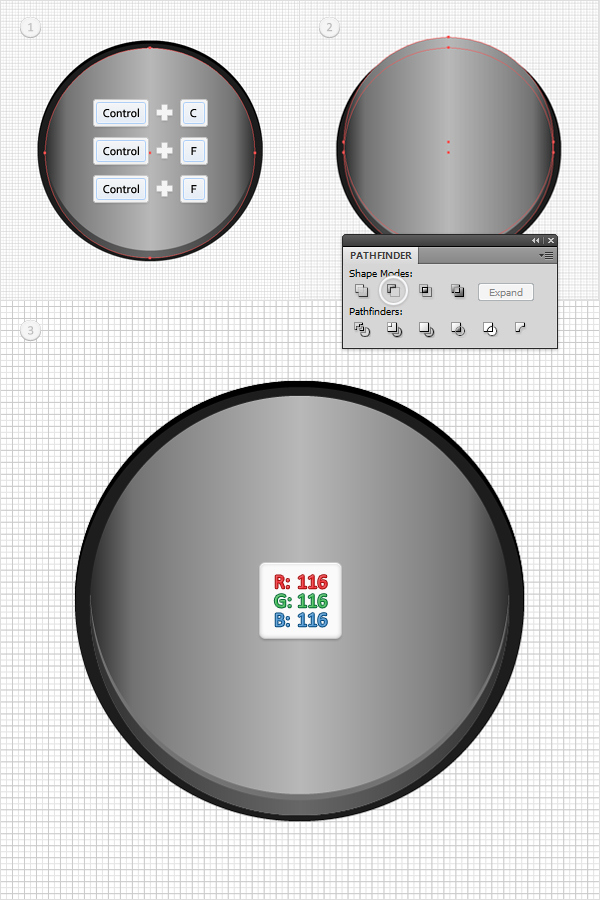
Reselect the shape created in the fourth step and make two copies in front (Control + C > Control + F > Control + F). Select the top copy and move it 7px up. Reselect both copies and click on the Minus Front button from the Pathfinder panel. Fill the resulting shape with R=116 G=116 B=116.
Step 7
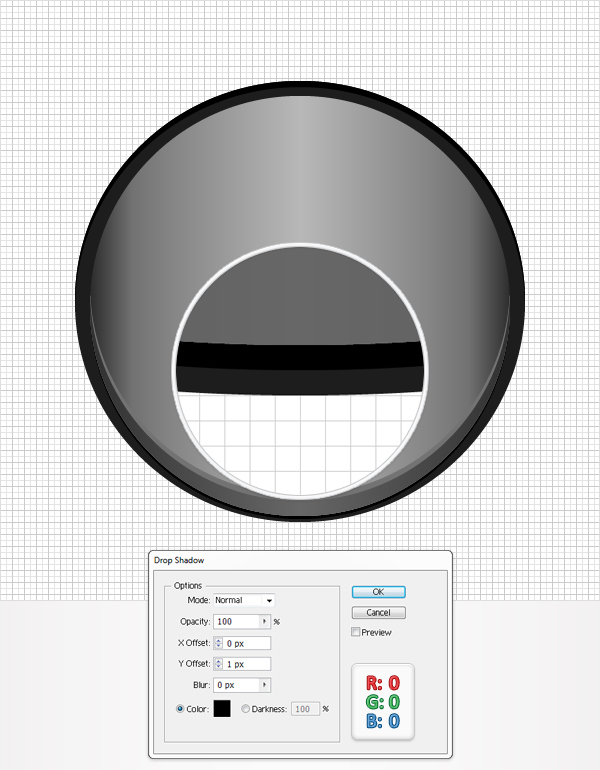
Reselect the shape created in the fourth step and go to Effect > Stylize > Drop Shadow. Enter the data shown below and click OK.
Step 8
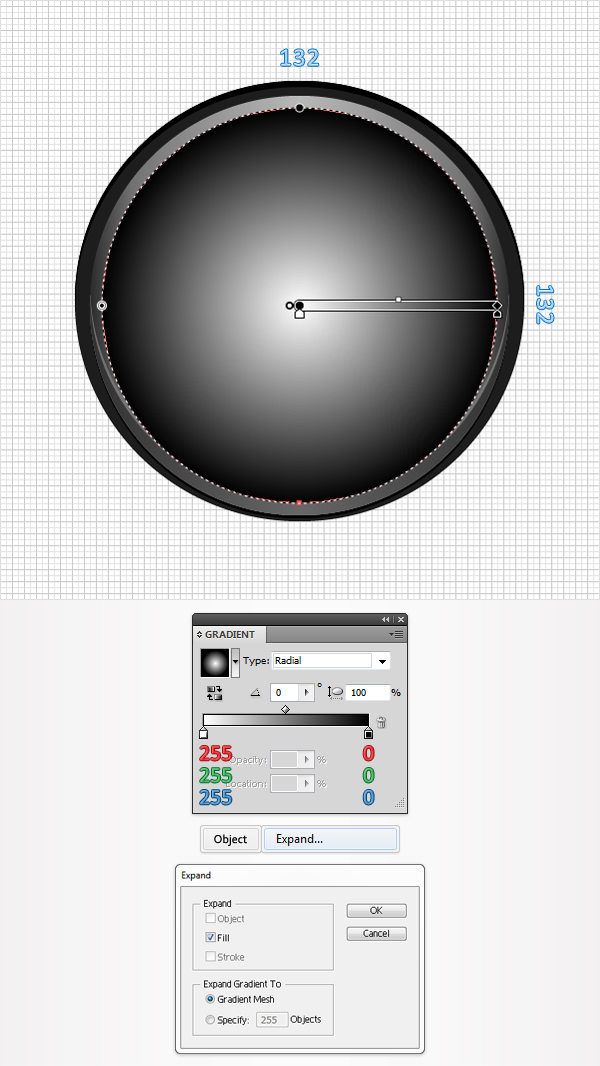
Pick the Ellipse Tool(L) and create a 132px circle. Fill it with the radial gradient shown below, place it as shown in the following image and go to Object > Expand. Check the Gradient Mesh button from the Expand menu and click OK. Move to the Layers panel and you will find a group with a mesh and a clipping path. Delete the clipping path and ungroup the remaining mesh (Shift + Control + G).
Step 9
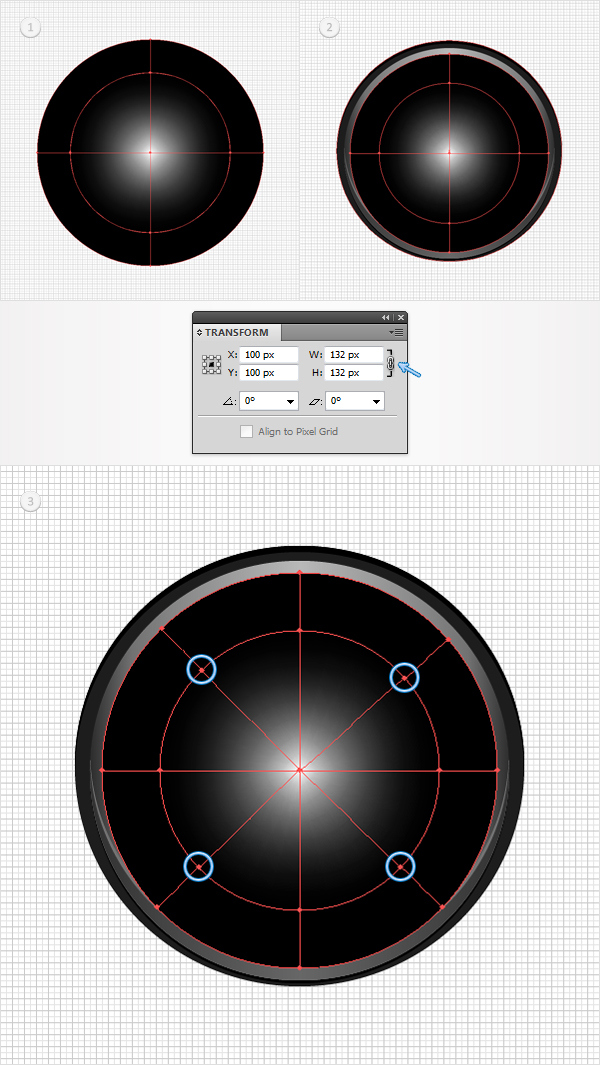
Disable the Snap to Grid (View > Snap to Grid). Reselect the mesh created in the previous step and open the Transform panel (Window > Transform). Make sure the the “Constrain Width and Height Proportions” button is checked then enter 132 in the width box. Keep the mesh selected, grab the Mesh Tool(U) and add four new mesh points as shown in the third image.
Step 10
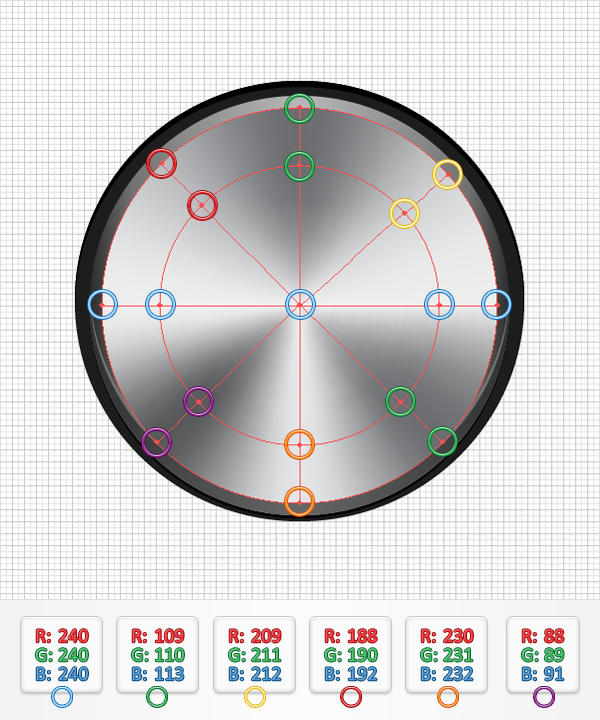
Reselect the mesh edited in the previous step. Pick the Direct Selection Tool(A), select the mesh points one by one and add the colors shown in the following image.
Step 11
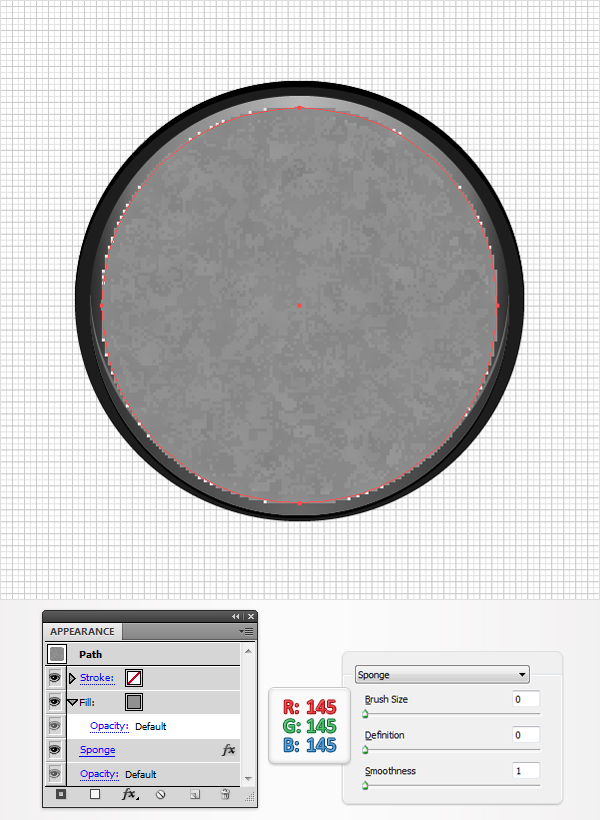
Enable the Snap to Grid (View > Snap to Grid). Pick the Ellipse Tool(L), create a new 132px circle and place it above the mesh edited in the previous step. Fill it with R=145 G=145 B=145 and go to Effect > Artistic > Sponge. Enter the data shown below and click OK.
Step 12
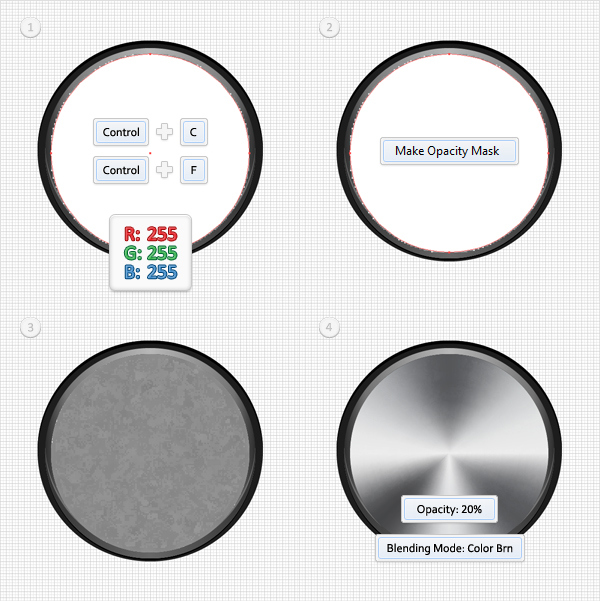
Next, you need to mask the shape created in the previous step. First, open the Transparency panel. Next, reselect the shape made in the previous step and make a copy in front (Control + C > Control + F). Select this copy and hit the “D” key on your keyboard. This will add the default properties (white fill and a 1pt, black stroke) for your shape. Remove the black stroke.
Select this white circle along with the shape created in the previous step, open the fly-out menu of the Transparency panel and click on Make Opacity Mask. Your masked circle should look like in the third image. Select it, lower its opacity to 20% and change the blending mode to Color Burn.
Step 13
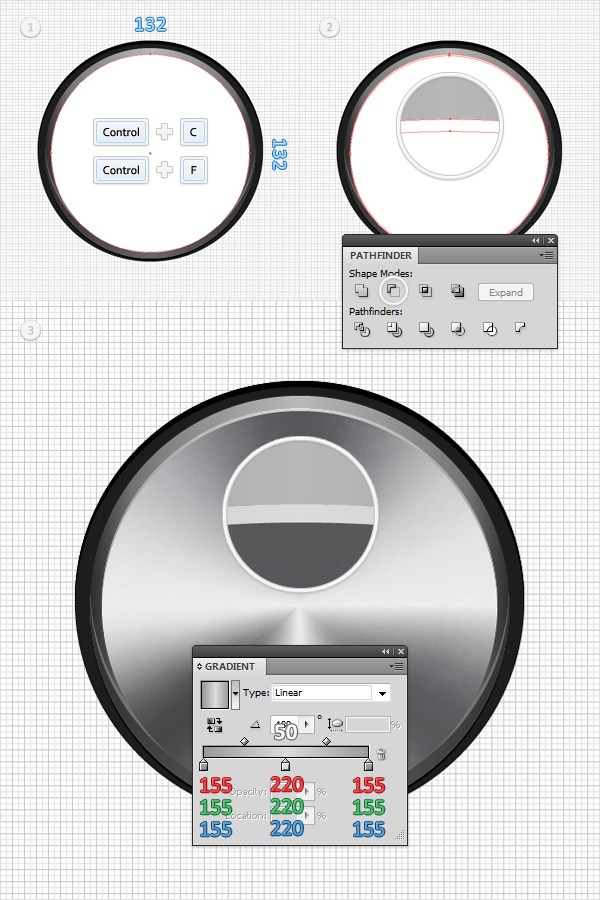
Pick the Ellipse Tool(L), create a new 132px circle and place it above the masked shape created in the previous step. Fill it with a random color and make a copy in front (Control + C > Control + F). Select it and move it 1px down. Now, select the copy along with the original shape and click on the Minus Front button from the Pathfinder panel. Fill the resulting shape with the linear gradient shown in the following image.
Step 14
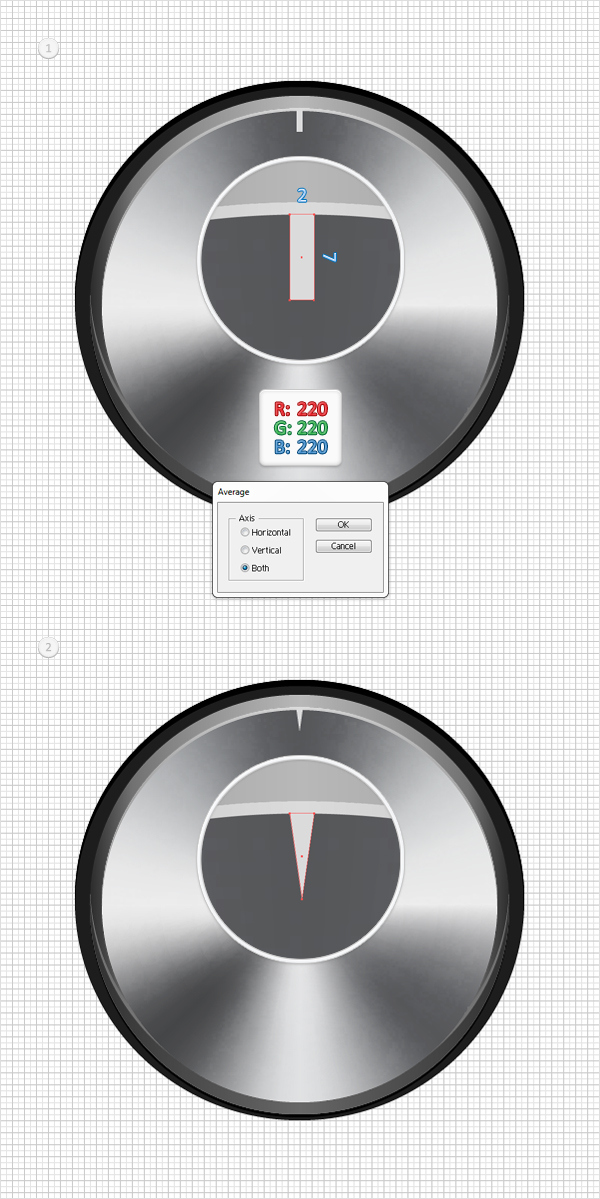
Pick the Rectangle Tool(M) and create a 2 by 7px shape. Fill it with R=220 G=220 B=220 and place it as shown in the first image. Switch to the Direct Selection Tool(A), select the bottom anchor points and go to Object > Path > Average. Check the Both button and click OK. This should turn your rectangle into a triangle. Make sure that it looks like that in the second image.
Step 15
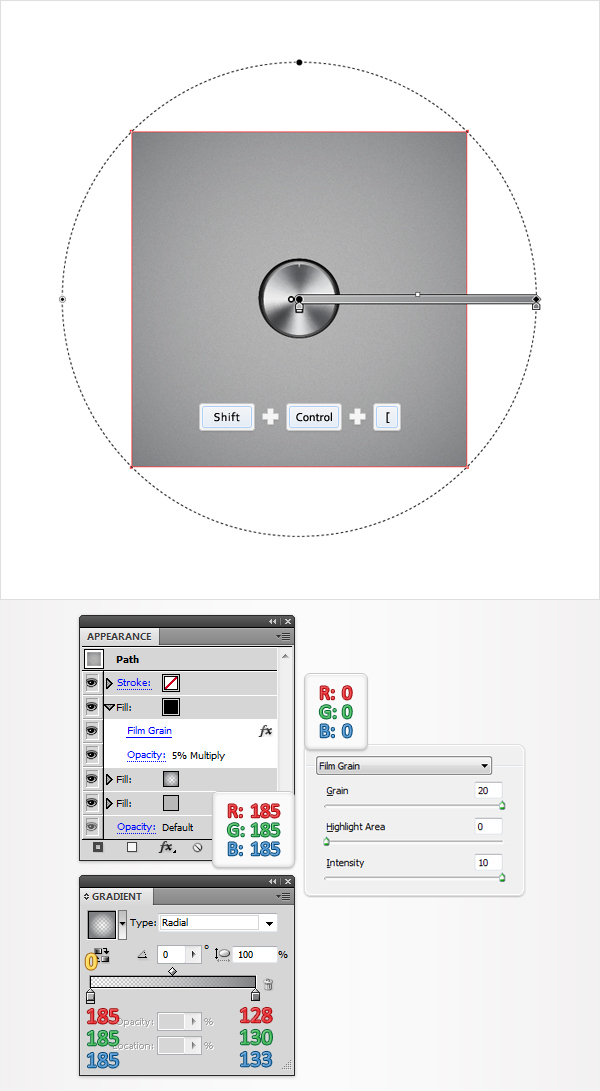
Pick the Rectangle Tool(M), create a shape the size of your artboard and send it to back (Shift + Control + [ ). Fill it with R=185 G=185 B=185 then focus the Appearance panel (Window > Appearance). Add a second fill for this shape using the Add New Fill button. It’s the white square icon at the bottom of the Appearance panel. Select this new fill and use the radial gradient shown in the following image. Add a third fill for this shape and select it from the Appearance panel. Make it black, lower its opacity to 5%, change the blending mode to Multiply and go to Effect > Artistic > Film Grain. Enter the data shown below and click OK.
Step 16
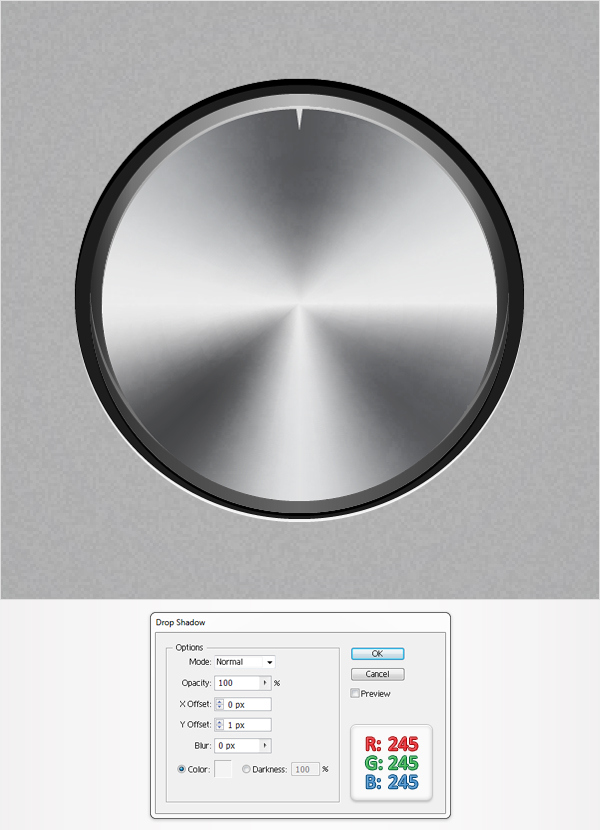
Reselect the shape created in the second step and go to Effect > Stylize > Drop Shadow. Enter the data shown below and click OK.
Step 17
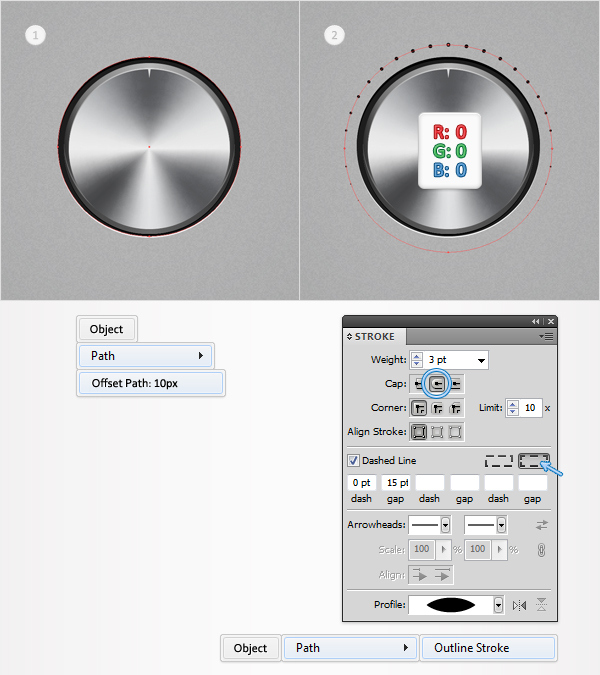
Reselect the shape created in the second step and go to Object > Path > Offset Path. Enter a 10px Offset and click OK. Select the resulting shape and focus on the Appearance panel. Remove the Drop Shadow effect and the color from the fill then add a 3pt, black stroke. Select it from the Appearance panel and open the Stroke panel (Window > Stroke).
First, check the Round Cap button from the Cap section. Next, check the Dash box and enter 0pt in the dash box and 15pt in the gap box. Move to the right and check the button that “aligns dashes to corners and paths ends, adjusting length to fit”.
Finally, move to the Profile section, open the drop down menu and select the “Width Profile 1”. In the end your stroke should look like that in the second image. Make sure that it’s still selected and go to Object > Path > Outline Stroke.
Step 18
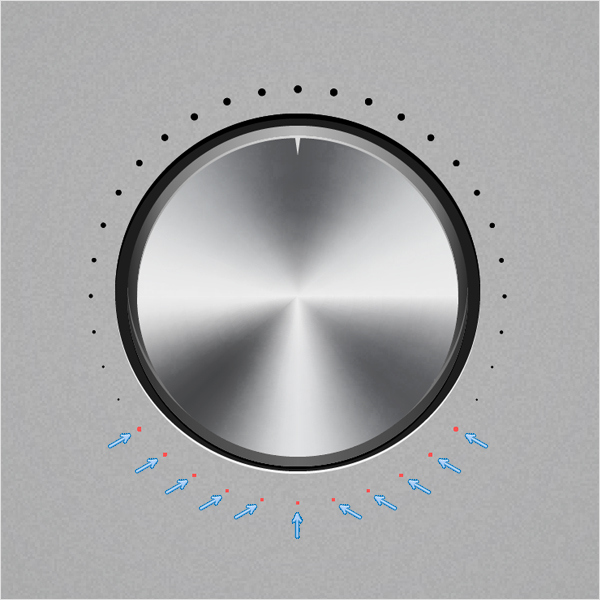
Move to the Layers panel, select the group created in the previous step and ungroup it (Shift + Control + G). Select the bottom circle (pointed by the arrows) and simply delete them.
Step 19
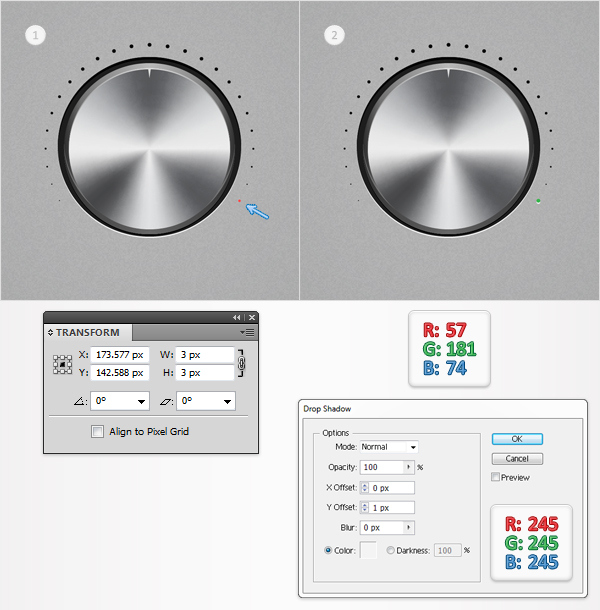
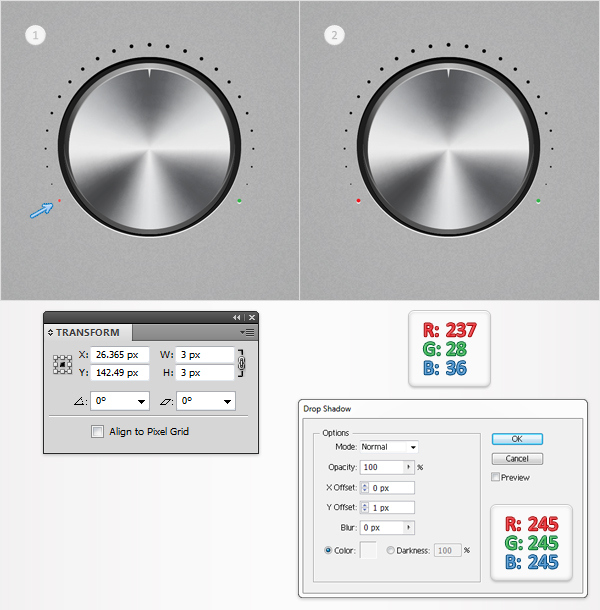
Keep focusing on the set of black circles. Select the bottom right circle and focus on the Transform panel. Make sure the the “Constrain Width and Height Proportions” button is checked then enter 3 in the width box. Move to the Appearance panel, replace the black with R=57 G=181 B=74 and go to Effect > Stylize > Drop Shadow. Enter the data shown below and click OK.
Step 20
Select the bottom left circle and focus on the Transform panel. Again, make sure the the “Constrain Width and Height Proportions” button is checked then enter 3 in the width box. Move to the Appearance panel, replace the black with R=237 G=28 B=36 and go to Effect > Stylize > Drop Shadow. Enter the data shown below and click OK.
Step 21
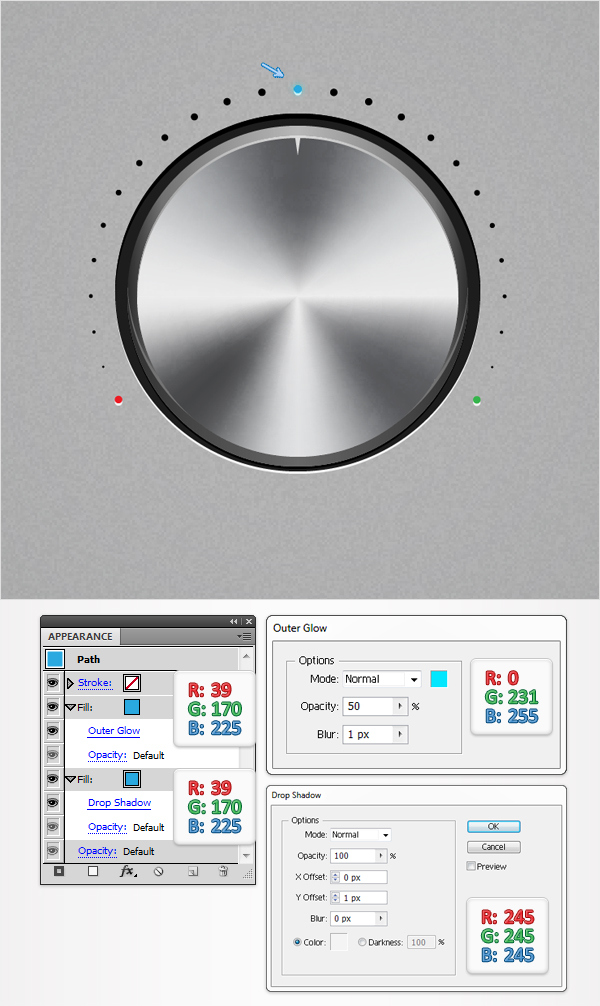
Select the top circle (pointed by the arrow), replace the black with R=39 G=170 B=225 and focus on the Appearance panel. Select the fill and go to Effect > Stylize > Drop Shadow. Enter the data shown below and click OK. Add a second fill for this circle and set its color at R=39 G=170 B=225. Select this new fill from the Appearance panel and go to Effect > Stylize > Outer Glow. Again, enter the data shown below and click OK.
Step 22
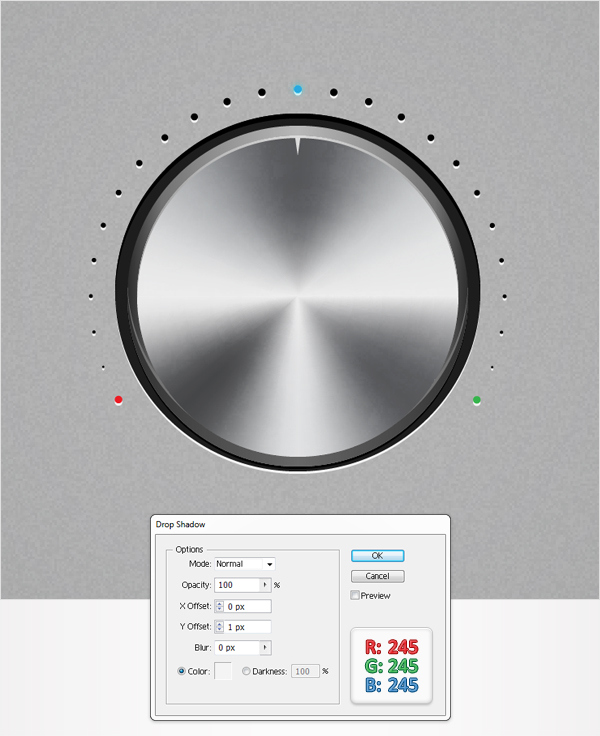
Finally, select the rest of the circles and go to Effect > Stylize > Drop Shadow. Enter the data shown below, click OK and you’re done.
Final Image
Here is how your final result should look.
