In this tutorial, you will learn how to draw a flowerpot from scratch using several techniques in Adobe Illustrator.
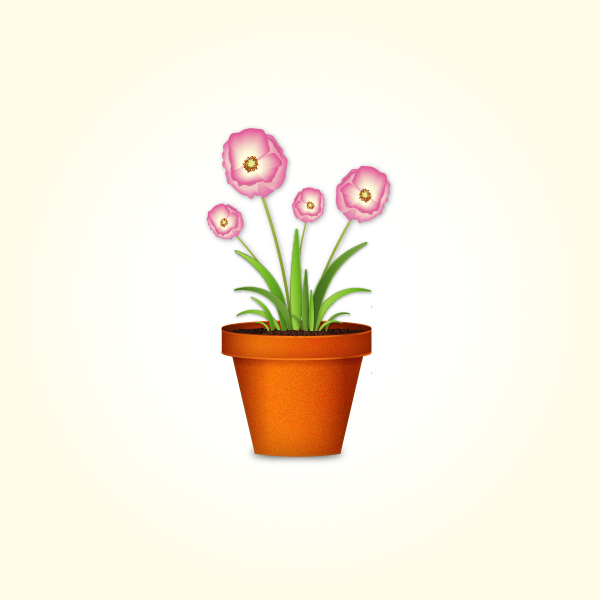
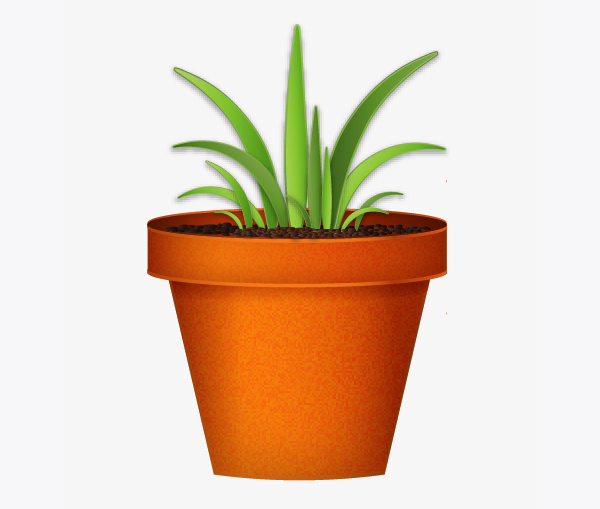
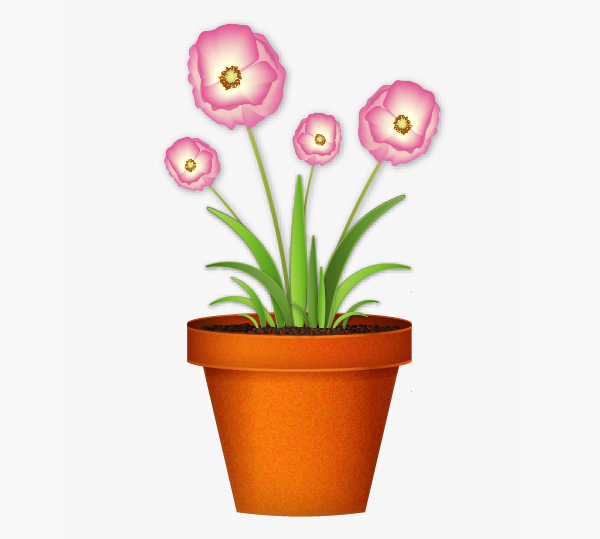
Final Image
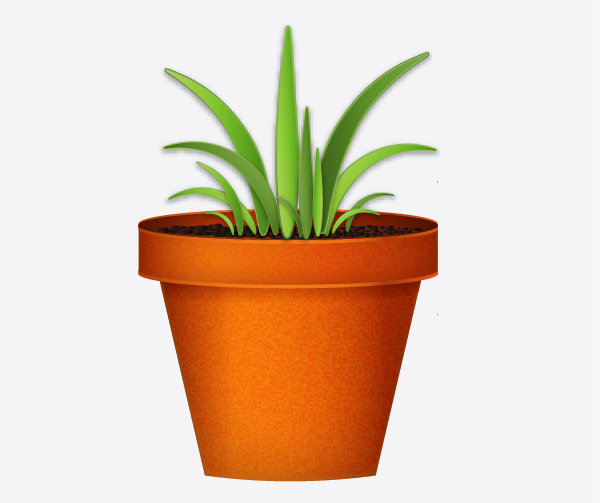
As always, this is the final image that we’ll be creating:
Tutorial Details
- Program: Adobe Illustrator CS3
- Estimated Completion Time: 45 minutes
- Difficulty: Beginner-Intermediate
Step 1
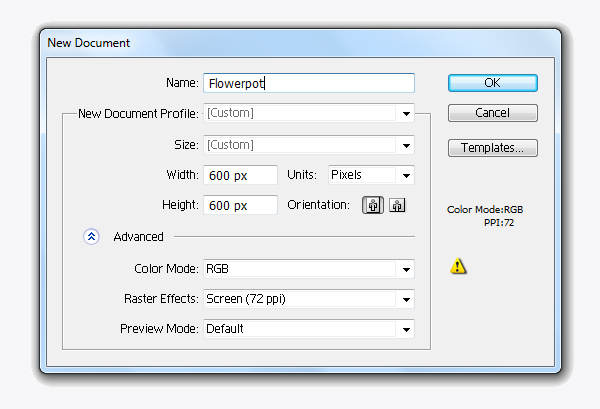
Let’s create a new document first. Make sure to set the dimensions to 600 x 600 pixels and the Color Mode to RGB.
Step 2
Using the Ellipse Tool (L) create an ellipse,then duplicate it and place a copy of the shape off to the side of the artboard, which we’ll use later.
Then pick Rectangle tool (M) to create a rectangle like this image below, the size is not important.

Place the rectangle in front of the ellipse and select both of these shapes and hit the Add to shape area button in the Pathfiner panel. Make sure to expand the shape.
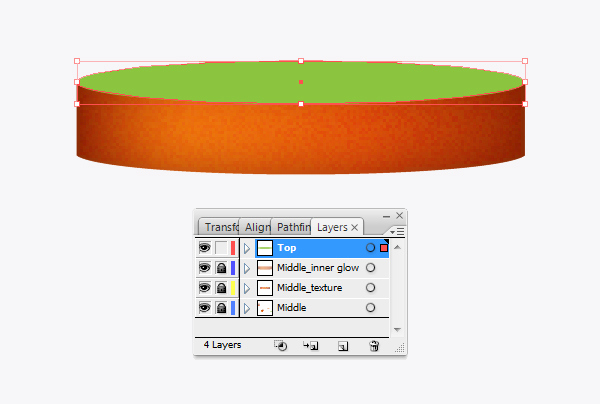
Go to Object > Expand Appearance. We named this layer as “Middle”.

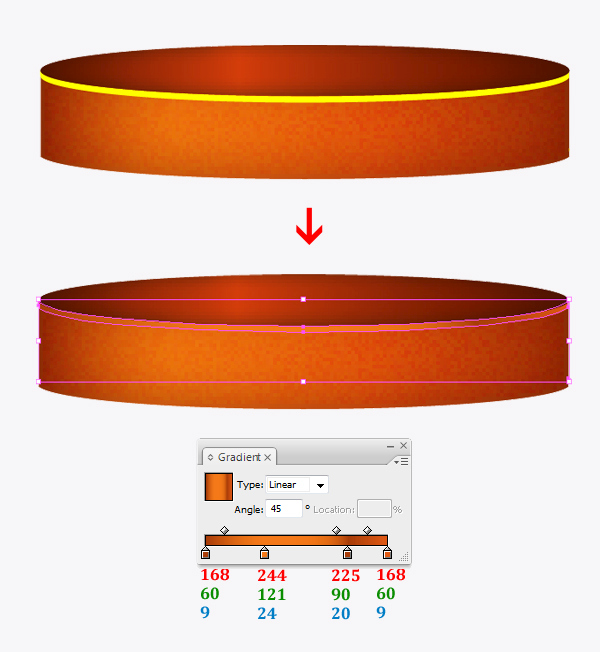
Step 3
Also, place a copy of the ” Middle ” shape off to the side of the artboard, which we’ll use later.
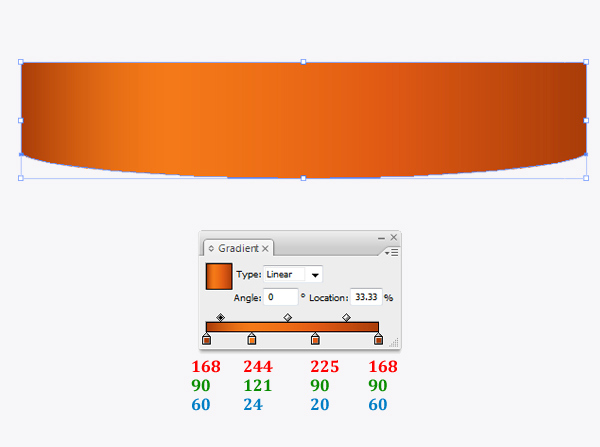
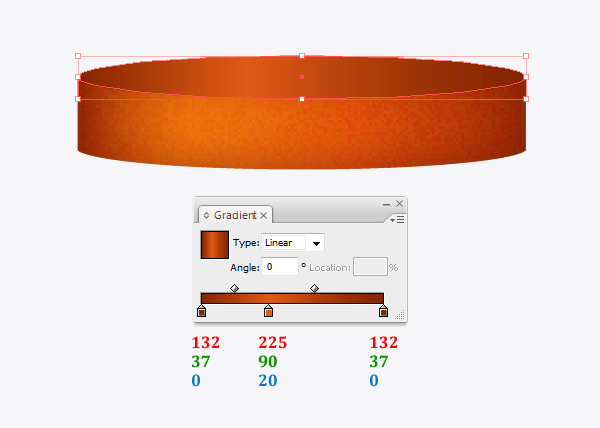
Next, we apply the gradient to the shape as shown in the image below.
Now we add the texture to our shape. Duplicate Ctrl/Cmd + C (Copy) the “Middle” shape then Ctrl/Cmd + F (Paste in front), and scale it a little smaller.
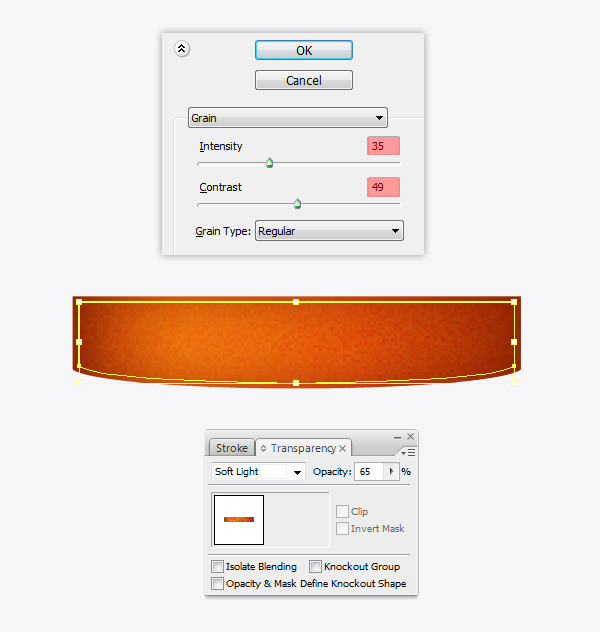
Go to Effect > Texture > Grain, change the settings as shown in the image below. Then apply the Soft light blending mode to the shape with lower Opacity = 65%.
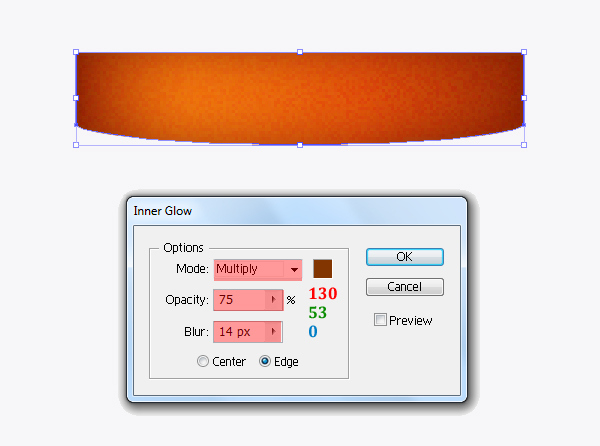
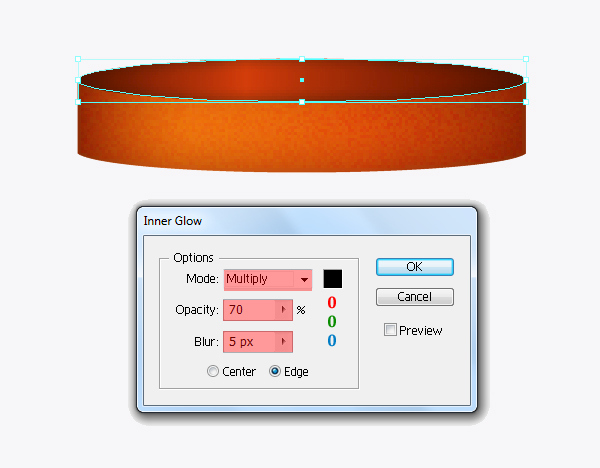
Duplicate (Ctrl / Cmd + C, Ctrl / Cmd + F) the “Middle” shape one more time.
Go to Effect > Stylize > Inner Glow and change the settings as shown in the image below. Apply the Darken blending mode to it with lower Opacity = 50%.
Step 4
Next, we create a new layer and named it ” Top “ . Back in Step 2, I mentioned placing a copy of the ellipse shape outside the Artboard. Go ahead and grab a copy to work with. Place the ellipse as shown in the image below.
Now we’ll add gradients to the “Top”.
Duplicate (Ctrl / Cmd + C, Ctrl / Cmd + F) the “Top” shape one more time, go to Effect > Stylize > Inner Glow and change the settings as shown in the image below. Apply the Multiply blending mode to it with lower Opacity = 50%.
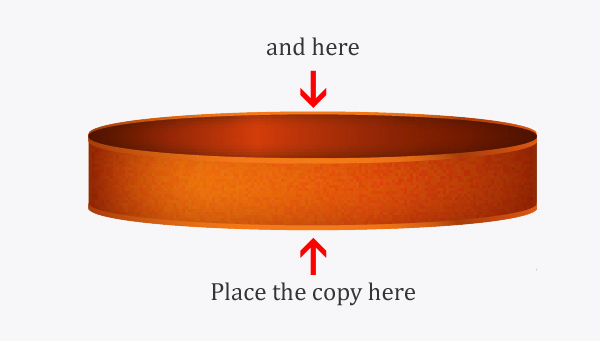
Step 5
Now we create a new layer and name it ” Edge “. Pick the Pen tool (P) to draw a shape as shown in the image. Then add the same gradient that we used with “Middle” shape.
Duplicate (Ctrl / Cmd + C, Ctrl / Cmd + F) the “Edge” shape 2 times, and place the copies as shown in the image below.
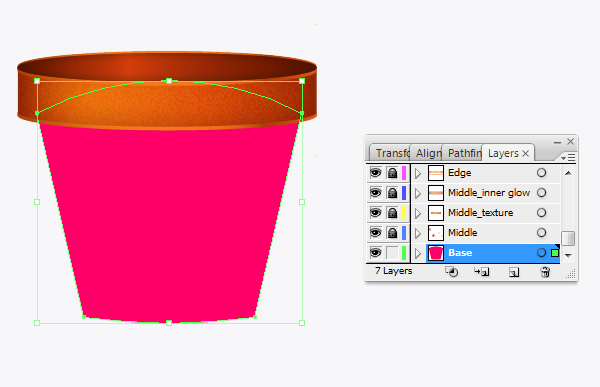
Step 6
Pick the Pen tool (P) to draw the base shape of the flowerpot. Name this layer “Base”.
Place this layer under the “Middle” layer.
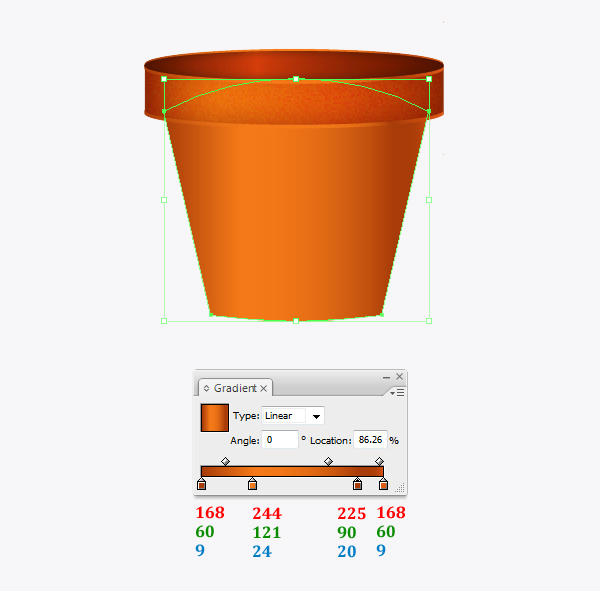
Now we’ll add gradients to the “Base”.
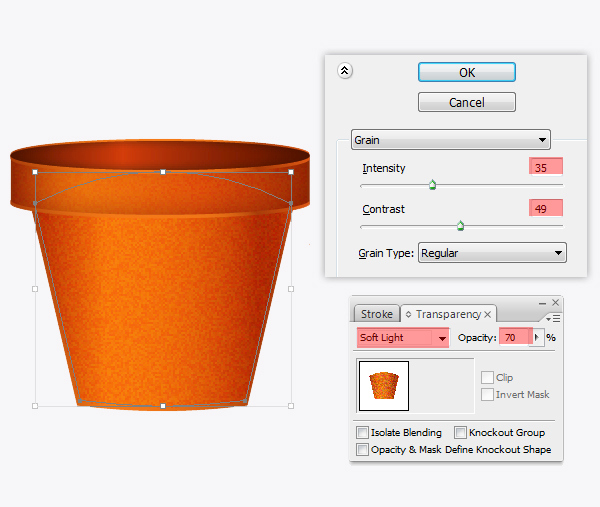
Now we add the texture to our base shape. Duplicate Ctrl/Cmd + C (Copy) the “Base” shape then Ctrl/Cmd + F (Paste in front), and scale it a little smaller.
Go to Effect > Texture > Grain, change the settings as shown in the image below. Then apply the Softlight blending mode to the shape with lower Opacity = 70%.
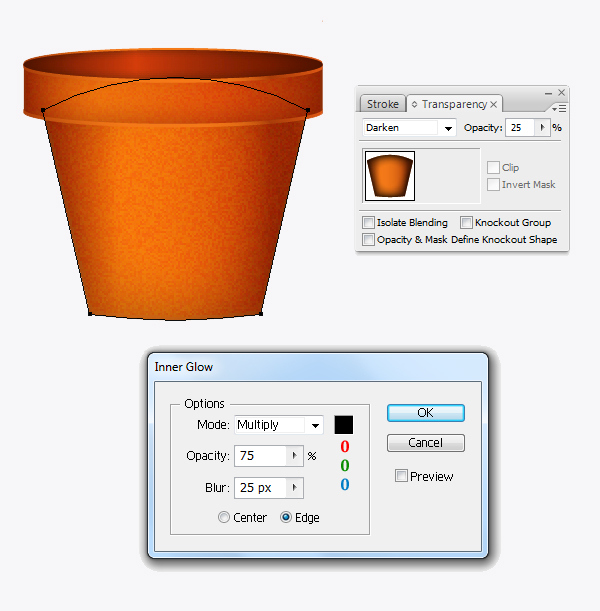
Duplicate (Ctrl / Cmd + C, Ctrl / Cmd + F) the “Base” shape one more time, go to Effect > Stylize > Inner Glow and change the settings as shown in the image below. Apply the Darken blending mode to it with lower Opacity = 25%.
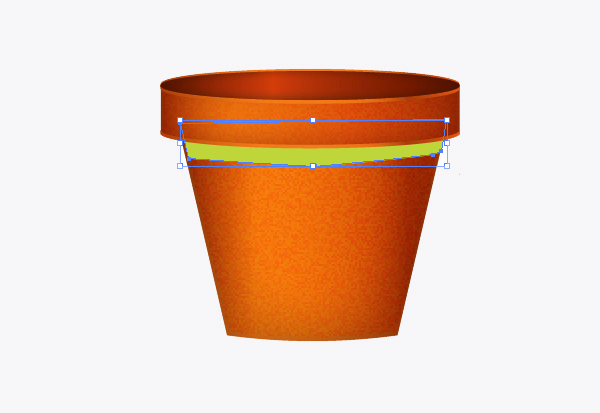
Next, we pick the Pen tool (P) to create the shape shown below.
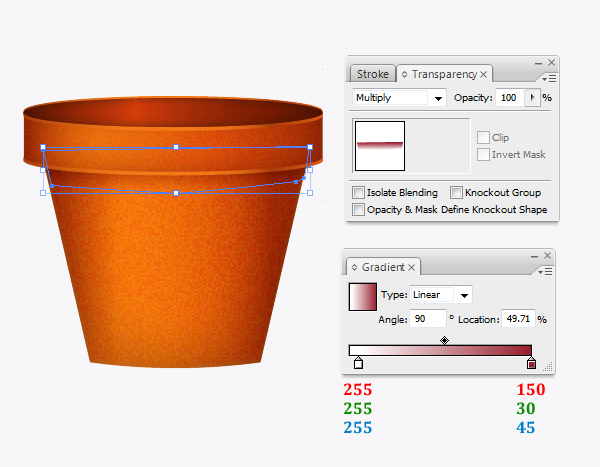
Fill the new shape with a gradient, then apply the Mutiply blending mode to the shape.
Step 7
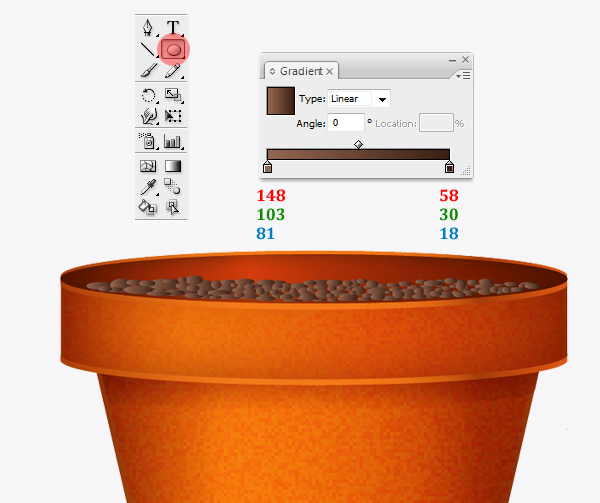
To create some dirt, we create a new layer and name it “Soil”. Use the Ellipse Tool (L) to create an ellipse and fill it with the gradient as shown in the image below.
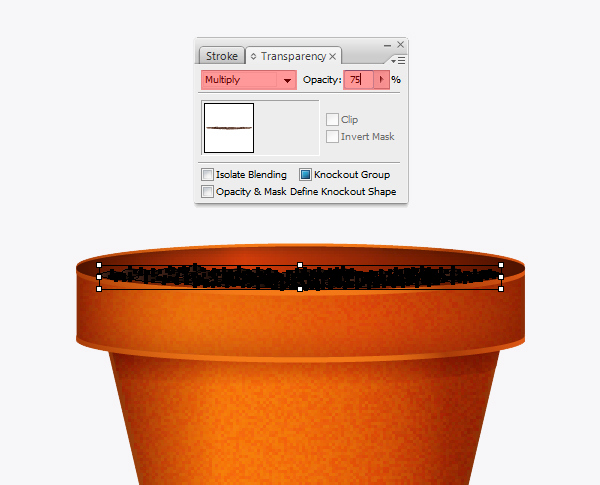
Next, we group (Ctrl + G) the shape on the “Soil” layer. Duplicate (Ctrl / Cmd + C, Ctrl / Cmd + F) the soil and apply the Multiply blending mode to the copy with lower Opacity = 75%.
Step 8
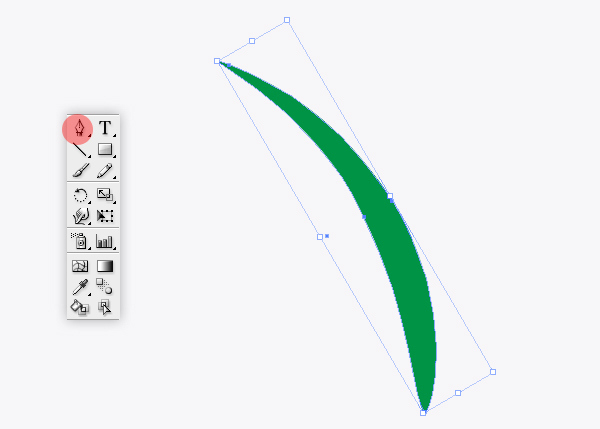
Grab the Pen tool (P) to draw a shape as shown in the image below. Let’s create a new layer for this. Call the new layer ” Leaf “.
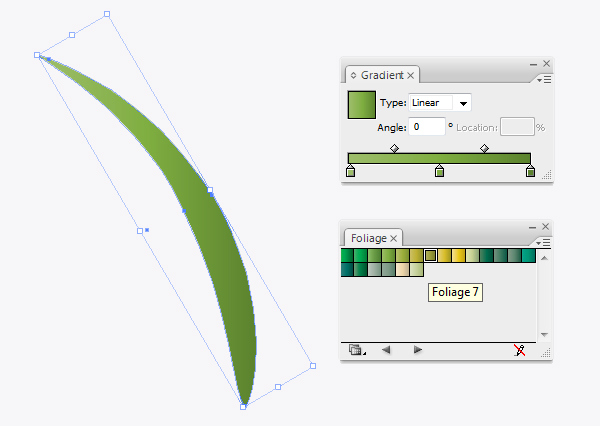
We’ll go ahead and add a gradient to our leaf. First, in the Swatches palette go to Open Swatches Library > Gradient > Foliage > Foliage 7.
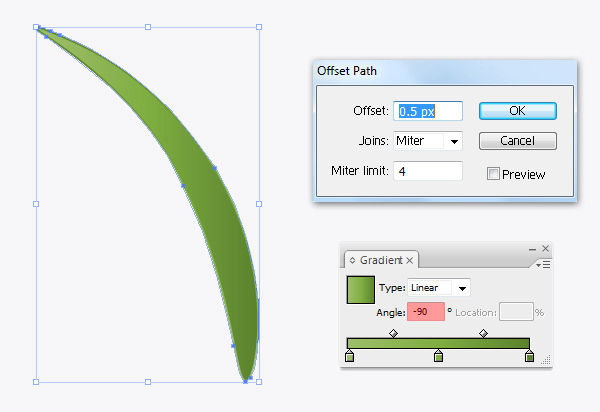
Select ” Leaf “ shape and go to Object > Path > Offset Path. Then change the Gradient angle = -90.
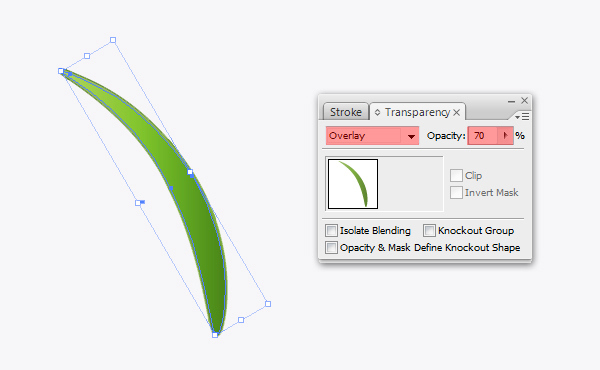
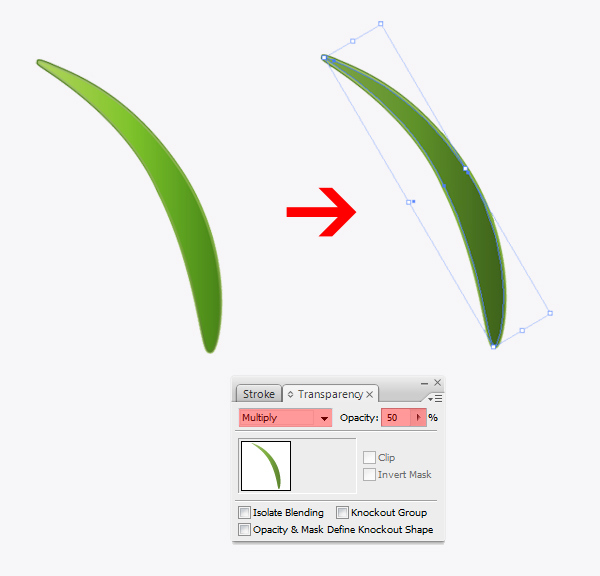
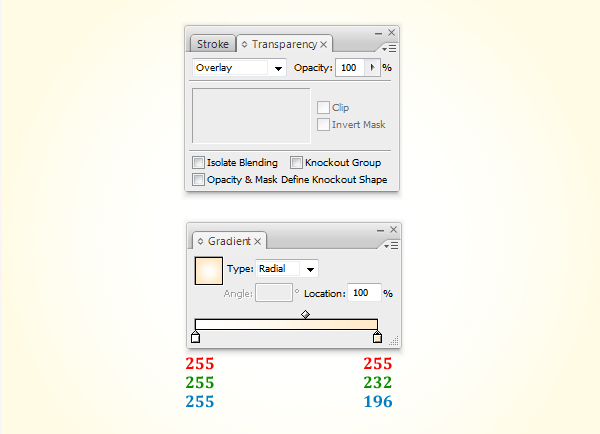
We want the “Leaf ” color to be much lighter than it is so duplicate ( Ctrl / Cmd + C, Ctrl / Cmd + F) it and apply the Overlay blending mode for the copy with lower Opacity = 70%
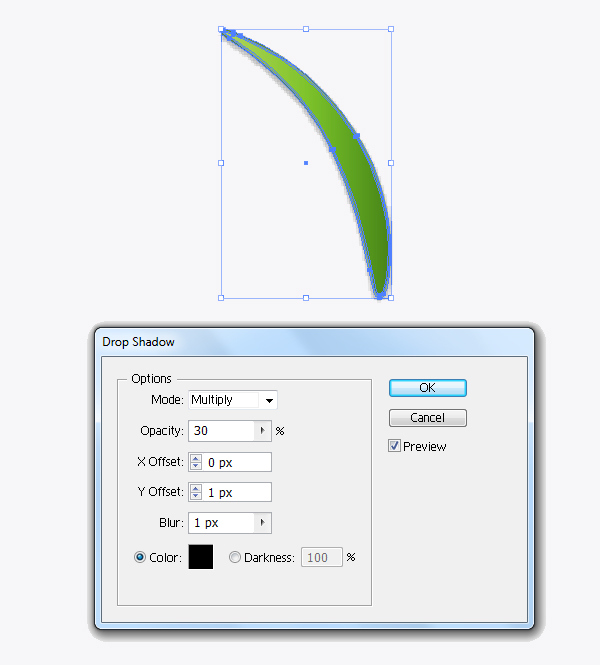
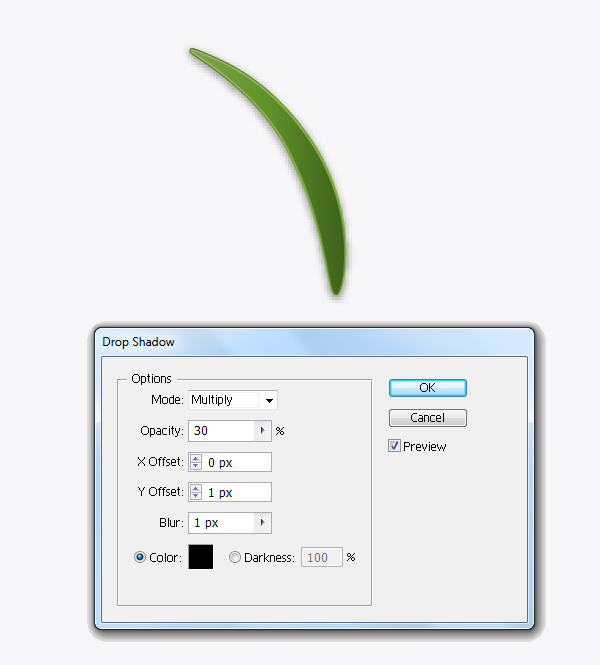
Now we group (Ctrl + G) the ” Leaf “ shapes together. Then go to Effect > Stylize > Drop Shadow.
Step 9
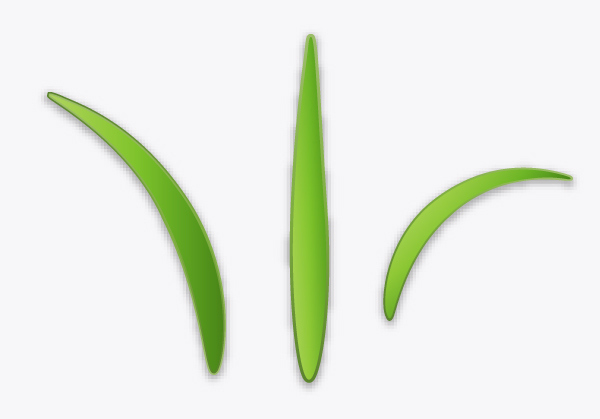
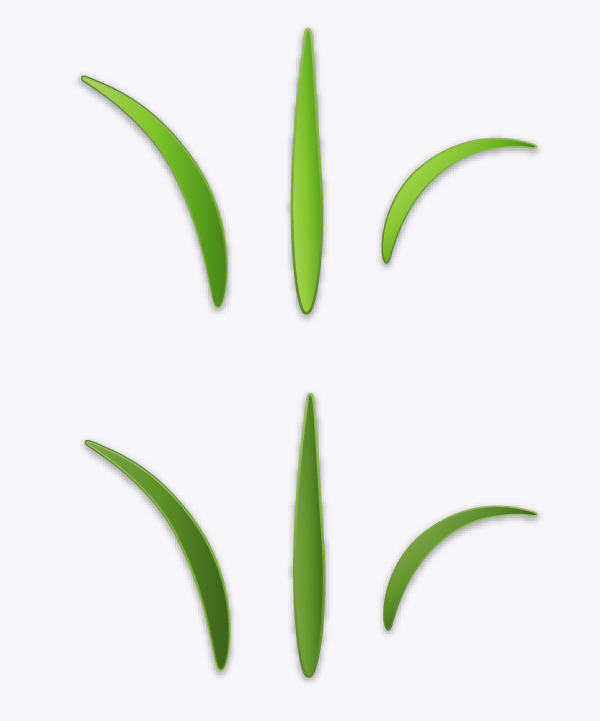
We use the Pen tool (P) to create two more shapes and repeat Step 8. Here is my result.
Step 10
Now we duplicate ( Ctrl / Cmd + C, Ctrl / Cmd + V ) the ” Leaf “ . Select the ” Leaf “ copy and Ungroup ( Shift + Ctrl + G ) them. Notice how the drop shadow effect will disappear.
We select the front part of leaf and apply Multiply blending mode to it with lower Opacity = 50%.
Now we group (Ctrl + G) the leaf shape together. Then go to Effect > Stylize > Drop Shadow.
Step 11
Be sure to apply these techniques to all the rest of the leaf shapes. Now you should have a total of six leaf shapes, the bottom image shows my result so far.
Step 12
Arrange the leaf shapes as you wish, just place them randomly. Here is my resulting image.
Step 13
Now we duplicate ( Ctrl / Cmd + C, Ctrl / Cmd + V ) some parts of ” Soil “ and put it in front of the leaf shape.
Step 14
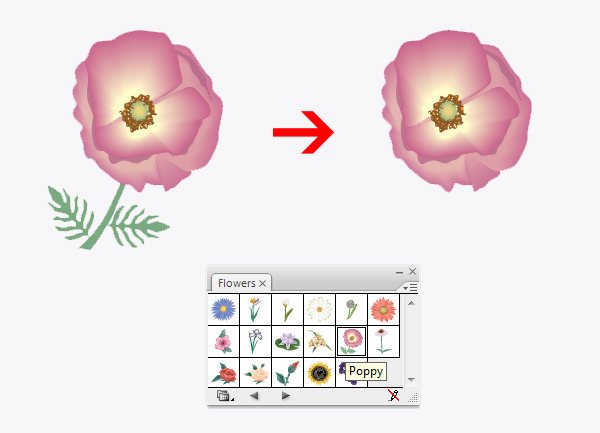
We will continue with the beautiful flower. In the Symbol palette go to Open Symbol Library > Flowers > Poppy. We select the poppy symbol and go to Object > Expand Appearance, then Ungroup (Shift + Ctrl + G) the flower shape and remove the leaf shape. Name this layer ” Flower”.
Now we want the “Flower “ color to be much lighter than it is so duplicate ( Ctrl / Cmd + C, Ctrl / Cmd + F) it and apply the Overlay blending mode for the copy with lower Opacity = 70%.
Grab the Pen tool (P) to create a stem for our flower as shown in the image below.
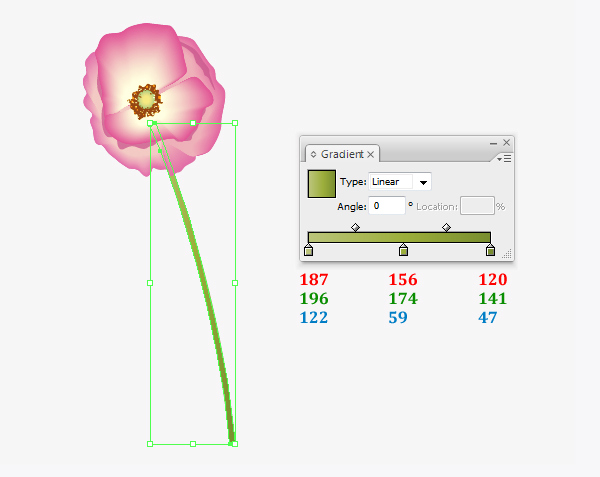
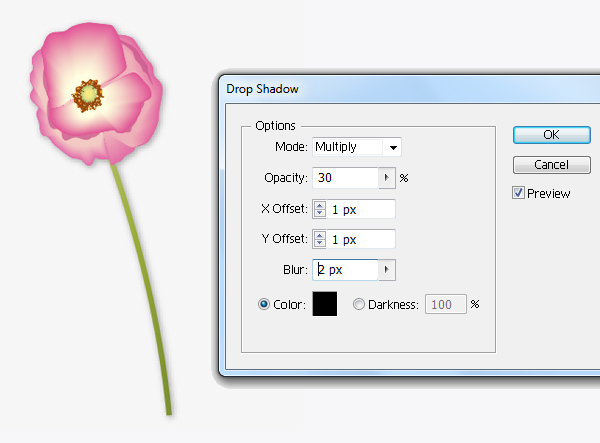
We group ( Ctrl + G ) the stem and flower, then go to Effect > Stylize > Drop shadow.
Step 15
We duplicate ( Ctrl / Cmd + C, Ctrl / Cmd + V ) the ” Flower “ and resize the copies into different size. Arrange the flowers as you wish. Here is my resulting image.
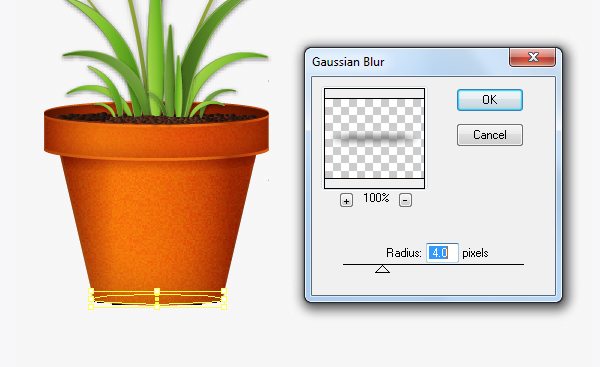
Step 16
Use the Ellipse Tool (L) to create an ellipse and put it under the bottom of the flowerpot , fill it with black #000000.
To to Effect > Gausian blur.
Step 17
Let’s set a background for our final design. Grab the Rectangle Tool (M) from the Tools Panel and click somewhere on the Artboard. The Rectangle Options box will pop up. Set the dimensions to 600 x 600 pixels.
Apply the gradient as shown in the image below.
Then duplicate ( Ctrl / Cmd + C, Ctrl / Cmd + F) the background we created and apply the Overlay blending mode to the copy.
And We’re Done!
Here is how it should look. I hope you’ve enjoyed this tutorial and can apply these techniques in your future projects.
