In the following tutorial you will learn how to create a grungy 3D text effect in Adobe Illustrator.
For starters, you will learn how to set up a simple grid, how to create a flat background and how to add a simple piece of text. Using a bunch of fills and effects along with the Appearance panel, you will learn how to create the fully editable 3D text effect. Finally, you will add the grungy texture using a radial gradient, basic blending techniques and some Film Grain effects.
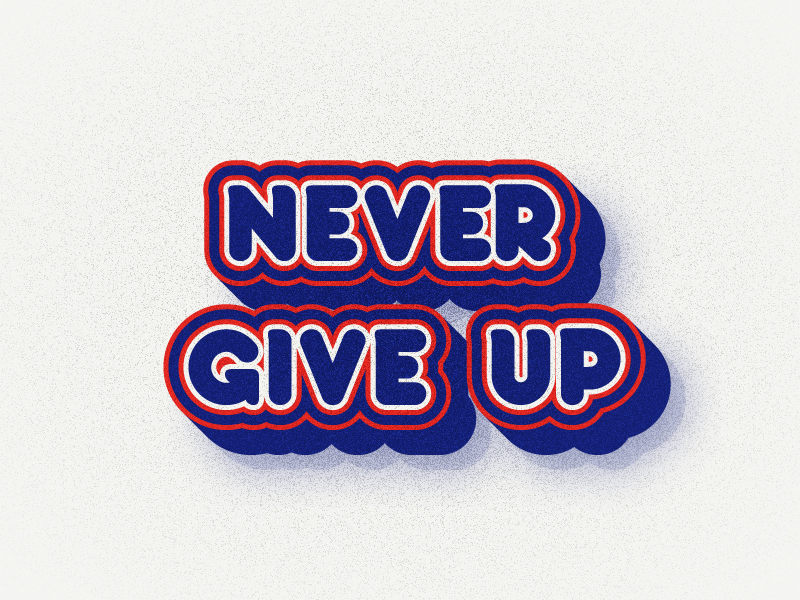
Final Image
As always, this is the final image that we’ll be creating:
Tutorial Details
- Program: Adobe Illustrator CC
- Estimated Completion Time: 45 minutes
- Difficulty: Beginner-Intermediate
Step 1
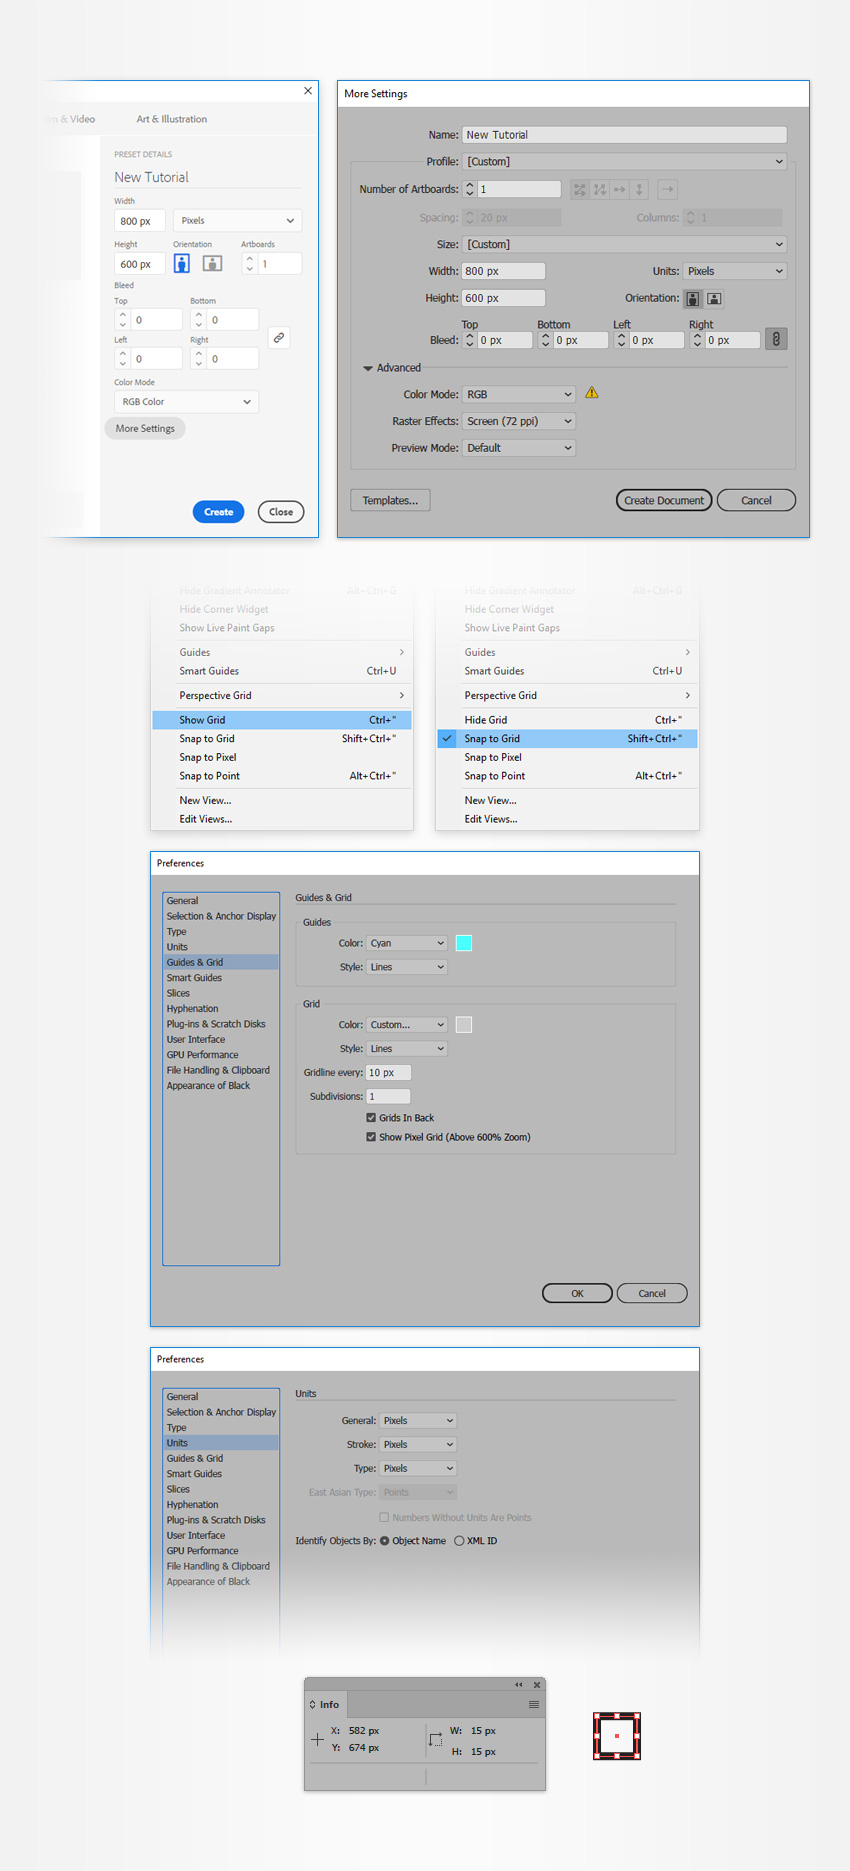
Hit Control + N to create a new document. Select Pixels from the Units drop-down menu, enter 800 in the width box and 600 in the height box then click on the Advanced button. Select RGB, Screen (72ppi) and make sure that the Align New Objects to Pixel Grid box is unchecked before you click OK.
Enable the Grid (View > Show Grid) and the Snap to Grid (View > Snap to Grid). You will need a grid every 10 px, so simply go to Edit > Preferences > Guides & Grid, enter 10 in the Gridline every box and 1 in the Subdivisions box. Try not to get discouraged by all that grid, it will ease your work and keep in mind that you can easily enable or disable it using the Control + " keyboard shortcut.
You should also open the Info panel (Window > Info) for a live preview with the size and position of your shapes. Do not forget to set the unit of measurement to pixels from Edit > Preferences > Units > General. All these options will significantly increase your work speed.
Step 2
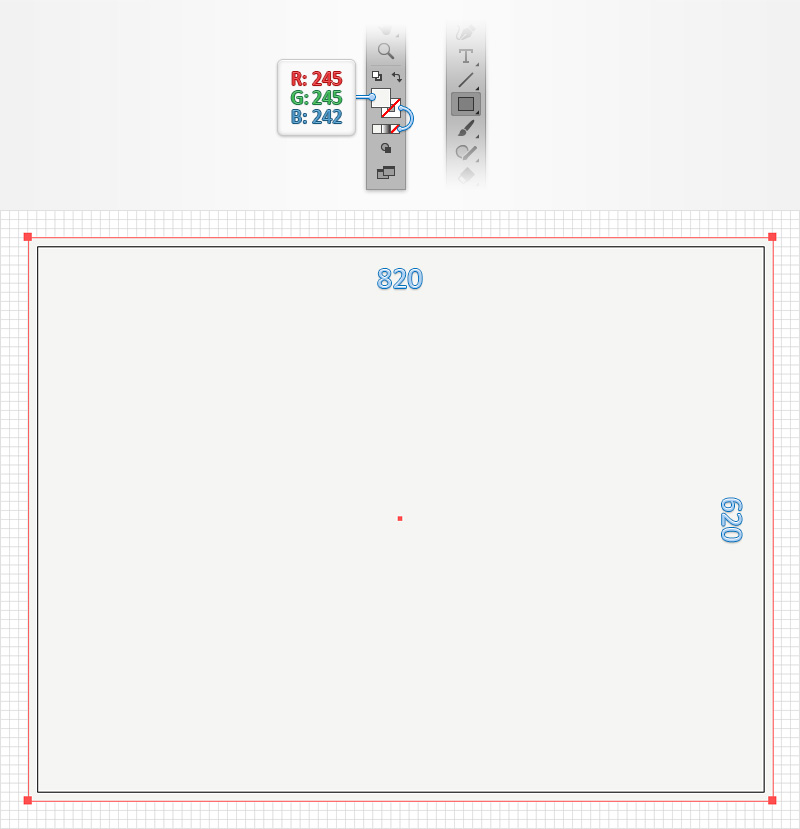
Pick the Rectangle Tool (M) and focus on your Toolbar. Remove the color from the stroke and then select the fill and set its color to R=245 G=245 B=242.
Create an 820 x 620 px rectangle and make sure that it covers your entire artboard as shown in the following image.
Step 3
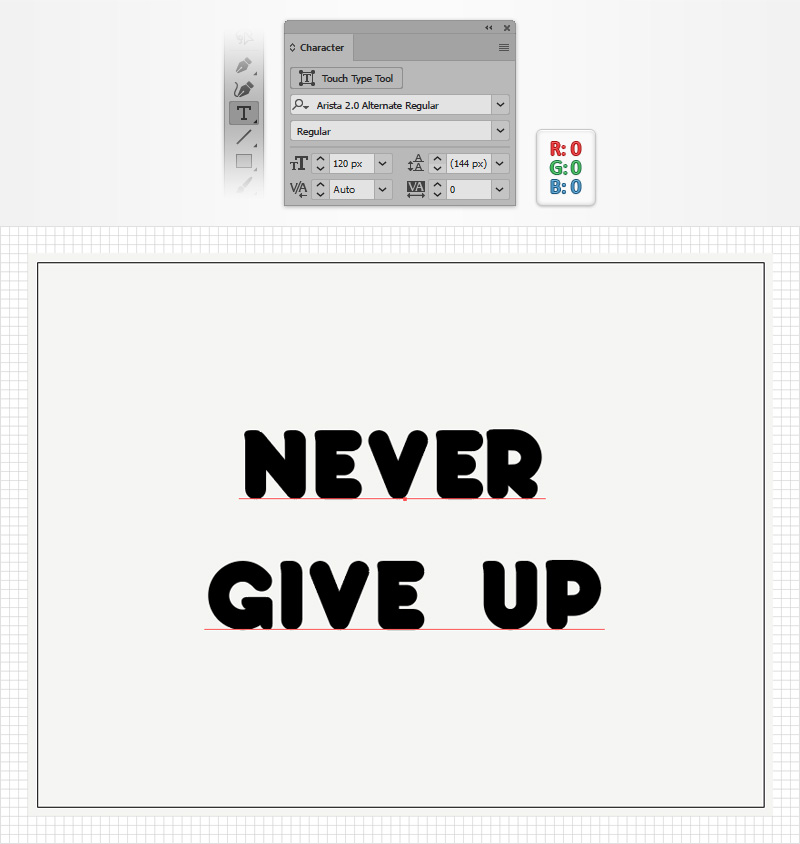
Pick the Type Tool (T) and open the Character panel (Window > Type > Character). Select the Arista font and then set the size to 120 px. Simply click on your artboard and type your text. Make it black, for now.
Step 4
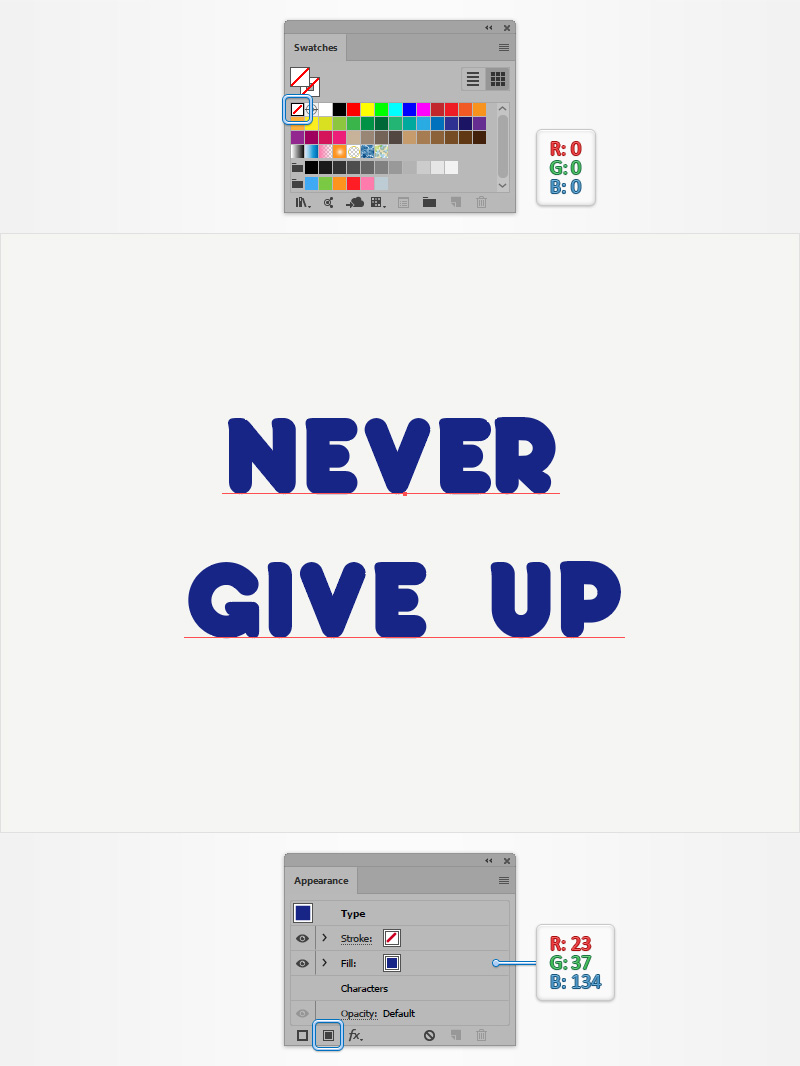
Make sure that your text is selected, focus on the Swatches panel (Window > Swatches), and click that [None] swatch to remove the existing text color.
Open the Appearance panel (Window > Appearance), and add a new fill using the Add New Fill button. Select it and set the color to R=23 G=37 B=134.
Step 5
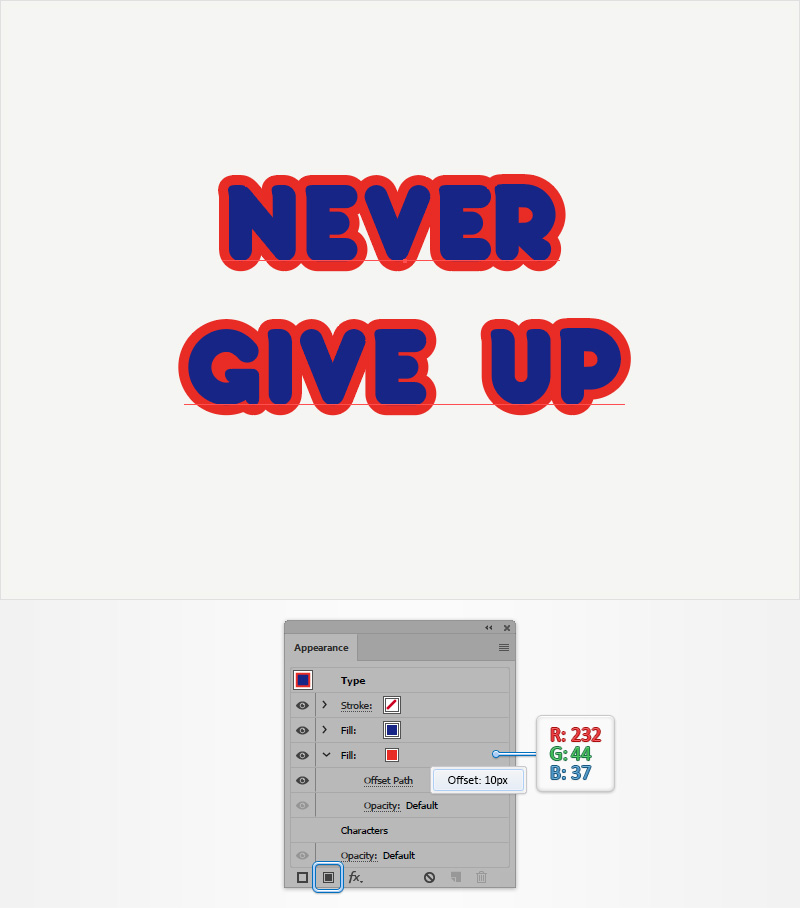
Make sure that your text stays selected, keep focusing on the Appearance panel, and add a second fill.
Select this new fill and set the color to R=232 G=44 B=37. Drag it below the existing fill and go to Effect > Path > Offset Path. Enter a 10 px Offset and click OK.
Step 6
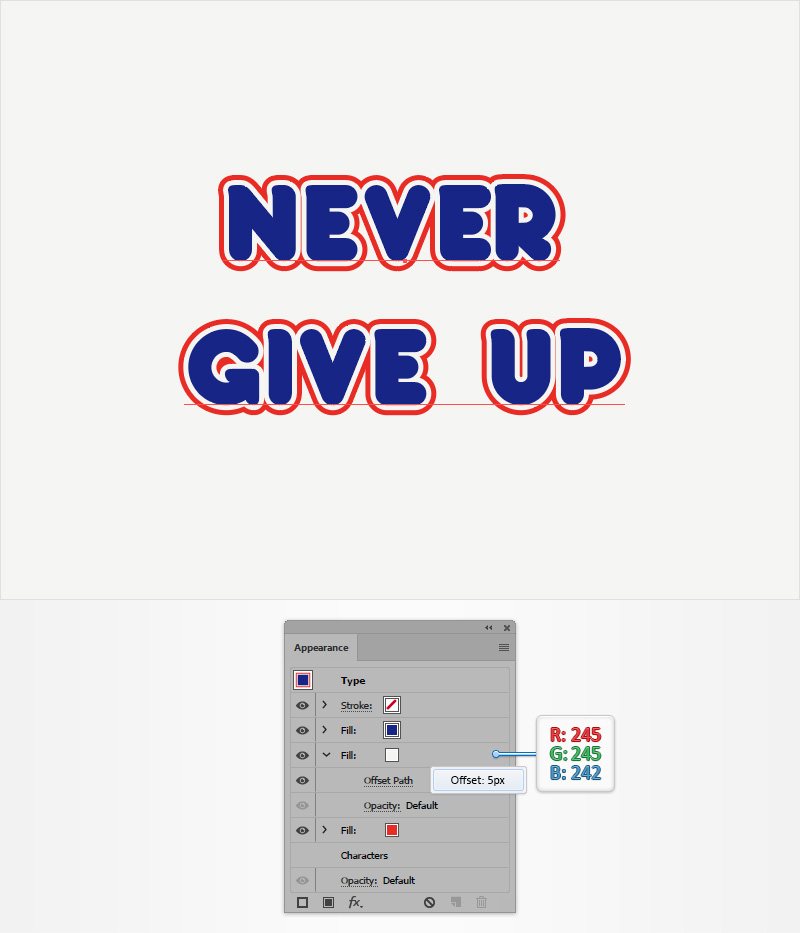
Make sure that your text stays selected, keep focusing on the Appearance panel, and add a third fill.
Select this new fill and set the color to R=245 G=245 B=242. Drag it between the existing fill and go to Effect > Path > Offset Path. Enter a 5 px Offset and click OK.
Step 7
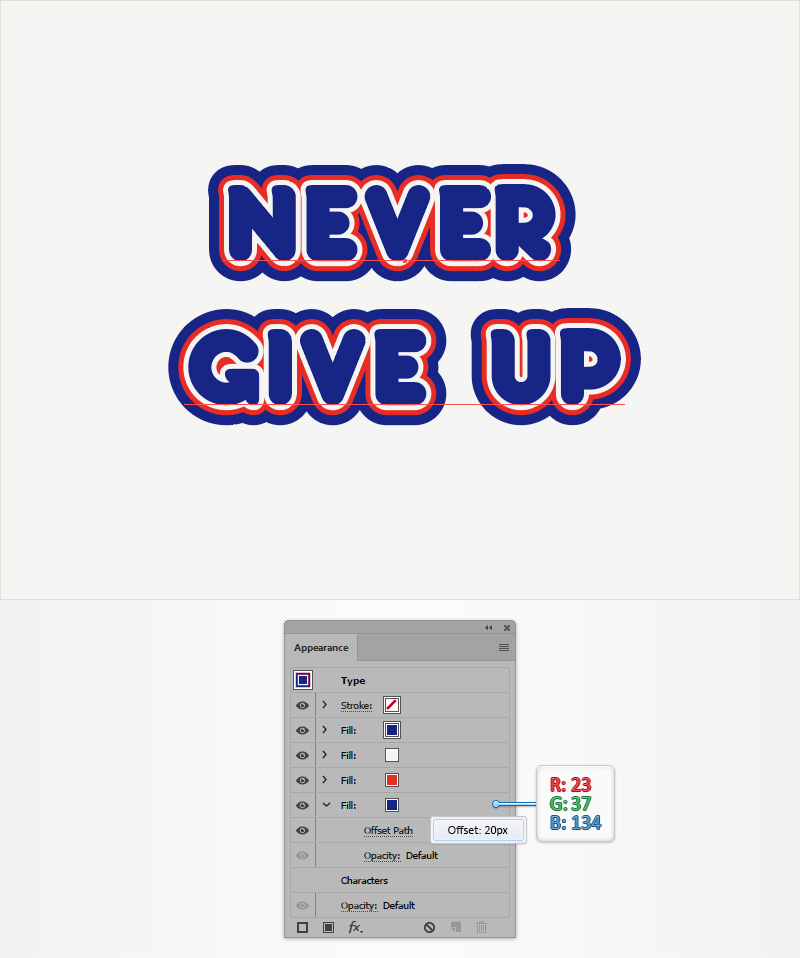
Make sure that your text stays selected, keep focusing on the Appearance panel, and add a fourth fill.
Select this new fill and set the color to R=23 G=37 B=134. Drag it in the bottom of the panel and go to Effect > Path > Offset Path. Enter a 20 px Offset and click OK.
Step 8
Make sure that your text stays selected, keep focusing on the Appearance panel, and add a fifth fill.
Select this new fill and set the color to R=232 G=44 B=37. Drag it in the bottom of the panel and go to Effect > Path > Offset Path. Enter a 25 px Offset and click OK.
Step 9
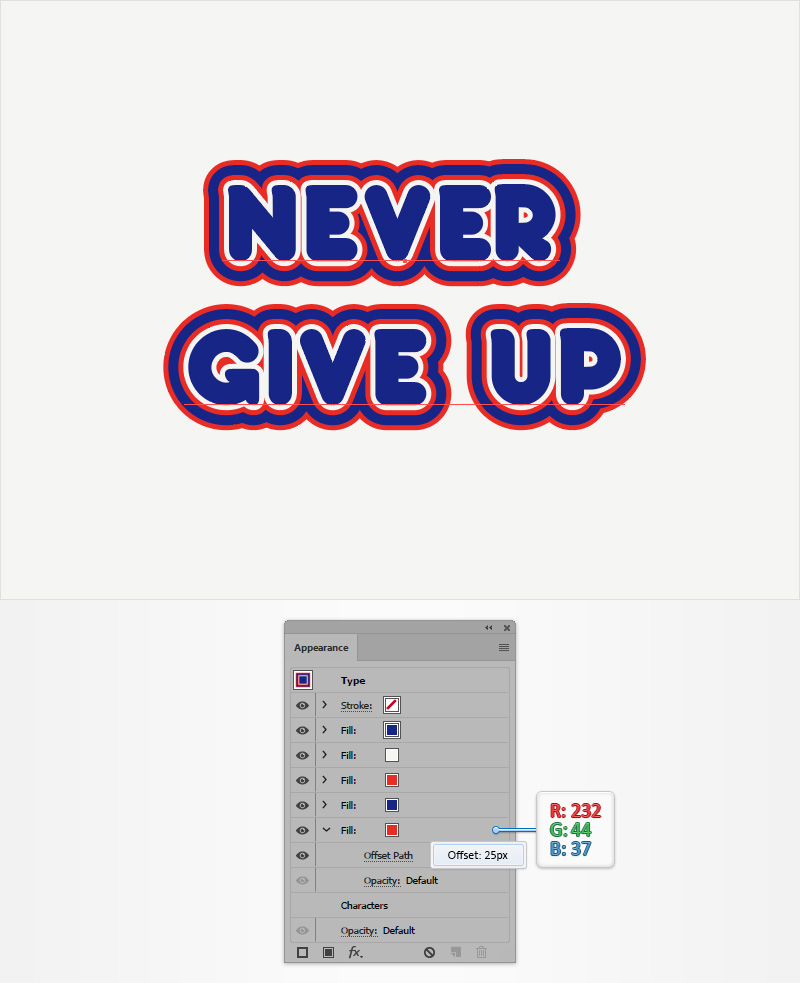
Make sure that your text stays selected, keep focusing on the Appearance panel, and add a sixth fill.
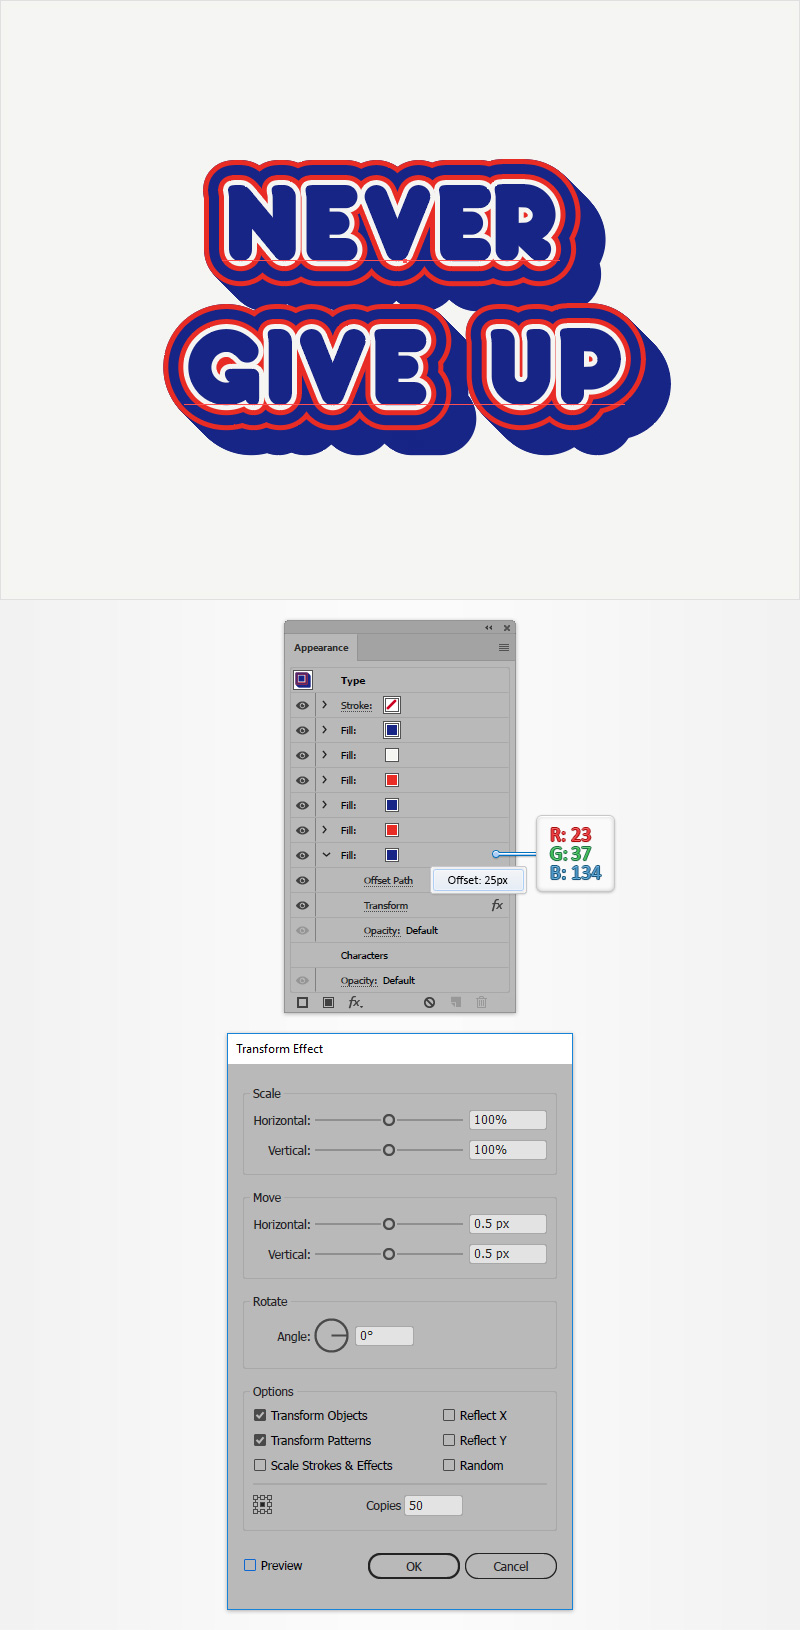
Select this new fill and set the color to R=23 G=37 B=134. Drag it in the bottom of the panel and go to Effect > Path > Offset Path. Enter a 25 px Offset, click OK and go to Effect > Distort & Transform > Transform.
Enter the attributes shown in the following image and click OK.
Step 10
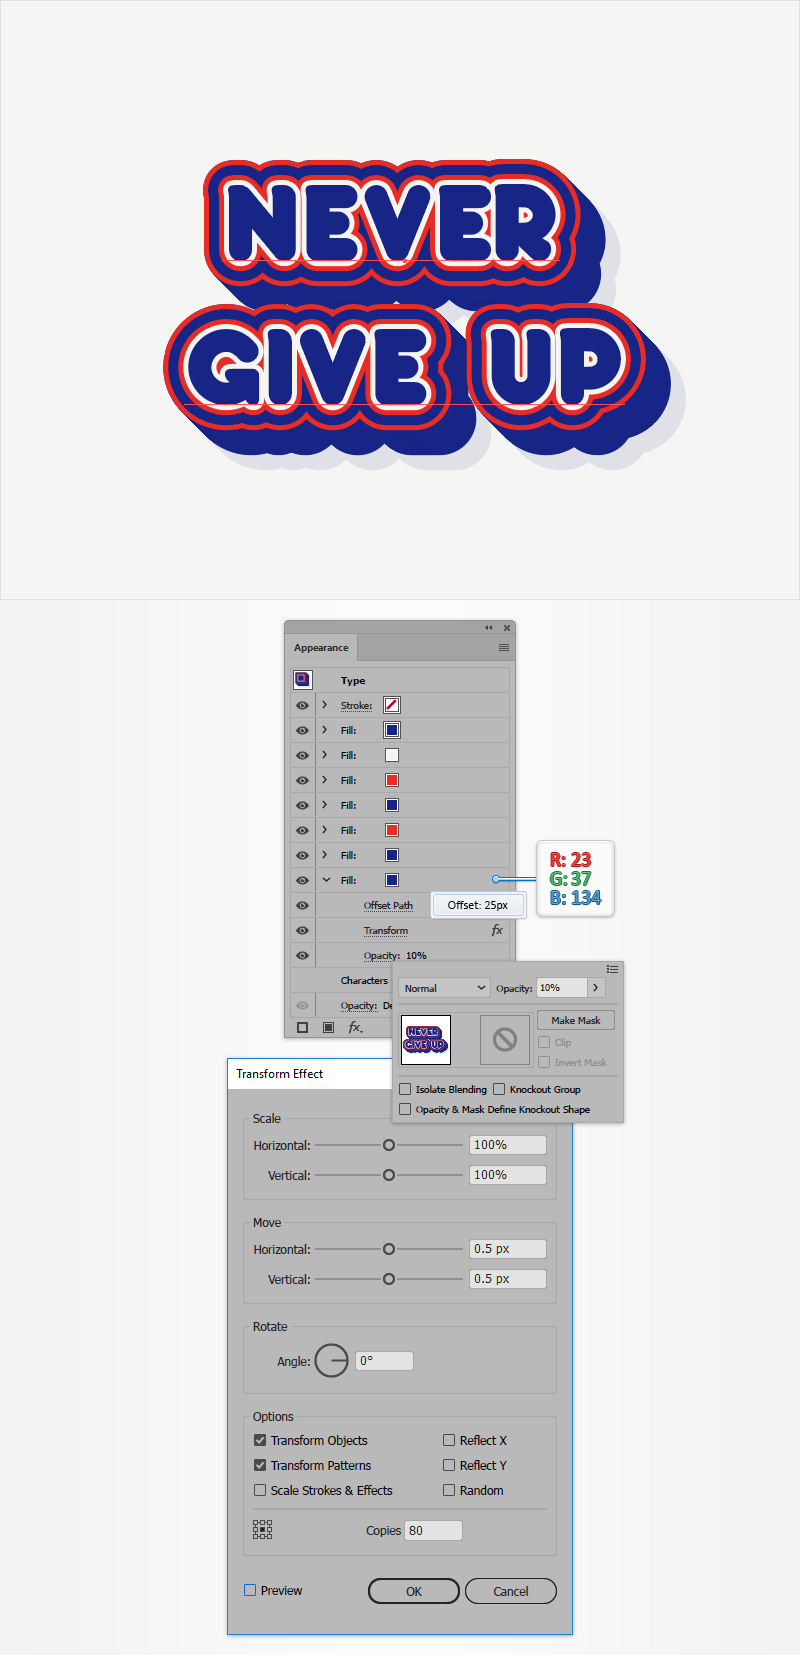
Make sure that your text stays selected, keep focusing on the Appearance panel, and add a seventh fill.
Select this new fill, set the color to R=23 G=37 B=134 and lower its Opacity to 10%. Drag it in the bottom of the panel and go to Effect > Path > Offset Path. Enter a 25 px Offset, click OK and go to Effect > Distort & Transform > Transform.
Enter the attributes shown in the following image and click OK.
Step 11
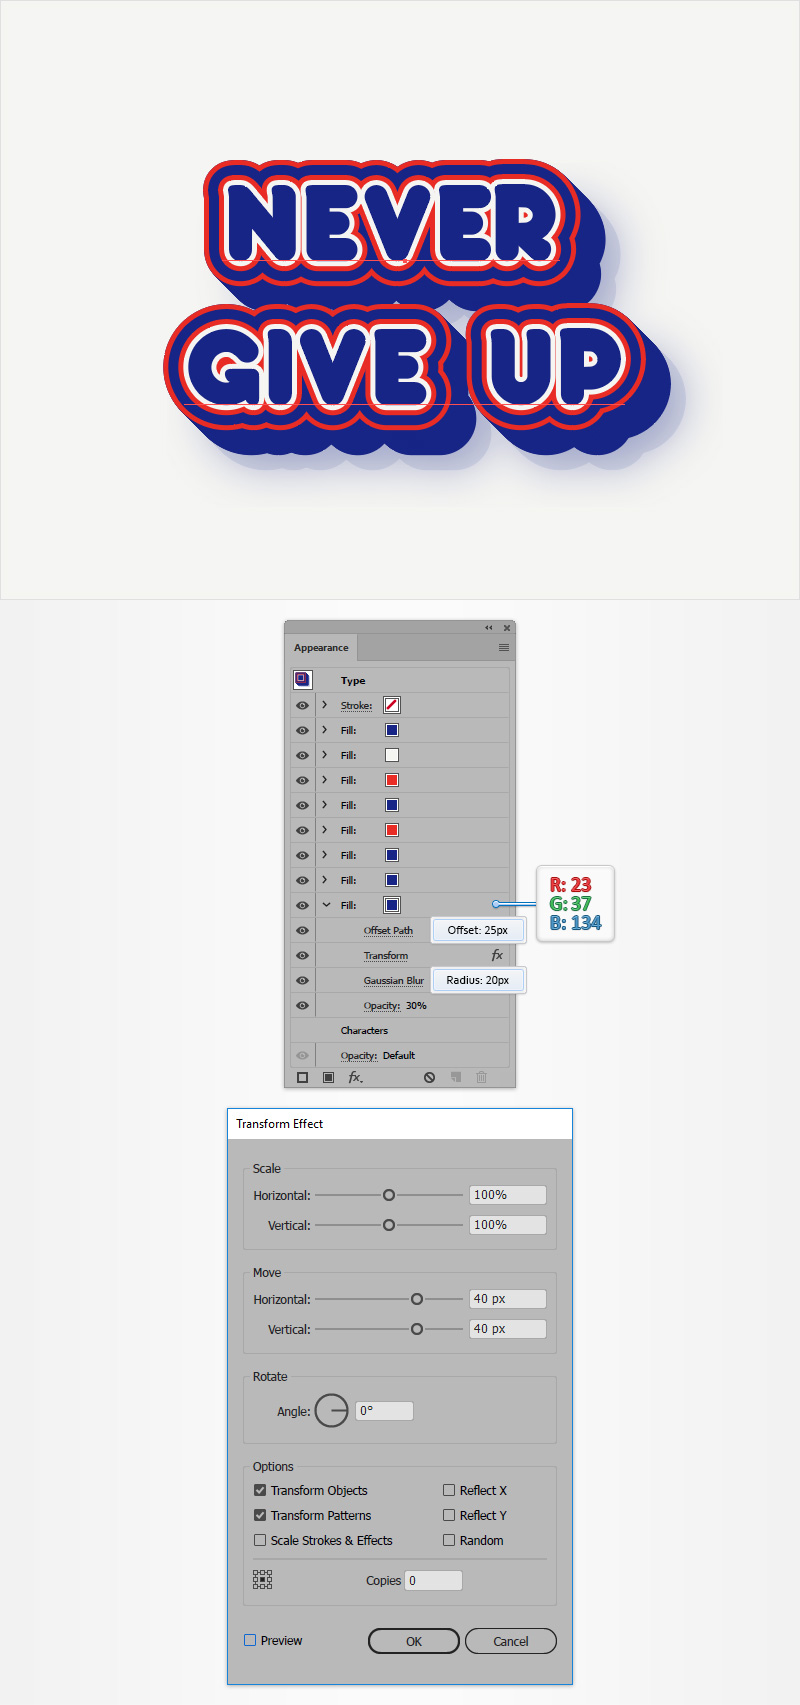
Make sure that your text stays selected, keep focusing on the Appearance panel, and add one last fill.
Select this new fill, set the color to R=23 G=37 B=134 and lower its Opacity to 30%. Drag it in the bottom of the panel and go to Effect > Path > Offset Path. Enter a 25 px Offset, click OK and go to Effect > Distort & Transform > Transform.
Enter the attributes shown in the following image, click OK and go to Effect > Blur > Gaussian Blur. Enter a 20 px Radius and click OK.
Step 12
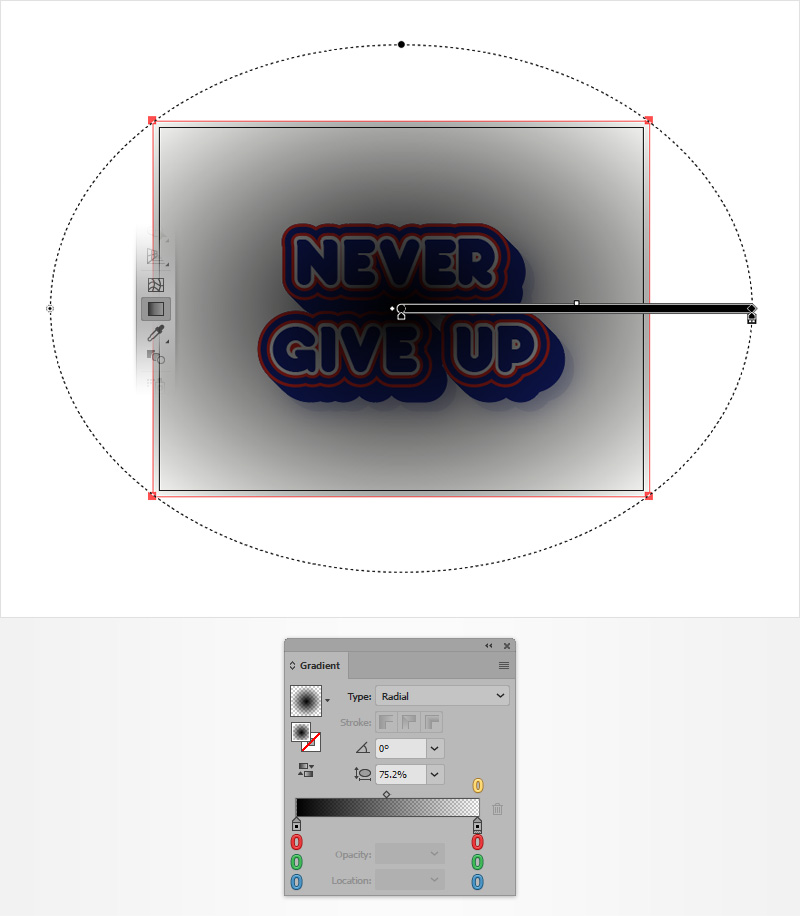
Select your background rectangle, add a copy in front (Control + C > Control + F) and bring it to front (Shift + Control + ]).
Make sure that this new shape stays selected and replace the flat color used for the fill with the radial gradient shown below. Use the Gradint Tool (G) to stretch your gradient as shown below. Remember to lower the opacity for the right gradient slider to 0% from the Gradient panel (Window > Gradient).
Step 13
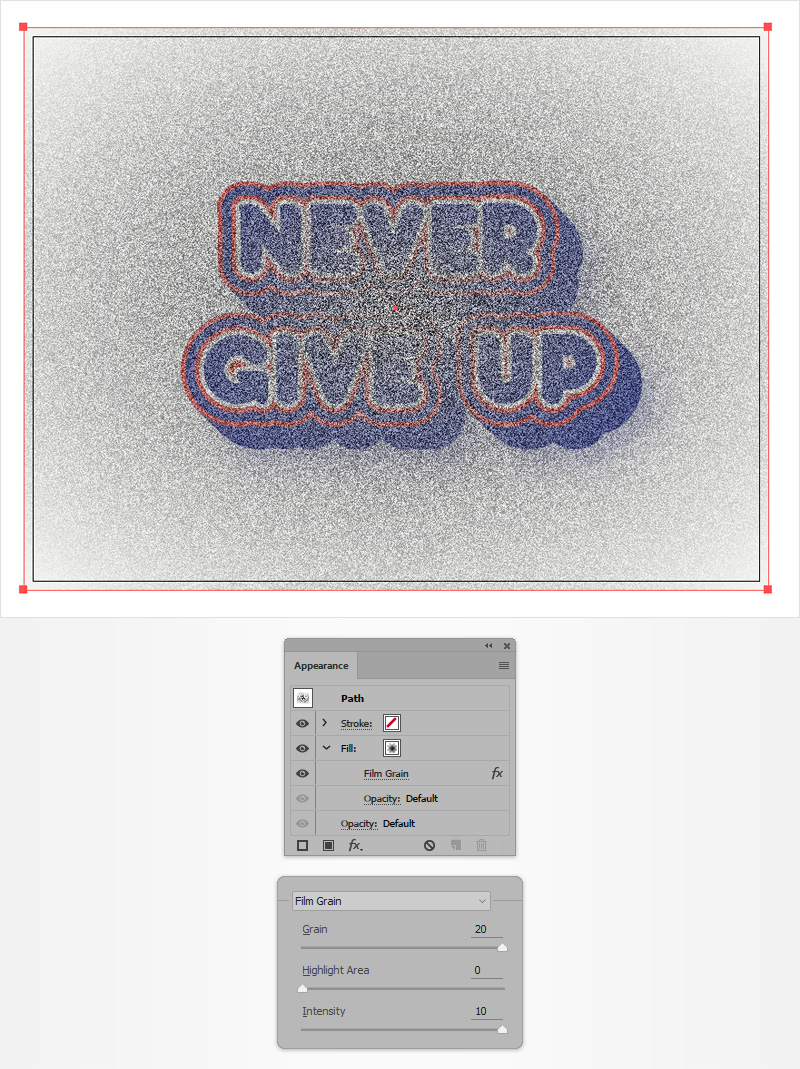
Make sure that your gradient filled rectangle stay selected and focus on the Appearance panel.
Select the existing fill and go to Effect > Artistic > Film Grain. Enter the attributes shown below and click OK.
Step 14
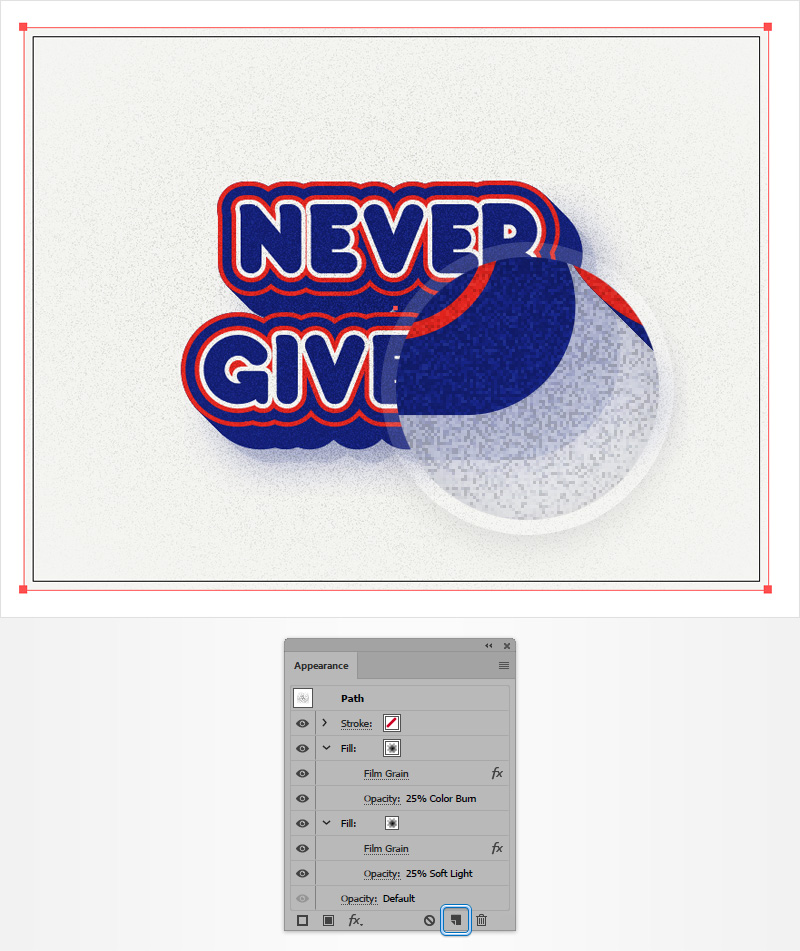
Make sure that your gradient filled rectangle stay selected and keep focusing on the Appearance panel.
Select the existing fill, lower its Opacity to 25% and change the Blending Mode to Soft Light.

Step 15
Make sure that your gradient filled rectangle stay selected and keep focusing on the Appearance panel.
Select the existing fill and duplicate using the Duplicate Selected Item button. Select the newly added fill and just change its Blending Mode to Color Burn.
And We’re Done!
Here is how it should look. I hope you’ve enjoyed this tutorial and can apply these techniques in your future projects.
