In this Illustrator tutorial you will learn how to create a Christmas planet card.
You will learn how to draw basic shapes, apply gradients for more realism and use some basic effects. Moreover, we will learn some basic vector techniques which will enrich our graphic design knowledge.
Final Image
As always, this is the final image that we’ll be creating:

Tutorial Details
- Program: Adobe Illustrator CS6
- Estimated Completion Time: 120 minutes
- Difficulty: Beginner-Intermediate
Step 1
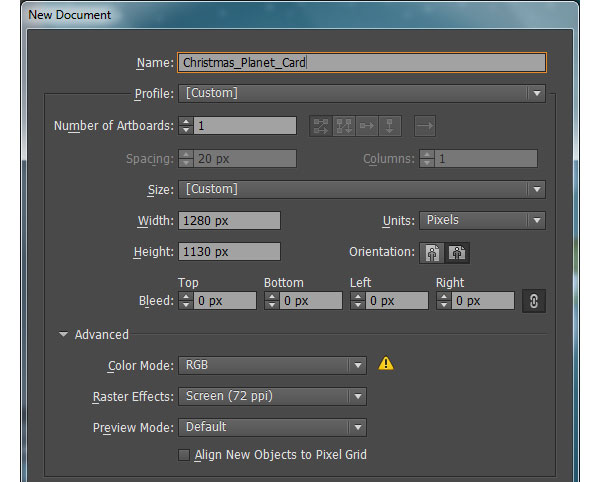
Launch Illustrator and then press (Ctrl + N) to create a New document.
Select Pixels from the Units drop-down menu, enter 1280 in the width box and 1130 in the height box then click on the Advanced button. Select RGB, Screen (72ppi) and make sure that the Align New Objects to Pixel Grid box is unchecked before you click OK.
Step 2
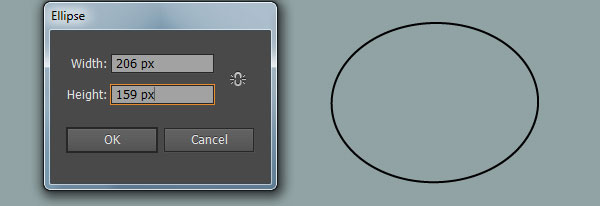
First of all, we’ll create the snowman. Pick the Ellipse Tool (L)
and create a 206 by 150px ellipse.
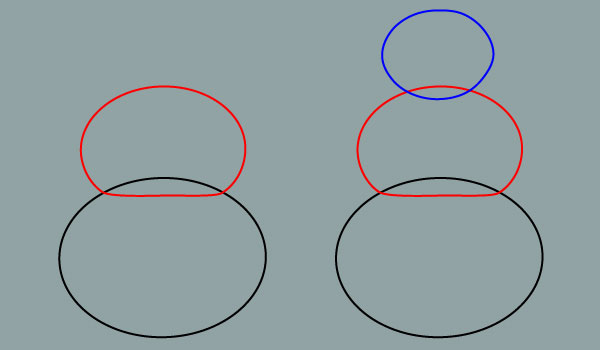
Next, with the Pen Tool (P), create two objects as you see in the second and the third images.
Step 3
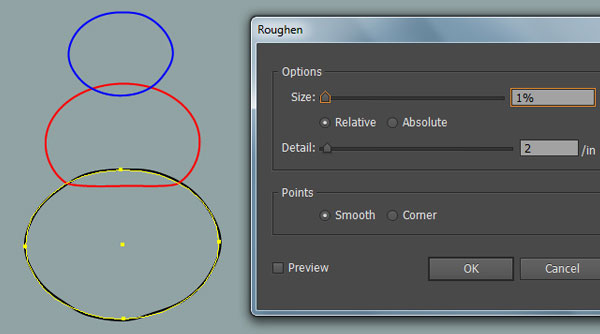
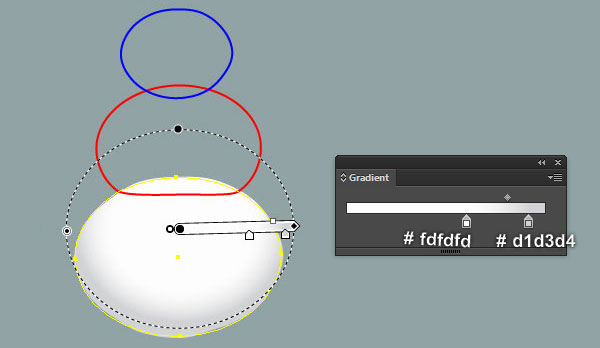
Select the black ellipse created in step 2 and go to the Effect > Distort & Transform > Roughen… Follow the data shown below and click OK.
Go to Object > Expand Appearance.
Keep the resulting object selected, remove its stroke and fill this object with the radial gradient you see in the second image.
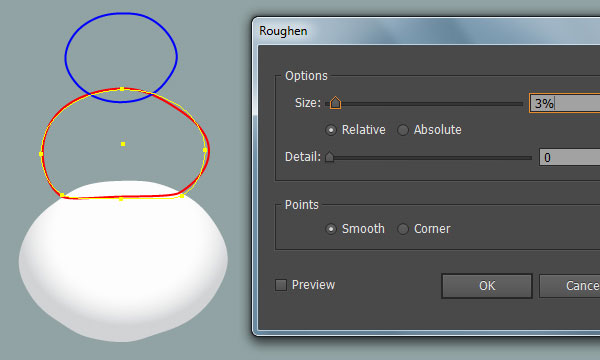
Next select the red object created in step 2 and go to Effect > Distort & Transform > Roughen… Follow the data shown in the third image and click OK, then go to the Object > Expand Appearance.
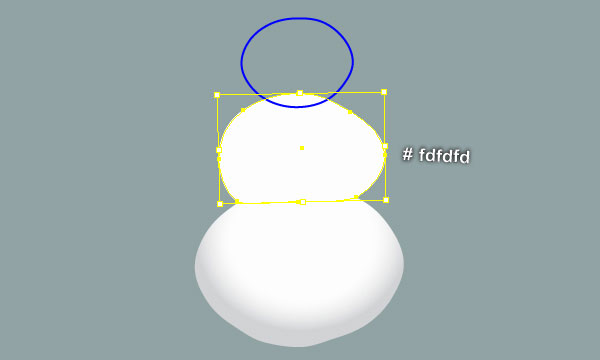
Make sure that the resulting object is still selected, remove its stroke and then fill this object with white (# fdfdfd).
Step 4
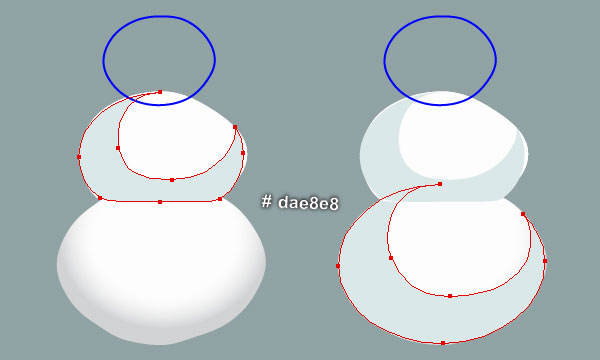
Pick the Pen Tool (P) and create two light gray cyan shapes (# dae8e8) as shown below.
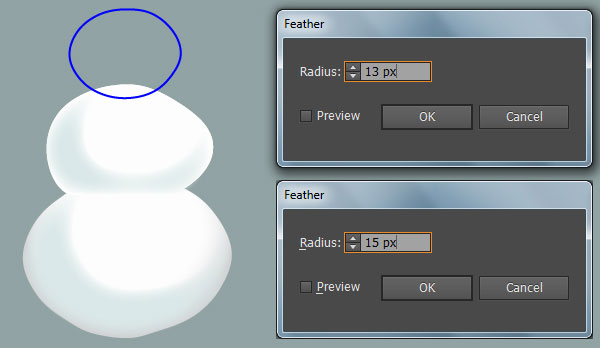
Reselect the upper shape created in this step and go to Effect > Stylize > Feather… Enter a 13px Radius and click OK.
Next select the remaining shape created in this step and apply a 15px Feather effect to it.
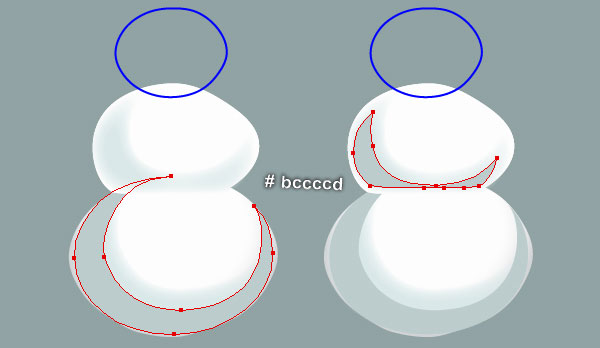
Continue with the Pen Tool (P), create two gray cyan shapes (# bccccd) as you see in the fourth and the fifth images.
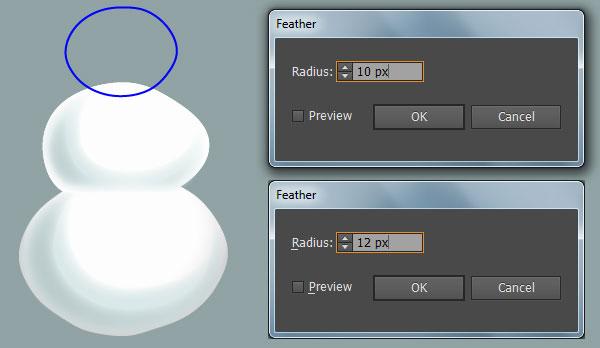
Finally, apply the Feather effects to the newly created shapes as shown in the last image.
Step 5
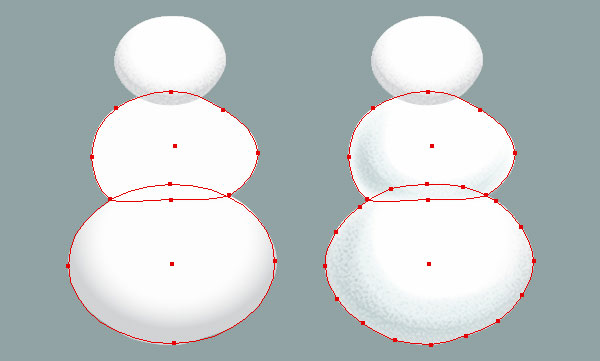
Select the blue object created in step 2, remove its stroke and fill this object with the radial gradient shown below.
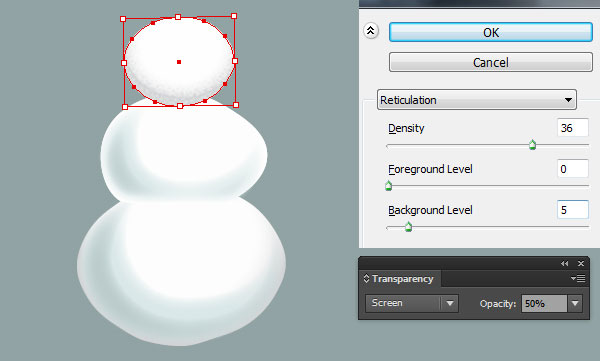
Make a copy (Ctrl +C, Ctrl +F) of the newly created shape, then go to Effect > Sketch > Reticulation… Follow the data you see in the second image and click OK.
Keep the resulting shape selected, set the Blending Mode to Screen and reduce its Opacity to 50%.
Now select two shapes created in step 3 and make a copy of them. Still having the copies selected, pick the Eyedropper Tool (I) and click on the shape with Reticulation effect applied in this step.
Finally, hide the resulting shapes behind the first shape created in this step.

Step 6
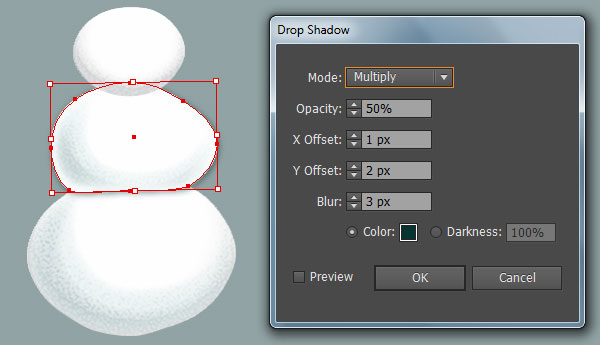
Select the upper shape created in step 3 and make a copy (Ctrl +C, Ctrl +F) of it, then go to Effect > Stylize > Drop Shadow… Follow the data you see in the image below and click OK.
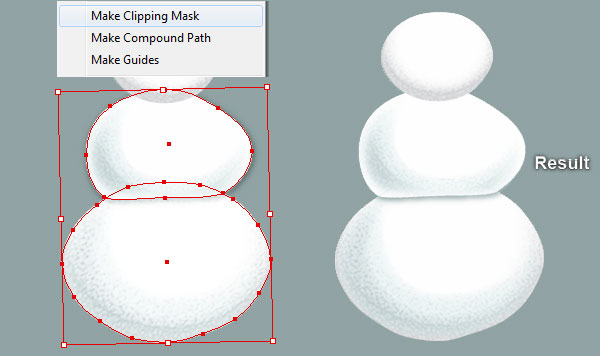
Now select the lower shape created in step 3, make a copy of it and bring the copy to front (Ctrl +Shift +Right Square Bracket).
Keep this copy selected, hold down the Shift key and click on the shape with shadow effect applied in this step.
Right click on the artboard and then select the Make Clipping Mask section from the drop-down menu.
Finally, hide the clipping set behind the upper shape created in step 3.
Step 7
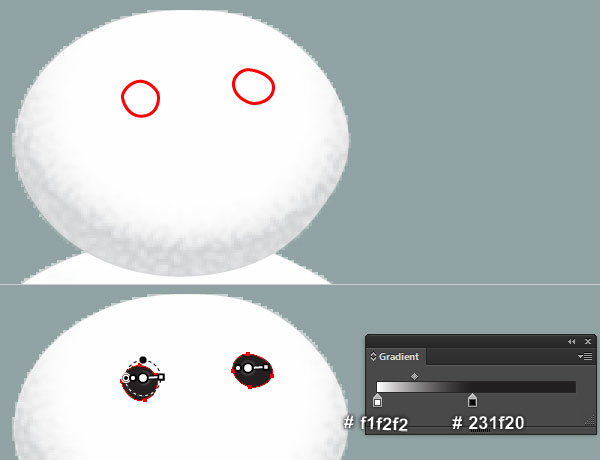
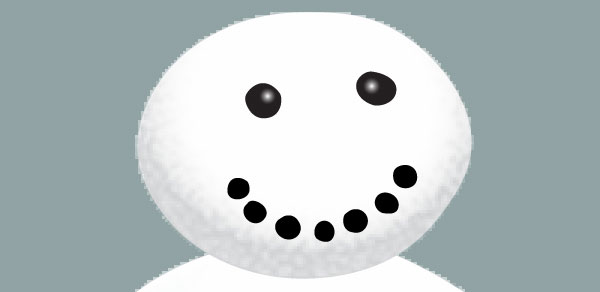
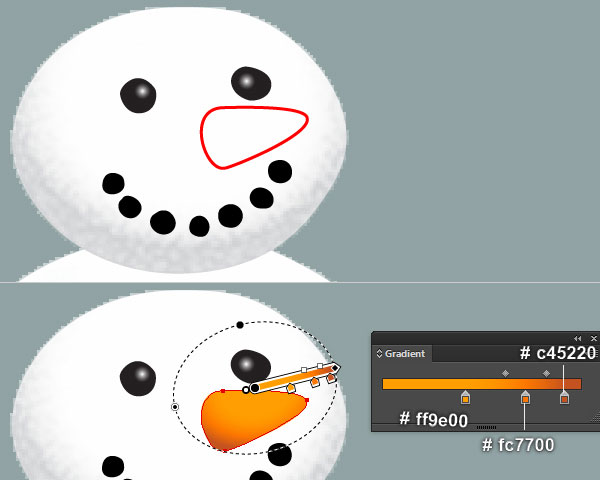
With the help of the Pen Tool (P) and the Gradient Tool (G), create eyes, mouth and nose for the snowman.
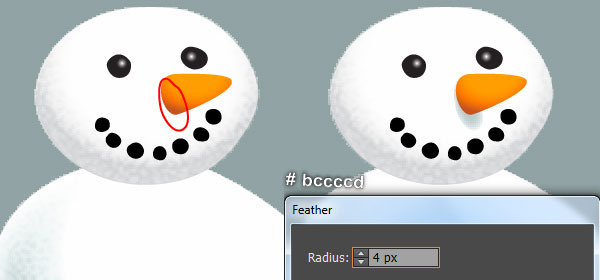
Next focus on the last two images, create a gray cyan shape (# bccccd). Then apply a 4px Feather effect to the newly created shape and hide it behind the nose.
Step 8
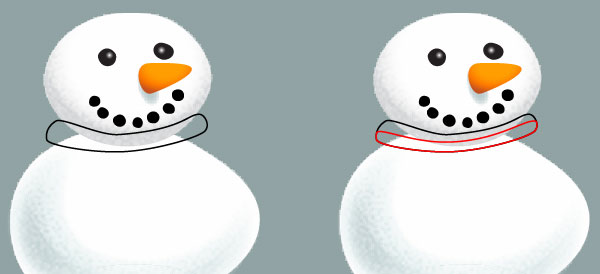
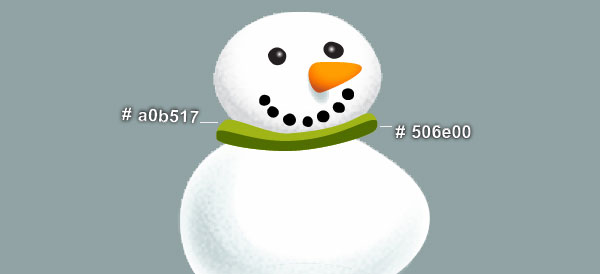
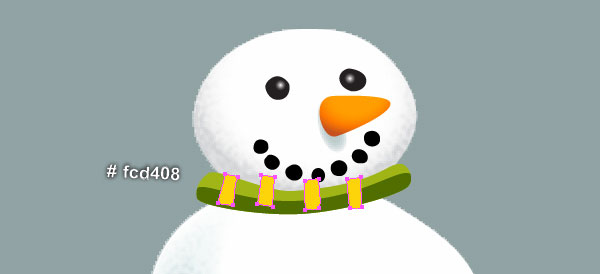
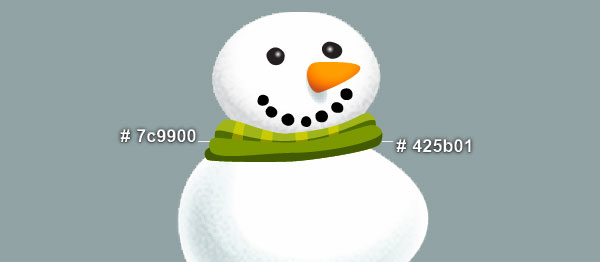
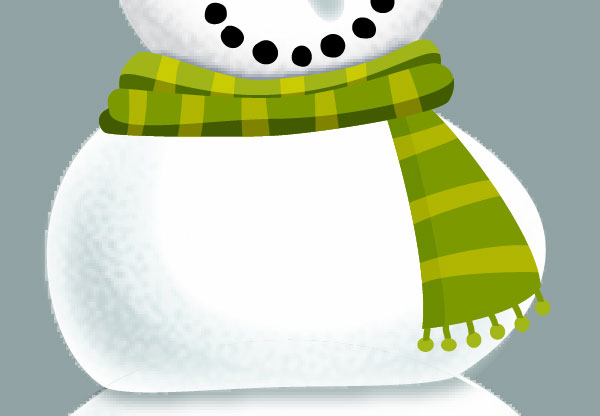
It’s time to draw the scarf. With the Pen Tool (P), create six shapes as you see in the images below.
Once your shapes are drawn, reselect and group (Ctrl +G) four yellow shapes.
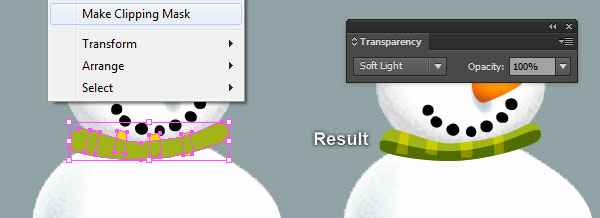
Now select the biggest shape created in this step and make a copy (Ctrl +C, Ctrl +F) of it, then bring the copy to front (Ctrl +Shift +Right Square Bracket).
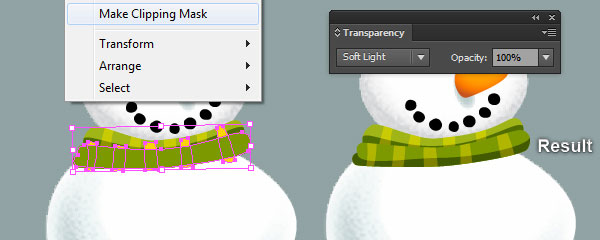
Keep this copy selected, hold down the Shift key and click on the group created in this step.
Right click on the artboard and then select the Make Clipping Mask section from the drop-down menu.
Finally set the Blending Mode of the clipping set to Soft Light.
Step 9
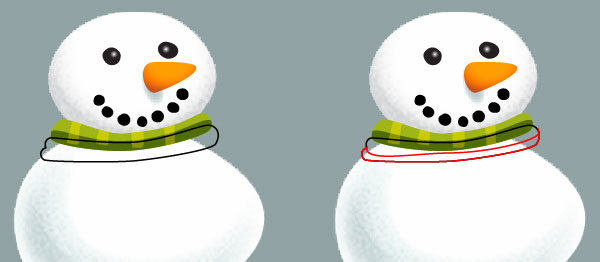
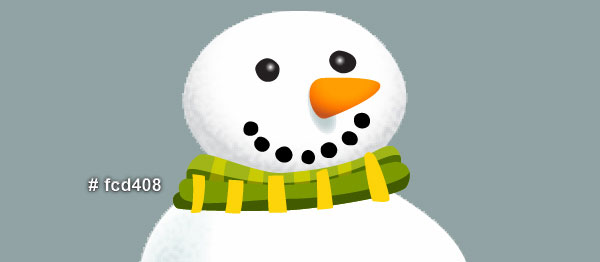
Now, follow the sequence of images and repeat the same process as in step 8 to draw the lower part of the scarf.
Step 10
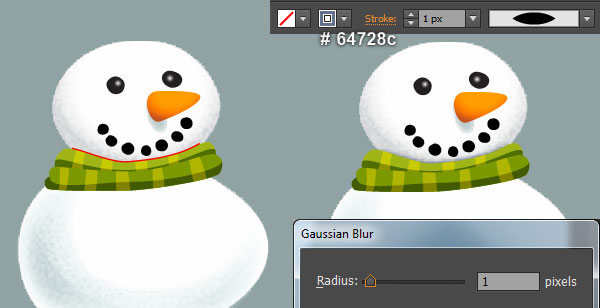
Pick the Pen Tool (P) and create a curved path as shown in the first image.
Reselect the newly created path, replace the existing stroke color with dark blue (# 64728c).
Next apply Width Profile 1 and a 1px Gaussian Blur effect to the resulting path.
Step 11
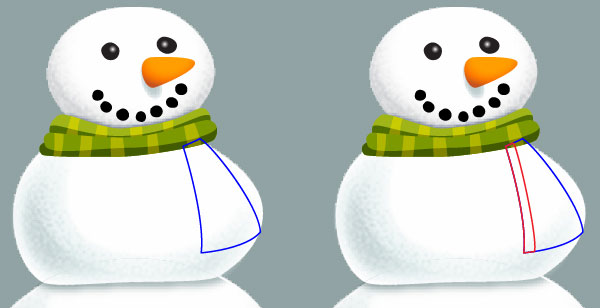
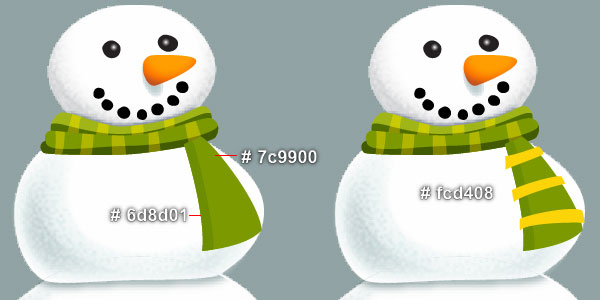
With the Pen Tool (P), create five shapes as you see in the images below.
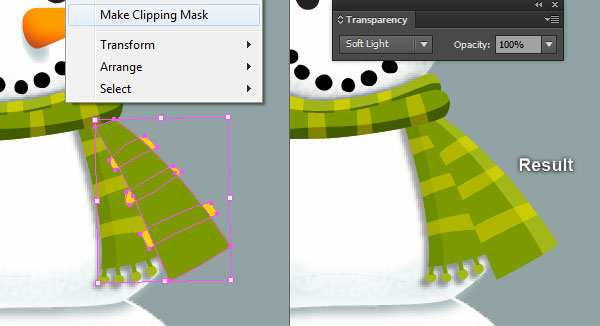
Once your shapes are drawn, reselect and group (Ctrl +G) three yellow shapes.
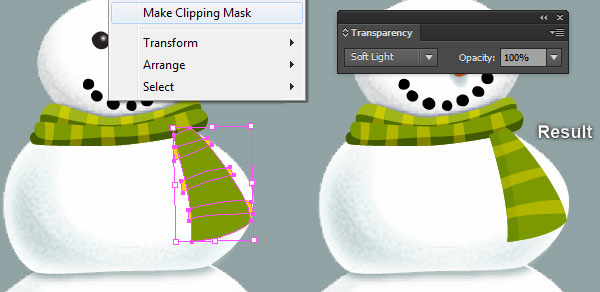
Now select the biggest shape created in this step and make a copy (Ctrl +C, Ctrl +F) of it, then bring the copy to front (Ctrl +Shift +Right Square Bracket).
Keep this copy selected, hold down the Shift key and click on the group created in this step.
Right click on the artboard and then select the Make Clipping Mask section from the drop-down menu.
Finally set the Blending Mode of the clipping set to Soft Light.
Step 12
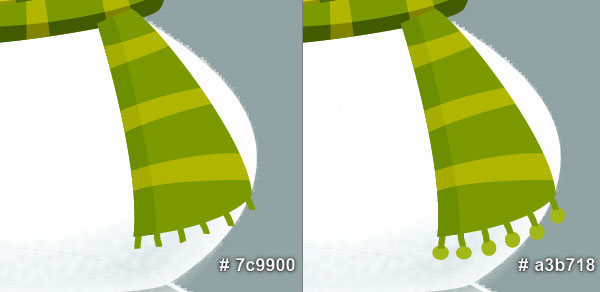
Follow the sequence of images and draw some details similar to the ones shown below.
Step 13
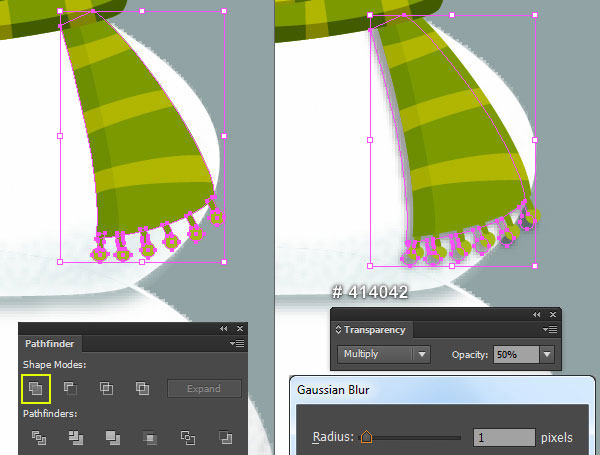
Select all objects created from the beginning of step 11 to this time, then hide them behind the lower part of the scarf.
Now select the biggest shape created in step 11 and all shapes created in step 12.
Open the Pathfinder palette (Window > Pathfinder) and click on the Unite button, then replace the existing color of the resulting shape with dark gray (# 414042).
Keep this new shape selected, apply a 1px Gaussian Blur then set it to Blending Mode Multiply and reduce the Opacity to 50%.
Finally, hide the resulting shape behind the biggest shape created in step 11.
Step 14
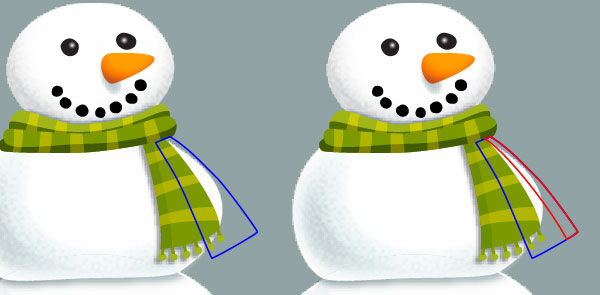
Now, follow the sequence of images and repeat the same process as in step 11 to draw the remaining part of the scarf.
Step 15
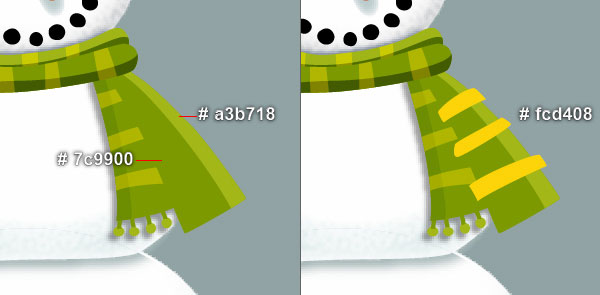
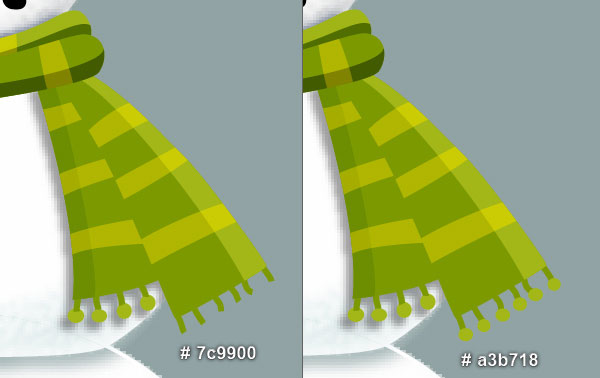
Follow the sequence of images and draw some details similar to the ones shown below.
Step 16
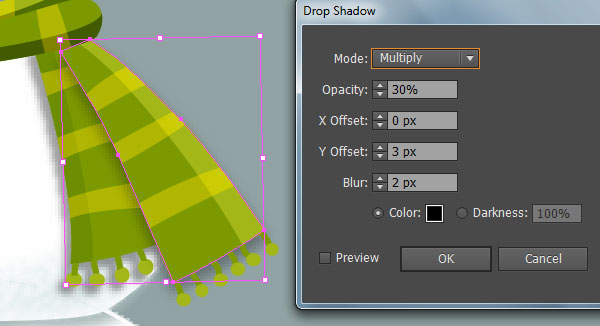
Select the biggest shape created in step 14 and make a copy (Ctrl +C, Ctrl +F) of it, then apply the shadow effect for this copy as shown below.
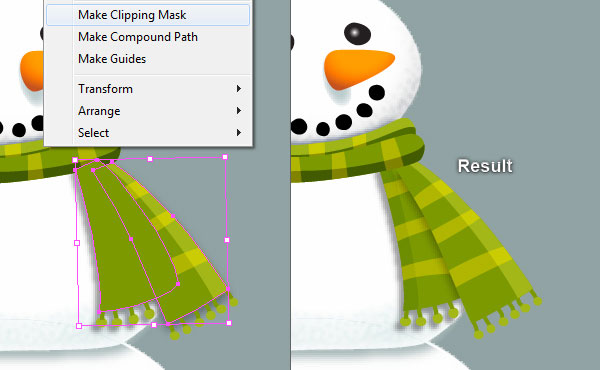
Next select the biggest shape created in step 11 and make a copy of it, then bring the copy to front (Ctrl +Shift +Right Square Bracket).
Keep this copy selected, hold down the Shift key and click on the shape with shadow effect applied in this step.
Right click on the artboard and then select the Make Clipping Mask section from the drop-down menu.
Finally, hide the clipping set behind the biggest shape created in step 14.
Step 17
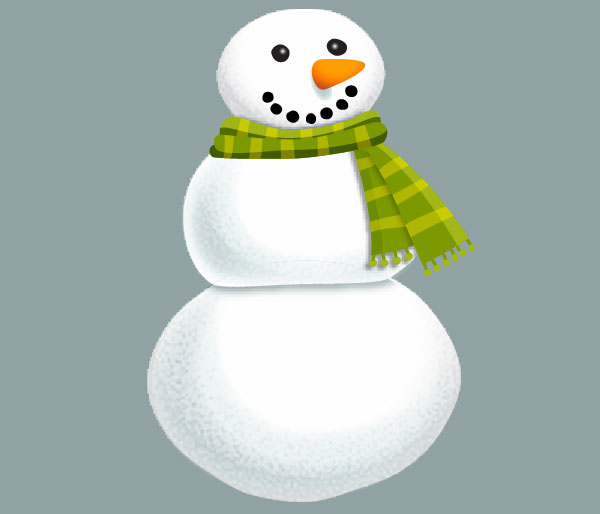
At this point your snowman should look like in the next image:
Step 18
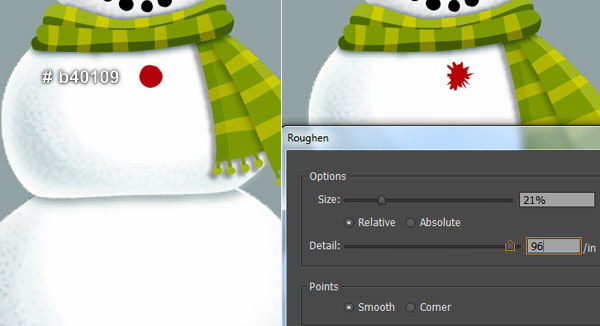
Pick the Pen Tool (P) and create a red shape (# b40109) as shown below.
Make a copy (Ctrl +C, Ctrl +F) of the red shape and then press (Ctrl +3) to hide this copy.
Reselect the red original shape and go to Effect > Distort & Transform > Roughen… Follow the data you see in the second image and click OK.
Before you continue, press (Ctrl +Alt +3) to show the shape hidden in this step. Then replace the existing color of this shape with the radial gradient shown in the third image.
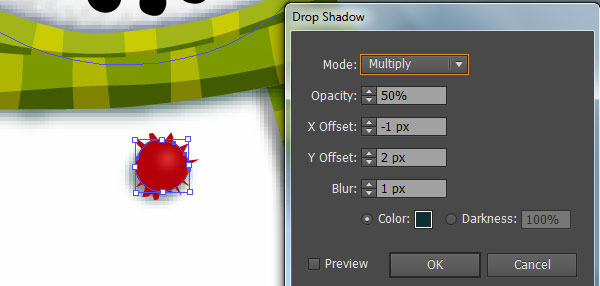
Make sure that the resulting shape is still selected and go to the Effect > Stylize > Drop Shadow… Follow the data shown in the fourth image and click OK.
Now select and group (Ctrl + G) all objects created in this step. Make two copies of this newly created group and then place them in the positions shown in the last image.


Step 19
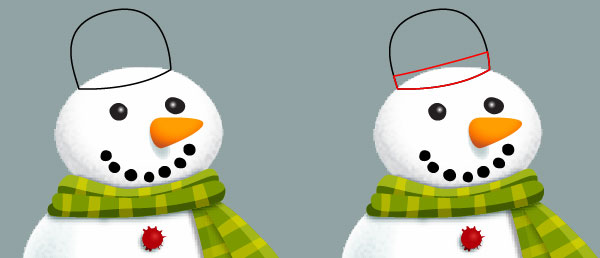
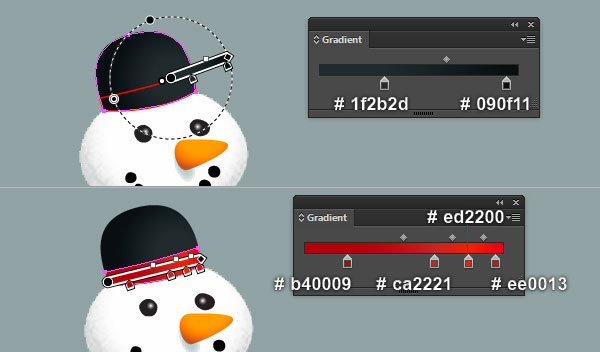
Next comes the hat. With the help of the Pen Tool (P) and the Gradient Tool (G), create three shapes as shown in the images below.

Step 20
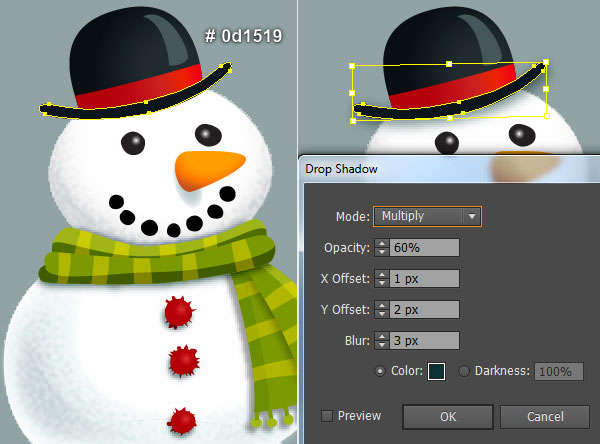
Continue with the Pen Tool (P), create a black shape (# 0d1519) as shown below.
Reselect the newly created shape and make a copy (Ctrl +C, Ctrl +F) of it, then apply the Shadow effect to this copy.
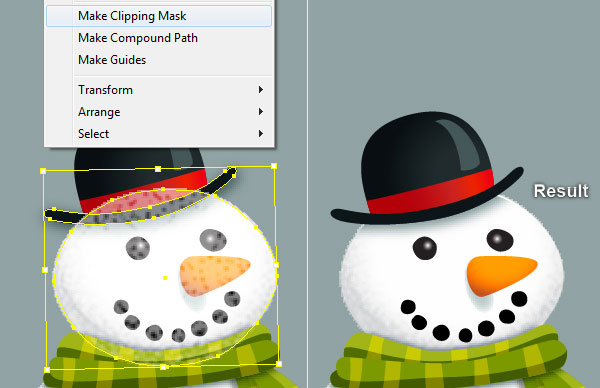
Now select the top shape with Reticulation effect applied in step 5 and make a copy of it.
Then bring the copy to front (Ctrl +Shift +Right Square Bracket). Keep this copy selected, hold down the Shift key and click on the shape with shadow effect applied in this step.
Right click on the artboard and then select the Make Clipping Mask section from the drop-down menu.
Finally, hide the clipping set behind the hat.
Step 21
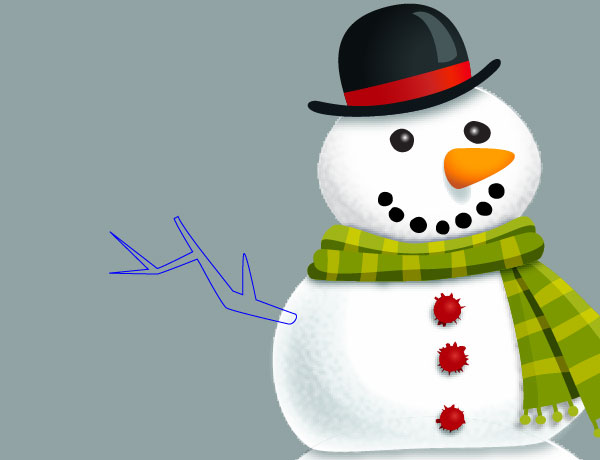
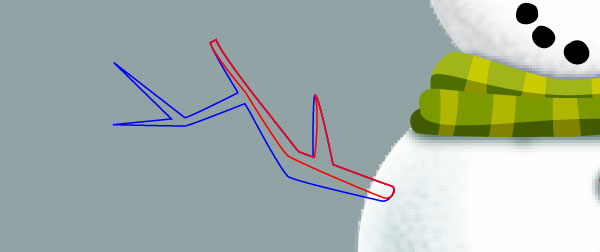
Pick the Pen Tool (P) and create two objects as you see in the first and the second images.
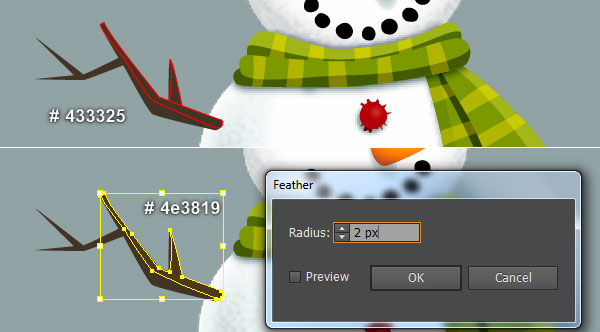
Once your objects are drawn, reselect the blue object and remove its stroke, then fill this object with dark brown (# 433325).
Next select the remaining object, remove its stroke and fill this object with brown (# 4e3819).
Finally apply a 2px Feather effect to the resulting shape.
Step 22
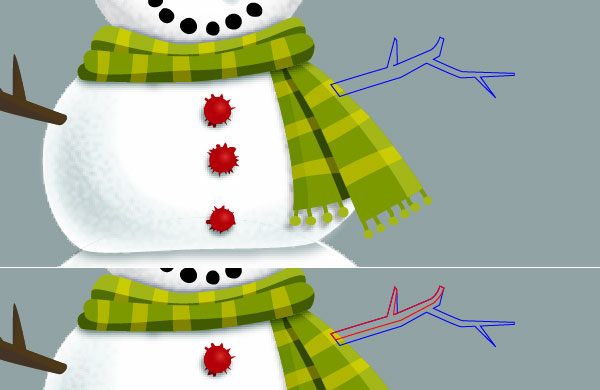
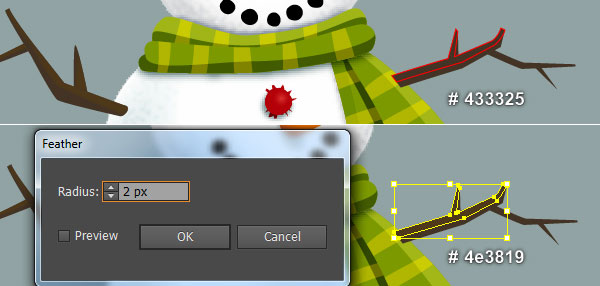
Follow the sequence of images and draw another hand for the snowman.
Step 23
At this point your snowman should look like in the next image:
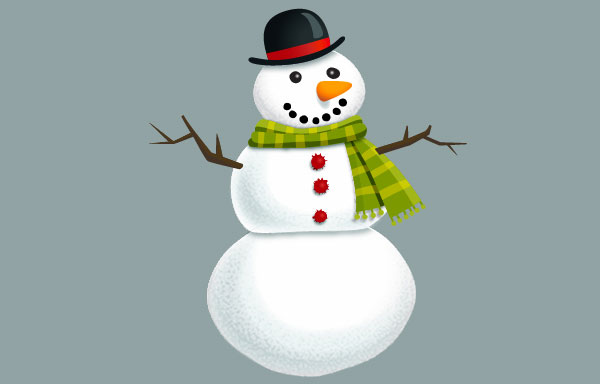
Step 24
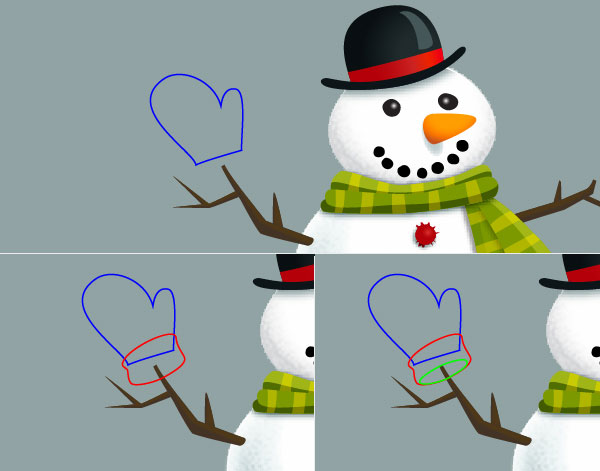
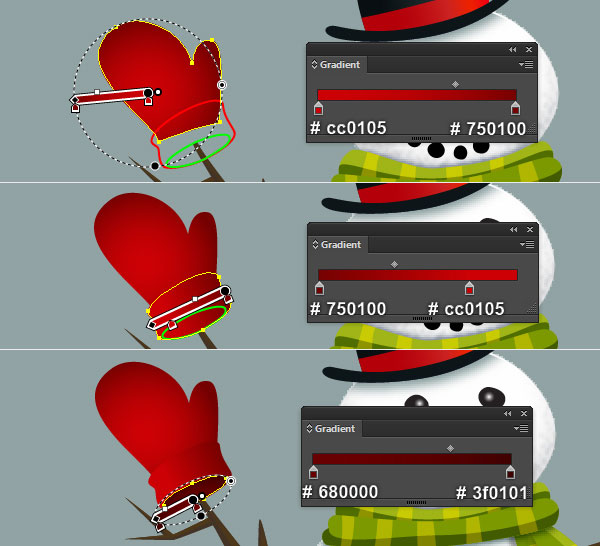
We will continue with the gloves. With the help of the Pen Tool (P) and the Gradient Tool (P), create three shapes as you see in the images below.
Step 25
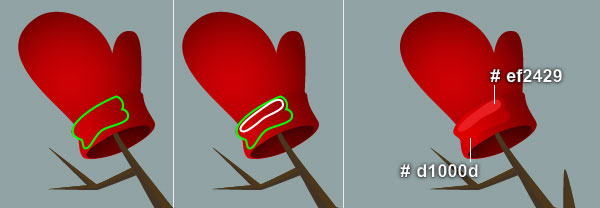
Continue with the Pen Tool (P), create two shapes as you see in the images below.
Reselect the two newly created shapes and apply a 5px Feather effect to them.

Step 26
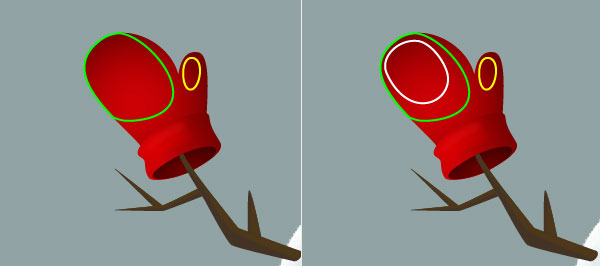
Keep working with the Pen Tool (P), create three objects as you see in the first and the second images.
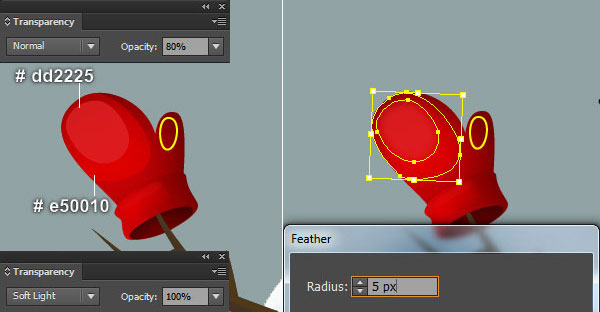
Once your objects are drawn, reselect the white object, remove its stroke and fill this object with bright red (# dd2225), then reduce the Opacity of the resulting shape to 80%.
Next select the green object, remove its stroke and fill this object with red (# e50010), then change the Blending Mode of the resulting shape to Soft Light.
Now reselect the two newly created shapes and apply a 5px Feather effect to them. Next select the yellow object, remove its stroke and fill this object with dark red (# ac0007), then set the Blending Mode of the resulting shape to Soft Light.

Step 27
Select and group (Ctrl + G) all objects created from the beginning of step 24 to this time.
We are done with the glove for the moment.
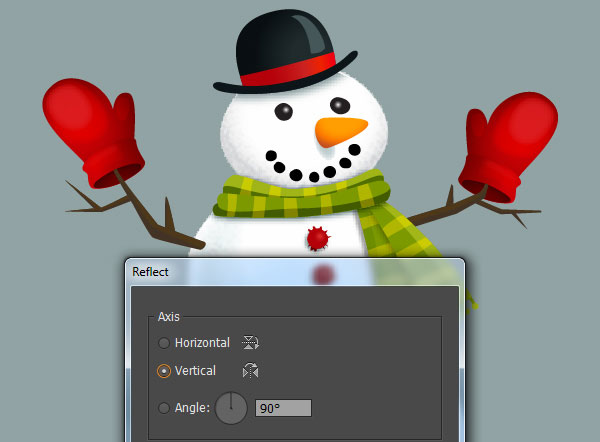
Let’s create the mirror image for the right side. Select the newly created group and go to the Object > Transform > Reflect…
Set the Axis to Vertical and then click Copy.
Drag the copy we have just created to the right and place it as shown in the image below.
Step 28
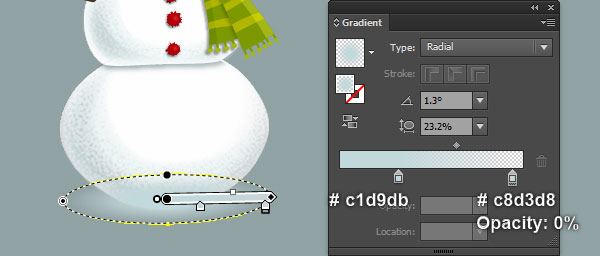
To give a more realistic look I’m going to be adding the shadow to the snowman.
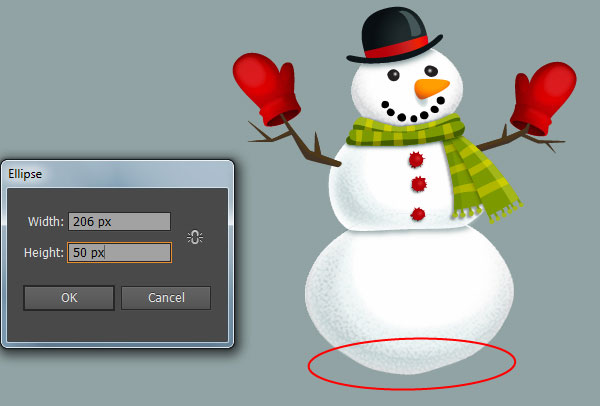
Pick the Ellipse Tool (L) and create a 206 by 50px ellipse, then place it in the position shown below.
Make sure that the newly created ellipse is still selected, remove its stroke and fill this object with the radial gradient. Finally, hide the resulting ellipse behind the snowman.
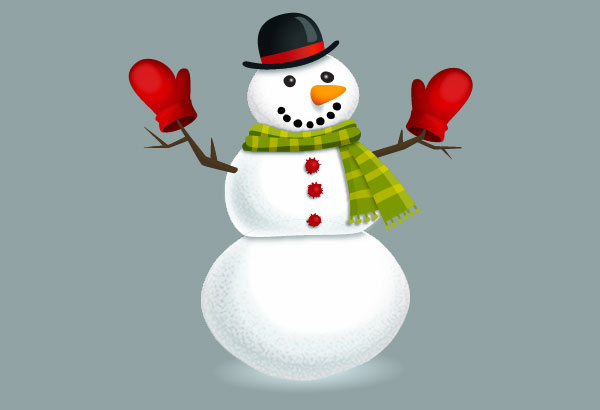
Now select and group (Ctrl + G) all objects created from the beginning of step 2 to this time, then name this group "Tall_Snowman".
The snowman is ready and looks like in the last image below.
Step 29
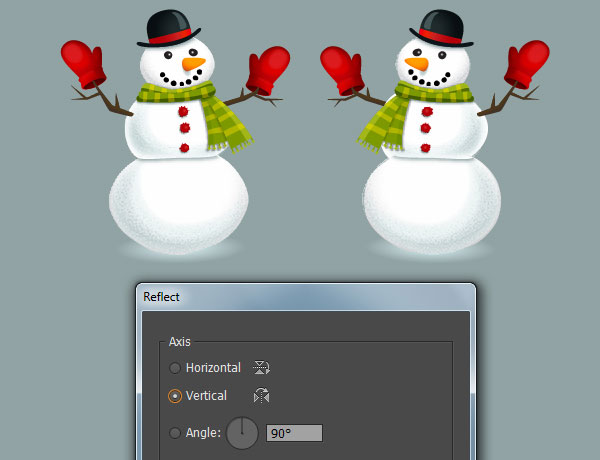
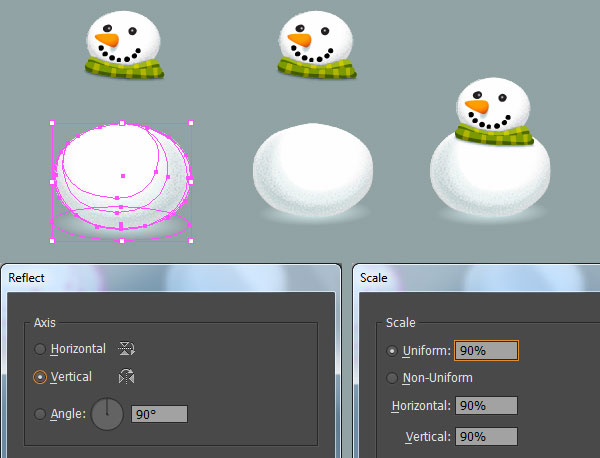
We will continue with another snowman. Select the "Tall_Snowman" group created in step 28 and go to Object > Transform > Reflect…
Check the Vertical box then hit the Copy button.
Select the resulting group, drag it to the right and place it as shown in the image below.
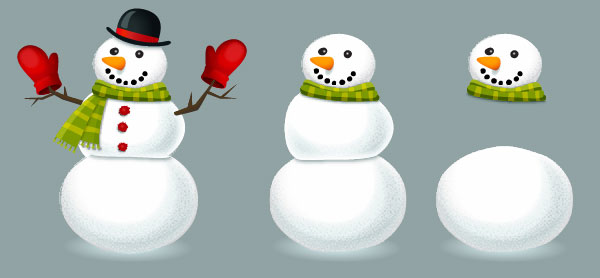
Keep the newly created group selected, press (Ctrl +Shift +G) to ungroup it.
Next, remove some parts of this new snowman to get the result as you see in the fourth image.
Now select all objects of the lower part of this snowman and go to Object > Transform > Reflect… Check the Vertical box then hit the OK button.
Still having the resulting objects selected and go to Object > Transform > Scale… Check Uniform and enter 90% in the Scale box, then click OK.
Next select all objects of the upper part of the snowman and move them to the position shown in the last image.
Step 30
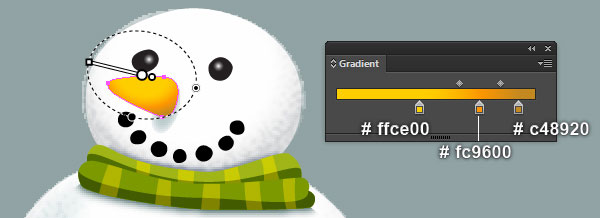
Select the nose shape of the new snowman and replace the existing color with the new radial gradient.
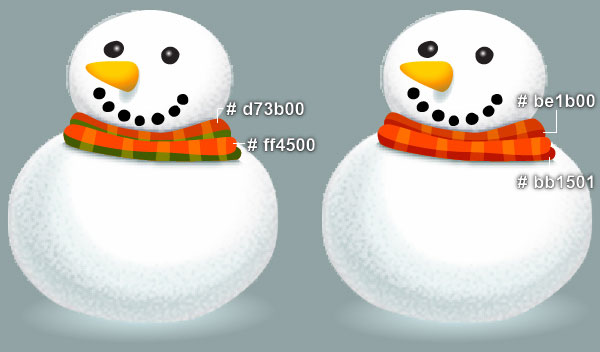
Next, replace the existing color of the four green shapes with orange as you see in the second and the third images.
Then draw two hands for this snowman.
Now select and group (Ctrl + G) all objects created from the beginning of step 29 to this time, then name this group "Short_Snowman".
The second snowman is ready and looks like in the last image below.

Step 31
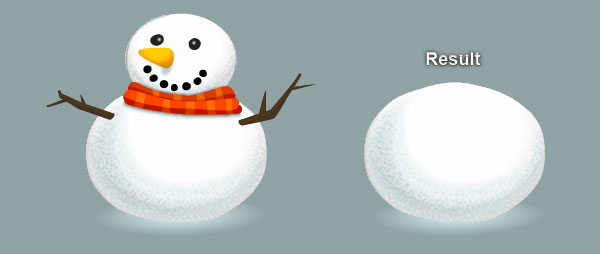
Select the "Short_Snowman" group and make a copy (Ctrl +C, Ctrl +F) of it, then drag the copy to another position.
Keep the newly created group selected, press (Ctrl +Shift +G) to ungroup it.
Next remove the head, the scarf and the hands of this new snowman.
Now reselect and group (Ctrl +G) all remaining objects of the snowman.
Step 32
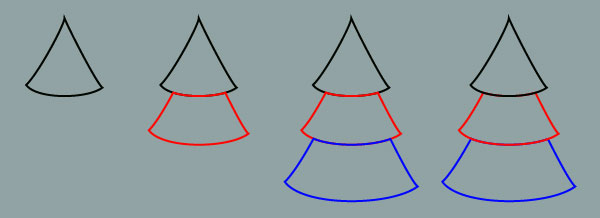
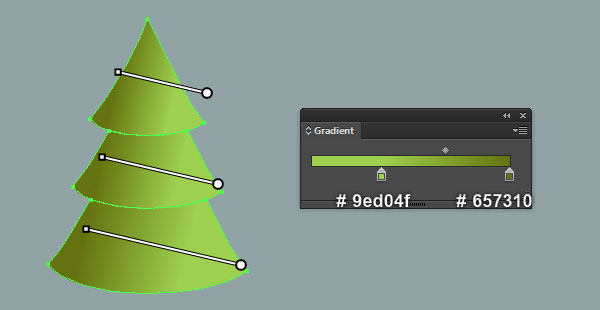
It’s time to draw the pine trees. With the help of the Pen Tool (P) and the Gradient Tool (G), create three shapes as you see in the images below.
Step 33
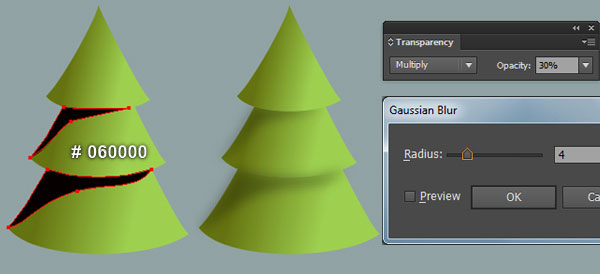
With the Pen Tool (P), create two black shapes (# 060000) as shown below.
Once your shapes are drawn, apply a 4px Gaussian Blur effect to them, then change the Blending Mode to Multiply and reduce their Opacity to 30%.
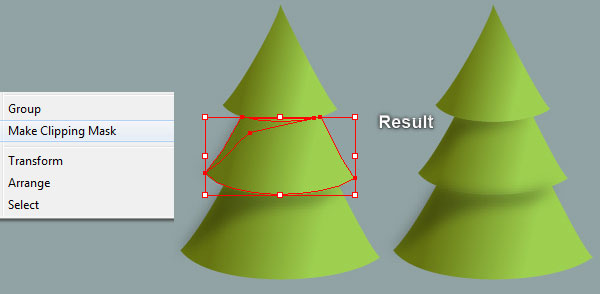
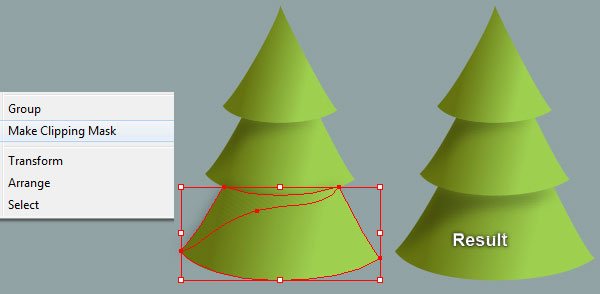
Now select the middle shape created in step 32 and make a copy (Ctrl +C, Ctrl +F) of it, then bring the copy to front (Ctrl +Shift +Right Square Bracket).
Keep this copy selected, hold down the Shift key and click on the upper shape with blur effect applied in this step.
Right click on the artboard and then select the Make Clipping Mask section from the drop-down menu.
Next select the lower shape created in step 32 and make a copy of it, then bring the copy to the front.
Still having this copy selected, hold down the Shift key and click on the lower shape with blur effect applied in this step.
Right click on the artboard and then select the Make Clipping Mask section from the drop-down menu.
Step 34
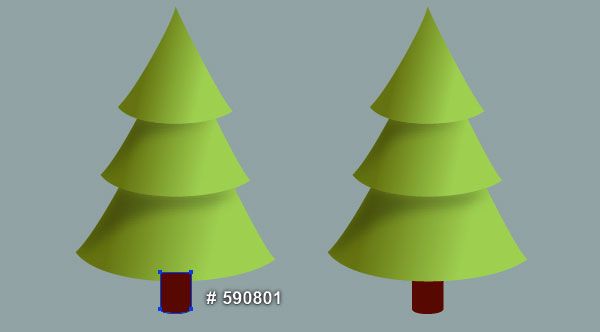
Pick the Pen Tool (P) and create a dark red shape (# 590801) as shown below, then send this shape to back (Ctrl +Shift +Left Square Bracket).
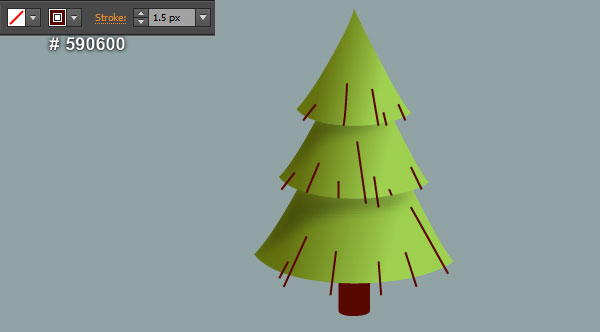
To add some details, using the Line Segment Tool (\) create some paths, with a 1.5px dark red stroke (# 590600) and no fill.
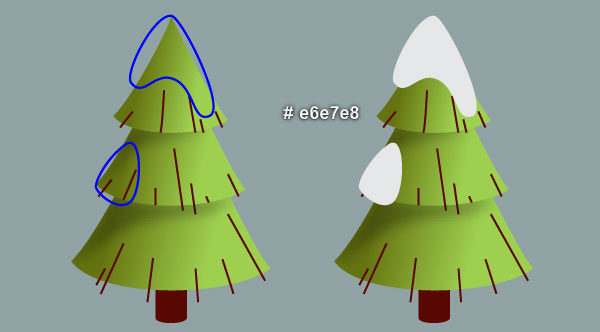
Now focus on the fourth and the fifth images, create two light gray blue shapes (# e6e7e8).
Once your shapes are drawn, reselect them and make a copy (Ctrl +C, Ctrl +F) of them.
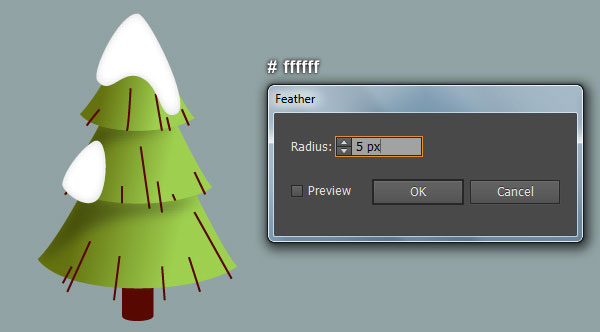
Replace the existing color of these copies with white (# ffffff), then apply a 5px Feather effect to the resulting shapes.
Finally select and group (Ctrl + G) all objects created from the beginning of step 32 to this time. We are done with the pine tree for the moment.
Step 35
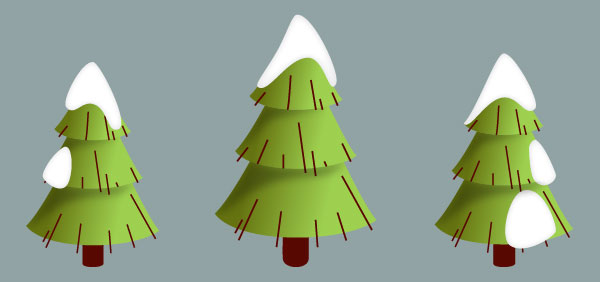
Likewise, repeat the same process as in the previous steps to draw two more pine trees.
Step 36
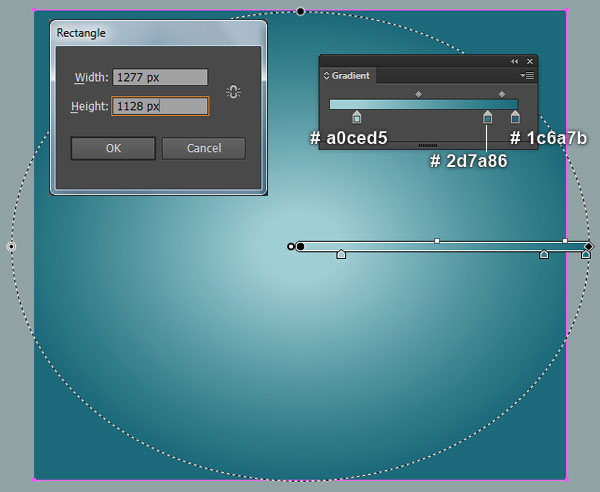
We are going to create the background. With the Pen Tool (P), create a 1277 by 1128px rectangle, then fill it with the radial gradient shown below.
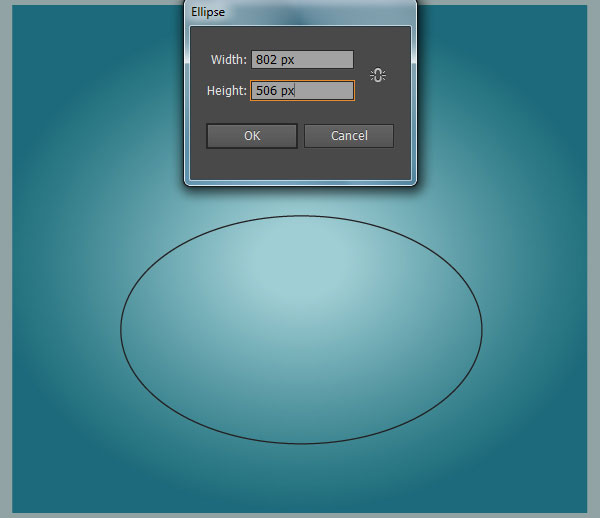
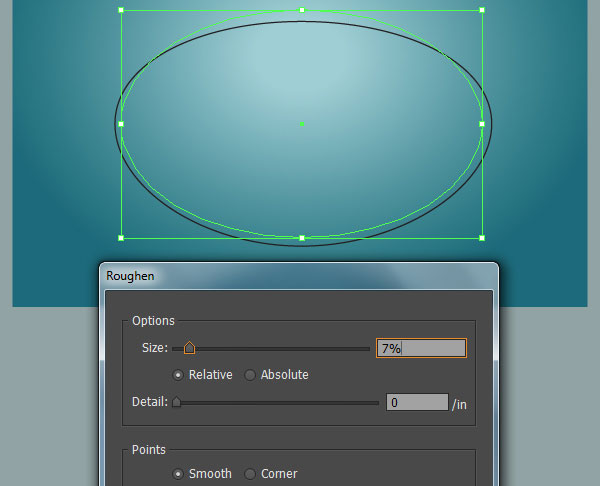
Next pick the Ellipse Tool (L) and create a 802 by 506px ellipse, then place it in the position you see in the second image.
Keep the newly created ellipse selected and go to Effect > Distort & Transform > Roughen… Follow the data shown in the third image and click OK.
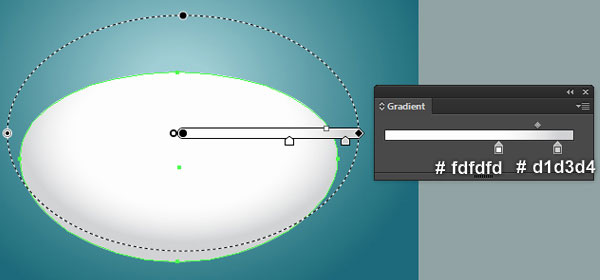
Make sure that the resulting object is still selected, remove its stroke and fill this object with the radial gradient you see in the fourth image.
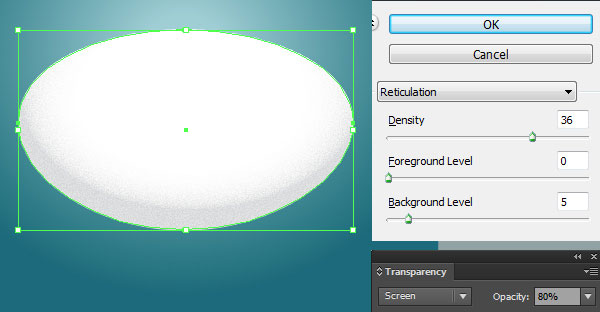
Now reselect the white shape created in this step and make a copy (Ctrl +C, Ctrl +F) of it, then go to the Object > Expand Appearance.
Still having the resulting shape selected, go to Effect > Sketch > Reticulation… Follow the data shown in the last image and click OK.
Finally change the Blending Mode of the resulting shape to Screen and reduce its Opacity to 80%.
Step 37
Place the snowmen into the newly created background.
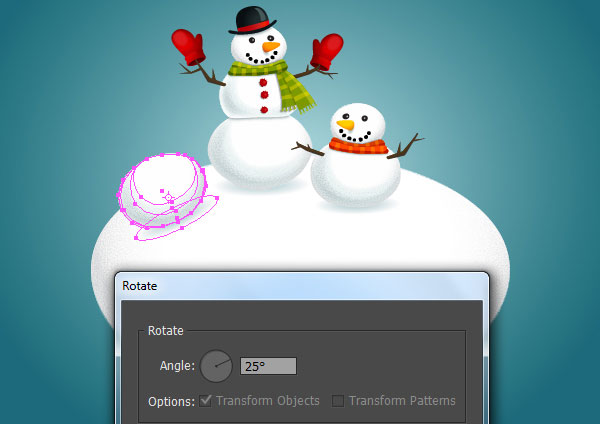
Next select the group created in step 31 and go to the Object > Transform > Rotate… Enter a 25 degrees Angle and click OK.
Then place the resulting group in the position shown in the second image.
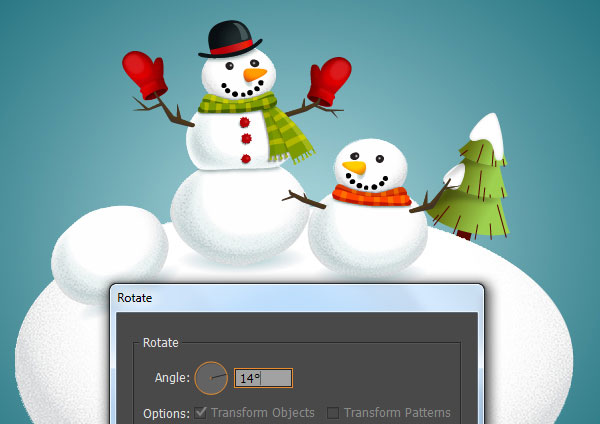
Now select the pine tree created in the step 34 and rotate it to an angle of about 14 degrees.
Place this pine tree in the position shown in the third image and then hide it behind the first white shape created in step 36.
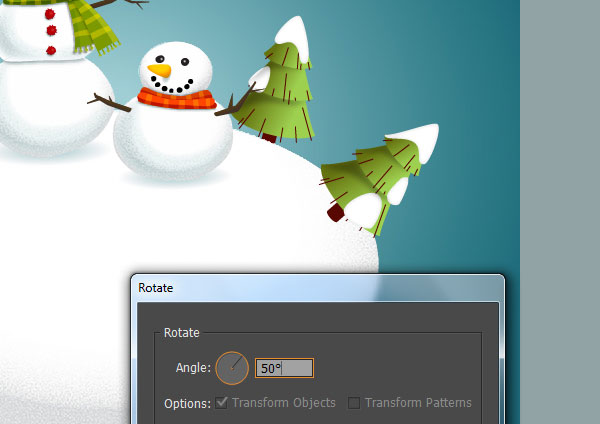
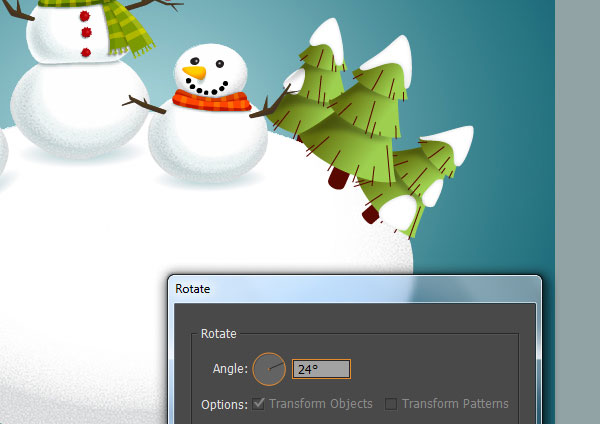
Likewise, repeat the same process to rotate the remaining two pine trees and then place them in the positions shown in the last two images.

Step 38
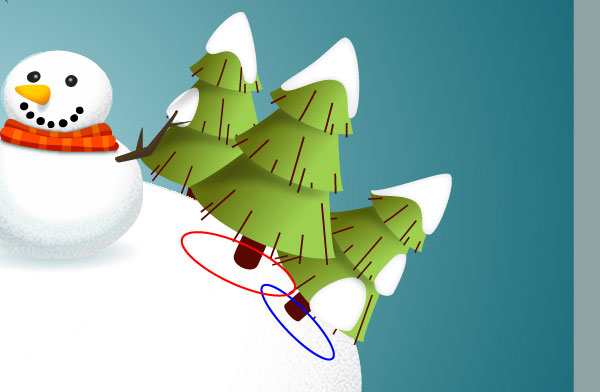
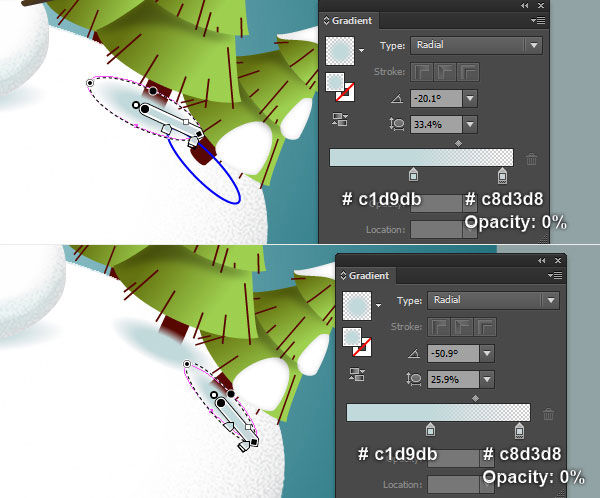
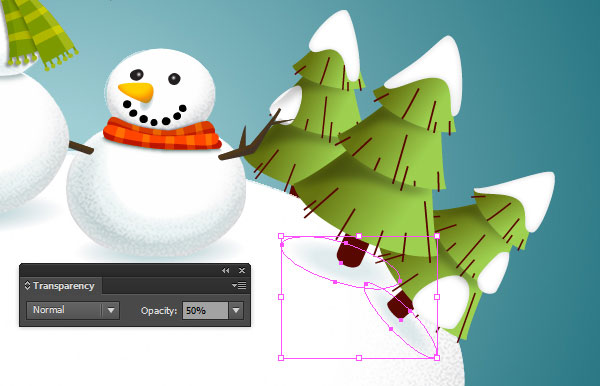
With the help of the Ellipse Tool (L) and the Gradient Tool (G), create two ellipses asyou see in the images below.
Next reduce the Opacity of the newly created ellipses to 50%.
Finally, hide the resulting ellipses behind the two front pine trees.
Step 39
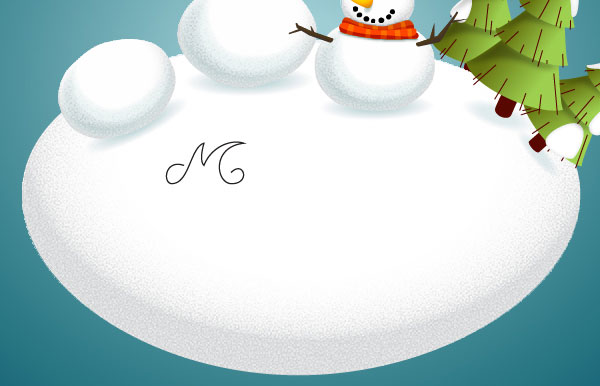
It’s time to draw the letter paths. Pick the Pen Tool (P) and create the "M" path as shown in the first image.
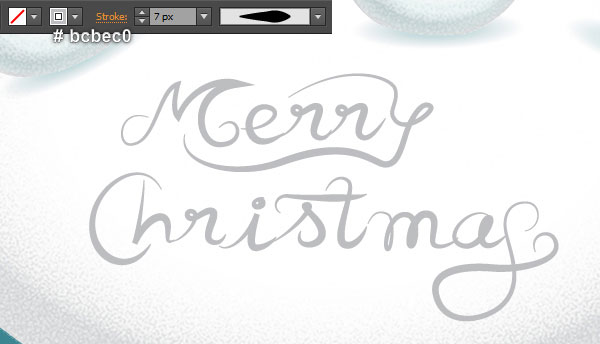
Keep working with the Pen Tool (P), create other letter paths as you see in second and the third images.
Once your paths are drawn, reselect them, replace the existing stroke color with gray blue (# bcbec0) and change the stroke weight to 7px.
Next apply Width Profile 5 to the resulting paths.
In the end, your letter paths should look like the last image shown.


Step 40
At this point your illustration should look like in the next image:

Step 41
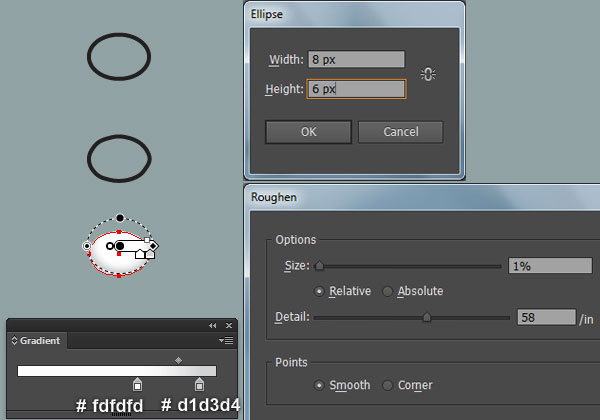
We are going to create snowflakes. Pick the Ellipse Tool (L) and create an 8 by 6px ellipse.
Reselect the newly created ellipse and go to Effect > Distort & Transform > Roughen… Follow the data shown in the image below and click OK.
Keep the resulting object selected, remove its stroke and fill this object with the radial gradient.
We are done with the snowflake for the moment. Make a lot of copies of this snowflake and place them into the background. Then scale and rotate these snowflakes as needed.

And We’re Done!
