In this tutorial you will learn how to create a detailed water gun illustration in Adobe Illustrator.
The entire design is made from Illustrator’s basic tools and effects and some gradients.
Final Image
As always, this is the final image that we’ll be creating:
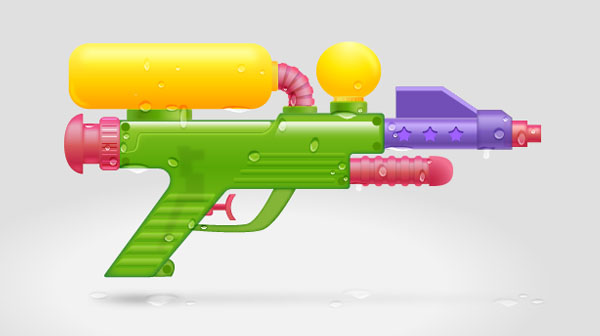
Tutorial Details
- Program: Adobe Illustrator CS6
- Estimated Completion Time: 120 minutes
- Difficulty: Beginner-Intermediate
Step 1
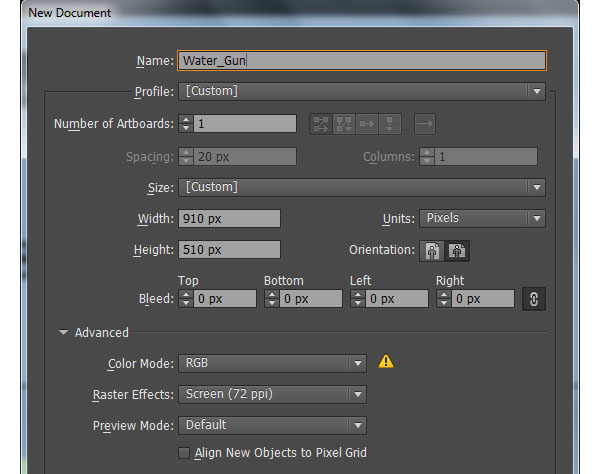
Launch Illustrator and then press (Ctrl + N) to create a New document.
Select Pixels from the Units drop-down menu, enter 910 in the width box and 510 in the height box then click on the Advanced button.
Select RGB, Screen (72ppi) and make sure that the Align New Objects to Pixel Grid box is unchecked before you click OK.
Step 2
First of all, we’ll create the body and the handle of the water gun.
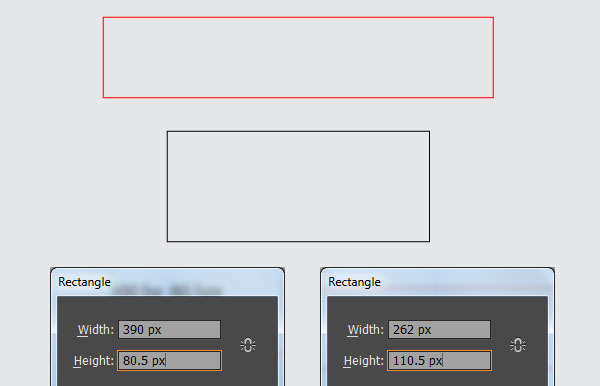
Pick the Rectangle Tool (M) and create two rectangles with dimensions: 390 by 80.5px and 262 by 110.5px.
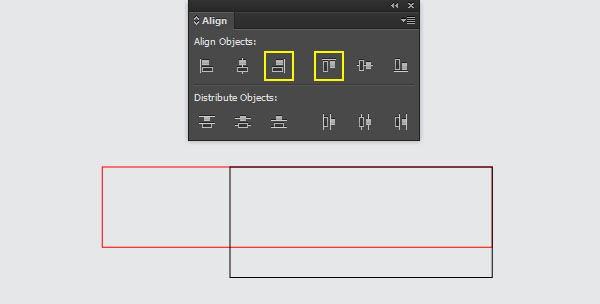
Reselect the two newly created rectangles, open the Align palette (Window > Align) and click on the Horizontal Align Right button, then click on the Vertical Align Top button.
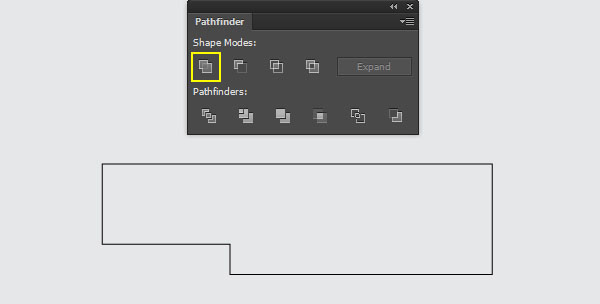
Keep these two rectangles selected, open the Pathfinder palette (Window > Pathfinder) and click on the Unite button.
The resulting object should look like the third image below.
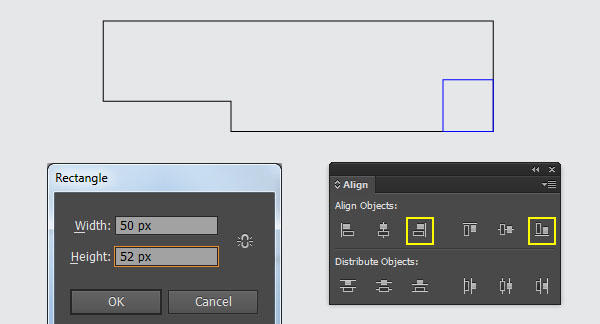
With the help of the Rectangle Tool (M) create a 50 by 52px blue rectangle.
Make sure that the newly created rectangle is still selected, hold down the Shift key, click on the black object created in this step, then release the Shift key and click on the black object again (to fix its position).
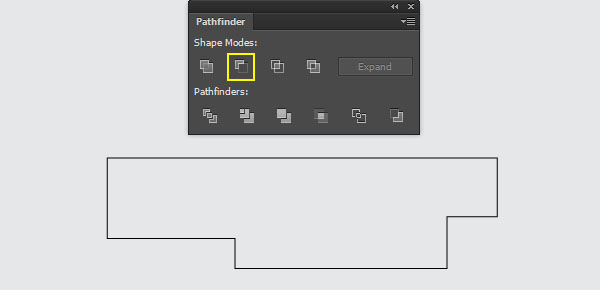
Next click on the Horizontal Align Right button from the Align palette and click on the Vertical Align Bottom button. Having these two objects selected, click on the Minus Front button from the Pathfinder palette.
In the end your object should look roughly like the last image.
Step 3
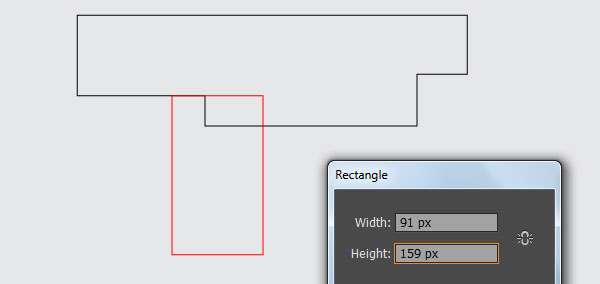
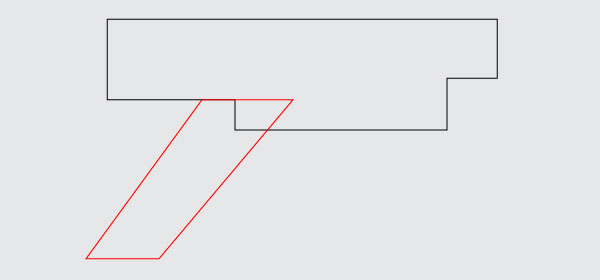
Pick the Rectangle Tool (M) and create a 91 by 159px red rectangle, then place it in the position shown below.
With the help of the Direct Selection Tool (A), select the bottom-left anchor point of the newly created rectangle and move it 116px to the left.
Next select the bottom-right anchor point and move it 134px to the left.
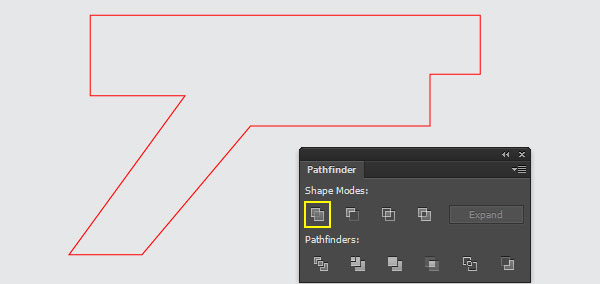
Now reselect the red object created in this step and the black object created in step 2, then open the Pathfinder palette (Window > Pathfinder) and click on the Unite button.
The resulting object should look like the last image below.
Step 4
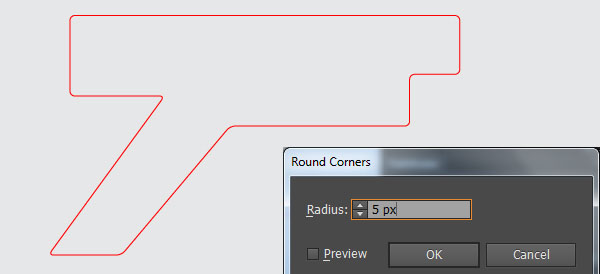
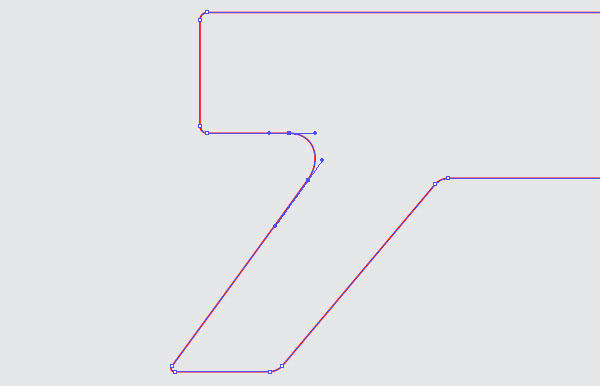
Select the red object created in step 3 and go to Effect > Stylize > Round Corners… Enter a 5px Radius and click OK. Go to Object > Expand Appearance.
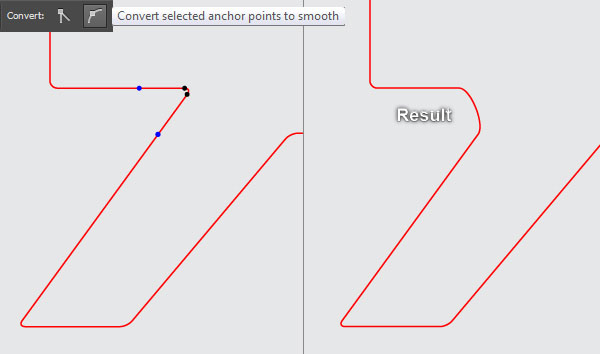
Now focus on the second image, pick the Add Anchor Point Tool (+) and click on the two points highlighted with blue to add two new anchor points.
Then pick the Direct Selection Tool (A), select and remove the two anchor points highlighted with black. Make sure that the Direct Selection Tool (A) is still active, extend the handles of the
two anchor points created in this step.
You should end up with something like in the last image.
Step 5
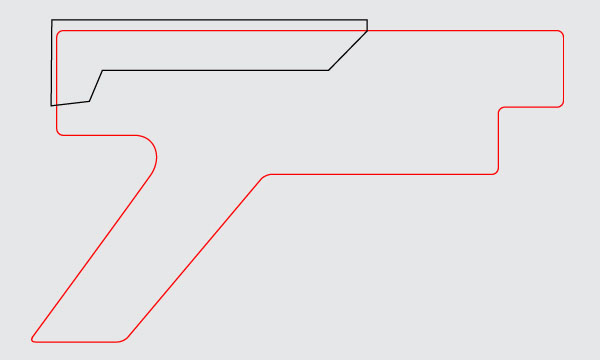
Pick the Pen Tool (P) and create a black object as you see in the image below.
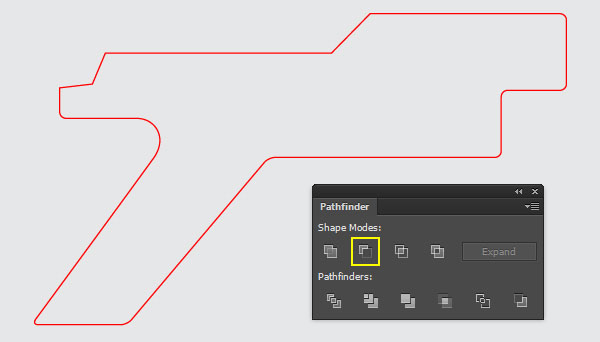
Once your object is drawn, reselect it and the red object, then open the Pathfinder palette (Window > Pathfinder) and click on the Minus Front button.
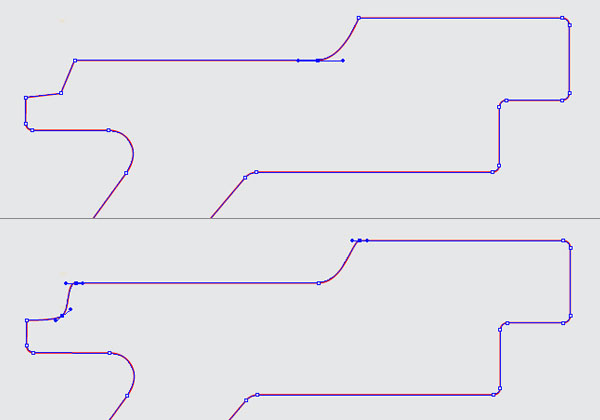
Now focus on the third image, pick the Convert Anchor Point Tool (Shift +C), click on the anchor point highlighted with blue, hold down the mouse button and drag it to the left.
Continue doing the same with the anchor points highlighted with blue to get the results you see in the last image below.
Step 6
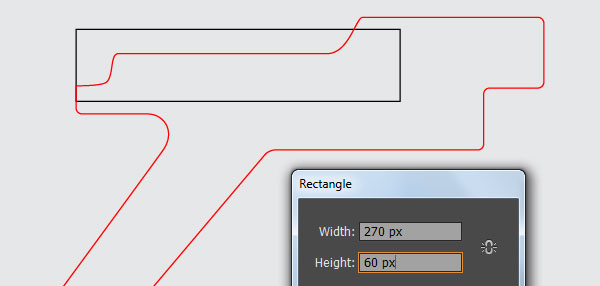
Pick the Rectangle Tool (M) and create a 270 by 60px black rectangle, then place it in the position shown below.
Select the red object created in step 5 and make a copy (Ctrl +C, Ctrl +F) of it.
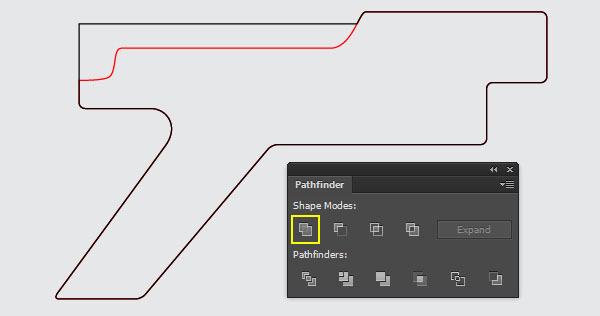
Keep this copy selected, hold down the Shift key and click on the black rectangle created in this step. Next open the Pathfinder palette (Window > Pathfinder) and click on the Unite button.
Then replace the existing stroke color of the resulting object with black and hide it behind the red object.
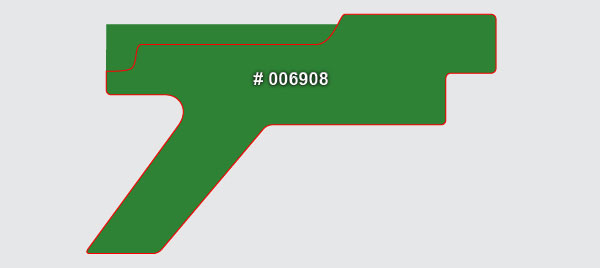
Now select the black object, remove its stroke and fill this object with dark green (# 006908).
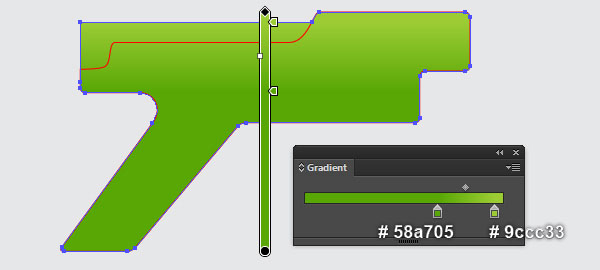
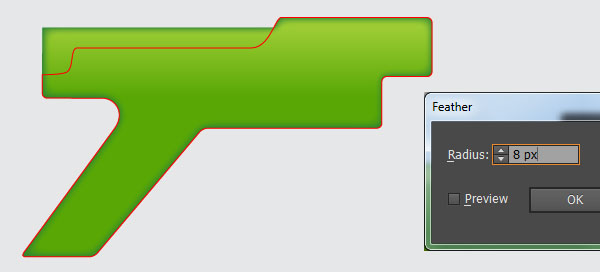
Still having the dark green shape selected, make a copy (Ctrl +C, Ctrl +F) of it, then replace the existing color of the copy with the linear gradient shown in the fourth image.
Keep the resulting shape selected and go to Effect > Stylize > Feather… Enter a 8px Radius and click OK.
Step 7
Before you continue, select the red object and make a copy (Ctrl +C, Ctrl +F) of it, then press (Ctrl +3) to hide the copy.
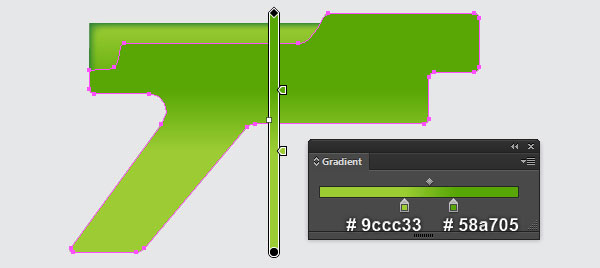
Reselect the red original object, remove its stroke and fill this object with the linear gradient you see in the image below.
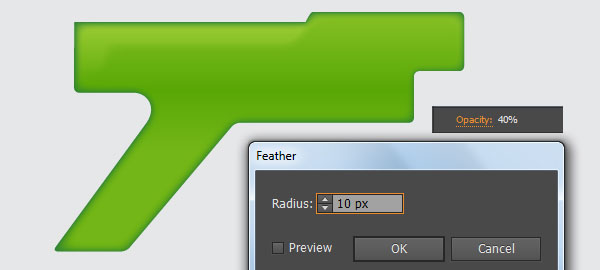
Keep the resulting shape selected, reduce the Opacity to 40% and then apply a 10px Feather effect to it.
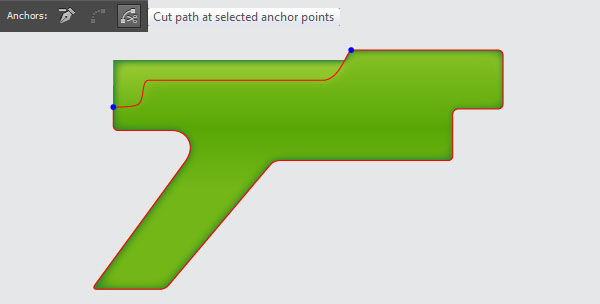
Now press (Ctrl +Alt +3) to show the red object hidden in this step. With the help of the Direct Selection Tool (A) and the Shift key, select the two anchor points highlighted with blue of the red object and click on the "Cut path at selected anchor points" button from the Properties bar. This makes the red object become two paths.
Select and remove the longer path.
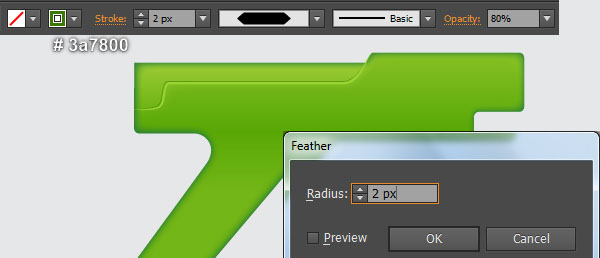
Reselect the remaining path, change the stroke weight to 2px and replace the existing stroke color with light green (# 9CD733). Then reduce the Opacity of the resulting path to 90% and apply the Width Profile 3 to it.
Keep the resulting path selected and make a copy (Ctrl +C, Ctrl +F) of it. Replace the existing stroke color of the copy with darker green (# 3a7800) and reduce its Opacity to 80%.
Next move the resulting path 1px up and 1px to the left.
Finally apply a 2px Feather effect to this path and then hide it behind the light green path created in this step.

Step 8
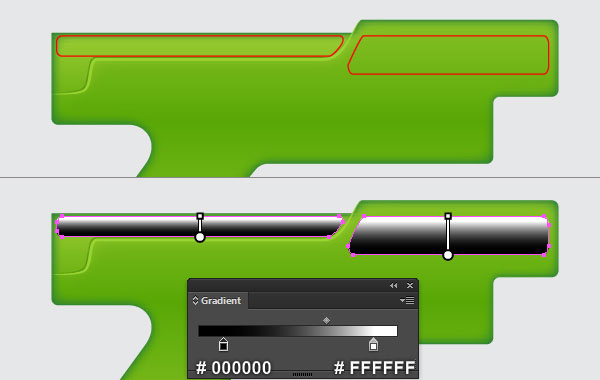
With the Pen Tool (P) create two red objects as you see in the image below.
Once your objects are drawn, remove their strokes and then fill them with the linear gradient shown in the second image.
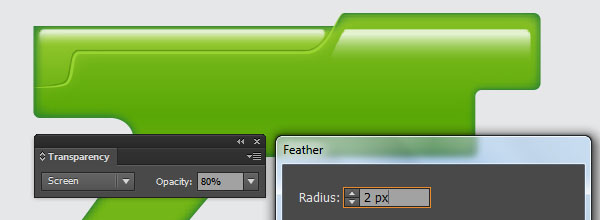
Keep the resulting shapes selected, apply a 2px Feather effect then set it to Blending Mode Screen and reduce the Opacity to 80%.
Step 9
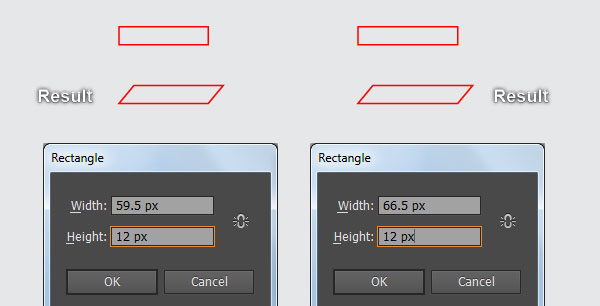
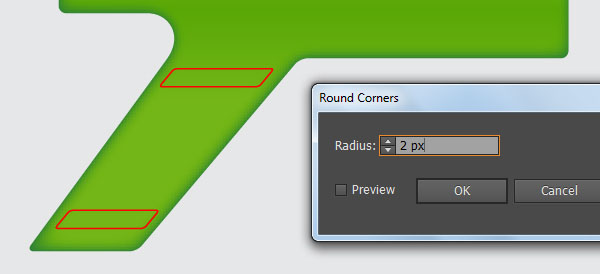
Pick the Rectangle Tool (M) and create two red rectangles with dimensions: 59.5 by 12px and 66.5 by 12px.
With the Direct Selection Tool (A) and the Shift key, select the four top anchor points of the two newly created rectangles and move them 10px to the right.
Reselect the two red objects and go to Effect > Stylize > Round Corners… Enter a 2px Radius and click OK, then go to the Object > Expand Appearance.
Place the two resulting objects to the positions as you see in the next to last image.
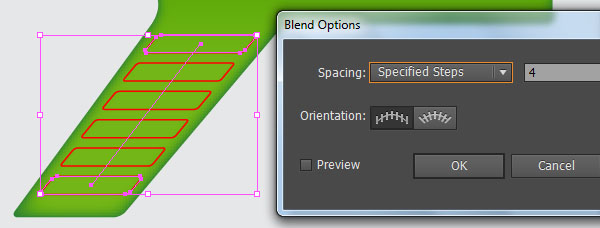
Still having these objects selected, go to Object > Blend > Blend Options… Follow the data shown in the last image and click OK, then go to Object > Blend > Make (Ctrl +Alt +B).
Keep the resulting objects selected and go to Object > Blend > Expand.
Step 10
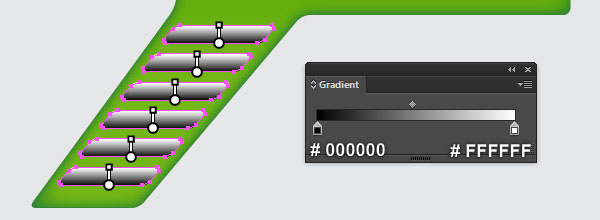
Select the group created in step 9, remove its stroke and then fill this group with the linear gradient shown below.
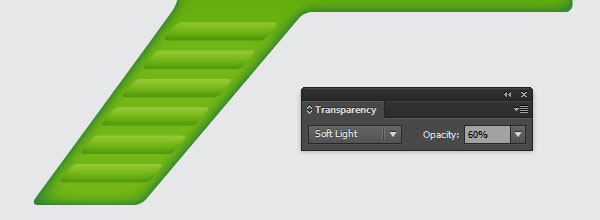
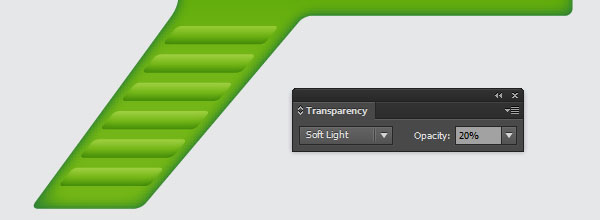
Keep the resulting group selected, change the Blending Mode to Soft Light and reduce its Opacity to 60%.
Make a copy (Ctrl +C, Ctrl +F) of the resulting group and then reduce the Opacity of this copy to 20%.
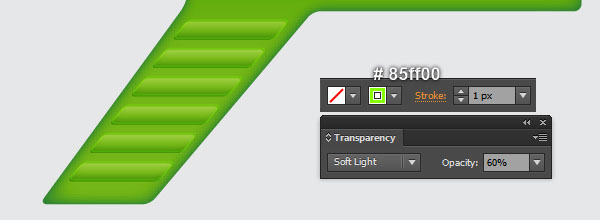
Still having the newly created group selected, make a copy of it.
Add a 1px light green stroke (# 85ff00) to the newly created group and remove the fill color, then change the Opacity to 60%.
Finally move the resulting group 1px up and 1px to the right.
Step 11
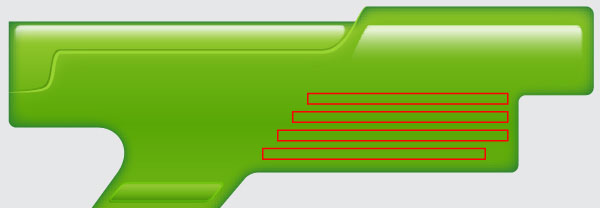
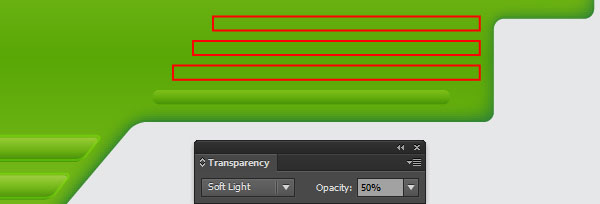
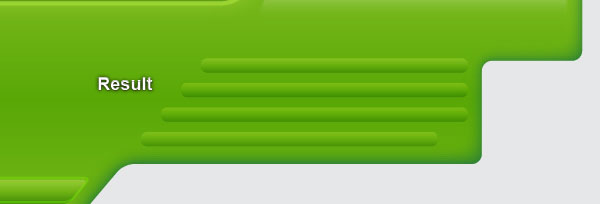
Pick the Rectangle Tool (M) and create four rectangles as shown below.
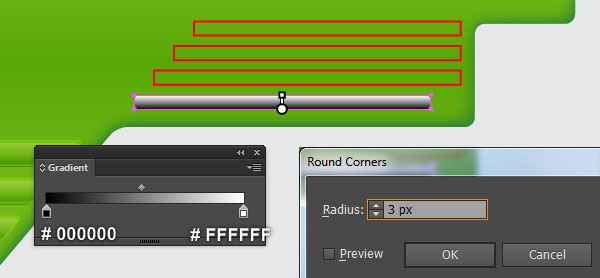
Select a newly created rectangle and go to Effect > Stylize > Round Corners… Enter a 3px Radius and click OK.
Keep the resulting rectangle selected, remove its stroke and fill this rectangle with the linear gradient shown in the second image.
Next change the Blending Mode of the resulting rectangle to Soft Light and reduce its Opacity to 50%.
Finally select the remaining three rectangles created in this step, then pick the Eyedropper Tool (I) and click on the rectangle edited in this step. The resulting rectangles should look like the last image below.
Step 12
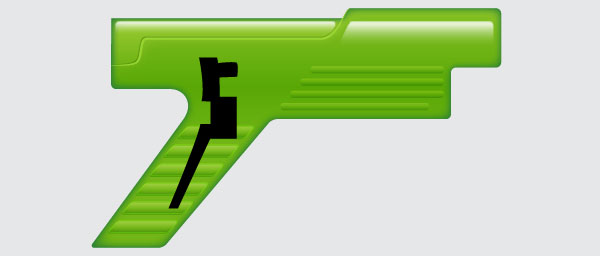
Pick the Pen Tool (P) and create a black shape as shown below.
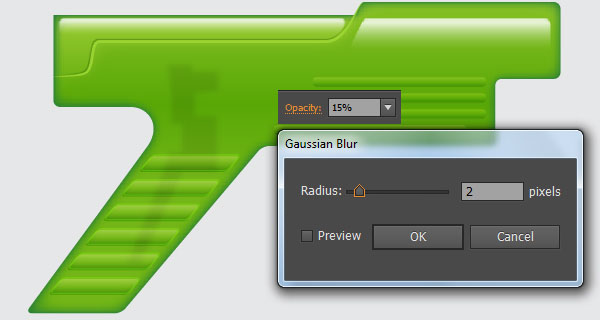
Once your shape is drawn, apply a 2px Gaussian Blur effect to it and reduce the Opacity to 15%.
Finally hide the resulting shape behind the shape created in step 7.
Step 13
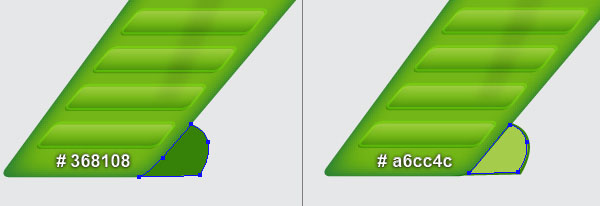
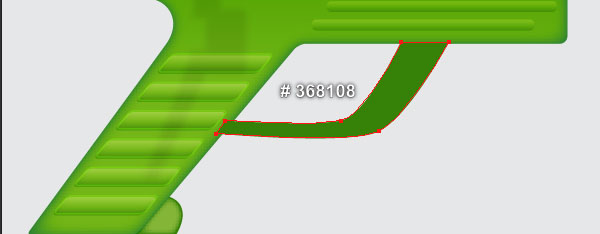
Pick the Pen Tool (P) and create two green shapes as you see in the first and the second images.
Next reselect the lighter green shape and apply a 4px Feather effect to it, then reduce the Opacity to 70%.
Continue with the Pen Tool (P), create two green shapes as shown in the last two images.
Once your shapes are drawn, reselect the lighter green shape and apply a 5px Feather effect to it, then reduce the Opacity to 70%.


Step 14
Next comes the trigger.
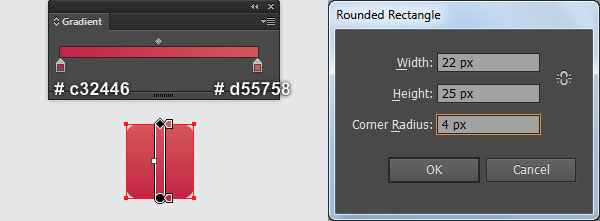
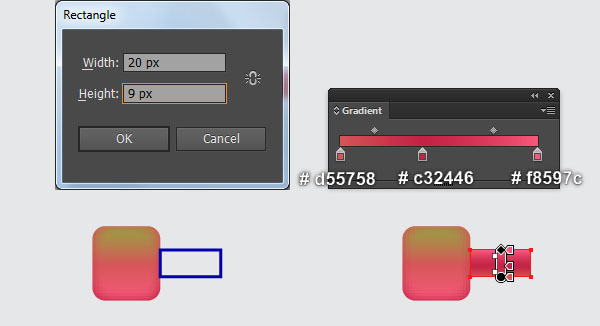
Pick the Rounded Rectangle Tool, simply click on your artboard to bring up its options, then enter the data as shown below and click OK.
Fill the newly created rectangle with the linear gradient you see in the first image.
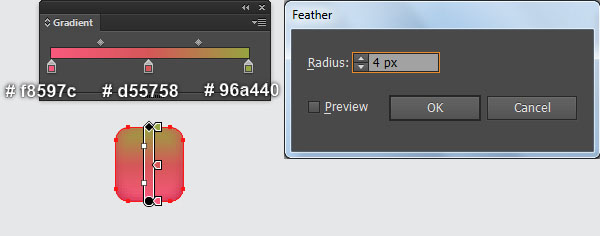
Keep the resulting rectangle selected and make a copy (Ctrl +C, Ctrl +F) of it, then replace the existing color of the copy with the new linear gradient shown in the second image.
Still having the resulting rectangle selected, go to Effect > Stylize > Feather… Enter a 4px Radius and click OK.
With the Rectangle Tool (M), create a 20 by 9px blue rectangle, then place it in the position shown in the third image.
Remove the stroke of the newly created rectangle and then fill it with the linear gradient shown in the fourth image.
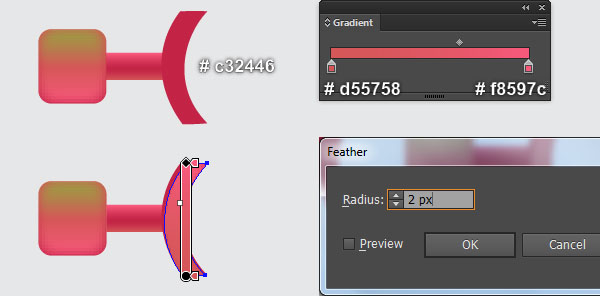
Continue with the Pen Tool (P), create a red shape (# c32446) as you see in the next to last image.
Make a copy of the newly created shape and then replace the existing color of the copy with the linear gradient as shown in the last image.
Now with the Direct Selection Tool (A), select the top-left anchor point of the newly created shape and move it 1px to the right.
Next select the bottom-right anchor point and move it 1px to the left.
Finally reselect the shape you just edited and apply a 2px Feather effect to it.
Step 15
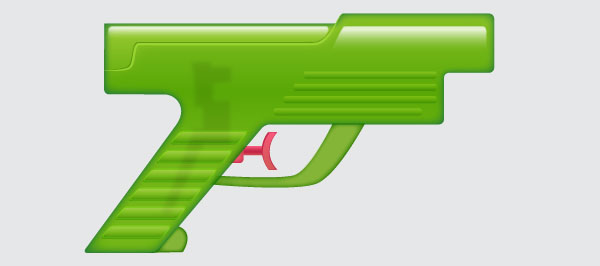
Select and group (Ctrl + G) all objects created in step 14, then place this group to the position shown in the first image.
Next send this newly created group to back (Ctrl +Shift +Left Square Bracket).
At this point your water gun should look like in the last image.

Step 16
Let’s work on the creation of the nozzle.
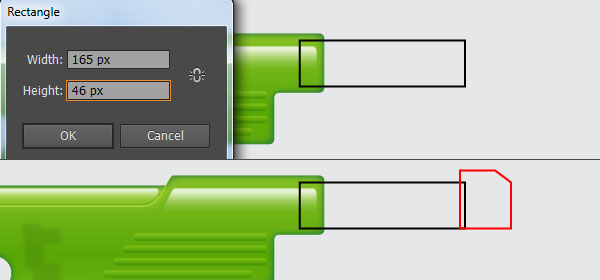
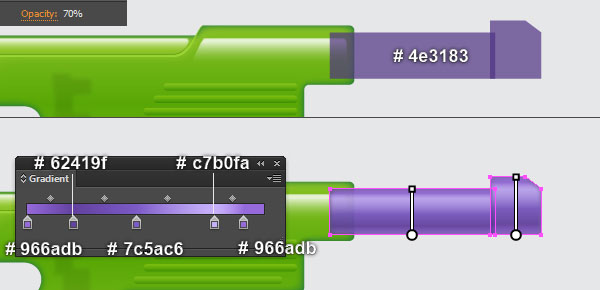
Pick the Rectangle Tool (M) and create a 165 by 46px black rectangle, then place it in the position shown below.
With the help of the Pen Tool (P) create a red object as you see in the second image.
Reselect the two newly created objects, remove their strokes and fill these objects with dark violet (# 4e3183), then reduce their Opacity to 70%.
Make a copy (Ctrl +C, Ctrl +F) of the newly created shapes and replace the existing color of these copies with the linear gradient shown in the fourth image.
Then apply a 5px Feather to the resulting shapes.
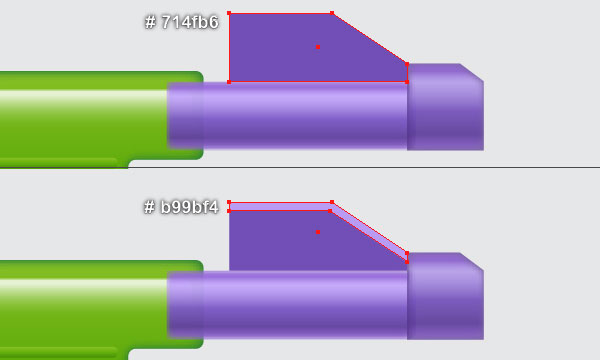
Finally, with the help of the Pen Tool (P) create two violet shapes as you see in the last two images.
Step 17
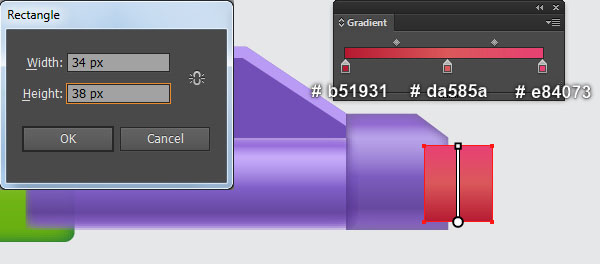
Pick the Rectangle Tool (M) and create a 34 by 38px rectangle, then fill it with the linear gradient shown below.
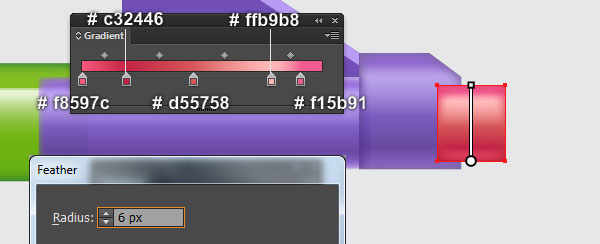
Make a copy (Ctrl +C, Ctrl +F) of the newly created rectangle and replace the existing color of the copy with the new linear gradient you see in the second image.
Then apply a 6px Feather effect to the resulting rectangle.
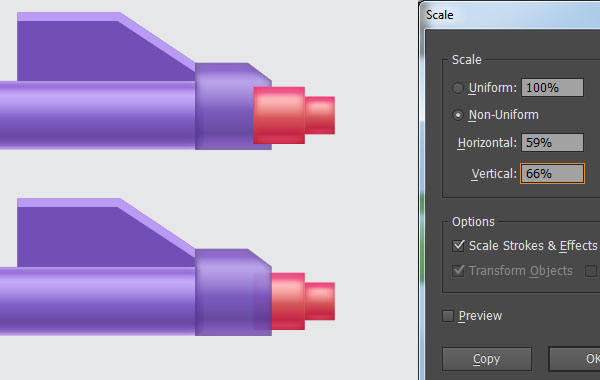
Now reselect the two rectangles created in this step and go to Object > Transform > Scale… Check Non-Uniform, enter 59 in the Horizontal box and 66 in the Vertical box, then click Copy.
Drag the copies to the right while holding the Shift key, and place them as shown in the next to last image.
Finally select all four rectangles created in this step and send them to back (Ctrl +Shift +Left Square Bracket).
Step 18
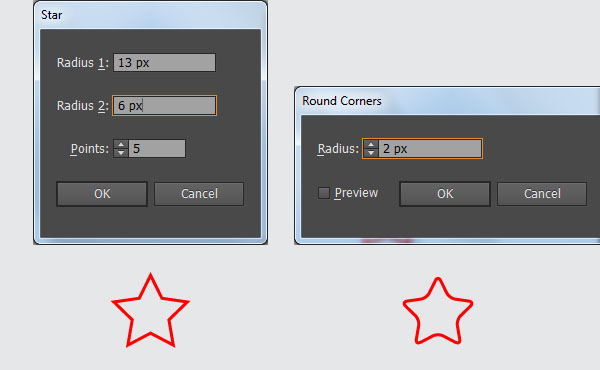
Pick the Star Tool, simply click on your artboard to bring up its options, then enter the data as shown below and click OK.
Keep this star selected and go to Effect > Stylize > Round Corners… Enter a 2px Radius and click OK, then go to the Object > Expand Appearance.
Remove the stroke of the resulting star and fill it with dark violet (# 532f9d).
Make a copy (Ctrl +C, Ctrl +F) of the dark violet star and replace the existing color of the copy with light violet (# a060ff), then move it 2px down.
Reselect the dark violet star and make a copy of it. Keep this copy selected, hold down the Shift key and click on the light violet star. Open the Pathfinder palette (Window > Pathfinder) and click on the Intersect button.
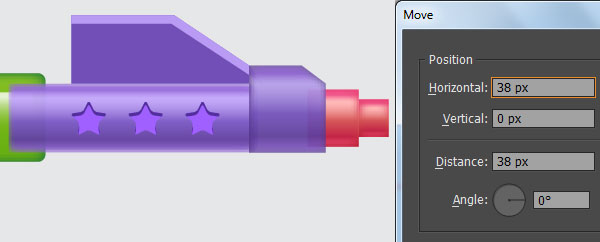
Now select both stars created in this step and go to the Object > Transform > Move… Enter 38 in the Horizontal box and click Copy, then press (Ctrl +D) once.
Finally select and group (Ctrl +G) all stars created in this step, then place this group in the position you see in the last image.

Step 19
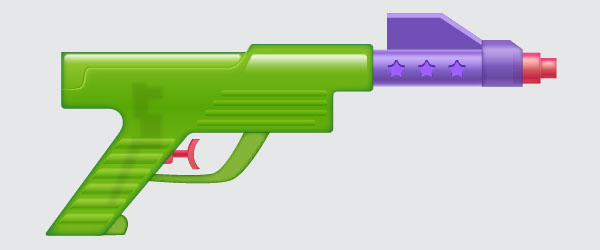
Select and group (Ctrl + G) all objects created from the beginning of step 16 to this time, then send this group to back (Ctrl +Shift +Left Square Bracket).
At this point your water gun should look like in the next image:
Step 20
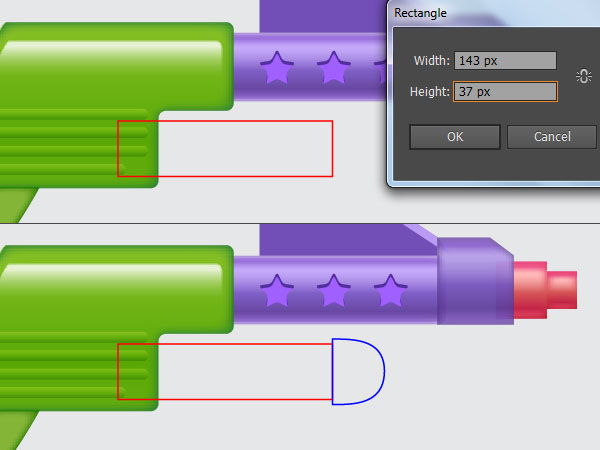
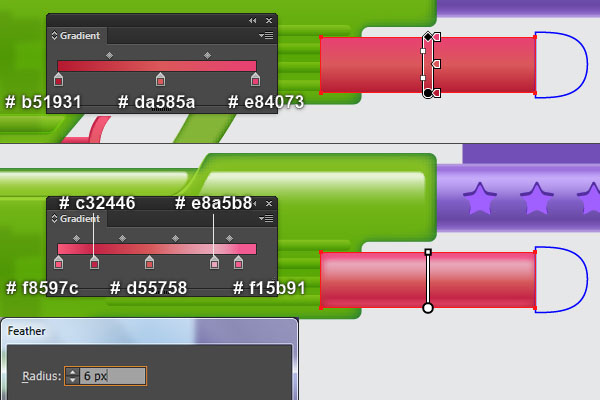
With the help of the Rectangle Tool (M) and the Pen Tool (P), create two objects as you see in the first and the second images.
Once your objects are drawn, reselect the rectangle and remove its stroke, then fill this rectangle with the linear gradient shown in the third image.
Make a copy (Ctrl +C, Ctrl +F) of the resulting rectangle and replace the existing color of the copy with the new linear gradient you see in the next to last image.
Next apply a 6px Feather effect to the resulting rectangle.
Finally select the remaining object created in this step, remove its stroke and fill this object with the radial gradient shown in the last image.

Step 21
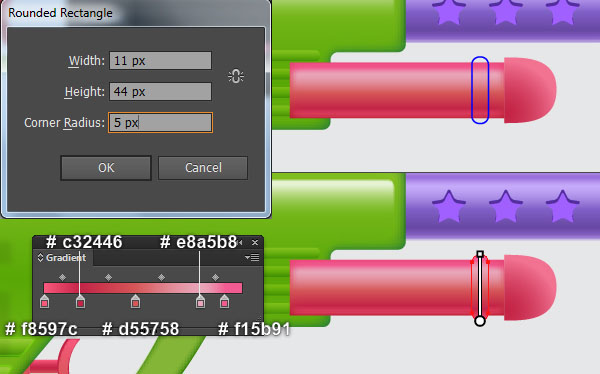
Pick the Rounded Rectangle Tool, simply click on your artboard to bring up its options, then enter the data shown below and click OK.
Remove the stroke of the newly created rectangle and fill it with the linear gradient you see in the second image.
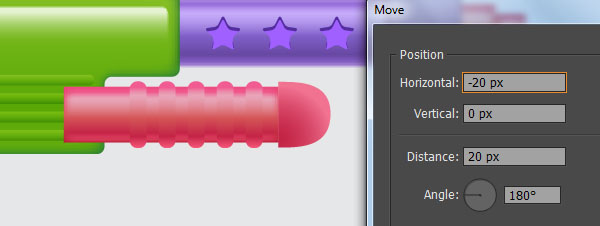
Keep the resulting rectangle selected and go to Object > Transform > Move… Enter -20 in the Horizontal box and click Copy, then press (Ctrl +D) three times to get the results shown in the third image.
Now select the five rounded rectangles created in this step and the last shape created in step 20, then make a copy (Ctrl +C, Ctrl +F) of them.
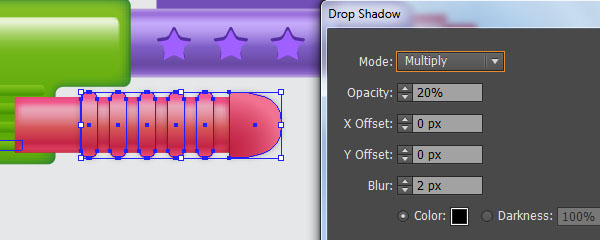
Keep these copies selected and press (Ctrl +G) to group them, then go to Effect > Stylize > Drop Shadow… Follow the data you see in the fourth image and click OK.
Now select the rectangle with Feather effect applied in step 20, make a copy of it and bring the copy to front (Ctrl +Shift +Right Square Bracket).
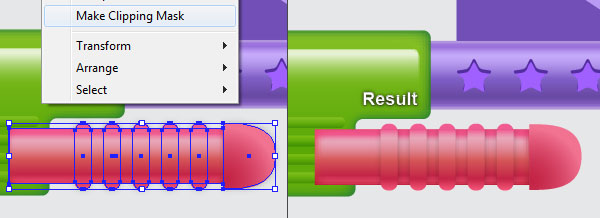
Make sure that the newly created rectangle is still selected, hold down the Shift key and click on the group with Shadow effect applied in this step.
Right click on the artboard and then select the Make Clipping Mask section from the drop-down menu.
Step 22
Select and group (Ctrl + G) all objects created from the beginning of step 20 to this time, then send this group to back (Ctrl +Shift +Left Square Bracket).
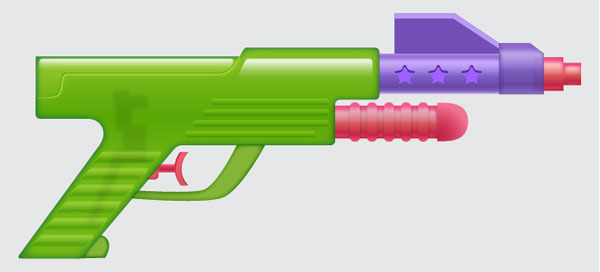
At this point your water gun should look like in the next image:
Step 23
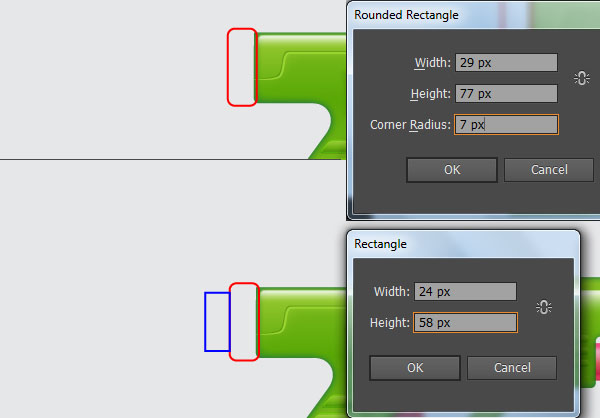
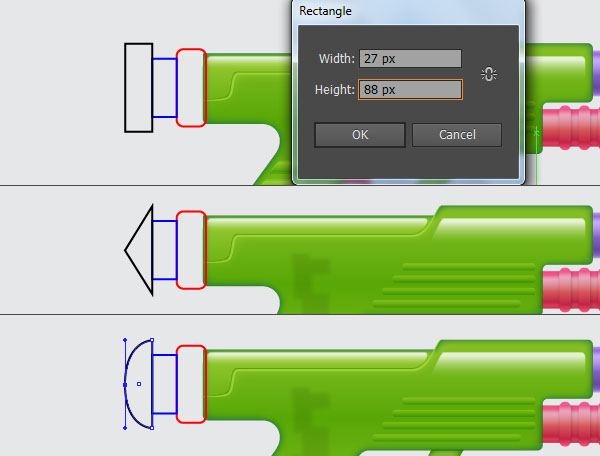
With the help of the Rounded Rectangle Tool and the Rectangle Tool (M), create three rectangles and then place them in the positions you see in the images below.
Now focus on the next to last image, pick the Direct Selection Tool (A), select the top-left anchor point of the black rectangle and remove it.
Next select the bottom-left anchor point and move it 44px up.
Finally, with the Convert Anchor Point Tool (Shift +C), click on the anchor point just moved, hold down the mouse button and drag it down while holding the Shiftkey.
You should end up with something like in the last image.
Step 24
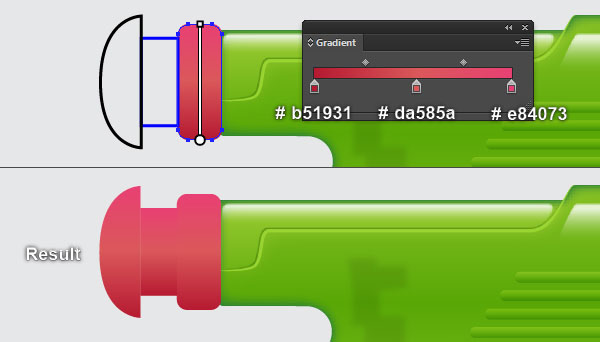
Select the rounded rectangle created in step 23, remove its stroke and fill this rectangle with the linear gradient shown below.
Next select the remaining two objects created in step 23, then pick the Eyedropper Tool (I) and click on the rounded rectangle you just filled with red gradient colors.
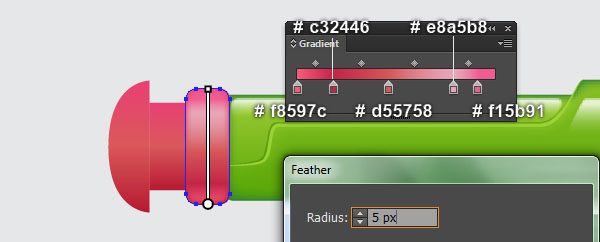
Reselect the rounded rectangle and make a copy (Ctrl +C, Ctrl +F) of it, then replace the existing color of the copy with the new linear gradient shown in the third image.
Apply a 5px Feather effect to the resulting rectangle.
Now select the remaining two shapes created in this step and make a copy of them. Having these two copies selected, pick the Eyedropper Tool (I) and then click on the rounded rectangle with Feather effect applied in this step.

Step 25
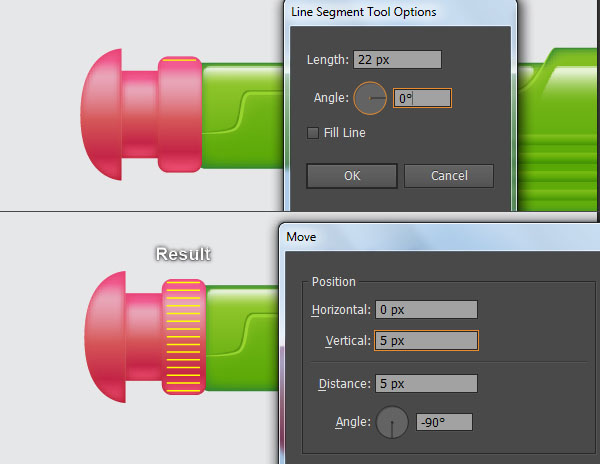
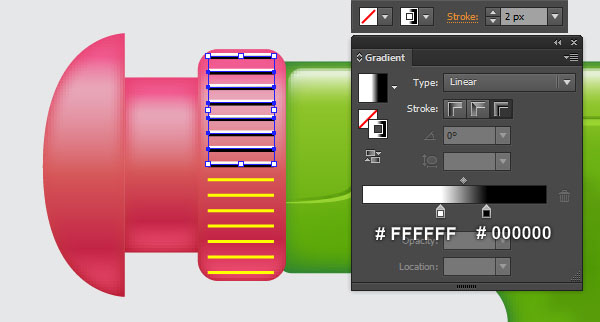
Using the Line Segment Tool (\) create a horizontal line of length 22px, with a yellow stroke and no fill, then place this line in the position shown below.
Make sure that the newly created line is still selected and go to Object > Transform > Move… Enter 5px in the Vertical box and click Copy, then press (Ctrl +D) thirteen times to get the results you see in the second image.
Now select eight upper lines, change the stroke weight to 2px and replace the existing stroke color with the linear gradient across stroke as shown in the third image.
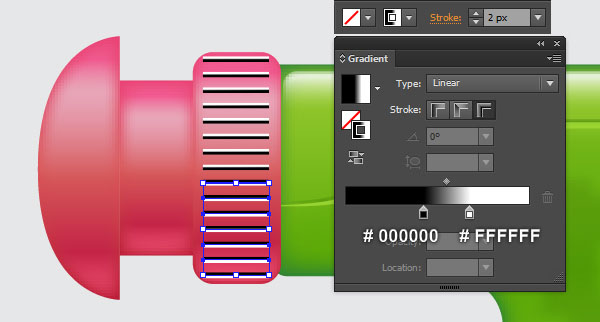
Next select the remaining lines, change the stroke weight to 2px and replace the existing stroke color with the linear gradient across stroke as shown in the next to last image.
Finally, reselect all lines created in this step, change the Blending Mode to Overlay and reduce the Opacity to 70%.

Step 26
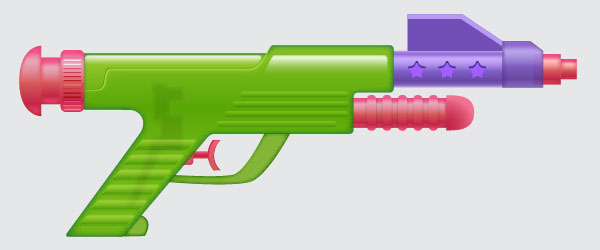
At this point your water gun should look like in the next image:
Step 27
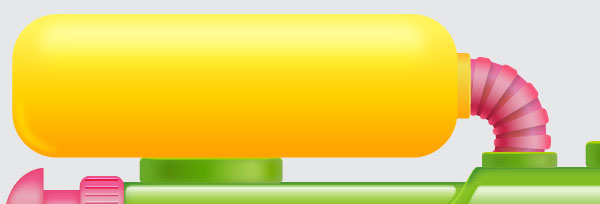
We will continue with the water container.
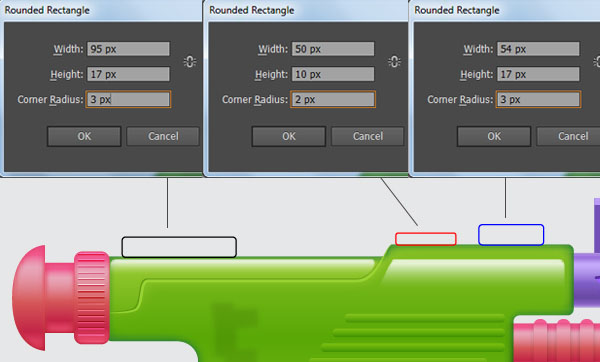
With the Rounded Rectangle Tool, create three rectangles and then place them in the positions shown below.
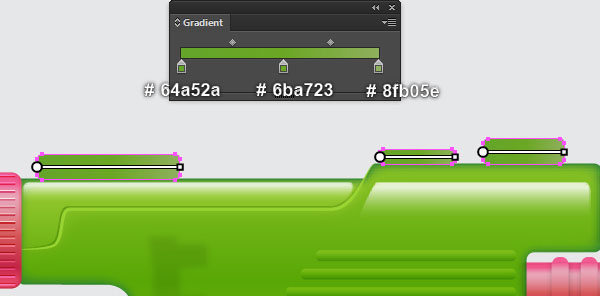
Reselect these rectangles, remove their strokes and fill them with the linear gradient you see in the second image.
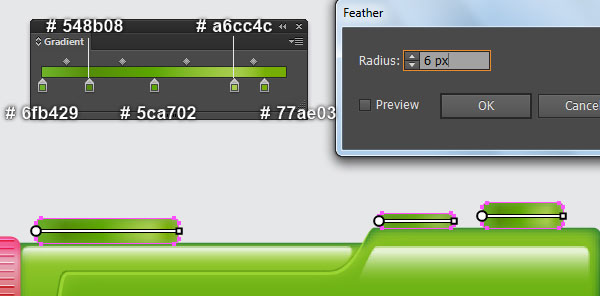
Keep the resulting rectangles selected and make a copy (Ctrl +C, Ctrl +F) of them, then replace the existing color of the copies with the new linear gradient shown in the third image.
Next apply a 6px Feather effect to the resulting rectangles.
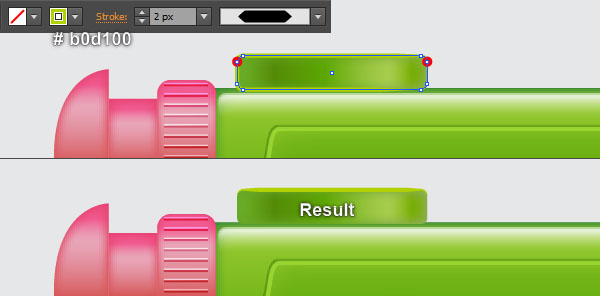
Now select the left rectangle with Feather effect applied in this step and make a copy of it.
Still having the copy selected, open the Appearance palette (Window > Appearance) and remove the Feather section.
Keep the resulting rectangle selected, remove the fill color of it and add a 2px green stroke (# b0d100), then apply Width Profile 3 to the resulting object.
Focus on the fourth image, select the two anchor points highlighted with red and click on the "Cut path at selected anchor points" button from the Properties bar. This makes the green object become two paths. Select and remove the lower path.
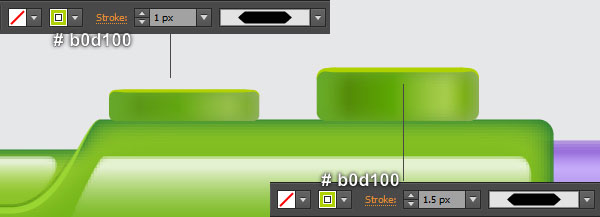
Likewise, repeat the same process to draw two more paths as you see in the last image.
Step 28
Pick the Rounded Rectangle Tool, simply click on your artboard to bring up its options. Enter the data shown below and click OK, then place the newly created rectangle in the position you see in the first image.
Still having this rectangle selected, remove its stroke and fill this rectangle with the linear gradient shown in the second image.
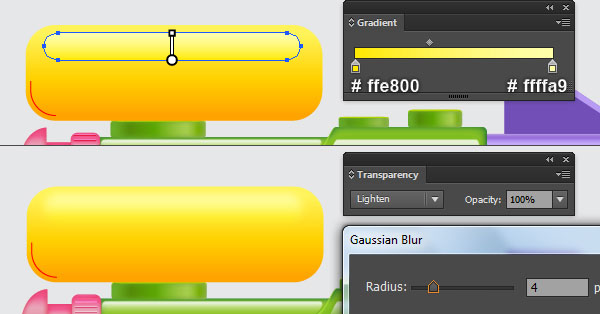
Next with the help of the Rounded Rectangle Tool and the Pen Tool (P), create a rectangle and a curved path as you see in the third image.
Once your objects are drawn, reselect the rectangle, remove its stroke and fill this rectangle with the linear gradient shown in the fourth image.
Apply a 4px Gaussian Blur to the resulting rectangle then set it to Blending Mode Lighten.
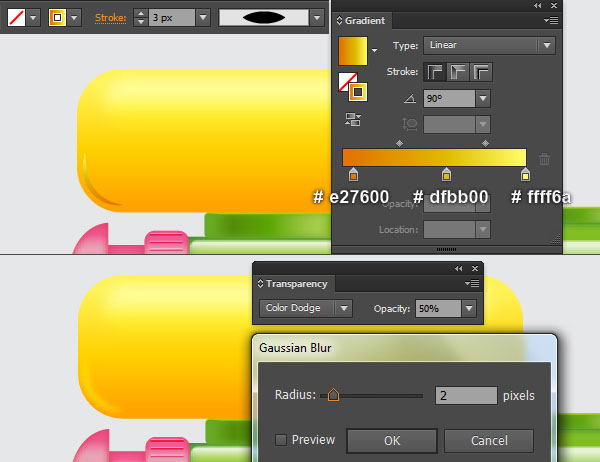
Now focus on the next to last image, select the curved path, change the stroke weight to 3px and replace the existing stroke color with the linear gradient within stroke.
Apply a 2px Gaussian Blur effect and Width Profile 1 to the resulting path, then set it to Blending Mode Color Dodge and reduce the Opacity to 50%.


Step 29
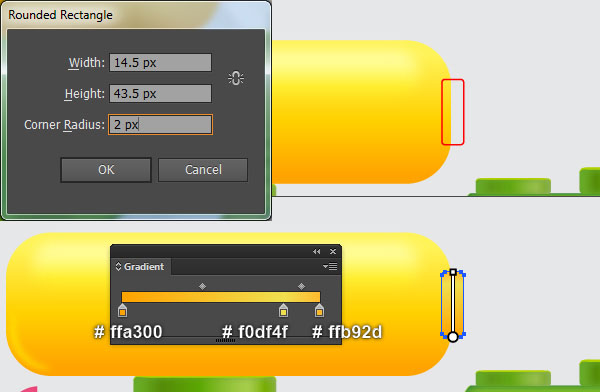
With the Rounded Rectangle Tool, create a rectangle and then place it in the position shown below.
Reselect the newly created rectangle, remove its stroke and fill this rectangle with the linear gradient shown in the second image.
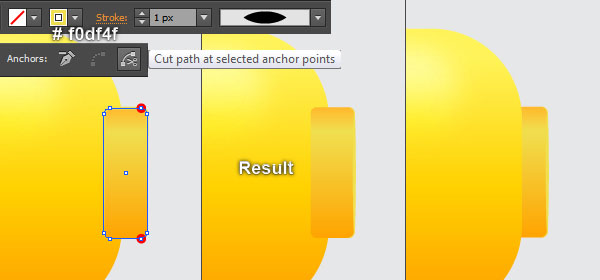
Keep the resulting rectangle selected and make a copy (Ctrl +C, Ctrl +F) of it. Remove the fill color of this copy and add a 1px yellow stroke (# f0df4f), then apply Width Profile 1 to the resulting object.
Focus on the third image, select the two anchor points highlighted with red and click on the "Cut path at selected anchor points" button from the Properties bar. This makes the yellow object become two paths.
Select and remove the left path.
Finally select the two objects created in this step and send them to back (Ctrl +Shift +Left Square Bracket).
Step 30
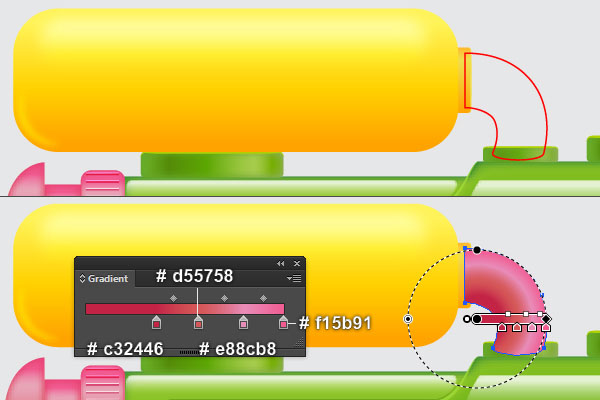
Pick the Pen Tool (P), create an object and then fill it with the radial gradient you see in the first and the second images.
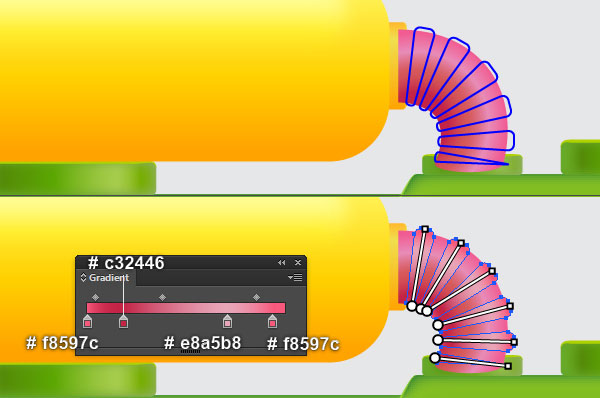
Continue with the Pen Tool (P), create six objects as shown in the third image.
Once your objects are drawn, reselect them, remove their strokes and fill these objects with the linear gradient you see in the fourth image.
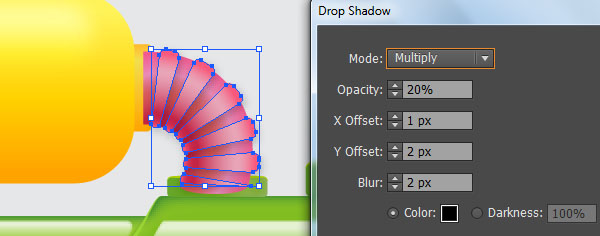
Reselect all shapes created in this step (except the biggest shape) and make a copy (Ctrl +C, Ctrl +F) of them, then press (Ctrl +G) to group the copies.
Still having the newly created group selected, go to Effect > Stylize > Drop Shadow… Follow the data shown in the fifth image and click OK.
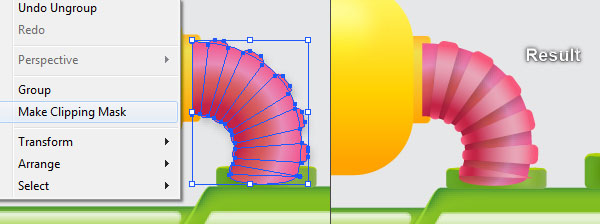
Now select the biggest shape created in this step and make a copy of it, then bring the copy to front (Ctrl +Shift +Right Square Bracket).
Keep this copy selected, hold down the Shift key and click on the group created in this step. Then right click on the artboard and select the Make Clipping Mask section from the drop-down menu.
Finally select all objects created in this step and send them to back (Ctrl +Shift +Left Square Bracket).
Step 31
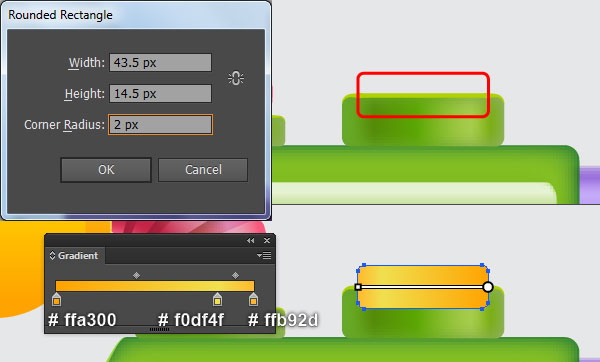
With the Rounded Rectangle Tool, create a rectangle and then place it in the position shown below.
Reselect the newly created rectangle, remove its stroke and fill this rectangle with the linear gradient shown in the second image.
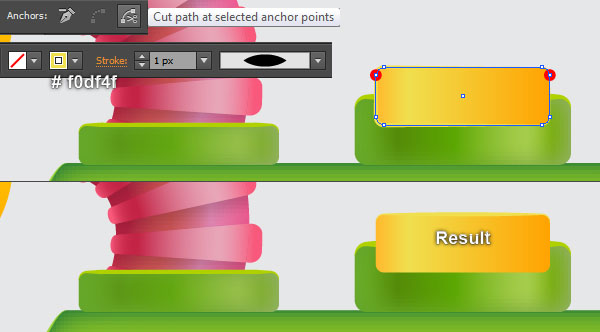
Keep the resulting rectangle selected and make a copy (Ctrl +C, Ctrl +F) of it. Remove the fill color of this copy and add a 1px yellow stroke (# f0df4f), then apply Width Profile 1 to the resulting object.
Focus on the third image, select the two anchor points highlighted with red and click on the "Cut path at selected anchor points" button from the Properties bar. This makes the yellow object become two paths.
Select and remove the lower path.
Step 32
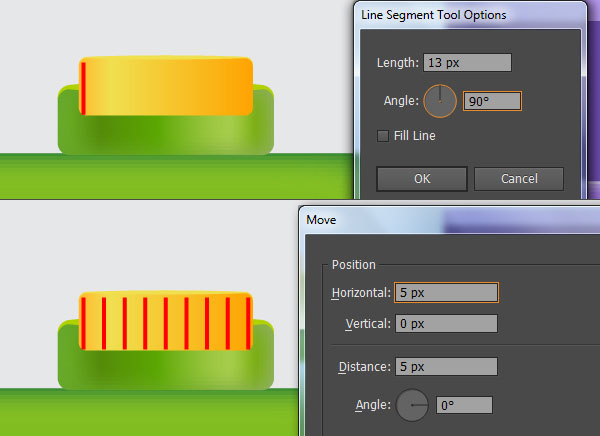
Using the Line Segment Tool (\) create a vertical line of length 13px, with a red stroke and no fill, then place this line in the position shown below.
Make sure that the newly created line is still selected and go to Object > Transform > Move… Enter 5px in the Horizontal box and click Copy, then press (Ctrl +D) seven times to get the results you see in the second image.
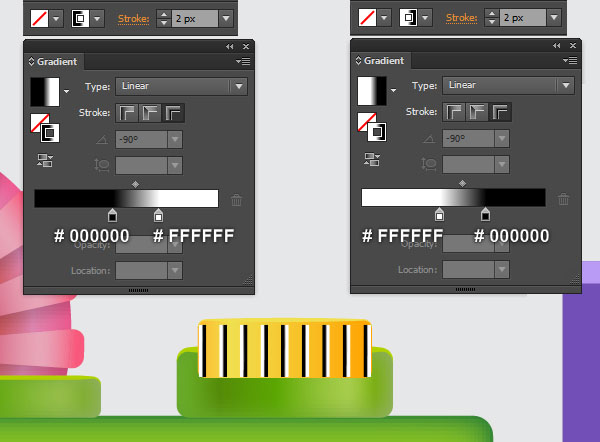
Now select the four left lines, change the stroke weight to 2px and replace the existing stroke color with the linear gradient across stroke as shown in the third image.
Next select the remaining lines, change the stroke weight to 2px and replace the existing stroke color with the linear gradient across stroke as shown in the third image.
Finally, reselect all lines created in this step, change the Blending Mode to Overlay and reduce the Opacity to 30%.

Step 33
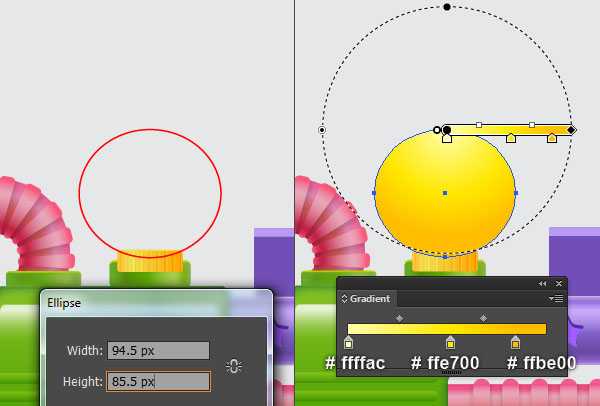
Pick the Ellipse Tool (L) and create a 94.5 by 85.5px ellipse, then place this ellipse in the position shown below.
Reselect the newly created ellipse, remove its stroke and fill this ellipse with the radial gradient you see in the second image.
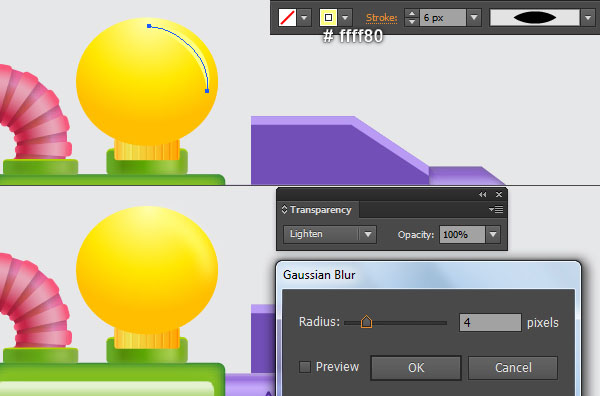
With the Pen Tool (P) create a curved path as shown in the third image.
Once your path is drawn, change the stroke weight to 6px and replace the existing stroke color with light yellow (# ffff80).
Apply Width Profile 1 and a 4px Gaussian Blur effect to the resulting path, then set it to Blending Mode Lighten.
Now select the yellow ellipse and the curved path created in this step, then send them to back (Ctrl +Shift +Left Square Bracket).
Finally select all objects created from the beginning of step 31 to this time and send them to back.

Step 34
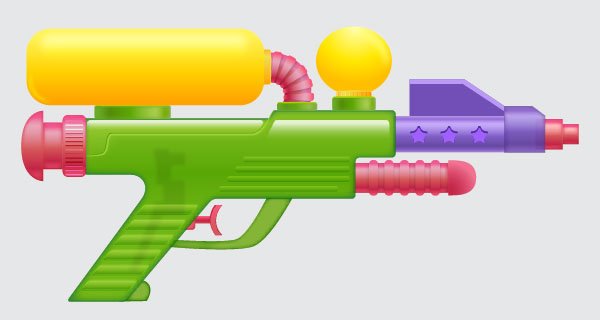
At this point your water gun should look like in the next image:
Step 35
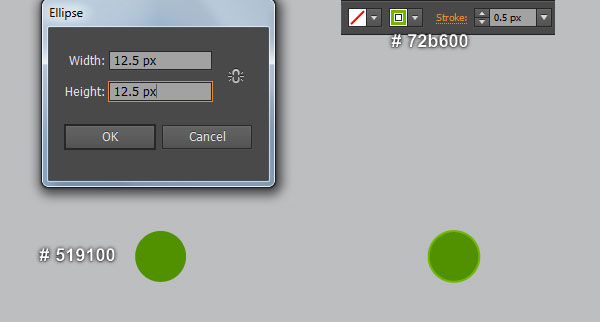
Pick the Ellipse Tool (L) and create a 12.5 by 12.5px green ellipse (# 519100).
Make a copy (Ctrl +C, Ctrl +F) of the green ellipse, then remove the fill color of the copy and add a 0.5px lighter green stroke (# 72b600).
Reselect and group (Ctrl +G) the two ellipses created in this step.
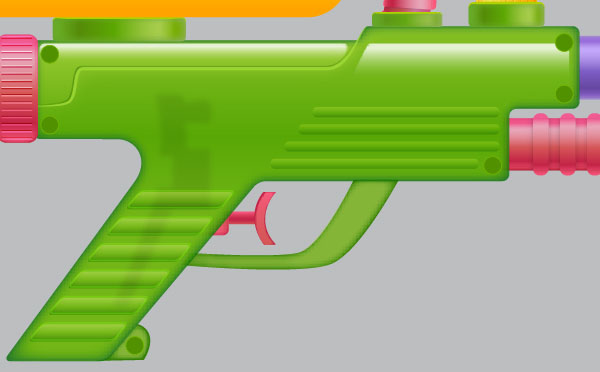
Next make five copies of the newly created group and place them in the positions you see in the last image.
Step 36
It’s time to draw the water drops.
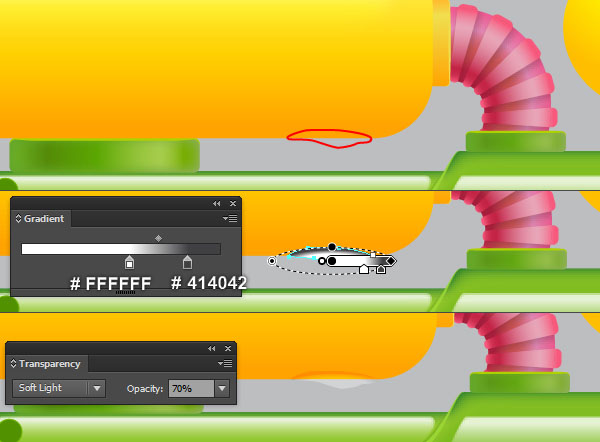
With the Pen Tool (P), create an object and then fill it with the radial gradient shown in the first and the second image.
Keep the newly created shape selected, change the Blending Mode to Soft Light and reduce the Opacity to 70%.
Now select the resulting shape and make a copy of it. Still having the copy selected, open the Transparency palette (Window > Transparency), change the Blending Mode to Normal and change the Opacity to 100%.
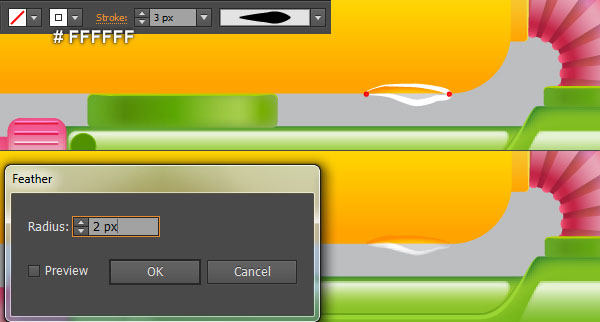
Keep the resulting shape selected, remove the fill color of it and add a 3px white stroke (# ffffff), then apply Width Profile 5 to the resulting object.
Focus on the fourth image, select the two anchor points highlighted with red and click on the "Cut path at selected anchor points" button from the Properties bar. This makes the white object become two paths.
Select and remove the upper path.
Finally reselect the remaining path and apply a 2px Feather effect to it.
Step 37
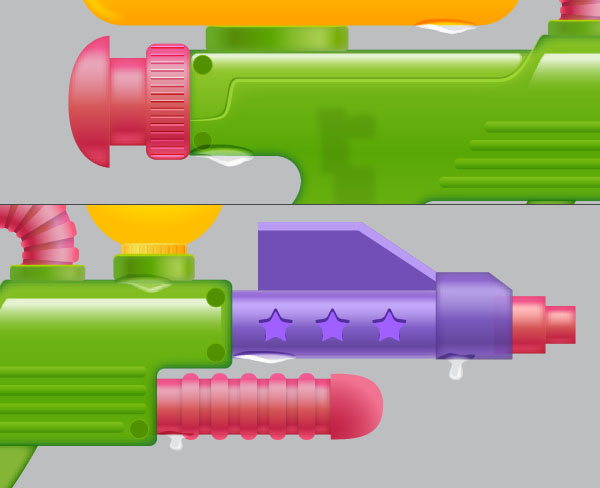
Now, follow the sequence of images and repeat the same process as the previous steps to draw some water drops similar to the ones shown below.
Step 38
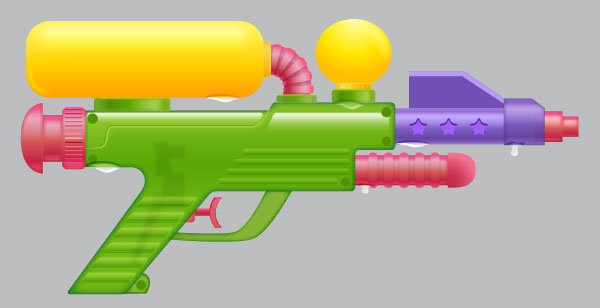
At this point your water gun should look like in the next image:
Step 39
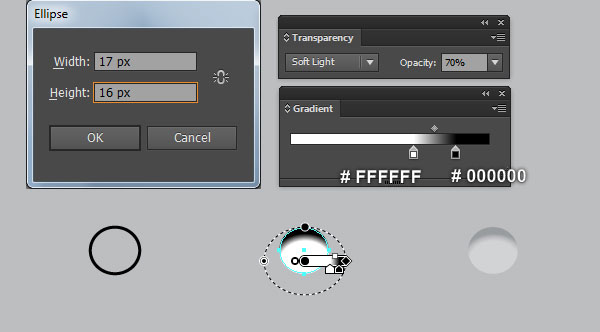
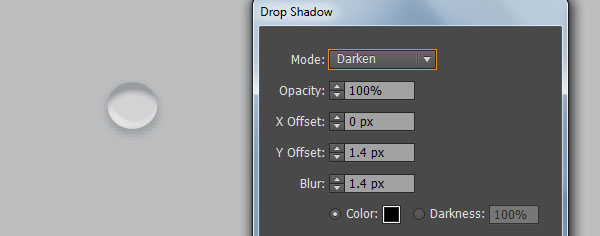
Pick the Ellipse Tool (L) and create a 17 by 16px ellipse, then fill it with the radial gradient you see in the image below.
Keep the newly created ellipse selected, change the Blending Mode to Soft Light and reduce the Opacity to 70%.
Now select the resulting ellipse and make a copy of it. Still having the copy selected, change the Blending Mode to Normal and change the Opacity to 100%.
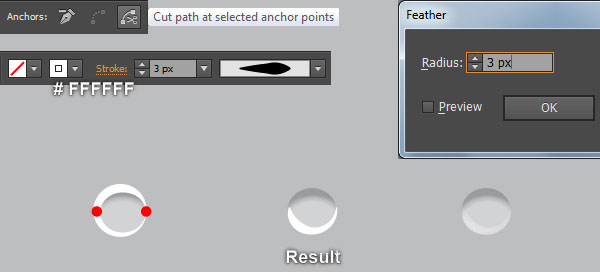
Keep the resulting ellipse selected, remove the fill color of it and add a 3px white stroke (# ffffff), then apply Width Profile 5 to the resulting object.
Focus on the fourth image, select the two anchor points highlighted with red and click on the "Cut path at selected anchor points" button from the Properties bar. This makes the white ellipse become two paths.
Select and remove the upper path.
Next reselect the remaining path and apply a 3px Feather effect to it.
Finally select and group (Ctrl +G) the two objects created in this step, then place this group in the position shown in the last image.

Step 40
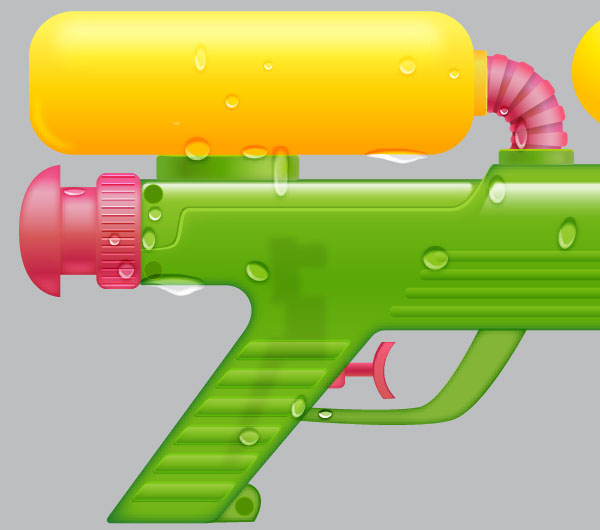
Likewise, repeat the same process as the previous steps to draw more water drops.
Step 41
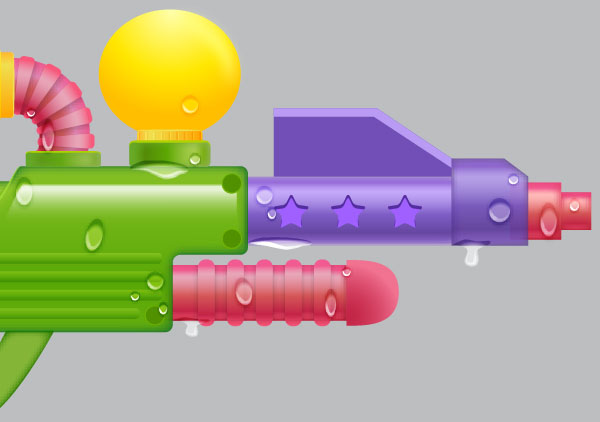
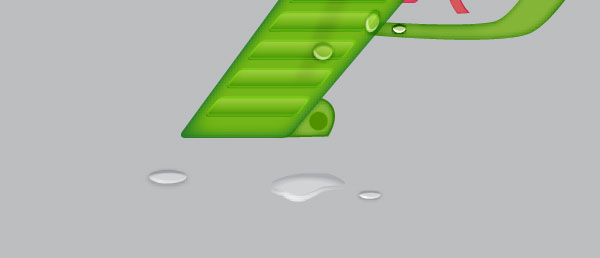
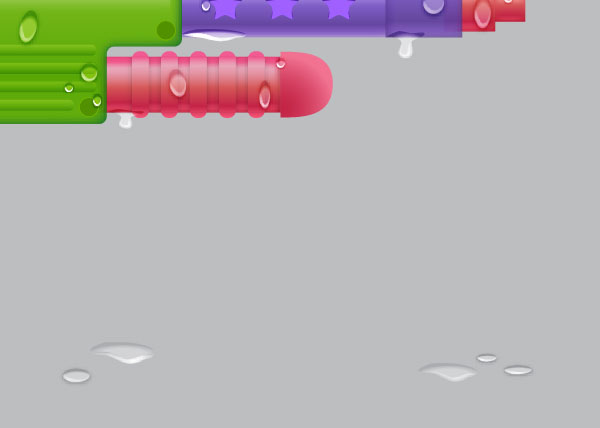
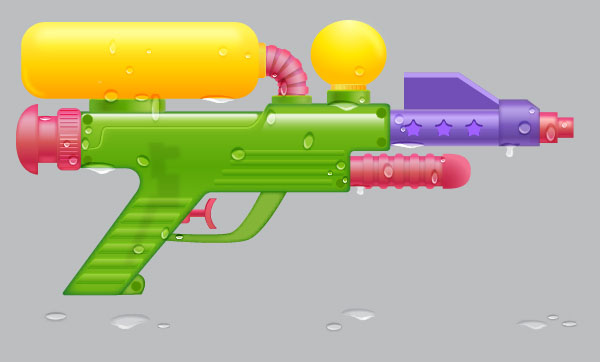
Continue to draw more water drops until you have something like this. Also you can see them all in the final image.
Step 42
We’re done with the water gun. It’s time for the background now.
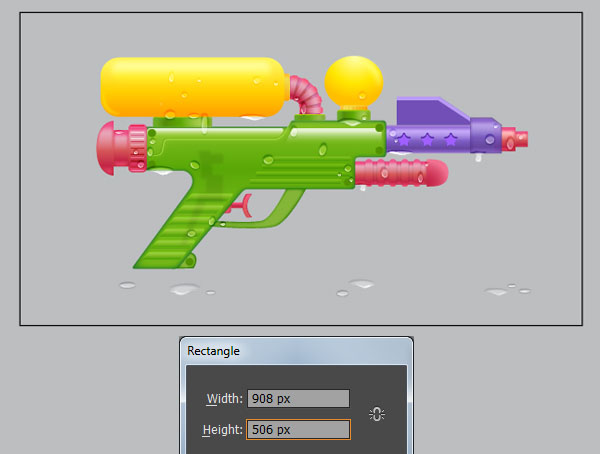
Pick the Rectangle Tool (M) and create a 908 by 506px rectangle, then place it in the position shown below.
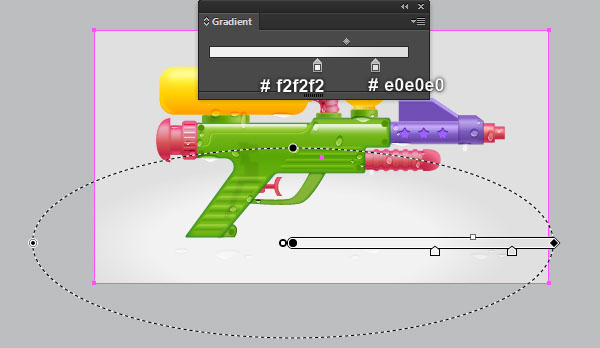
Remove the stroke of the newly created rectangle and then fill it with the radial gradient you see in the second image.
Finally send the resulting rectangle to back (Ctrl +Shift +Left Square Bracket).
Step 43
To give a more realistic look I’m going to be adding some shadows in some key places.
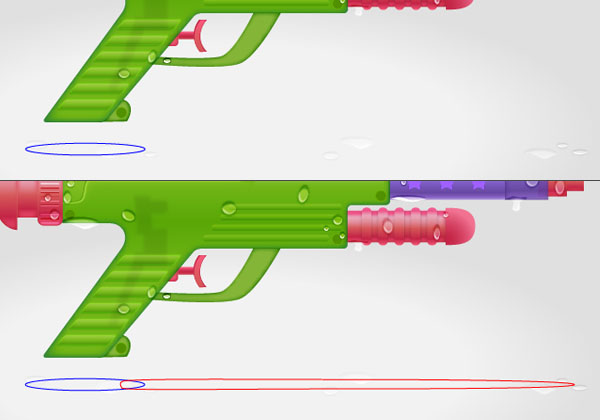
With the help of the Ellipse Tool (L) and the Pen Tool (P), create two objects as shown in the first and the second images.
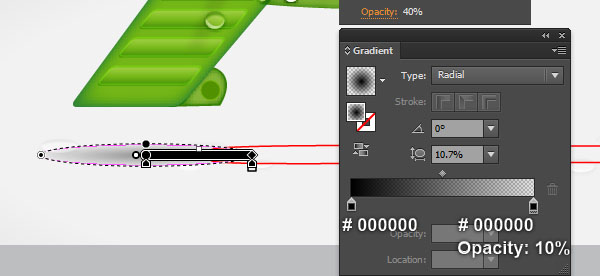
Once your objects are drawn, reselect the ellipse, remove its stroke and fill it with the radial gradient you see in the third image, then reduce the Opacity of the resulting ellipse to 40%.
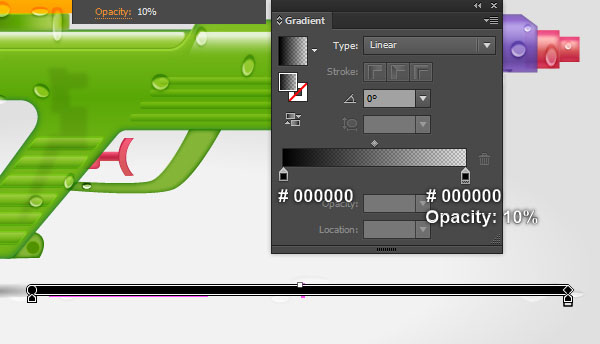
Select the remaining object, remove its stroke and fill this object with the linear gradient you see in the next to last image.
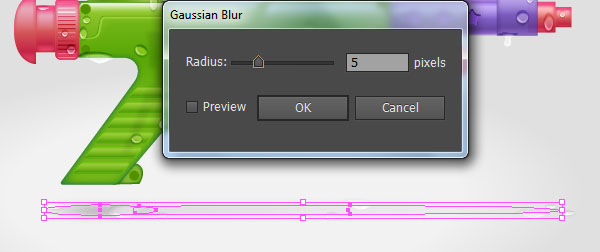
Finally reselect the two objects created in this step and apply a 5px Gaussian Blur effect, then hide them behind the water drops created in step 41.
And We’re Done!
