In this tutorial, you will learn how to create a fun and colorful Lego text effect in Adobe Illustrator.
Have fun with this tutorial and learn how to create a Lego text effect in Adobe Illustrator. Everything starts with a single square and with the help of the Appearance panel we’ll create the first Lego square.
After that, it’s just a matter of coloring and combining to obtain the rest of the Lego bricks and the entire text effect. Let’s begin!
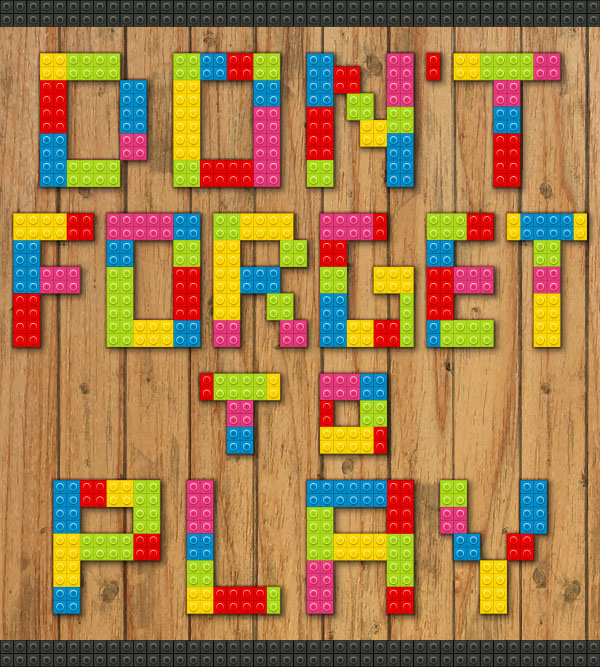
Final Image
As always, this is the final image that we’ll be creating:
Tutorial Details
- Program: Adobe Illustrator CS3-CC
- Estimated Completion Time: 1 hour
- Difficulty: Beginner-Intermediate
Step 1
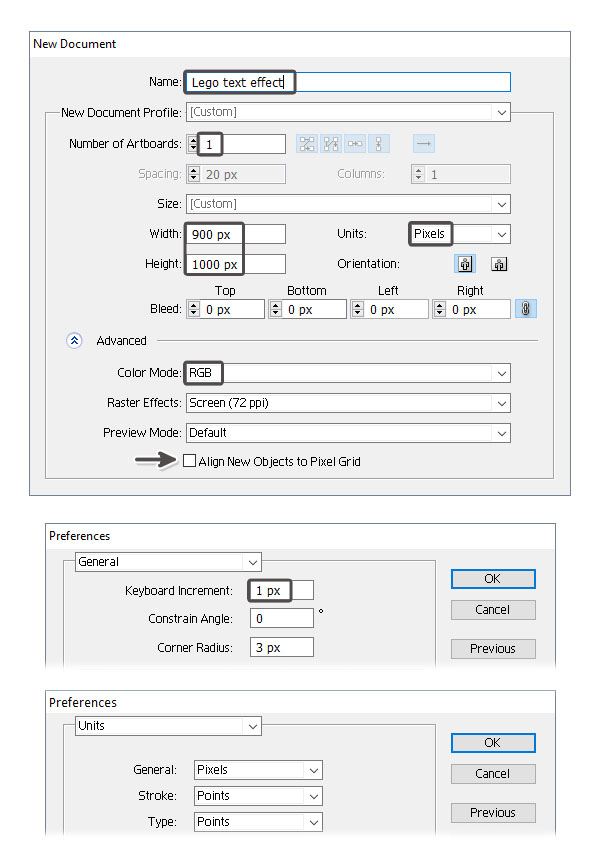
Launch Illustrator and go to File > New in order to open a blank document. Type a name for your file and set up the dimensions then select Pixels as Units and RGB as Color Mode. Also, uncheck Align New Objects to Pixel Grid.
Next, go to Edit > Preferences > General and set the Keyboard Increment to 1 px and while there, also go to Units and make sure that they are set as in the following image. I usually work with these settings and they will help you throughout the drawing process.
Step 2
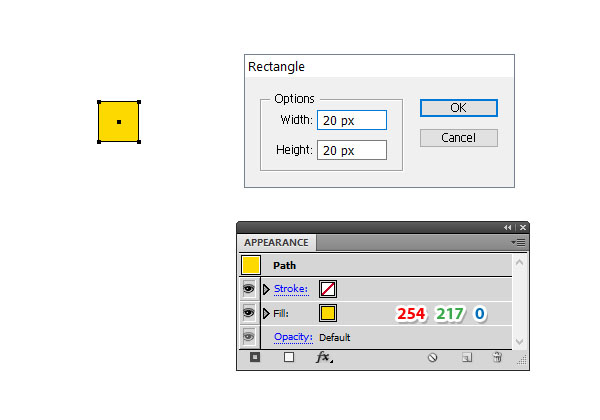
Take the Rectangle Tool (M) and draw the first shape, a 20 x 20 px square. Select the shade of yellow shown as the fill color.
Step 3
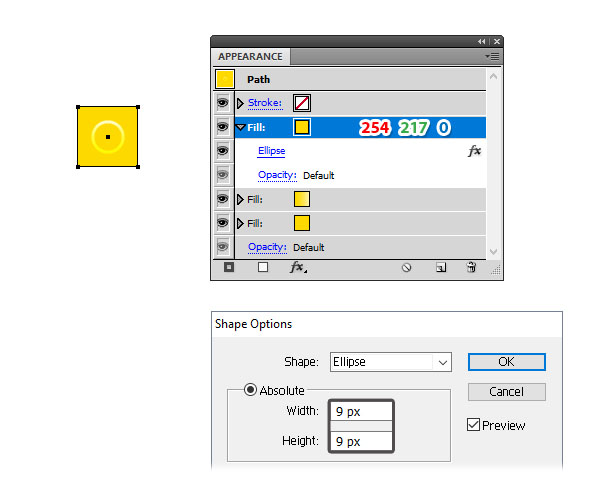
While the square stays selected, go to the Appearance panel and press Add New Fill at the bottom in order to add a second Fill attribute above the first. Replace the existing color with the linear gradient shown at a 90 degrees Angle and after that, go to Effect > Convert to Shape > Ellipse.
There, select 11 x 11 px as the dimensions and as a result your second Fill will turn from a square into a circle in the center. Set this Fill attribute to Blending Mode Screen.

Step 4
While the square stays selected, add a third Fill at the top of the Appearance panel and use the same shade of yellow as before. Next, go Effect > Convert to Shape > Ellipse and this time, select 9 x 9 px as the dimensions. As a result, you will get a smaller circle in the center of the square.
Step 5
Still having the square selected, add a New Fill above the others and use the radial gradient shown from black to white. Apply the Ellipse effect again and select 10 x 10 px as the dimensions (1). Set this Fill attribute to Blending Mode Soft Light and reduce the Opacity to 60% (2).
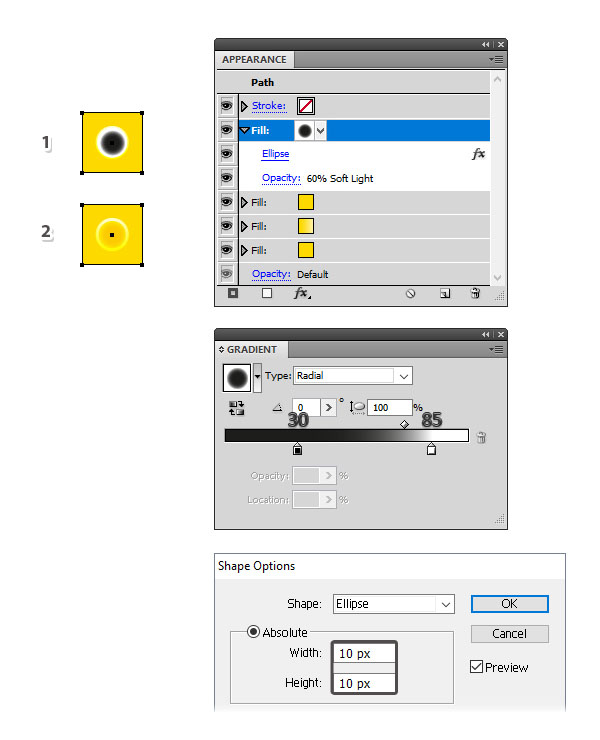
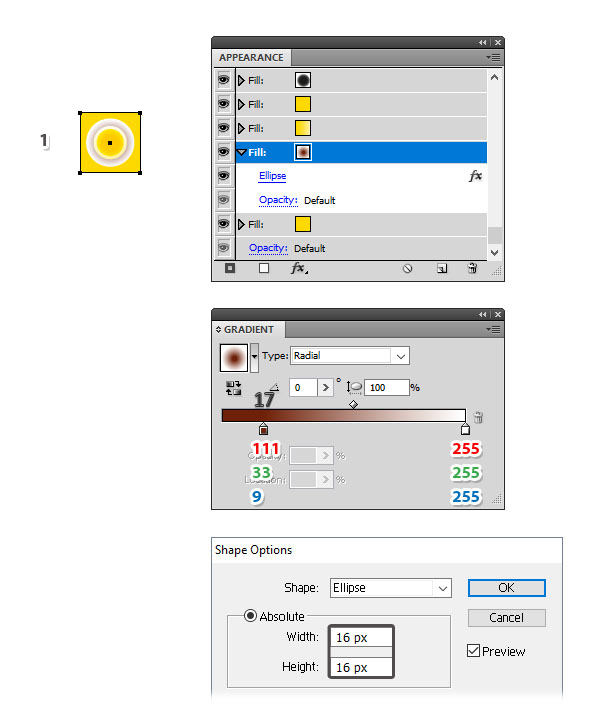
Step 6
While the square stays selected, add a New Fill above the first one and use the radial gradient shown. Apply the Ellipse effect again and select 16 x 16 px as the dimensions in order to get a bigger circle in the center (1).
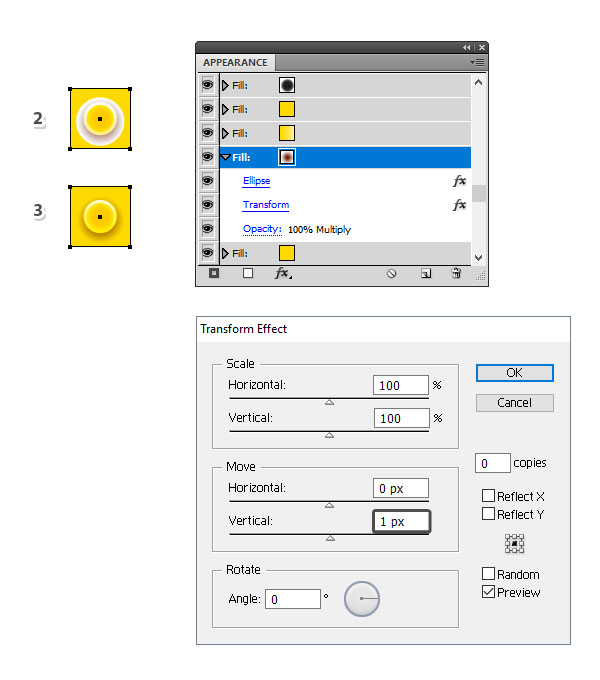
Step 7
We are still working with the Fill attribute from the previous step so make sure that it stays selected in the Appearance panel. Go to Effect > Distort & Transform > Transform and apply a 1 px Vertical Move (2) in order to move the circle downwards a little because the shadow should be more visible at the bottom. Set this Fill to Blending Mode Multiply (3).
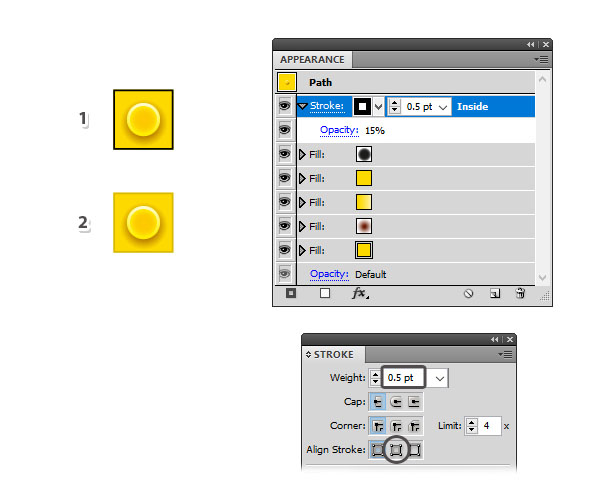
Step 8
We are almost done. Add a 0.5 pt black Stroke to your square and select the Align Stroke to Inside option in the Stroke panel (1). Reduce the Opacity to 15% (2) and at this point the first yellow Lego square is ready.
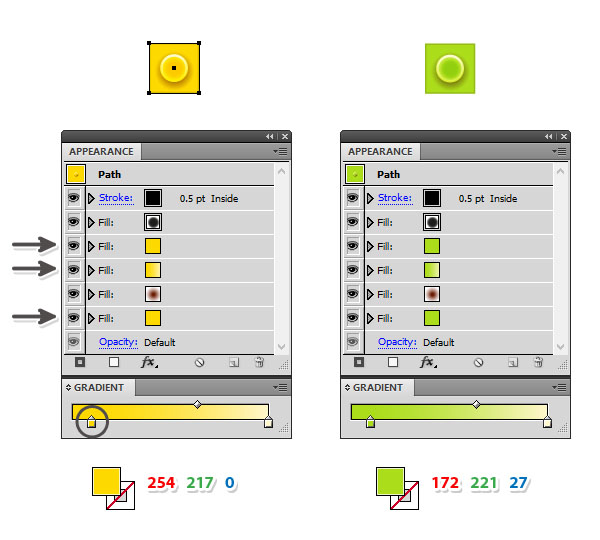
Step 9
It’s time for more colors. The first thing is to make a copy of the yellow square. Now, if you take a look at the Appearance panel, you’ll see that you have two yellow Fills and a gradient that uses the same shade of yellow. All you have to do is to replace the yellow with the shade of lime green indicated and you’ll get the green square.
Step 10
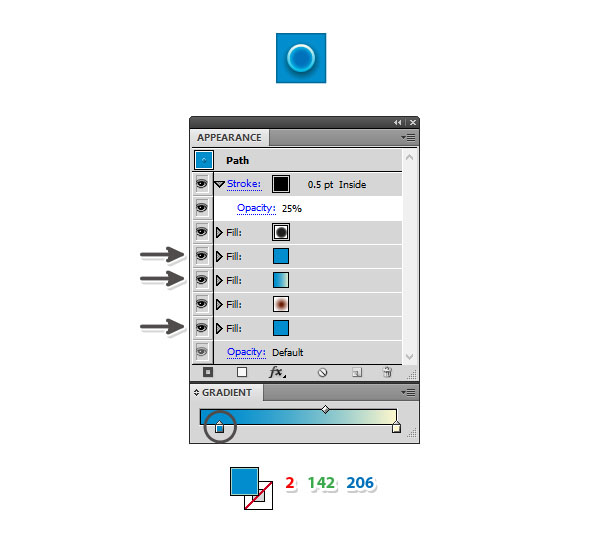
Let’s continue with other colors. Make another copy of the yellow square and this time, replace the shade of yellow with blue. Also, increase the Opacity of the black stroke from 15% to 25% because of the slightly darker color.
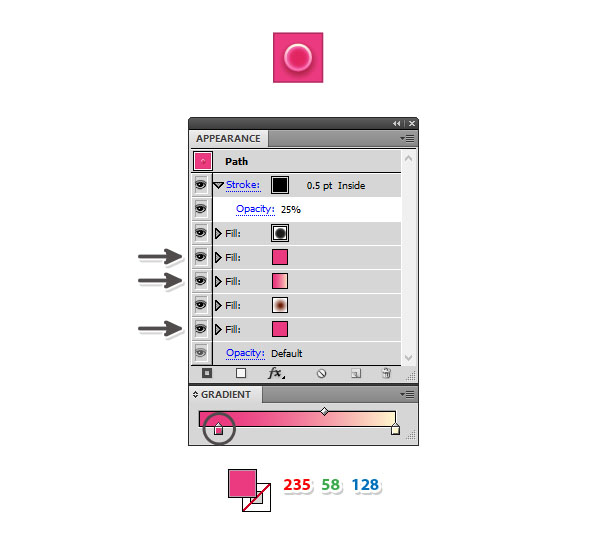
Step 11
The same thing goes for the pink square:
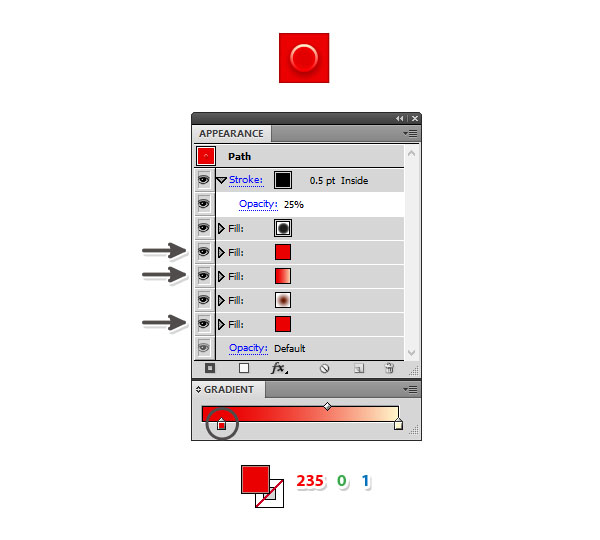
Step 12
And here is the red square:
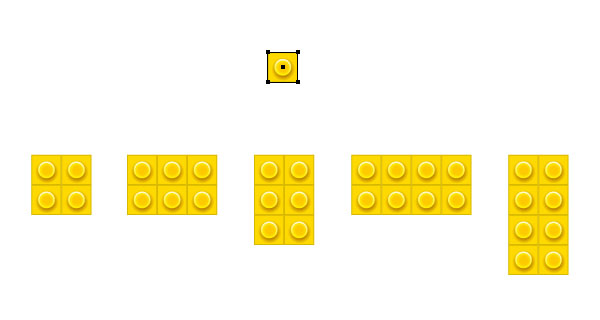
Step 13
It’s time to create the well known Lego bricks. Grab the yellow square, multiply it and align the corner points to create bricks of 4, 6 and 8 squares. Group (Control-G) each brick separately after you are done.
I don’t recommend that you rotate the bricks to obtain the vertical ones although it seams faster because the highlights and shadows of the single squares will change position as well.
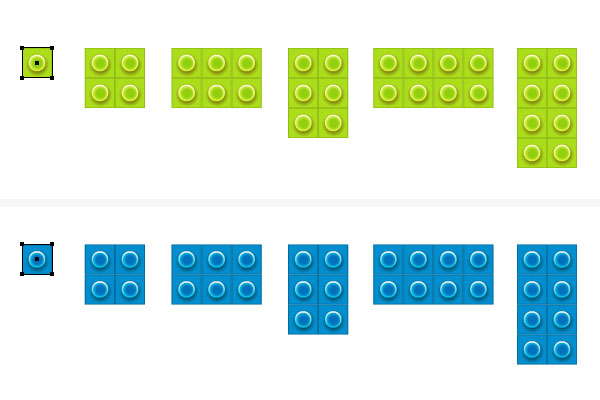
Step 14
Repeat the same process to create the green and blue bricks:
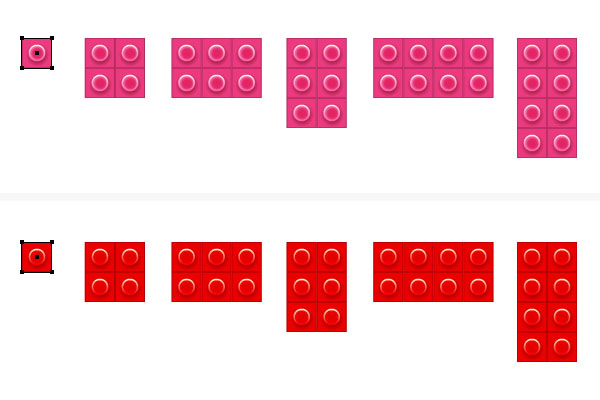
Step 15
And here are the pink and red bricks. Don’t forget to Group (Control-G) each brick.
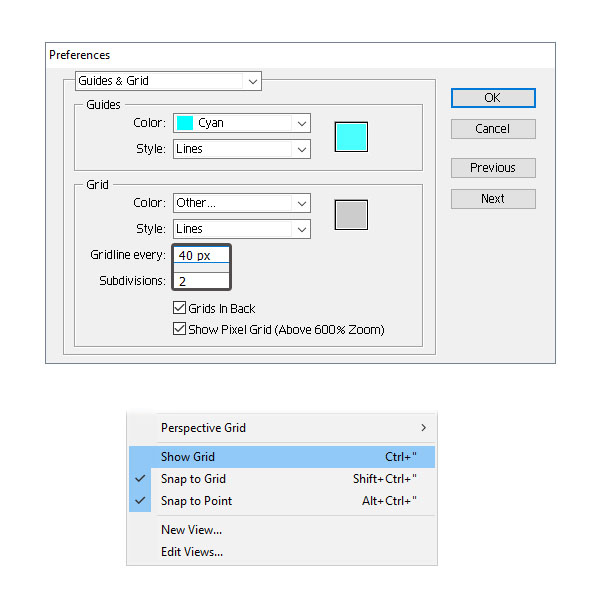
Step 16
Now, go to Edit > Preferences > Guides & Grid and select to Gridline your artboard every 40 px and 2 Subdivisions. Hit OK. In the View menu, select Show Grid and also check Snap to Grid.
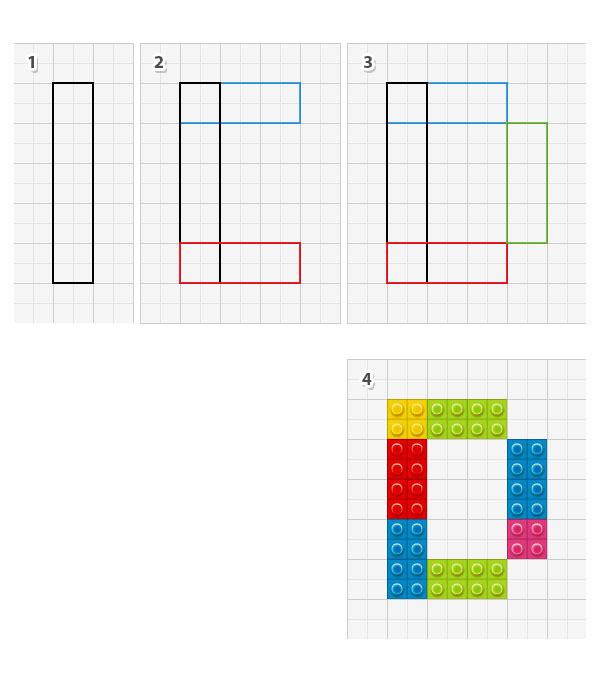
Step 17
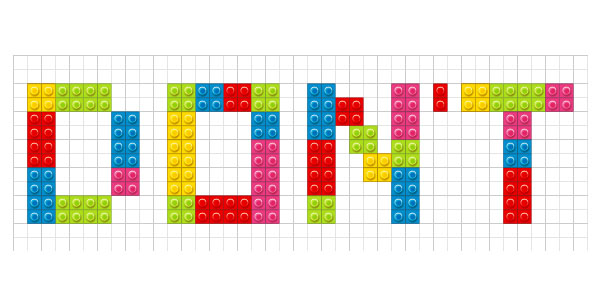
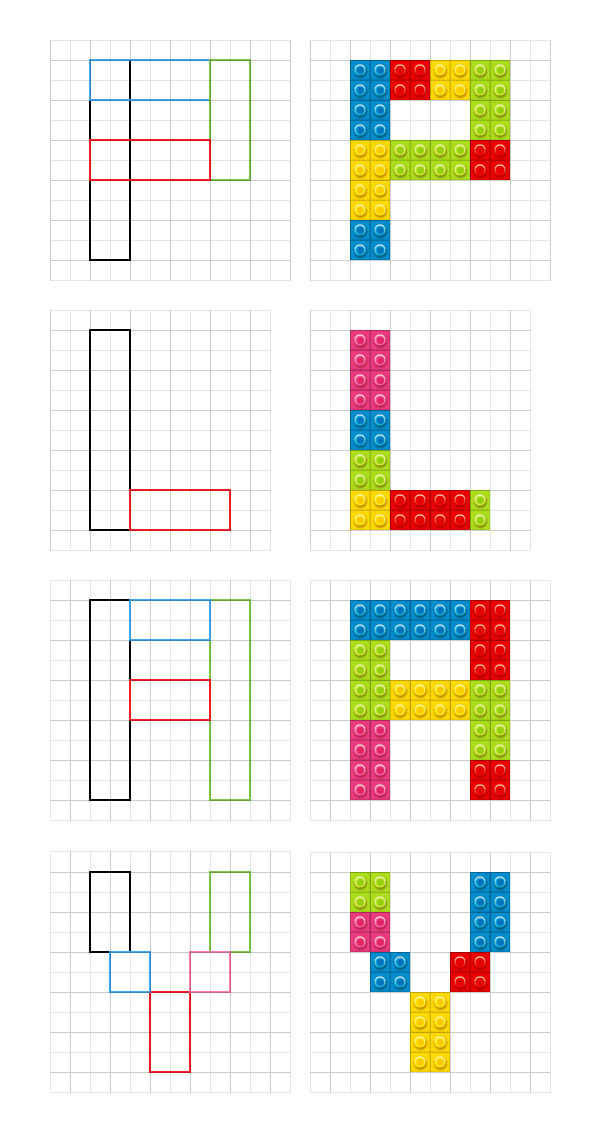
We are ready to create the letters. Grab the Rectangle Tool (M) and draw the first rectangle having the length of 10 subdivisions and the width of 2 subdivisions (1). Continue with the blue and red rectangles having 6 subdivisions in length (2) and finish with the green rectangle in the right side.
This will be the shape of the letter “D” (3). Now, be creative and use the colored Lego bricks to fill the inside of the letter as you refer (4).
Step 18
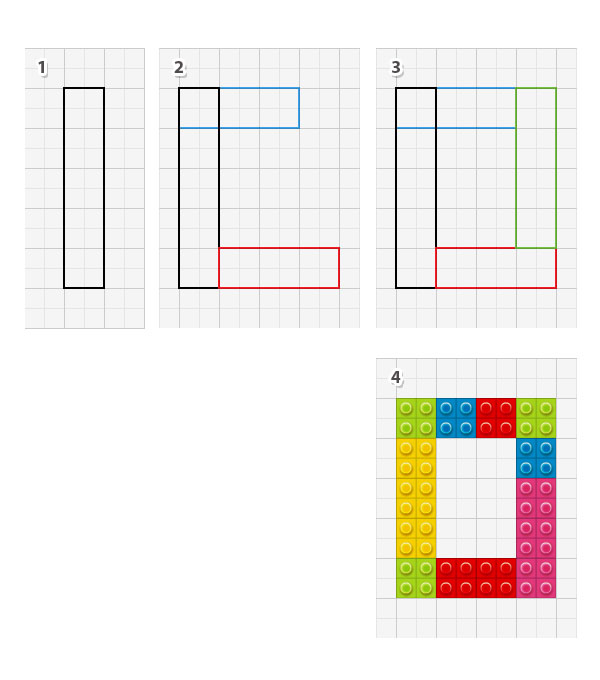
The next one is the letter “O”. Follow the sequence of images and the grid lines to create the shape of the letter as in the following image. After that, use the Lego bricks to fill this shape on the inside (4).
Step 19
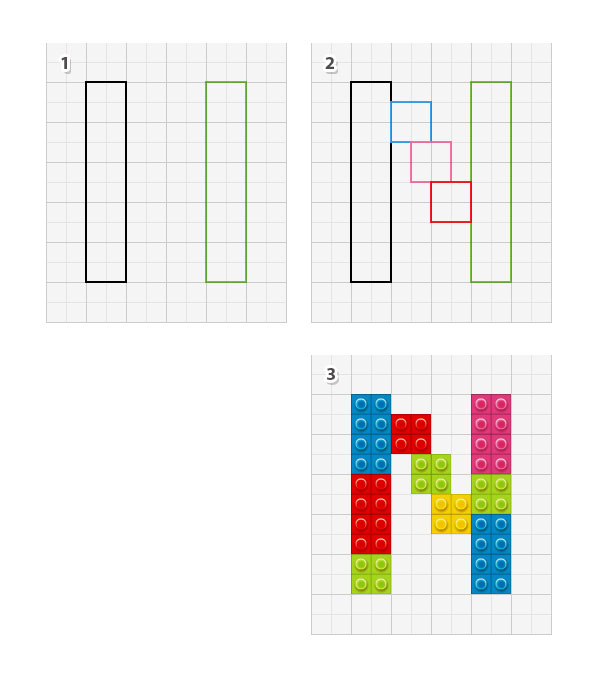
Continue with the letter “N”:
Step 20
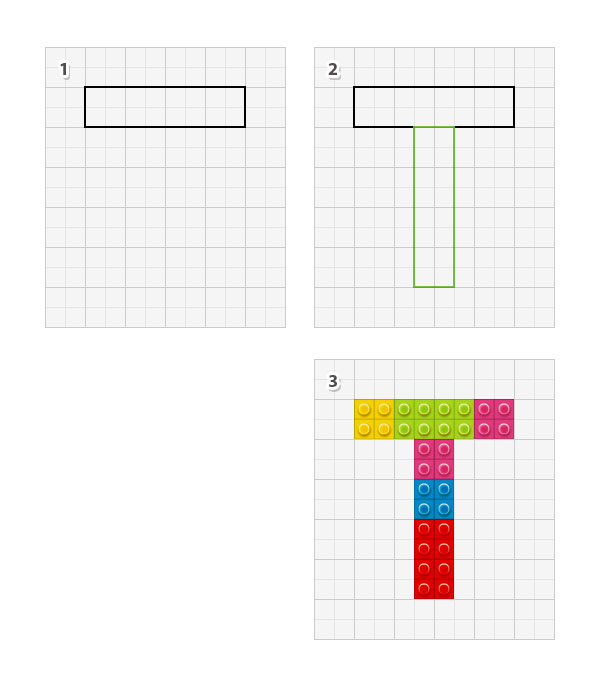
Here is the letter “T”:
Step 21
These are the letters so far. As the apostrophe just use two squares.
Step 22
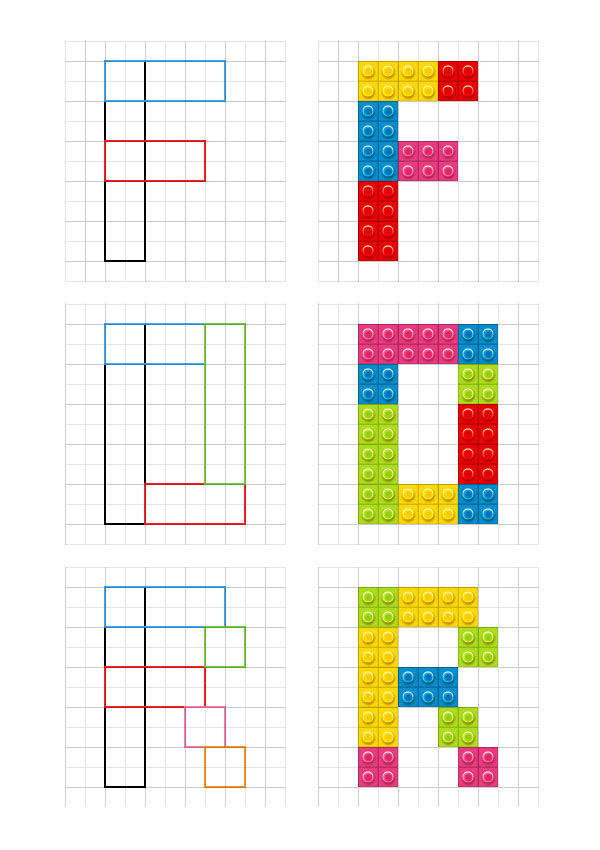
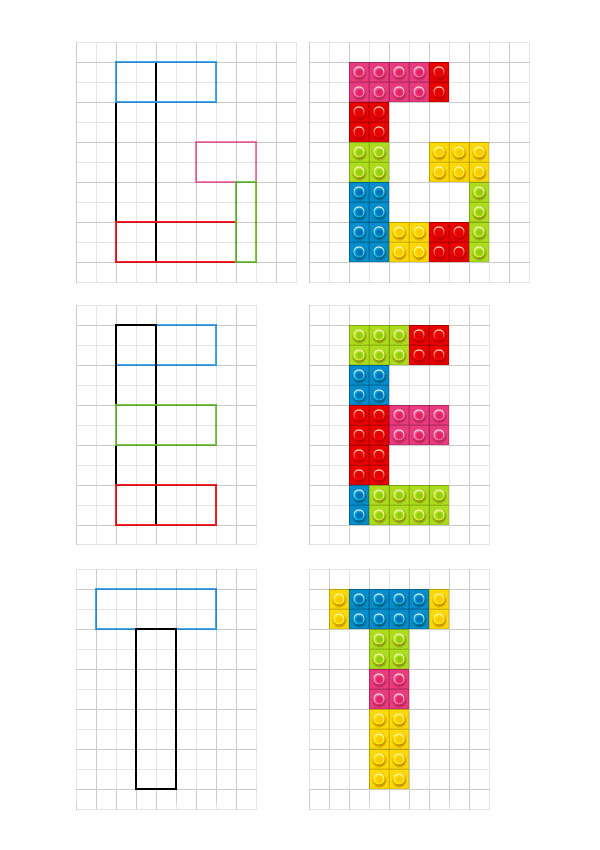
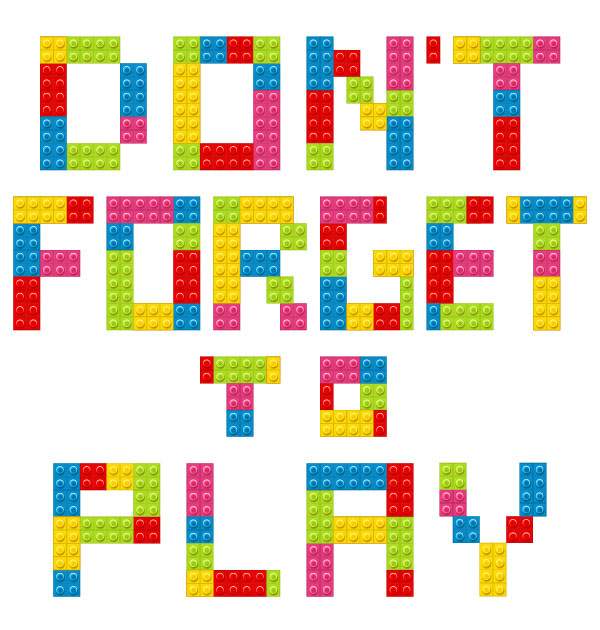
The next word is “Forget” so follow the images below and create these letters.
Step 23
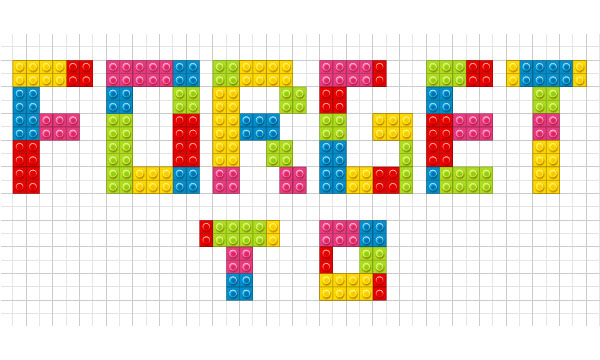
Here is an overview of the words “Forget to”:
Step 24
The last word is “Play” so follow my example and create the last four letters.
Step 25
At this point the text is ready and everything should fit perfectly into your 900 x 1000 px artboard.
Step 26
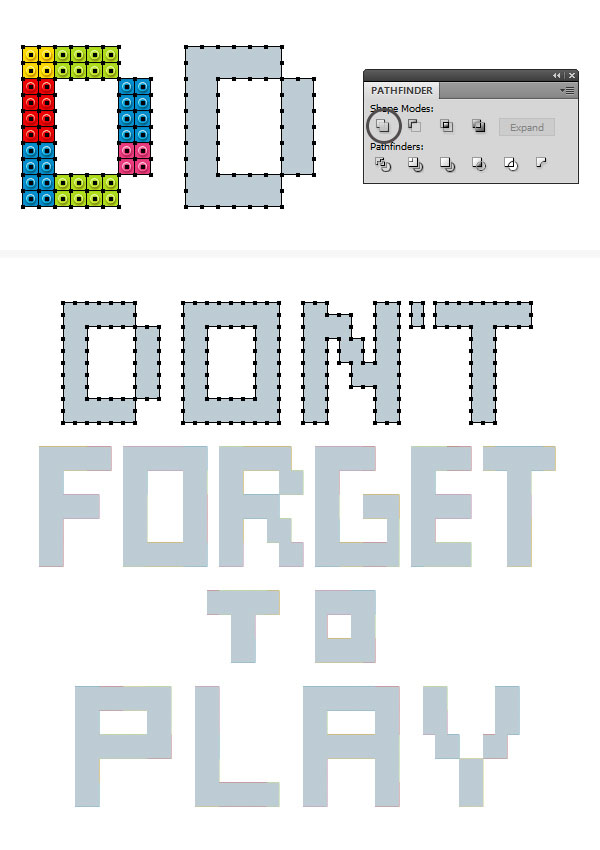
It’s time to create the shadow. Select all Lego bricks that make up the letter “D” and Copy and Paste in Place (Shift-Control-V) in order to create a copy of everything, Ungroup (Shift-Control-G) if necessary until you have the single squares separately and before you release them, press Unite in the Pathfinder panel. As a result you will get the shape of the letter “D”.
Follow the same process and create the shapes of the rest of the letters.
Step 27
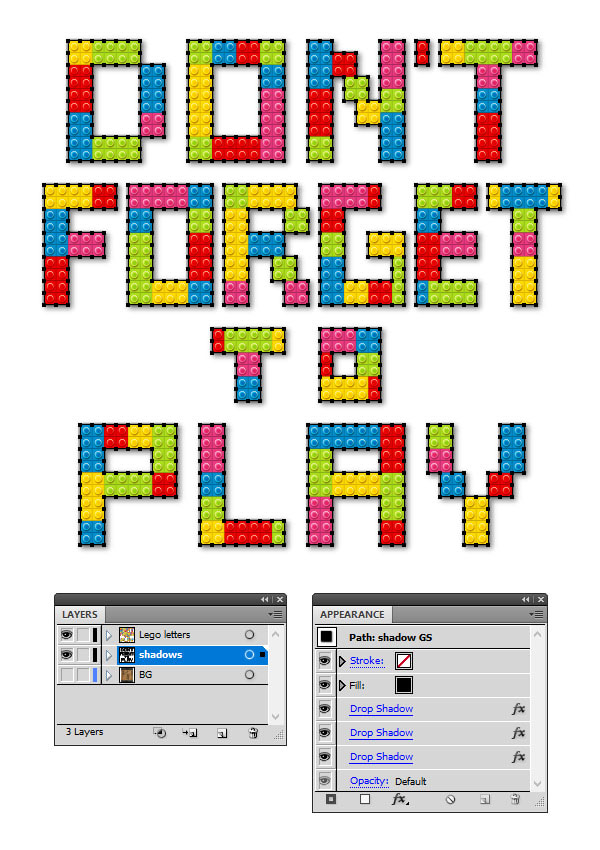
Move the gray letters that you have obtained at the previous step into a new Layer under the original text effect and then go to Effect > Stylize > Drop Shadow and apply this effect three times to create the shadow.
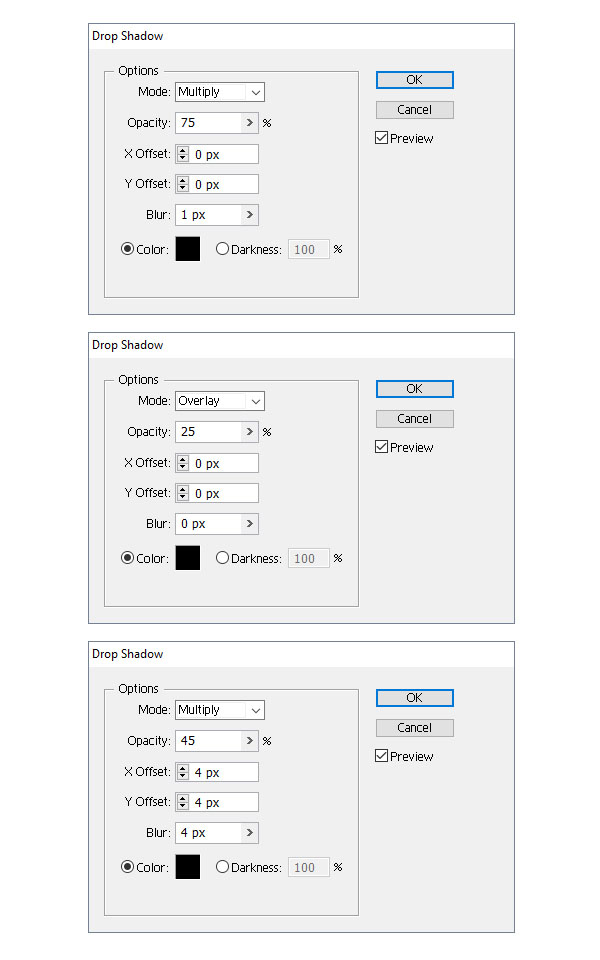
Step 28
These are the settings for the Drop Shadow effects in order:
Awesome work!
Here is the final image of the Lego inspired text effect. You can also add a background using a texture.
I hope you enjoyed this tutorial and that you learned new things today. Be creative and create your own letters and use the colors that you prefer because it’s fun.
