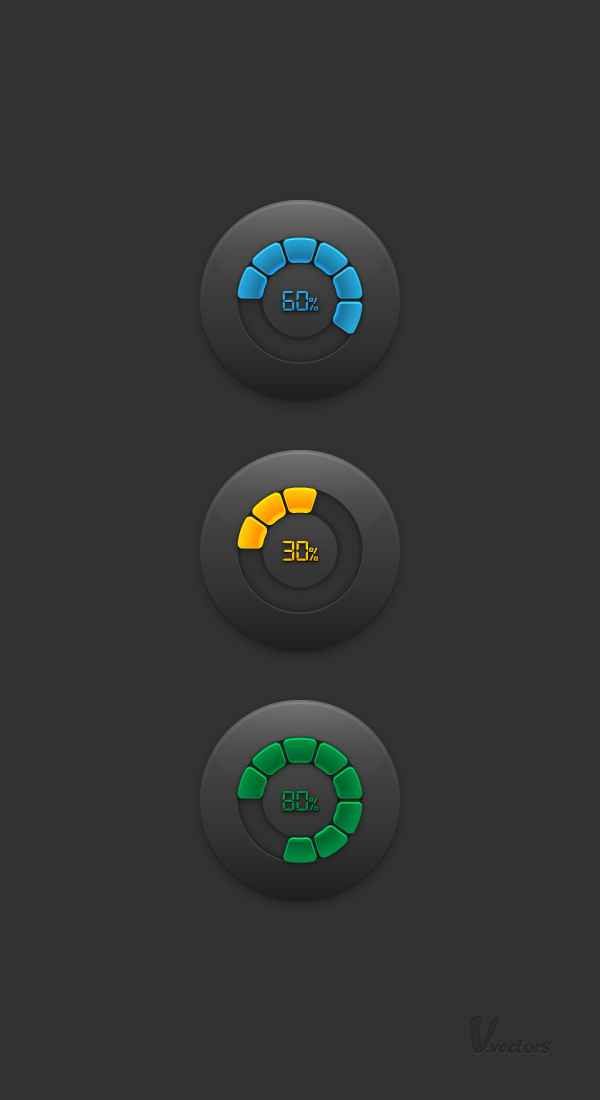
In the following tutorial you will learn how to create a radial progress bar in Adobe Illustrator.
Final Image
As always, this is the final image that we’ll be creating:

Tutorial Details
- Program: Adobe Illustrator CS5
- Estimated Completion Time: 45 minutes
- Difficulty: Beginner – Intermediate
Resources
Step 1
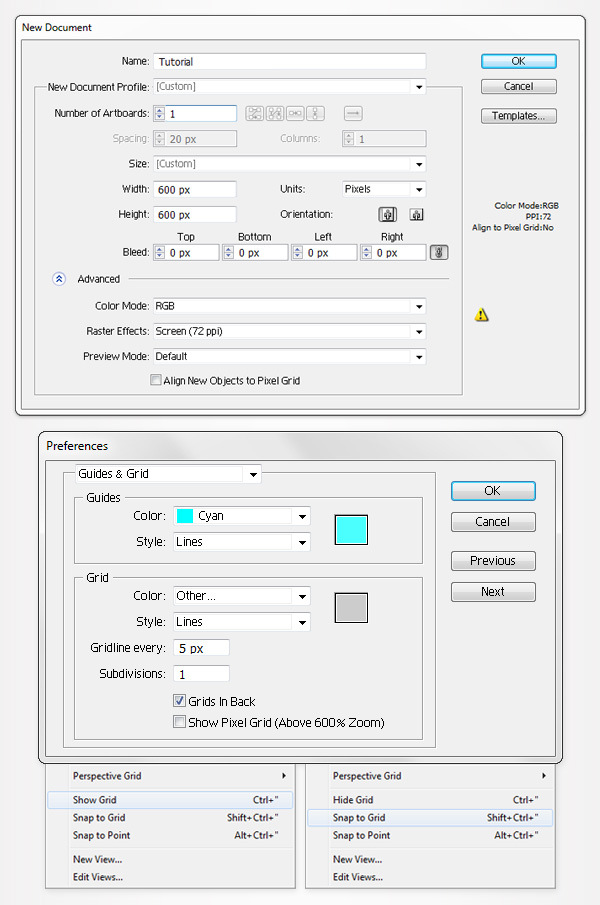
Open Illustrator and hit Control + N to create a new document. Enter 600 in the width and height boxes then click on the Advanced button. Select RGB, Screen (72ppi) and make sure that the “Align New Objects to Pixel Grid” box is unchecked before you click OK.
Now, turn on the Grid (View > Grid) and the Snap to Grid (View > Snap to Grid). You’ll need a grid every 5px. Simply go to Edit > Preferences > Guides & Grid, enter 5 in the Gridline every box and 1 in the Subdivisions box.
You can also open the Info panel (Window > Info) for a live preview with the size and position of your shapes. Do not forget to set the unit of measurement to pixels from Edit > Preferences > Unit > General. All these options will significantly increase your work speed.
Step 2
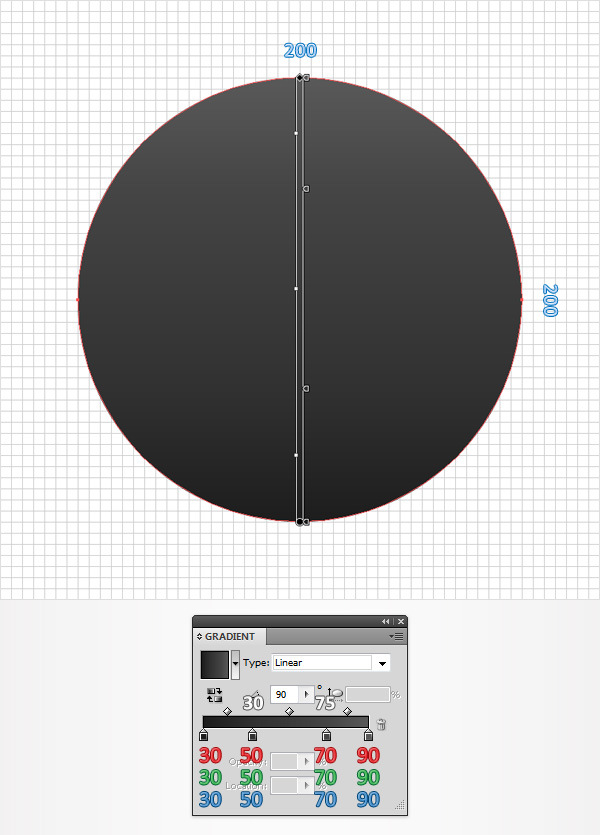
Pick the Ellipse Tool(L), create a 200px circle and fill it with the linear gradient shown in the following image. The white numbers from the gradient image stand for location percentage.
Step 3
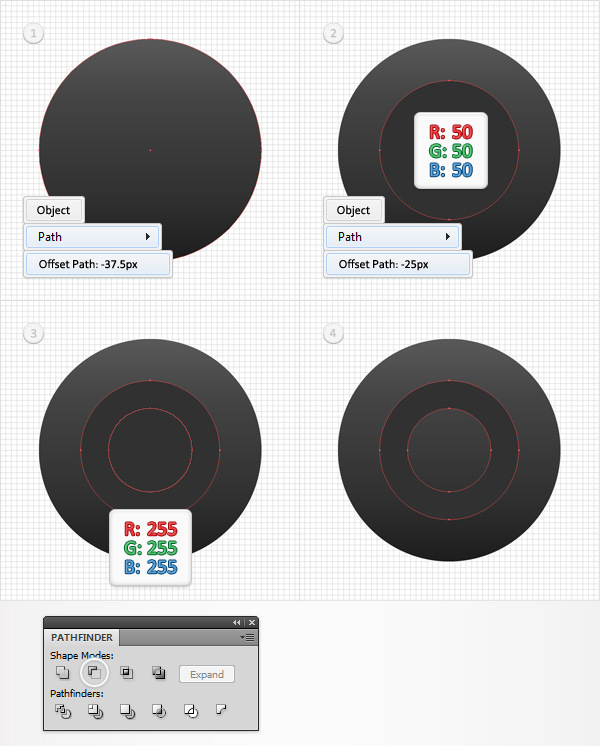
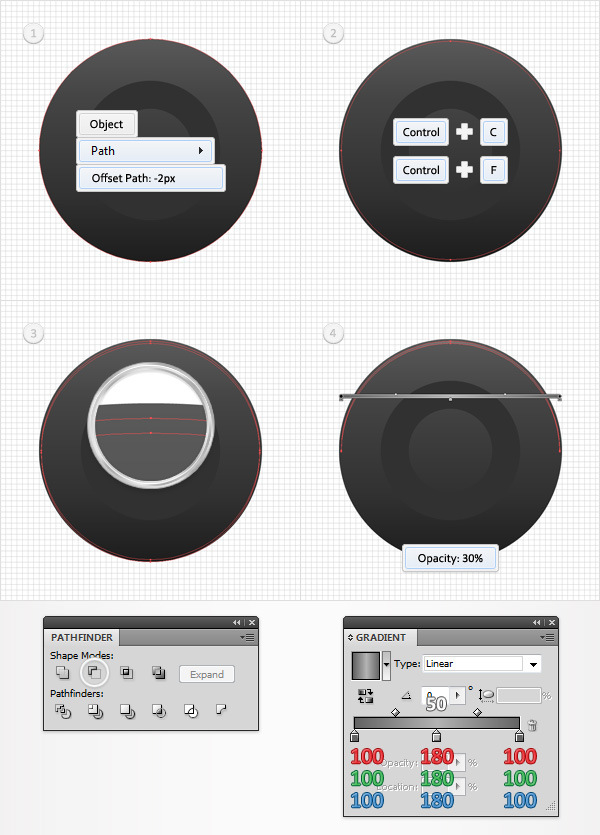
Reselect the shape made in the previous step and go to Object > Path > Offset Path. Enter a -37.5px Offset and click OK.
Select the resulting shape, fill it with R=50 G=50 B=50 and go again to Object > Path > Offset Path. Enter a -25px Offset and click OK.
Select both shapes made in this step, open the Pathfinder panel (Window > Pathfinder) and click on the Minus Front button. In the end your shape should look like in the fourth image below.
Step 4
Disable the Snap to Grid (View > Snap to Grid) then go to Edit > Preferences > General and make sure that the Keyboard Increment is set at 1px.
Reselect the circle made in the second step and go to Object > Path > Offset Path. Enter a -2px Offset and click OK.
Select the resulting shape and make a copy in front (Control + C > Control + F). Select this copy and move it 2px down using the down arrow from your keyboard.
Reselect both shapes made in this step and click on the Minus Front button from the Pathfinder panel. Fill the resulting shape with the linear gradient shown in the following image and lower its opacity to 30%.
Step 5
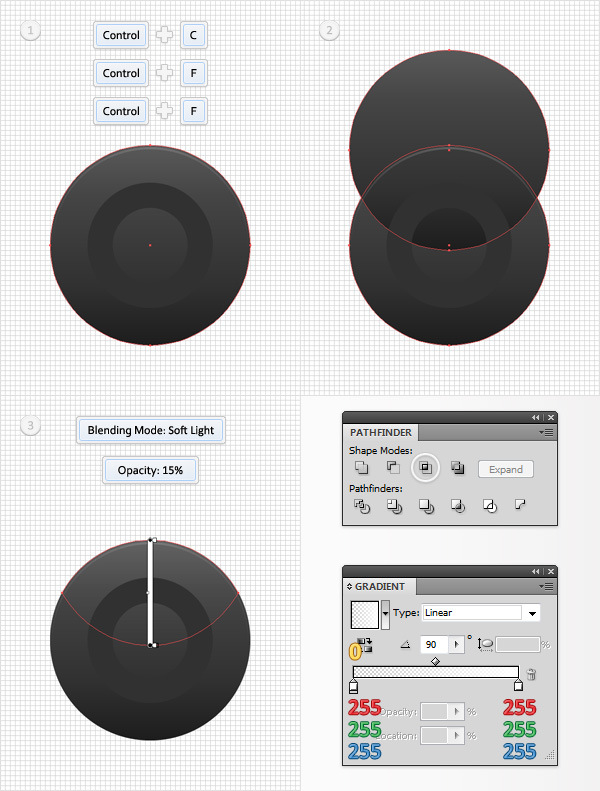
Reselect the circle made in the second step and make two copies in front (Control + C > Control + F > Control + F).
Select the top copy and go to Object > Transform > Move. Enter -95px in the Vertical box and click OK.
Reselect both shapes made in this step and click on the Intersect button from the Pathfinder panel. Fill the resulting shape with the linear gradient shown in the following image, lower its opacity to 15% and change the blending mode to Soft Light. The yellow zero from the gradient image stands for opacity percentage.
Step 6
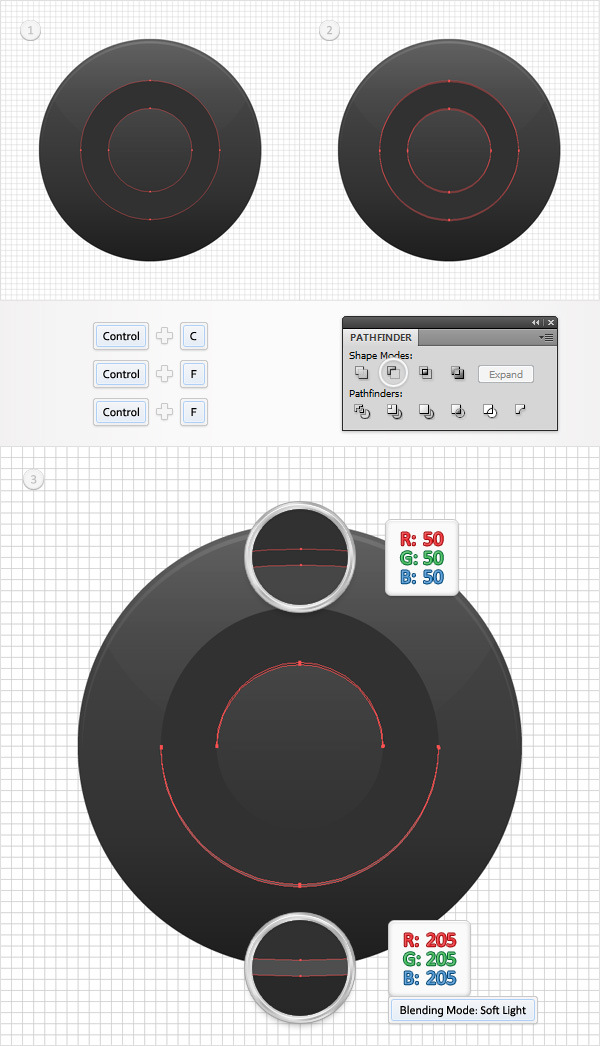
Reselect the shape made in the third step and make two copies in front (Control + C > Control + F > Control + F).
Move to the Layers panel, select the bottom copy and move it 1px down using the down arrow from the keyboard.
Reselect both copies and click on the Minus Front button from the Pathfinder panel.
Return to the Layers panel, select the resulting group of shapes and ungroup it (Shift + Control + G).
Select the top, thin shape and fill it with R=50 G=50 B=50.
Move to the other thin shape, fill it with R=205 G=205 B=205 and change the blending mode to Soft Light.
Step 7
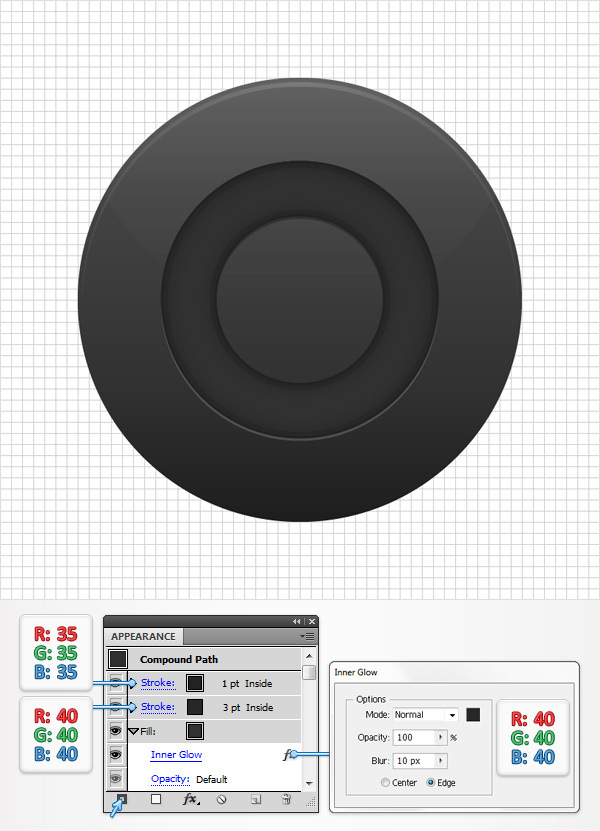
Reselect the shape made in the third step and focus on the Appearance panel.
First, select the fill and go to Effect > Stylize > Inner Glow. Enter the properties shown in the following image and click OK.
Return to the Appearance panel and add a 3pt stroke for this shape. Align it to inside and set the color at R=40 G=40 B=40.
Keep focusing on the Appearance panel and add a second stroke for this shape using the Add New Stroke button (pointed by the little, blue arrow). Select this new stroke, make it 1pt wide, align it to inside and set the color at R=35 G=35 B=35.
Step 8
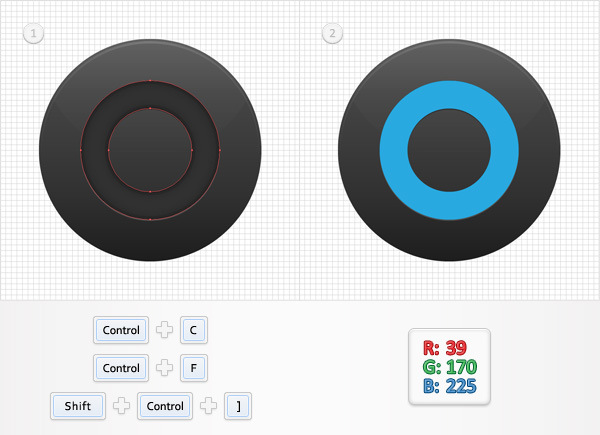
Reselect the shape edited in the previous step and make a copy in front (Control + C > Control + F).
Select this copy, bring it to front (Shift + Control + ] ) and focus on the Appearance panel.
Remove the Inner Glow effect and the two strokes then replace the dark color used for the fill with a light blue (R=39 G=170 B=225).
Step 9
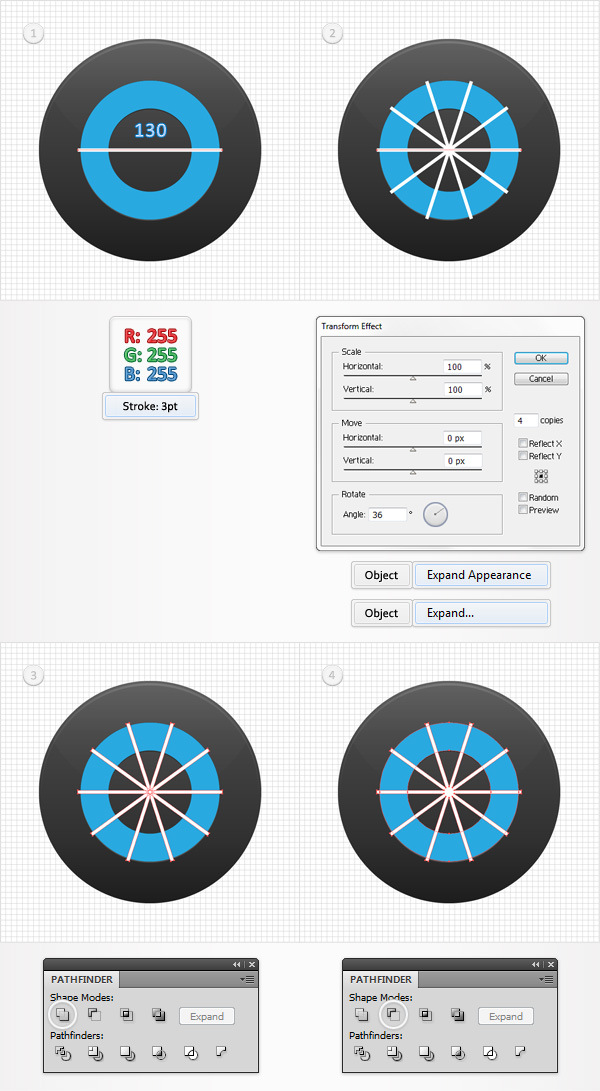
Enable the Snap to Grid (View > Snap to Grid). Pick the Pen Tool(P) and draw a 130px, horizontal path.
Add a 3pt, white stroke for this shape and place it as shown in the first image.
Make sure that this new path is selected and go to Effect > Distort & Transform > Transform. Enter the properties shown in the second image, click OK then go to Object > Expand Appearance and Object > Expand.
Select the resulting group of shape and click on the Unite button from the Pathfinder panel. Select the resulting shape along with the blue path made in the previous step and click on the Minus Front button from the Pathfinder panel.
Step 10
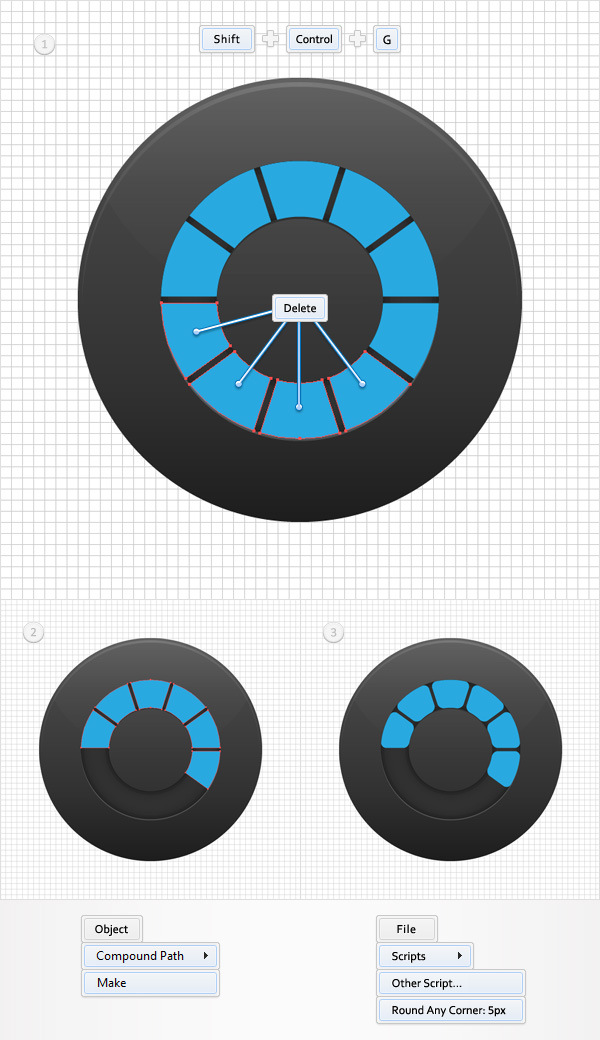
Move to the Layers panel, select the group of blue shapes made in the previous step and ungroup it (Shift + Control + G).
Select the four shapes highlighted in the first image and simply delete them.
Select the remaining blue shapes and turn them into a compound path (Object > Compound Path > Make).
Next, you’ll need the Round Any Corner script. Save it to your hard drive and return to Illustrator.
Make sure that your blue compound path is still selected and go to File > Scripts > Other Script. Open the Round Any Corner Script, enter a 5px Radius and click OK.
In the end your shape should look like in the third image.
Step 11
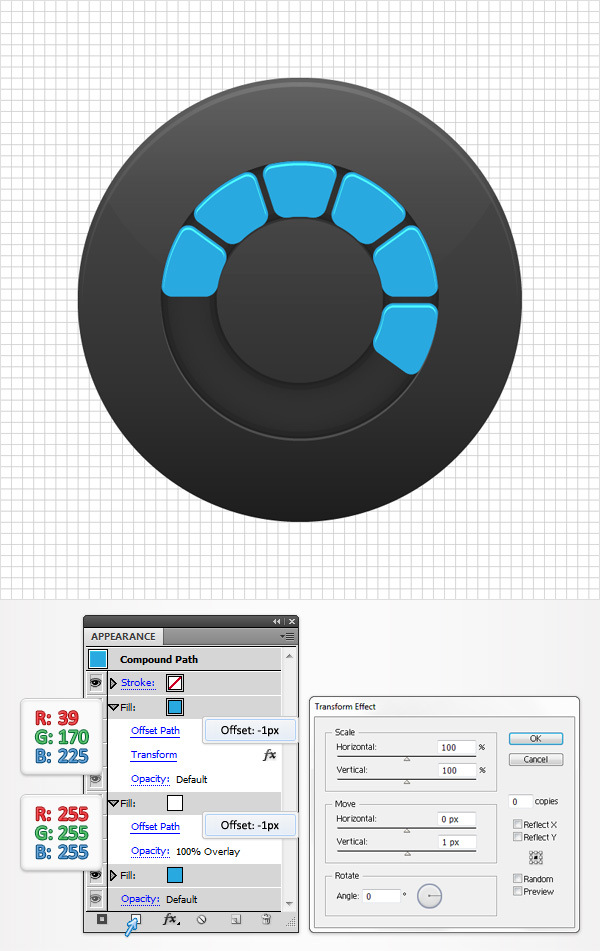
Select the blue compound path, focus on the Appearance panel and add second fill using the Add New Fill button (pointed by the little blue arrow).
Select this new fill, make it white, change the blending mode to Overlay and go to Effect > Path > Offset Path. Enter a -1px Offset and click OK.
Keep focusing on the Appearance panel and add a third fill for this path. Select it, set the color at R=39 G=170 B=225 and go to Effect > Path > Offset Path. Enter a -1px Offset, click OK and go to Effect > Distort & Transform > Transform. Enter the properties shown in the following image and click OK.
Step 12
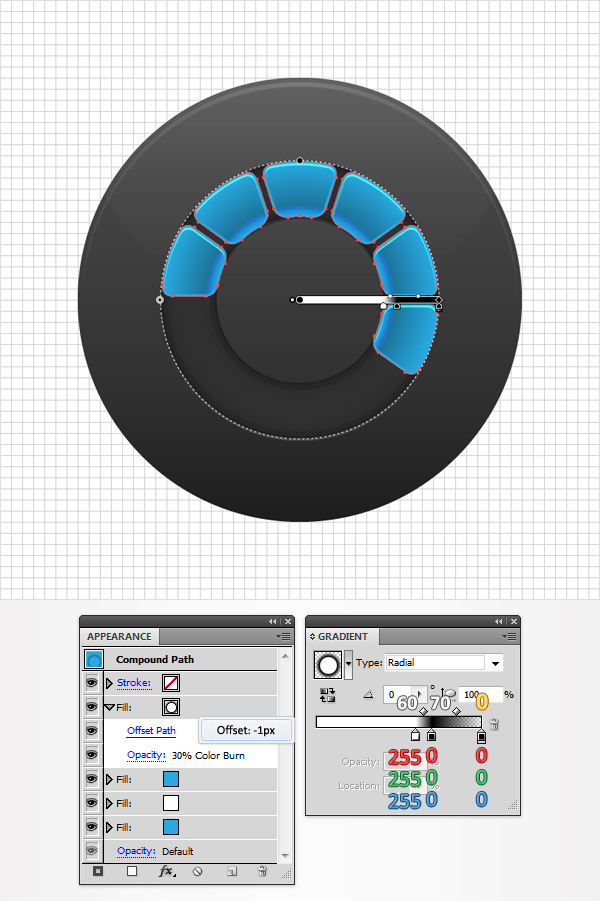
Reselect the blue compound path, add a fourth fill and drag it in the top of the Appearance panel. Select it, add the radial gradient shown in the following image, lower the opacity to 30%, change the blending mode to Color Burn and go to Effect > Path > Offset Path. Enter a -1px Offset and click OK.
Step 13
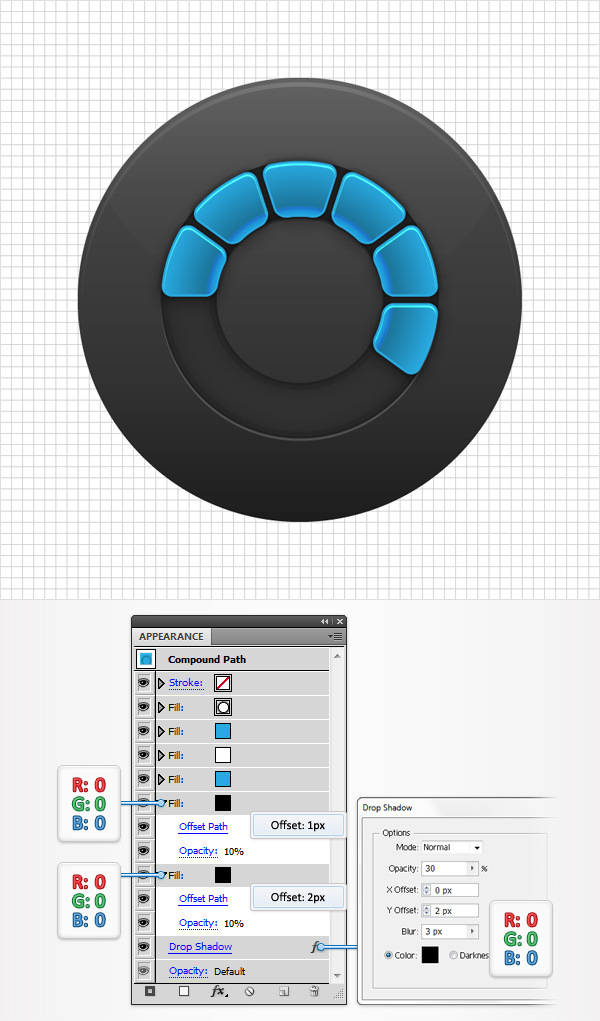
Reselect the blue compound path, add two black fills and drag them in the bottom of the Appearance panel.
Select the bottom, black fill, lower its opacity to 10% and go to Effect > Path > Offset Path. Enter a 2px Offset and click OK.
Select the top, black fill, lower its opacity to 10% and go to Effect > Path > Offset Path. Enter a 1px Offset and click OK.
Return to the Appearance panel, make sure that no fill is selected and go to Effect > Stylize > Drop Shadow. Enter the properties shown in the following image and click OK.
Step 14
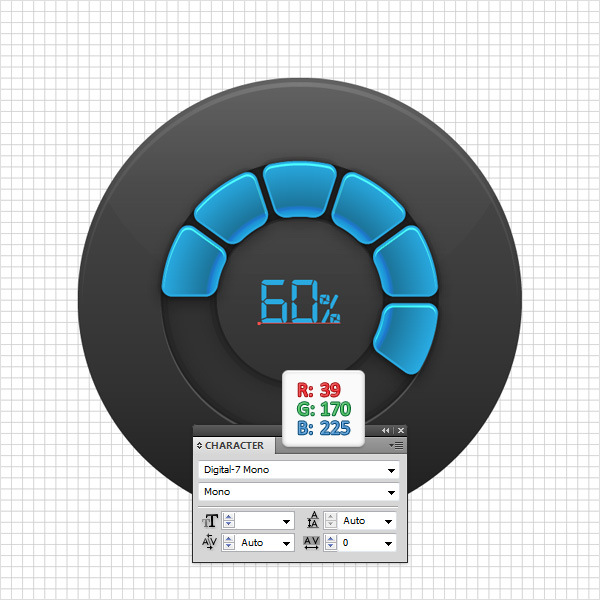
Pick the Type Tool(T) and add a simple piece of text as shown in the following image. Use the Digital-7 Mono font and set the color at R=39 G=170 B=225.
For the numbers set the size at 30pt and for the percentage symbol decrease it to 20pt.
Step 15
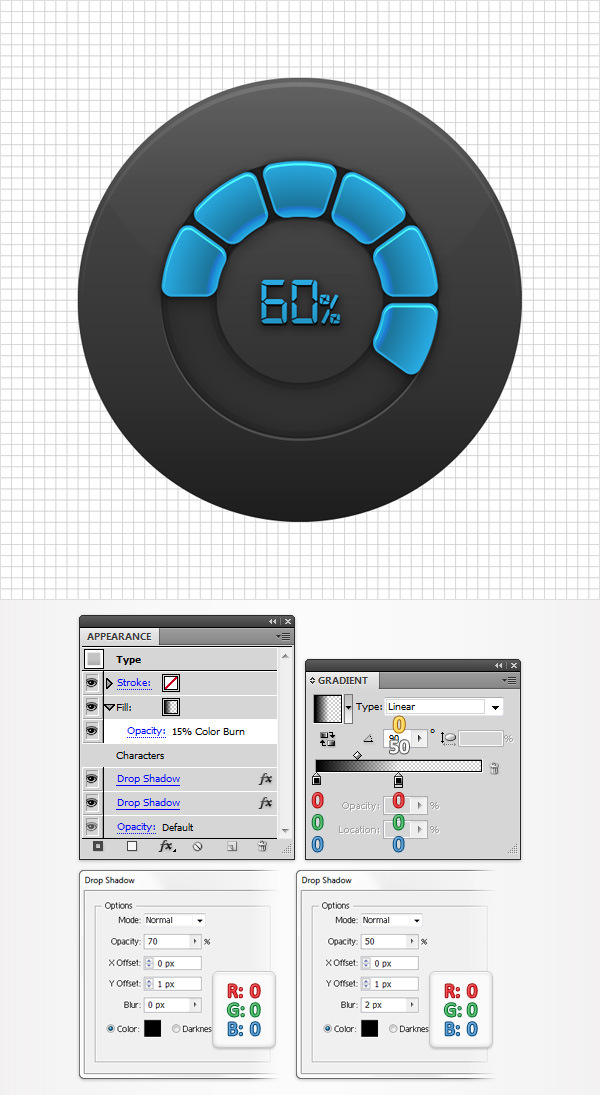
Reselect the piece of text added in the previous step and go to Effect > Stylize > Drop Shadow. Enter the properties shown in the left window, click OK and go again to Effect > Stylize > Drop Shadow. Enter the properties shown in the right window and click OK.
Make sure that the text is still selected, focus on the Appearance panel and add a new fill. Select it, add the linear gradient shown in the following image, lower the opacity to 15% and change the blending mode to Color Burn.
Step 16
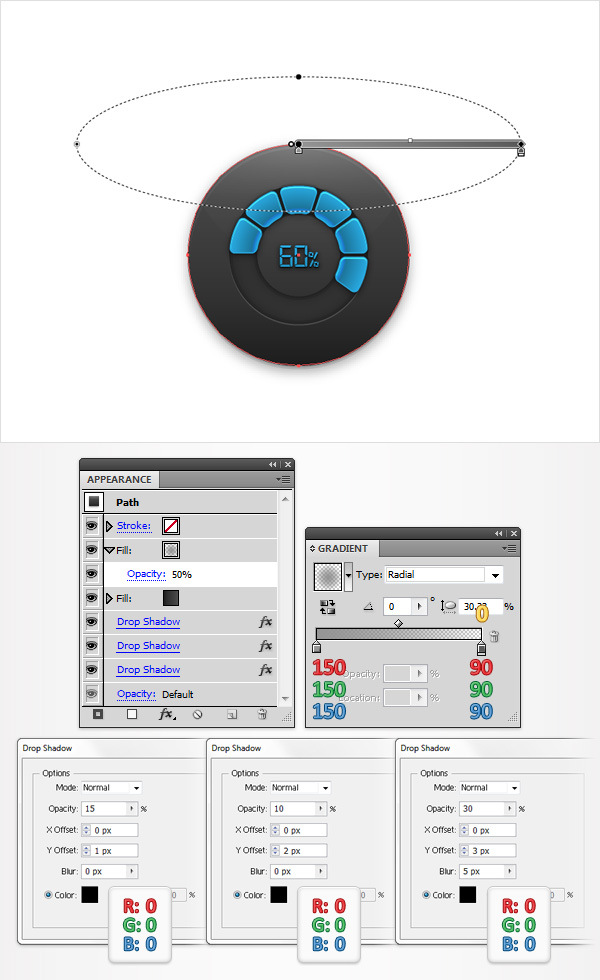
Reselect the circle made in the second step and go to Effect > Stylize > Drop Shadow. Enter the properties shown in the left window, click OK and go again to Effect > Stylize > Drop Shadow. Enter the properties shown in the middle window, click OK and go one more time to Effect > Stylize > Drop Shadow. Enter the properties shown in the right window and click OK.
Move to the Appearance panel and add a new fill for this shape. Select it, lower the opacity to 50% and add the radial gradient shown in the following image.
Conclusion
Here is how your final result should look.
