In this new tutorial you will learn how to create a not-so-scary spider character in Adobe Illustrator.
We will create this spider in vector form using basic shapes and a few simple manipulation techniques along with a custom blend brush that will help us to add details. At the end, we’ll give this character a cute face and complete the illustration. This little guy will be quite cute so let’s start the fun!
Final Image
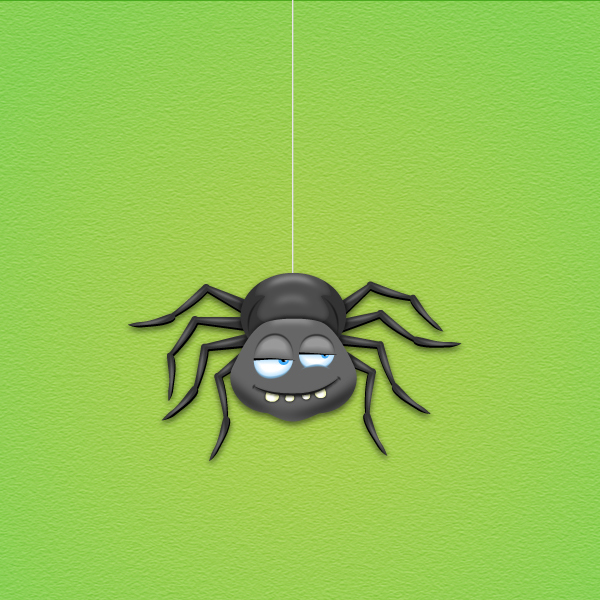
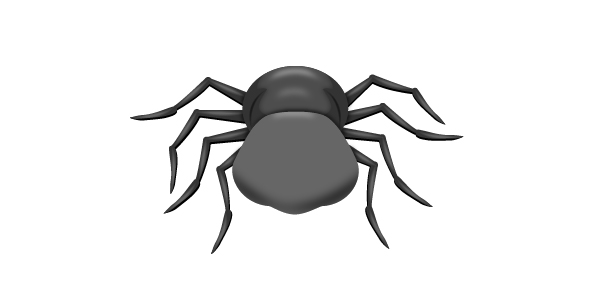
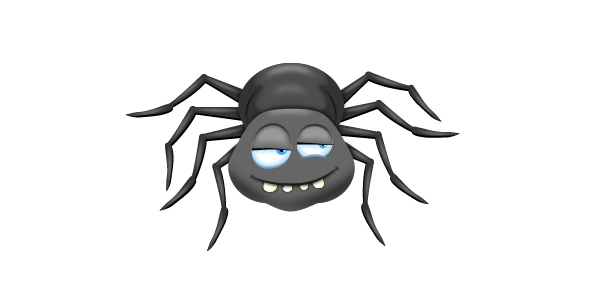
As always, this is the final image that we’ll be creating:
Tutorial Details
- Program: Adobe Illustrator CS3 – CS5
- Estimated Completion Time: 1.5 hours
- Difficulty: Beginner-Intermediate
Step 1
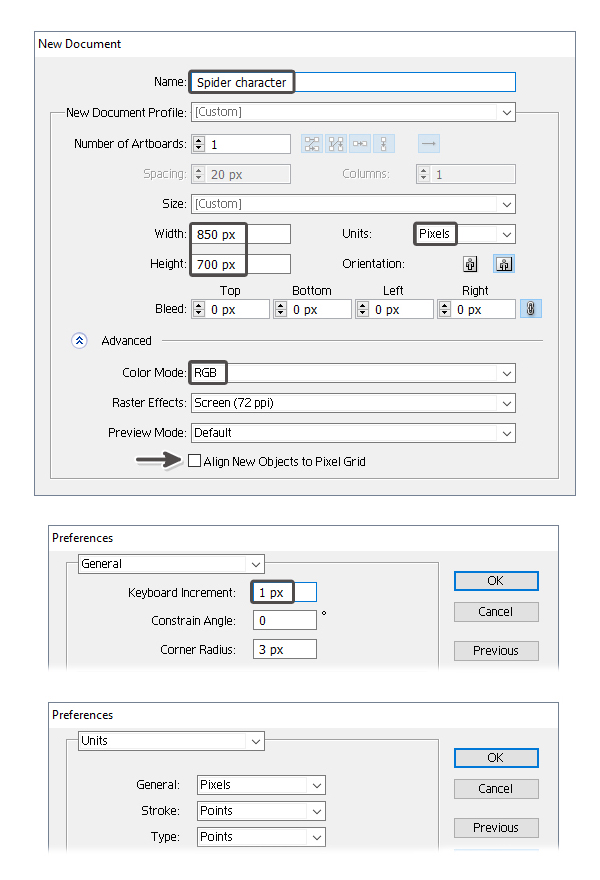
Launch Illustrator and go to File > New in order to open a blank document. Type a name for your file and set up the dimensions then select Pixels as Units and RGB as Color Mode. Also, uncheck Align New Objects to Pixel Grid. Next, go to Edit > Preferences > General and set the Keyboard Increment to 1 px and while there, also go to Units and make sure that they are set as in the following image. I usually work with these settings and they will help you throughout the drawing process.
Step 2
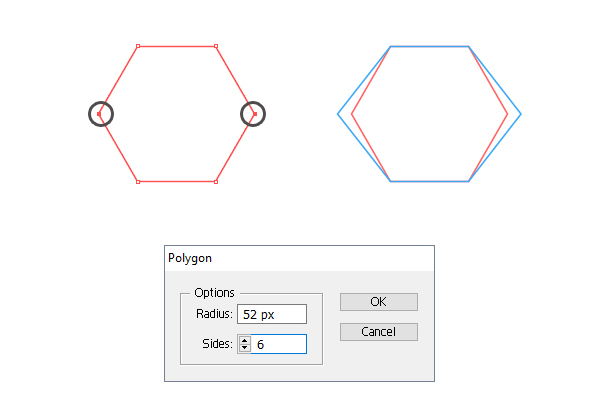
Grab the Polygon Tool, click on your artboard and enter the dimensions shown to draw a hexagon. Now, use the Direct Selection Tool (A) to select only the left and right anchor points and move them outwards by pressing the Left Arrow key, respectively the Right Arrow key on your keyboard a few times. In the image below, the red shape is the first shape and the blue shape is the new shape so you can see the difference between them.
Step 3
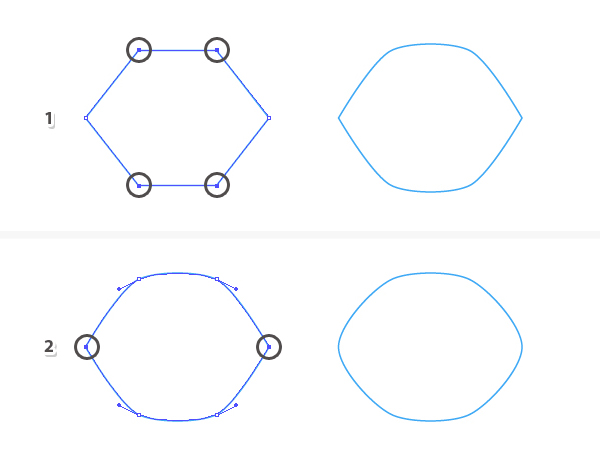
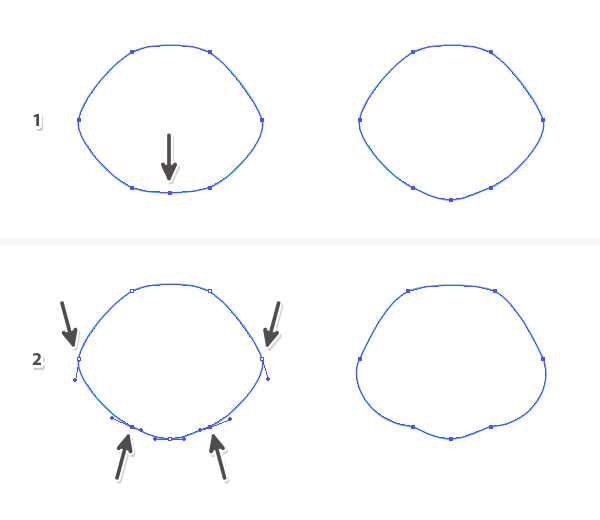
We need to distort the hexagon shape even more. Use the Direct Selection Tool (A) again to select the four points indicated and press the Convert selected anchor points to smooth option in the Control panel (1).
Next, select the left and right points and press the Convert selected anchor points to smooth option again to generate the handles (2).
Step 4
Use the Add Anchor Point Tool (+) to add an extra point at the bottom of the shape and in the middle; then use the Direct Selection Tool (A) to move this point a little downwards (1).
Select the four points indicated one at a time with the Direct Selection Tool (A) and adjust their handles to make the curves more rounded and you can see the final shape in the image below (2).
Step 5
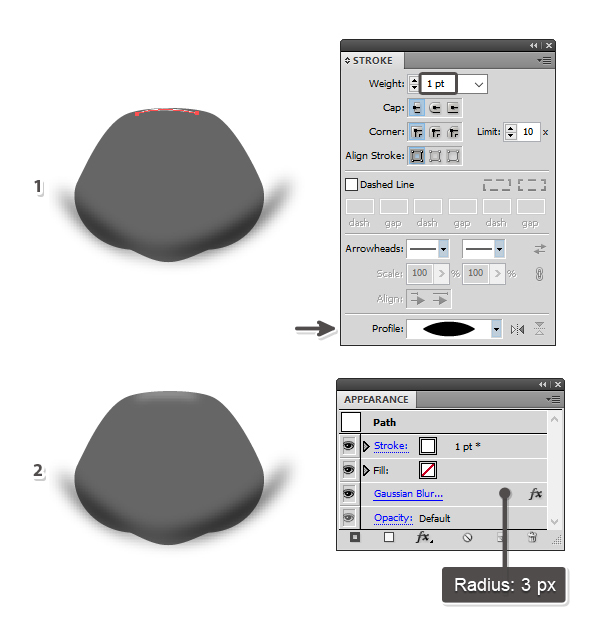
Fill the shape of the spider’s head with gray (1). Next, take the Pen Tool (P) and draw a curved path at the base of the head; then give it a 5 pt black Stroke and use the Width Profile 2 in the Stroke panel (2). While this path stays selected, go to Effect > Blur > Gaussian Blur and apply a Radius of 5 px (3).

Step 6
Draw a shorter path at the top of the head with the Pen Tool (P) and give it a 1 pt white Stroke using the Width Profile 1 this time (1). While this path stays selected, go to Effect > Blur > Gaussian Blur and apply a Radius of 3 px (2).
Step 7
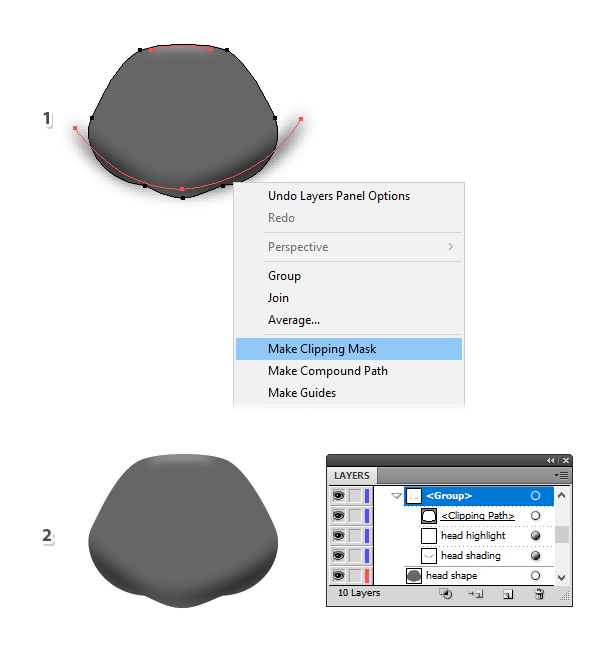
Select the head shape and Copy and Paste in Place (Shift-Control-V) in order to make a copy of it in front of everything. Set the copy to stroke-none and fill-none. Now, select this copy along with the two stroked paths from the previous two steps and go to Object > Clipping Mask > Make (Control-7) (1). You can see the result in the image below (2).
Step 8
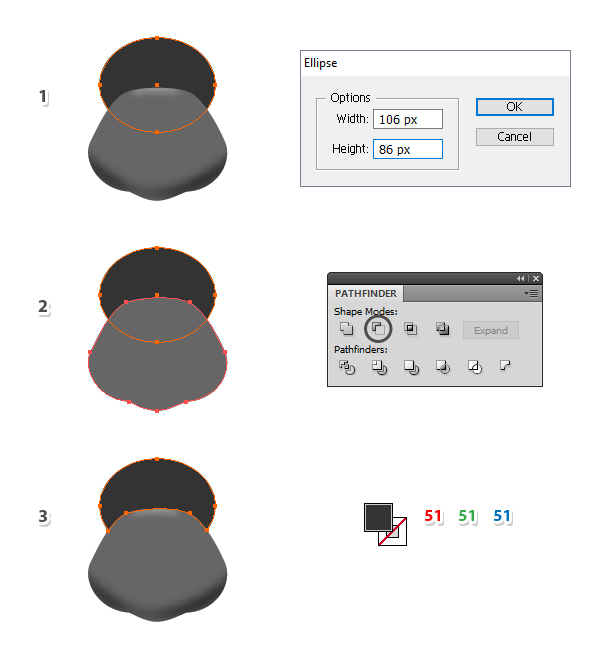
Let’s continue with the body of the spider. Take the Ellipse Tool (L) and draw an ellipse having the dimensions shown behind the head (1).
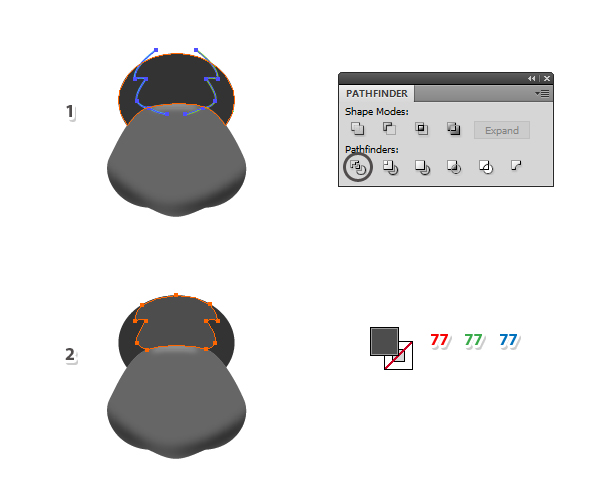
Now, select the head shape and Copy and Paste in Place (Shift-Control-V) to make a copy of it in front of everything. While the copy of the head and the body shape stay selected, press Minus Front in the Pathfinder panel (2). Fill the newly obtained shape of the body with dark gray (3).
Step 9
Use the Pen Tool (P) to draw two paths on the body like in the following image (1). Now, select the body shape and then Copy and Paste in Front (Control-F) to make a copy of it. While the copy of the body and the two paths stay selected, press Divide in the Pathfinder panel. As a result you will get three separate shapes but you need to Ungroup (Shift-Control-G) them. Use a lighter shade of gray for the shape in the middle (2).
Step 10
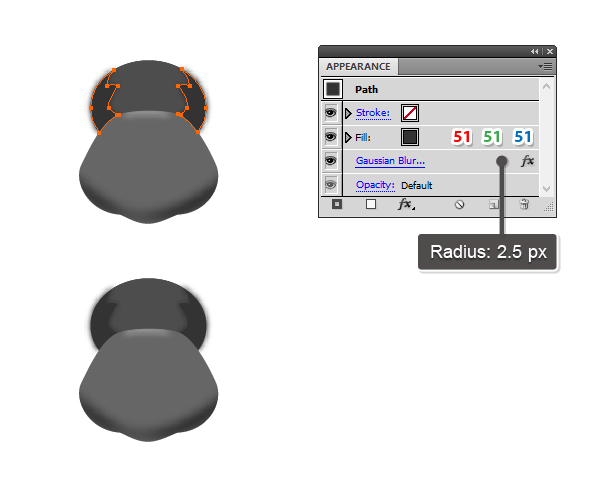
Focus on the two shapes on the sides of the body that you have obtained at the previous step. Fill them with dark gray; then go to Effect > Blur > Gaussian Blur and apply a Radius of 2.5 px.
Step 11
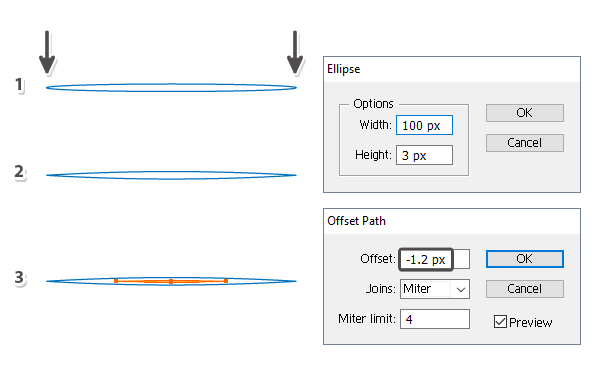
It’s time to create and save a custom Art Brush. First, take the Ellipse Tool (L) and draw a 100 x 3 px ellipse (1). Switch to the Direct Selection Tool (A) and use it to select only the left and right points and then press the Convert selected anchor points to corner option in the Control panel (2).
Select the new ellipse, go to Object > Path > Offset Path and apply an Offset of -1.2 px to get a smaller ellipse in the center (3).
Step 12
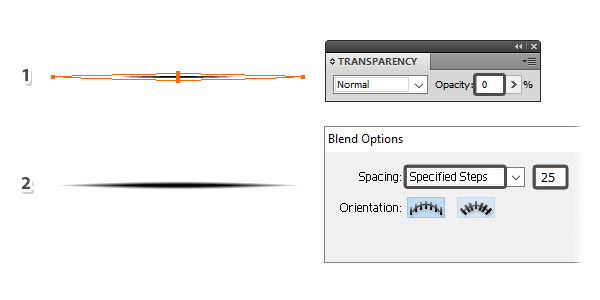
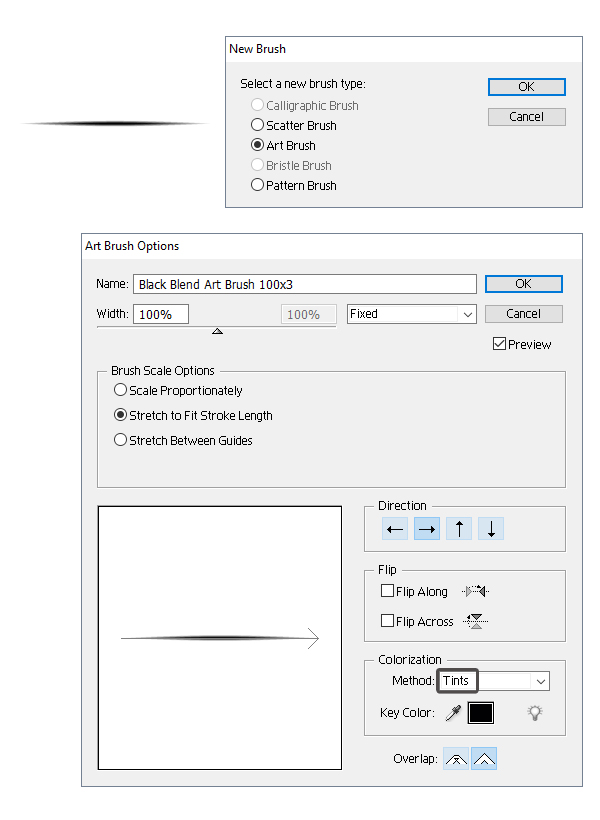
Fill both ellipses with black but set the Opacity for the bigger one to 0% (1). While both shapes stay selected, go to Object > Blend > Blend Options and choose 25 Specified Steps. Hit OK and then go back to Object > Blend > Make (Alt-Control-B) (2).
Step 13
Drag the blend group obtained at the previous step into the Brushes panel and choose New Art Brush. In the Art Brush Options window, type “Black Blend Art Brush” as the name and set the Colorization Method to Tints. Hit OK.
Step 14
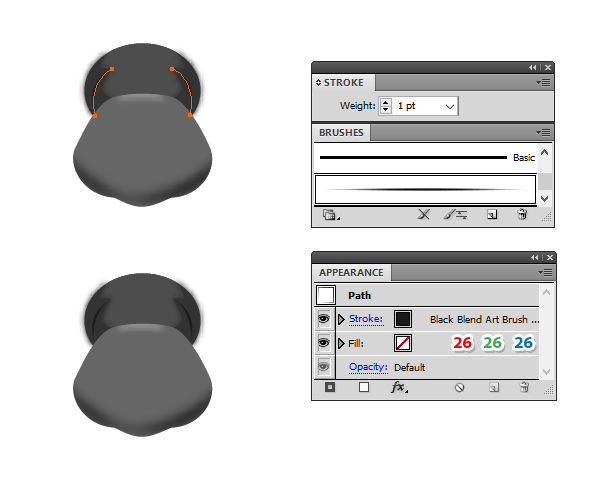
Use the Pen Tool (P) to draw two paths on the sides of the body like in the following image. Give them a 1 pt Stroke using a very dark gray and also use the Black Blend Art Brush saved earlier.
Step 15
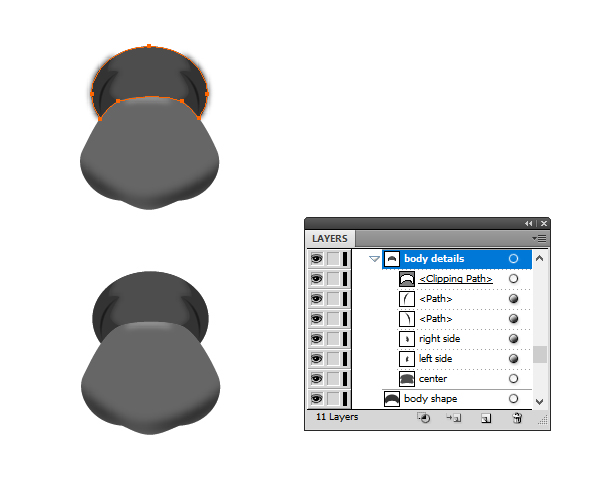
Select the body shape and then Copy and Paste in Place (Shift-Control-V) to make a copy of it in front of everything and after that, set it to stroke-none and fill-none. Keep this copy selected along with the three separate shapes from earlier and the two paths from the previous step and go to Object > Clipping Mask > Make (Control-7).
Step 16
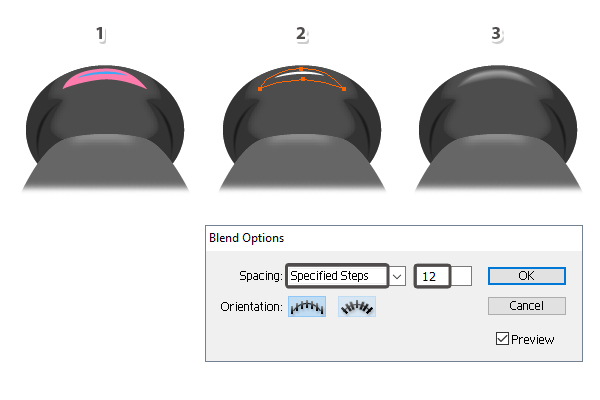
Take the Pen Tool (P) and draw a moon-like shape at the top of the body (the pink shape) and then draw a similar but much smaller shape in the middle (1). Fill both shapes with white but set the Opacity of the bigger shape to 0% (2).
While both shapes stay selected, go to Object > Blend > Blend Options and choose 12 Specified Steps. Hit OK and then go back to Object > Blend > Make (Alt-Control-B) (3).
Step 17
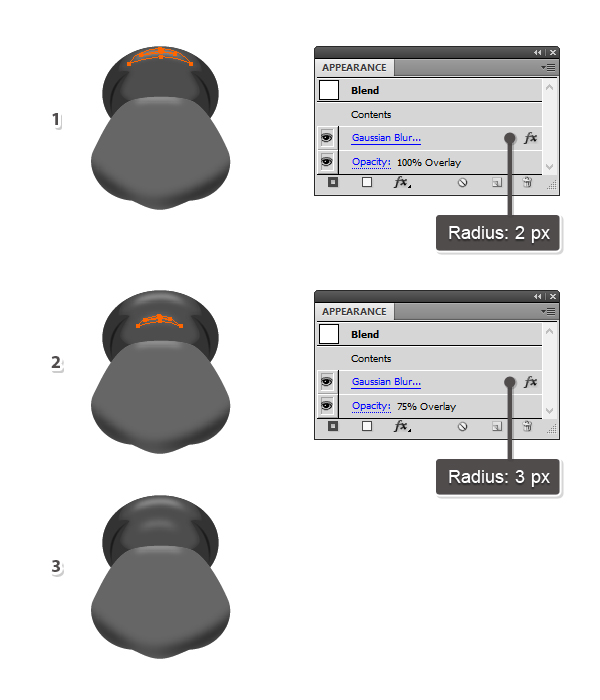
Select the blend group that you have obtained at the previous step, go to Effect > Blur > Gaussian Blur and apply a Radius of 2 px. Set the Blending Mode to Overlay (1).
Following the same technique and create a smaller blend group below the first. This time, apply a 3 px Gaussian Blur, set the Blending Mode to Overlay and reduce the Opacity to 75% (2). You can see the result in the image below (3).
Step 18
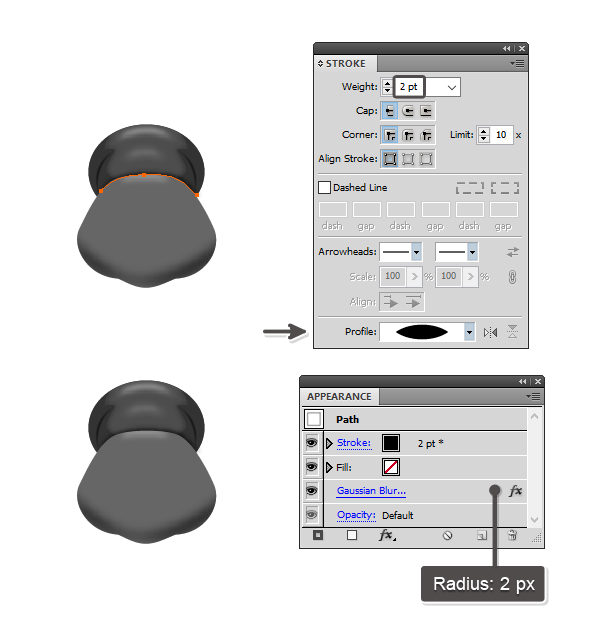
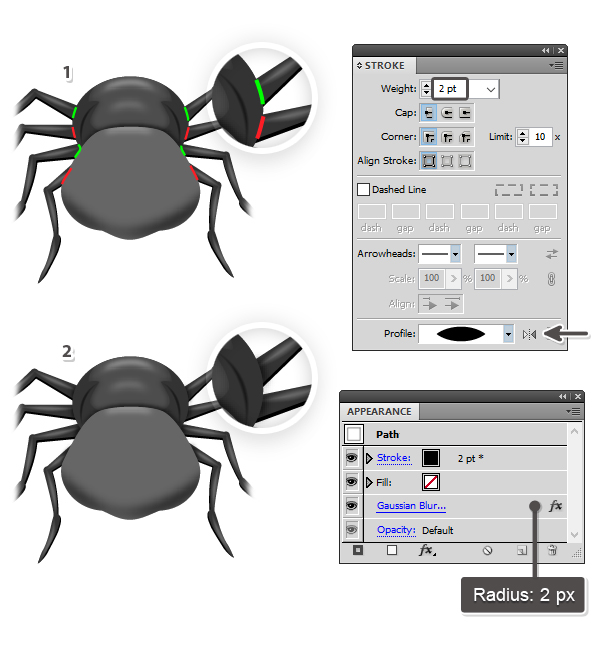
Next, grab the Pen Tool (P) and draw a path following the top edge of the head. Give it a 2 pt black Stroke and select the Width Profile 1 in the Stroke panel. Also apply a 2 px Gaussian Blur.
At this point the body of the spider is ready.
Step 19
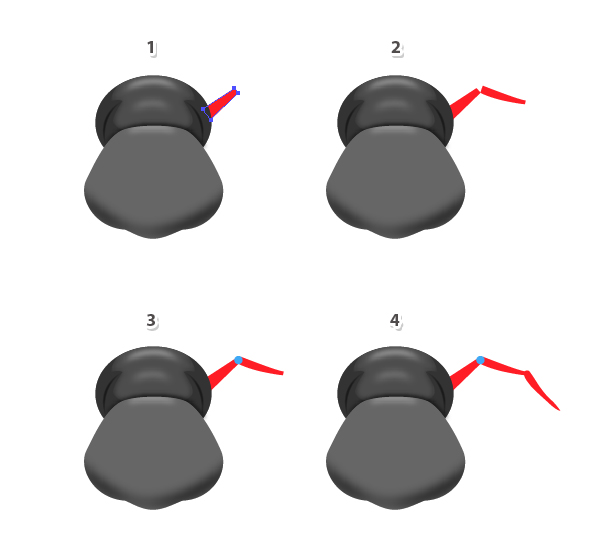
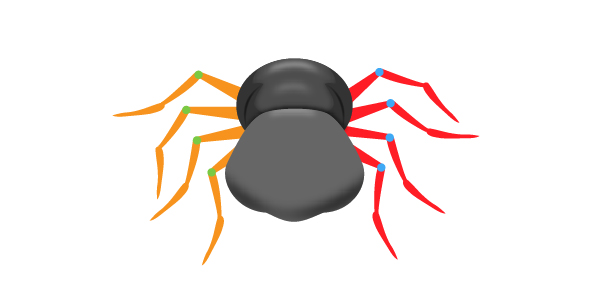
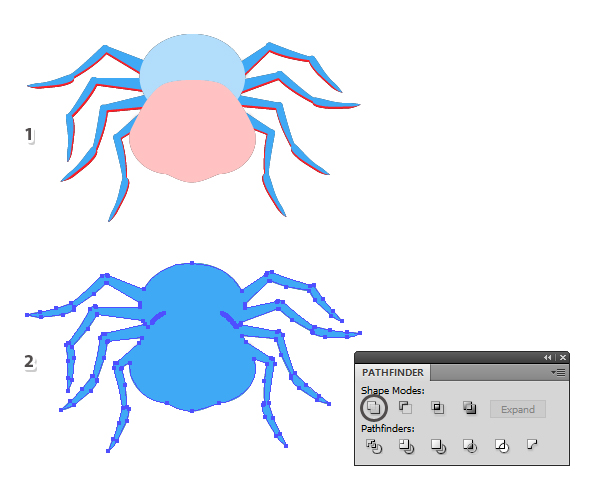
Let’s continue with the spider’s legs. Use the Pen Tool (P) to draw a shape like in the image below (1) and then draw a similar shape at the end of it (2). Cover the empty space between these two shapes with a small circle (3) and after that, draw the last piece of the leg (4).
Step 20
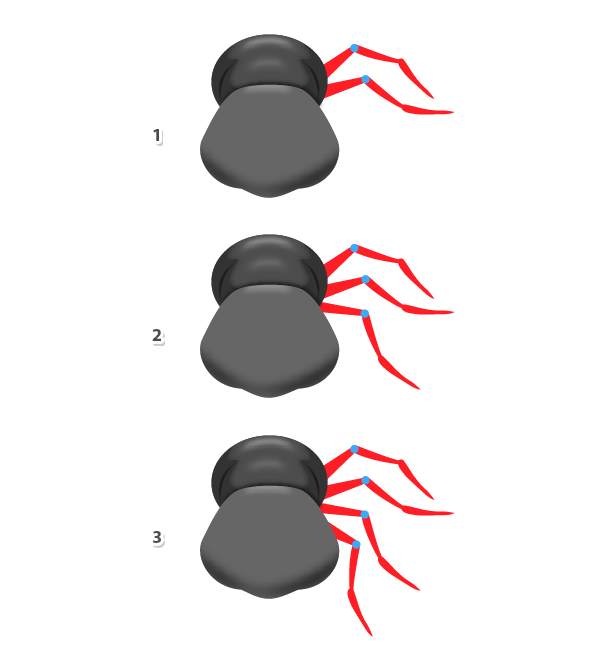
Now, draw the second leg the same way as the first (1); then continue with the third leg (2) and the forth leg (3).
Step 21
Draw four legs in the left side as well. To make things easier, you could just reflect vertically the legs from the right side (Object > Transform > Reflect).
Step 22
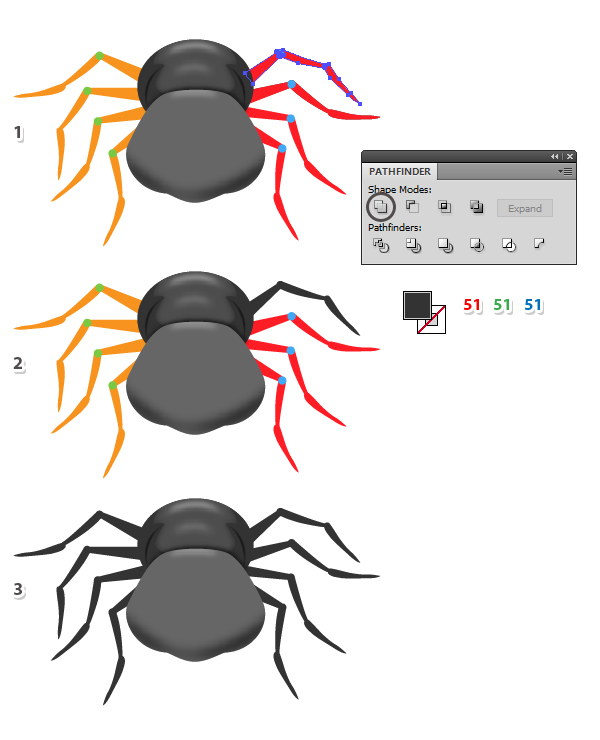
Select all the shapes that make up the first leg and press Unite in the Pathfinder panel to merge them into a single shape (1). Fill the newly obtained shape of the leg with dark gray (2) and them do the same thing for the rest of the legs (3).
Step 23
Select the shape of the first leg and then Copy and Paste in Back (Control-B) to make a copy of it. Move this copy downwards a little by pressing the Down Arrow key on your keyboard once or twice and change the fill color to black (1).
Repeat the same thing for the rest of the legs. For the legs in the front, you need to move the black copy inwards (2).
Step 24
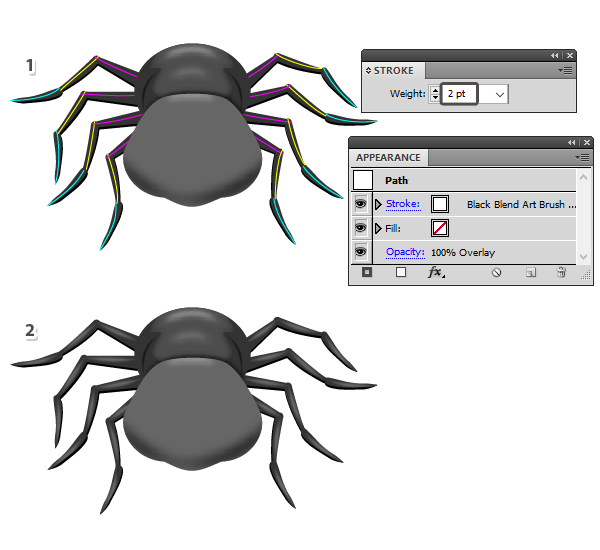
Let’s add some highlights on the spider’s legs. Grab the Pen Tool (P) and draw a path through the middle of each segment of the legs (1). Give all of them a 2 pt white Stroke and use the Black Blend Art Brush. Since the Colorization of the brush was set to Tints, the brush will become white as well. Set the Blending Mode to Overlay for all of them (2).
You can Group (Control-G) all these paths to keep things organized in the Layers panel.
Step 25
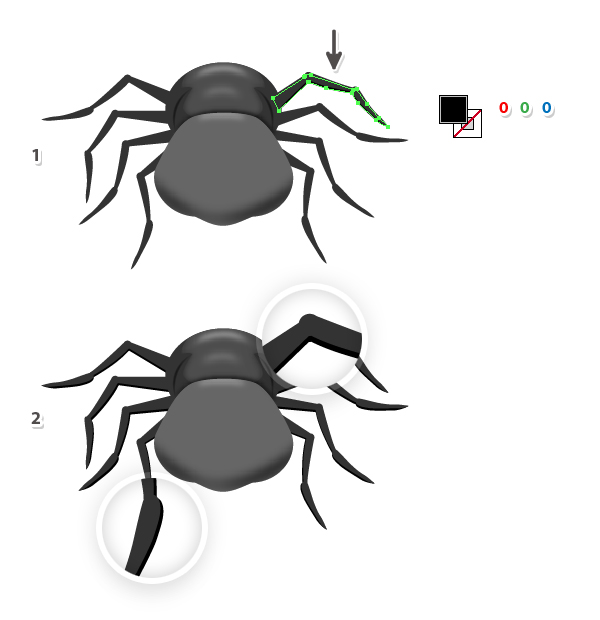
Now, let’s add some shadows. Use the Pen Tool (P) again to draw a short path at the base of each leg right next to the body and head (1). Give them a 2 pt black Stroke and use the Width Profile 1 in the Stroke panel. While the paths are still selected, go to Effect > Blur > Gaussian Blur and apply a Radius of 2 px. You can see the result in the image below (2).
You can Group (Control-G) all these paths to keep things organized in the Layers panel.
Step 26
At this point the legs are ready and the spider is almost done. Now, let’s create a cute face for this little guy.
Step 27
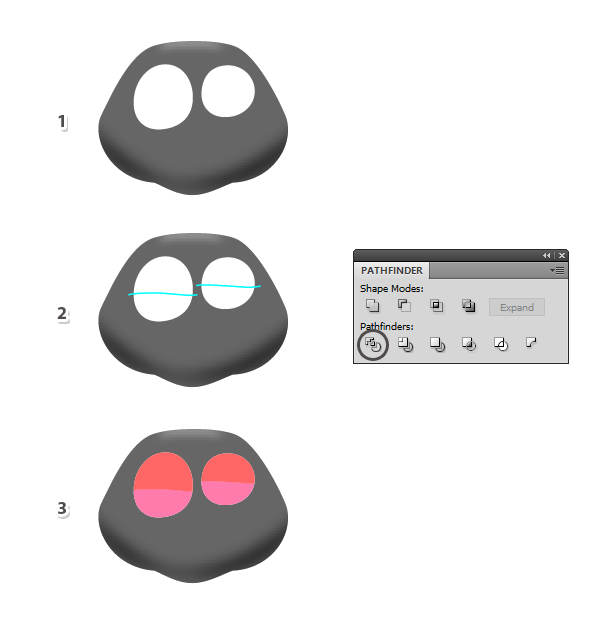
First, take the Ellipse Tool (L) and draw two ellipses as the eyes, one bigger than the other. They don’t have to be perfectly round (1). Switch to the Pen Tool (P) and draw two paths approximately through the middle of the eyes (2).
Now, select the left eye along with the path on top of it and press Divide in the Pathfinder panel. As a result you will get two separate halves and you need to Ungroup (Shift-Control-G) them. Repeat the same thing for the right eye (3).
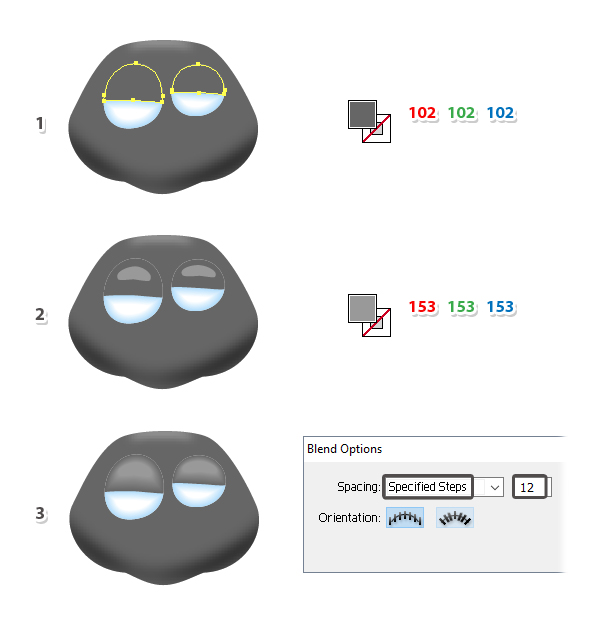
Step 28
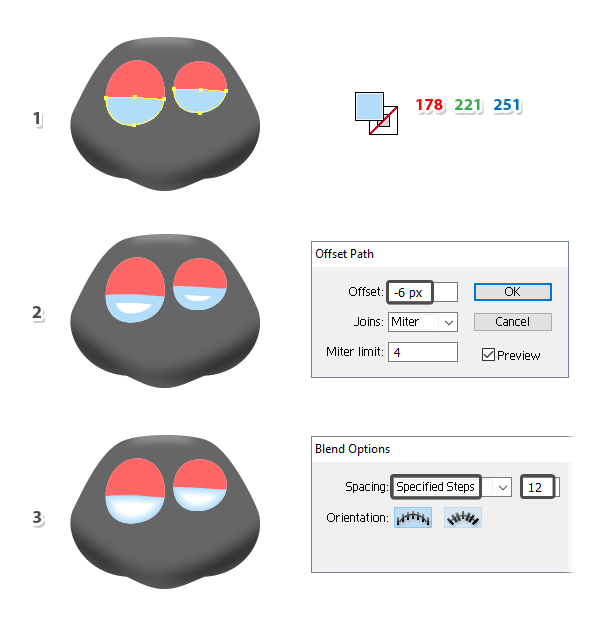
Focus on the two shapes at the bottom and fill them with light blue (1). Select the left blue shape, go to Object > Path > Offset Path and apply an Offset of -6 px to obtain a smaller similar shape in the center. Repeat the same thing for the right blue shape. Fill the two smaller shapes newly obtained with white (2).
Now, select the left blue shape along with the smaller white shape on top of it, go to Object > Blend > Blend Options and choose 12 Specified Steps. Hit OK and go back to Object > Blend > Make (Alt-Control-B). Repeat the same thing using the blue and white shapes from the right side (3).
Step 29
Now, focus on the two shapes at the top, the eyelids and fill them with gray (1). With the help of the Pen Tool (P) draw two smaller shapes in the center filled with a lighter shade of gray (2).
Select the left eyelid along with the smaller shape on top of it and blend them using 12 Specified Steps. Repeat the same thing for the right eyelid (3).
Step 30
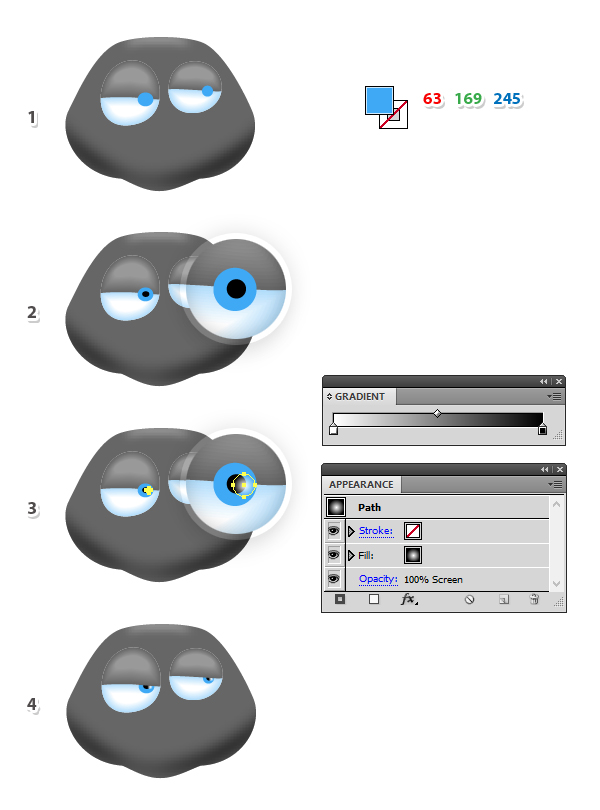
Grab the Ellipse Tool (L) and draw two small circles, one bigger than the other and fill them with blue (1). Draw two smaller circles filled with black as the pupils (2).
To add sparkles in the eyes, draw two circles in the right side of the pupils, filled with a radial gradient from white to black and set the Blending Mode to Screen (black becomes transparent) (3). Finally, Group (Control-G) the iris, pupil and sparkle for each eye and move them behind the eyelids in the Layers panel (4).
Step 31
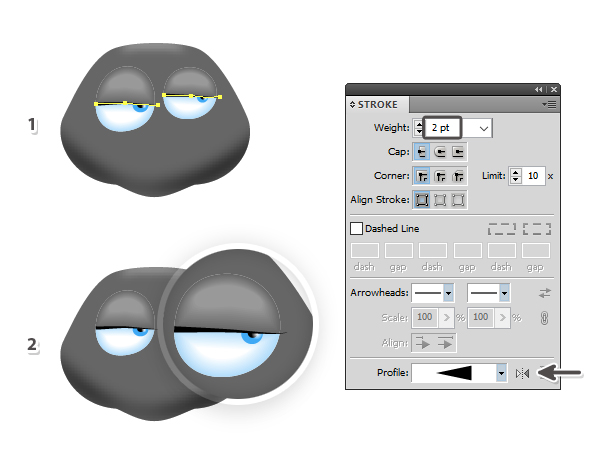
Draw two straight paths right at the bottom of the eyelids (1), give them a 2 pt black Stroke and use the Width Profile 4 (2). The tip of the brush should go in the right side and if not, press the Flip Along option in the Stroke panel.
Step 32
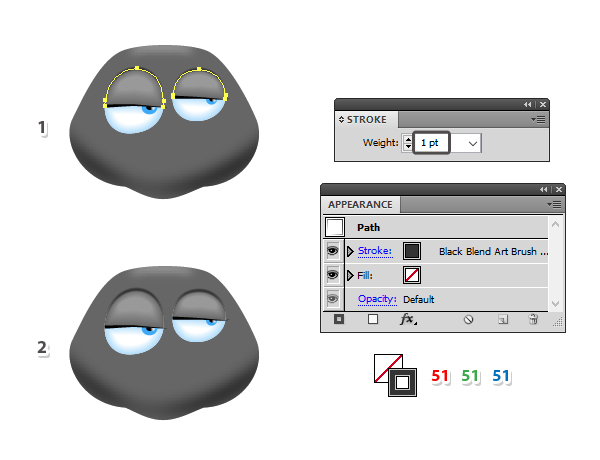
Next, take the Pen Tool (P) and draw a path above each eye following the top edge (1). Give them a 1 pt Stroke using a very dark gray and also use the Black Blend Art Brush (2).
Step 33
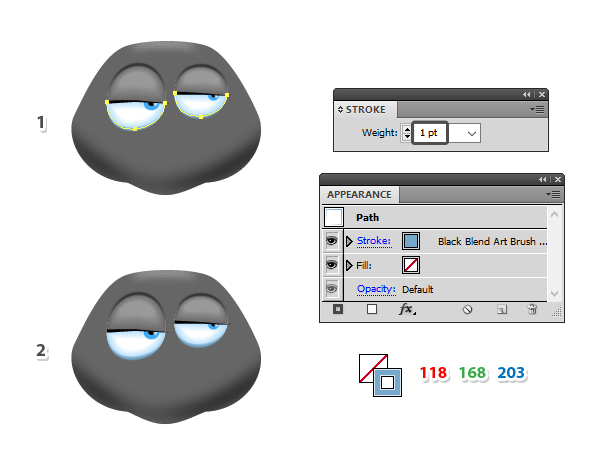
Now, draw a path under each eye following the bottom edge (1). Give them a 1 pt Stroke using light blue and also use the Black Blend Art Brush (2).
Step 34
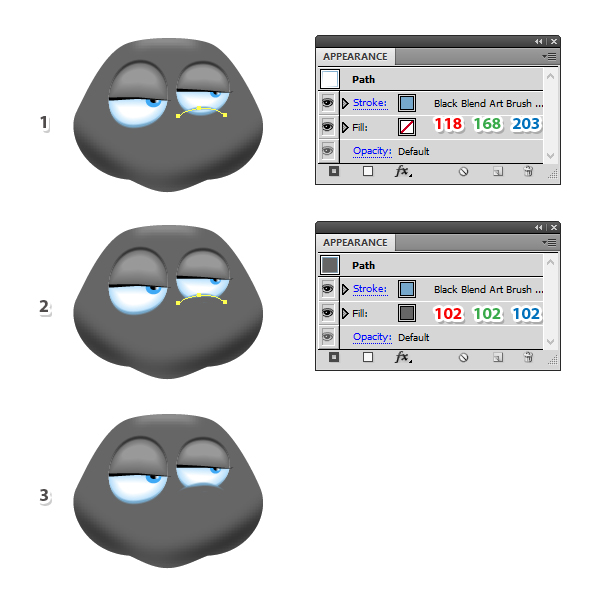
Draw a curved path at the base of the right eye like in the following image. Give it a 1 pt light blue Stroke and use the Black Blend Art Brush again (1). Also select a gray fill color (the same color as the head) and this will make the bottom of the right eye not visible (2). You can see the final result in the image below (3).
Step 35
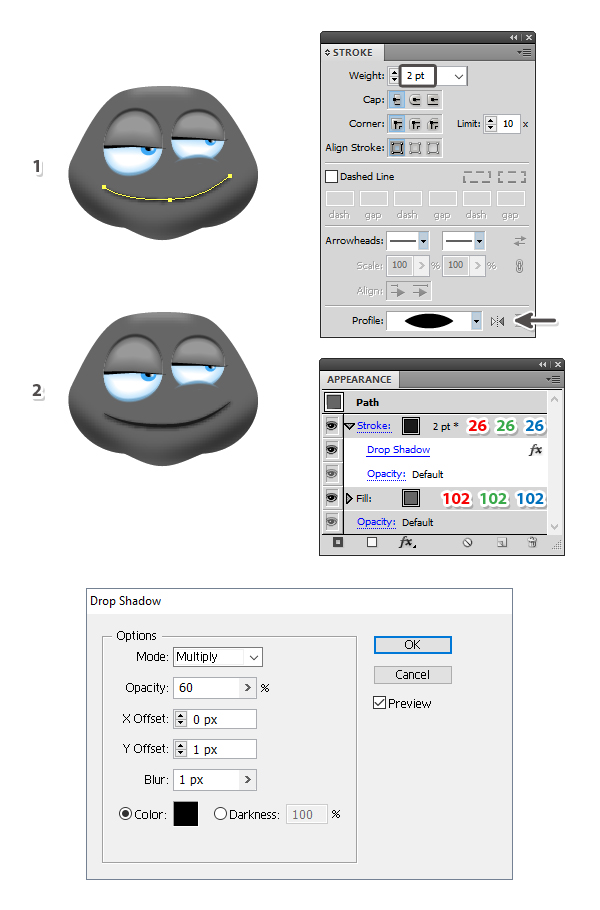
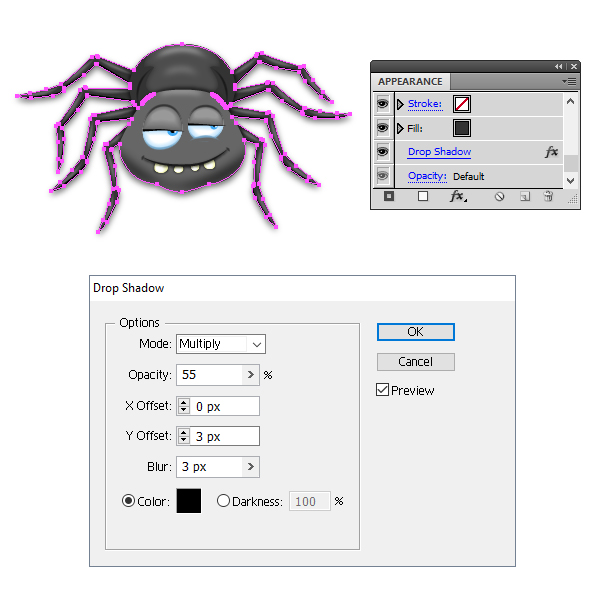
Let’s continue with the spider’s mouth. Use the Pen Tool (P) to draw a curved path, give it a 2 pt Stroke and select the Width Profile 1 in the Stroke panel (1). While the Stroke attribute stays selected in the Appearance panel, go to Effect > Stylize > Drop Shadow and apply the settings shown. Also select a gray fill color (the same color as the head) and this will make the shadow at the top of the mouth not visible (2).
Step 36
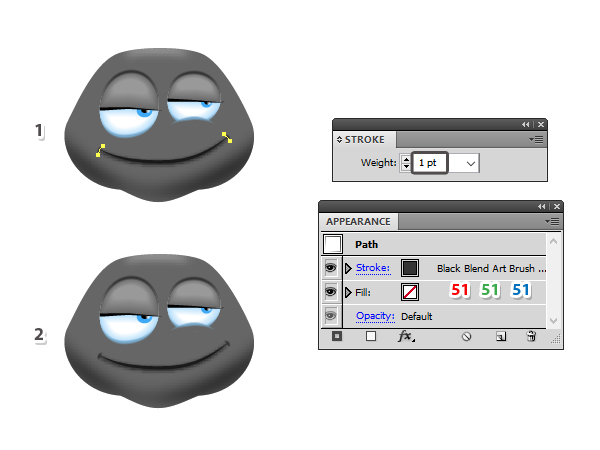
Next, draw two short curved paths at the ends of the mouth (1). Give them a 1 pt Stroke and use the Black Blend Art Brush (2).
Step 37
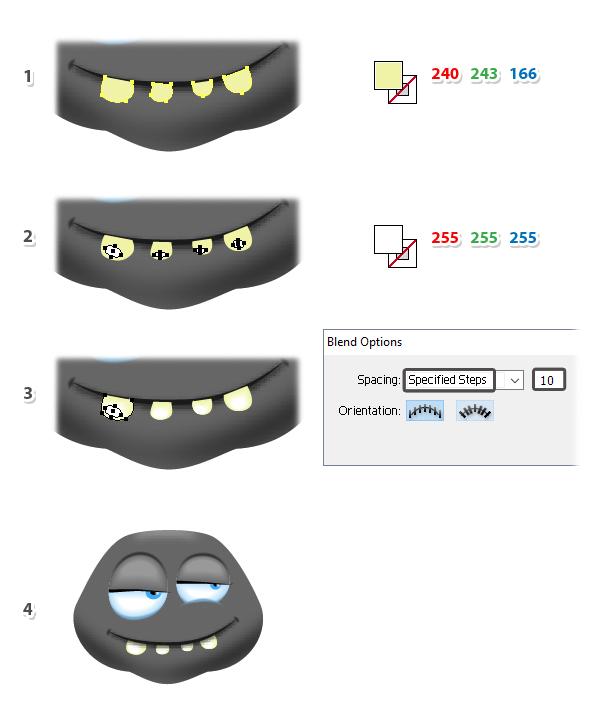
Draw four shapes like in the following image as the teeth (1) and after that, draw a smaller ellipse filled with white on each tooth (2).
Now, select the first tooth along with the white ellipse on top of it and blend them using 10 Specified Steps. Repeat the same thing for the other three teeth (3). When you are done, Group (Control-G) the four teeth and move them behind the mouth path in the Layers panel (4).
Step 38
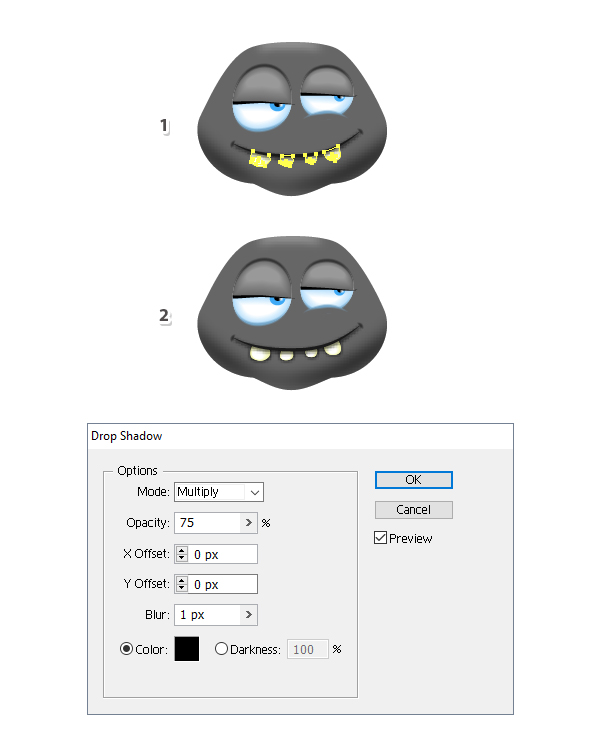
Select the group of teeth (1), go to Effect > Stylize > Drop Shadow and apply the settings shown. You can see the result in the image below (2).
Step 39
At this point the face is ready and the spider is pretty much done as a cartoon character.
Step 40
If you want to complete the illustration, you need to add a shadow behind the spider and here is how to make it. Select the head, the body and the two shapes that make up each leg and then Copy and Paste in Place (Shift-Control-V) in order to make copies of them in front of everything (1). While these copies stay selected, press Unite in the Pathfinder panel to merge them into a single shape (2).
Step 41
Move the shadow shape from the previous step into a New layer behind the spider and fill it with dark gray. Next, go to Effect > Stylize > Drop Shadow and apply the settings shown.
Step 42
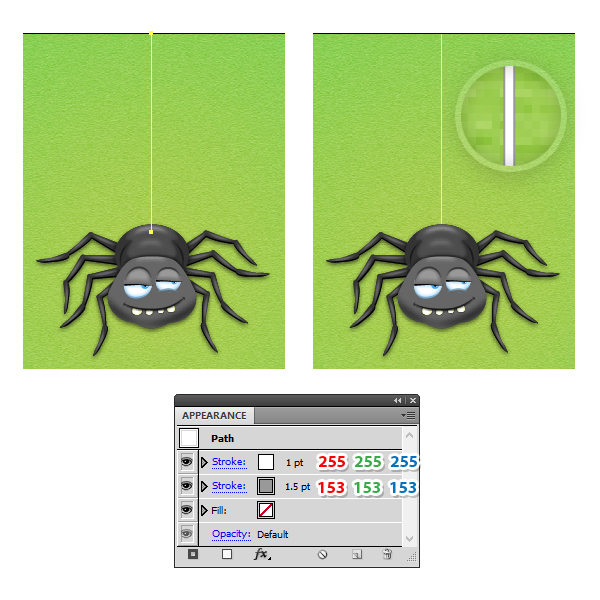
The final thing to complete the illustration is to add a spider string. Take the Pen Tool (P) and draw a straight path from behind the body and going up to the top of your artboard. Select a 1.5 pt Stroke using light gray. Add a New Stroke attribute above the first and this time, select a 1 pt Stroke using white.
At this point you can also select a background that you prefer.
Awesome work!
Here is the final image of the not-so-scary spider cartoon character. He is quite cute, right? I hope this tutorial was fun for you and that you learned new illustrator skills today.
