In the following tutorial you will learn how to create semi-realistic Weighing Scales in Adobe Illustrator.
In this tutorial you will learn how to transform a rectangle into a complex custom shape, you will learn to use the Round Any Corner Script in order to round specific corners from a shape and you will finally learn how to use the appearance panel in order to combine multiple fills and strokes.
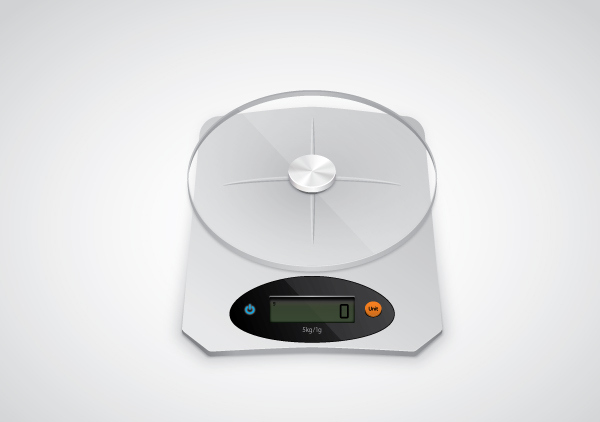
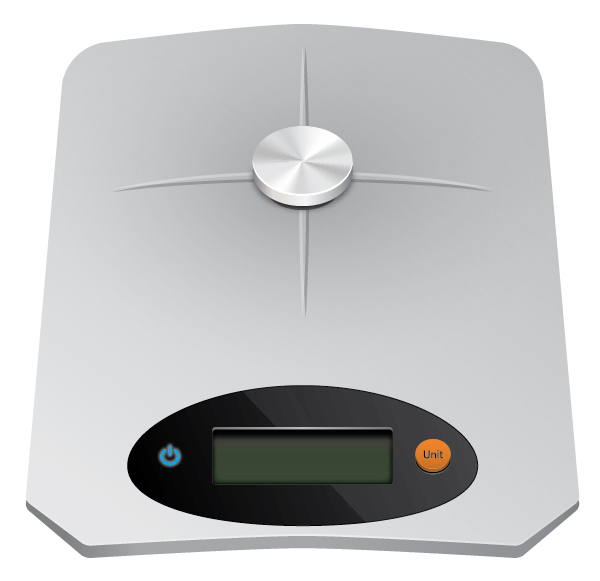
Final Image
As always, this is the final image that we’ll be creating:
Tutorial Details
- Program: Adobe Illustrator CS6
- Estimated Completion Time: 2 hours
- Difficulty: Intermediate-Advanced
Resources
Step 1
Open Adobe Illustrator and create a new 1280 x 900px document (Ctrl + N). Select CMYK Color Mode, 300 PPI Raster Effects and make sure that Align New Objects to Pixel Grid is unchecked.
Next, go to Edit > Preferences > General and set the Keyboard Increment to 1 pt.

Step 2
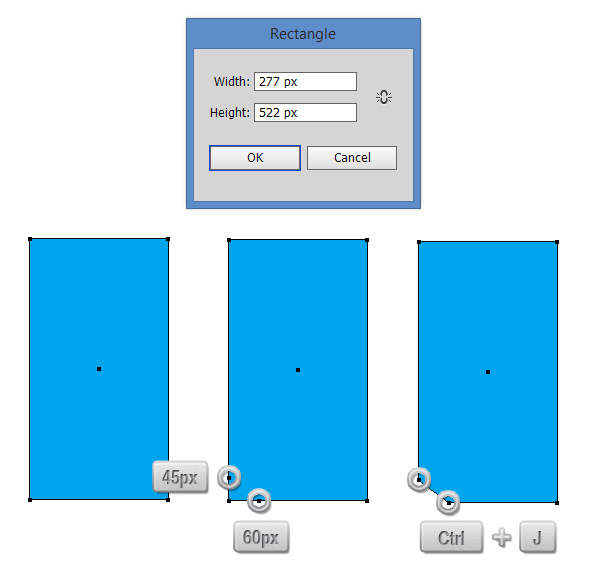
Pick the Rectangle Tool (M) and create a 277 x 522px rectangle.
With the Add Anchor Point Tool (+) add two anchor points, one 45px above the lower left point of the rectangle and one 60px to the right of the lower left point of the rectangle. Now select the lower left anchor point of the rectangle and delete it (Del). Select both anchor point previously created and join them (Object > Path > Join).
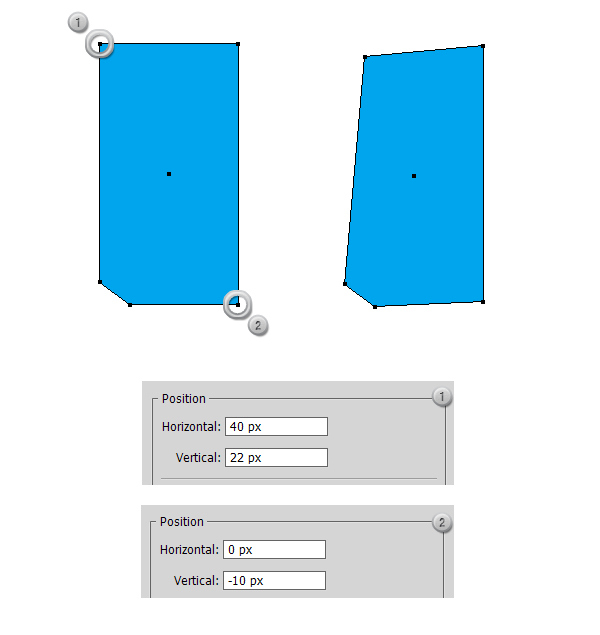
 Now with the Direct Selection Tool (A) pick the upper left corner (1) and double click on the Direct Selection Tool from the Tools Panel. In the dialog box enter a value of 40px for Horizontal and 22px for Vertical then hit the OK button.
Select the lower right anchor point and the again double click on the Direct Selection Tool from the Tools Panel. In the dialog box enter a value of 0px for Horizontal and a value of -10px for Vertical.
Step 3
For this step, you’ll need the Round Any Corner script. Save it to your hard drive, return to Illustrator and grab the Direct Selection Tool (A).
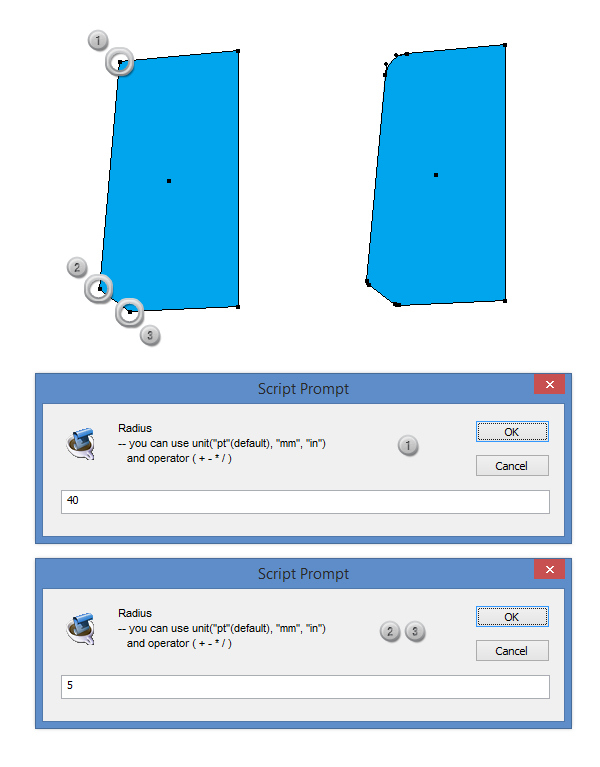
Select only the anchor point highlighted in the image with (1) and go to File > Scripts > Other Script. Open the Round Any Corner script, enter a 40px radius and click OK.
Now with the Direct Selection Tool select both anchor points tagged with (2) and (3) and go to File > Scripts > Other Script. Open the Round Any Corner script, enter a 5px radius and click OK
Step 4
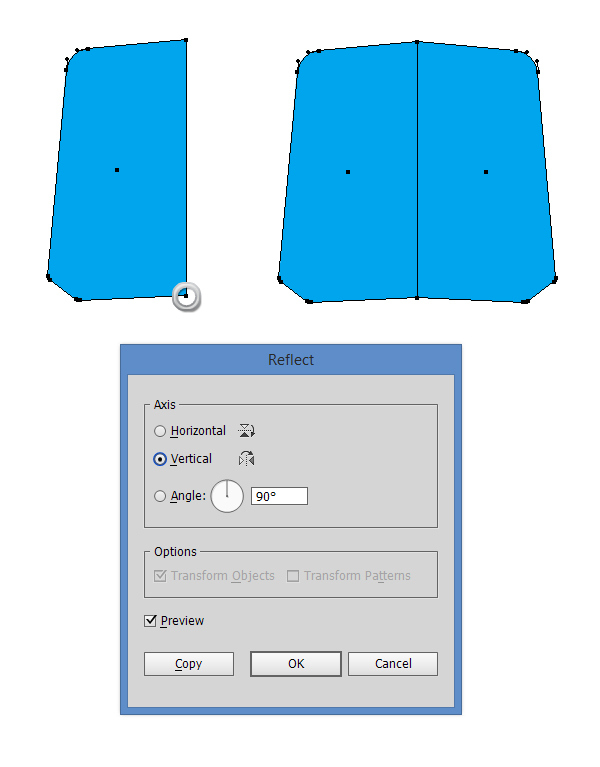
Now let’s create the other half of the Weighing Scale. Select the shape we’ve previously created and then pick the Reflect Tool (O). With the ALT key pressed, click on the lower right anchor point to define it as a reference point for the reflection (see the highlighted point in the image below). In the dialog box make sure that you check the Vertical option and then set an angle of 90 degrees then hit the COPY button.
Step 5
Select both shapes then from the Pathfinder Panel hit the Unite button.

Step 6
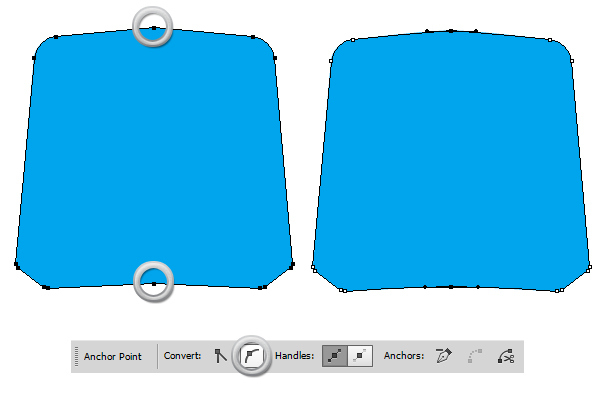
With the Direct Selection Tool select only the point highlighted then convert it to Smooth Points.
Step 7
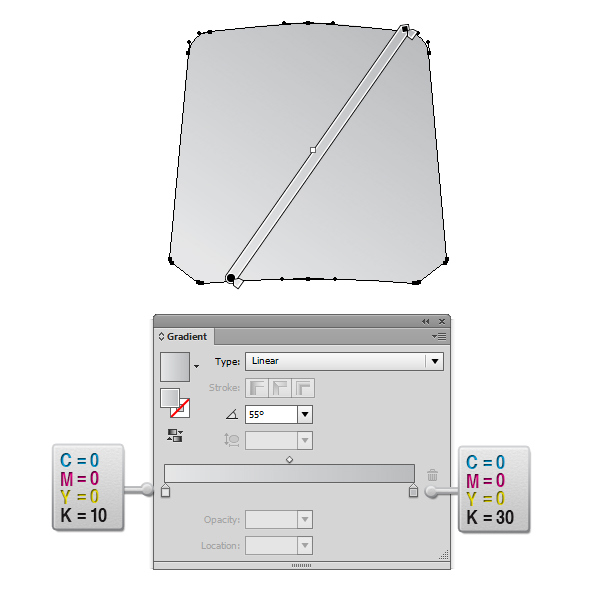
From the Gradient Panel (Window > Gradient) fill the shape with a two color linear gradient fill. Set the angle to 55 degrees then pick the left slider and assign it a very light grey (C=0 M=0 Y=0 K=10) then pick the right slider and assign it a bit darker grey (C=0 M=0 Y=0 K=30).
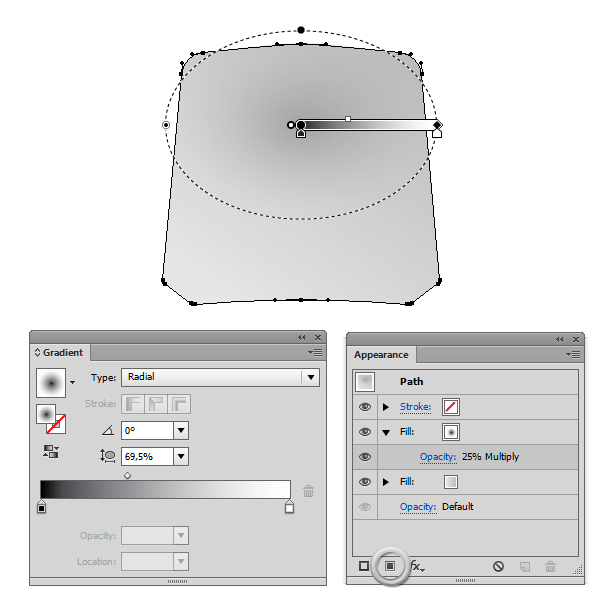
From the Appearance Panel (Window > Appearance) add a new black to white radial gradient fill (see the highlighted button). From the Transparency Panel set the blending mode to Multiply and lower the opacity to 25%.
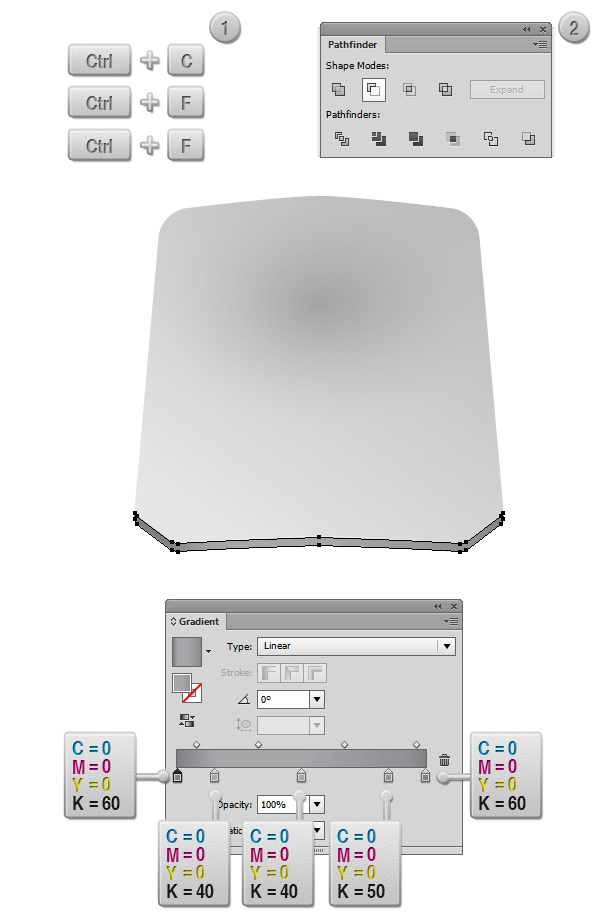
Step 8
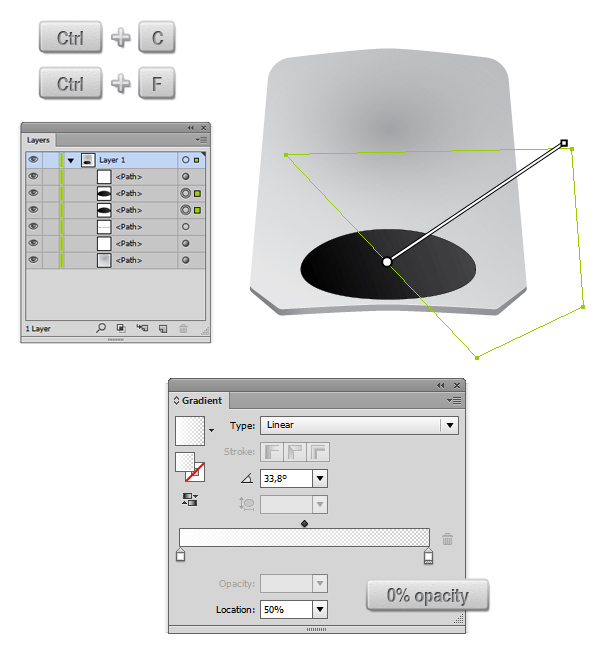
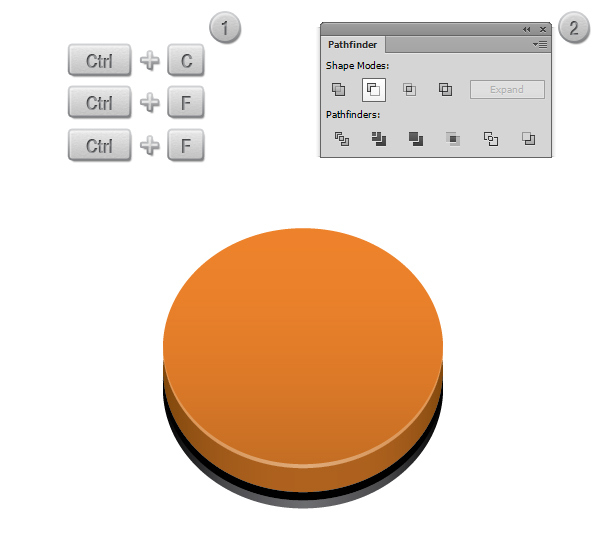
Select the main body shape of the scale and make two copies in front of it (Ctrl + C > Ctrl + F > Ctrl + F). Select the copy that is in front of the others and move it 2px up.
Now select both copies and from the Pathfinder Panel hit the Minus Front button. Fill the resulting shape with a three color (set the colour to white) gradient, then from the Gradient Panel set the opacity of the edge sliders to 0%.
From the Transparency Panel lower the opacity to 50% then set the blending mode to Screen.

Step 9
Select again the main shape and make two copies in front of it (Ctrl + C > Ctrl + F > Ctrl + F). Select the first copy and move it 12px down. Select both copies and from the Pathfinder Panel hit the Minus Front button. Fill the resulting shape with a linear gradient fill as you see in the image below.
Step 10
With the Direct Selection Tool (A) select only the anchor points highlighted, then using your keyboard, move them 5px up.
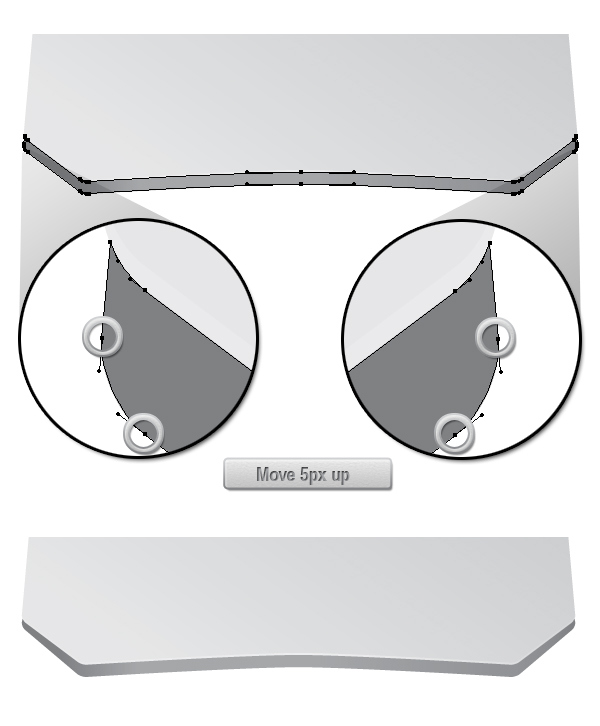
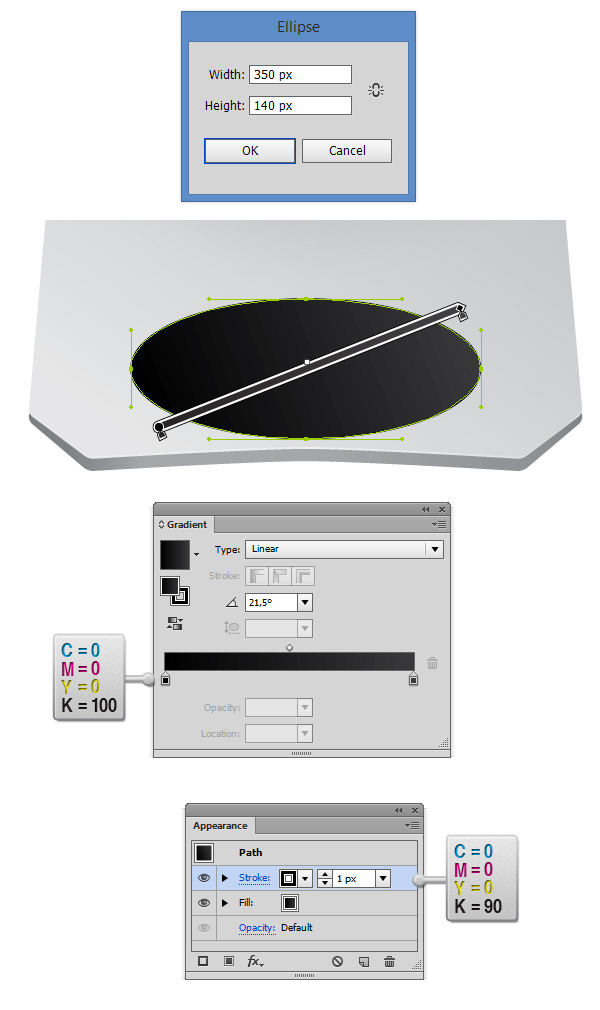
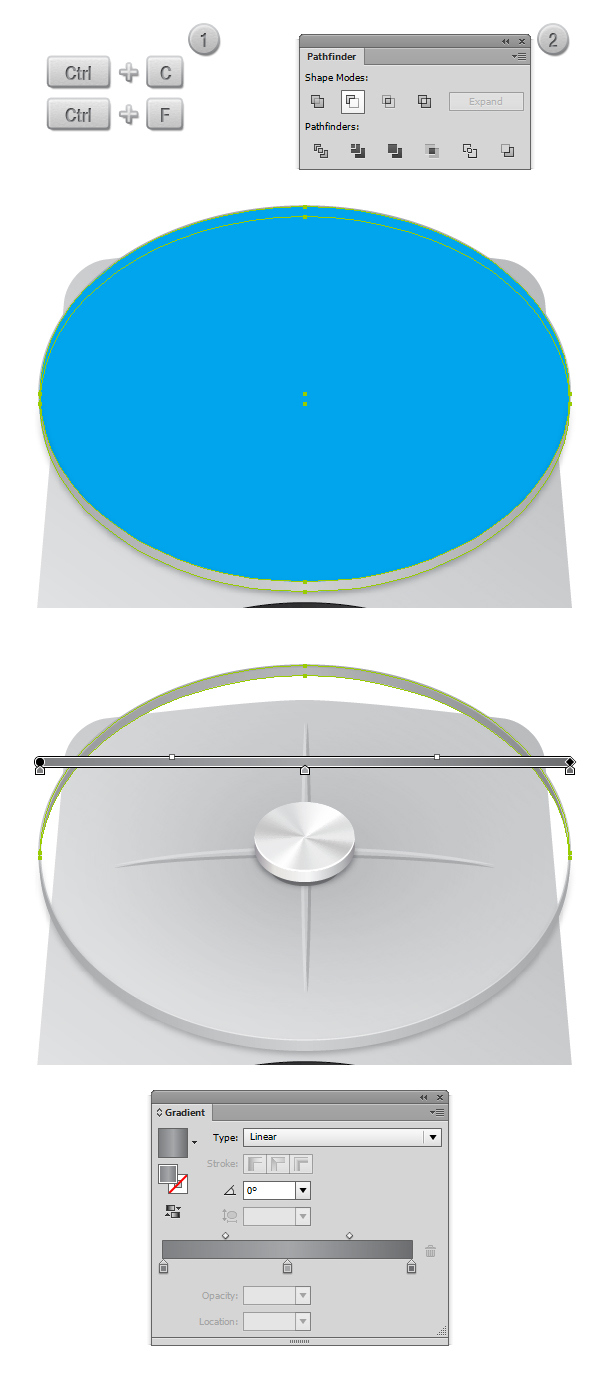
Step 11
Using the Ellipse Tool (L) draw a 350 x 140px ellipse. Fill it with a linear gradient fill, set the gradient angle to 21.5 degrees then add a 1px width stroke then set it’s color to C=90 M=0 Y=0 K=0.
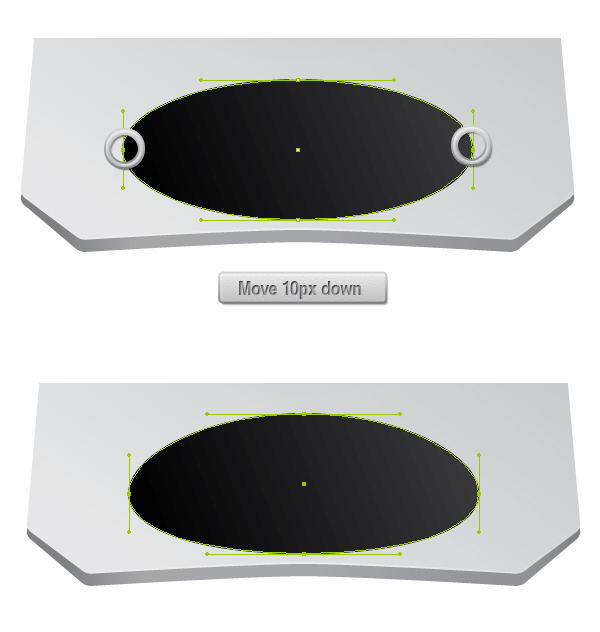
Step 12
With the Direct Selection Tool (A) select only the anchor point highlighted, then using your keyboard, move them 10px down.
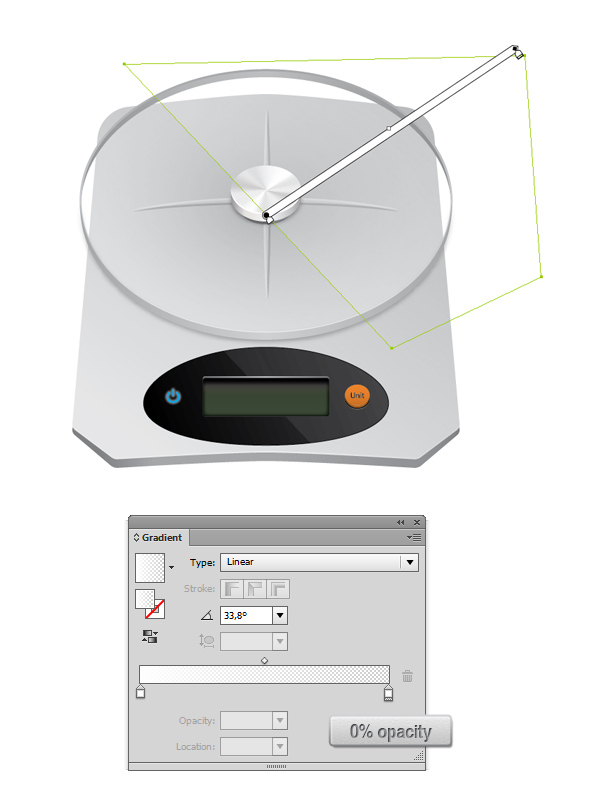
Step 13
Select the ellipse we’ve previously created and make a copy in front of it (CTRL + C > CTRL + F). Now using the Pen Tool (P) create a shape similar to the one in the screenshot below. Fill it with a linear gradient fill, set the angle to 33,8 degrees then set the opacity of the right slider to 0%.
Step 14
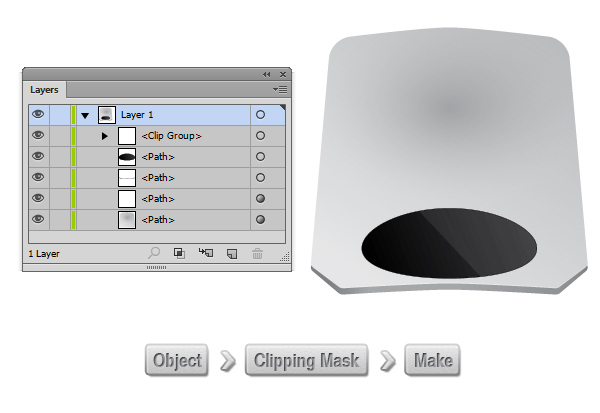
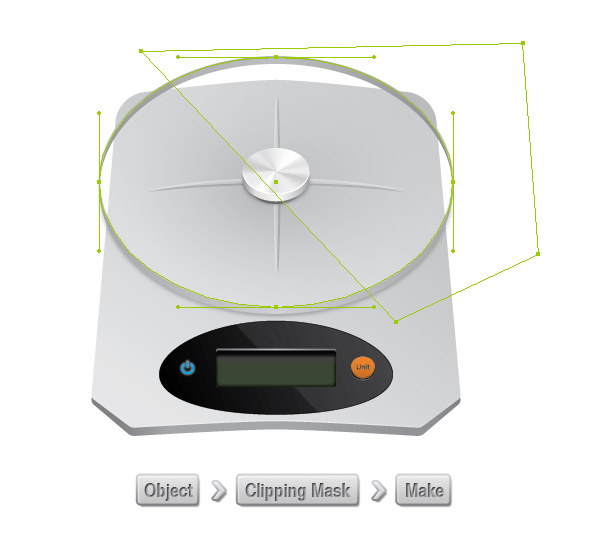
Select the copy of the ellipse and from the Layers Panel move it on top of the other objects (CTRL + SHIFT + ]). Now select the copy and the highlight we’ve created and go to Object > Clipping Mask > Make (Ctrl + 7). Now we have masked the highlight into the ellipse shape.
Step 15
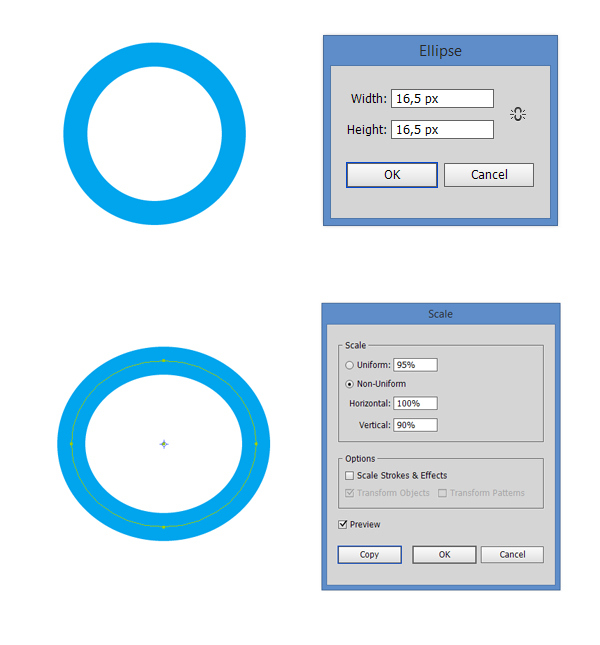
Now let’s create the power button. Using the Ellipse Tool (L) create a 16,5 x 16,5px ellipse. With the ellipse selected, double click on the Scale Tool icon from the toolbox. In the new window pop-up check the Non-Uniform option, then enter a 90% value for Vertical.
Step 16
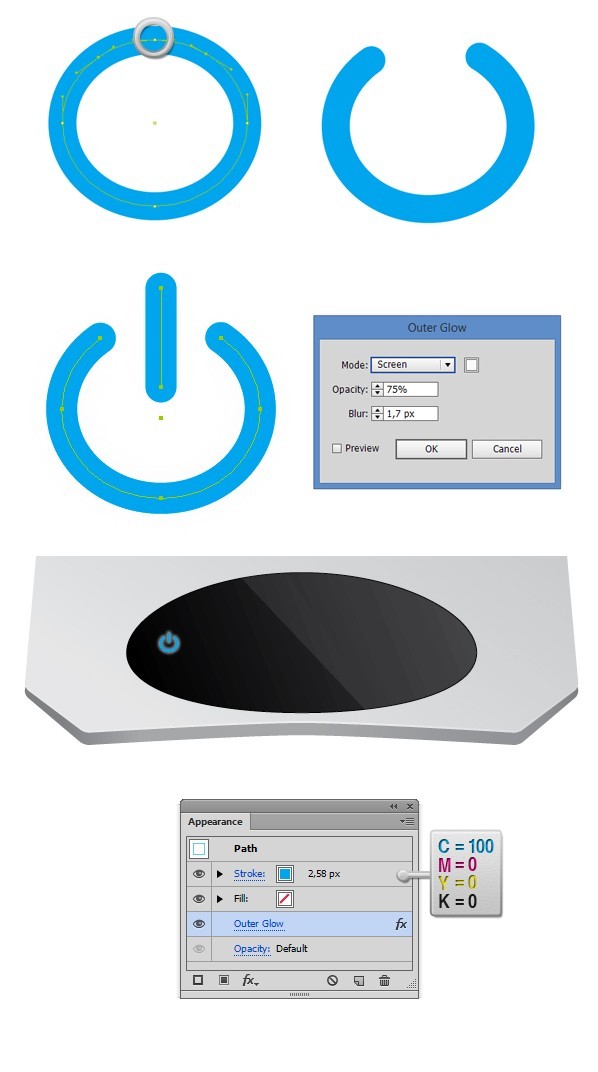
Pick the Add Anchor Point Tool (+), then add two anchor points, one to the left of the highlighted point and one to the right of it. Now with the Direct Selection Tool (A) select the highlighted point and delete it (Del).
Pick the Pen Tool (P) and draw a simple line as shown in the the image below. Set the color of the stroke to C=100 M=0 Y=0 K=0 and the width to 2,58px. Select both paths and go to Effect > Stylize > Outer Glow then enter the values from below.
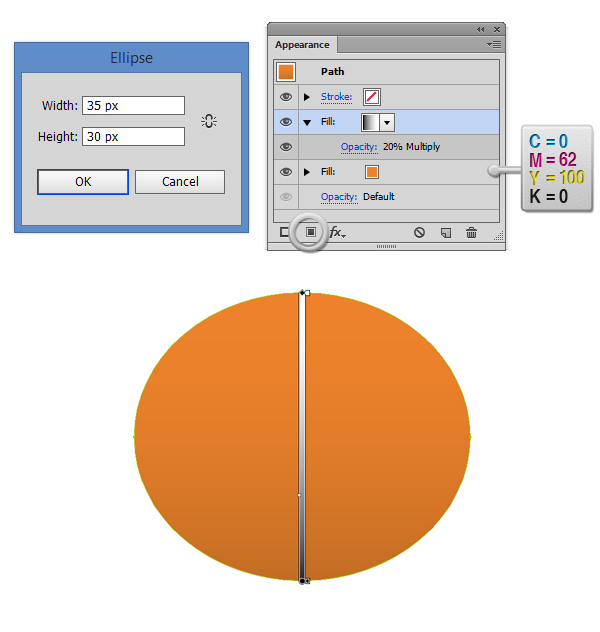
Step 17
Pick the Ellipse Tool (L) and draw a 35 x 30px ellipse. Fill it with C=0 M=62 Y=100 K=0. From the Appearance Panel add a new black to white linear gradient fill (see the highlighted button). Select the second fill and set it’s opacity to 20% and then set the blending mode to Multiply.
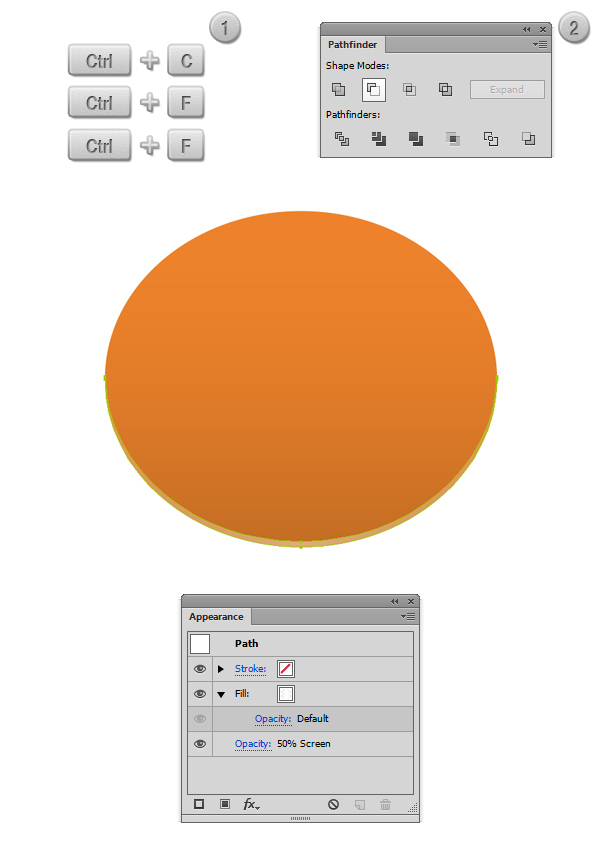
Step 18
Select the main ellipse and make two copies in front of it (CTRL + C > CTRL + F > CTRL + F). Select the top shape and move it 0,5px up. Select both copies and from the Pathfinder Panel hit the Minus Front button. Fill the resulting shape with white, then from the Transparency Panel lower the opacity tool to 50% then set the blending mode to Screen.
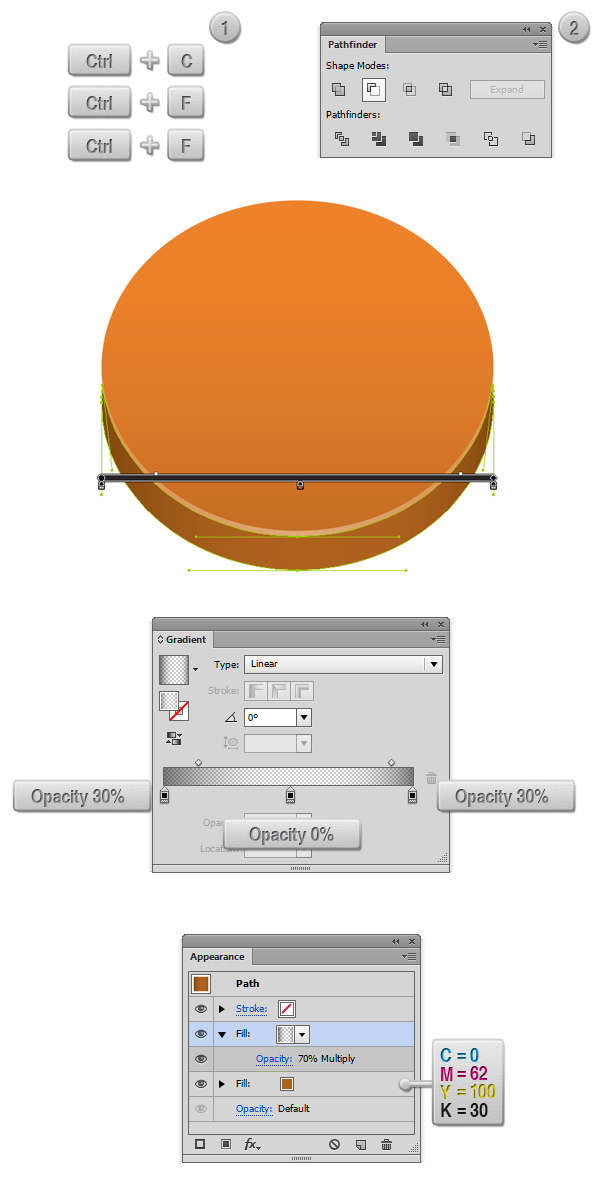
Step 19
Select again the main ellipse and make again two copies on top of it (CTRL + C > CTRL + F > CTRL + F). Select the first copy and move it 3px down. Select both copies and from the Pathfinder Panel hit the Minus Front button. Fill the resulting shape with C=0 M=62 Y=100 K=0.
From the Appearance Panel add a new linear gradient fill. Select this last fill and from the Transparency Panel lower the opacity to 70%, then set the blending mode to Multiply.
Step 20
Select again the main ellipse and make again two copies on top of it (CTRL + C > CTRL + F > CTRL + F). Select the first copy and move it 5px down. Select both copies and from the Pathfinder Panel hit the Minus Front button. Fill the resulting shape with a linear gradient fill.
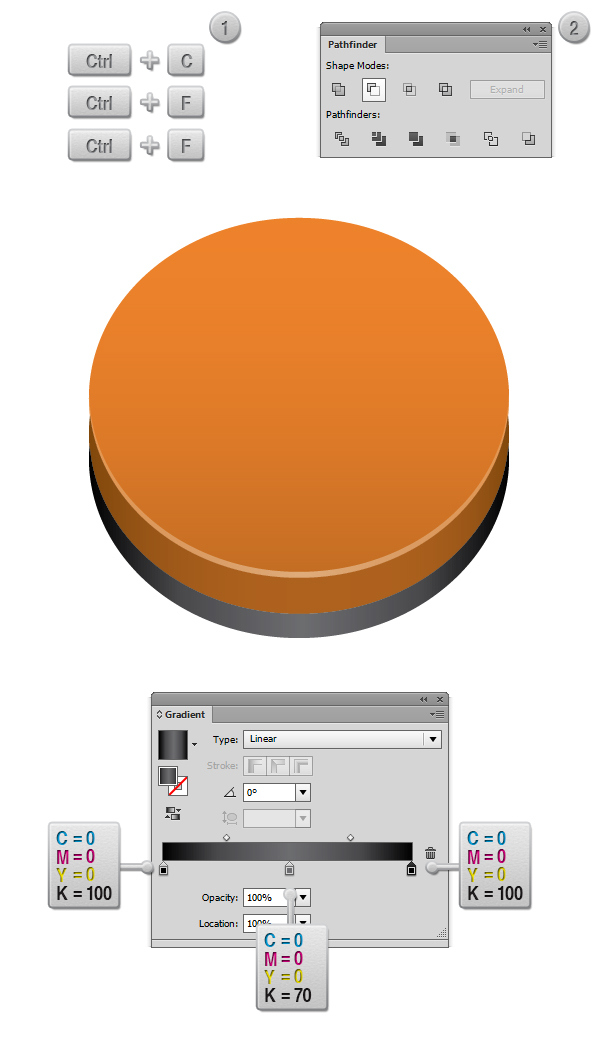
Step 21
Select again the main ellipse and make again two copies on top of it (CTRL + C > CTRL + F > CTRL + F). Select the first copy and move it 4px down. Select both copies and from the Pathfinder Panel hit the Minus Front button. Fill the resulting shape with black.
Step 22
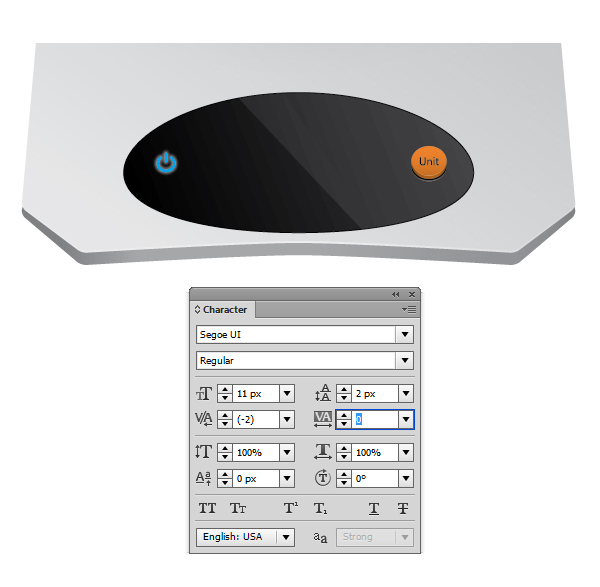
Pick the Type Tool (T) and write the word ‘Unit”. Use the Segoe UI Regular font, with a size of 11px.
Step 23
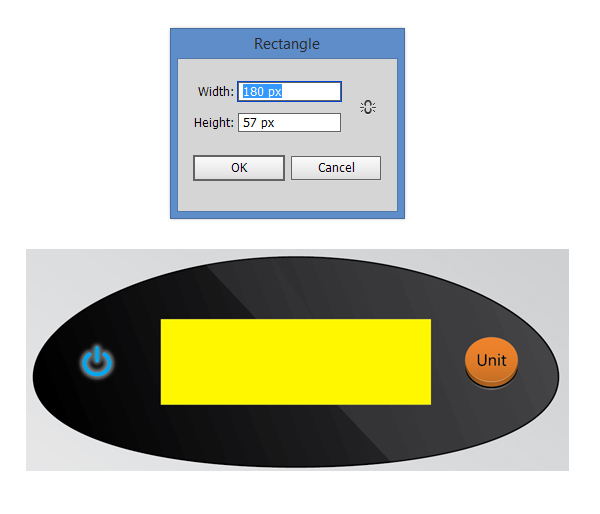
Using the Rectangle Tool (M), draw a 180 x 57px rectangle.
Step 24
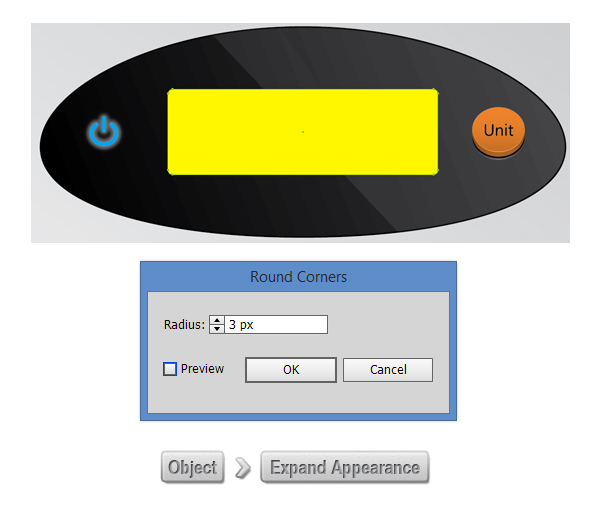
Select the rectangle we’ve previously created, then go to Effect > Stylize > Round Corners and in the dialog box enter a value of 3px. With the rectangle selected, go to Object > Expand Appearance in order to expand the round corners effect.
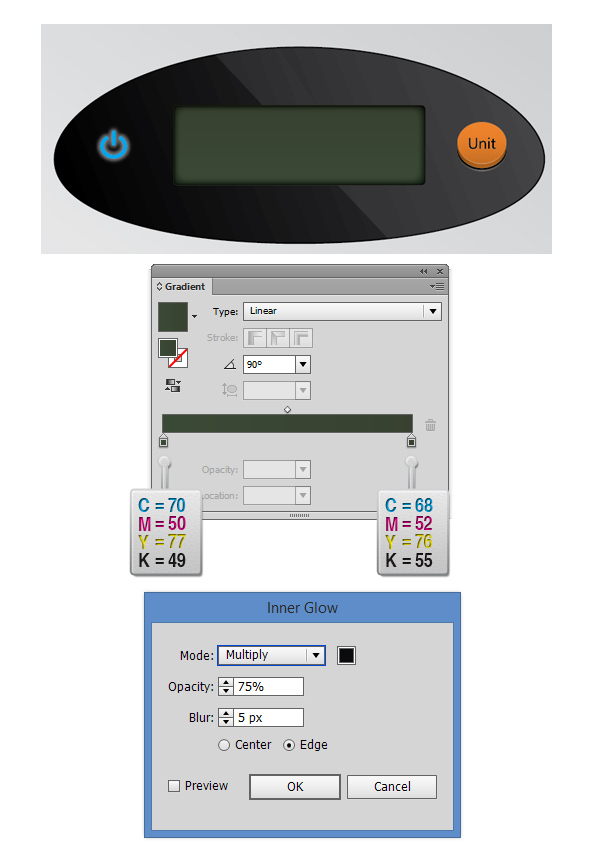
Step 25
Fill the previous shape with a linear gradient fill, make sure you set the angle to 90 degrees. Pick the left slider and set it’s color to C=70, M=50 Y=77 K=49, then pick the right slider and set the color to C=68 M=52 Y=76 K=55.
Now let’s add an inner shadow (Effect > Stylize > Inner Glow). In the dialog box enter a value of 5px blur and an opacity of 75%.
Step 26
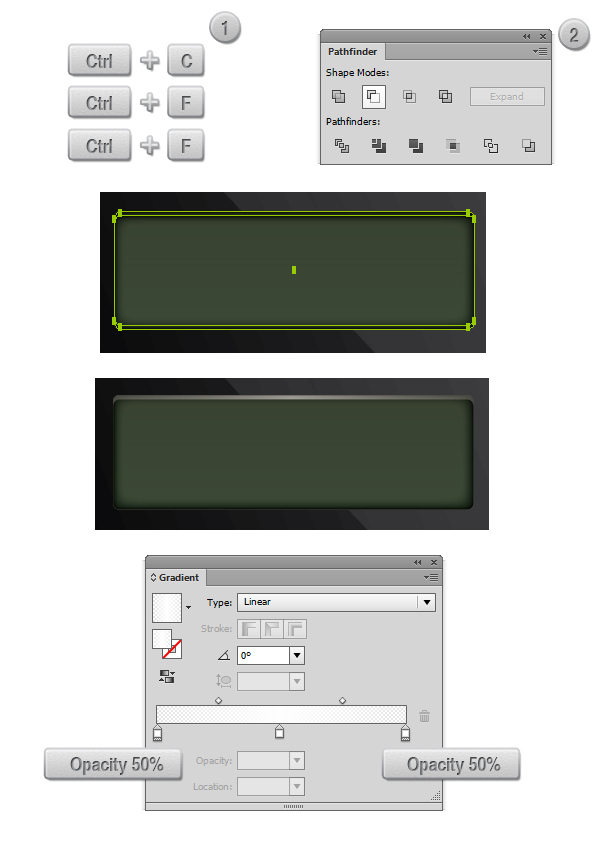
Select the main rectangle and make two copies on top of it (CTRL + C > CTRL + F > CTRL + F). Select the top copy and move it 2px down. Select both copies and from the Pathfinder Panel hit the Minus Front button. Fill the resulting shape with a linear gradient fill.
Set the color for all three sliders to white, but for the left and for the right slider lower the opacity to 50%. From the Transparency Panel lower the opacity of the shape to 70%, then change the blending mode to Screen.
Step 27
Using the Rectangle Tool (M) draw a rectangle similar to the one in the screenshot below then fill it with black. With the rectangle still selected go to Effect > Blur > Gaussian Blur and in the dialog box enter a value of 20px blur.

Step 28
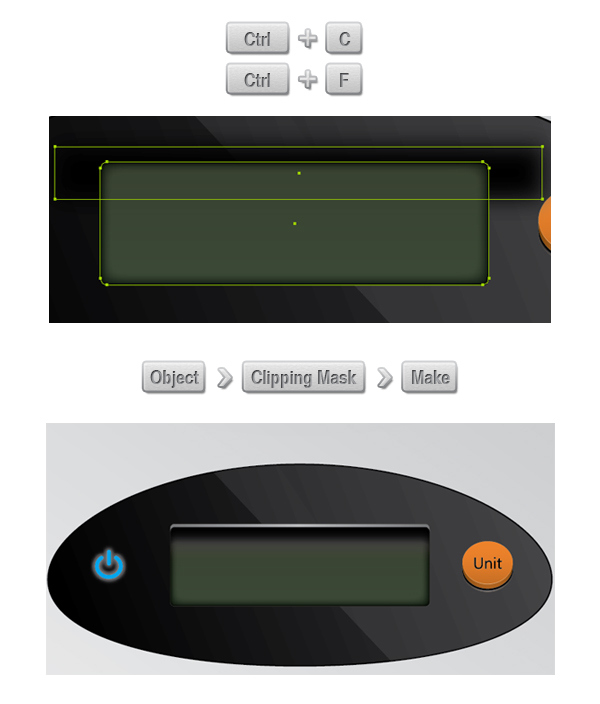
Select the rectangle we’ve created in Step 23 and make a copy in front of it (Ctrl + C > Ctrl + F) then move the copy in front of the other shapes (Ctrl + Shift + ]).
Now select both the copy and the shape we’ve previously created in Step 27 and create a Clipping Mask (Object > Clipping Mask > Make). Now we have the shadow clipped into the display of the scale.
Step 29
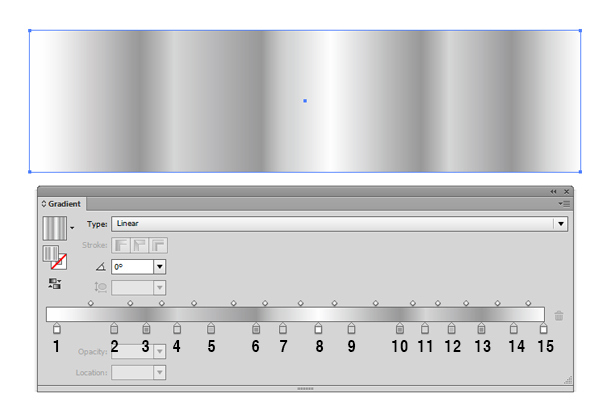
Now we are going to finish our illustration by learning how to make the screws using a Conical Gradient. Create a Rectangle (M), then add a multicolor gradient (Window > Gradient).
Step 30
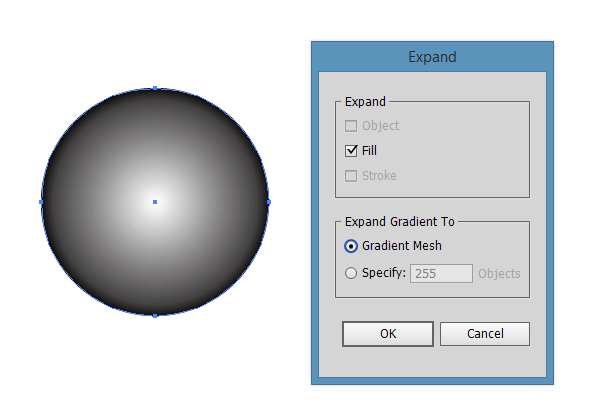
Draw an Ellipse (E) and fill it with a two color radial Gradient (Click Window > Gradient and simply click on the gradient thumbnail to add the linear gradient then change the type of gradient from Linear to Radial, as shown in the the image below). It doesn’t matter what colors you use. With the Ellipse selected, go to Object > Expand and be sure you check Expand Gradient to Gradient Mesh.Then hit OK.

Step 31
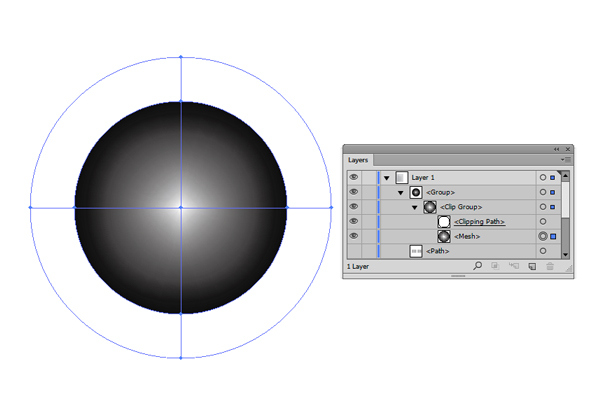
Now we have a Clip Group. Delete the Clipping Path from the Layers panel.
Step 32
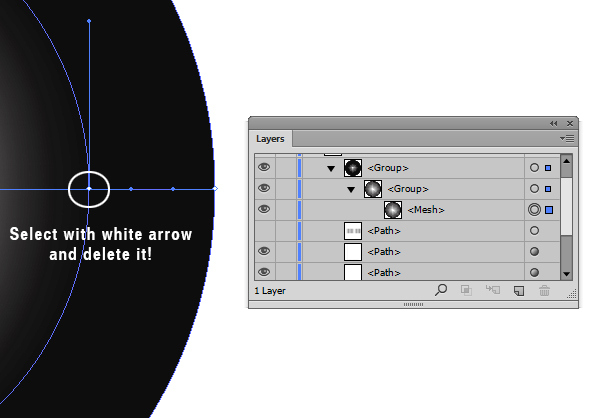
With the Direct Selection Tool (A) select the right point on the Inner Circle and delete it (del).
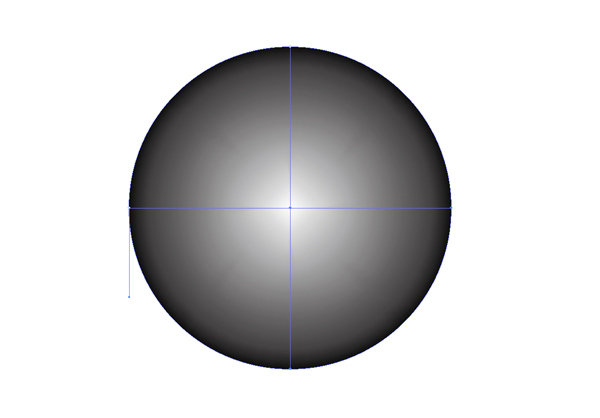
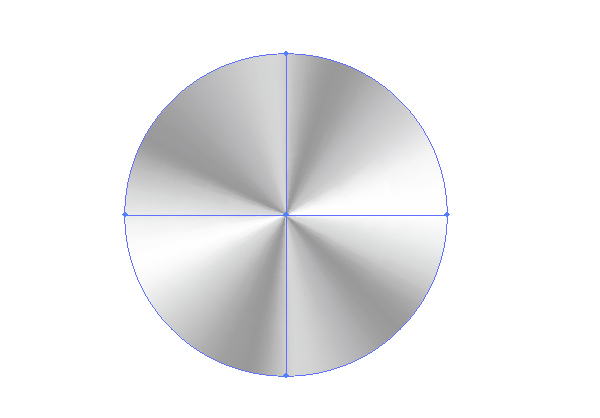
 This is the shape that will remain: a Gradient Mesh with 4 points.
Step 33
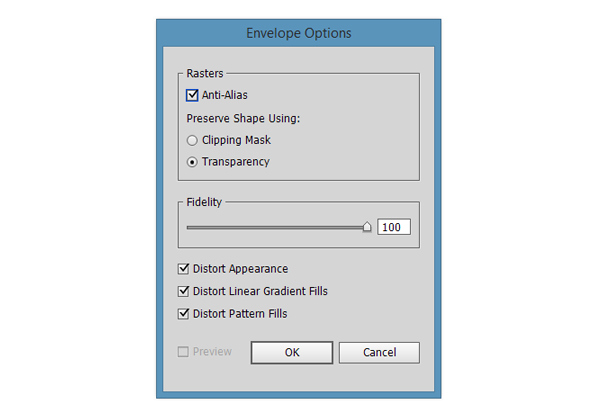
Go to Object > Envelope Distort > Envelope Options and be sure you have the same properties just like in the image below.
Step 34
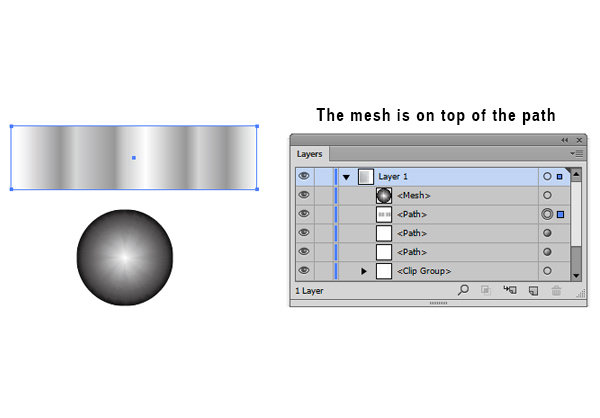
Select both the Gradient Mesh and the Rectangle, make sure that the Mesh is on top by checking the Layers Panel, then go to Object > Envelope Distort > Make with Top Object.
 And this is our Ellipse with a Conical gradient that will serve at the screw for our Plexiglas® plate!
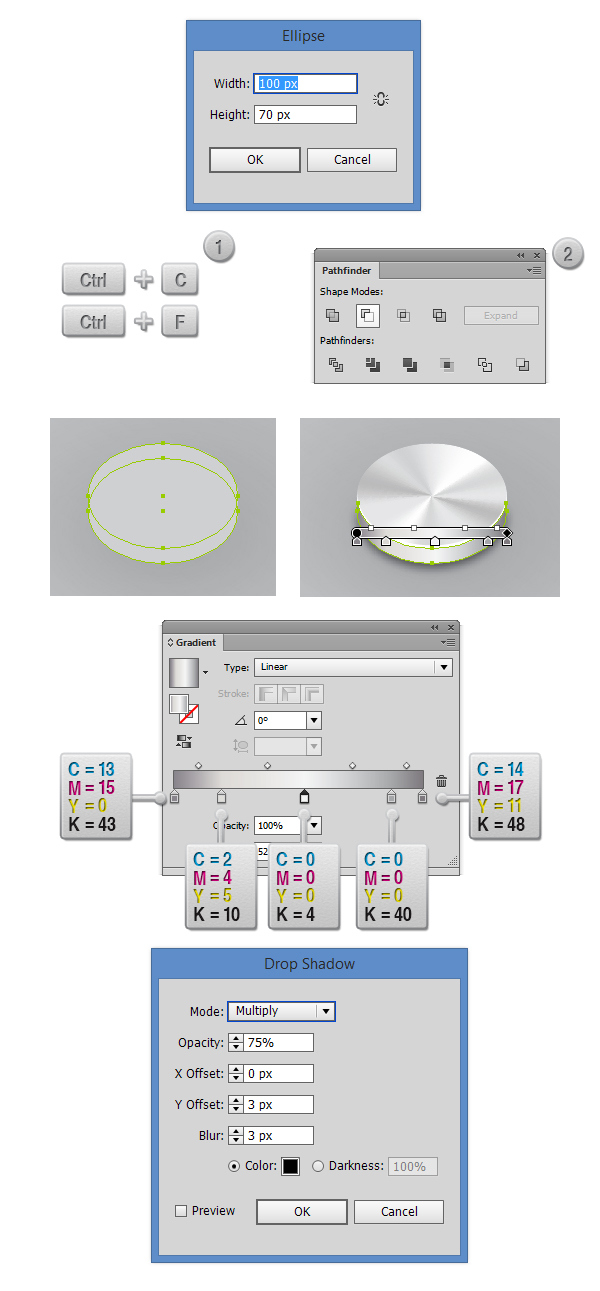
Step 35
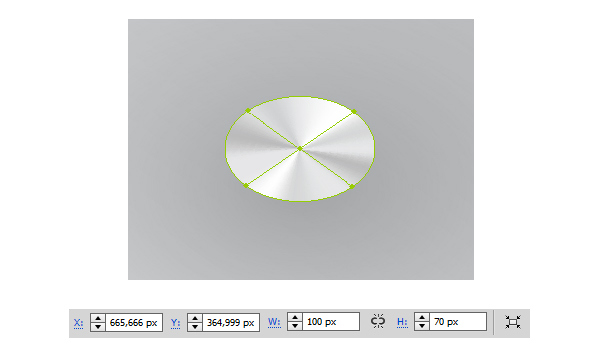
Select the conical gradient that we’ve created and from the top menu, enter a value of 100px for width and a value of 70px for height.
Step 36
Pick the Ellipse Tool (L) and create another 100 x 70px ellipse. Make a copy in front of it (Ctrl + C > Ctrl + F), then move the copy 2px up. Select both the copy and the main shape and from the Pathfinder Panel hit the Minus Front button. Fill the resulting shape with white (C=0 M=-0 Y=0 K=0)
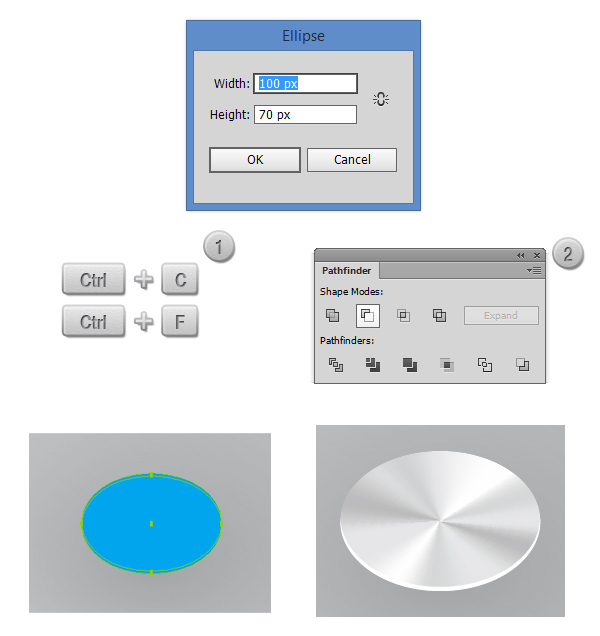
Step 37
Pick the Ellipse Tool (L) and create another 100 x 70px elipse. Make a copy in front of it (Ctrl + C > Ctrl + F), then move the copy 12px down. Select both the copy and the main shape and from the Pathfinder Panel hit the Minus Front button. Fill the resulting shape with a linear gradient fill.
Now let’s add a drop shadow by going to Effect > Stylize > Drop Shadow then enter the same values as shown in the screenshot below.
Step 38
Pick again the Ellipse Tool (L) and create a 72 x 42px ellipse, then fill it with C=0 M=0 Y=0 K=80.

Step 39
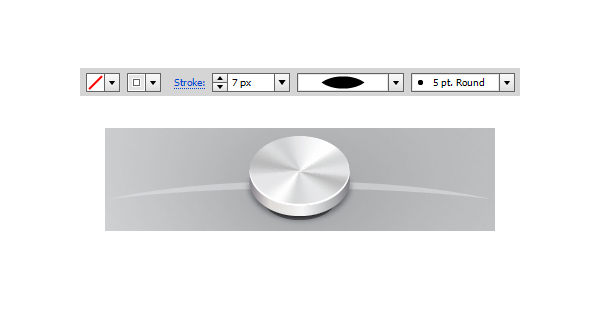
Using the Pen Tool (P) draw a simple line. Fill it with C=0 M=0 Y=0 K=10, then from the Transparency Panel lower the opacity to 50%.
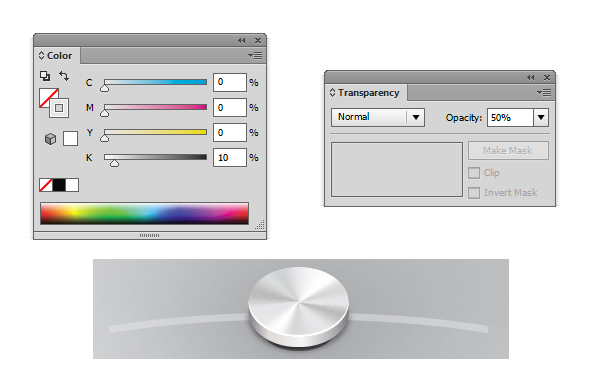
Select the path and set the stroke width to 7px, then change the Variable Width Profile to Width Profile 1.
With the Path selected go to Effect > Stylize > Drop Shadow and enter the values you see below in the dialog box.
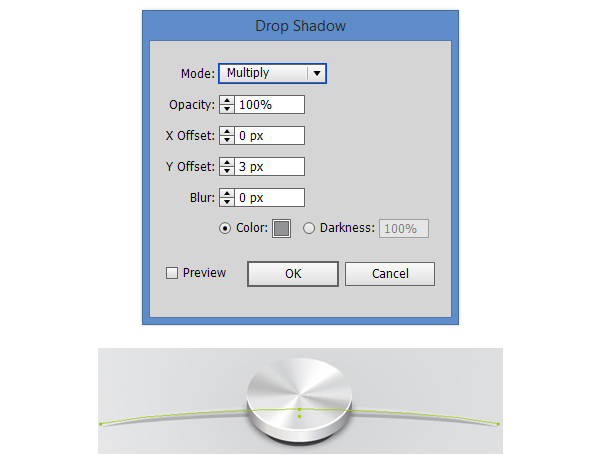
Step 40
Now repeat Step 39 in order to create a second line, but this one needs to be straight, not curved.
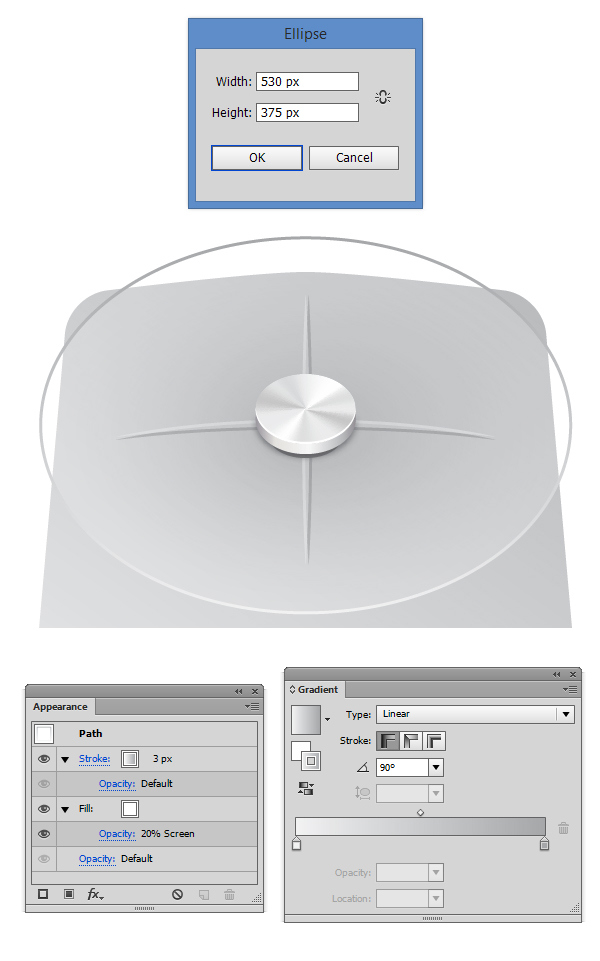
Step 41
Pick the Ellipse Tool (L) and create a 530 x 375px ellipse. Now focus on the Appearance Panel. Fill the ellipse with white, then lower the opacity to 20% and make sure you set the Blending Mode to Screen. Add a gradient stroke (Only Adobe Illustrator CS6 and above users can do that), from white to gray then change the angle to 90 degrees and also make sure that you select the first gradient stroke option from the Gradient Panel.
Step 42
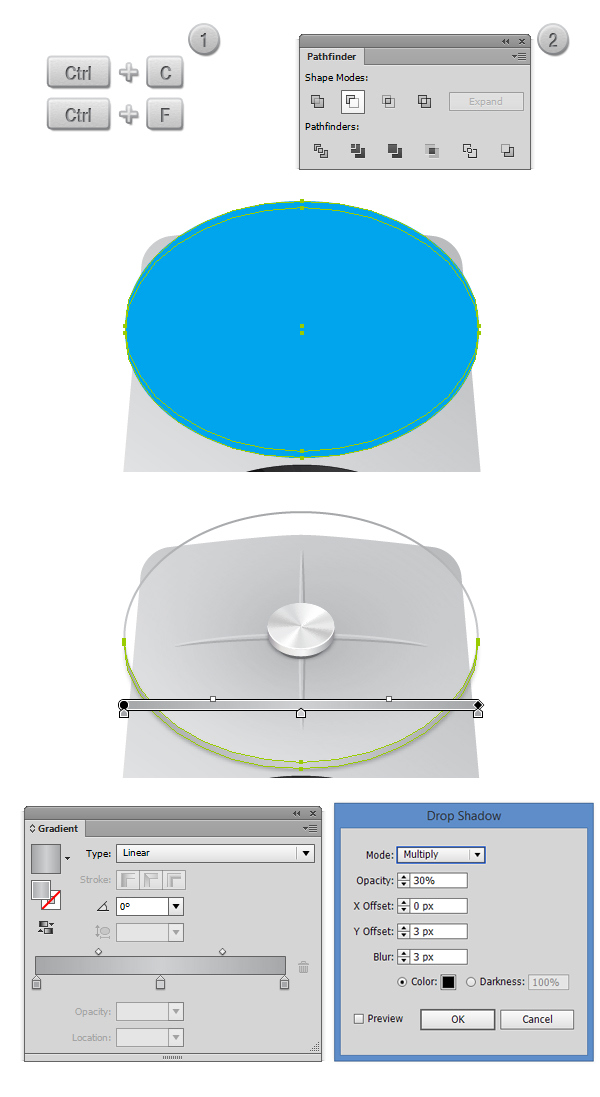
Pick the Ellipse Tool (L) and create another 530 x 375px ellipse. Make a copy in front of it (Ctrl + C > Ctrl + F), then move the main shape 10px down. Select both the copy and the main shape and from the Pathfinder Panel hit the Minus Front button. Fill the resulting shape with a linear gradient fill. With the shape selected go to Effect > Stylize > Drop Shadow and enter the values you see below in the dialog box.
Step 43
Pick the Ellipse Tool (L) and create another 530 x 375px ellipse. Make a copy in front of it (Ctrl + C > Ctrl + F), then move the copy 10px down. Select both the copy and the main shape and from the Pathfinder Panel hit the Minus Front button. Fill the resulting shape with a linear gradient fill. With the shape selected go to Effect > Stylize > Drop Shadow and enter the values you see below in the dialog box.
Step 44
Now using the Pen Tool (P) create a shape similar to the one in the screenshot below. Fill it with a linear gradient fill, set the angle to 33,8 degrees then set the opacity of the right slider to 0%.
Step 45
Pick the Ellipse Tool (L) and create another 530 x 375px ellipse. Select both the ellipse and the previous shape and create a Clipping Mask (Object > Clipping Mask > Make).
And We’re Done!
Here is how it should look. I hope you’ve enjoyed this tutorial and can apply these techniques in your future projects.
