In this new tutorial you will learn how to create a seamless pattern inspired by the winter holidays in Adobe Illustrator.
We will start this tutorial by drawing the winter holiday inspired icons using basic shapes and flat colors. With the help of the Transform and Roughen effects we will add a subtle grungy look to these icons in order to make the pattern more unique.
Once the icons are ready, we will compose, edit and then save the pattern. Let’s start!
Final Image
As always, this is the final image that we’ll be creating:

Tutorial Details
- Program: Adobe Illustrator CS6 – CC 2017
- Estimated Completion Time: 1 hour 30 minutes
- Difficulty: Beginner-Intermediate
Step 1
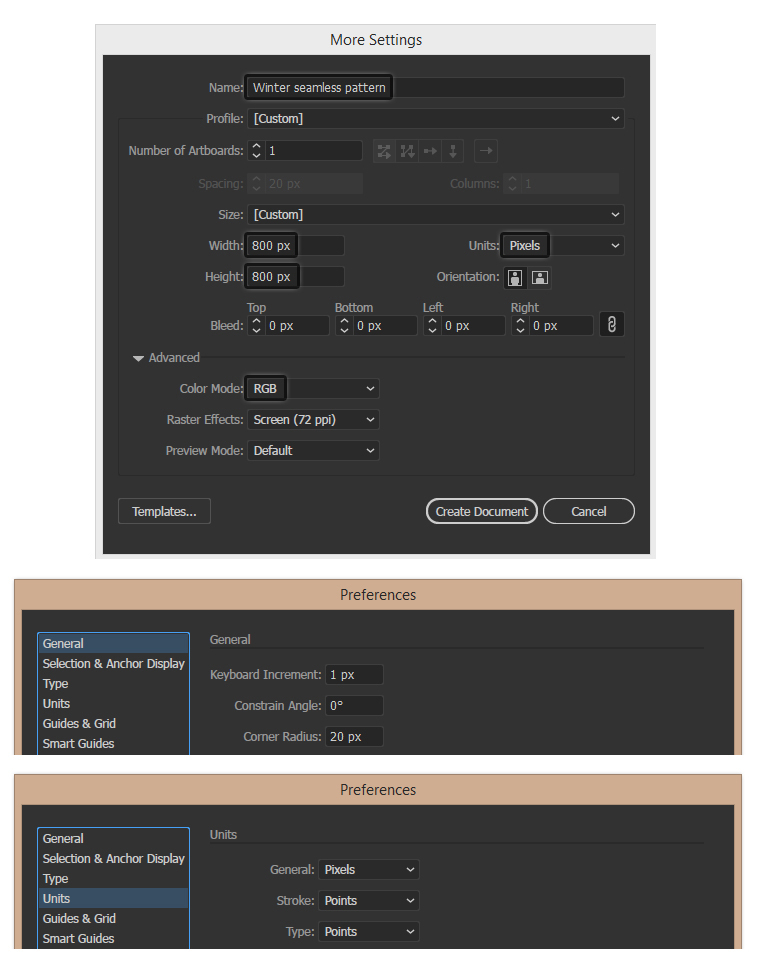
Launch Illustrator and open a new document. Type a name and set up the dimensions then select Pixels as Units and RGB as Color Mode. Next, go to Edit > Preferences > General and set the Keyboard Increment to 1 px and while there, also check the Units. These settings will help you throughout the drawing process.
Step 2
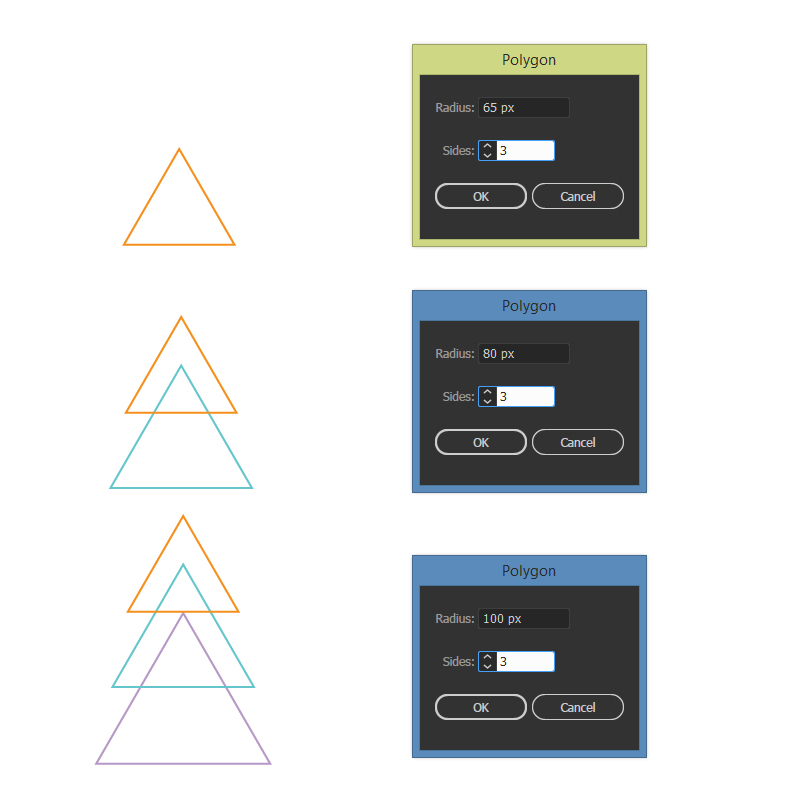
We will start with the tree icon. Grab the Polygon Tool, click on your artboard and enter the dimensions shown to draw the three triangles of different sizes. Arrange them as in the image below to compose the tree.
Step 3
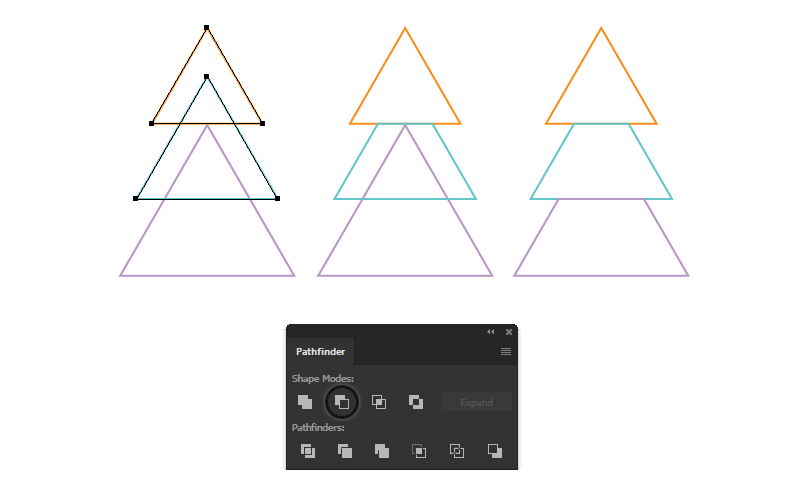
Select only the smallest triangle at the top and then Copy and Paste in Place (Shift-Control-V) to make a copy of it. Now, select this copy along with the middle triangle and press Minus Front in the Pathfinder panel. This will cut the tip of the middle triangle.
Repeat the same thing for the bottom triangle.
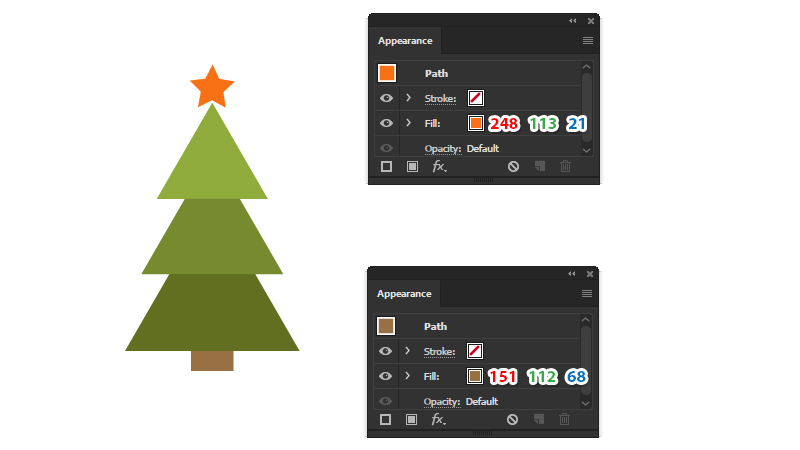
Step 4
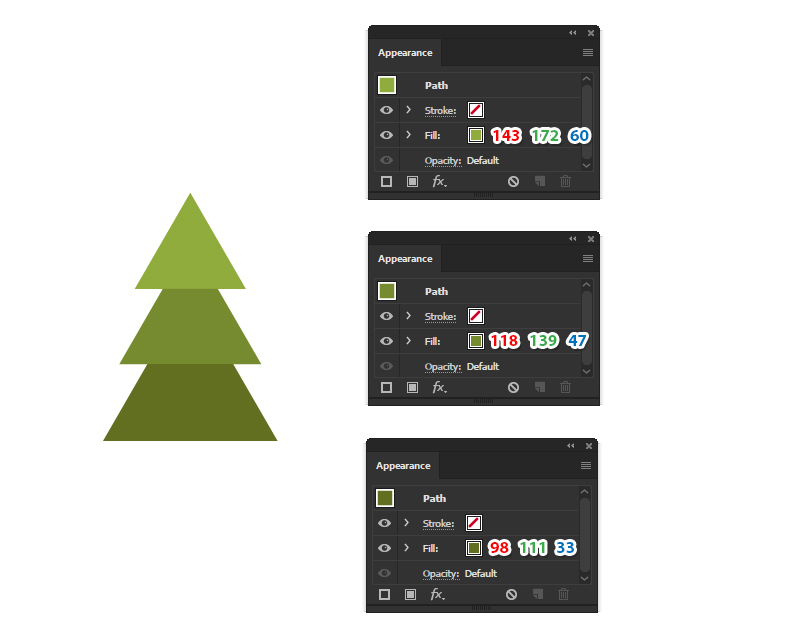
Color the triangles with the shades of green indicated.
Step 5
Next, use the Star Tool to draw a star at the top of the tree and color it with orange. Switch to the Rectangle Tool (M) and draw a small rectangle of about 42 x 20 px filled with brown at the bottom.
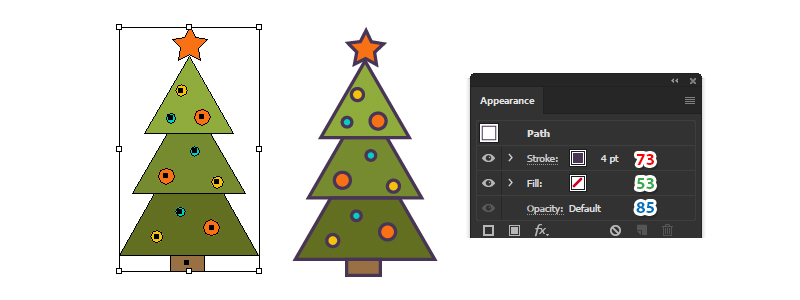
Step 6
Use the Ellipse Tool (L) to draw a bunch of circles of different sizes on the tree and color them with yellow, orange and blue.

Step 7
Select all the shapes that you have drawn so far and then Copy and Paste in Place (Shift-Control-V) to make copies of them. Group (Control-G) all the copies, remove the existing fill colors and just apply a 4 pt dark purple Stroke. Name this group “outline” in the Layers panel.
Step 8
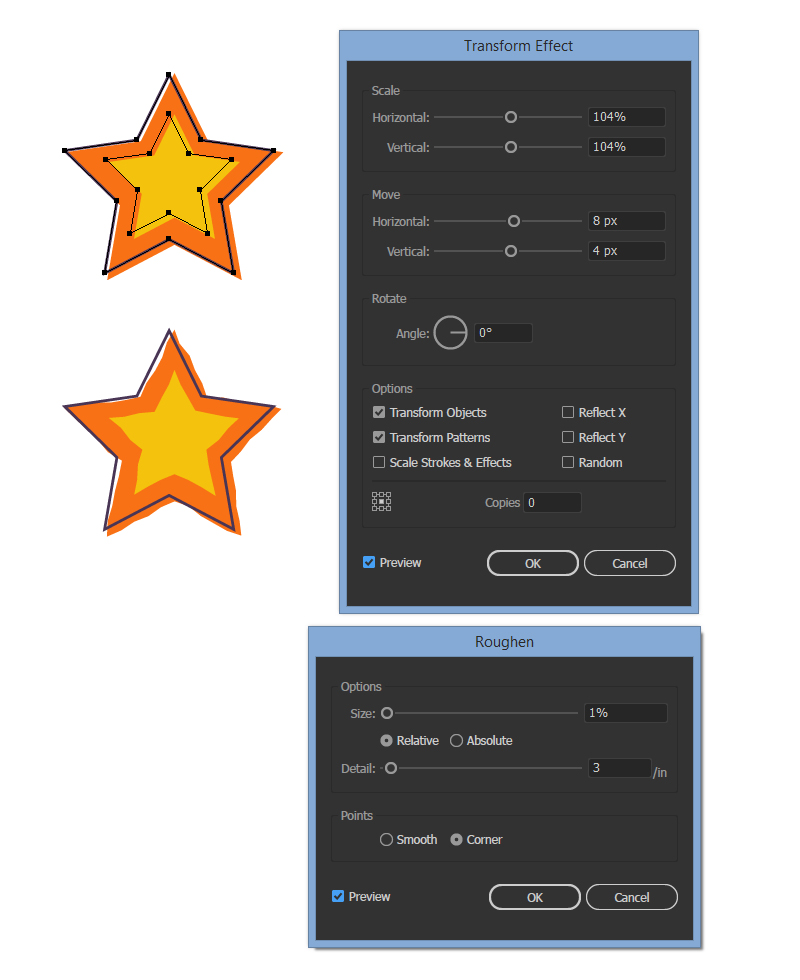
Select the green tree, the orange star and the trunk and Group (Control-G) them. Name this group “tree” and make sure that it is under the “outline” group in the Layers panel.
While the “tree” group stays selected, go to Effect > Distort & Transform > Transform and apply the Scale and Move settings shown. This will move the tree a little downwards and to the right whilst the purple outline stays still. Next, go to Effect > Distort & Transform > Roughen and apply the settings shown to create a subtle grungy look.
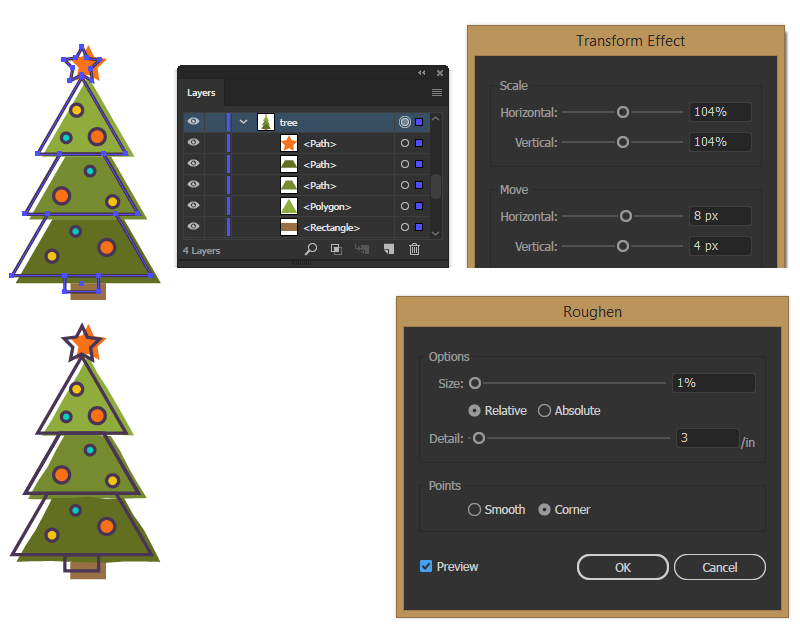
Step 9
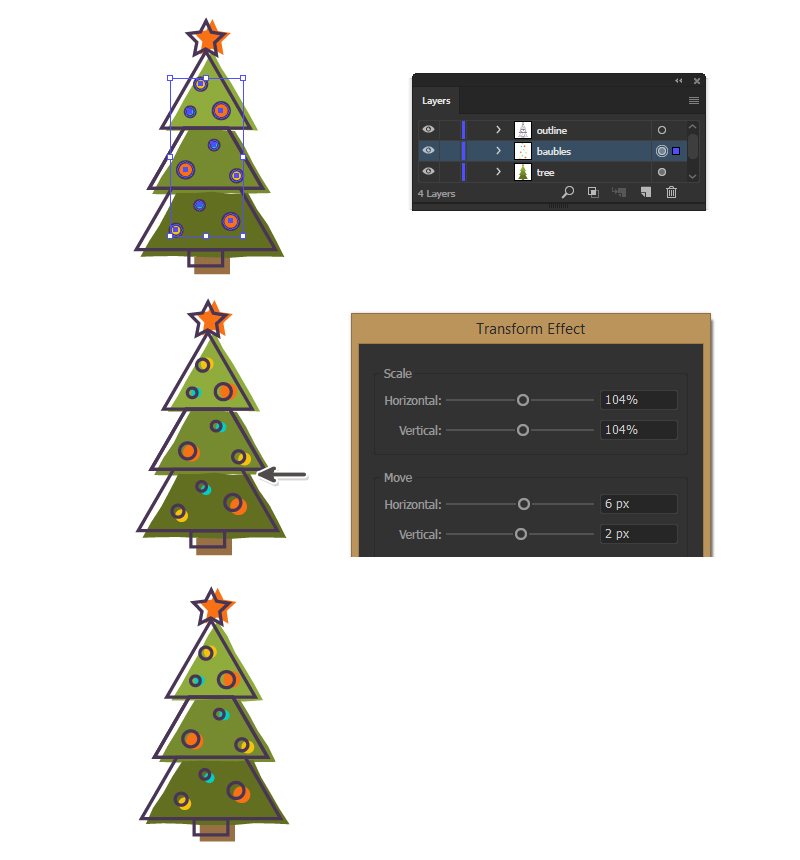
Now, select all colored circles, Group (Control-G) them and name the group “baubles” in the Layers panel. While this group stays selected, go to Effect > Distort & Transform > Transform and apply the settings shown to move them a little downwards and to the right whilst the outline stays still.
If you get small empty areas between the shapes of the tree after applying the Transform effect, all you have to do is to move the shapes closer to each other using the Direct Selection Tool (A) and the Arrow keys on your keyboard and you will cover that space. At this point the tree icon is ready.
Step 10
We will continue with the globe icon. Grab the Ellipse Tool (L) and draw a 292 x 292 px circle and color it with white. Next, take the Rounded Rectangle Tool and draw a rectangle having the dimensions shown. Color it with red and arrange it at the bottom of the circle.

Step 11
Use the Ellipse Tool (L) and draw a bunch of circles of different sizes inside the white circle and color them with light blue. Group (Control-G) all these circles and name the group “snow” in the Layers panel.

Step 12
Select the white circle and the red rectangle and then Copy and Paste in Place (Shift-Control-V) to make copies of them. Remove the existing fill colors and give them a 4 pt purple Stroke as you did before to create the outline. Now, select only the outline of the rectangle and Copy and Paste in Place (Shift-Control-V) to make a copy of it. While this copy stays selected, also select the outline of the circle and press Minus Front in the Pathfinder panel. This will cut the bottom of the circle outline.
Next, select the “snow” group and then Copy and Paste in Place (Shift-Control-V). Remove the blue fill and apply a 4 pt purple Stroke to create the snow outline. Group (Control-G) all the shapes that have the 4 pt Stroke applied to them and name the group “globe outline” in the Layers panel.
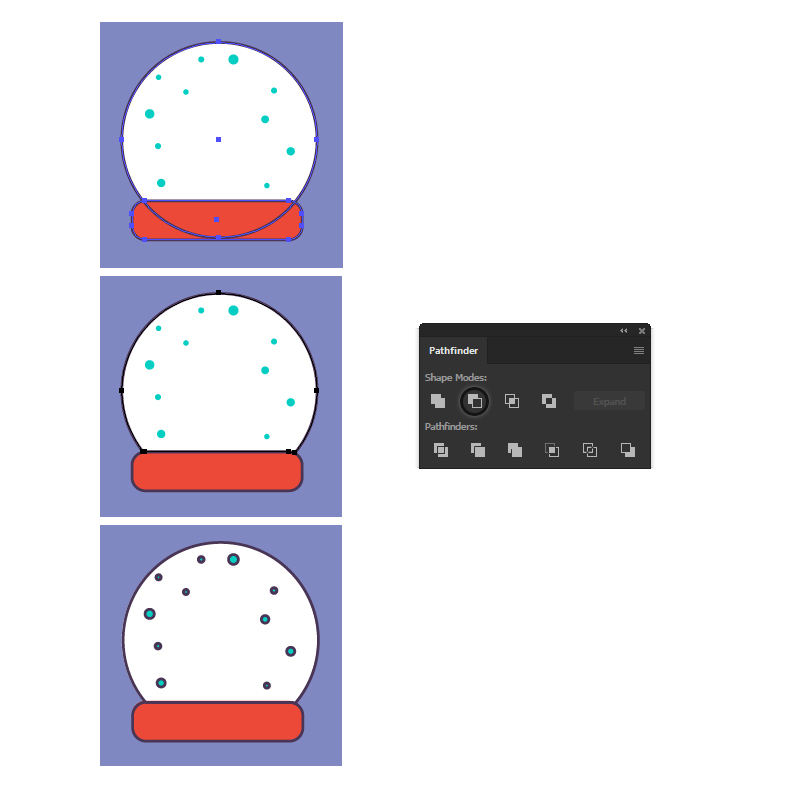
Step 13
Select the white circle along with the red rectangle and Group (Control-G) them. Name the group “globe” in the Layers panel; then go to Effect > Distort & Transform > Transform and apply the settings shown. Go back to Effect > Distort & Transform and apply the Roughen effect to create the subtle grungy look.
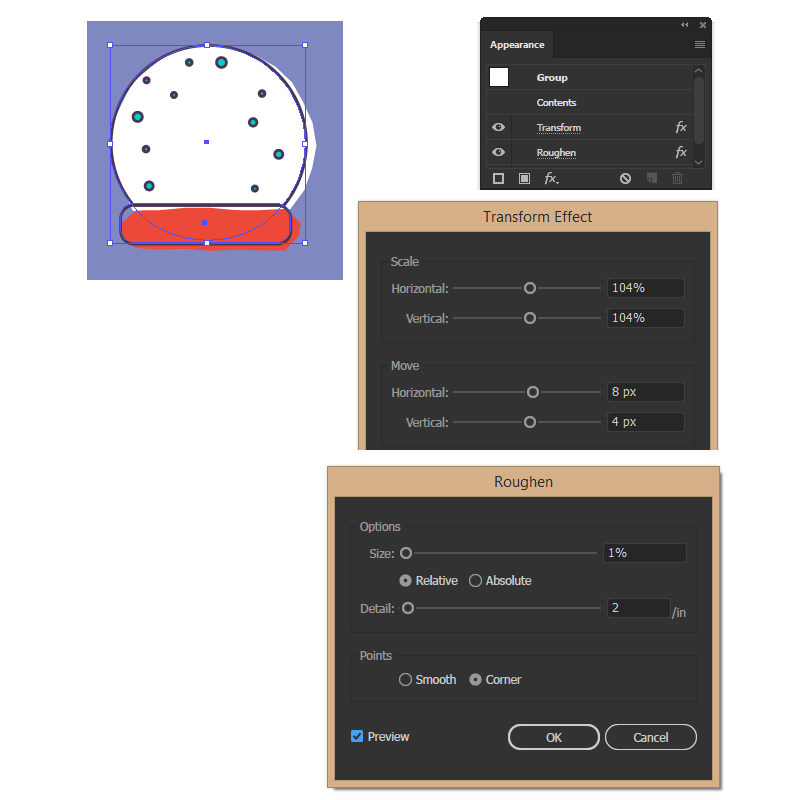
Step 14
Select the “snow”group; then go to Effect > Distort & Transform > Transform and apply the settings shown in order to move the blue circles a little downwards and to the right whilst the outline stays still.
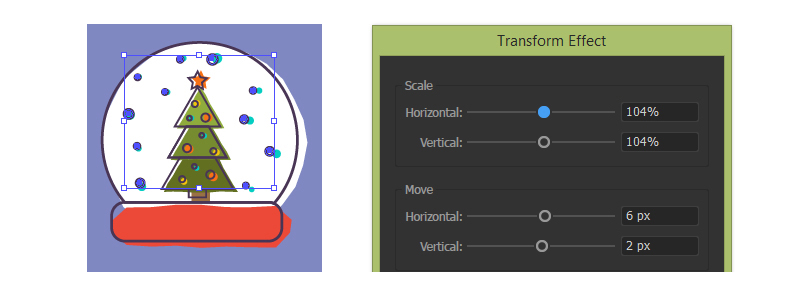
At this point, make a copy of the tree icon and go to Object > Expand Appearance followed by Object > Expand to expand the effects applied and the purple stroke. Now, you can scale down the tree and arrange it inside the globe to complete this icon.
Step 15
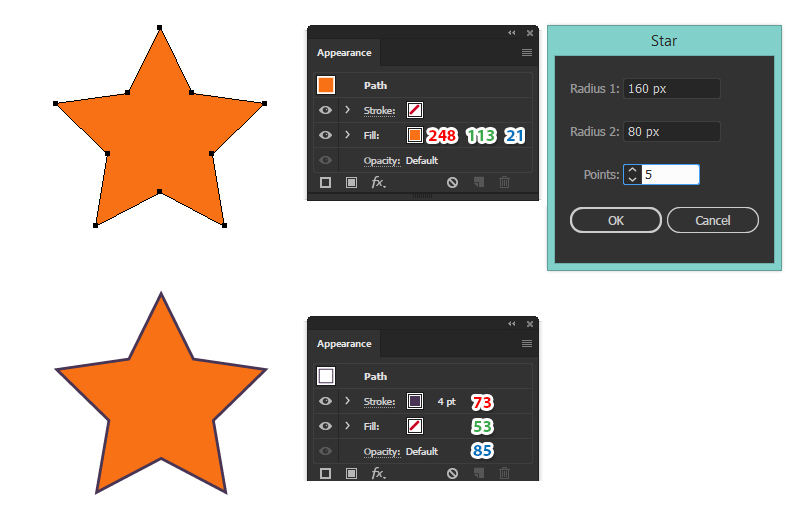
We will continue with the star icon. Grab the Star Tool, click on your artboard and enter the dimensions shown to draw the shape of the star. Color it with orange.
Copy and Paste in Front (Control-F) the star shape, remove the fill color and apply the same 4 pt purple Stroke to create the outline.
Step 16
Select the orange star and go to Object > Transform > Scale. Type 60% in the Scale field and hit Copy to get a smaller star in the middle. Color it with yellow.

Step 17
Group (Control-G) the orange and yellow stars and then apply the Transform and Roughen effects as you did for the other icons. At this point the star icon is ready.
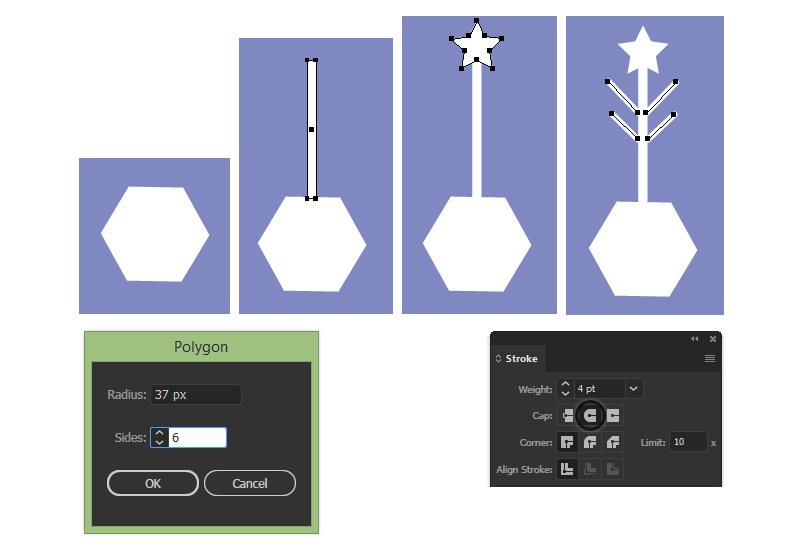
Step 18
We will continue with the snowflake icon. Grab the Polygon Tool, click on your artboard and enter the dimensions shown to draw a hexagon. Color it with white. Next, use the Rectangle Tool (M) to draw a 6 x 92 px rectangle and arrange it above the hexagon followed by a star at the top. Select these three shapes and press the Horizontal Align Center icon in the Align panel.
Use the Pen Tool (P) or the Line Segment Tool (\) to draw two short paths on each side of the rectangle and give them a 4 pt white Stroke. In the Stroke panel, press the Round Cap option to get the rounded ends. This will be the first branch of the snowflake.
Step 19
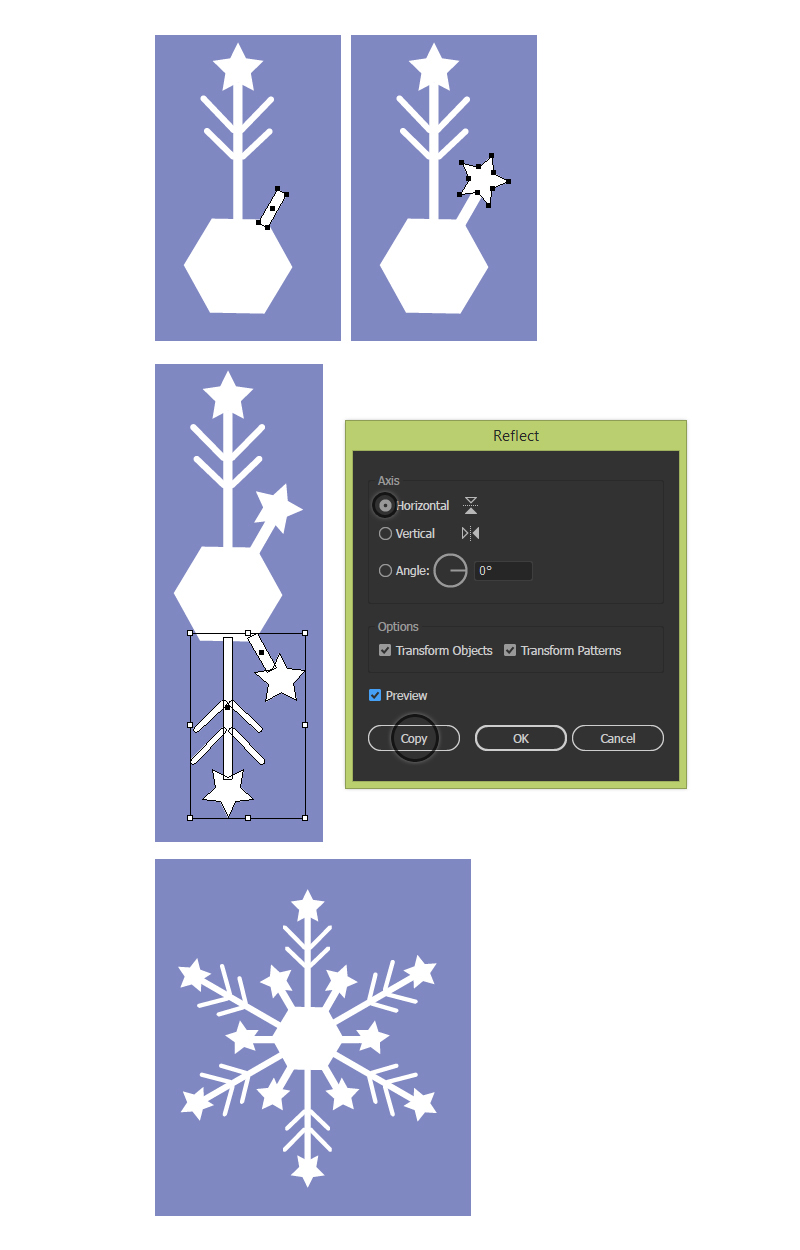
Draw a shorter white rectangle and arrange it in the upper right corner of the hexagon. Make a copy of the star and arrange it at the top of this rectangle. This will be the shorter branch of the snowflake.
Select the long and the short branches and go to Object > Transform > Reflect. Check Horizontal and press Copy to get other two branches. All you have to do is to move them into place at the bottom of the hexagon.
Rotate and Copy the four branches that you have so far in order the get the rest of the branches and complete the radial symmetry.
Step 20
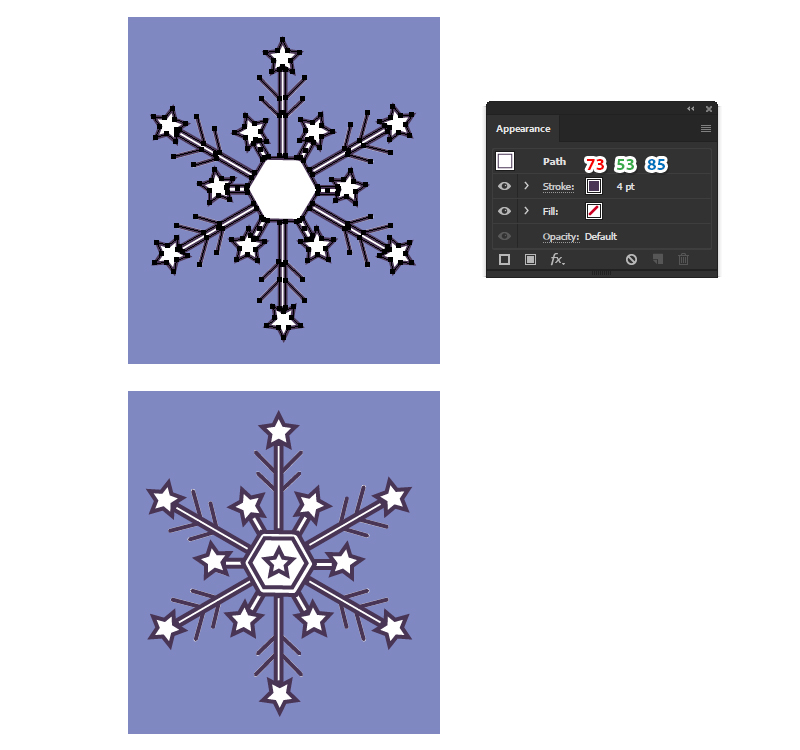
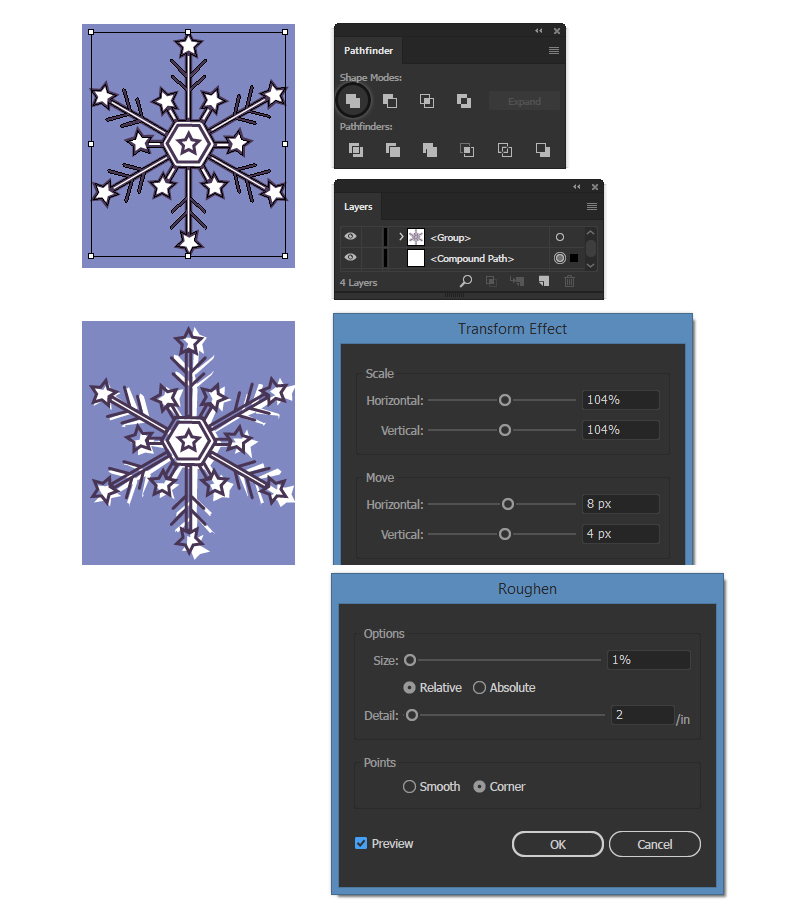
Copy and Paste in Place (Shift-Control-V) all the shapes that compose the snowflake and replace the white color with a 4 pt purple Stroke. To add more details, draw a smaller hexagon in the center followed by a small star, both having the same purple stroke. Group (Control-G) them and name the group “snowflake outline” in the Layers panel.
Step 21
Select all the white shapes that compose the snowflake and go to Object > Expand to turn the existing strokes into fills. Now, press Unite in the Pathfinder panel and then go to Object > Compound Path > Make (Control-8).
While this snowflake compound path stays selected, apply the Transform and the Roughen effects as you did before. At this point the snowflake icon is ready.
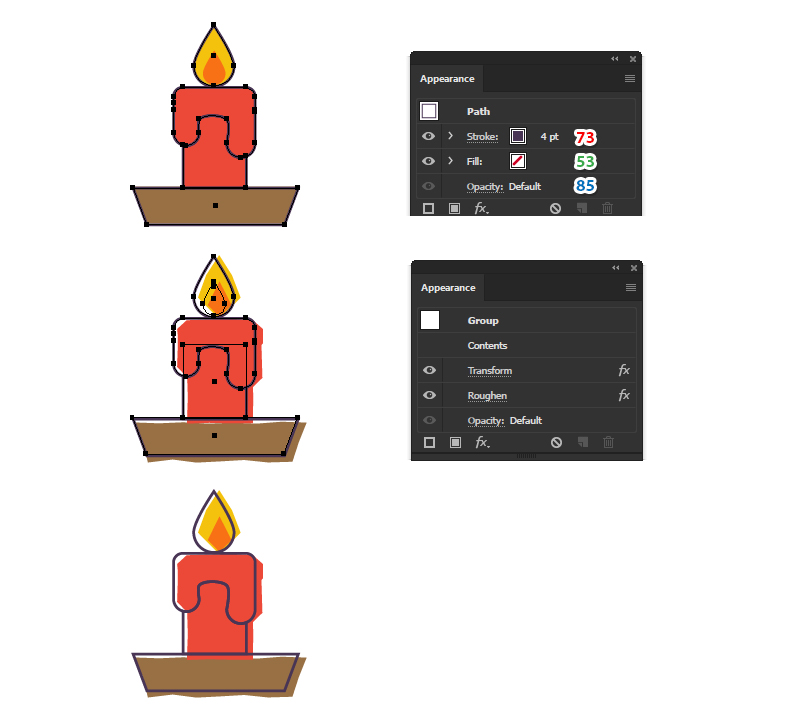
Step 22
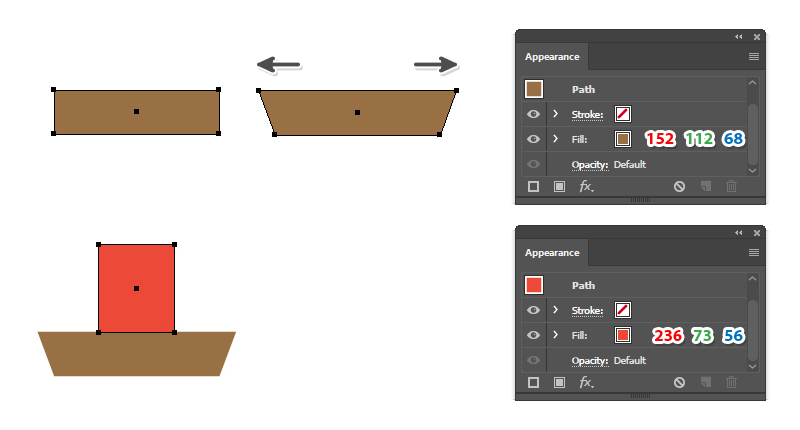
We will continue with the candle icon. Use the Rectangle Tool (M) to draw a 247 x 55 px rectangle and color it with brown. Switch to the Direct Selection Tool (A) and use it to select only the top two points and move them outwards to create a boat-like shape.
Draw another 95 x 110 px rectangle filled with red as the candle.
Step 23
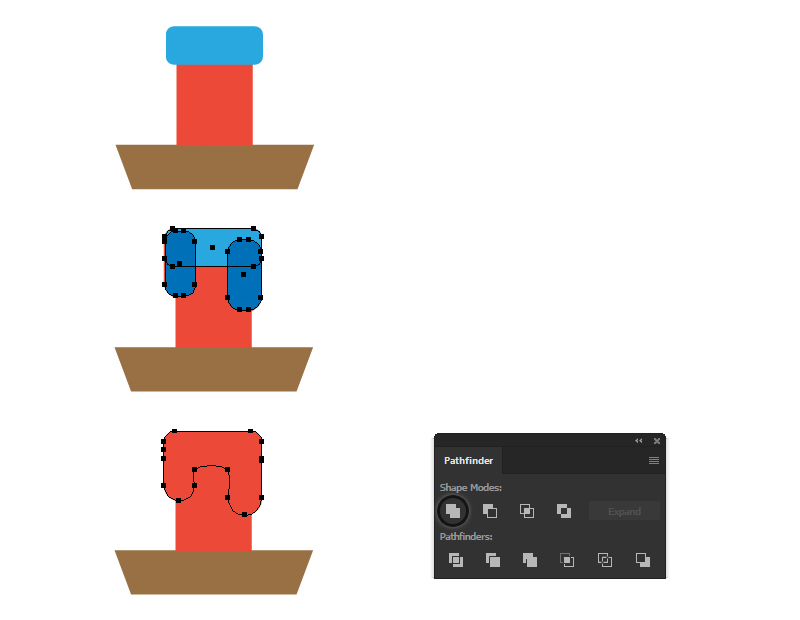
Use the Rounded Rectangle Tool to draw a new shape at the top of the candle followed by other two rounded rectangles on the sides like in the next image. Now, select these three blue shapes and press Unite in the Pathfinder panel to merge them into a single shape. Color it with the same shade of red. You can made extra adjustments and smooth the inner corners of this melting candle shape.
Step 24
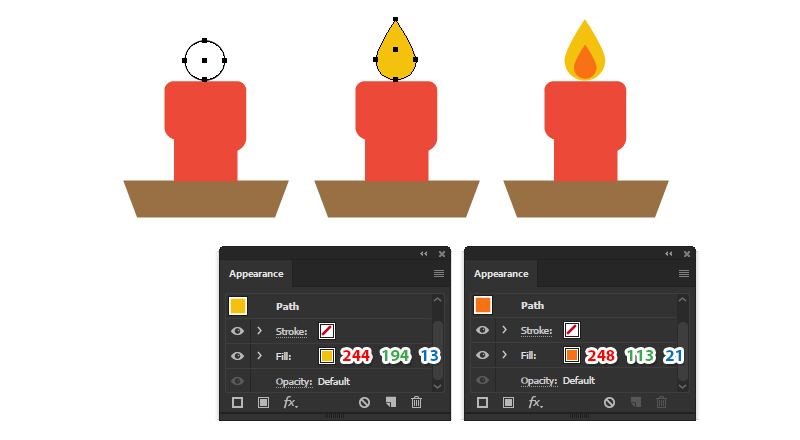
Take the Ellipse Tool (L) and draw a 60 x 60 px circle at the top of the candle. Switch to the Direct Selection Tool (A) and use it to select only the top point and then move it upwards to obtain the shape of the flame. Color it with yellow.
Make a copy of this shape and scale it down to obtain a smaller flame inside. Change the fill color to orange.
Step 25
Select all the shapes that compose the candle and then Copy and Paste in Place (Shift-Control-V) to make copies of them. Remove the existing fill colors and apply the 4 pt purple Stroke. Group (Control-G) these copies and name the group “candle outline” in the Layers panel.
Now, select the brown dish, the red candle and the flames and Group (Control-G) them. Name the group “candle” and then apply the Transform and Roughen effects using the same settings as before to distort it. The outline remains in the same place.
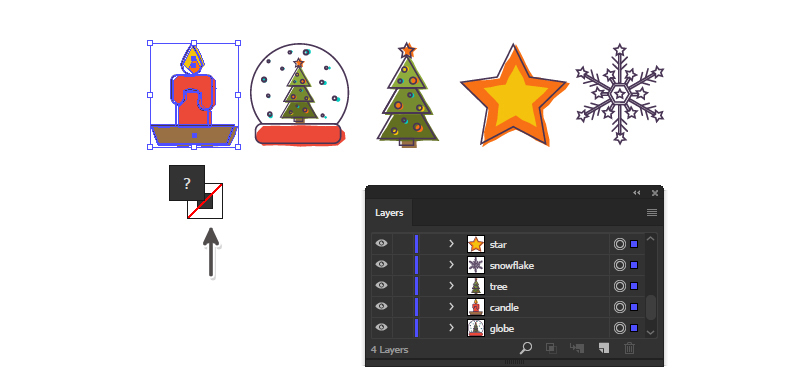
Step 26
At this point all the icons are ready. Before you continue with the pattern, Group (Control-G) each icon and give it a name to keep things organized in the Layers panel. Also, select each icon and go to Object > Expand Appearance followed by Object > Expand in order to expand the effects applied and to turn the strokes into fills. If Illustrator shows you that you have no strokes when you select the icons then you can continue with the next step.
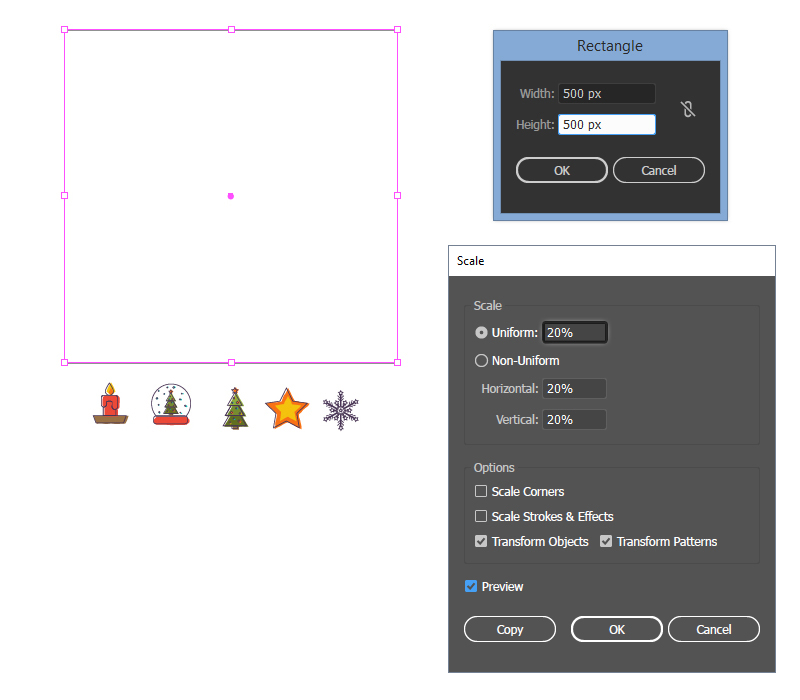
Step 27
It’s time to create the pattern. Take the Rectangle Tool (M) and draw a 500 x 500 px square on you artboard and then go to Object > Artboards > Convert to Artboards to define a new working area. Grab the five icons and Scale them about 20%.
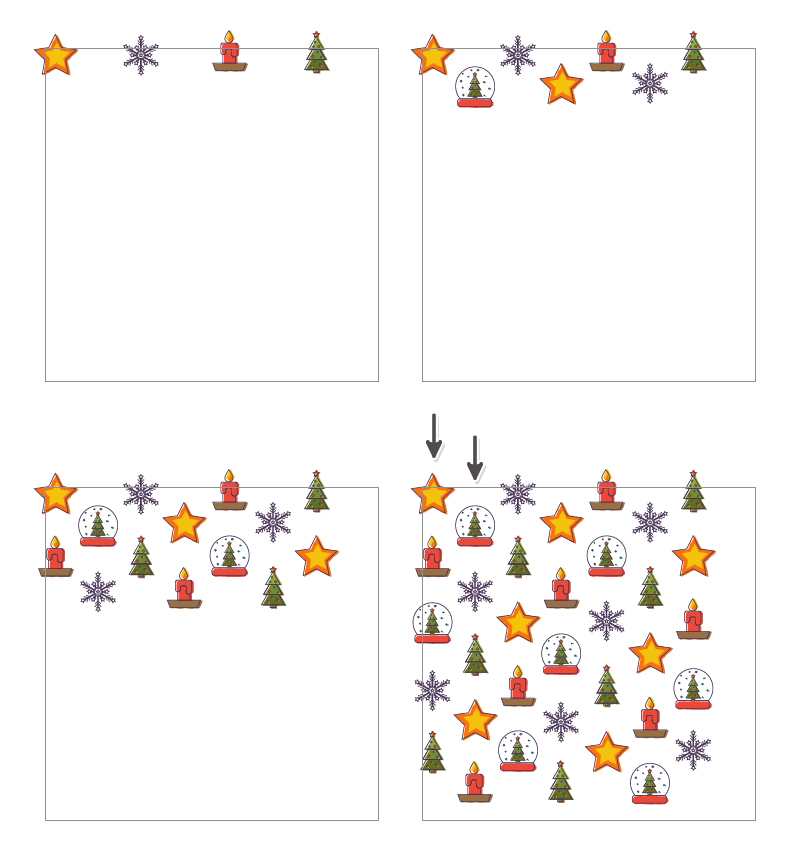
Step 28
To compose the pattern, start to arrange the icons at the top of the working area going a little over the edge. Make copies of the icons and create the second row between the first one. Continue to create more rows in the same way. Go over the edge only in the upper and left side of the working area and leave some empty space in the right and at the bottom so the pattern can repeat itself seamlessly. At the end, make sure that the icons are also aligned vertically in columns.
Step 29
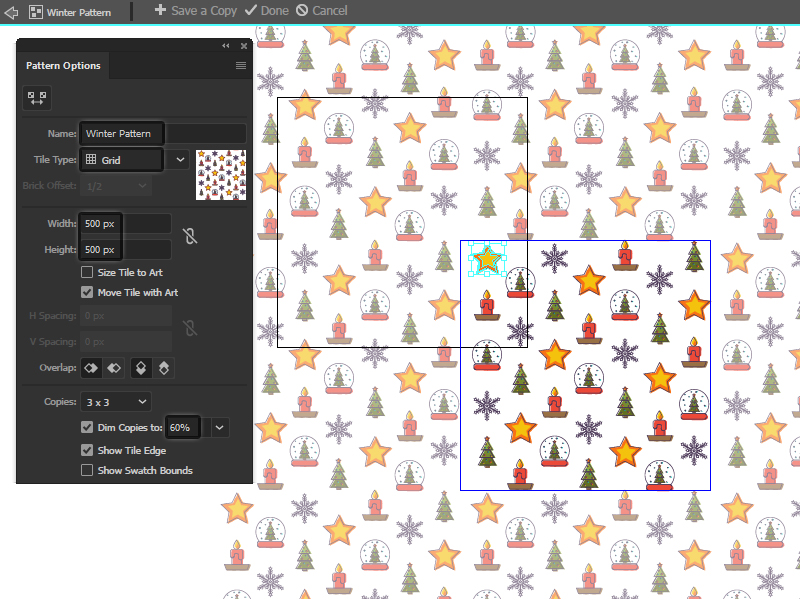
Select all icons that you have arranged in the previous step and go to Object > Pattern > Make. In the Pattern Options window that will appear, type a name for your pattern and enter the same dimensions of your working area which in this case is 500 x 500 px.
You can lower the opacity of the repeating pattern tiles by checking the Dim Copies to 60% or even lower and this way, you will be able to see the original pattern tile at 100% so you can make further adjustments.
Whilst in the editing mode, you can select and move any of the icons to adjust the pattern until you are happy with it. Press Done when you are finished.
Step 30
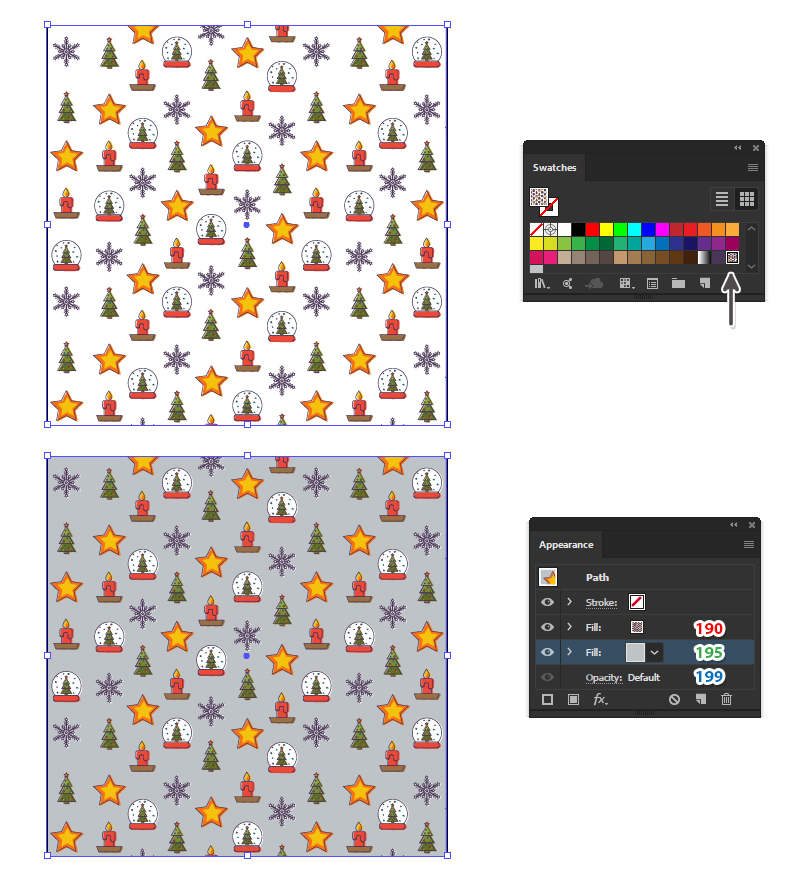
Now the pattern has been saved in the Swatches panel. You can draw a shape of any size and apply the pattern to it.
To add a background, go to the Appearance panel while the shape is selected and add a New Fill under the pattern. Choose light blue but feel free to experiment with other colors. That’s it!
And We’re Done!
Here is the final image of the winter pattern. I hope you enjoyed this tutorial and that you learned new things today.
