In the following tutorial you will learn how to create a simple flip clock illustration in Adobe Illustrator.
Final Image
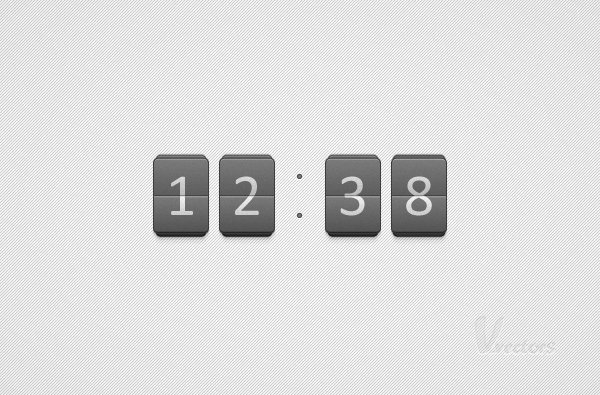
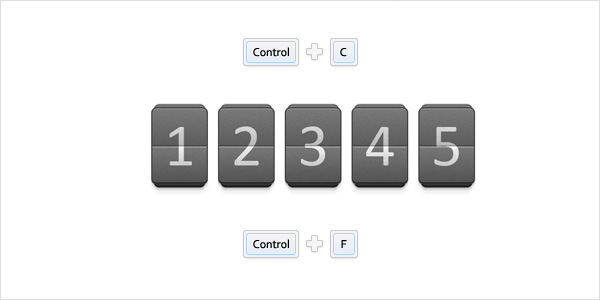
As always, this is the final image that we’ll be creating:
Tutorial Details
- Program: Adobe Illustrator CS5
- Estimated Completion Time: 45 minutes
- Difficulty: Intermediate
Step 1
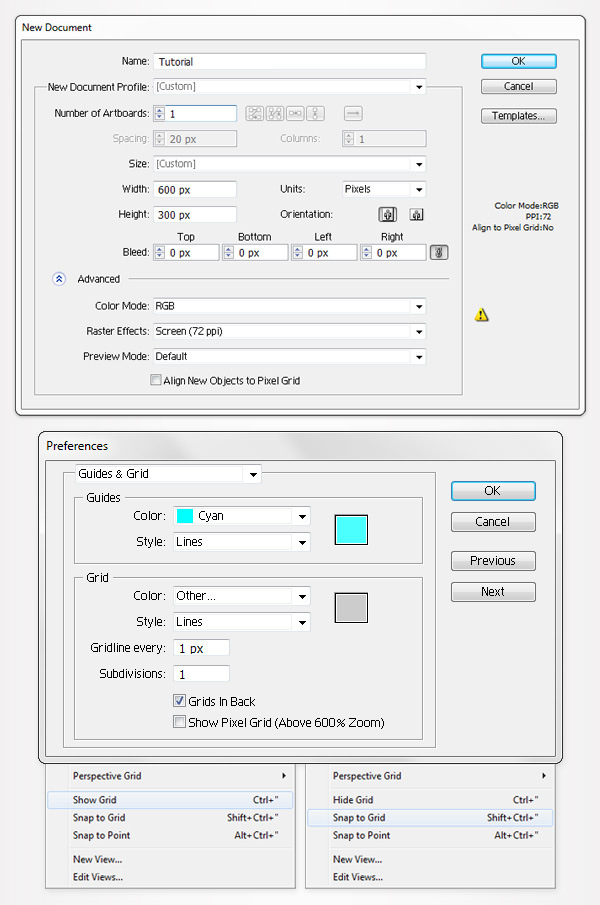
Hit Command + N to create a new document.
Enter 600 in the width box and 300 in the height box then click on the Advanced button. Select RGB, Screen (72ppi) and make sure that the “Align New Objects to Pixel Grid” box is unchecked before your click OK.
Enable the Grid (View > Show Grid) and the Snap to Grid (View > Snap to Grid). You’ll need a grid every 1px. Simply go to Edit > Preferences > Guides > Grid, enter 1 in the Gridline every box and 1 in the Subdivisions box.
You should also open the Info panel (Window > Info) for a live preview with the size and position of your shapes.
Do not forget to set the unit of measurement to pixels from Edit > Preferences > Unit > General. All these options will significantly increase your work speed.
Step 2
Pick the Type Tool(T), simply click inside your artboard and add the “1”. Set its color to black and use the Calibri font with the size set at 60pt.
Make sure that this little piece of text stays selected, open the Paragraph panel (Window > Type > Paragraph) and click on the “Align center” button.

Step 3
Disable the Grid (View > Hide Grid) and the Snap to Grid (View > Snap to Grid).
Make sure that the piece of text made in the previous step is still selected.
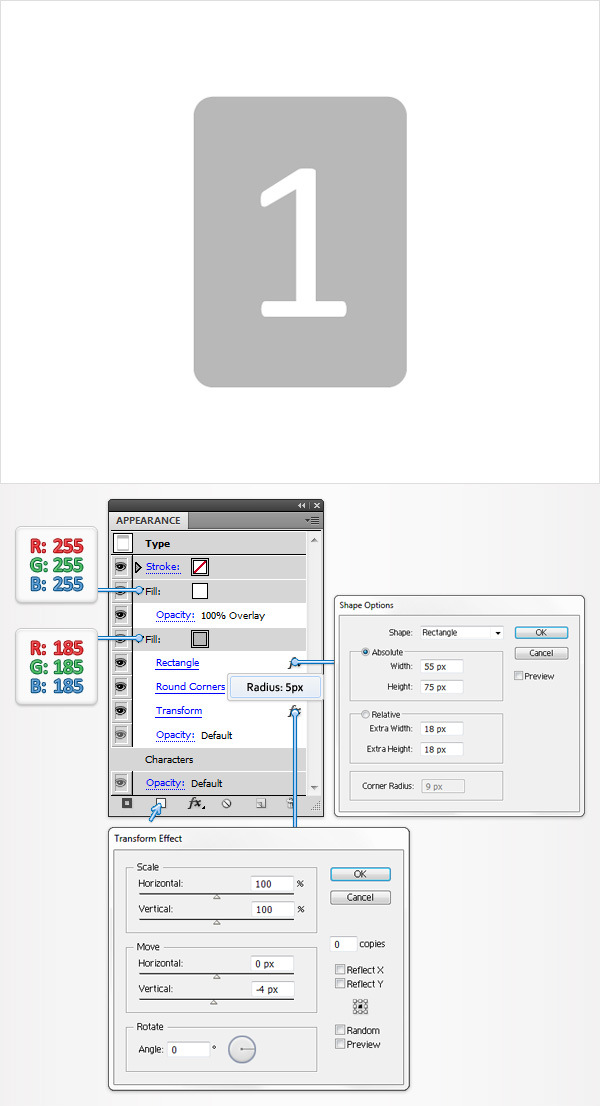
Open the Appearance panel and click on the Add New Fill button (pointed by the little, blue arrow). Obviously, this will add a new fill for your selected piece of text. Select it from the Appearance panel, set the color to R=185 G=185 B=185 and go to Effect > Convert to Shape > Rectangle.
Enter the properties shown in the following image, click OK and go to Effect > Stylize > Rounded Corners. Enter a 5px radius, click OK and go to Effect > Distort & Transform > Transform. Enter the data shown in the following image, click OK and return to the Appearance panel.
Add a second fill for your text using the same Add New Fill button. Select this new fill, make it white and change its blending mode to Overlay.
Step 4
Make sure that your piece of text is still selected and focus on the Appearance panel.
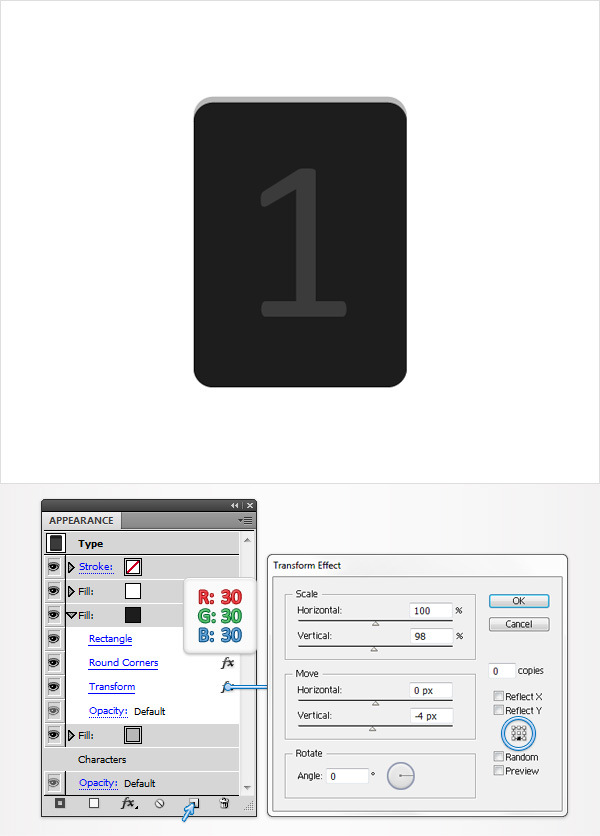
Select the bottom fill and click on the “Duplicate Selected Item” button (pointed by the little, blue arrow). Obviously, this will add a copy of the selected fill.
Select this new fill, set its color to R=30 G=30 B=30 then open the existing Transform effect. Enter the properties shown in the following image, make sure that you check the middle, bottom reference point and click OK.
Step 5
Make sure that your piece of text is still selected and keep focusing on the Appearance panel.
Select the fill added in the previous step and click again on the “Duplicate Selected Item” button.
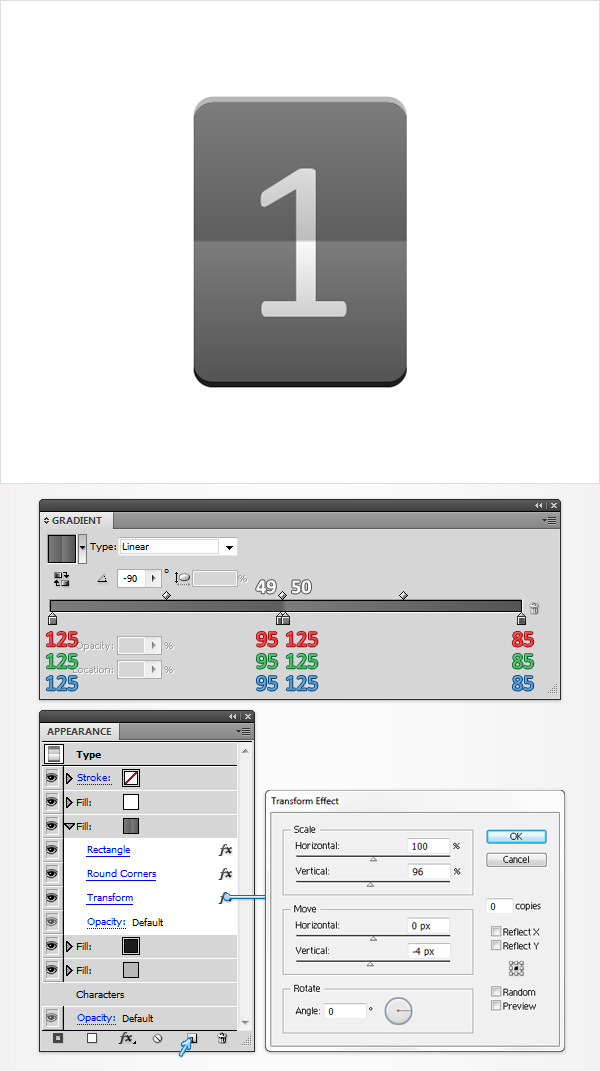
Select this new fill, replace the flat color with the linear gradient shown in the following image then open the existing Transform effect. Enter the properties shown in the following image, make sure that you check the middle reference point then click OK.
Step 6
Make sure that your piece of text is still selected and keep focusing on the Appearance panel.
Select the fill added in the previous step and simply click on the “Add New Fill” button. Select this new fill, replace the linear gradient with a simple, dark color (R=70 G=70 B=70) and go to Effect > Convert to Shape > Rectangle. Enter the properties shown below, click OK.
Go to Effect > Distort & Transform > Transform. Enter the data shown in the following image, click OK.
Go to Effect > Stylize > Drop Shadow. Enter the properties show below and click OK.

Step 7
Make sure that your piece of text is still selected and keep focusing on the Appearance panel.
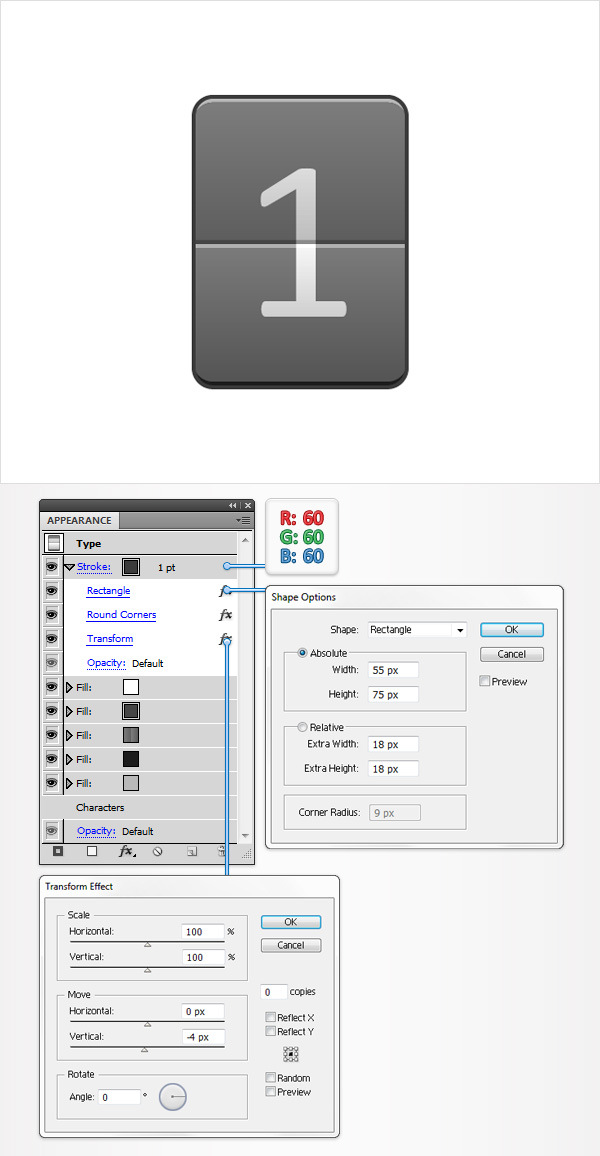
Add a 1pt stroke and set the color to R=60 G=60 B=60. Select it and go to Effect > Convert to Shape > Rectangle. Enter the data shown below, click OK.
Go to Effect > Distort & Transform > Transform. Enter the properties shown in the following image and click OK.
Step 8
Make sure that your piece of text is still selected and keep focusing on the Appearance panel.
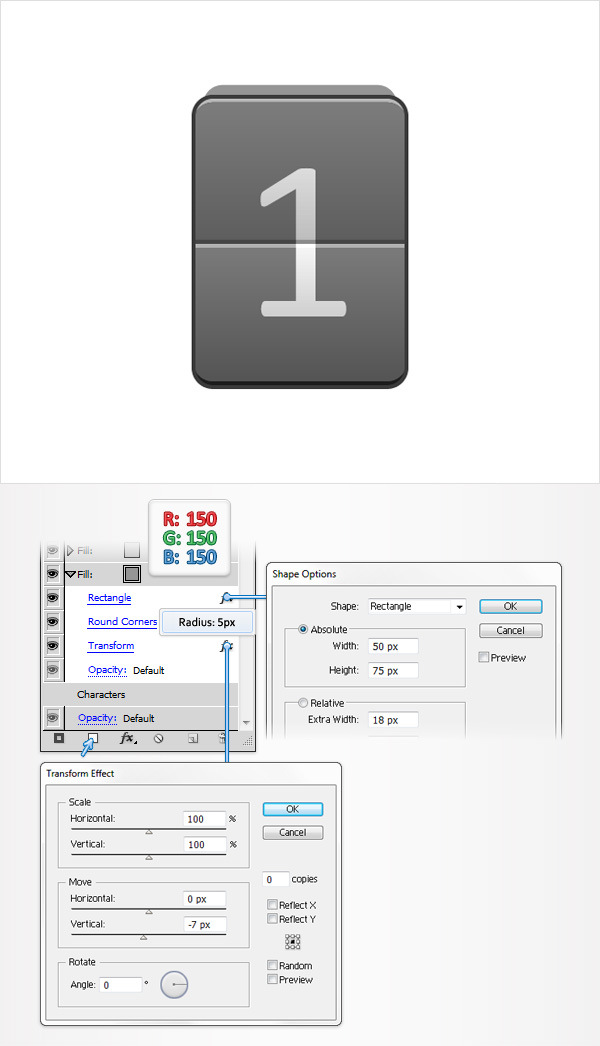
Add a new fill, drag it in the bottom of the Appearance panel and set the color at R=150 G=150 B=150. Select it and go to Effect > Convert to Shape > Rectangle. Enter the data shown below, click OK.
Go to Effect > Stylize > Rounded Corners. Enter a 5px radius, click OK.
Go to Effect > Distort & Transform > Transform. Enter the properties shown in the following image and click OK.
Step 9
Make sure that your piece of text is still selected and focus on the Appearance panel.
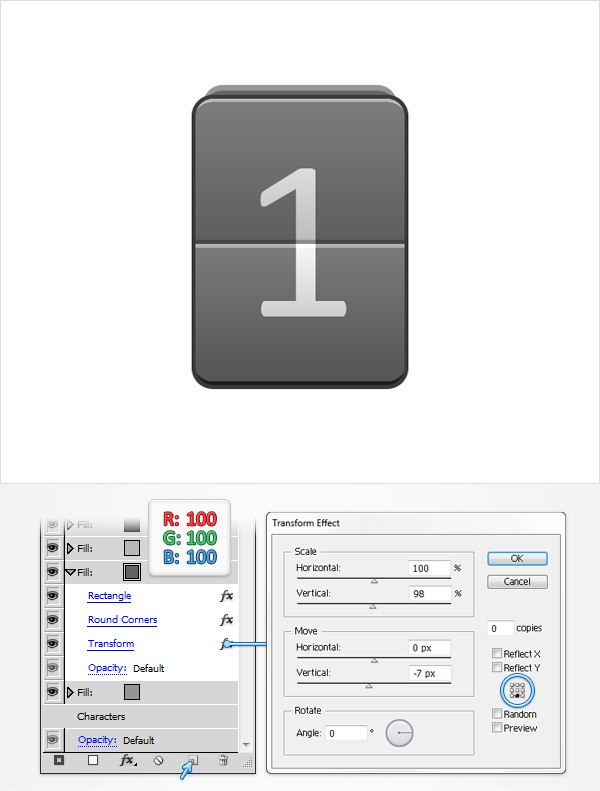
Select the fill added in the previous step and click on the “Duplicate Selected Item” button. Select this new fill, set the color to R=100 G=100 B=100 then open the existing Transform effect. Enter the properties shown in the following image, make sure that you check the middle, bottom reference point and click OK.
Step 10
Make sure that your piece of text is still selected and focus on the Appearance panel.
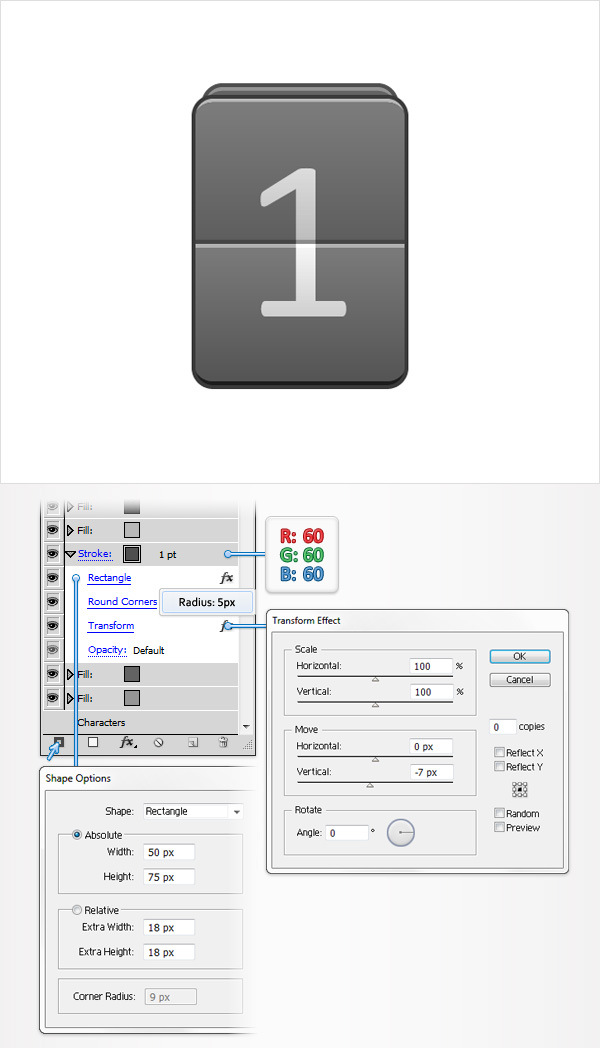
Select the fill added in the previous step and click on the “Add New Stroke” button. Select this new stroke, set the color to R=60 G=60 B=60 and go to Effect > Convert to Shape > Rectangle. Enter the data shown below, click OK.
Go to Effect > Stylize > Rounded Corners. Enter a 5px radius, click OK.
Go to Effect > Distort & Transform > Transform. Enter the properties shown in the following image and click OK.
Step 11
Make sure that your piece of text is still selected and keep focusing on the Appearance panel.
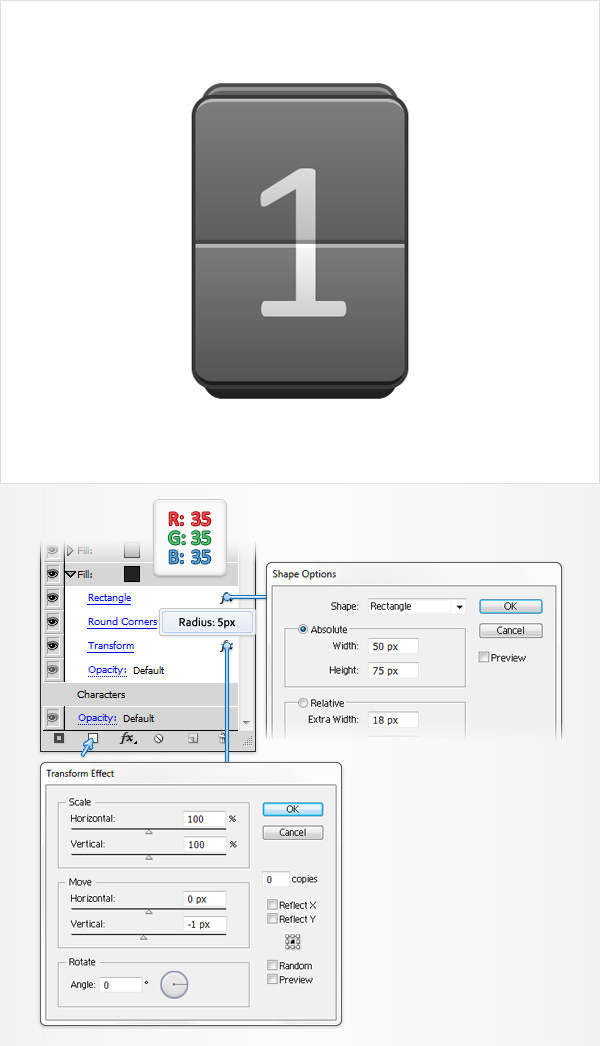
Add a new fill, drag it to the bottom of the Appearance panel and set the color to R=35 G=35 B=35. Select it and go to Effect > Convert to Shape > Rectangle. Enter the data shown below, click OK.
Go to Effect > Stylize > Rounded Corners. Enter a 5px radius, click OK.
Go to Effect > Distort & Transform > Transform. Enter the properties shown in the following image and click OK.
Step 12
Make sure that your piece of text is still selected and focus on the Appearance panel.
Select the fill added in the previous step and click on the “Duplicate Selected Item” button. Select this new fill, set the color to R=50 G=50 B=50 then open the existing Transform effect. Enter the properties shown in the following image, make sure that you check the middle, top reference point and click OK.

Step 13
Make sure that your piece of text is still selected and focus on the Appearance panel.
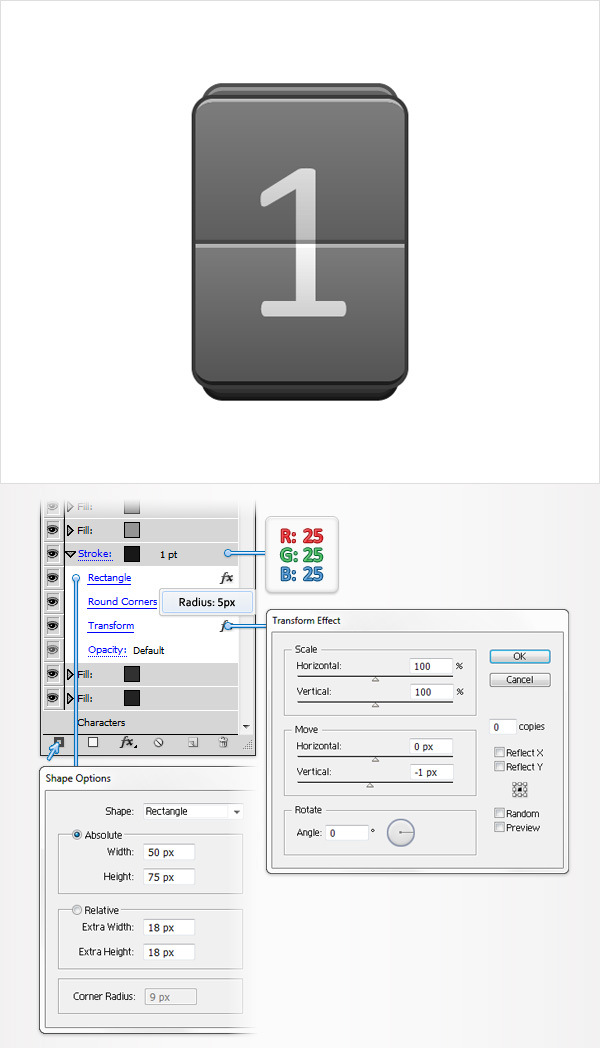
Select the fill added in the previous step and click on the “Add New Stroke” button. Select this new stroke, set the color to R=25 G=25 B=25.
Go to Effect > Convert to Shape > Rectangle. Enter the data shown below, click OK.
Go to Effect > Stylize > Rounded Corners. Enter a 5px radius, click OK.
Go to Effect > Distort & Transform > Transform. Enter the properties shown in the following image and click OK.
Step 14
Make sure that your piece of text is still selected and keep focusing on the Appearance panel.
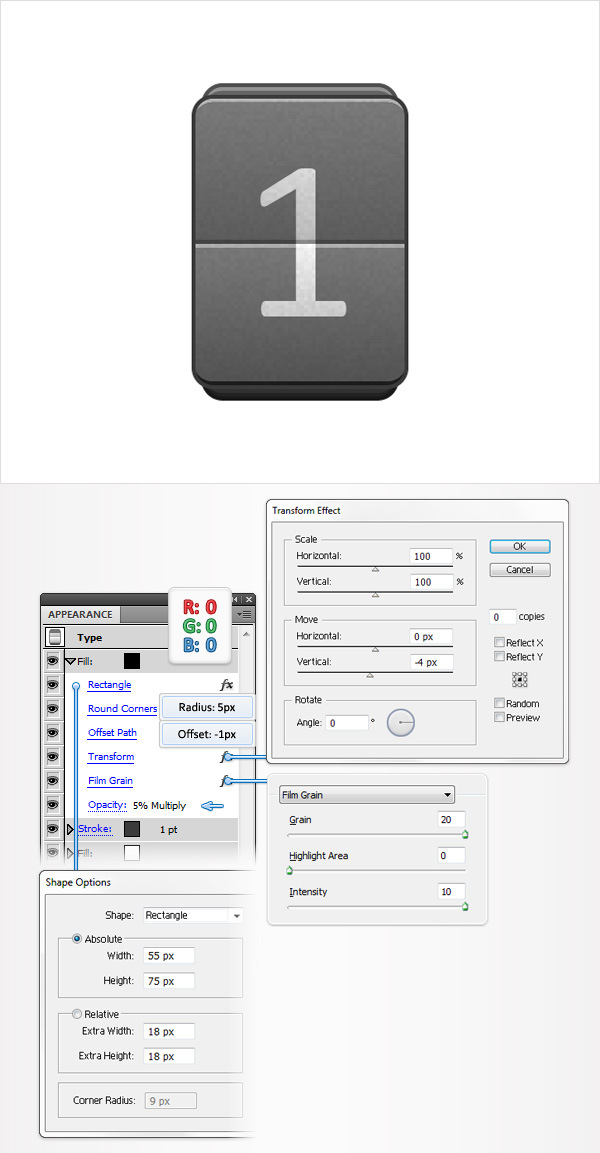
Add a new fill, drag it to the top of the Appearance panel and set the color to black. Select it, lower the opacity to 5%, change the blending mode to Multiply.
Go to Effect > Convert to Shape > Rectangle. Enter the data shown below, click OK.
Go to Effect > Stylize > Rounded Corners. Enter a 5px radius, click OK.
Go to Effect > Path > Offset Path. Enter a -1px Offset, click OK.
Go to Effect > Distort & Transform > Transform. Enter the properties shown in the following image, click OK.
Go to Effect > Artistic > Film Grain. Enter the data shown below and click OK.
Step 15
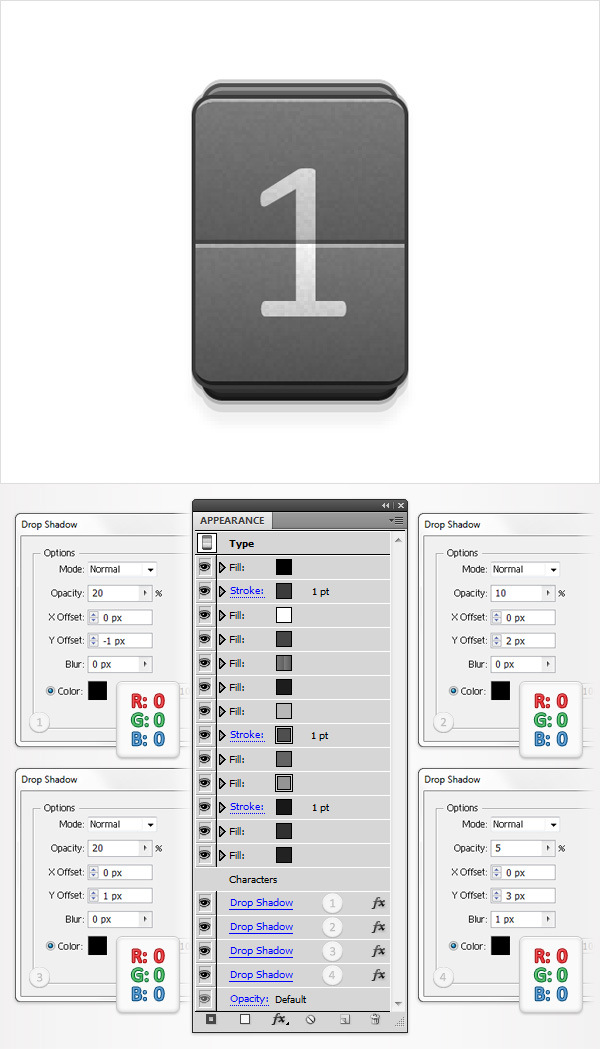
Reselect your piece of text and focus on the Appearance panel.
Make sure that no fill or stroke is selected and add the four Drop Shadow effects shown in the following image.
Step 16
Enable the Snap to Grid (View > Snap to Grid) and duplicate your little pice of text (Control + C > Control + F).
Select this copy, move it a few pixels to the right then simply replace the existing number.
Conclusion
Here is how your final result should look.
