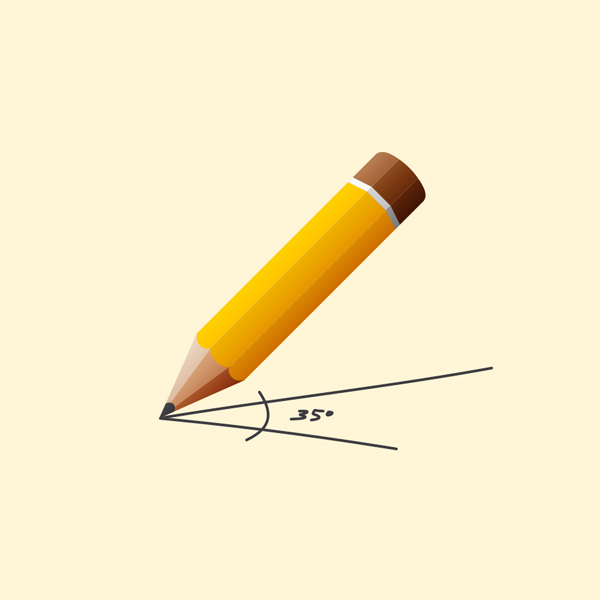
In the following Graphic tutorial you will learn how to create a simple pencil illustration in Graphic for iPad.
For starters you will learn how to setup a simple grid and how to create the main shapes using basic tools and vector shape building techniques. Next, you will learn how to add color and subtle shading using a simple linear gradient and basic blending techniques. Finally, you will learn how to use a simple brush.
Final Image
As always, this is the final image that we’ll be creating:

Tutorial Details
- Program: Graphic for iPad
- Estimated Completion Time: 45 minutes
- Difficulty: Beginner-Intermediate
Step 1
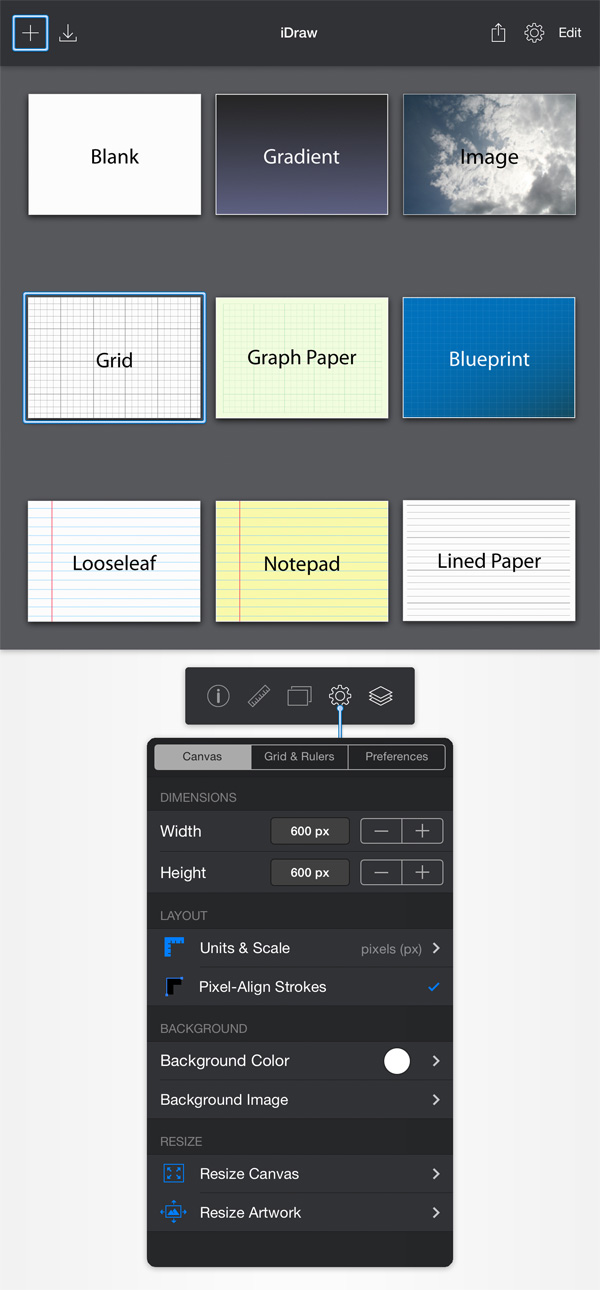
For this tutorial we’ll create a new 600 x 600 pixel document. From the Documents Browser, tap the plus button at the top-right corner of the Titlebar and choose the Grid document style.
Focus on the right side of the Titlebar and tap the Settings icon. In the Canvas pane set the Width and Height to 600px, select Pixels for the base units, and verify that the Pixel-Align Strokes feature is enabled. The Pixel-Align Strokes feature ensures that all shapes which are aligned to the pixel grid will have solid, crisp strokes.
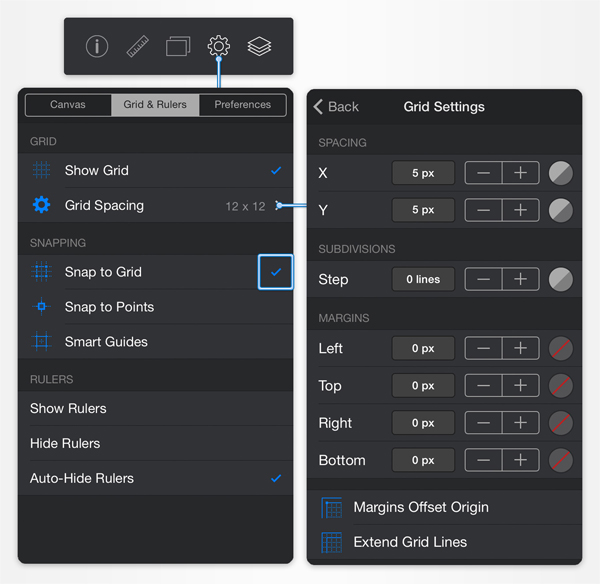
Next, we’ll set up the document grid. Switch to the Grid & Rulers section in the Settings popover. Ensure that the Snap to Grid feature is enabled and keep in mind that this is where you should come whenever you wish to enable or disable the grid or Snap to Grid. Finally, simply tap the Grid Spacing section, enter 5px in both Spacing boxes and 0px in the Subdivisions box.
Step 2
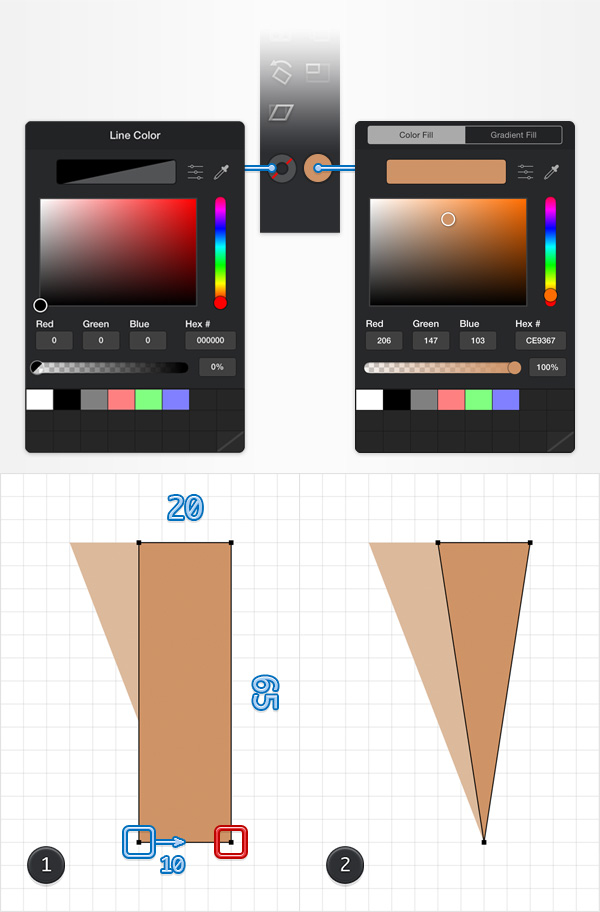
Focus on the Toolbar and you will notice that by default the Fill color is set to white while the Line color is set to black. Tap the Fill color box and set its color to R=220 G=185 B=155 then tap the Line color box and drag the Alpha slider to 0%, which will make your line invisible.
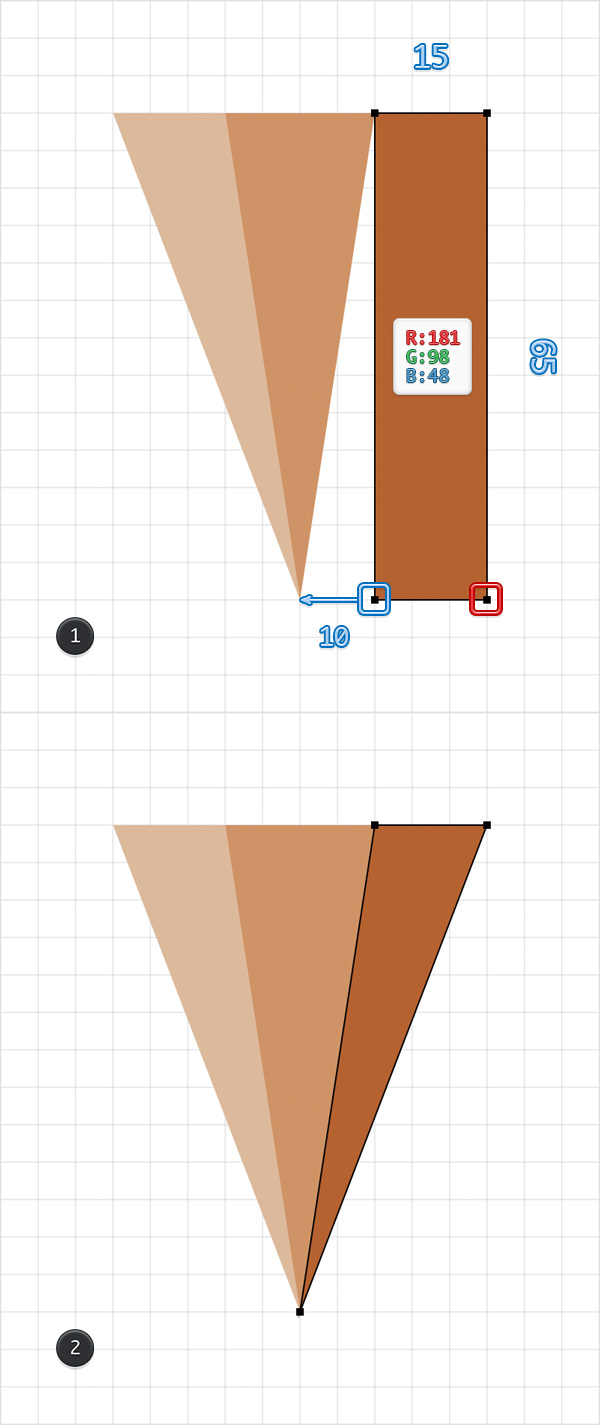
Grab the Rectangle Tool and create a 15 x 65px shape. The grid and the Snap to Grid feature will ease your work.
Focus on the bottom side of this rectangle and switch to the Pen Tool. Move to the newly opened tool pane and activate the third tool mode. Return to the bottom side of your rectangle and tap on the left anchor point to remove it.
Focus on the remaining, bottom anchor point and grab the Path Selection Tool. Select that anchor point and drag it 10px to the right. Once again, the grid and the Snap to Grid feature will come in handy.

Step 3
Return to your Toolbar, replace the existing Fill color with R=206 G=147 B=103 and make sure that the stroke remains invisible.
Using the Rectangle Tool, create a 20 x 65px shape and place it exactly as shown in the first image.
Focus on the bottom side of this new rectangle, remove the right anchor point and then select the remaining anchor point and move it 10px to the right. In the end your new shape should look like in the second image.
Step 4
Return to your Toolbar, replace the existing Fill color with R=181 G=98 B=48 and make sure that the stroke remains invisible.
Using the Rectangle Tool, create a 14 x 65px shape and place it exactly as shown in the first image.
Focus on the bottom side of this new rectangle, remove the right anchor point and then select the remaining anchor point and move it 10px to the left. In the end your new shape should look like in the second image.
Step 5
Reselect the three shapes made so far, focus on the left side of your Titlebar, tap that paperclip icon and then tap the Copy and Paste in Place commands to duplicate your selected shapes.
Pick the Path Selection Tool, focus on the newly opened tool pane and activate the second tool mode. Using this tool, select only the three copies made a few moments ago, focus the right side of your Titlebar and tap that rectangular icon.
Move to the Combine section and then simply tap the Union button. Make sure that the resulting shape is selected and replace the existing Fill color with a simple white (R=255 G=255 B=255).

Step 6
Make sure that your white triangle stays selected, focus on the right side of your Titlebar and tap the leftmost icon. Move to the Effects section and tap the color box that stands for the existing Fill.
Select Gradient Fill and Linear, set the angle to 0 degrees then move to the gradient sliders.
Select the left one and set its color to white then select the right one and set its color to black. Return to the Effects pane and tap the cogwheel icon that stands for the existing Fill. Tap the Blend Mode option, select the Soft Light blend mode from that list and then tap the Done button. In the end things should look like in the following image.
Make sure that the triangle edited in this step stays selected, return to that paperclip pop-over menu and this time tap the Copy Style command.

Step 7
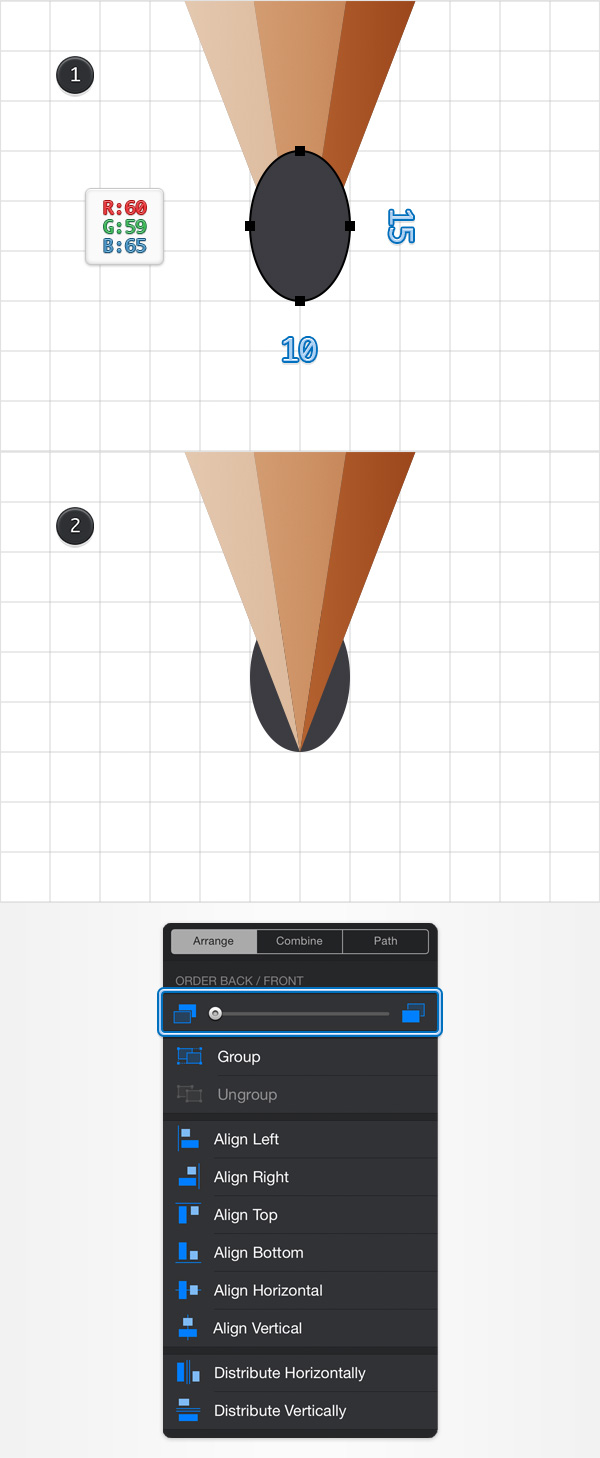
Using the Ellipse Tool, create a 10 x 15px shape, set the Fill color to R=60 G=59 B=65 and place it as shown in the first image.
Make sure that this new shape stays selected, move to the Arrange pane and drag that Order slider to the left to send your shape to back.
Step 8
Reselect that triangle filled with the linear gradient, re-open that paperclip pop-over menu and then tap the Copy and Paste in Place commands.
Pick the Path Selection Tool and activate the second tool mode. Now, select the copy made a few moments ago along with the squeezed circle made in the previous step, focus on the Combine pane and tap the Intersect button.

Step 9
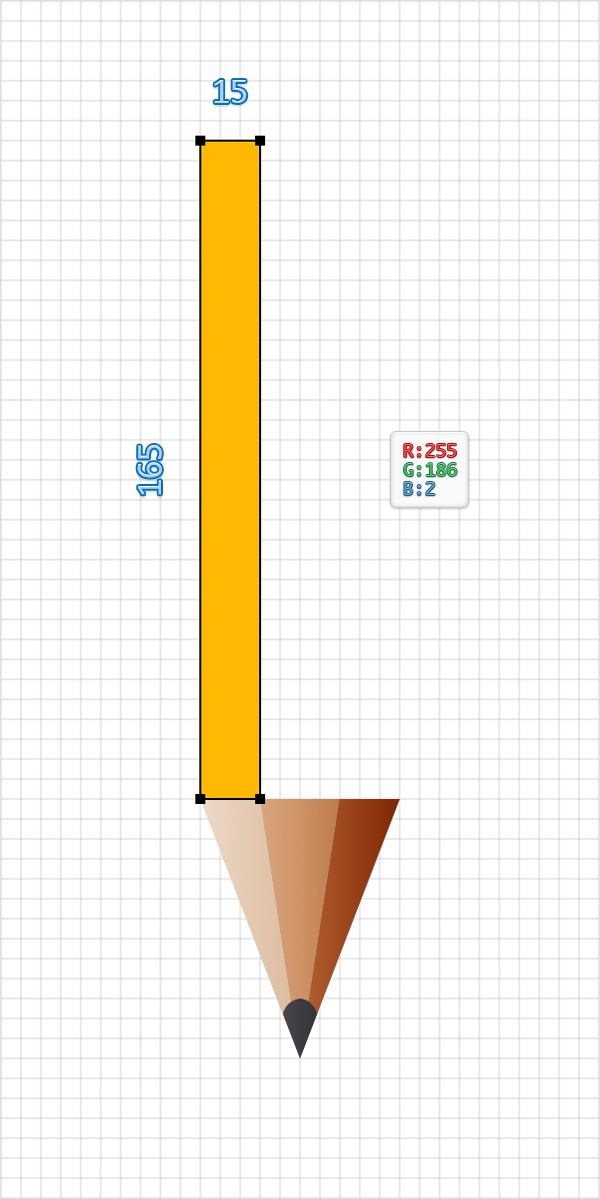
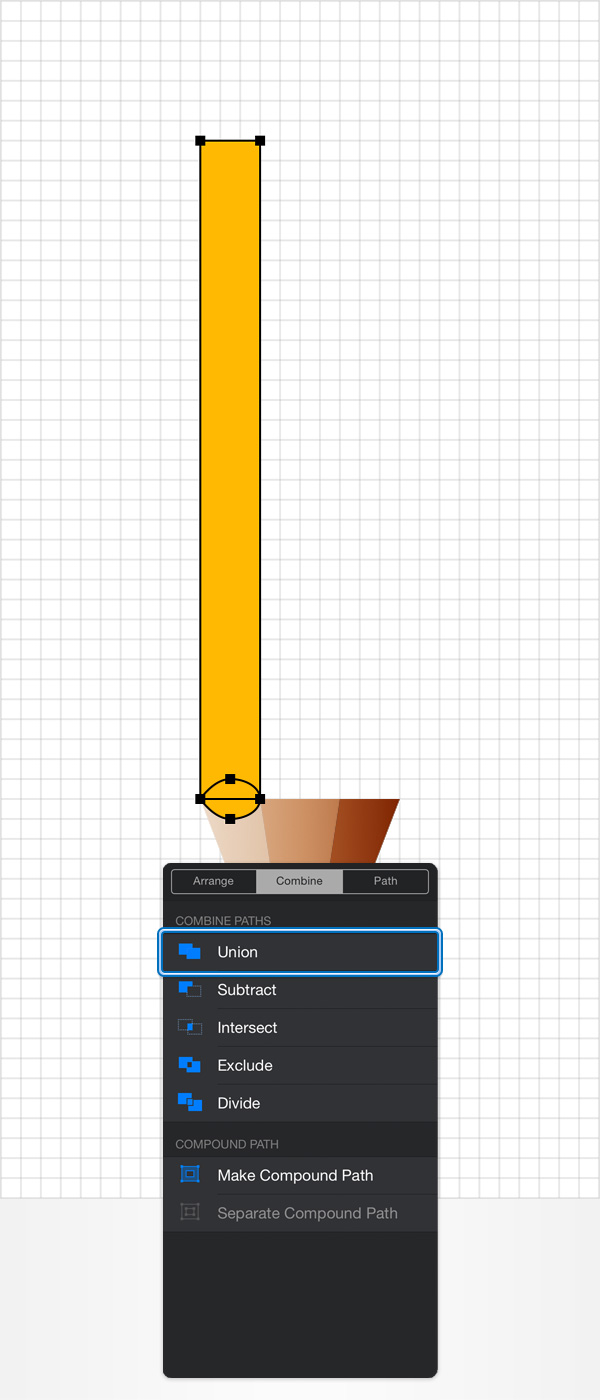
Using the Rectangle Tool, create a 15 x 165px shape, place it as shown in the following image and set the Fill color to R=255 G=186 B=2 .
Step 10
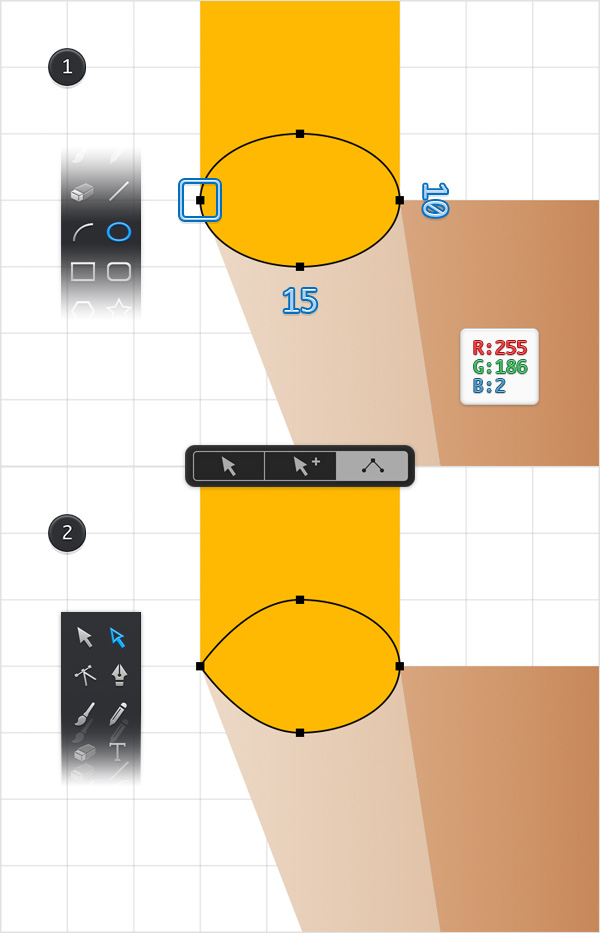
Using the Ellipse Tool, create a 15 x 10px shape, place it as shown in the following image and set the Fill color to R=255 G=186 B=2.
Focus on the left side of this new shape, pick the Path Selection Tool , activate the third tool mode from that tool pane and then tap on that anchor point. In the end things should look like in the second image.
Step 11
Reselect the both yellow shapes, focus on the Combine pane and tap the Union button.
Step 12
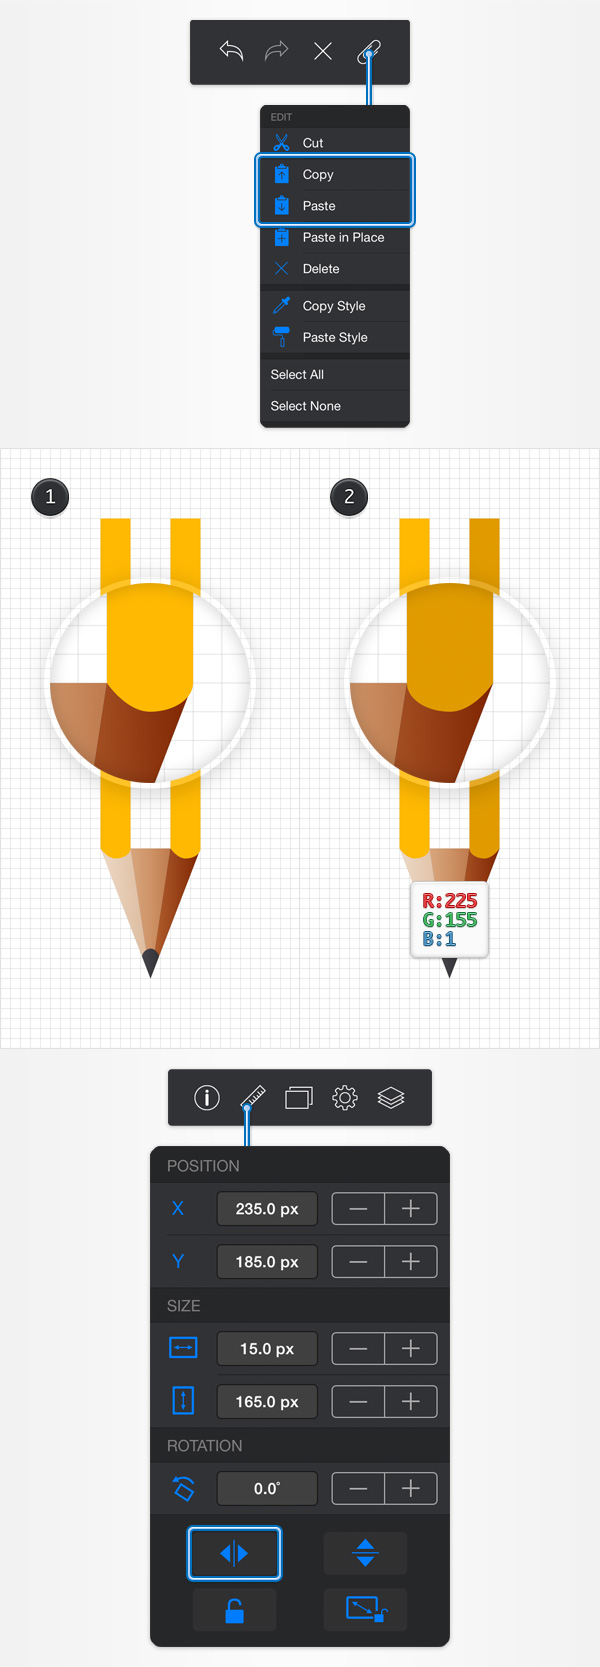
Make sure that your yellow shape is selected and duplicate it using the Copy and Paste commands from that paperclip pop-over menu.
Select this copy and place it as shown in the second image. Make sure that your copy stays selected, replace the existing Fill color with R=225 G=155 B=1 and then focus on the right side of your Titlebar. Tap that ruler icon and then tap the Flip Horizontal button.
Step 13
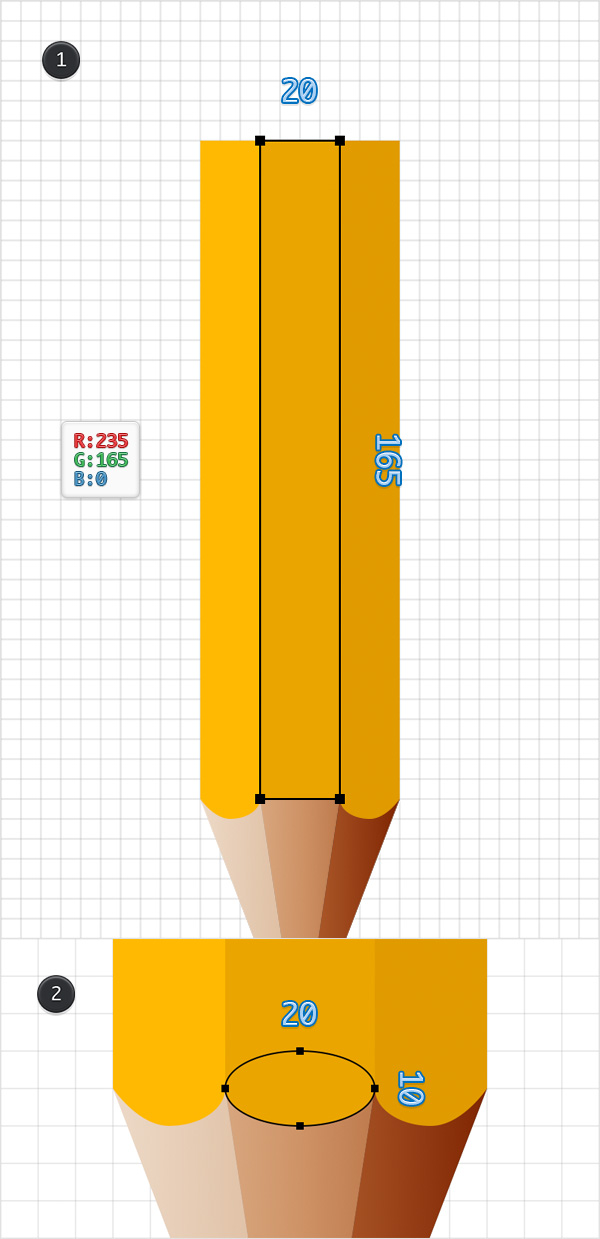
Using the Rectangle Tool, create a 20 x 165px shape, place it as shown in the first image and set the Fill color to R=235 G=165 B=0.
Switch to the Ellipse Tool, create a 20 x 10px shape, place it as shown in the second image and use the same Fill color.
Step 14
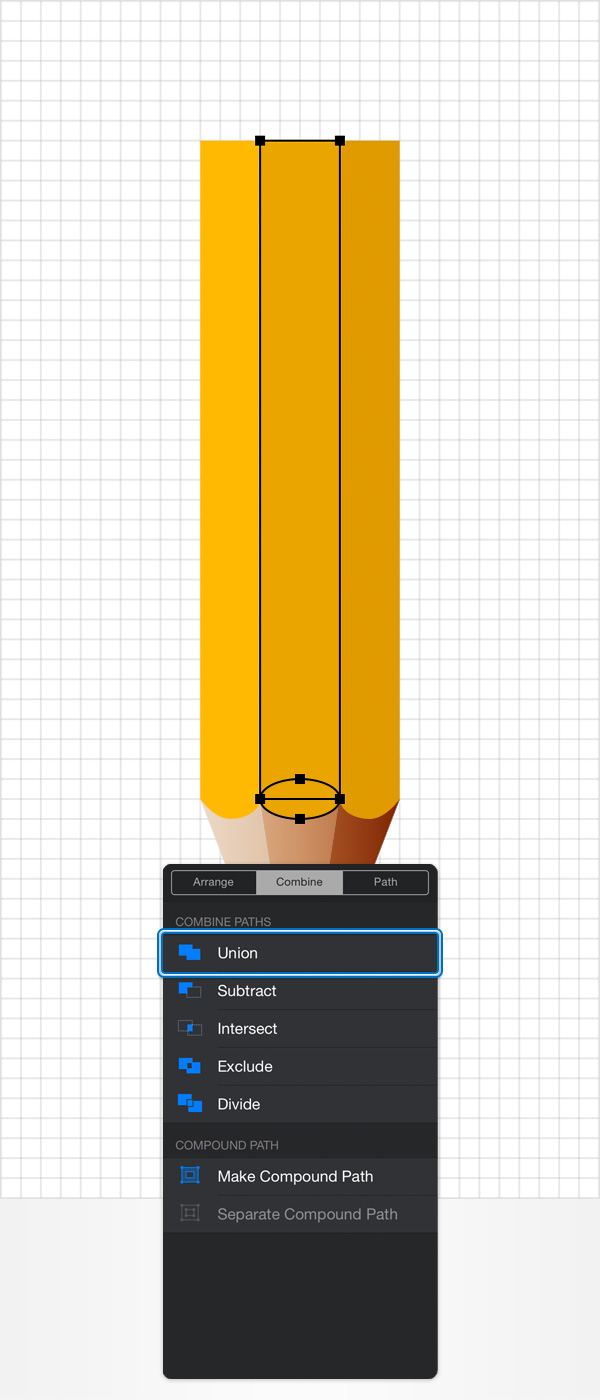
Reselect both shapes made in the previous step, focus on the Combine pane and tap the Union button.
Step 15
Reselect the three yellow shapes made so far and duplicate them using the same Copy and Paste in Place commands from that paperclip pop-over menu.
Pick the Path Selection Tool, focus on the newly opened tool pane and activate the second tool mode. Now, select the three copies made a few moments ago, focus on the Combine pane and tap the Union button.
Make sure that the resulting shape stays selected, re-open that paperclip pop-over menu and go to Paste Style
Move to the Appearance pane, drag the Opacity slider to 75% and then get back to your paperclip pop-over menu and tap the Copy Style command.

Step 16
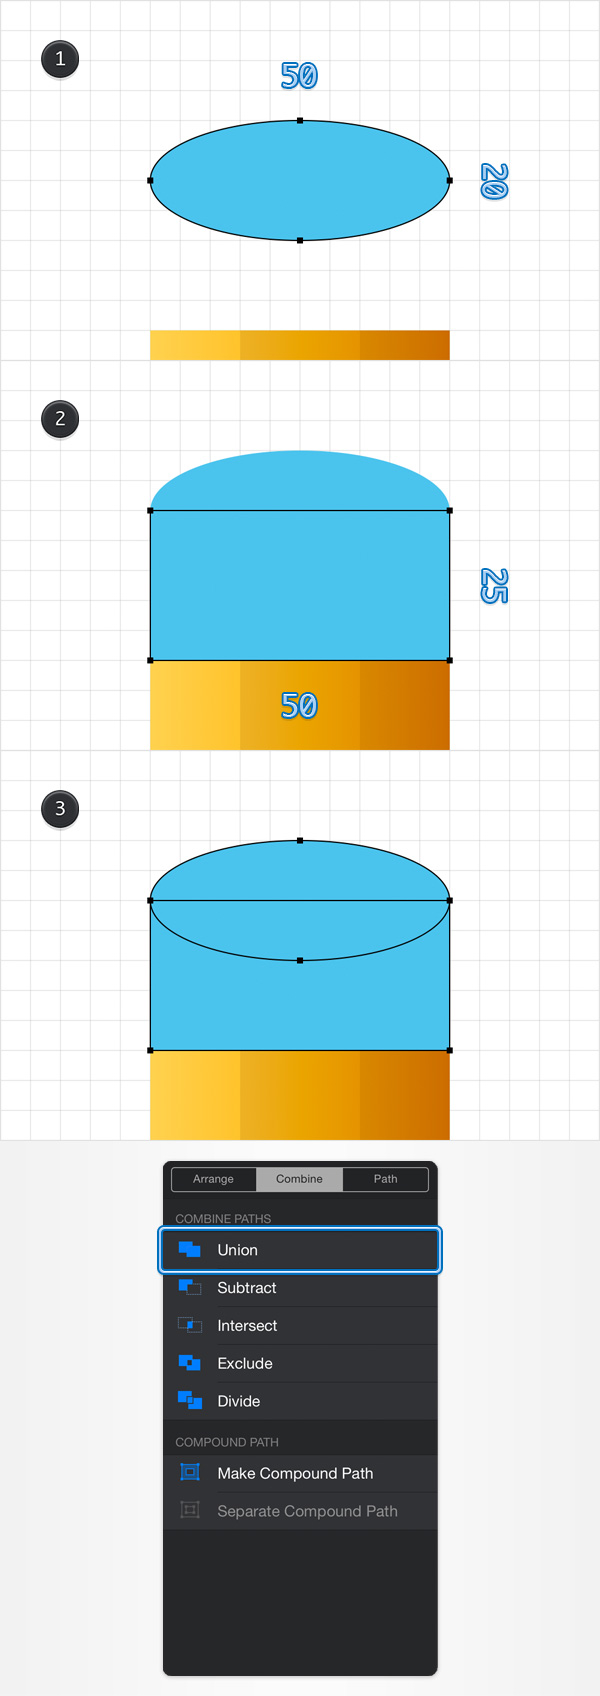
Using the Ellipse Tool, create a 50 x 20px shape, place it as shown in the first image and use a random blue for the Fill color.
Switch to the Rectangle Tool, create a 50 x 25px shape, place it as shown in the second image and use that same Fill color.
Reselect both shapes made in this step, focus on the Combine pane and tap the Union button.
Step 17
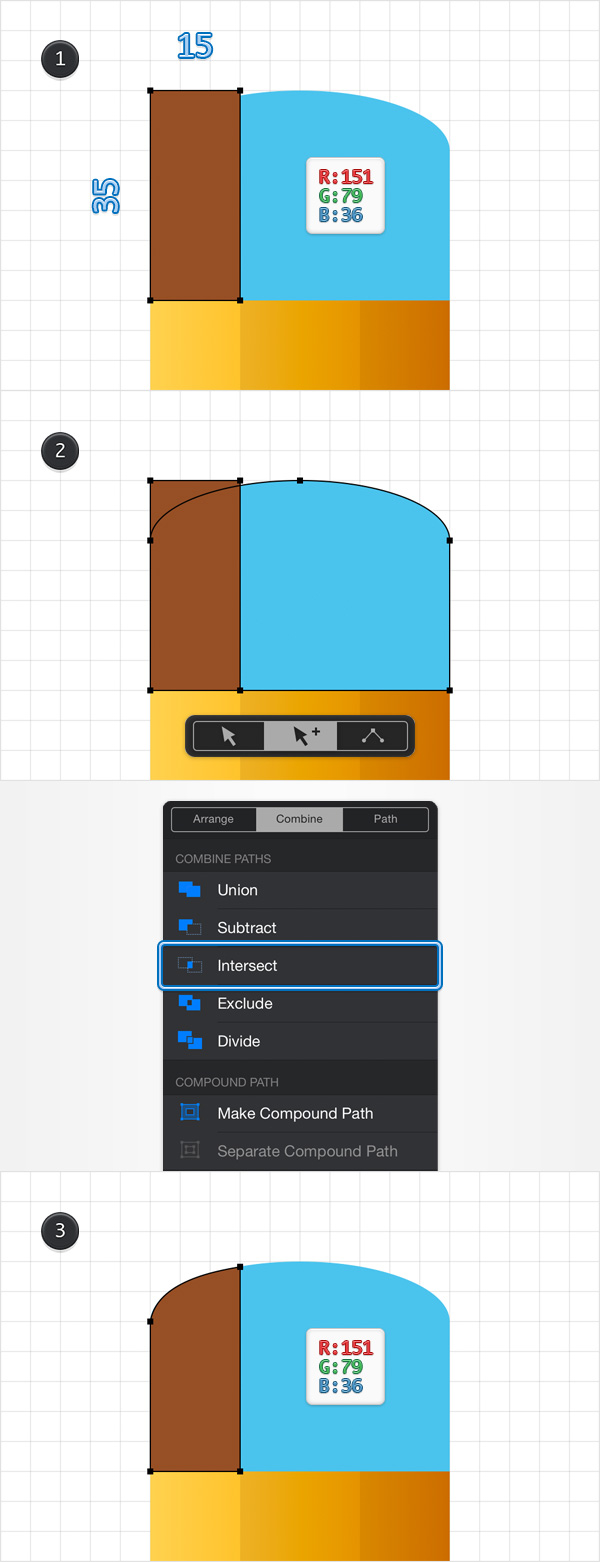
Using the Rectangle Tool, create a 15 x 35px shape, place it as shown in the first image and set the Fill color to R=151 G=79 B=36.
Reselect that blue shape and make a copy in front using the same Copy and Paste in Place commands from that paperclip pop-over menu.
Pick the Path Selection Tool, focus on the newly opened tool pane and activate the second tool mode. Now, select the fresh copy along with the rectangle made in the beginning of this step, focus on the Combine pane and tap the Intersect button. In the end things should look like in the third image.
Step 18
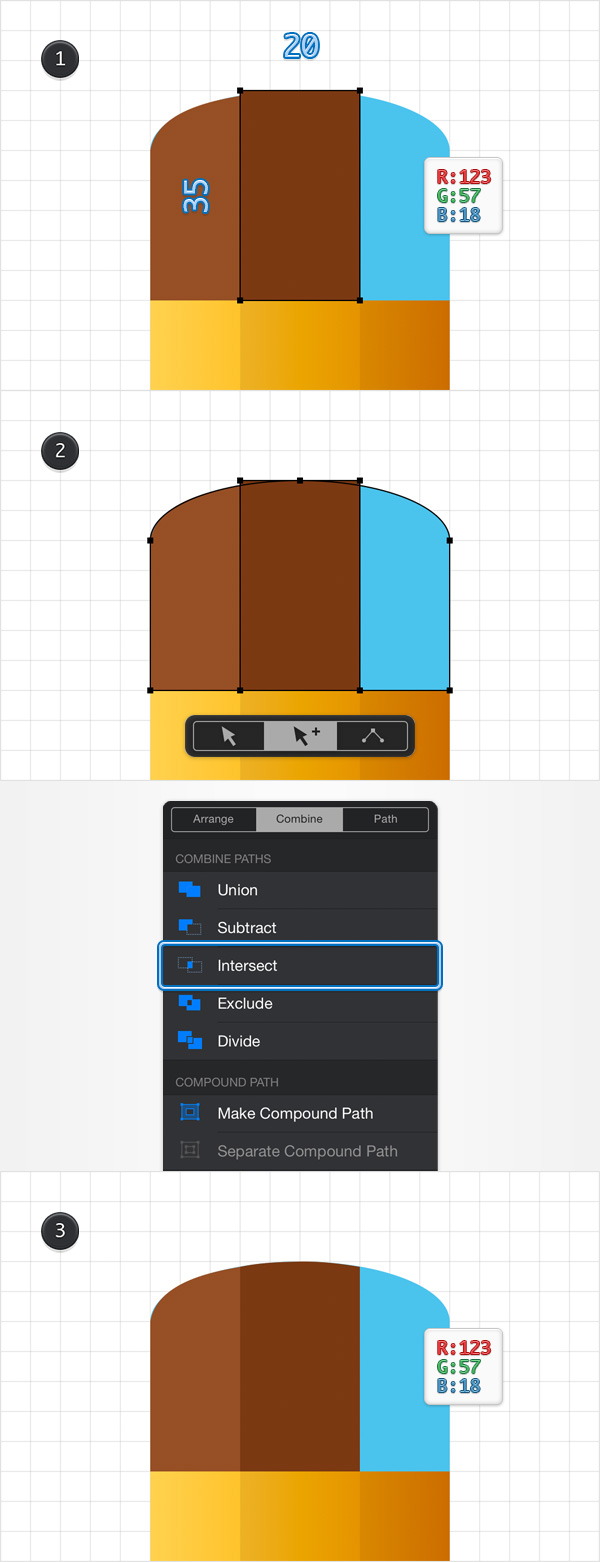
Using the Rectangle Tool, create a 20 x 35px shape, place it as shown in the first image and set the Fill color to R=123 G=57 B=18.
Reselect that blue shape and make a copy in front. Pick the Path Selection Tool and activate the second tool mode.
Reselect both shapes made in this step, focus on the Combine pane and tap the Intersect button. In the end things should look like in the third image.
Step 19
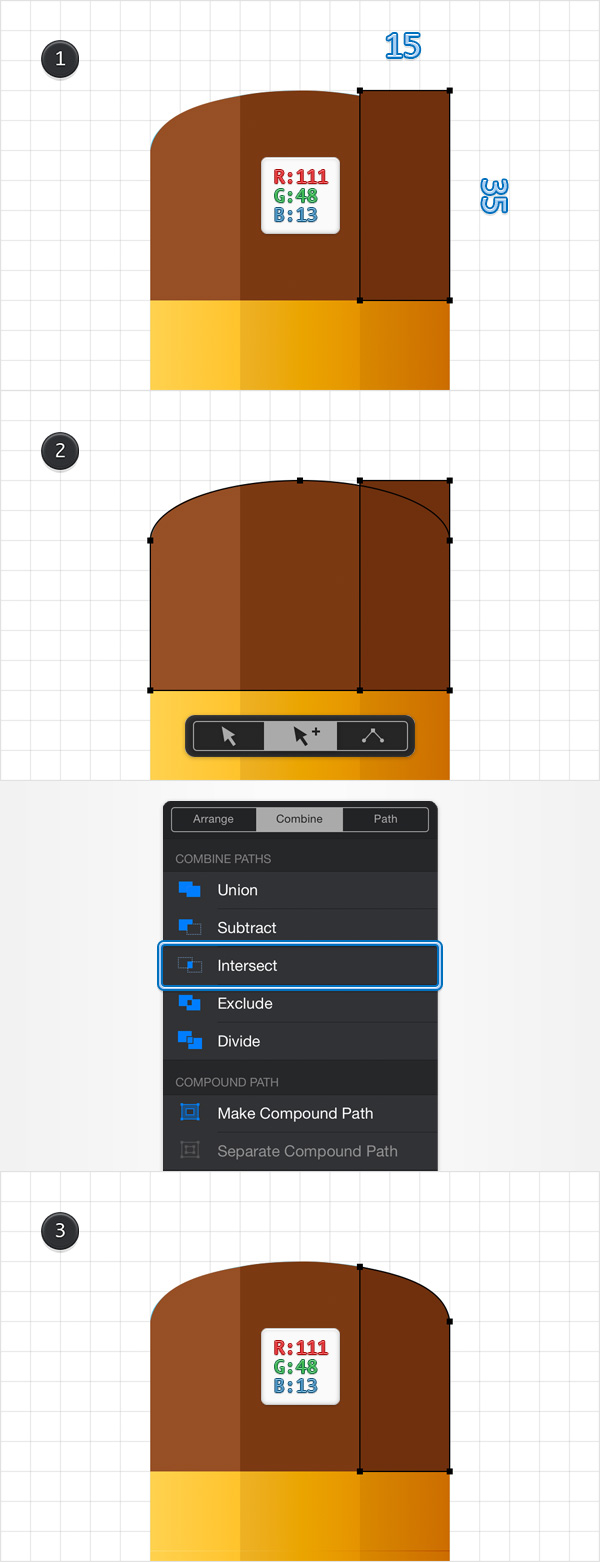
Using the Rectangle Tool, create a 15 x 35px shape, place it as shown in the first image and set the Fill color to R=111 G=48 B=13.
Pick the Path Selection Tool and activate the second tool mode. Select this new rectangle along with the remaining blue shape, focus on the Combine pane and tap the Intersect button.
Select the resulting shape and make sure that the Fill color is set to R=111 G=48 B=13.
Step 20
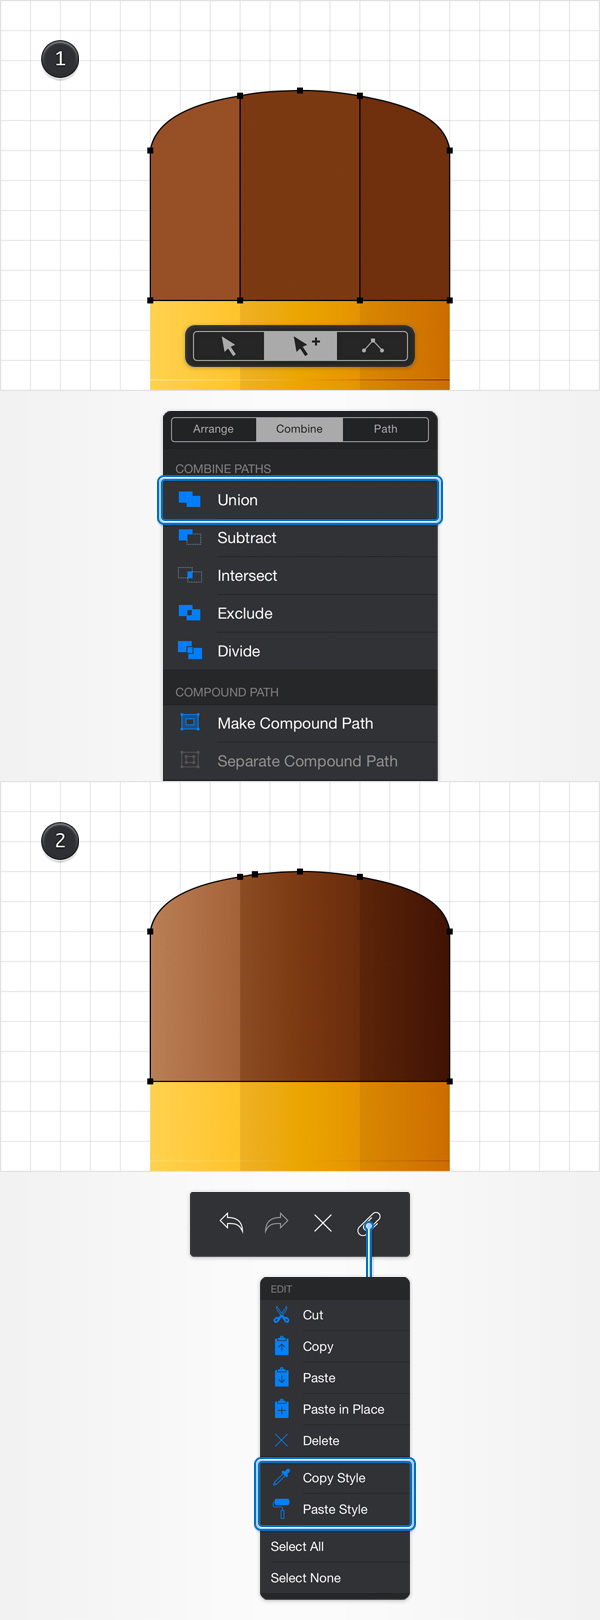
Reselect the three, brown shapes and duplicate them using the same Copy and Paste in Place commands from that paperclip pop-over menu.
Pick the Path Selection Tool, focus on the tool pane and activate the second tool mode. Now, select only the three copies made in the beginning of this step, focus on the Combine pane and tap the Union button.
Make sure that the resulting shape is selected, return to that paperclip pop-over menu and tap the Paste Style command.
Step 21
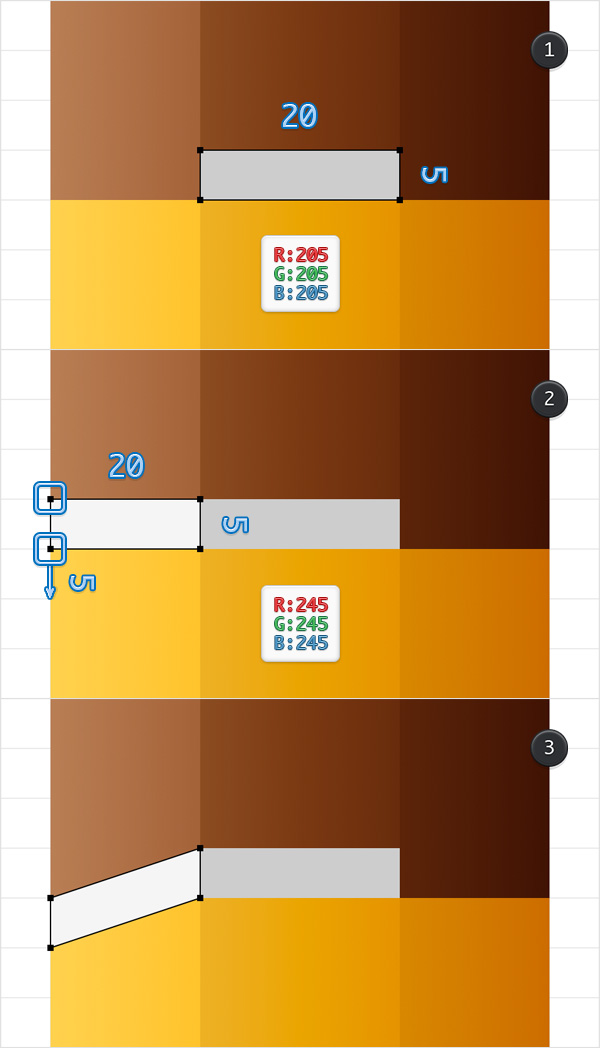
Using the Rectangle Tool, create a 20 x 5px shape, place it as shown in the first image and set the Fill color to R=205 G=205 B=205.
Using the same tool, create a second, 20 x 5px shape, place it as shown in the second image and set the Fill color to R=245 G=245 B=245.
Focus on the left side of this new rectangle and switch to the Path Selection Tool. Select both anchor points and drag them 5 px down as shown in the third image.
Step 22
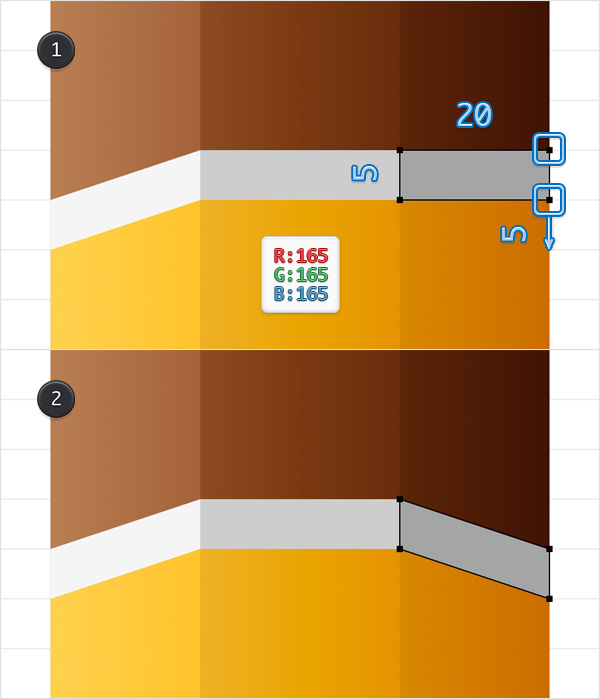
Using the Rectangle Tool, create a 20 x 5px shape, place it as shown in the first image and set the Fill color to R=165 G=165 B=165.
Focus on the right side of this new rectangle and switch to the Path Selection Tool. Select both anchor points and drag them 5px down as shown in the second image.
Step 23
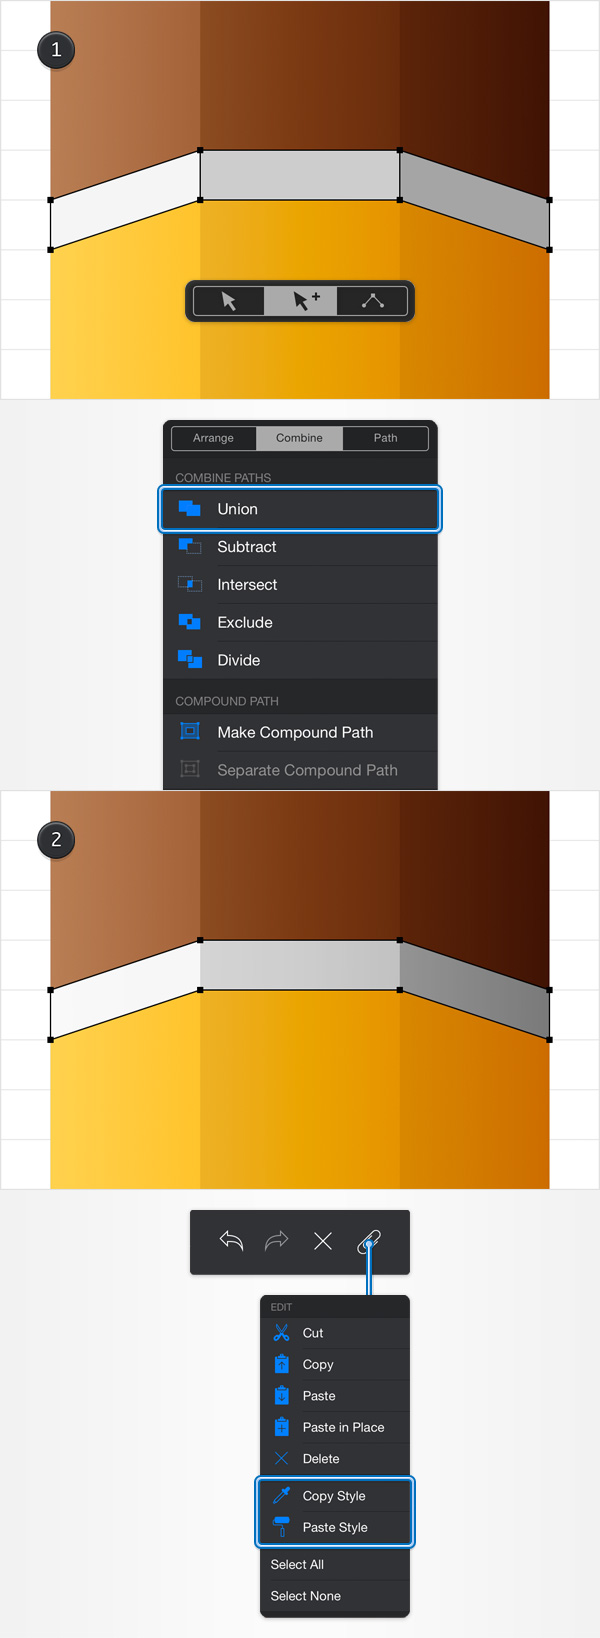
Reselect the three, grey shapes and duplicate them using the same Copy and Paste in Place commands from that paperclip pop-over menu.
Pick the Path Selection Tool and activate the second tool mode. Now, select only the three copies made in the beginning of this step, focus on the Combine pane and tap the Union button.
Make sure that the resulting shape is selected, return to the paperclip pop-over menu and tap the Paste Style command.
Step 24
Reselect all the shapes that make up your pencil, focus on the Arrange pane and tap the Group button. This should make it easier for you to select and move the entire pencil.
Make sure that it is selected and rotate it 45 degrees as shown in the second image.

Step 25
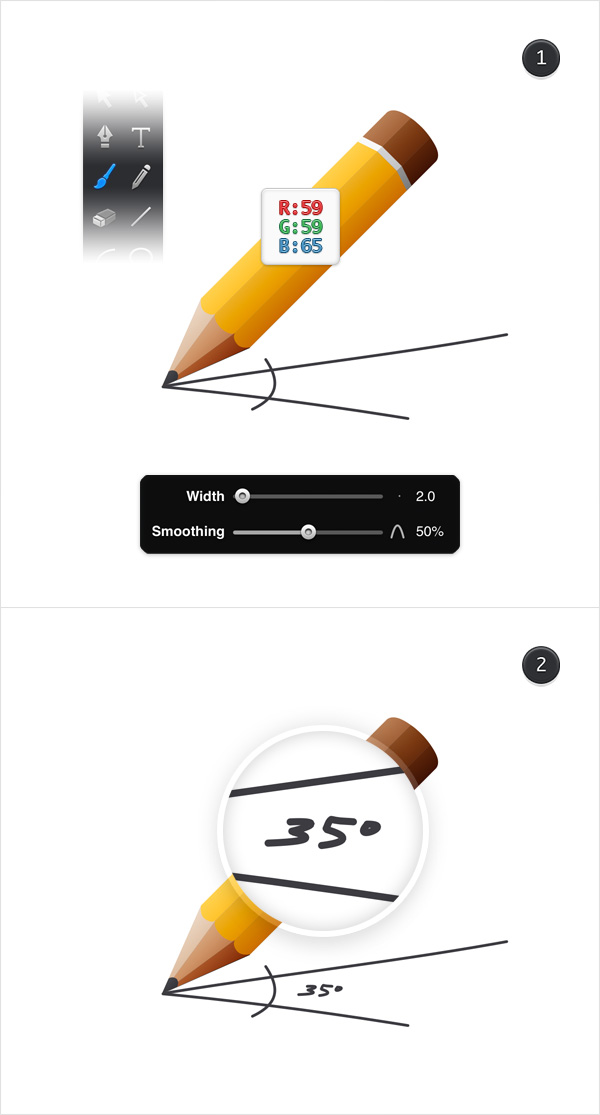
Pick the Brush Tool (B) and focus on the newly opened tool pane. Drag the Width slider to 2 pt and the Smoothing slider to 50% and then move to your canvas.
Add the simple paths shown in the following image and use R=59 G=59 B=65 for the brush color.
Finally, use the same brush and attributes to add that simple piece of text shown in the second image.
And We’re Done!
Here is how it should look. I hope you’ve enjoyed this tutorial and can apply these techniques in your future projects.
