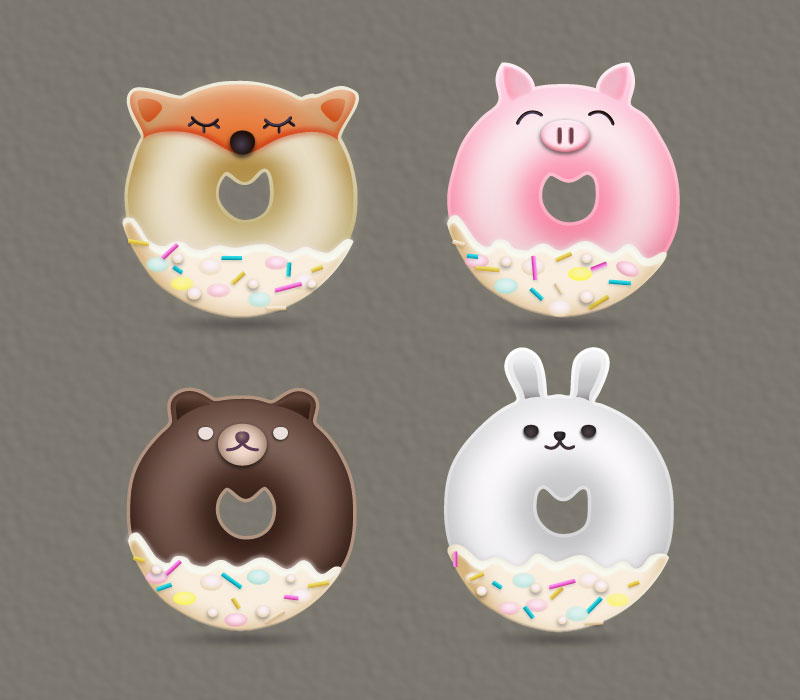
In this tutorial, you will learn how to create four animal donuts in Adobe Illustrator.
We’ll use some simple shapes and tools that you would normally use on a daily basis to achieve the final result. By the end of the tutorial, you will have the skills to draw other animal donuts in future projects.
Final Image
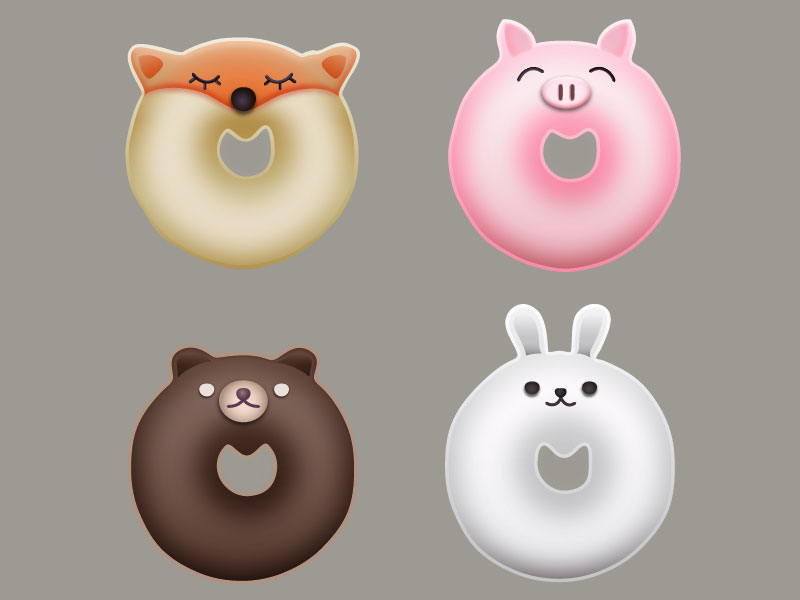
As always, this is the final image that we’ll be creating:

Tutorial Details
- Program: Adobe Illustrator CS6
- Estimated Completion Time: 120 minutes
- Difficulty: Beginner-Intermediate
Step 1
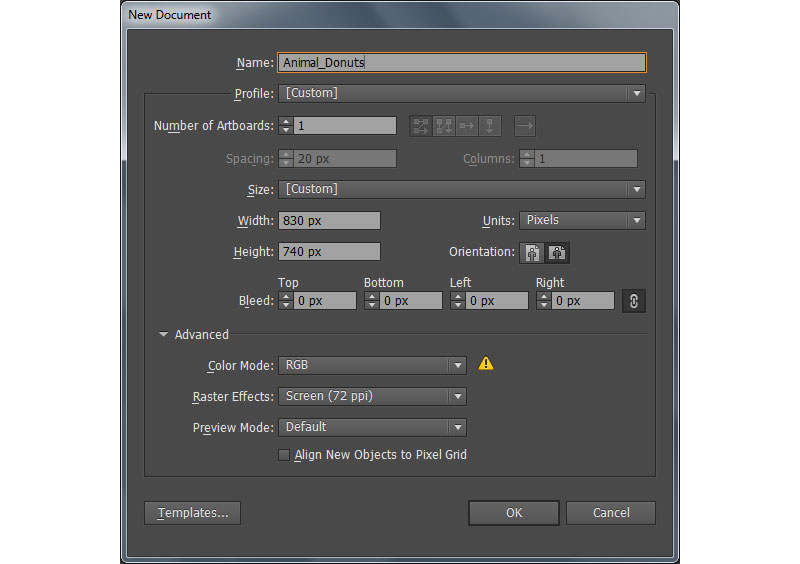
Launch Illustrator and then press (Ctrl + N) to create a New document. Select Pixels from the Units drop-down menu, enter 830 in the width box and 740 in the height box then click on the Advanced button. Select RGB, Screen (72ppi) and make sure that the Align New Objects to Pixel Grid box is unchecked before you click OK
Step 2
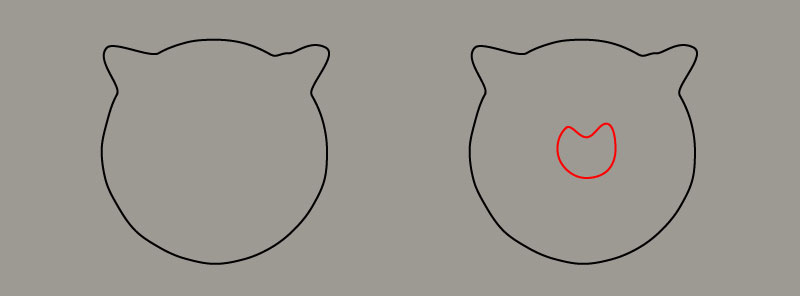
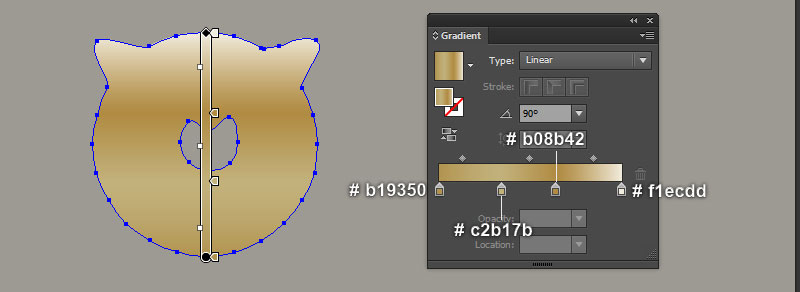
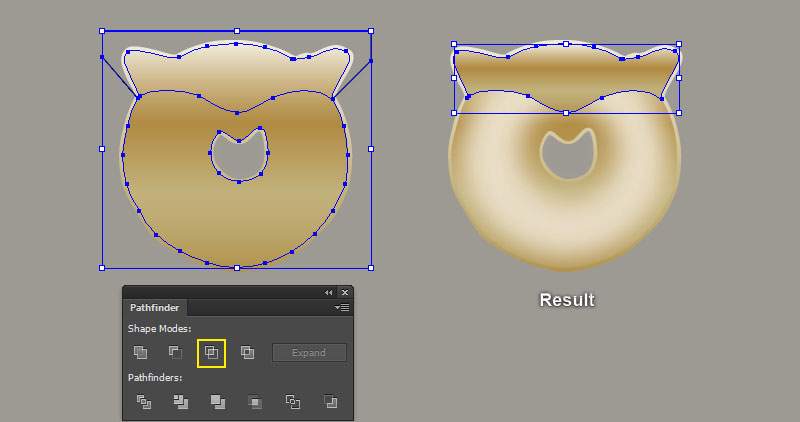
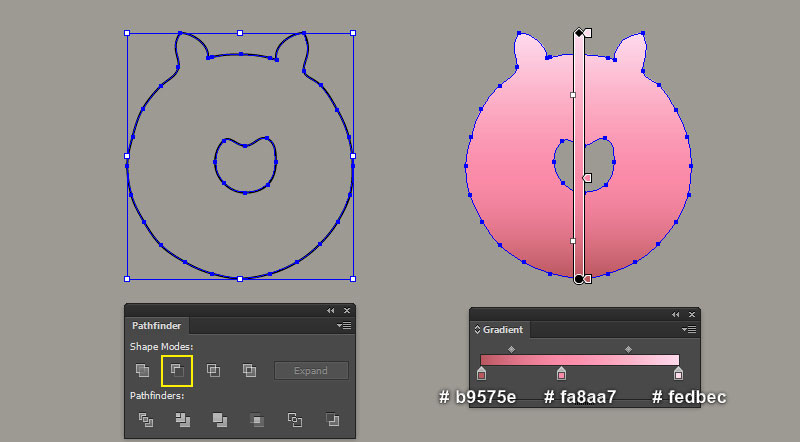
Let’s start by creating the fox donut. Pick the Pen Tool (P) and create two objects like you see in the first and the second image. Reselect the two newly created objects, then open the Pathfinder panel (Window > Pathfinder) and click on the Minus Front button.
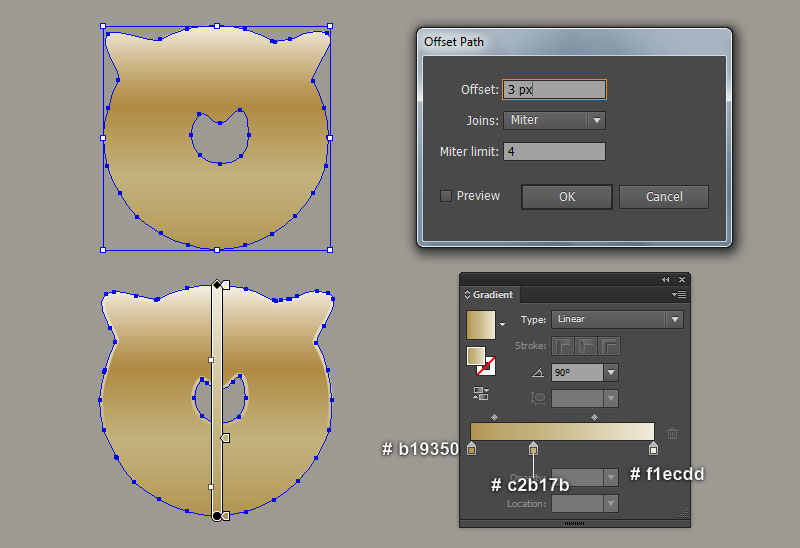
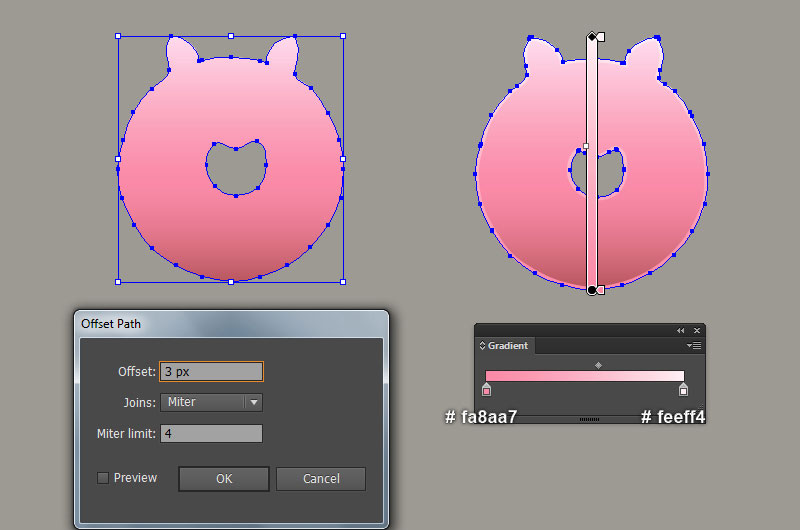
Remove the stroke of the resulting compound path and then fill it with the linear gradient as shown in the fourth image. Keep the resulting compound path selected and go to the Object > Path > Offset Path… Enter a 3px Offset and click OK.
Replace the existing fill color of the newly created compound path with a new linear gradient as shown in the last image.
Step 3
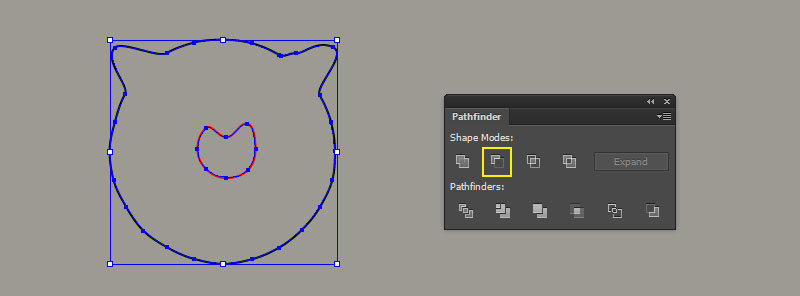
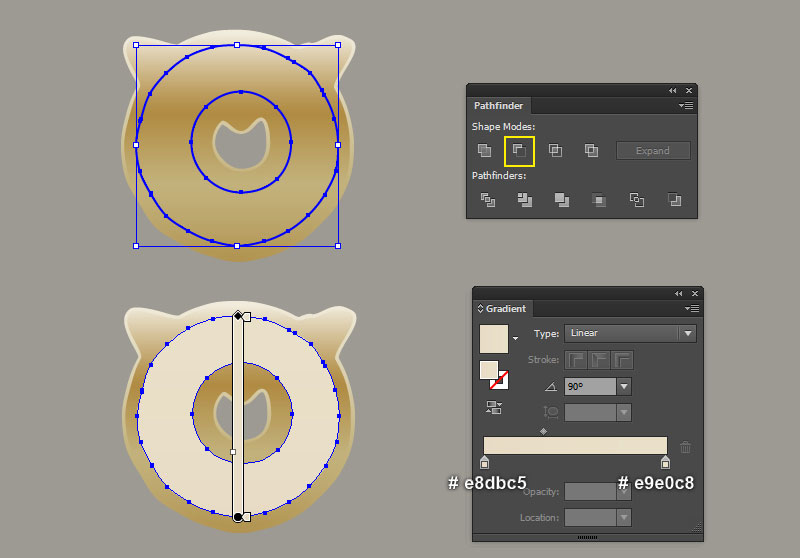
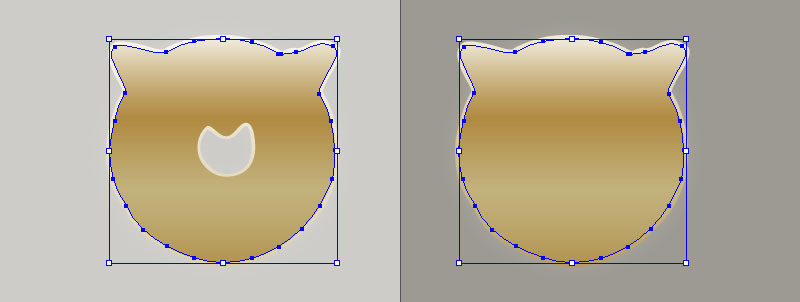
Pick the Pen Tool (P) and create two blue objects like you see in the first and the second image.
Reselect the two newly created objects, then open the Pathfinder panel (Window > Pathfinder) and click on the Minus Front button.
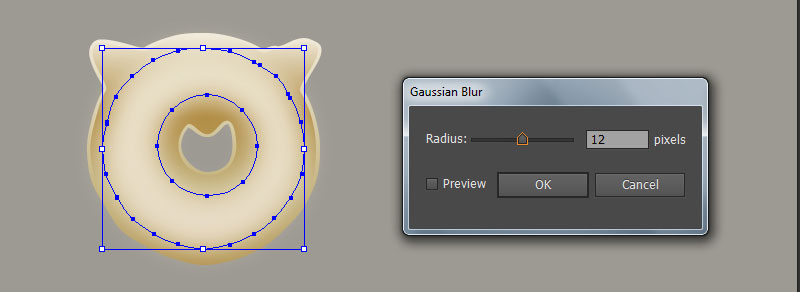
Remove the stroke of the resulting compound path and then fill it with the linear gradient as shown in the fourth image. Still having the resulting compound path selected and go to the Effect > Blur > Gaussian Blur… Enter a 12px Radius and click OK.
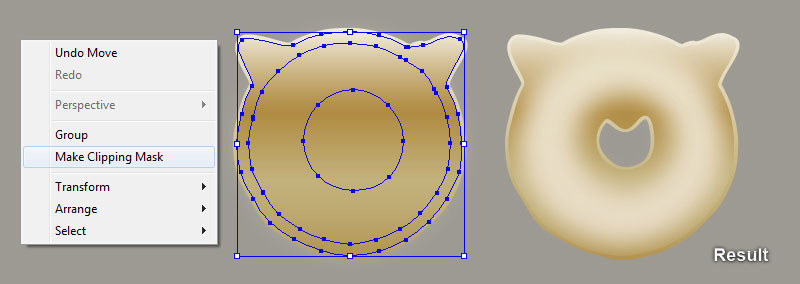
Now pick the Selection Tool (V), double-click on the first compound path created in step 2. Select the bigger shape and press (Ctrl +C) to copy it.
Next double-click on the anywhere outside of this compound path. Then press (Ctrl +F) to paste the shape was copied in this step. Keep this copy selected, hold down Shift and click on the compound path with blur effect applied in this step. Right-click on the artboard and then select the Make Clipping Mask section from the drop-down menu.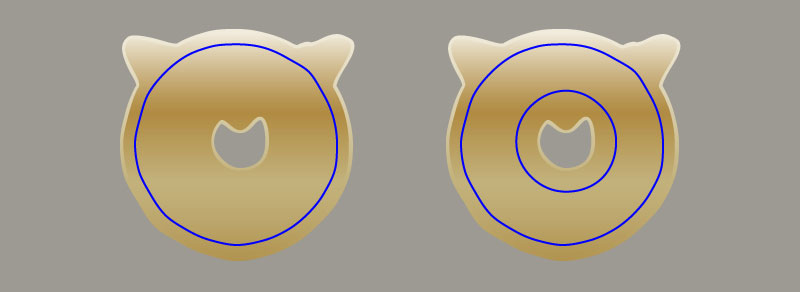
Step 4
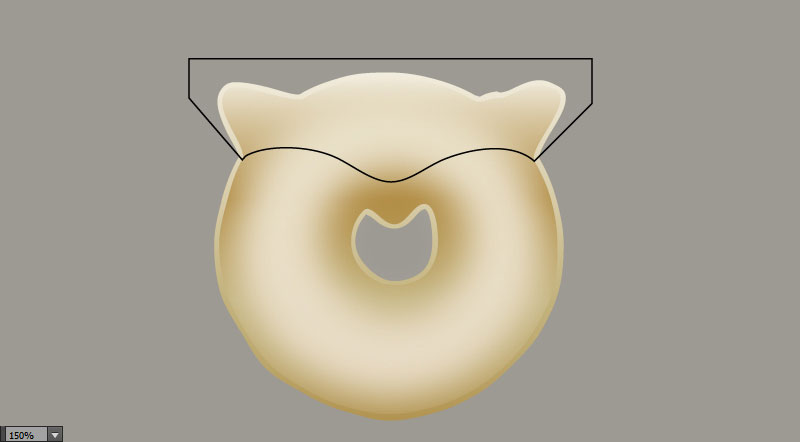
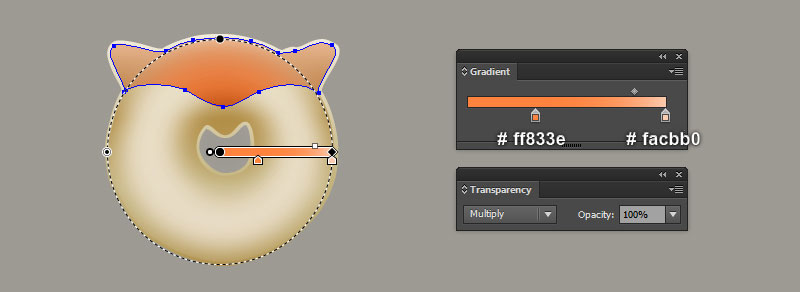
With the Pen Tool (P), create a black object like you see in the first image. Select the first compound path created in step 2 and make a copy (Ctrl +C, Ctrl +F) of it, then bring the copy to front (Ctrl +Shift +Right Square Bracket).
Keep the copy selected, hold down Shift and click on the black object created in this step. Then open the Pathfinder panel (Window > Pathfinder) and click on the Intersect button. Still having the resulting shape selected and replace the existing fill color with the radial gradient as shown in the last image.
Change the Blending Mode of the resulting shape to Multiply.
Step 5
Select the shape created in step 4 and make a copy (Ctrl +C, Ctrl +F) of it. Keep the copy selected, swap the fill and stroke colors by clicking the bent double-headed arrow next to the Fill and Stroke color swatches in the Toolbox.
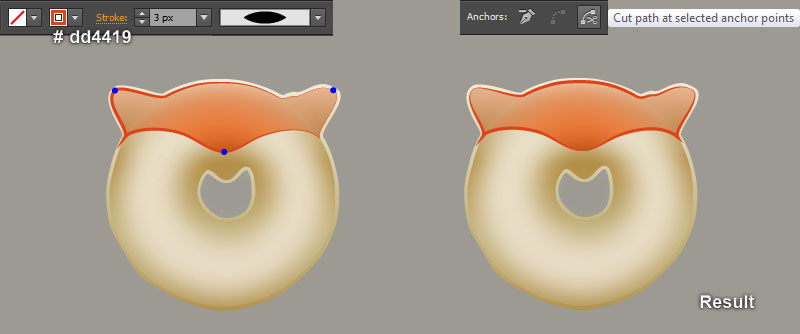
Change the Blending Mode of the resulting object to Normal and replace the existing stroke color with vivid red (#dd4419). Still having the resulting object selected, change the stroke weight to 3px and apply the Width Profile 1 for it.
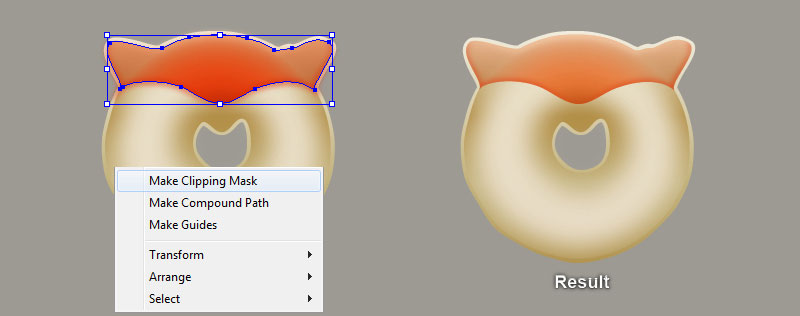
Before you continue, make a copy of the resulting object and then press (Ctrl +3) to hide the copy. Focus on the first image, select three anchor points highlighted with blue and click on the “Cut path at selected anchor points” icon from the Properties bar. This makes the object becomes three paths.
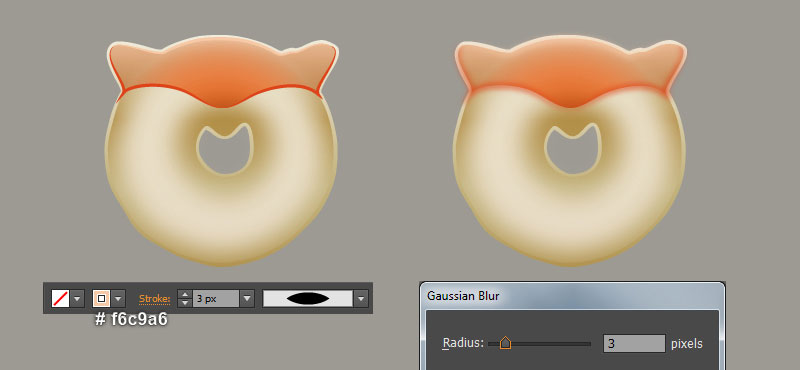
Select the upper path and replace the existing stroke color with very soft orange (#f6c9a6). Now reselect three paths created in this step and go to the Effect > Blur > Gaussian Blur… Enter a 3px Radius and click OK. Now select the shape created in step 4 and make a copy of it, then bring the copy to front (Ctrl +Shift +Right Square Bracket).
Still having the copy selected, hold down Shift and click on the three paths with blur effect applied in this step. Right-click on the artboard and then select the Make Clipping Mask section from the drop-down menu.
Step 6
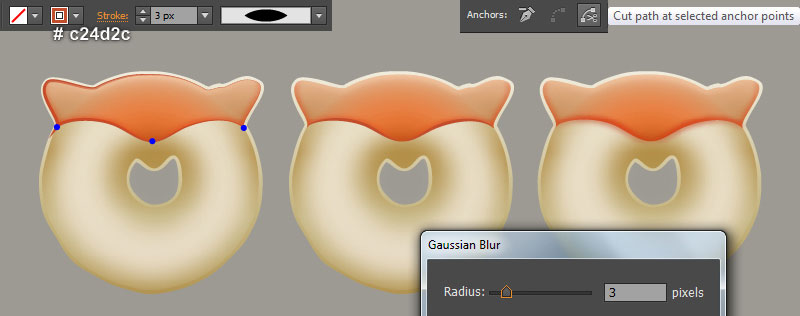
Press (Ctrl +Alt +3) to show the object hidden in step 5 and then replace the existing stroke color with strong red (#c24d2c).
Focus on the first image, select three anchor points highlighted with blue and click on the “Cut path at selected anchor points” icon from the Properties bar. This makes the strong red object becomes three paths. Select and remove the upper path. Select the remaining two paths created in this step and apply a 3px Gaussian Blur effect for them.
Hide the two resulting paths behind the shape created in step 4.
Step 7
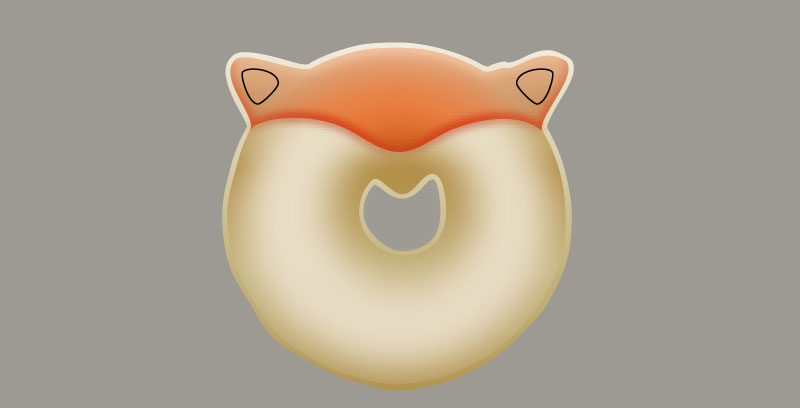
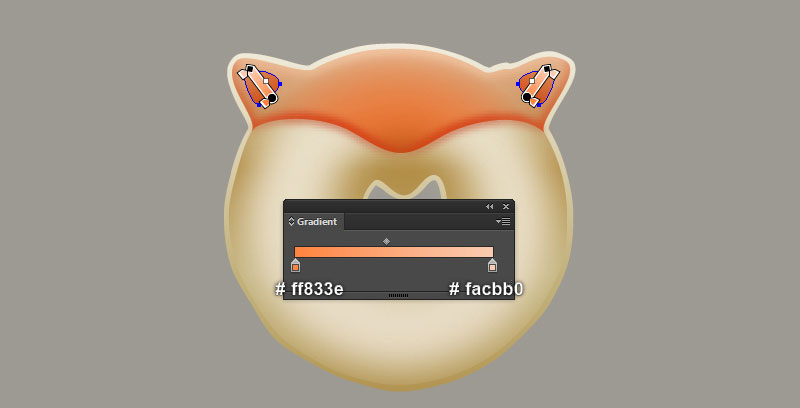
We will continue with the ears of the fox. Pick the Pen Tool (P) and create two black objects like you see in the first image. Once your objects are drawn, remove their strokes and then fill these objects with the linear gradient as shown in the second image.
Step 8
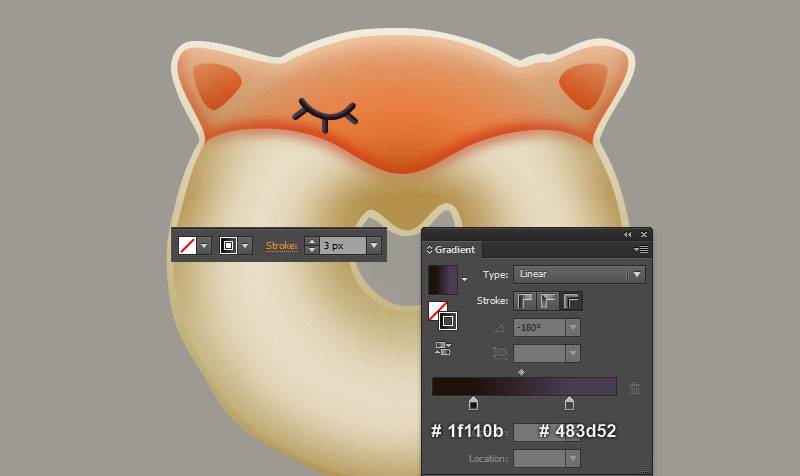
Next, come the eyes of the fox. With the help of the Pen Tool (P), create four curved paths like you see in the first and the second image.
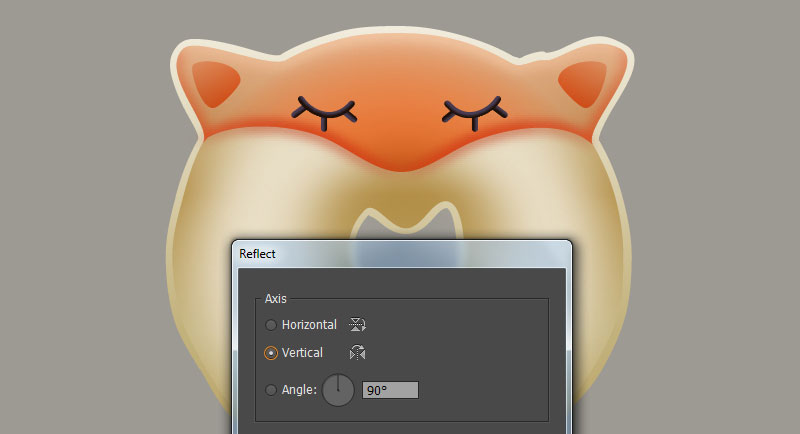
Reselect four newly created paths, change the stroke weight to 3px and then replace the existing stroke colors with the linear gradient across stroke as shown in the third image. Keep the resulting paths selected and go to the Object > Transform > Reflect… Check the Vertical box then hit the Copy button.
Select the resulting paths, drag them to the right and place them as shown in the last image. 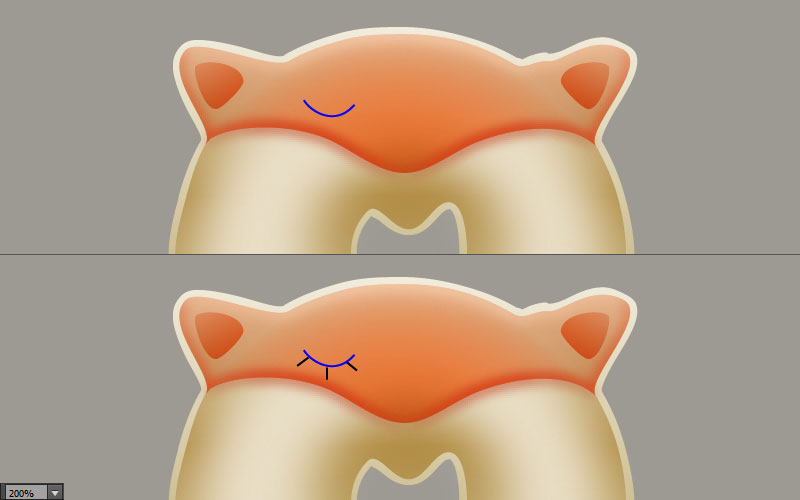
Step 9
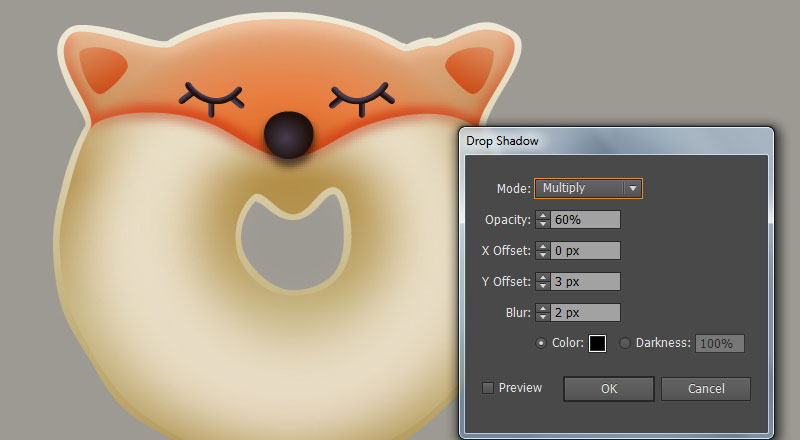
It’s time to draw the nose of the fox. With the help of the Pen Tool (P) and the Gradient Tool (G), create a shape like you see in the first and the second image. Once your shape is drawn, reselect it and go to the Effect > Stylize > Drop Shadow… Follow the data as shown in the last image and click OK. 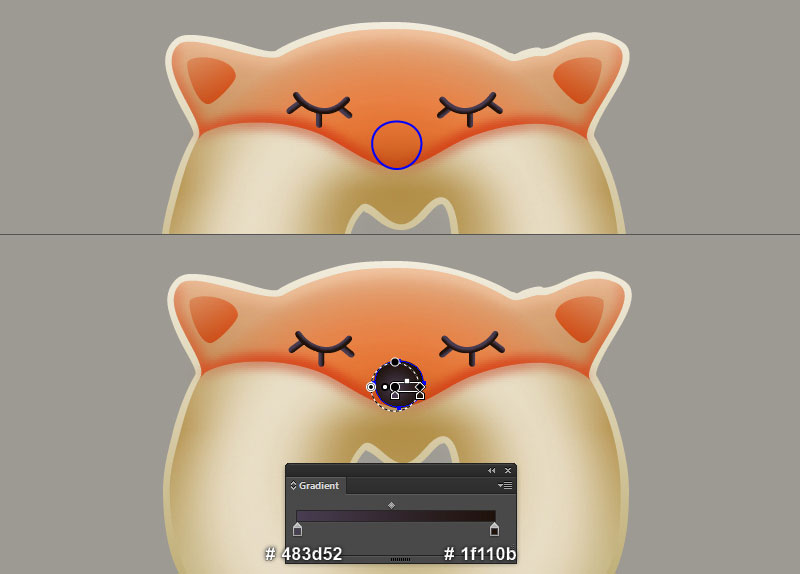
Step 10
Select and group (Ctrl +G) all objects created from beginning step 2 to this time. The fox donut is ready and looks like this:

Step 11
Next, comes the big donut. Pick the Pen Tool (P) and create two objects like you see in the first and the second image. Reselect the two newly created objects, then open the Pathfinder panel (Window > Pathfinder) and click on the Minus Front button.
Remove the stroke of the resulting compound path and then fill it with the linear gradient as shown in the fourth image. Keep the resulting compound path selected and go to the Object > Path > Offset Path… Enter a 3px Offset and click OK.
Replace the existing fill color of the newly created compound path with a new linear gradient as shown in the last image.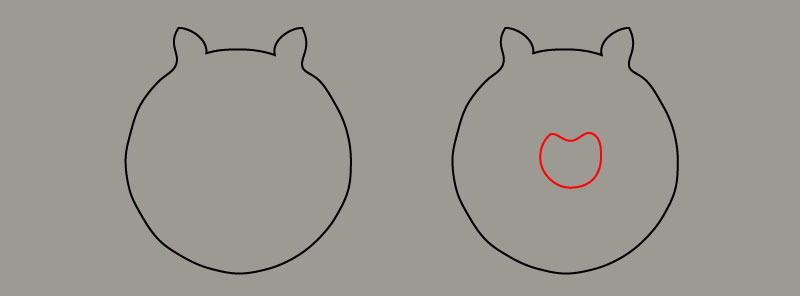
Step 12
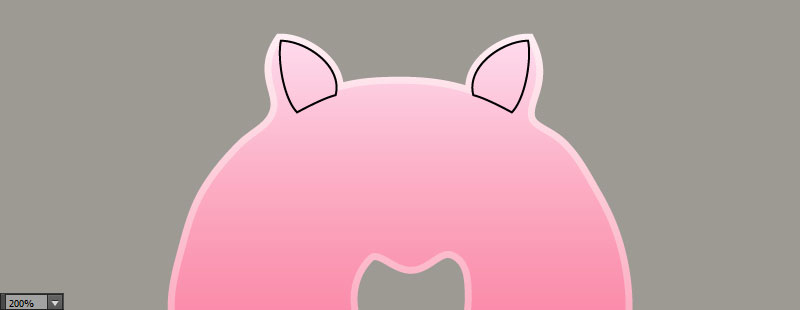
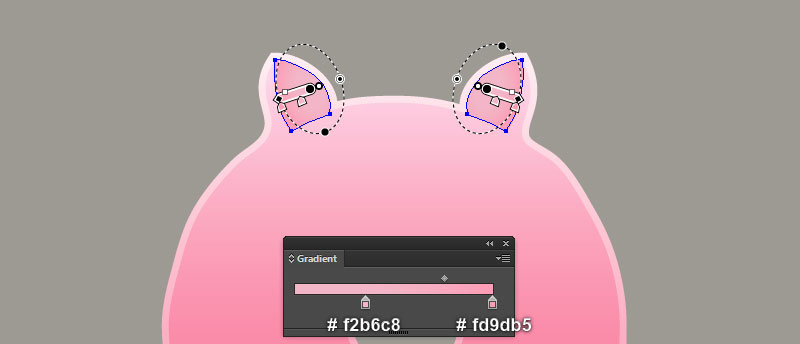
We are going to create the ears of the big. Pick the Pen Tool (P) and create two black objects like you see in the first image. Once your objects are drawn, remove their strokes and then fill these objects with the radial gradient as shown in the second image.
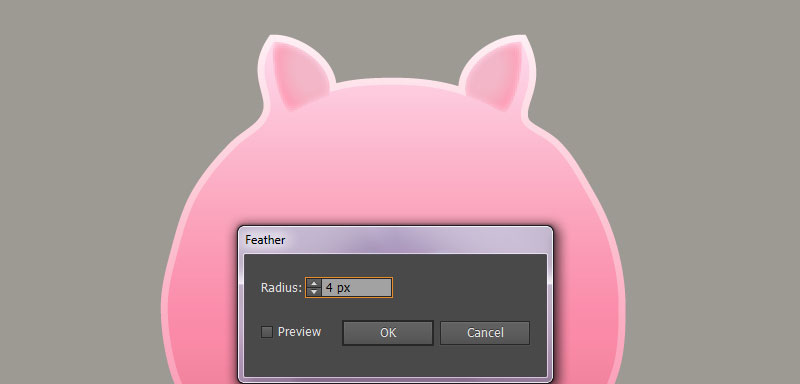
Apply a 4px Feather effect for the resulting shapes.
Step 13
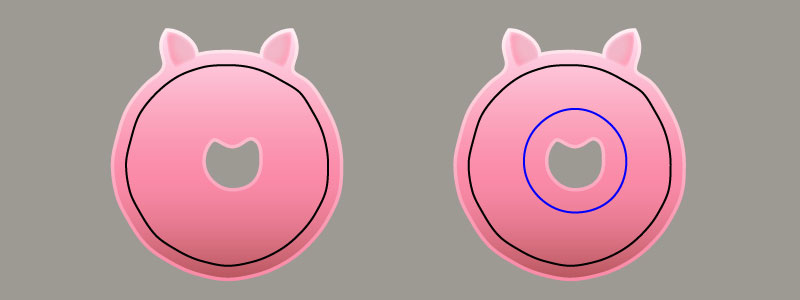
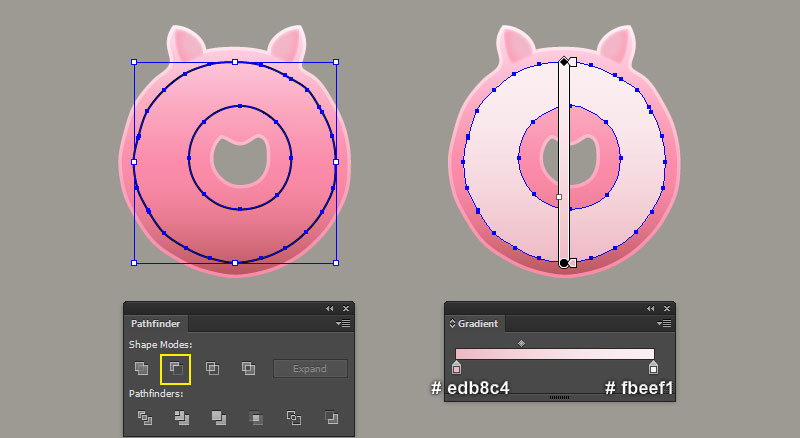
Pick the Pen Tool (P) and create two objects like you see in the first and the second image.
Reselect the two newly created objects, then open the Pathfinder panel (Window > Pathfinder) and click on the Minus Front button. Remove the stroke of the resulting compound path and then fill it with the linear gradient as shown in the fourth image.
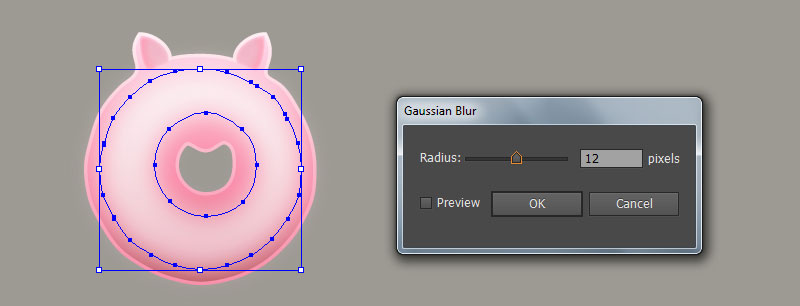
Still having the resulting compound path selected and go to the Effect > Blur > Gaussian Blur… Enter a 12px Radius and click OK. Now pick the Selection Tool (V), double-click on the first compound path created in step 11.
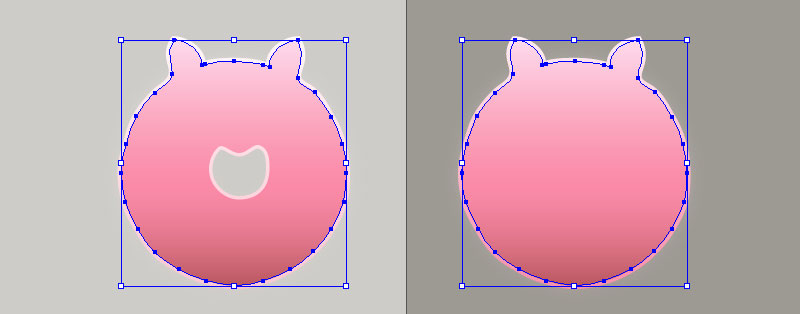
Select the bigger shape and press (Ctrl +C) to copy it. Next double-click on the anywhere outside of this compound path. Then press (Ctrl +F) to paste the shape was copied in this step.
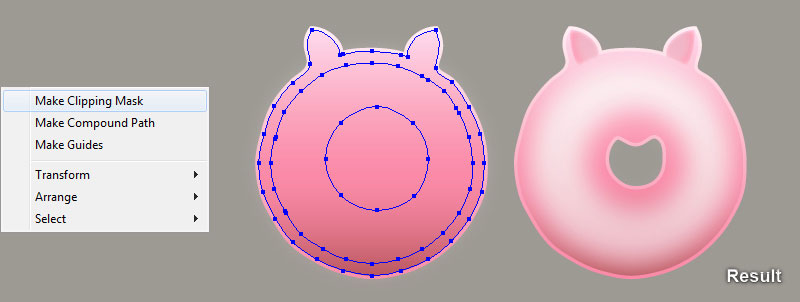
Keep this copy selected, hold down Shift and click on the compound path with blur effect applied in this step. Right-click on the artboard and then select the Make Clipping Mask section from the drop-down menu.
Step 14
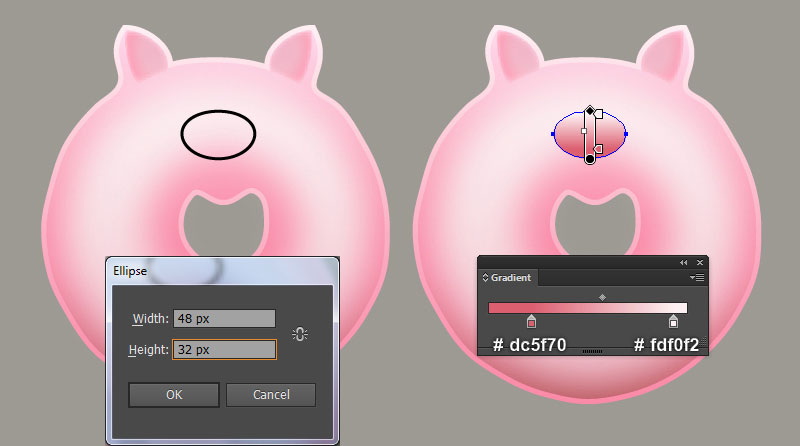
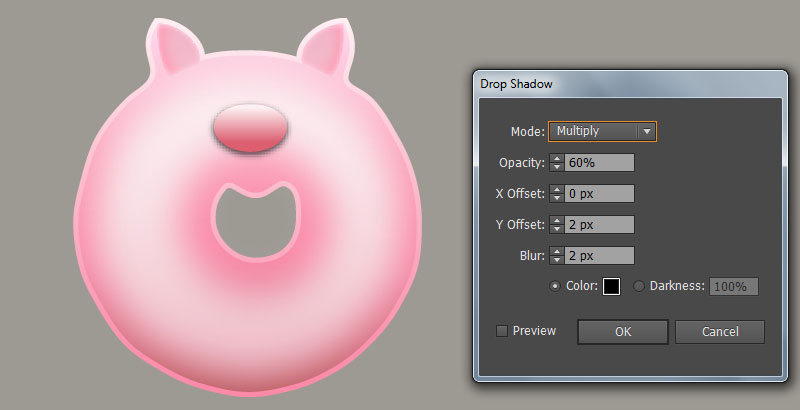
It’s time to draw the nose of the big. With the help of the Ellipse Tool (L) and the Gradient Tool (G), create an ellipse like you see in the first and the second image. Once your ellipse is drawn, reselect it and go to the Effect > Stylize > Drop Shadow… Follow the data as shown in the third image and click OK.
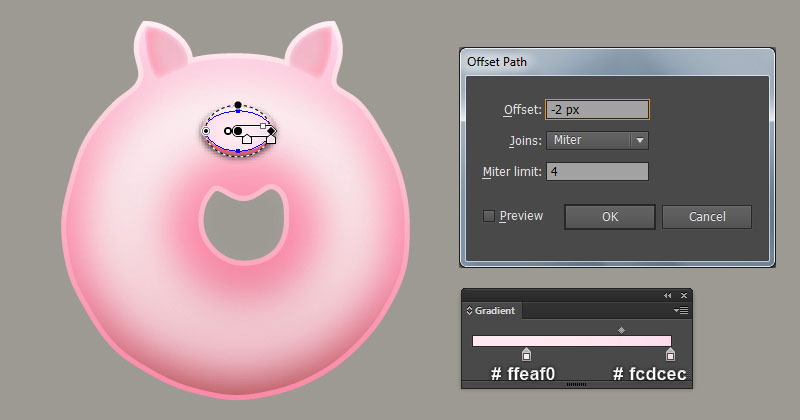
Keep the resulting ellipse selected and go to the Object > Path > Offset Path… Enter a -2px Offset and click OK.
Still having the newly created ellipse selected, open the Appearance panel (Window > Appearance) and remove the Drop Shadow section. Next, replace the existing fill color of the resulting ellipse with the radial gradient as shown in the fourth image.
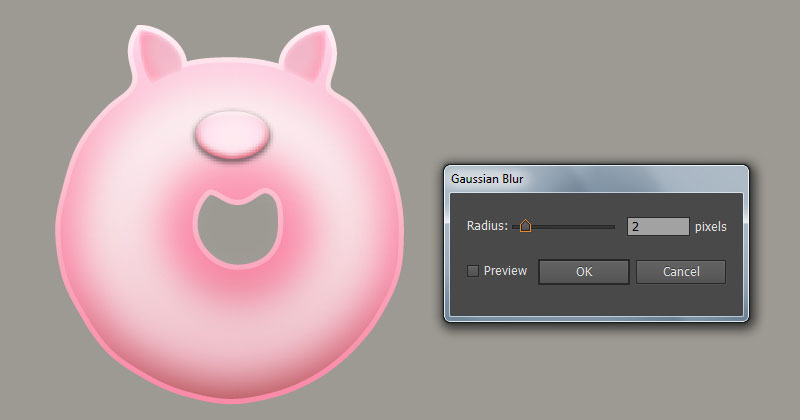
Apply 2px Gaussian Blur effect for the resulting ellipse.
Step 15
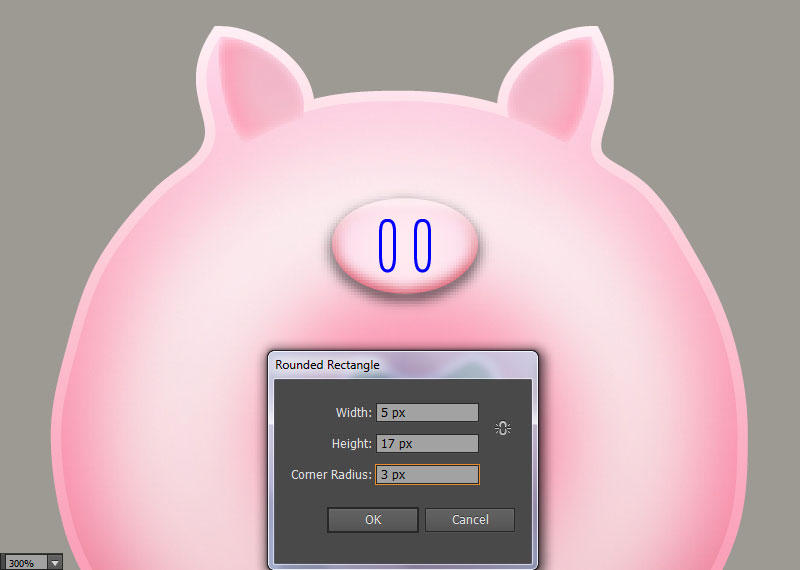
Pick the Rounded Rectangle Tool from the Toolbox and simply click on the artboard. Enter the data like you see in the first image and click OK.
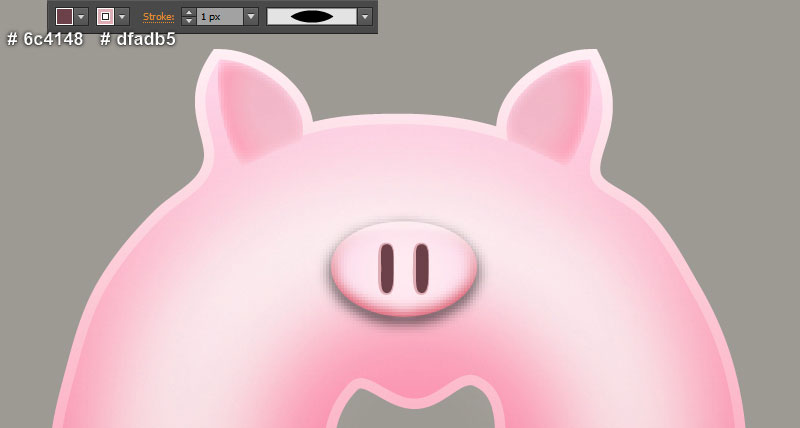
Make a copy (Ctrl +C, Ctrl +F) of the newly created rectangle, then place them in the positions like you see in the first image. Replace the existing stroke color of the two blue rounded rectangles with very soft red (#dfadb5) and fill these objects with very dark red (#6c4148).
Apply the Width Profile 1 for the resulting rectangles.
Step 16
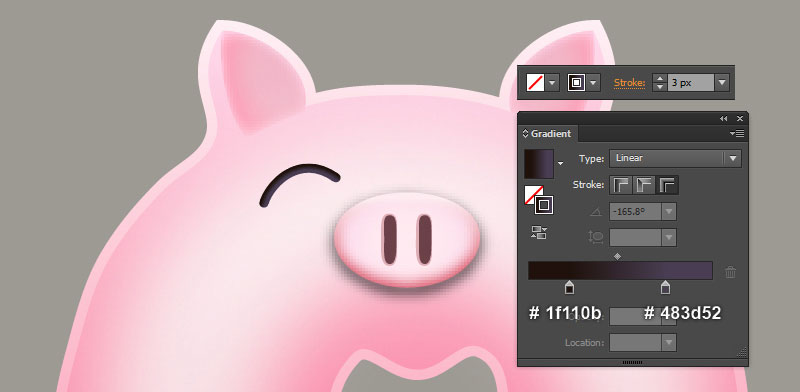
Next, come the eyes of the big. With the Pen Tool (P) create a curved path as shown in the first image. Reselect the newly created path, change the stroke weight to 3px and then replace the existing stroke color with the linear gradient across stroke as shown in the first image.
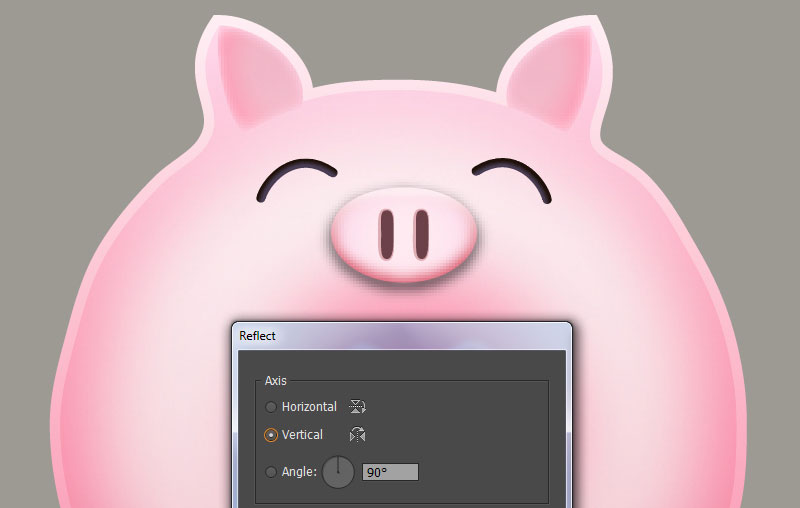
Keep the resulting path selected and go to the Object > Transform > Reflect… Check the Vertical box then hit the Copy button. Select the resulting path, drag them to the right and place them as shown in the last image.
Step 17
Select and group (Ctrl +G) all objects created from beginning step 11 to this time. The big donut is ready and looks like this:
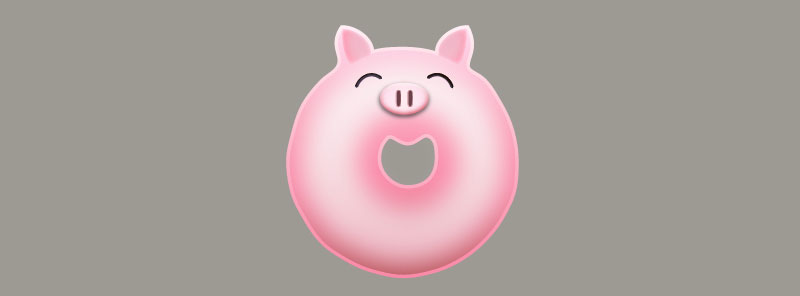
Step 18
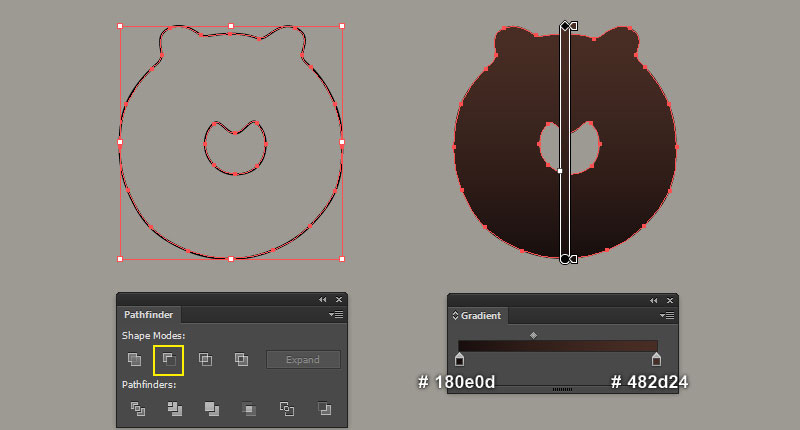
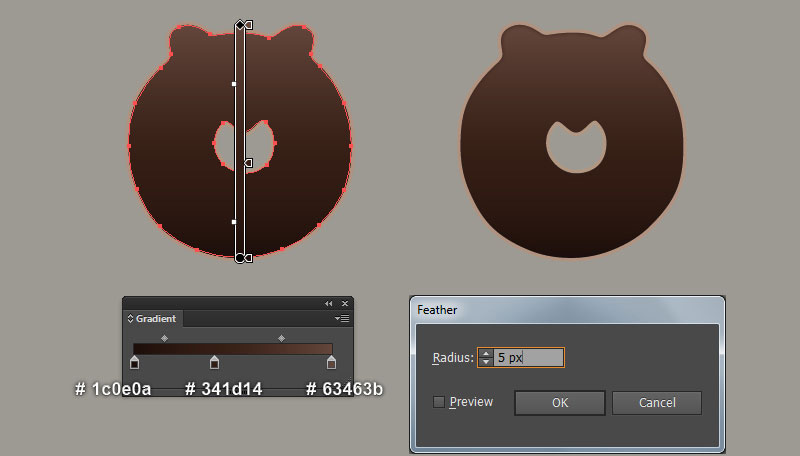
Next come the bear donut. Pick the Pen Tool (P) and create two objects like you see in the first and the second image. Reselect the two newly created objects, then open the Pathfinder panel (Window > Pathfinder) and click on the Minus Front button.
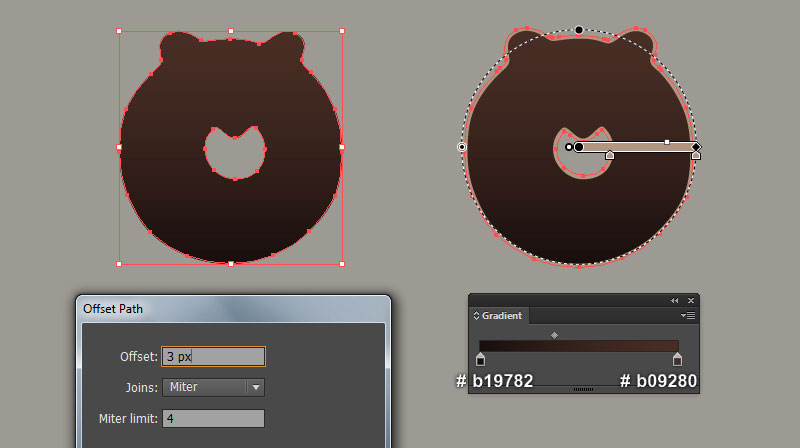
Remove the stroke of the resulting compound path and then fill it with the linear gradient as shown in the fourth image. Keep the resulting compound path selected and go to the Object > Path > Offset Path… Enter a 3px Offset and click OK. Replace the existing fill color of the newly created compound path with the radial gradient as shown in the sixth image.
Now select the first compound path created in this step and make a copy (Ctrl +C, Ctrl +F) of it. Then replace the existing fill color of the newly created compound path with new linear gradient like you see in the next to last image. Finally apply a 5px Feather effect for the resulting compound path.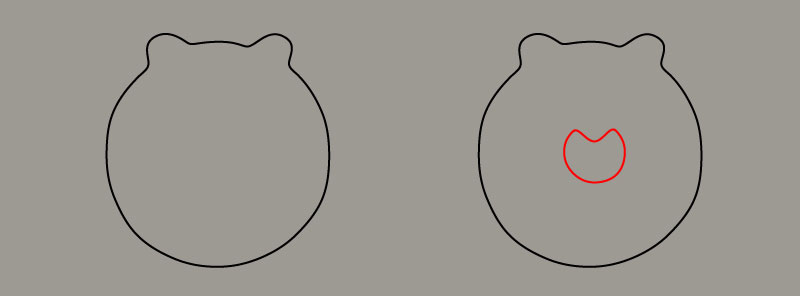
Step 19
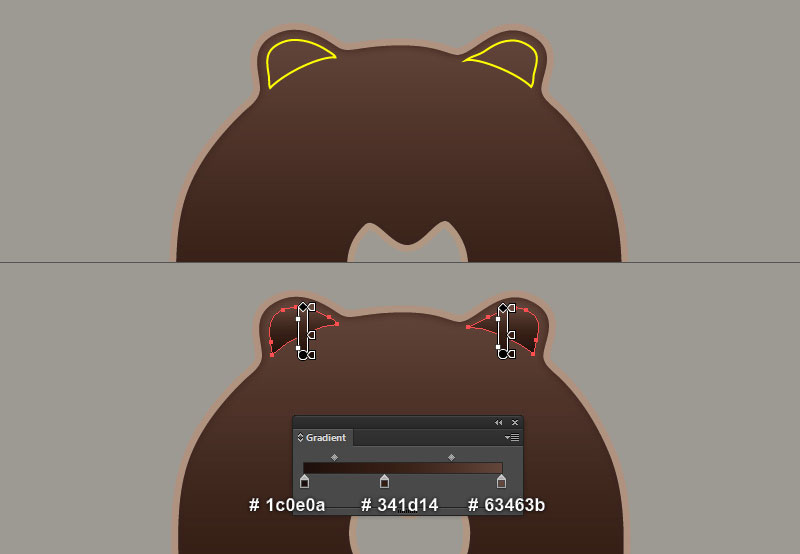
We are going to create the ears of the bear. Pick the Pen Tool (P) and create two yellow objects like you see in the first image. Once your objects are drawn, remove their strokes and then fill these objects with the linear gradient as shown in the second image.
Step 20
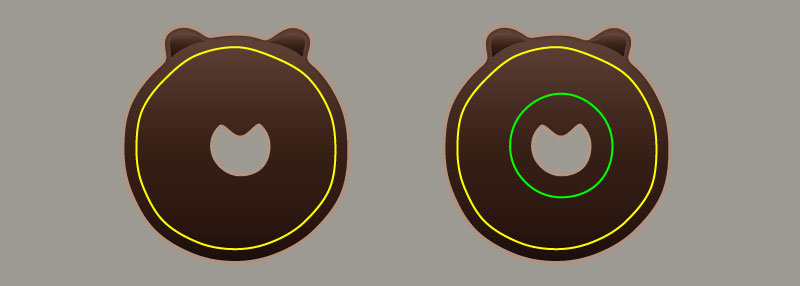
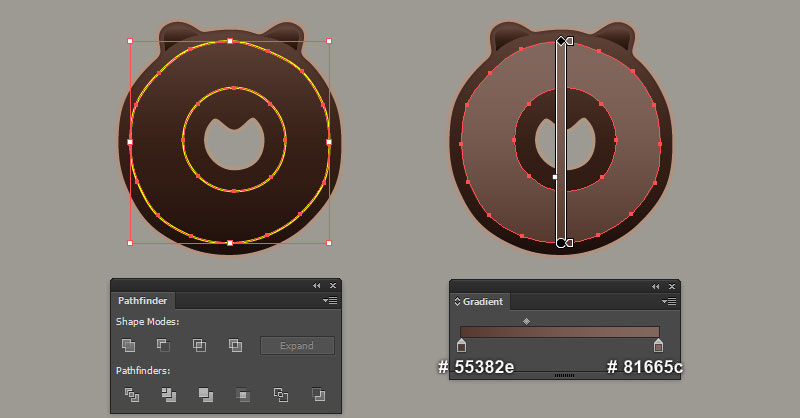
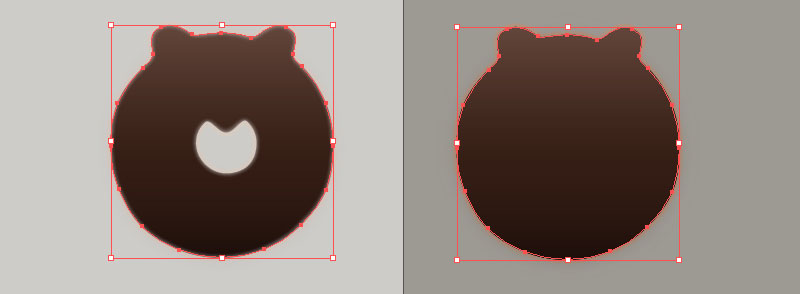
Pick the Pen Tool (P) and create two objects like you see in the first and the second image.
Reselect the two newly created objects, then open the Pathfinder panel (Window > Pathfinder) and click on the Minus Front button.
Remove the stroke of the resulting compound path and then fill it with the linear gradient as shown in the fourth image.
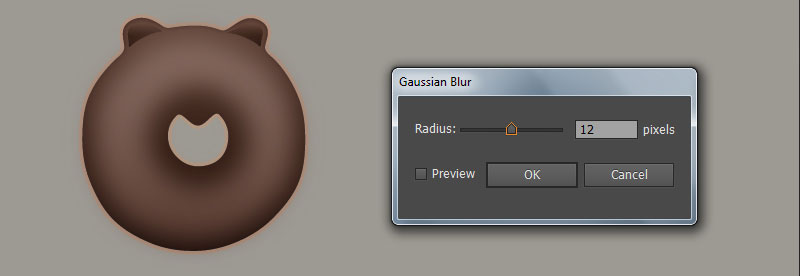
Still having the resulting compound path selected and go to the Effect > Blur > Gaussian Blur… Enter a 12px Radius and click OK.
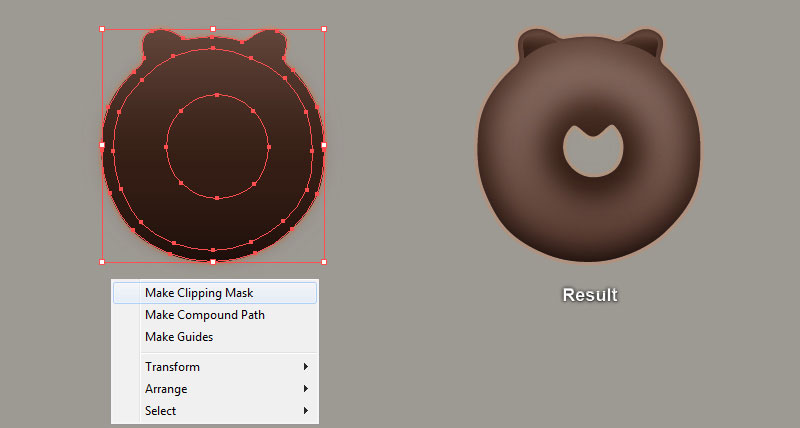
Now pick the Selection Tool (V), double-click on the compound path with feather effect applied in step 18. Select the bigger shape and press (Ctrl +C) to copy it. Next double-click on the anywhere outside of this compound path. Then press (Ctrl +F) to paste the shape was copied in this step.
Keep this copy selected, hold down Shift and click on the compound path with blur effect applied in this step. Right-click on the artboard and then select the Make Clipping Mask section from the drop-down menu.
Step 21
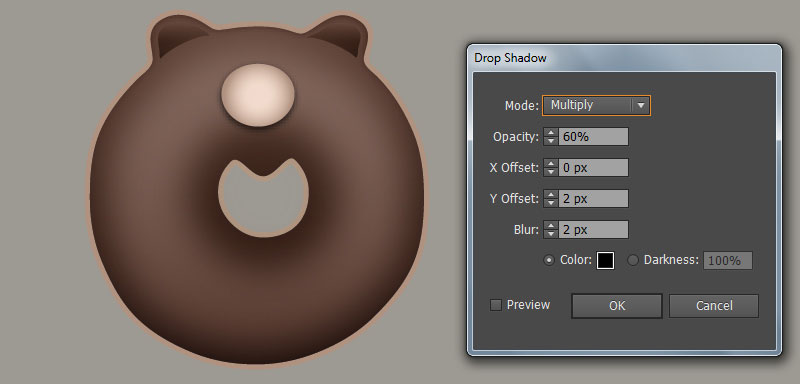
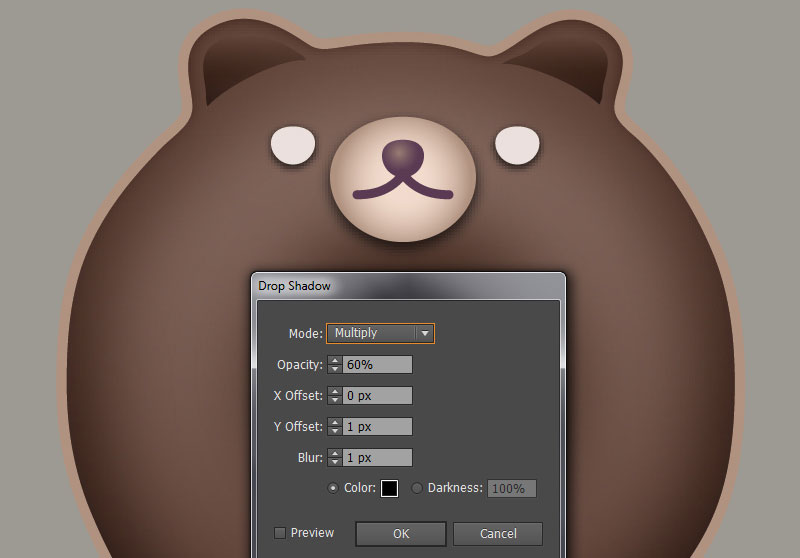
It’s time to draw the nose of the bear. With the help of the Ellipse Tool (L) and the Gradient Tool (G), create a 48 by 42px ellipse like you see in the first and the second image. Once your ellipse is drawn, reselect it and go to the Effect > Stylize > Drop Shadow… Follow the data as shown in the third image and click OK.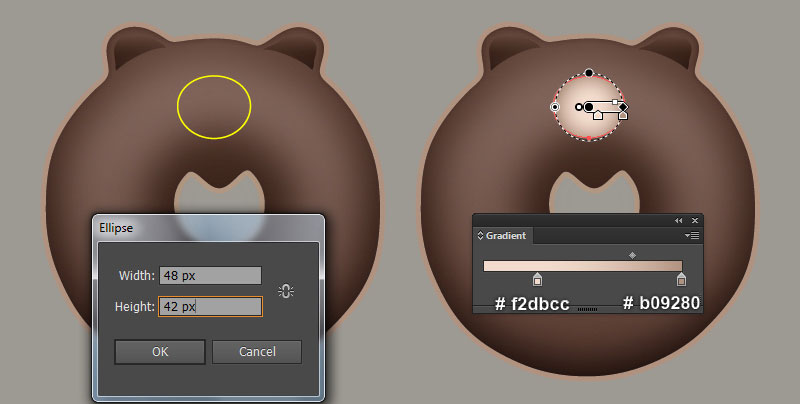
Step 22
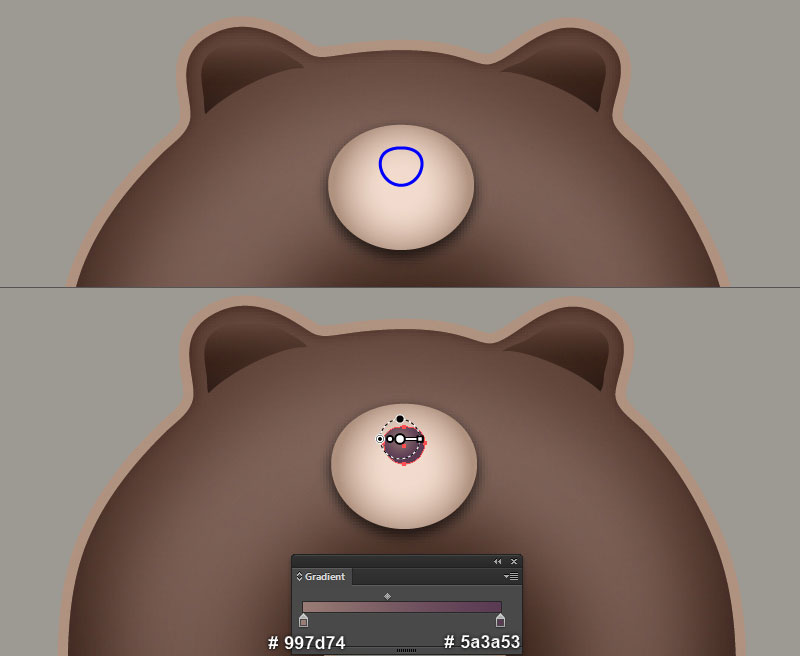
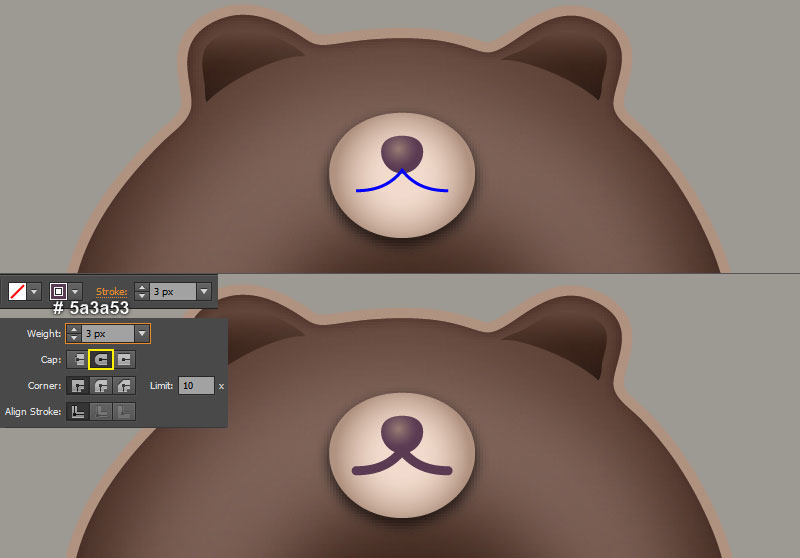
With the help of the Pen Tool (L) and the Gradient Tool (G), create a shape like you see in the first and the second image. Continue with the Pen Tool (P) create a curved path as shown in the third image.
Reselect the newly created path, change the stroke weight to 3px and then replace the existing stroke color with very dark magenta (#5a3a53). Keep the resulting path selected, open the Stroke panel (Window > Stroke) and then click on the Round Cap icon.
Step 23
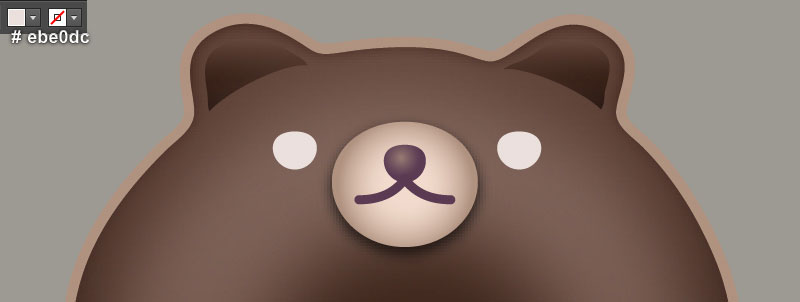
With the help of the Pen Tool (P), create two light grayish orange shapes (#ebe0dc) like you see in the first image. Once your shapes are drawn, reselect them and go to the Effect > Stylize > Drop Shadow… Follow the data as shown in the second image and click OK.
Step 24
Select and group (Ctrl +G) all objects created from beginning step 18 to this time. The bear donut is ready and looks like this:
Step 25
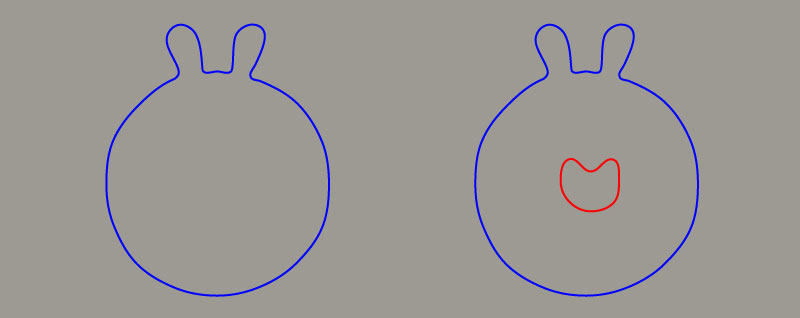
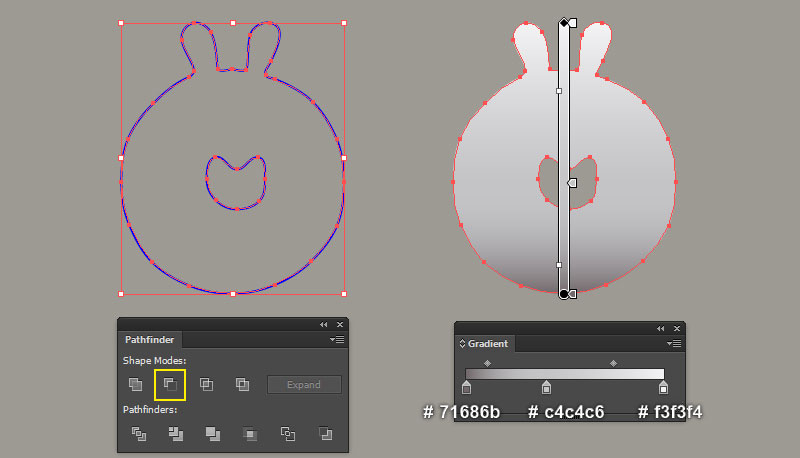
We will continue with the rabbit donut. Pick the Pen Tool (P) and create two objects like you see in the first and the second image. Reselect the two newly created objects, then open the Pathfinder panel (Window > Pathfinder) and click on the Minus Front button.
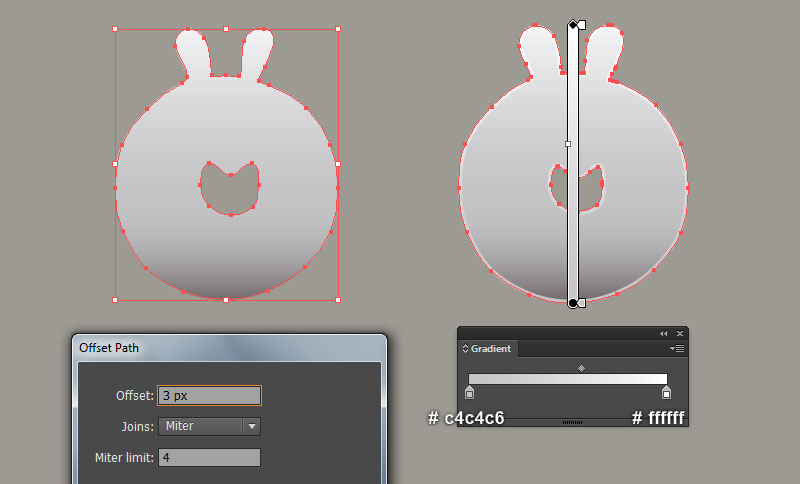
Remove the stroke of the resulting compound path and then fill it with the linear gradient as shown in the fourth image. Keep the resulting compound path selected and go to the Object > Path > Offset Path… Enter a 3px Offset and click OK.
Replace the existing fill color of the newly created compound path with a new linear gradient as shown in the last image.
Step 26
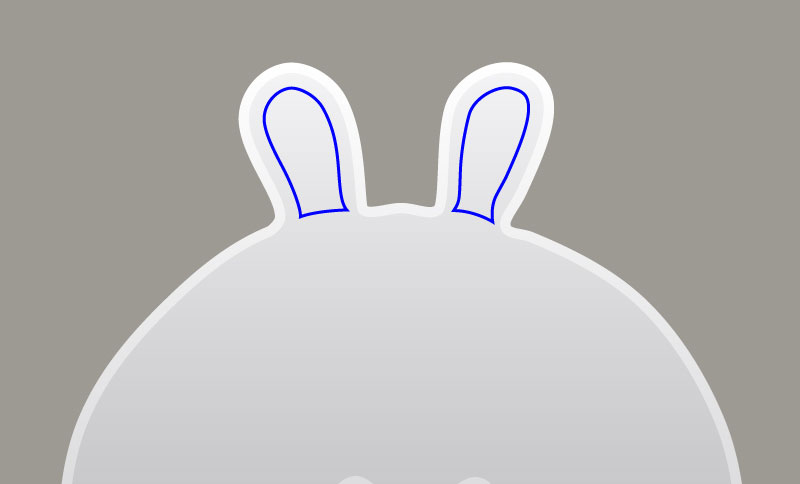
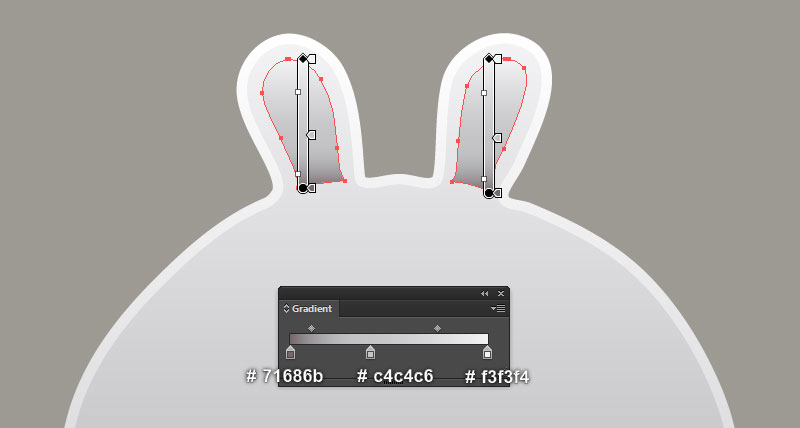
We are going to create the ears of the rabbit. Pick the Pen Tool (P) and create two blue objects like you see in the first image. Once your objects are drawn, remove their strokes and then fill these objects with the linear gradient as shown in the second image.
Step 27
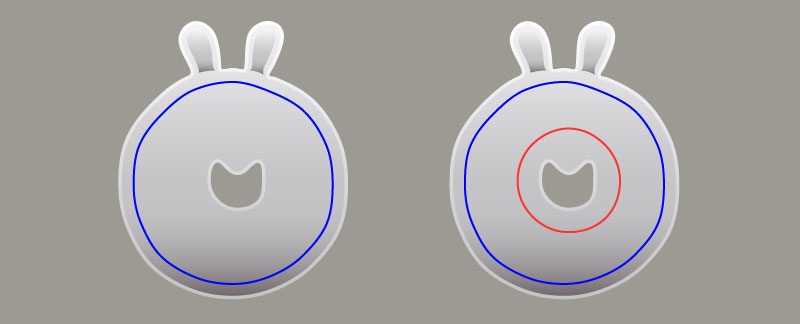
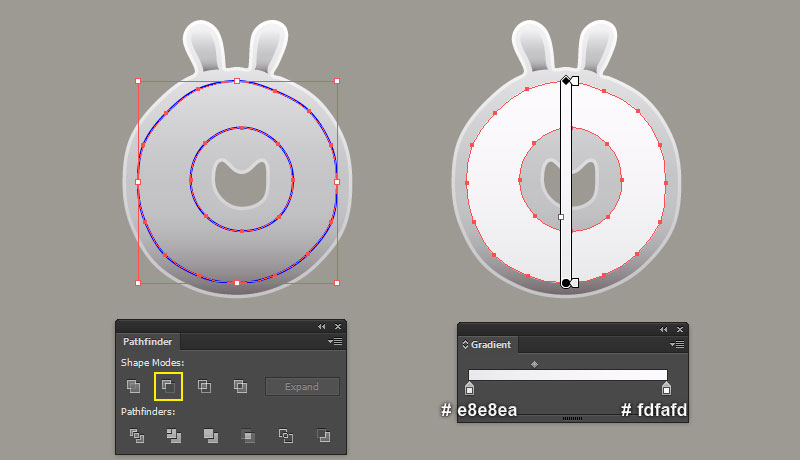
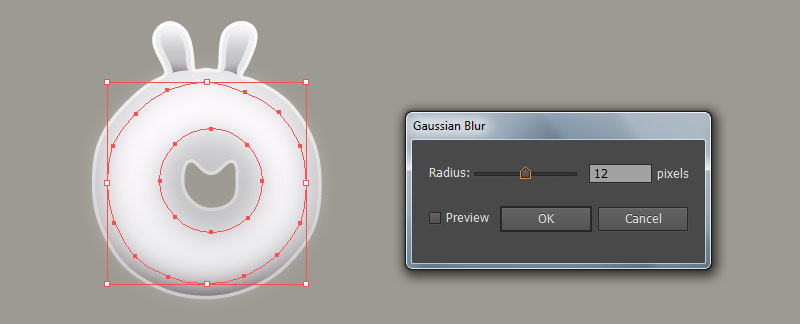
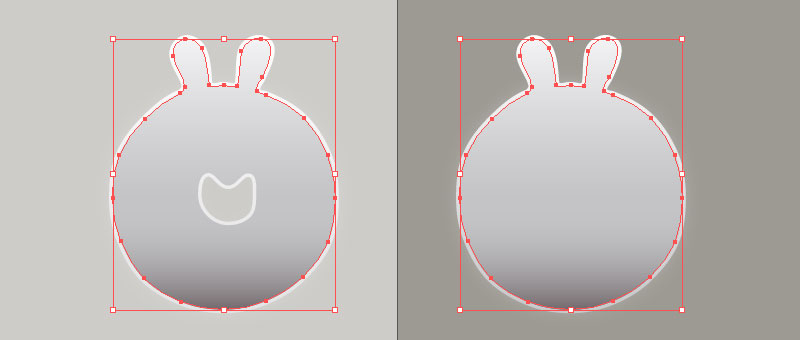
Pick the Pen Tool (P) and create two objects like you see in the first and the second image.
Reselect the two newly created objects, then open the Pathfinder panel (Window > Pathfinder) and click on the Minus Front button.
Remove the stroke of the resulting compound path and then fill it with the linear gradient as shown in the fourth image. Still having the resulting compound path selected and go to the Effect > Blur > Gaussian Blur… Enter a 12px Radius and click OK.
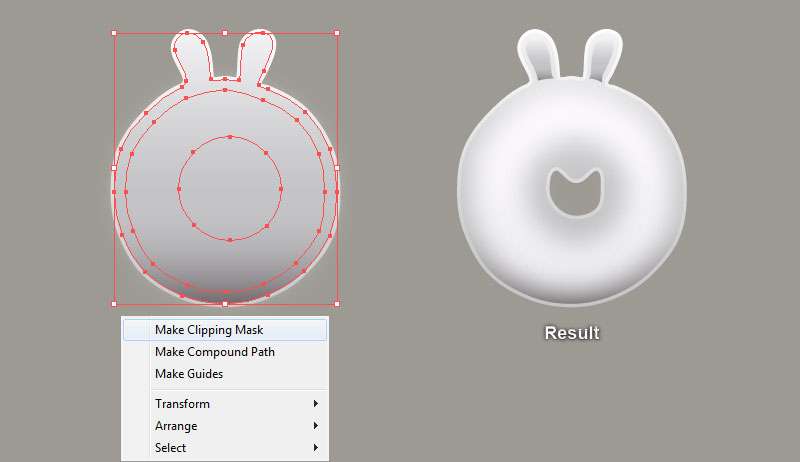
Now pick the Selection Tool (V), double-click on the compound path with feather effect applied in step 25. Select the bigger shape and press (Ctrl +C) to copy it. Next double-click on the anywhere outside of this compound path. Then press (Ctrl +F) to paste the shape was copied in this step.
Keep this copy selected, hold down Shift and click on the compound path with blur effect applied in this step. Right-click on the artboard and then select the Make Clipping Mask section from the drop-down menu.
Step 28
With the help of the Pen Tool (L) and the Gradient Tool (G), create a shape like you see in the first and the second image. Continue with the Pen Tool (P) create a curved path as shown in the third image.
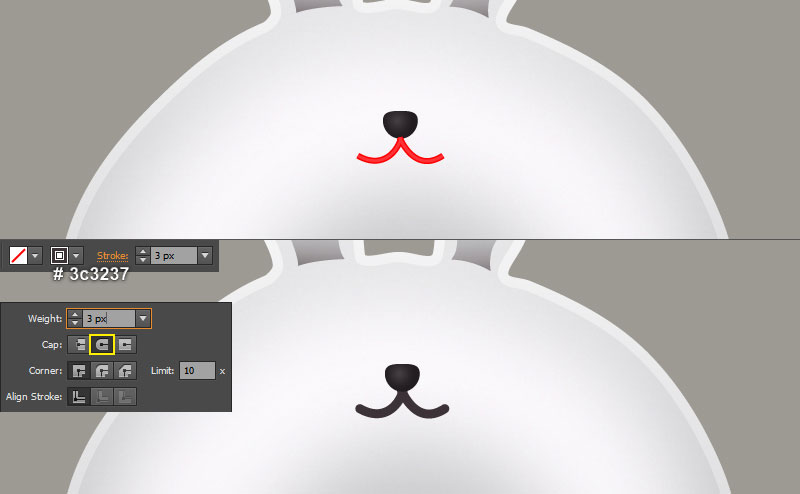
Reselect the newly created path, change the stroke weight to 3px and then replace the existing stroke color with very dark grayish pink (#3c3237). Keep the resulting path selected, open the Stroke panel (Window > Stroke) and then click on the Round Cap icon.
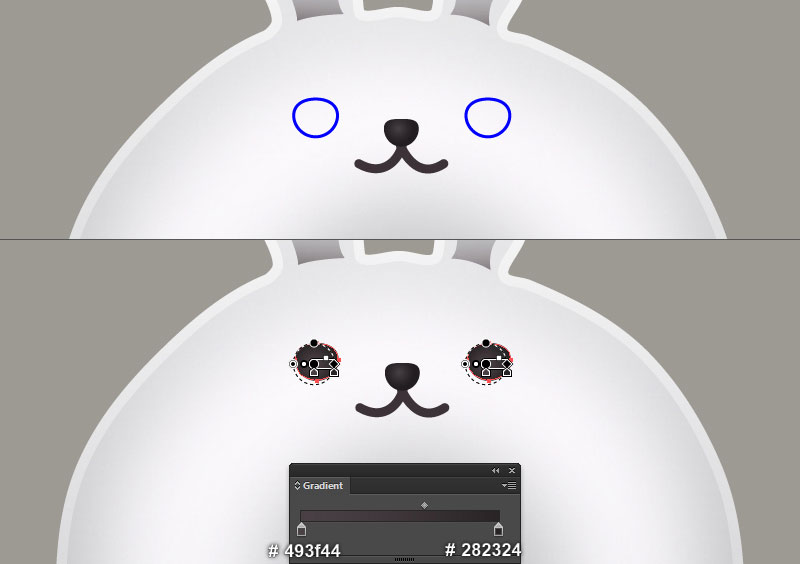
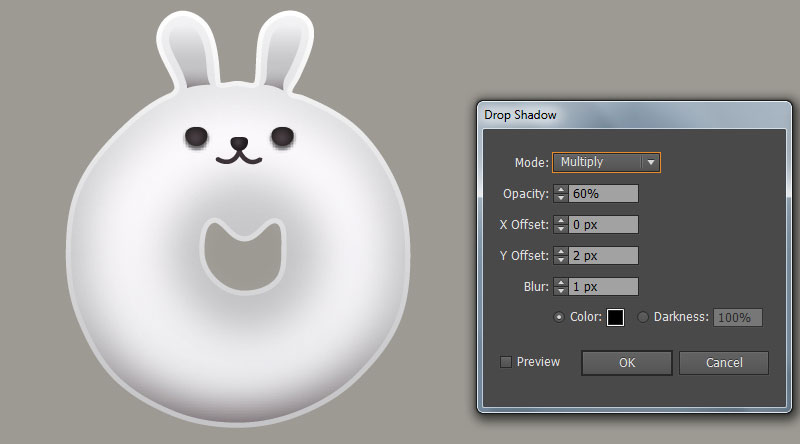
Now with the help of the Pen Tool (P) and the Gradient Tool (G), create two shapes like you see in the fifth and the sixth image. Once your shapes are drawn, reselect them and go to the Effect > Stylize > Drop Shadow… Follow the data as shown in the last image and click OK.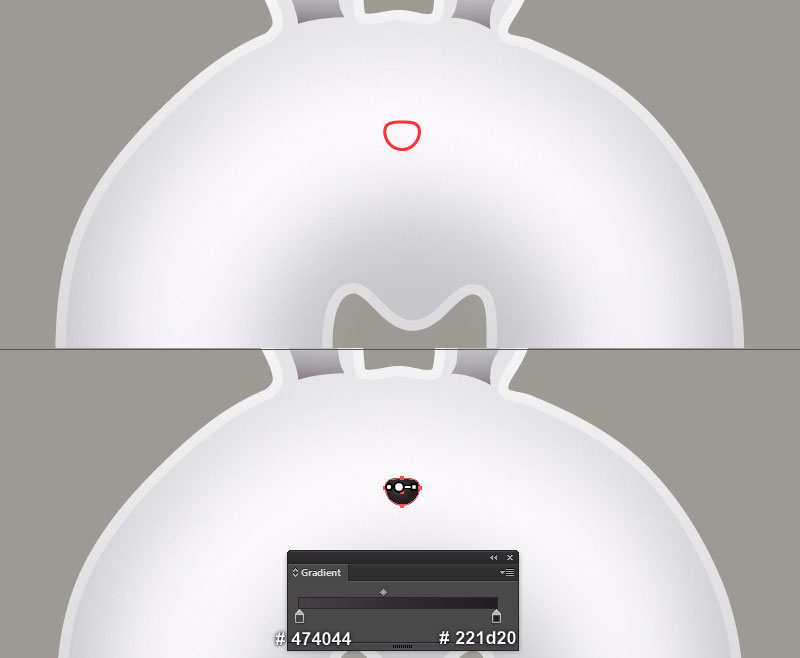
Step 29
Select and group (Ctrl +G) all objects created from beginning step 25 to this time. The rabbit donut is ready and looks like this: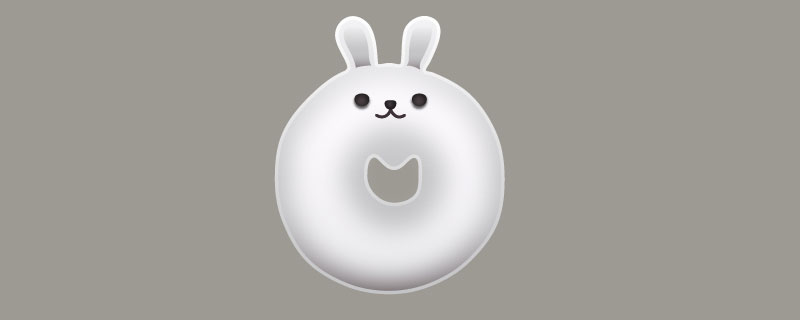
Step 30
At this point your animal donuts should look like in the next image:
Step 31
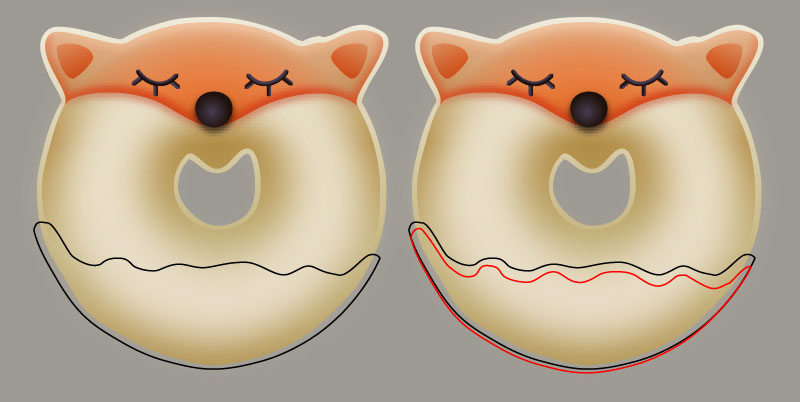
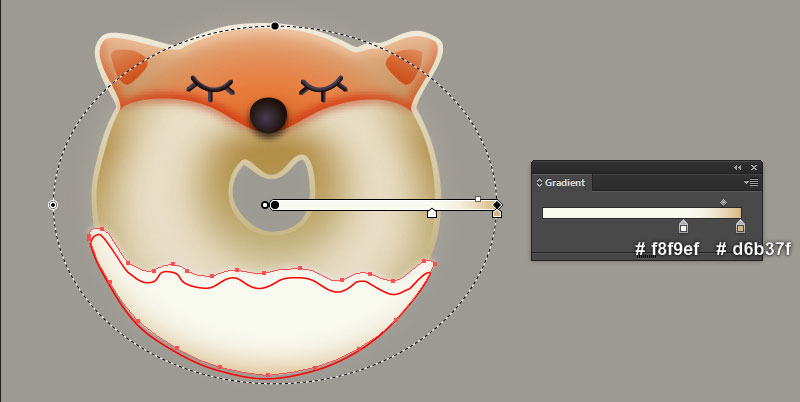
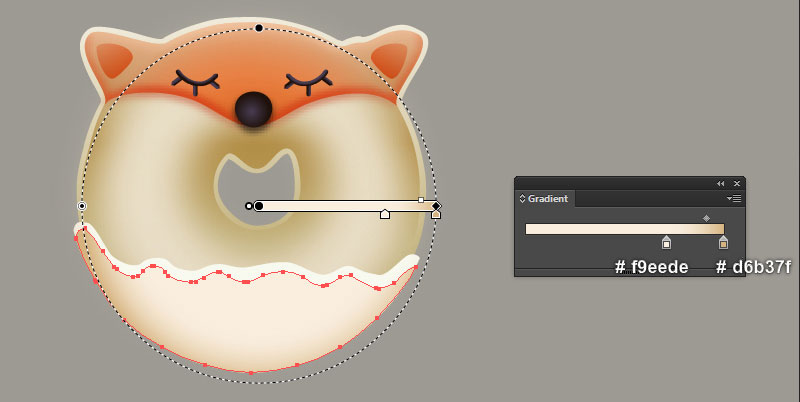
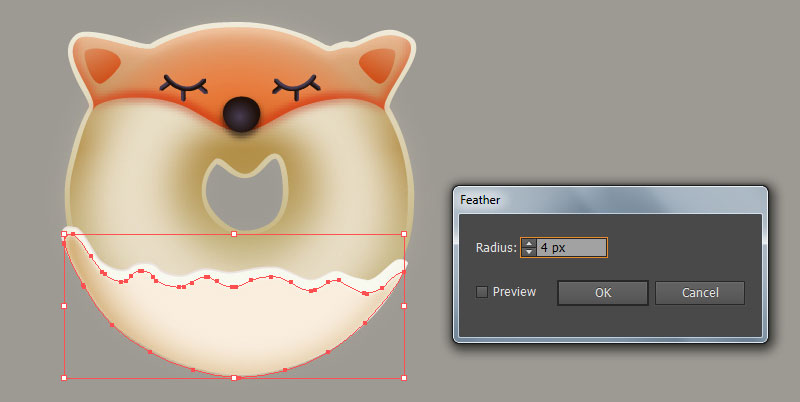
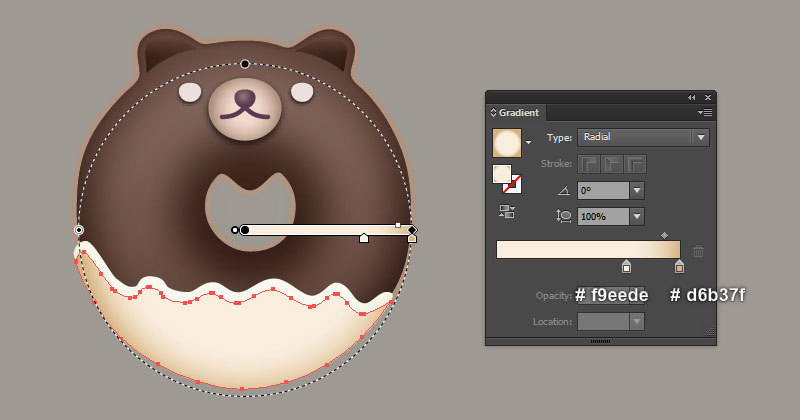
Pick the Pen Tool (P) and create two objects like you see in the first and the second image. Once your objects are drawn, select the black object, remove its stroke and then fill this object with the radial gradient as shown in the third image.
Next, select the red object, remove its stroke and fill this object with the radial gradient as shown in the next to last image.
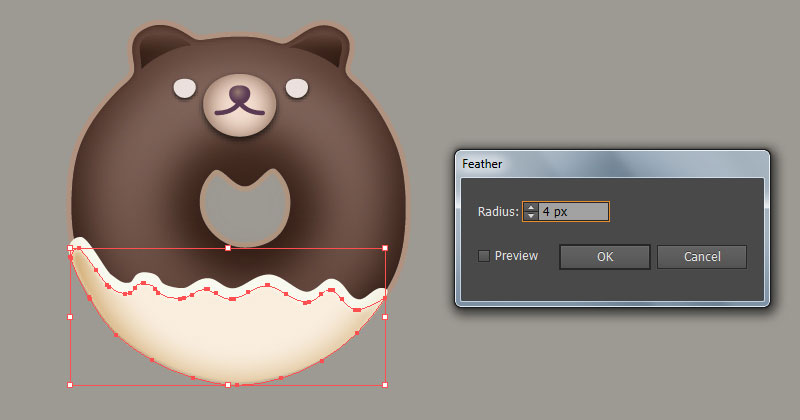
Apply a 4px Feather effect for the resulting shape.
Step 32
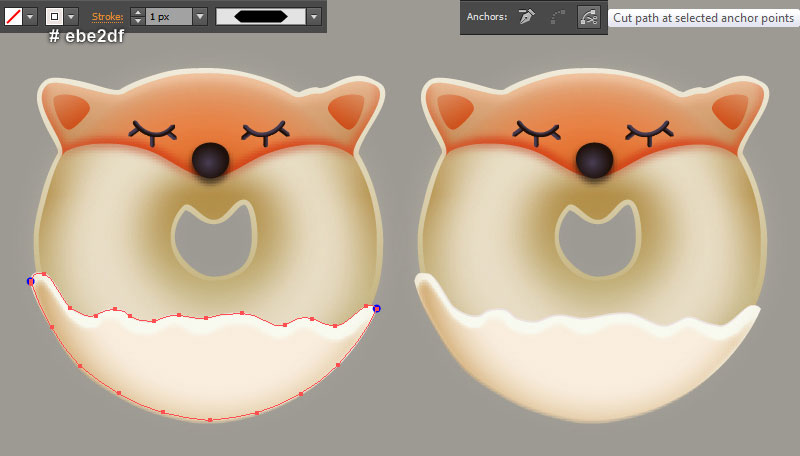
Select the bigger shape created in step 31 and make a copy (Ctrl +C, Ctrl +F) of it. Keep the copy selected, swap the fill and stroke colors by clicking the bent double-headed arrow next to the Fill and Stroke color swatches in the Toolbox. Replace the existing stroke color of the resulting object with light grayish red (#ebe2df) and apply the Width Profile 3 for it.
Focus on the first image, select two anchor points highlighted with blue and click on the “Cut path at selected anchor points” icon from the Properties bar. This makes the object created in this step becomes two paths. Select and remove the lower path.
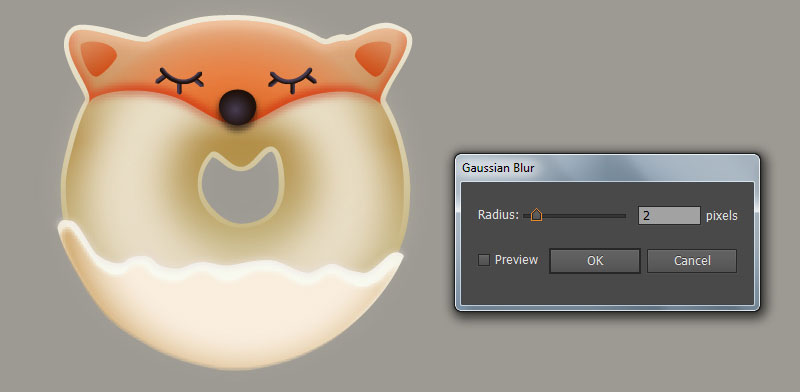
Apply a 2px Gaussian Blur effect for the remaining path.
Step 33
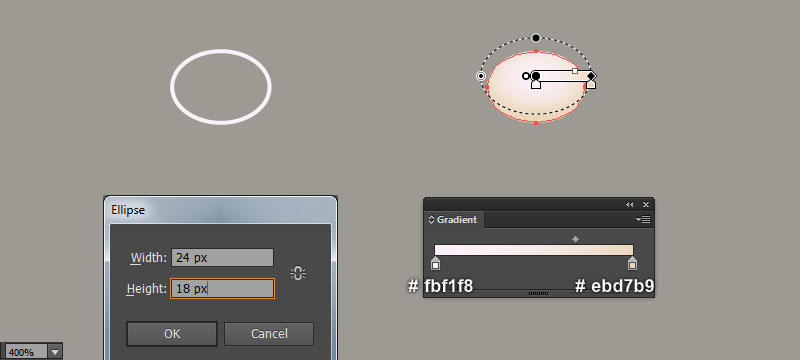
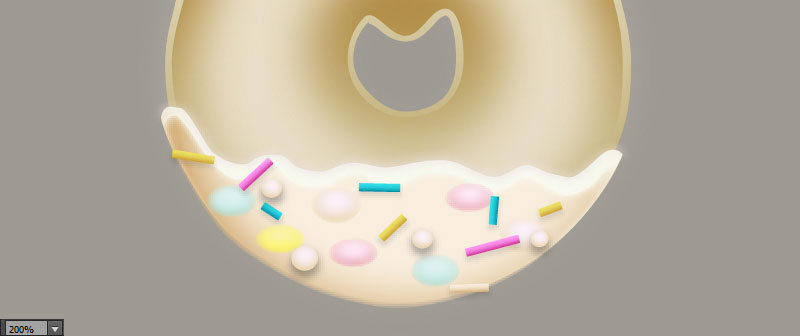
Pick the Ellipse Tool (L) and create a 24 by 18px ellipse. Remove the stroke of the newly created ellipse and then fill it with the radial gradient as shown in the second image. Continue to draw more ellipses until you have something like this. Also, you can see them all in the next to last image.
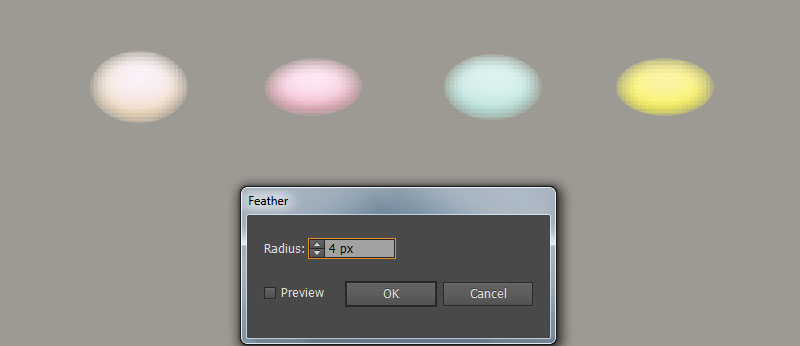
Select four ellipses created in this step and apply a 4px Feather effect for them.

Step 34
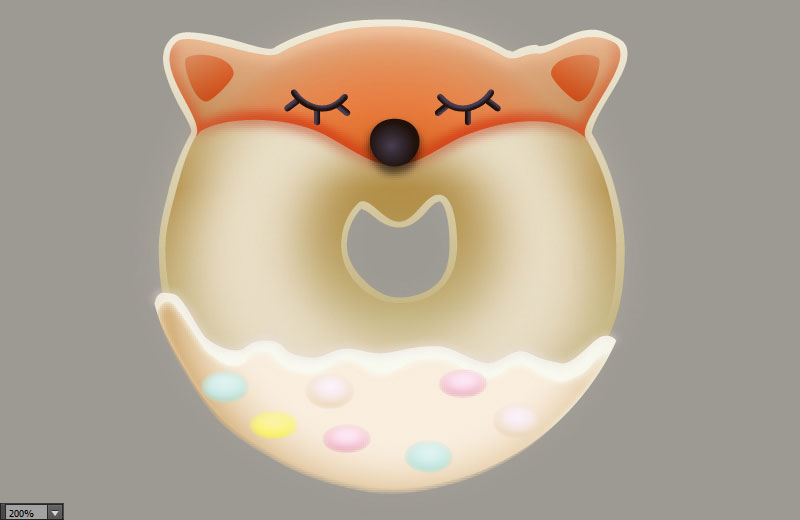
Make some copies of the four ellipses created in step 33 and then place them in the positions like you see in the first image. You can arrange these objects the way you want by aligning and rotating them in various ways.
Step 35
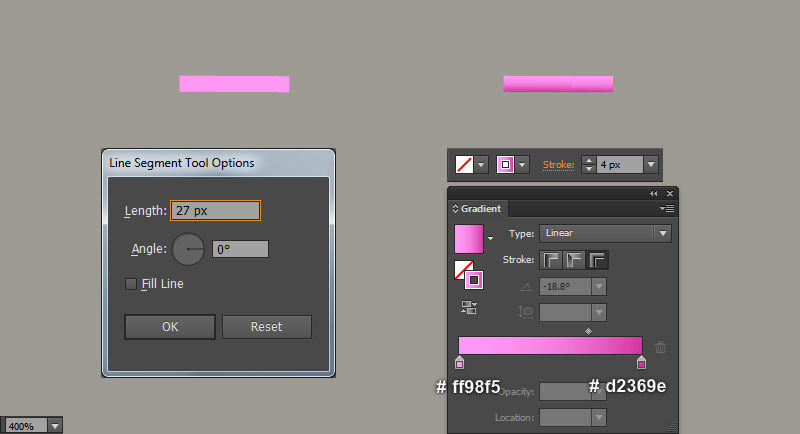
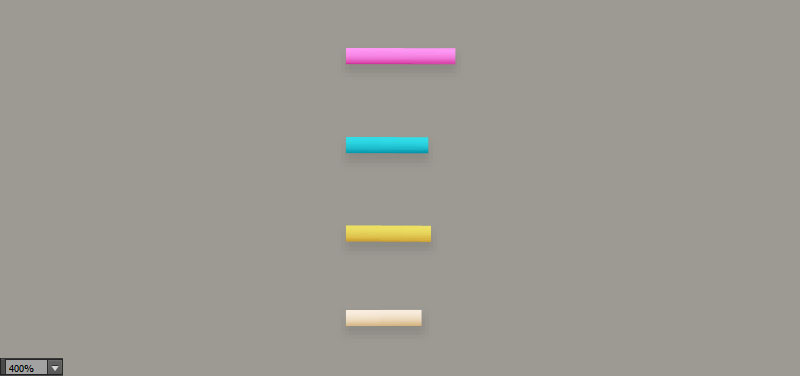
Using the Line Segment Tool (\) create a horizontal line of length 27px, with a 4px stroke and no fill. Next, replace the existing stroke color of the newly created line with the linear gradient across stroke as shown in the second image.
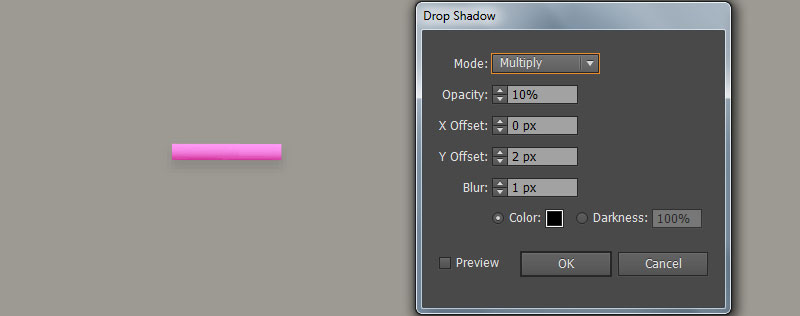
Keep the resulting line selected and go to the Effect > Stylize > Drop Shadow… Follow the data as shown in the third image and click OK. Likewise, repeat the same process as the previous steps to draw more lines. Also, you can see them all in the final image.
Step 36
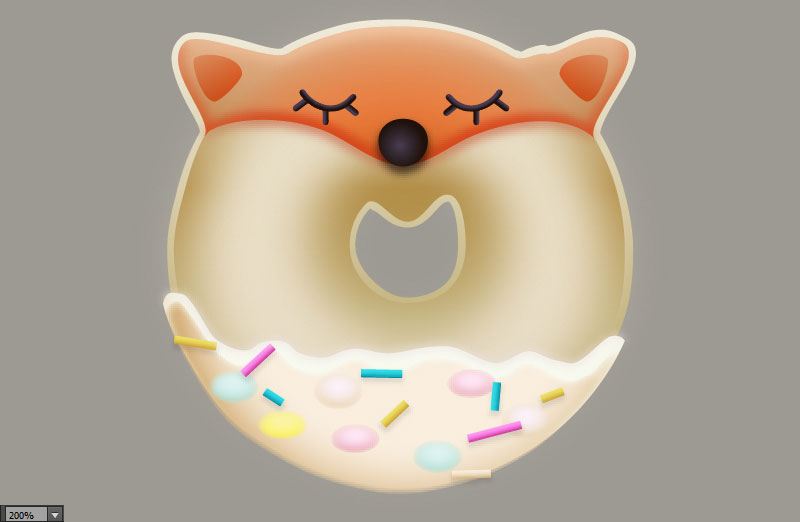
Make some copies of the four lines created in step 35 and then place them in the positions like you see in the first image. You can arrange these objects the way you want by aligning and rotating them in various ways.
Step 37
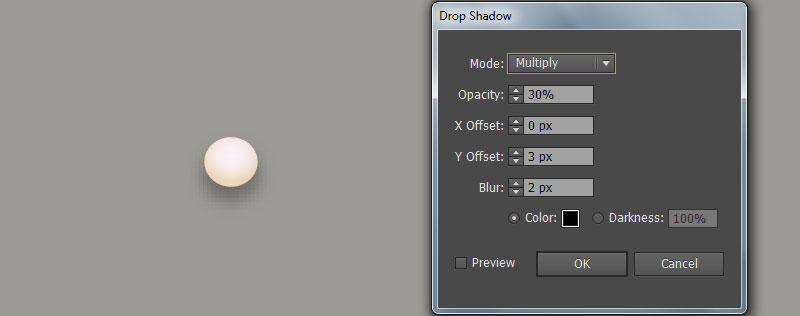
With the help of the Ellipse Tool (L) and the Gradient Tool (G), create a 13 by 12px ellipse like you see in the first and the second image. Still having the newly created ellipse selected and go to the Effect > Stylize > Drop Shadow… Follow the data as shown in the third image and click OK.
Make some copies of the resulting ellipse and place them in the positions as shown in the last image. Then scale the newly created ellipses as needed. 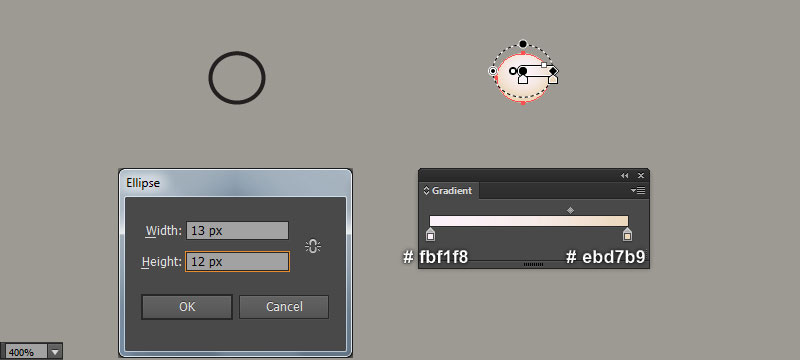
Step 38
Select all objects of the fox donut and press (Ctrl +G) to group them. We are done with the fox donut for the moment.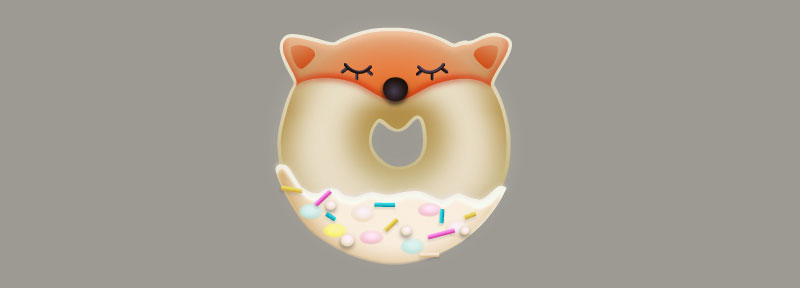
Step 39
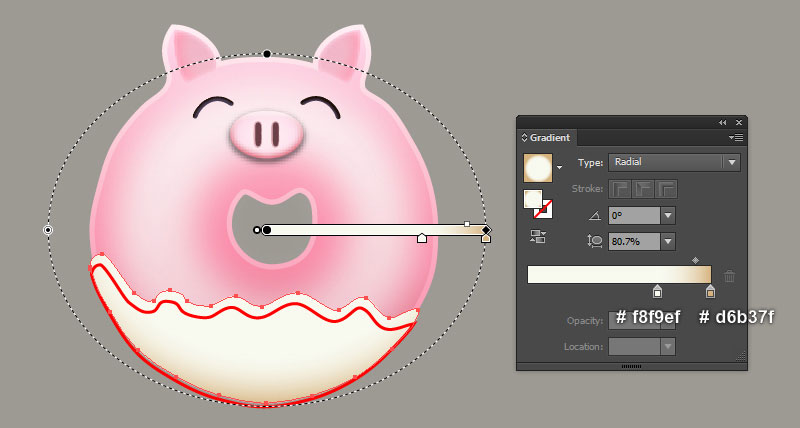
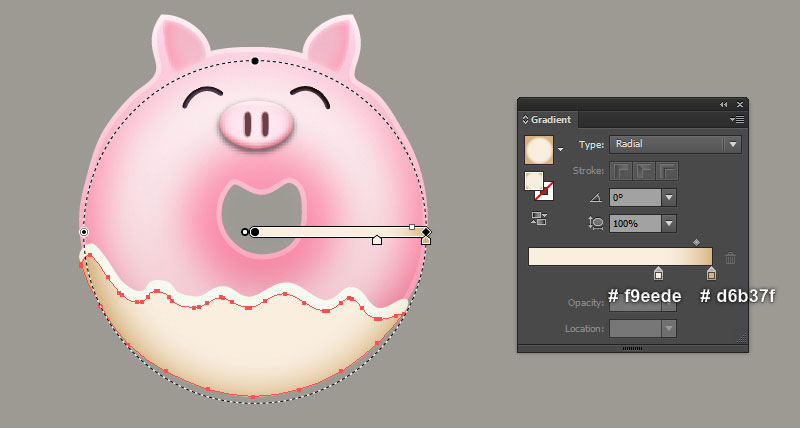
Pick the Pen Tool (P) and create two objects like you see in the first and the second image. Once your objects are drawn, select the blue object, remove its stroke and then fill this object with the radial gradient as shown in the third image.
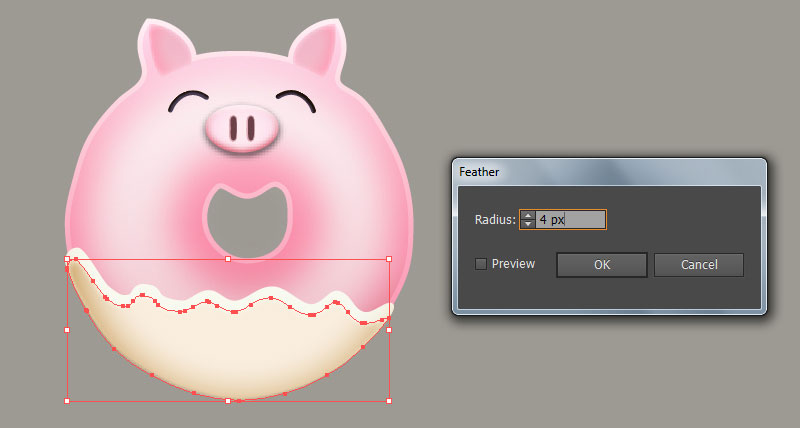
Next, select the red object, remove its stroke and fill this object with the radial gradient as shown in the fourth image. Then apply a 4px Feather effect for the resulting shape.
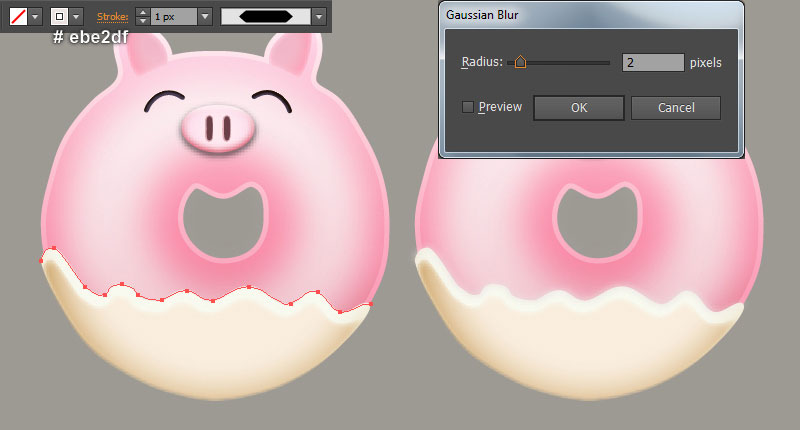
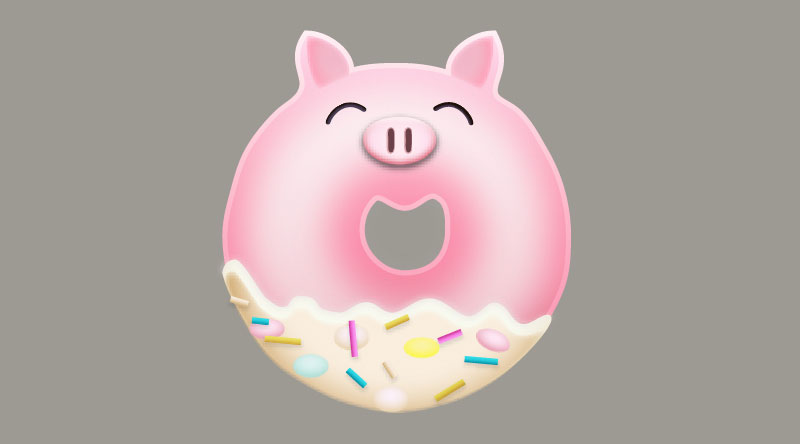
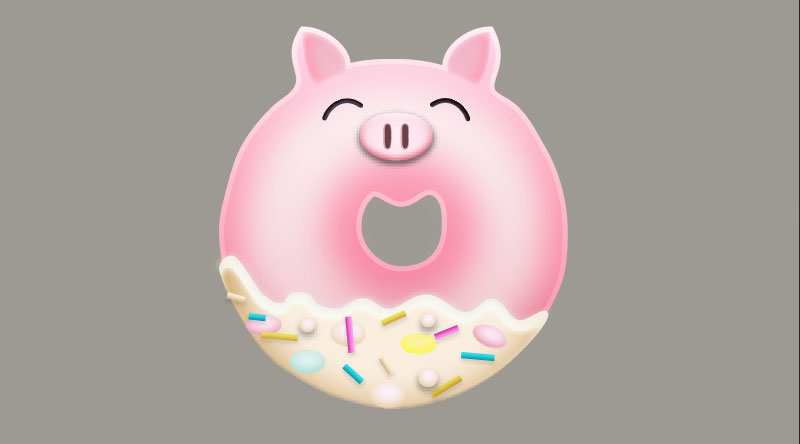
Now focus on the next to last image and repeat the same process as step 32 to draw a curved path. Replace the existing stroke color of the newly created path with light grayish red (#ebe2df) and apply the Width Profile 3 for it.
Keep the resulting path selected and go to the Effect > Blur > Gaussian Blur… Enter a 2px Radius and click OK.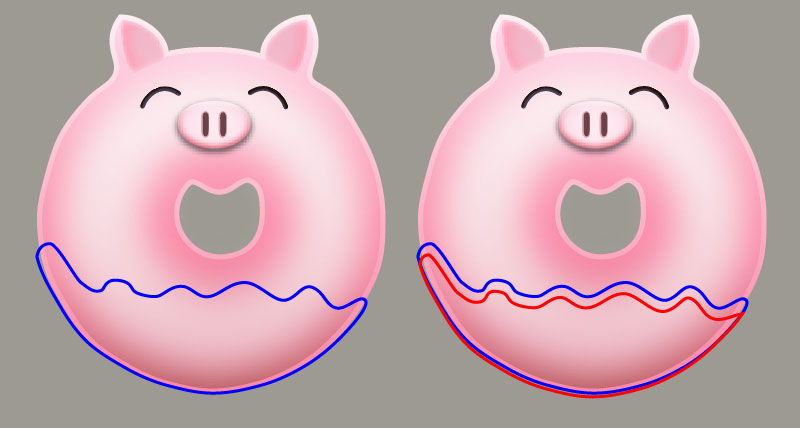
Step 40
Now, follow the sequence of images and repeat the same process as the previous steps to add details on the pig donut.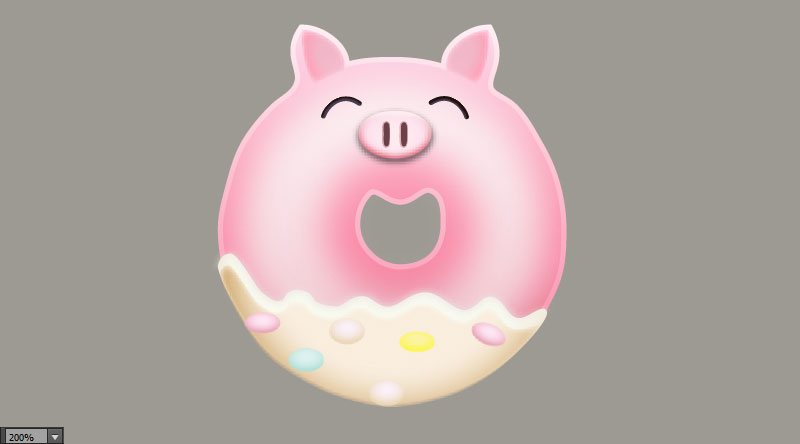
Step 41
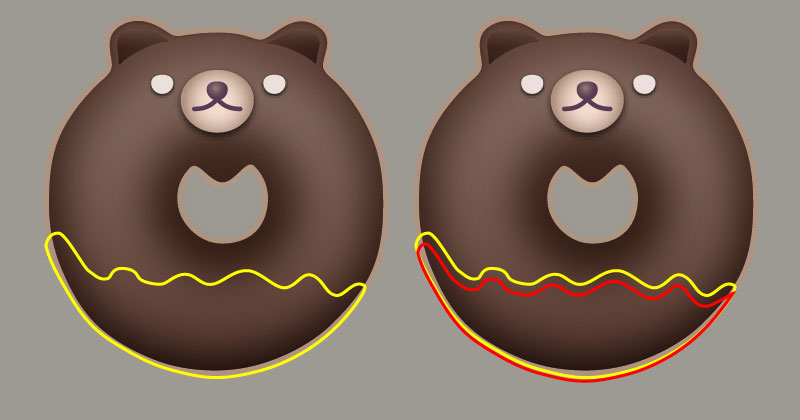
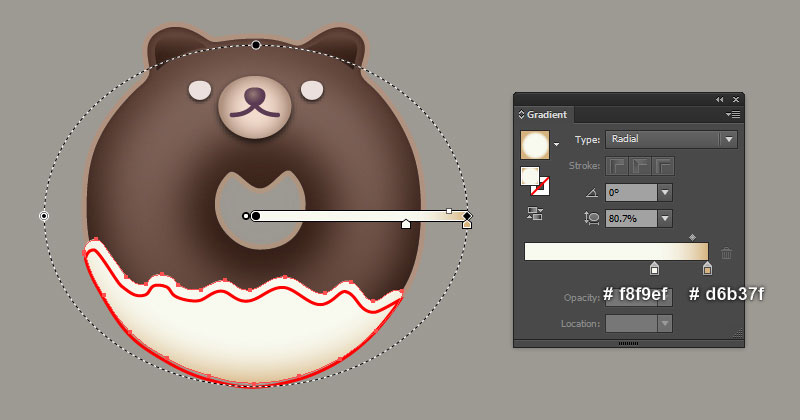
Pick the Pen Tool (P) and create two objects like you see in the first and the second image. Once your objects are drawn, select the yellow object, remove its stroke and then fill this object with the radial gradient as shown in the third image.
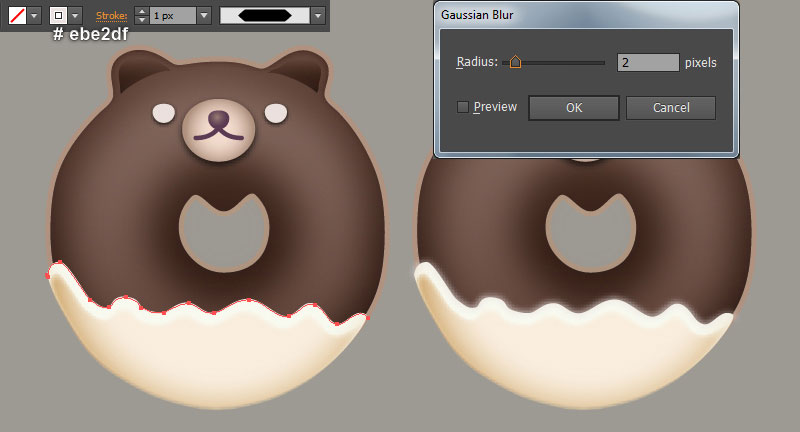
Select the red object, remove its stroke and fill this object with the radial gradient as shown in the fourth image. Then apply a 4px Feather effect for the resulting shape. Now focus on the next to last image and repeat the same process as step 32 to draw a curved path.
Replace the existing stroke color of the newly created path with light grayish red (#ebe2df) and apply the Width Profile 3 for it. Keep the resulting path selected and go to the Effect > Blur > Gaussian Blur… Enter a 2px Radius and click OK.
Step 42
Follow the sequence of images and repeat the same process as the previous steps to add details on the bear donut.

Step 43
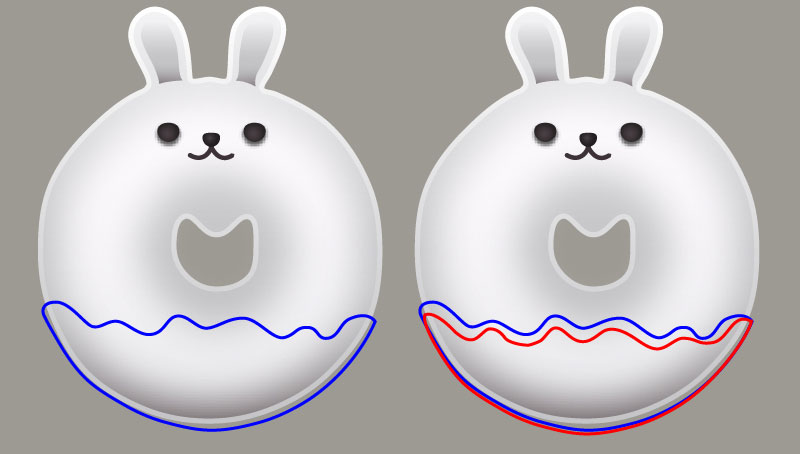
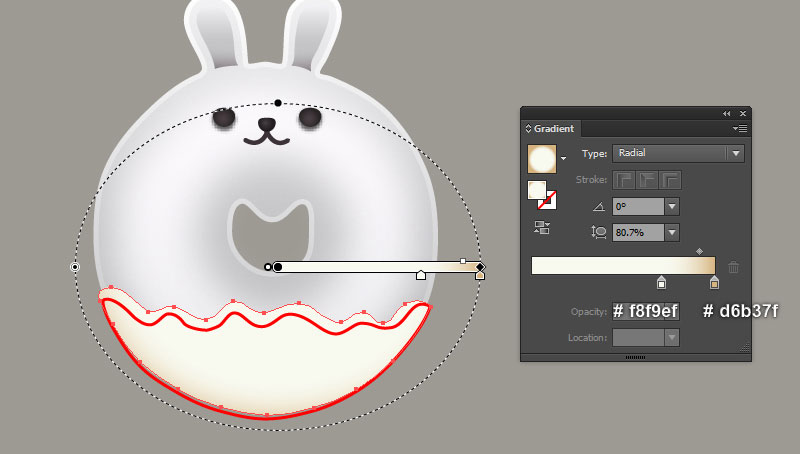
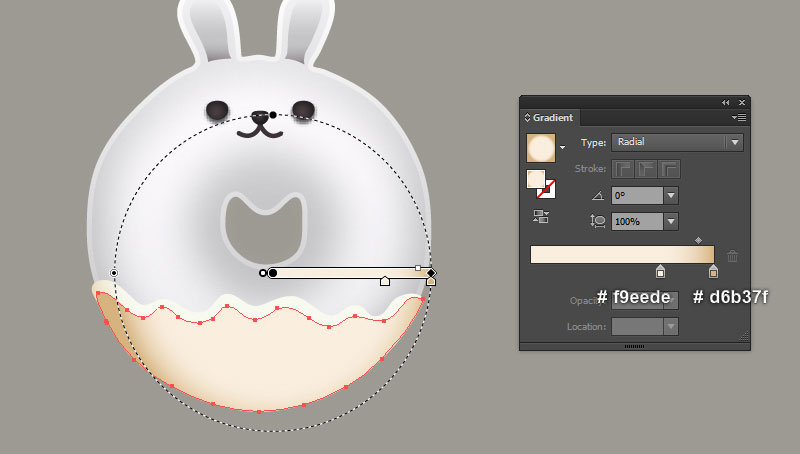
Pick the Pen Tool (P) and create two objects like you see in the first and the second image. Once your objects are drawn, select the yellow object, remove its stroke and then fill this object with the radial gradient as shown in the third image.
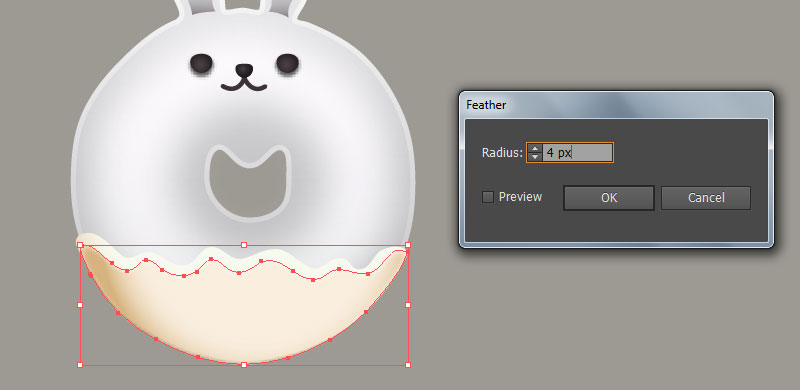
Select the red object, remove its stroke and fill this object with the radial gradient as shown in the fourth image. Then apply a 4px Feather effect for the resulting shape. Now focus on the next to last image and repeat the same process as step 32 to draw a curved path.
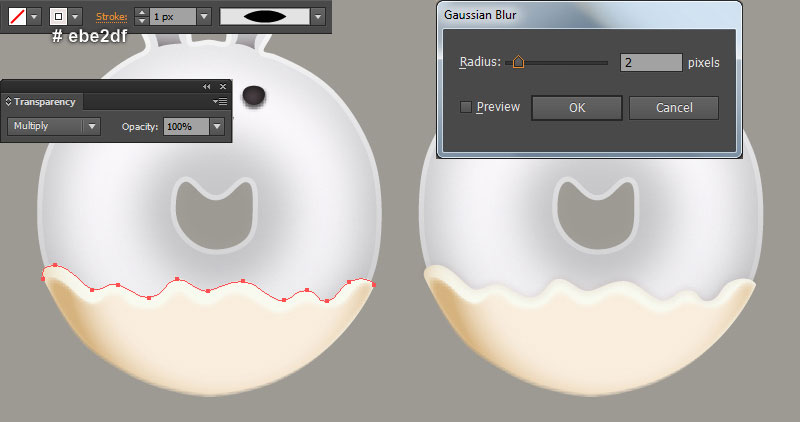
Replace the existing stroke color of the newly created path with light grayish red (#ebe2df) and change the Blending Mode to Multiply.
Apply the Width Profile 1 and a 2px Gaussian Blur effect for the resulting path.
Step 44
Now follow the sequence of images and repeat the same process as the previous steps to add details on the rabbit donut.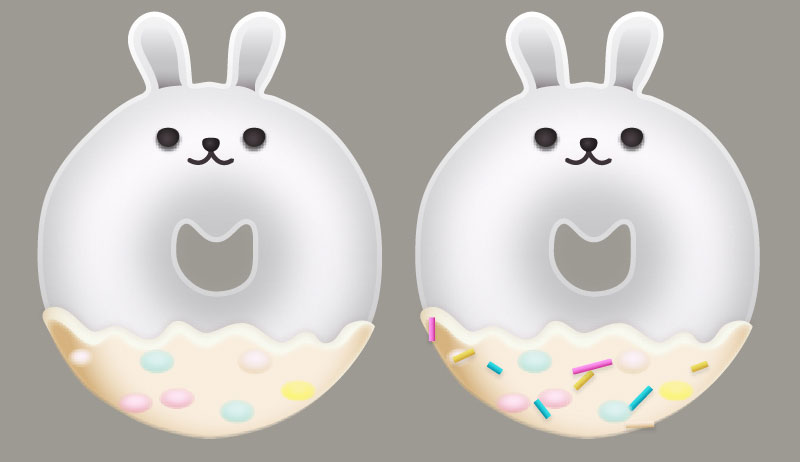
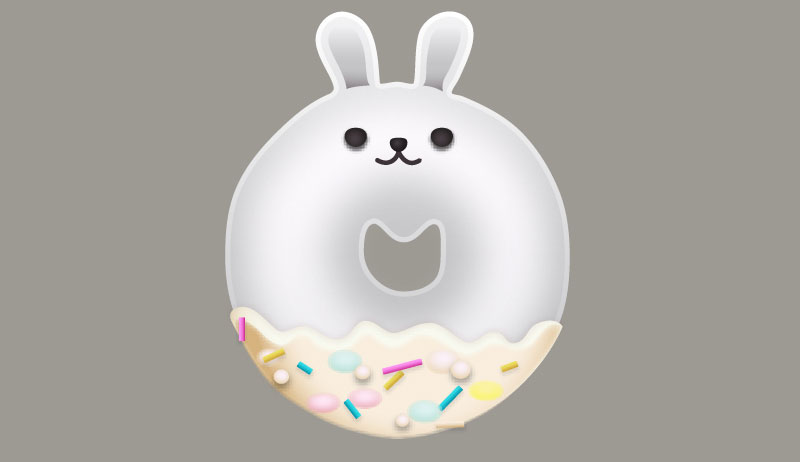
Step 45
The animal donuts are ready and look like this:
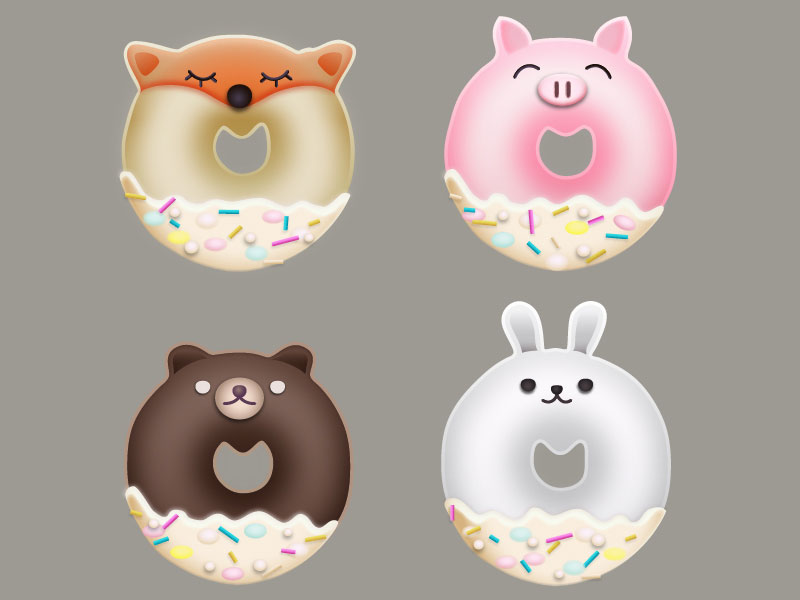
Step 46
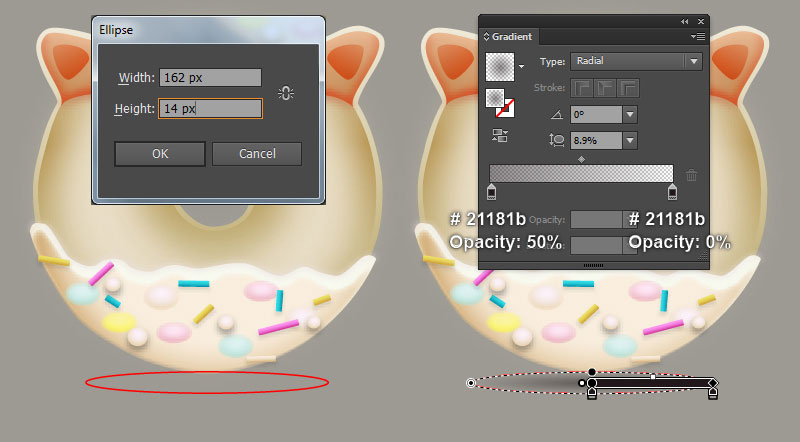
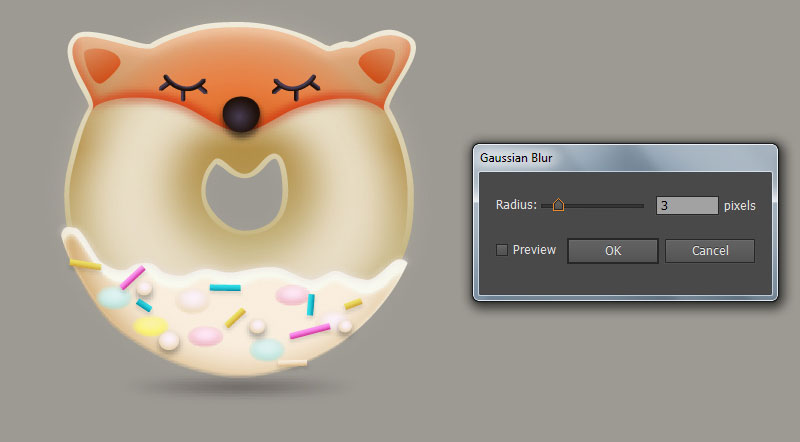
We are going to start making shadows on the animal donuts to give them more of a 3D look. With the help of the Ellipse Tool (L) and the Gradient Tool (G), create a 162 by 14px ellipse as shown in the first and the second image.
Apply a 3px Gaussian Blur effect for the newly created ellipse.
Step 47
Make three copies of the ellipse created in step 46 and then place them in the positions like you see in the image below. 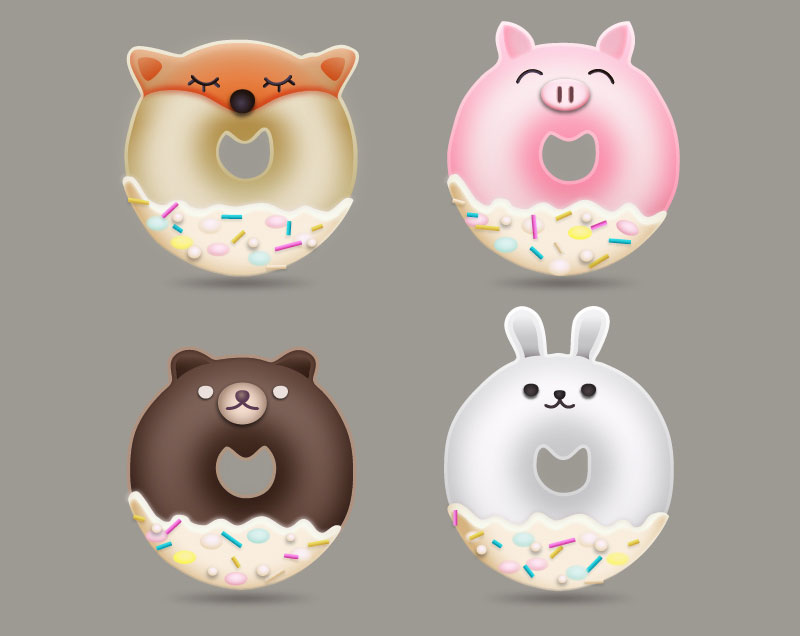
Step 48
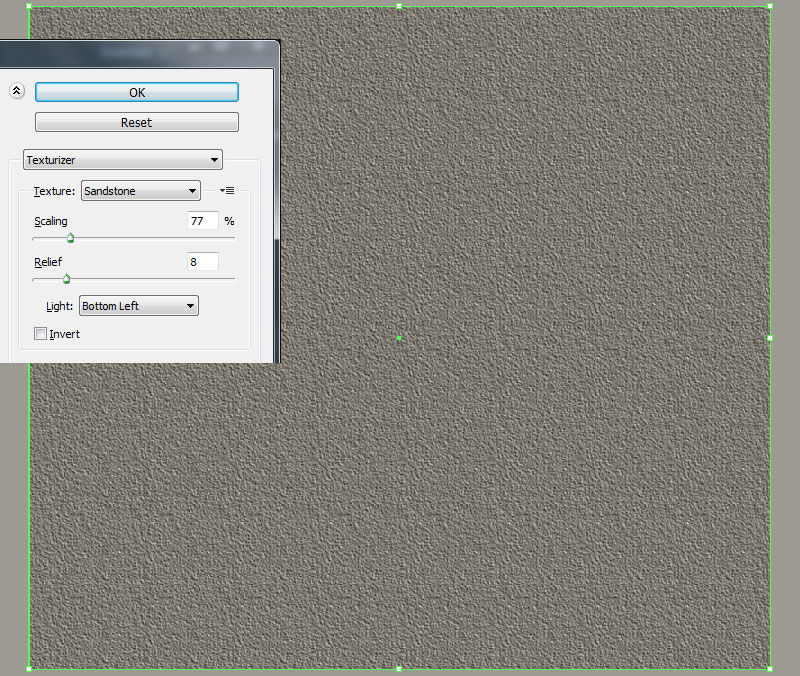
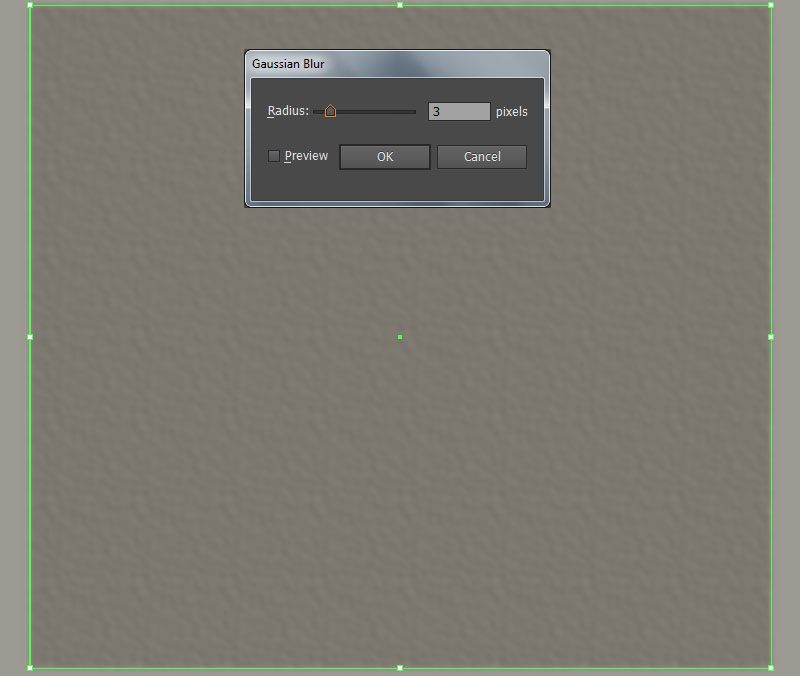
We’re done with the animal donuts. It’s time for the background now. Pick the Rectangle Tool (M) and create an 824 by 736px dark grayish orange rectangle (#7c786f). Still having the newly created rectangle selected and go to the Effect > Texture > Texturizer… Follow the data as shown in the second image and click OK.
Apply a 3px Gaussian Blur effect for the resulting rectangle. The last thing to do is place the animal donuts into the newly created background.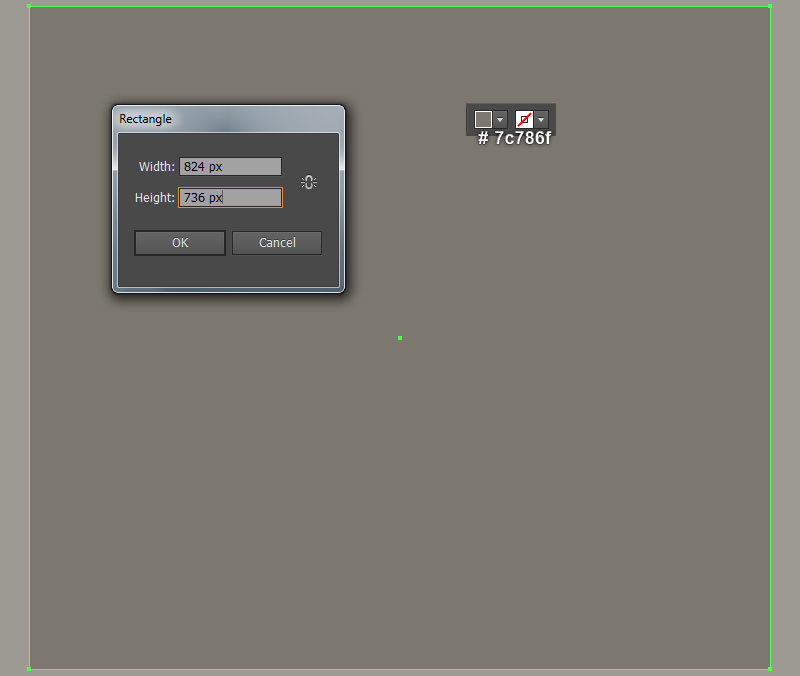
And We’re Done!
