In the following tutorial you will learn how to create a racing bicycle in Adobe Illustrator.
You will learn how to create the various parts and different details of the image by using vector shape building techniques along with Transform effects and Blend options.
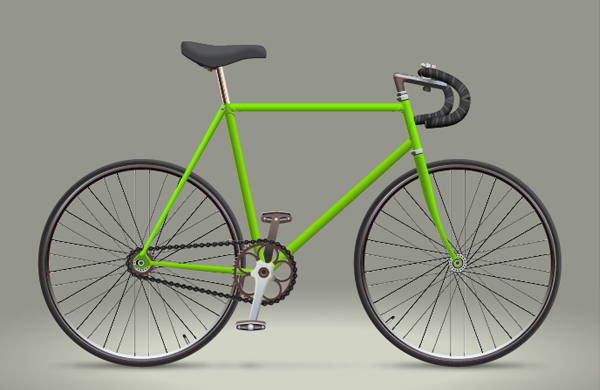
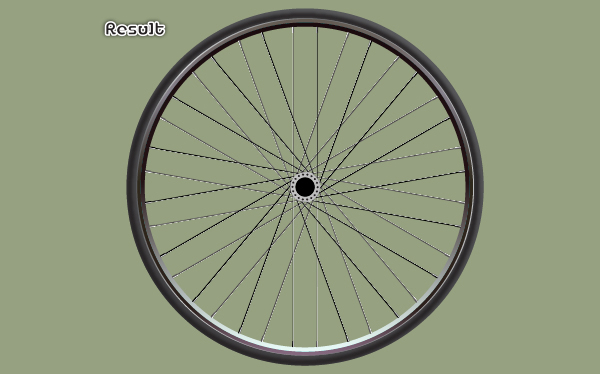
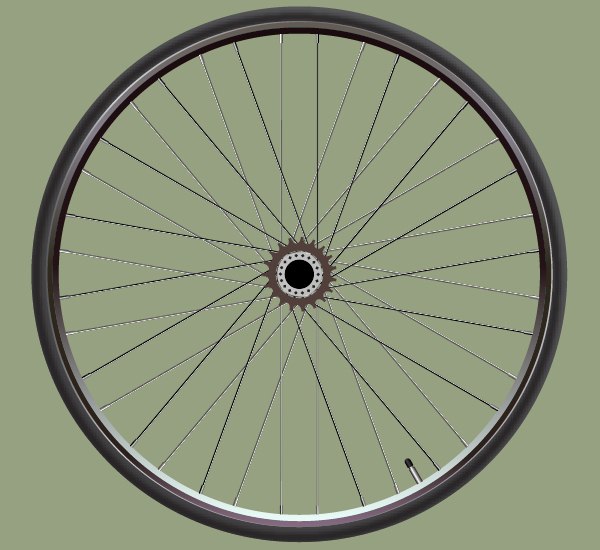
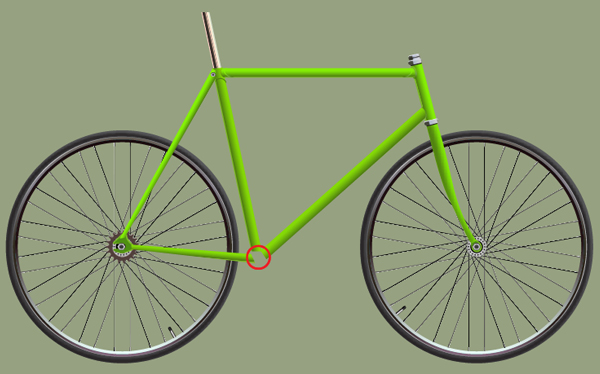
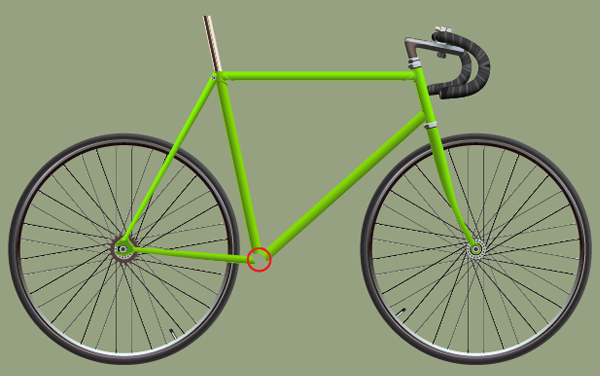
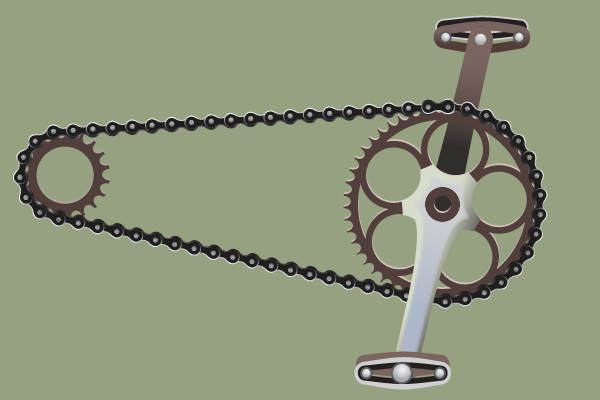
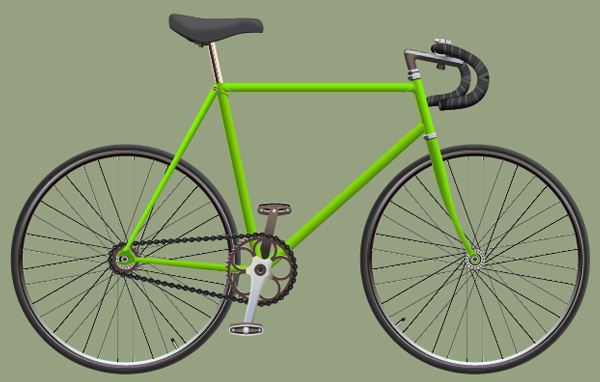
Final Image
As always, this is the final image that we’ll be creating:
Tutorial Details
- Program: Adobe Illustrator CS6
- Estimated Completion Time: 120 minutes
- Difficulty: Beginner-Intermediate
Step 1
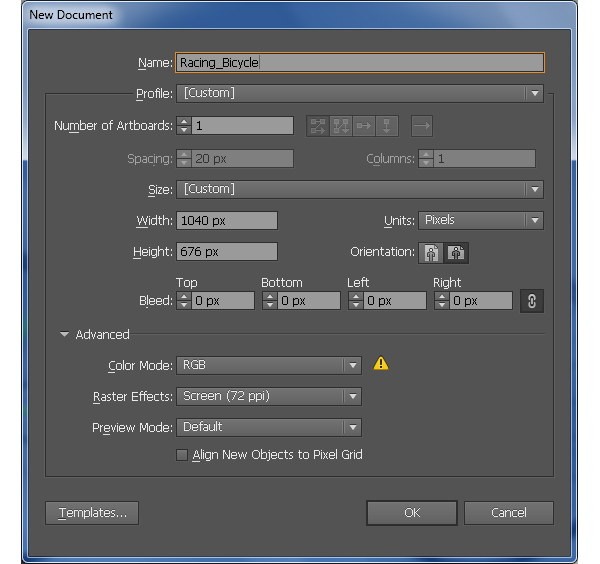
Launch Illustrator and then press (Ctrl + N) to create a New document.
Select Pixels from the Units drop-down menu, enter 1040 in the width box and 676 in the height box then click on the Advanced button.
Select RGB, Screen (72ppi) and make sure that the Align New Objects to Pixel Grid box is unchecked before you click OK.
Step 2
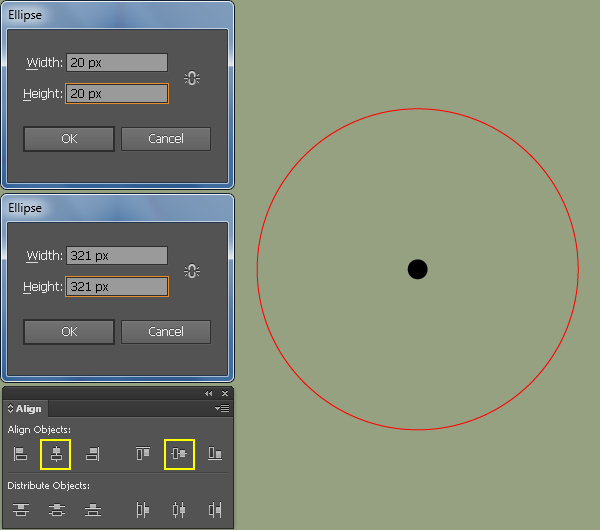
Let’s start by creating the front wheel of the bicycle.
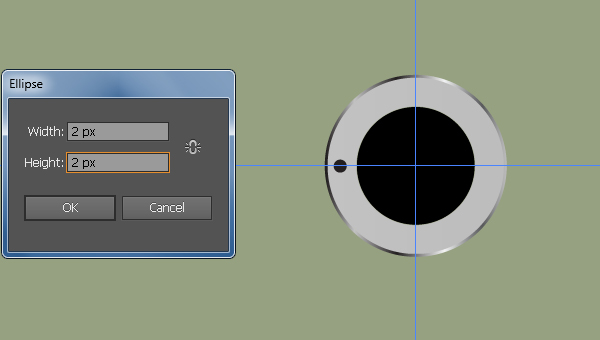
Pick the Ellipse Tool (L) and create two ellipses with dimensions: 20px by 20px and 321px by 321px.
Fill the small ellipse with black.
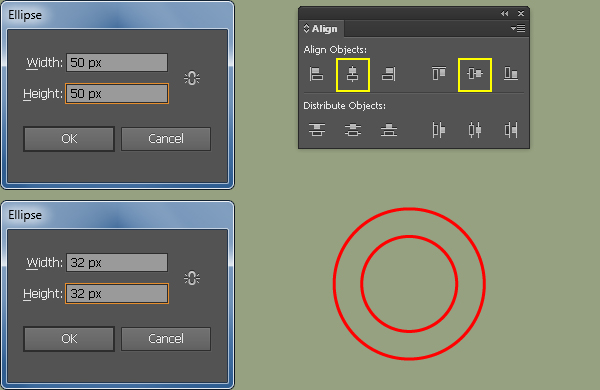
Next select the two newly created ellipses and open the Align palette (Window > Align), then click on the Horizontal Align Center button and click on the Vertical Align Center button.
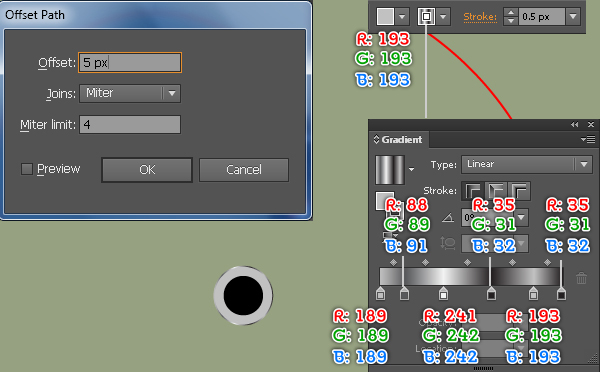
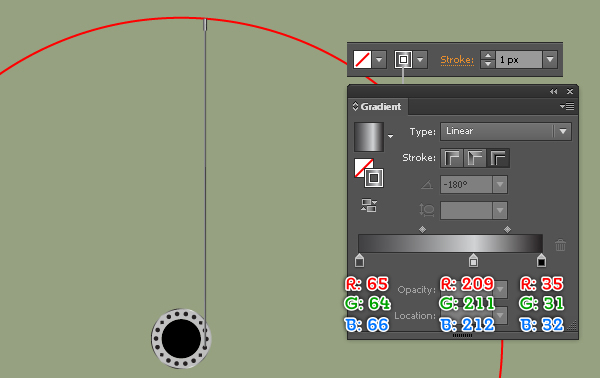
Reselect the small ellipse and go to Object > Path > Offset Path… Enter a 5px Offset and click OK.
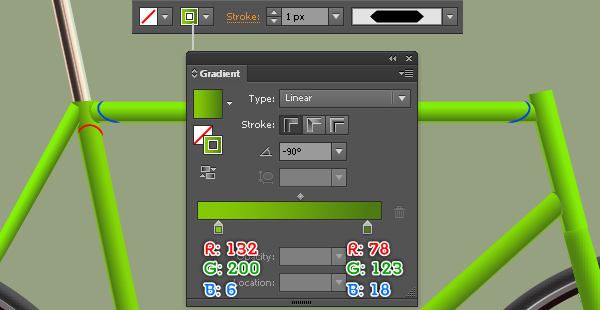
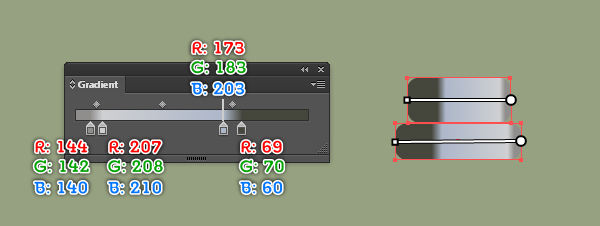
Replace the existing color of the new ellipse with R=193, G=193, B=193 and add a 0.5px stroke (apply the linear gradient within stroke).
Step 3
Show the Rulers (View > View Rulers > Show Ruler) or (Ctrl +R).
Next drag a horizontal and vertical guide from the Rulers (if the guides are locked, go to the View > Guides > Lock Guides) or (Ctrl +Alt + ;).
Now select the black ellipse, hold down the Shift key, click on the two newly created guides, release the Shift key and then click on the black ellipse again (to fix its position).
Next open the Align palette (Window > Align), click on the Horizontal Align Center button and then click on the Vertical Align Center button.
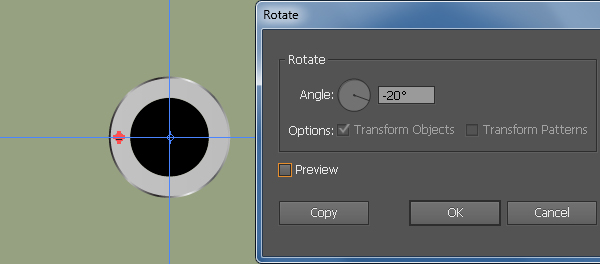
With the Ellipse Tool (L) create a 2 by 2px black ellipse and place it in the correct position as shown below.
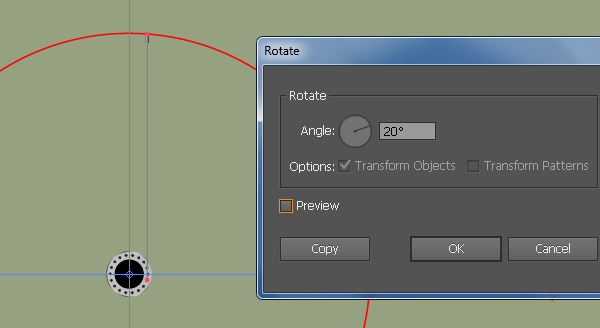
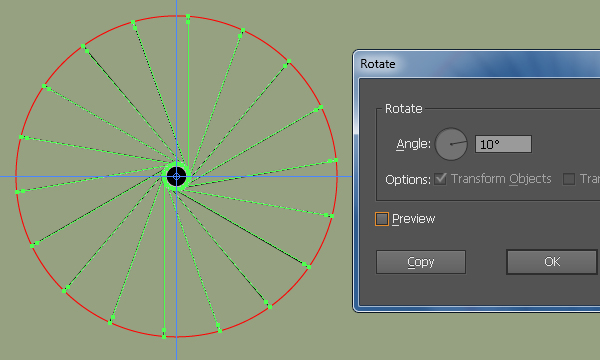
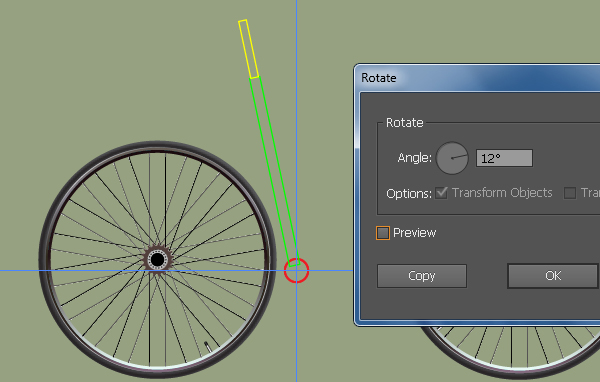
Make sure that the newly created ellipse is still selected, hold down the Alt key and click on the intersection point of the two guides.
In the Rotate dialog box, enter -20 in the Angle box and click Copy.
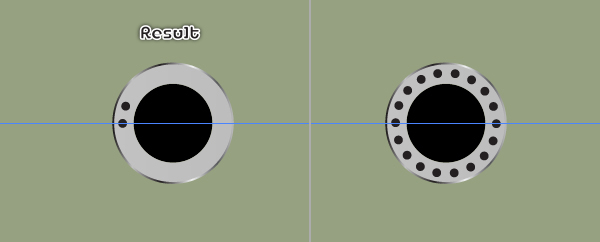
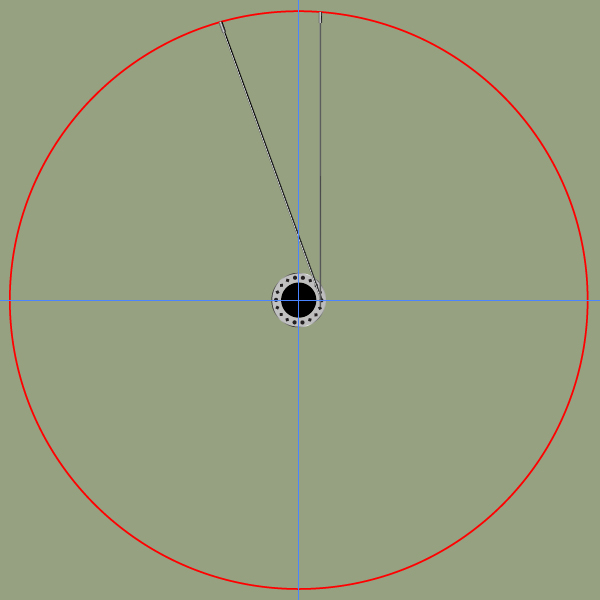
Press (Ctrl +D) sixteen times to get the result you see in the fourth image.
Finally select and group (Ctrl + G) all shapes created from the beginning of step 2 to this time (except the red ellipse).
Step 4
Next come the spokes.
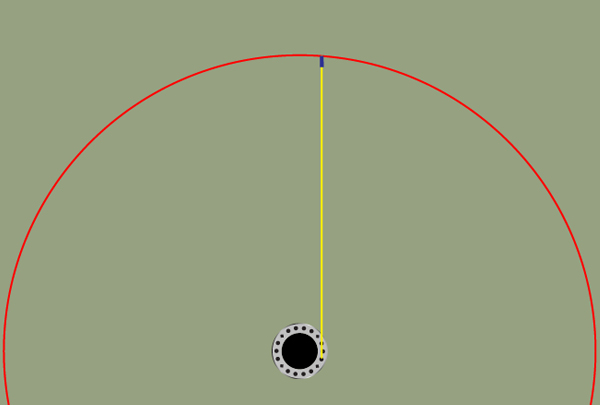
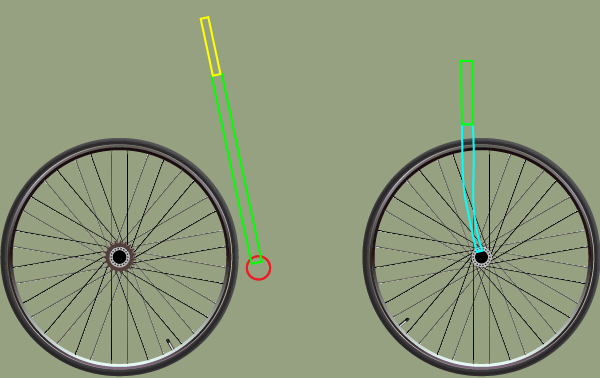
Pick the Line Segment Tool (\) and create two vertical lines, then place them in the correct positions as shown below.
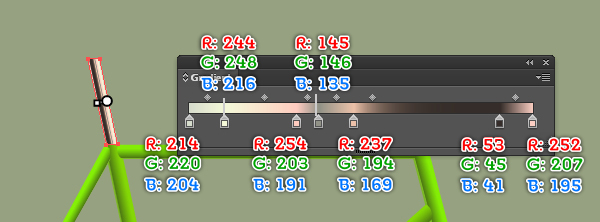
Reselect these two lines and replace the existing stroke color with the linear gradient across stroke as shown in the second image.
Next select the shorter line and change the stroke weight of it to 2px.
Now select and group (Ctrl +G) the two newly created lines.
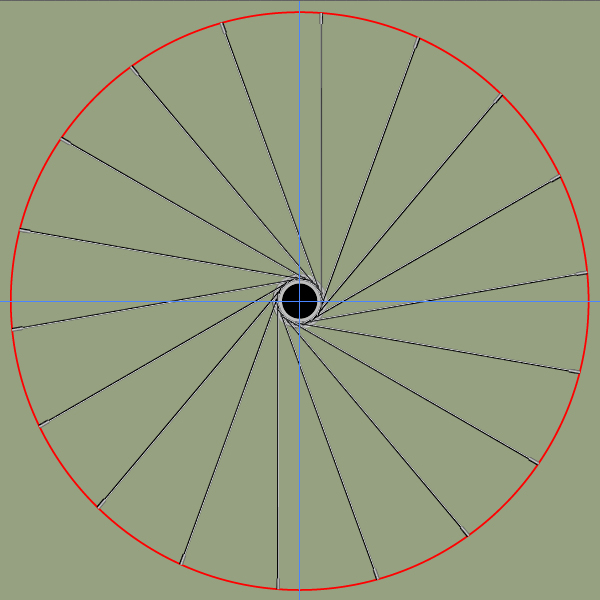
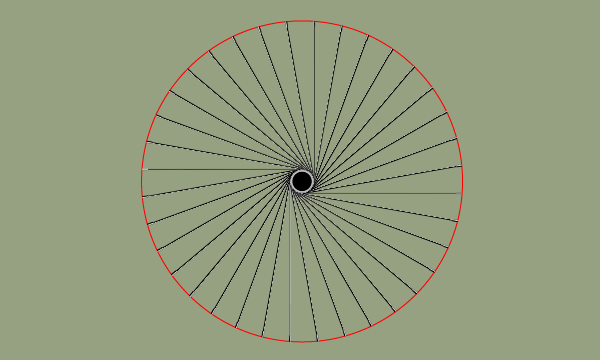
Make sure that the new group is still selected, pick the Rotate Tool (R) and hold down the Alt key, then click on the intersection point of the two guides created in step 3.
In the Rotate dialog box, enter 20 for the Angle and click Copy.
Press (Ctrl +D) sixteen times to get the result shown in the final image.
Finally select and group (Ctrl +G) all spokes created in this step.
Step 5
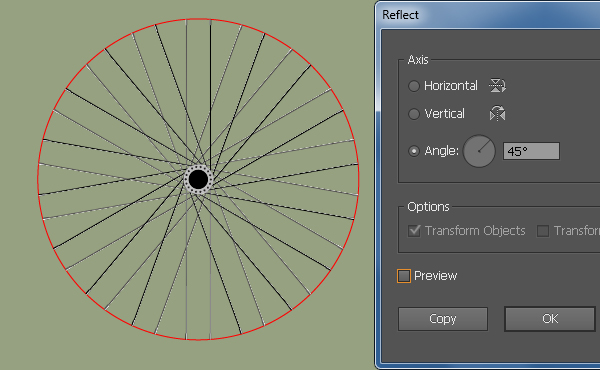
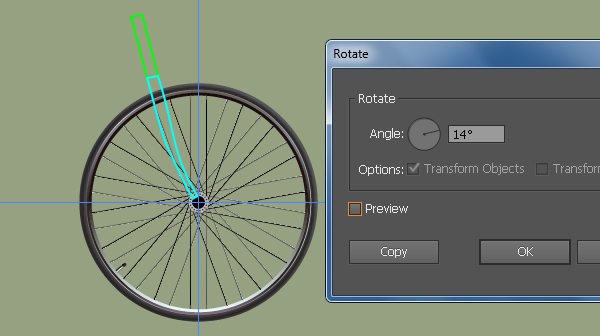
Select the group created in step 4 and go to Object > Transform > Rotate… Enter 10 in the Angle box and click Copy.
Go to Object > Tranform > Reflect… Check the Angle section and enter 45 in the Angle box, then click OK.
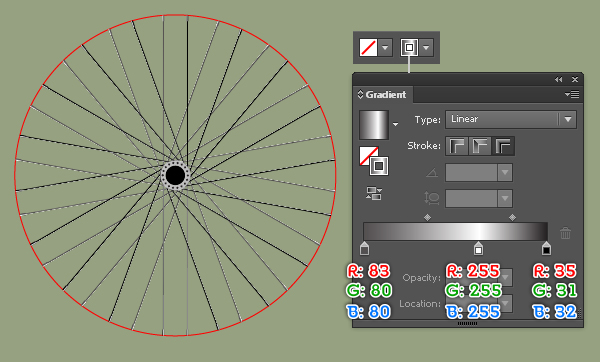
Next replace the existing stroke color of the newly created group as you see in the final image.
Step 6
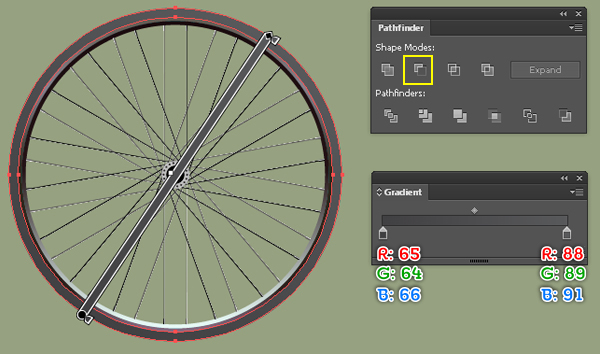
It’s time to draw the rim and the tyre of the wheel.
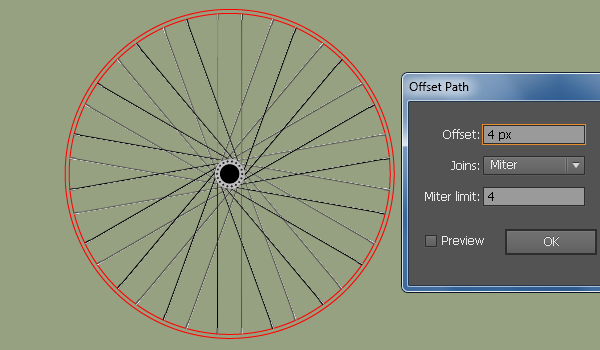
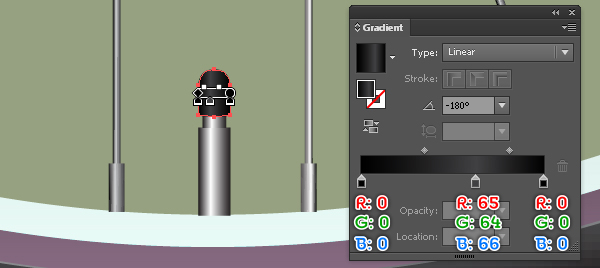
Select the red ellipse and go to Object > Path > Offset Path… Enter a 4px Offset and click OK.
Keep the new ellipse selected and duplicate (Ctrl +C, Ctrl +F) it once, then hide the copy (Ctrl +3).
Reselect the two red ellipses, open the Pathfinder palette (Window > Pathfinder) and click on the Minus Front button, then fill the resulting object with the linear gradient as shown in the second image.

Step 7
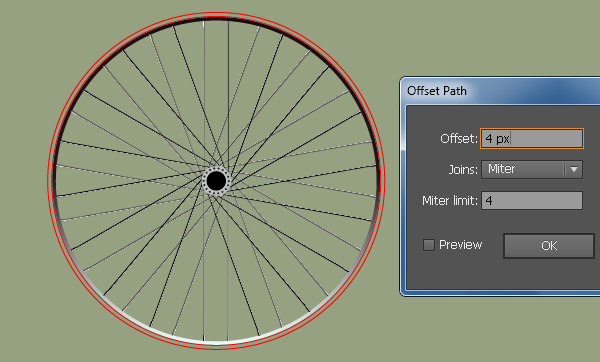
Before you continue, press (Ctrl +Alt +3) to show the red ellipse hidden in step 6.
Keep this ellipse selected and go to Object > Path > Offset Path… Enter a 4px Offset and click OK.
Make sure that the new ellipse is still selected and duplicate (Ctrl +C, Ctrl +F) it once, then hide the copy (Ctrl +3).
Reselect the two red ellipses and click on the Minus Front button from the Pathfinder palette, then fill the resulting object with the linear gradient as shown in the second image.
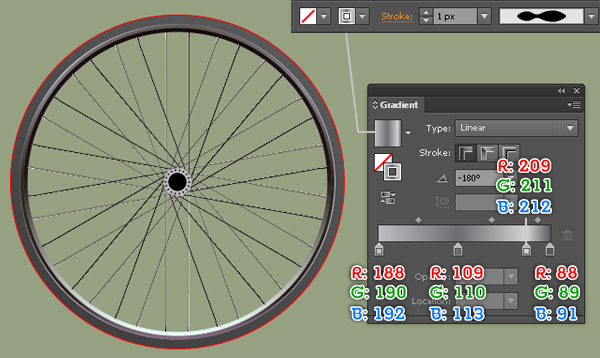
Step 8
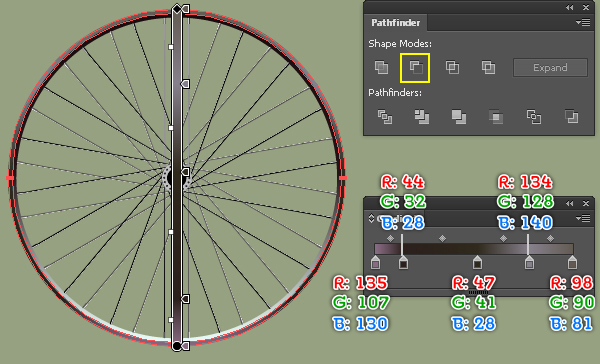
Show the red ellipse hidden in step 7. Keep this ellipse selected and go to Object > Path > Offset Path… Enter a 10px Offset and click OK.
Next select the two red ellipses and duplicate (Ctrl +C, Ctrl +F) them once, then hide the copies (Ctrl +3).
Reselect the two original ellipses and click on the Minus Front button from the Pathfinder palette, then fill the resulting object with the linear gradient as shown in the second image.
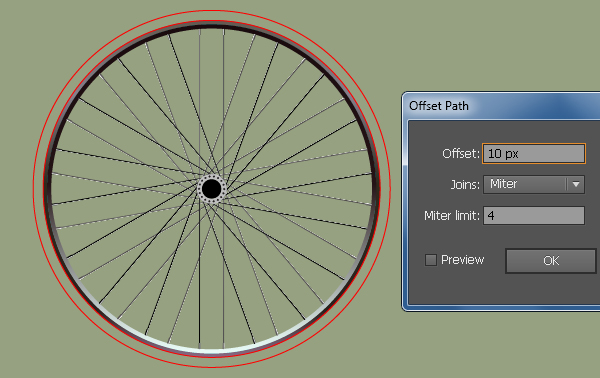
Now show the two red ellipses hidden in this step, then select the smaller ellipse and replace the existing stroke colort with the linear gradient within stroke.
Finally apply Width Profile 2 to the resulting ellipse.
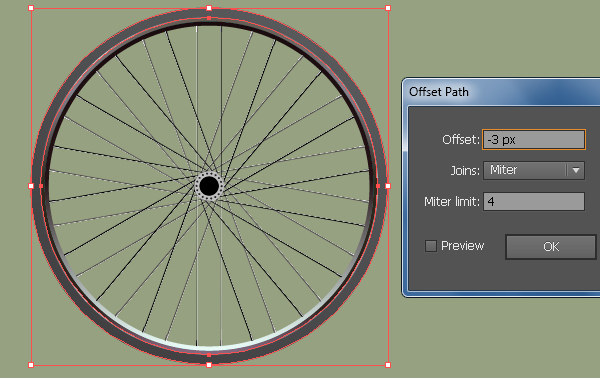
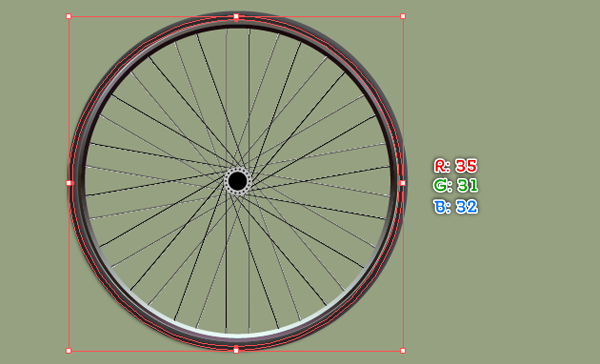
Step 9
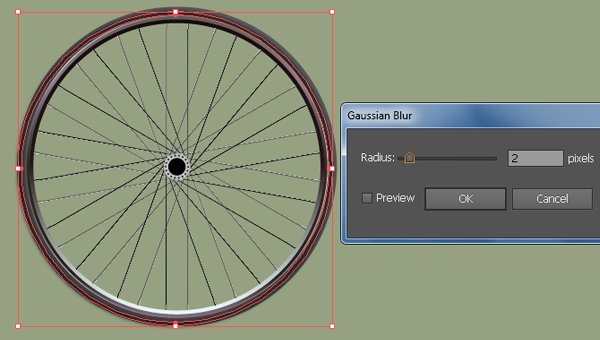
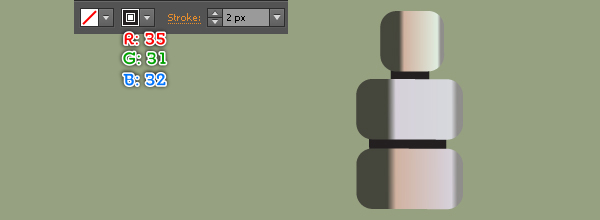
Select the shape created in step 8 and go to Object > Path > Offset Path… Enter a -3px Offset and click OK.
Replace the existing color of the resulting shape with R=35, G=31, B=32.
Keep the resulting shape selected and go to the Effect > Blur > Gaussian Blur… Enter a 2px Radius and click OK.
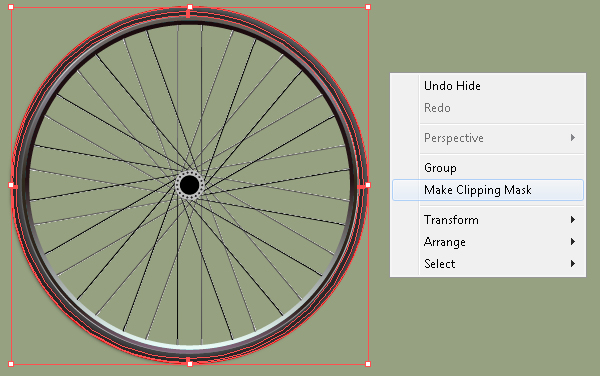
Now reselect the red ellipse created in step 8 and bring it to front (Ctrl +Shift +Right Square Bracket).
Make sure that the red ellipse is still selected, hold down the Shift key and click on the shape with blur effect applied in this step, then go to Object > Clipping Mask > Make (Ctrl +7).
Step 10
We will continue with the valve.
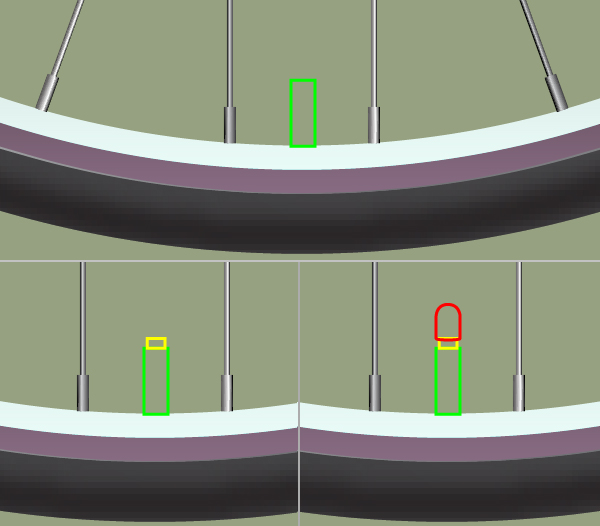
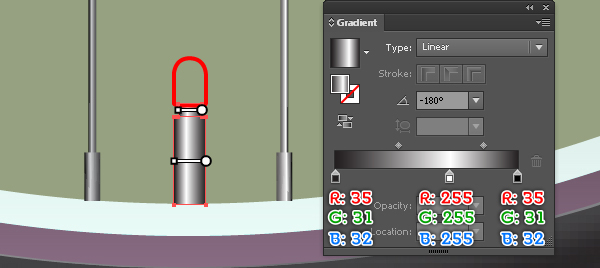
With the help of the Rectangle Tool (M) along with the Pen Tool (P) create three objects and then place them in the positions shown below.
Next fill these objects with the linear gradient as you see in the fourth and the fifth images.
Finally reselect and group (Ctrl + G) all shapes created in this step, then name this group "Valve".
Step 11
Before you continue, press (Ctrl +:) to show the two guides created in step 3 (if you hid them in the previous step).
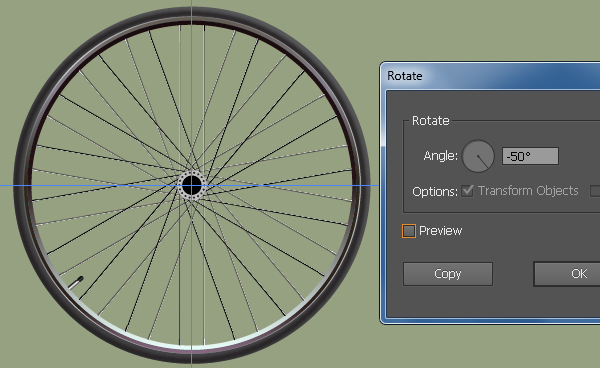
Reselect the group "Valve", pick the Rotate Tool (R), then hold down the Alt key and click on the intersection point of the two guides.
In the Rotate dialog box, enter -50 in the Angle box and click OK.
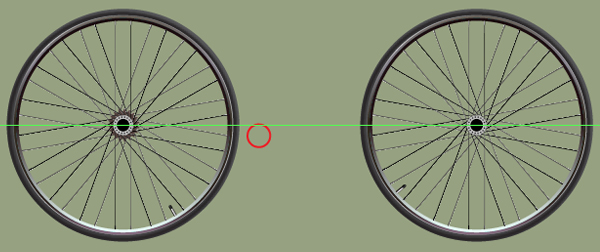
Now select all objects of the front wheel and make a copy (Ctrl +C, Ctrl +F) of them, then hide these copies (Ctrl +3).
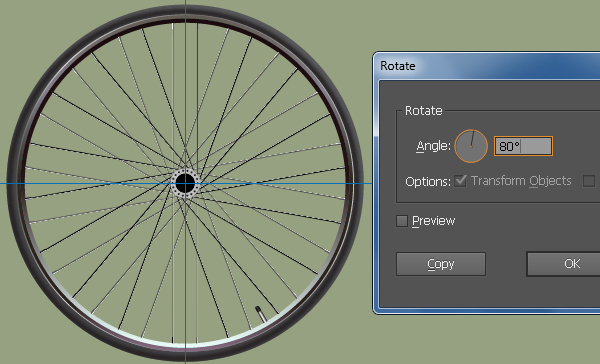
Next select the group "Valve" of the original wheel, pick the Rotate Tool (R), then hold down the Alt key and click on the intersection point of the two guides.
In the Rotate dialog box, enter 80 in the Angle box and click OK.
Reselect all objects of the wheel and move them 543px to the left.
Finally press (Ctrl +Alt +3) to show the wheel hidden in this step. We are done with the two wheels for the moment.

Step 12
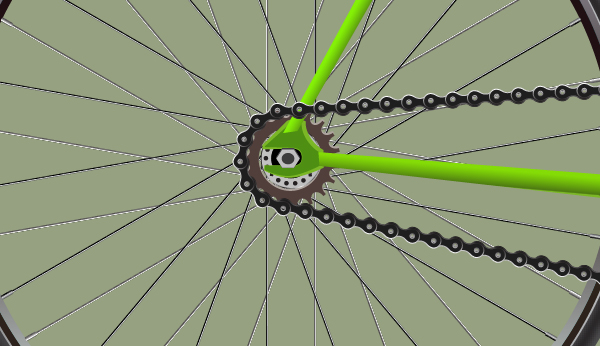
Next comes the cog of the back wheel.
Pick the Ellipse Tool (L) and create two ellipses with dimensions: 50px by 50px and 32px by 32px.
Reselect these two ellipses, open the Align palette (Window > Align), then click on the Horizontal Align Center button and click on the Vertical Align Center button.
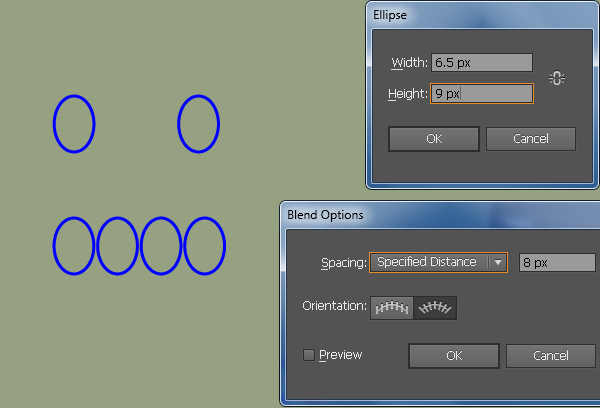
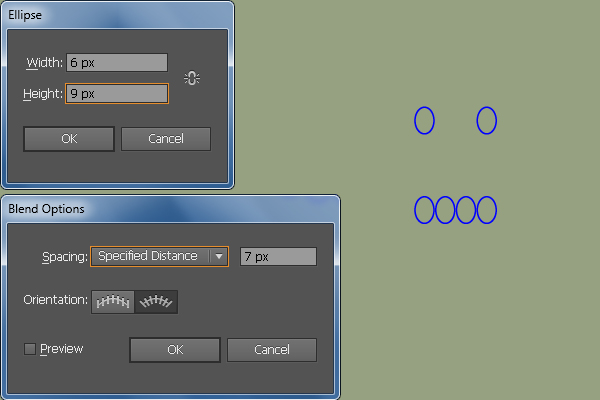
Continue with the Ellipse Tool (L) create a 6.5 by 9px ellipse.
Make a copy of this ellipse and move the copy 21px to the right.
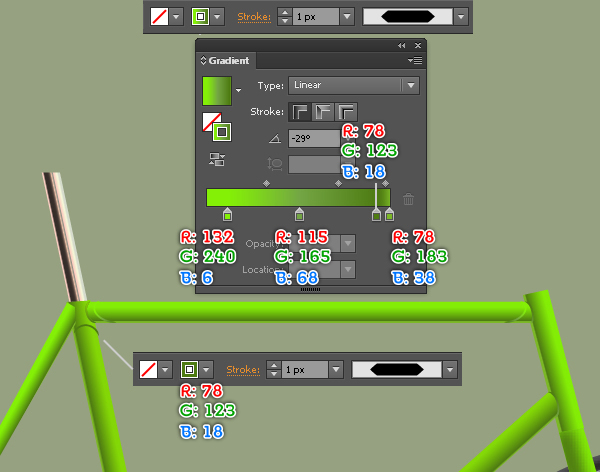
Reselect the two newly created ellipses and go to Object > Blend > Blend Option… Follow the data as you see in the second image and click OK.
Go to Object > Blend > Make (Ctrl +Alt +B).
Step 13
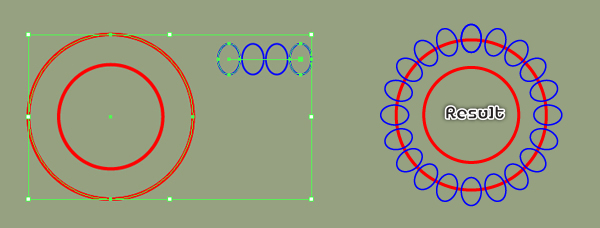
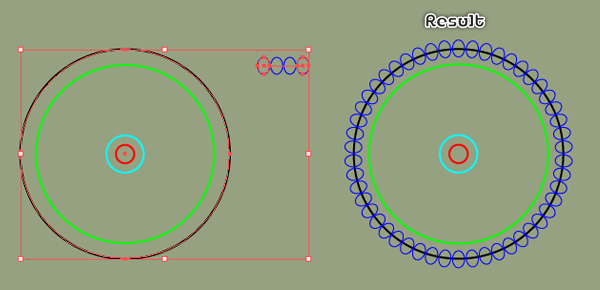
Before you continue, select the bigger red ellipse and make a copy of it.
Next select the top anchor point of the bigger red ellipse and click on "Cut path at selected anchor points" button from the Properties bar.
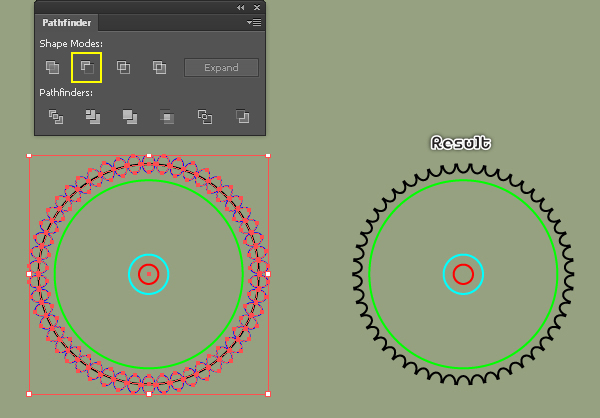
This makes this ellipse become an open path. Reselect this path and the blended object created in step 12, then go to Object > Blend > Replace Spine.
Make sure that the result is still selected and go to Object > Expand… Click OK when the Expand dialog box appears.
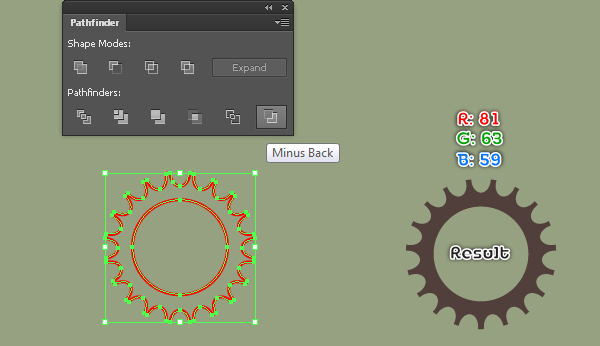
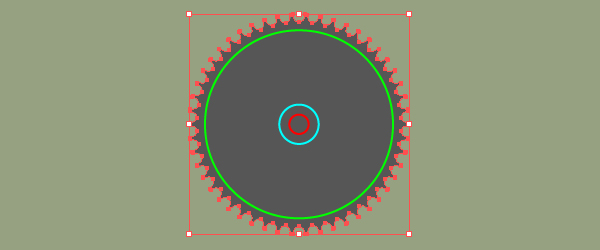
Keep the result selected, hold down the Shift key and click on the remaining bigger red ellipse.
Next open the Pathfinder palette (Window > Pathfinder) and click on the Minus Front button.
Make sure that the resulting object is still selected, hold down the Shift key and click on the remaining red ellipse, then click on the Minus Back button from the Pathfinder palette.
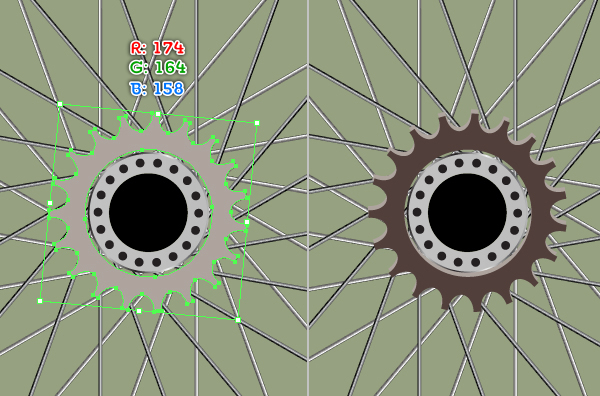
Fill the resulting object with R=81, G=63, B=59 and then place it in the correct position as you see in the seventh image.
Finally make a copy of the new shape and replace the existing color of the copy with R=174, G=164, B=158, then move it 1px up and hide it behind the original shape.

Step 14
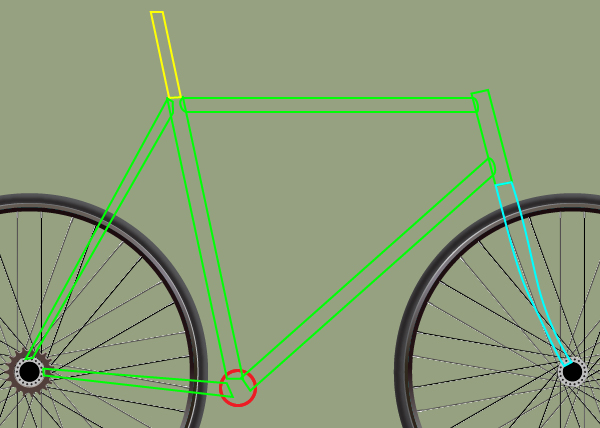
Let’s work on the creation of the frame.
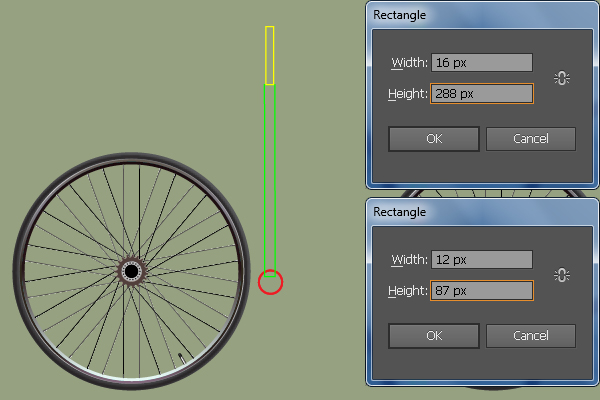
With the Ellipse Tool (L) create a red ellipse and then place it in the position shown below.
Pick the Rectangle Tool (M) and create two rectangles with dimensions: 16px by 288px and 12px by 87px, then place them in the positions shown in the second image.
Now drag a horizontal and vertical guide from the Rulers.
Select the red ellipse, hold down the Shift key, click on the two newly created guides, release the Shift key and then click on the red ellipse again (to fix its position).
Next open the Align palette (Window > Align), click on the Horizontal Align Center button and then click on the Vertical Align Center button.
Reselect the two rectangles created in this step, pick the Rotate Tool (R), then hold down the Alt key and click on the intersection point of the two guides.
In the Rotate dialog box, enter 12 in the Angle box and click OK.
Step 15
Let’s work on the creation of the frame.
With the help of the Pen Tool (P) along with the Rectangle Tool (M) create two objects and place them in the positions shown below.
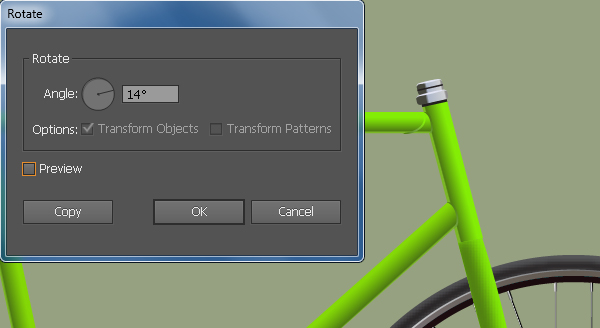
Reselect the two newly created objects, pick the Rotate Tool (R), then hold down the Alt key and click on the intersection point of the two guides created in step 4.
In the Rotate dialog box, enter 14 in the Angle box and click OK.
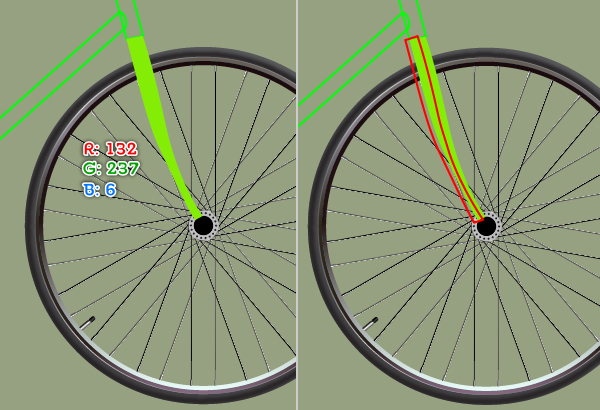
Continue with the Pen Tool (P) create four green objects as you see in the final image below.
Step 16
Fill the turquoise object with R=132, G=237, B=6.
Next pick the Pen Tool (P) and create an object as shown in the second image.
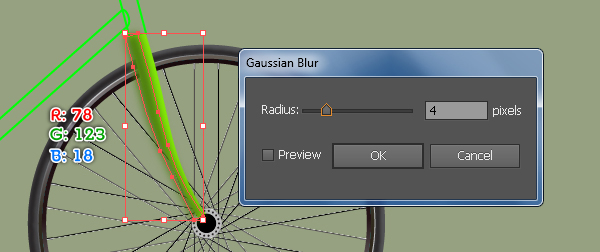
Once your object is drawn, fill it with R=78, G=123, B=18 and then apply a 4px Gaussian Blur effect to the resulting shape.
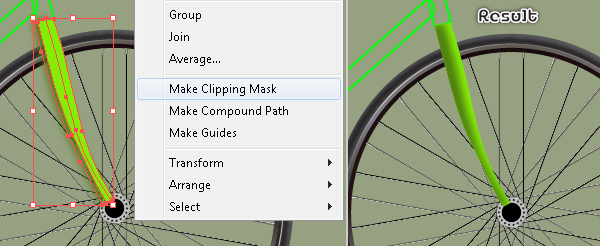
Reselect the first shape created in this step and make a copy of it, then bring the copy to front.
Keep this copy selected, hold down the Shift key and click on the shape with blur effect applied in this step, then go to Object > Clipping Mask > Make (Ctrl +7).
Step 17
Fill the remaining objects with the linear gradient as you see in the images below.
Step 18
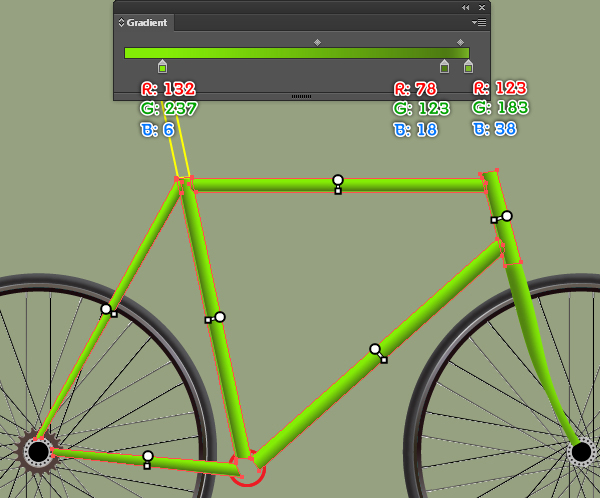
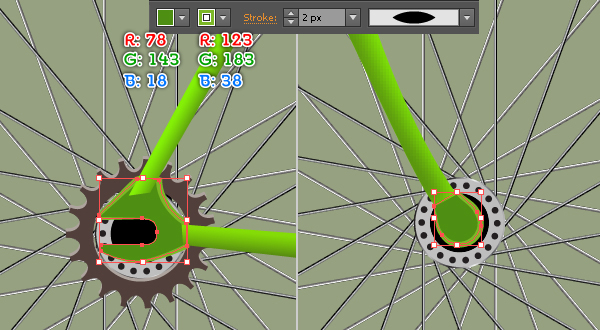
With the help of the Pen Tool (P) create two yellow objects as shown below.
Once your objects are drawn, reselect them and fill them with R=78, G=143, B=18, then add a 2px stroke (R=123, G=183, B=38).
Next apply Width Profile 1 to the resulting shapes.
Step 19
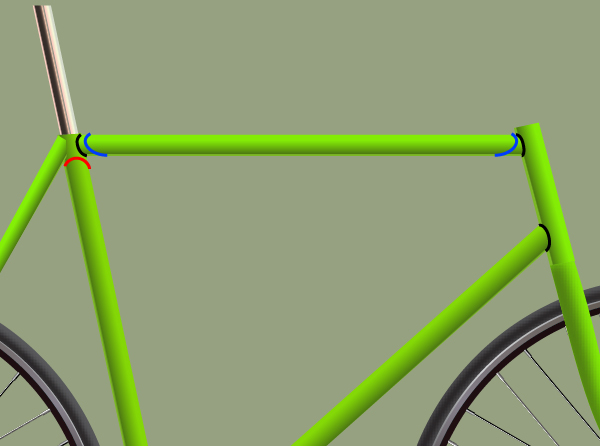
To add some details on the tubes, first draw six curved paths using the Pen Tool (P) as in the image.
Once your paths are drawn, select the three black paths and replace the existing stroke color with the linear gradient within stroke as shown in the second image.
Apply Width Profile 3 to the resulting paths.
Next select the two blue paths and replace the existing stroke color with the linear gradient within stroke as shown in the third image.
Apply Width Profile 3 to the resulting paths.
Finally select the remaining path, replace the existing stroke color with R=78, G=123, B=18.
Apply Width Profile 3 to the resulting path.
Step 20
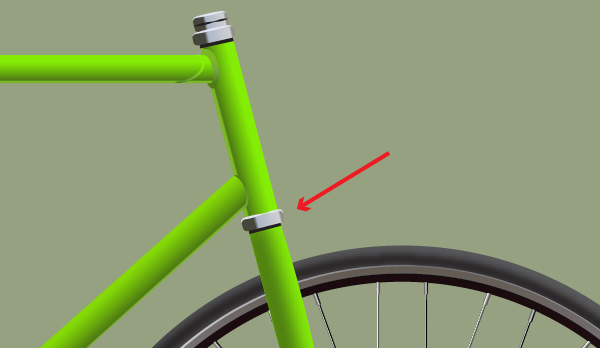
Next come the screws.
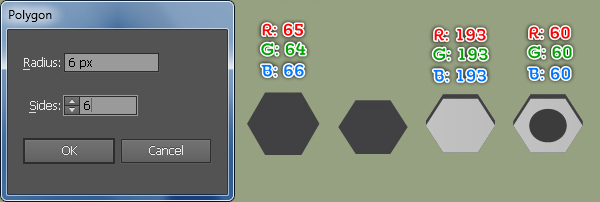
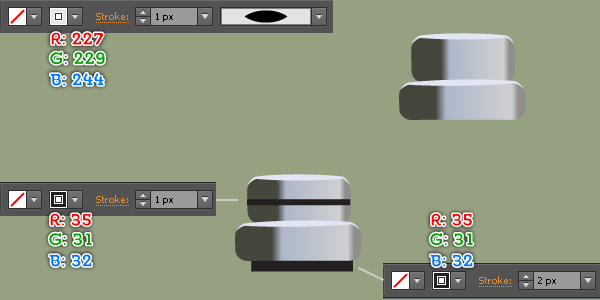
Pick the Polygon Tool and click on the artboard. In the Polygon dialog box, enter 6 in the Radius box and enter 6 in the Sides box, then click OK.
Fill the new object with R=65, G=64, B=66 and then go to Object > Transform > Scale… Check Non-Uniform, enter 90 in the Vertical box and click OK.
Make a copy of the resulting shape, then replace the existing color of the copy with R=193, G=193, B=193 and move it 1px down.
With the Ellipse Tool (L) create a black ellipse and place it in the position shown in the fourth image.
Now select and group (Ctrl +G) all shapes created in this step, then name this group "Screw".
We are done with the screw for the moment.
Next make two copies (Ctrl +C, Ctrl +F, Ctrl +F) of the group "Screw" and then place these three groups "Screw" in the positions shown in the fifth, the sixth and the seventh images.

Step 21
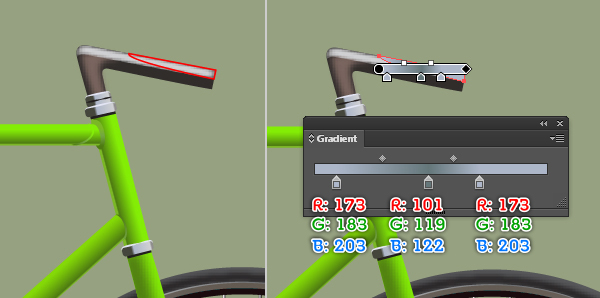
We will continue with the handlebars.
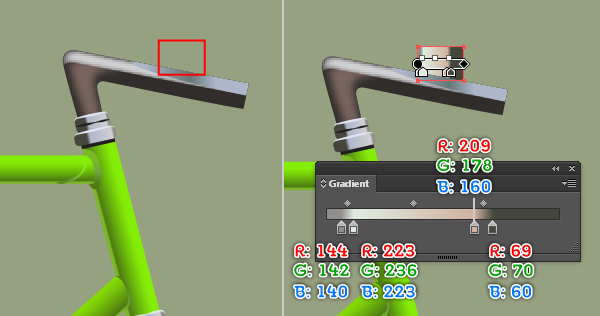
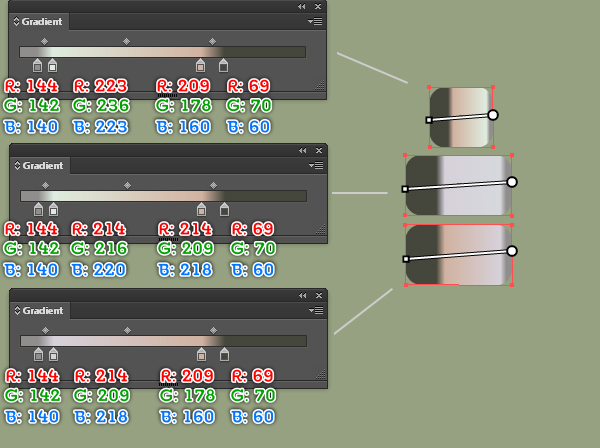
With the Rounded Rectangle Tool create two rectangles and place them in the positions shown below, then fill them with the linear gradient.
Next pick the Pen Tool (P) and create four curved paths, then set the values for these paths as you see in the third image.
Now select and group (Ctrl +G) all objects created in this step.
Next rotate this group to an angle of about 14 degrees and then place it in the correct position as shown in the final image below.
Step 22
Likewise, repeat the same process as in step 21 to draw more objects and then place them in the positions shown in the image below.
At this point your bicycle should look like in the second image.
Step 23
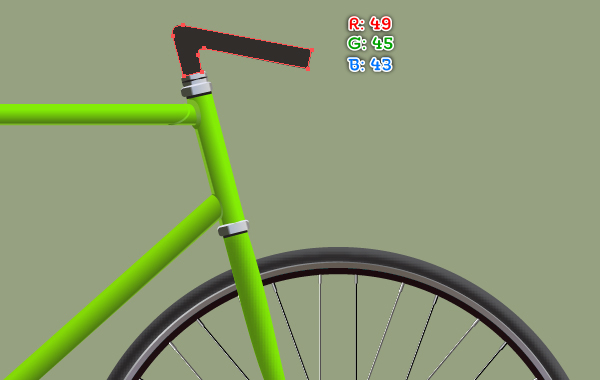
It’s time to draw the the stem.
Using the Pen Tool (P) create a shape (R=49, G=45, B=43) as shown below.
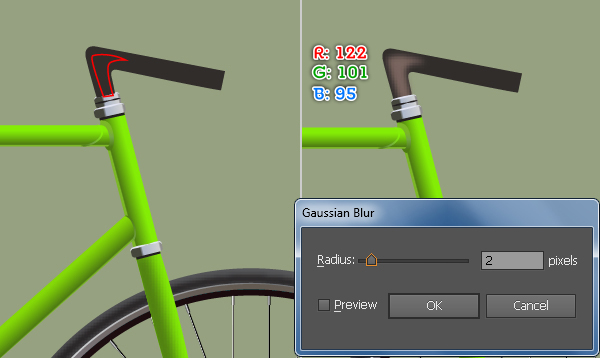
Create another object as you see in the second image and fill this object with R=122, G=101, B=95, then apply a 2px Gaussian Blur effect to the resulting shape.
Keep working with the Pen Tool (P) create an object as shown in the fourth image.
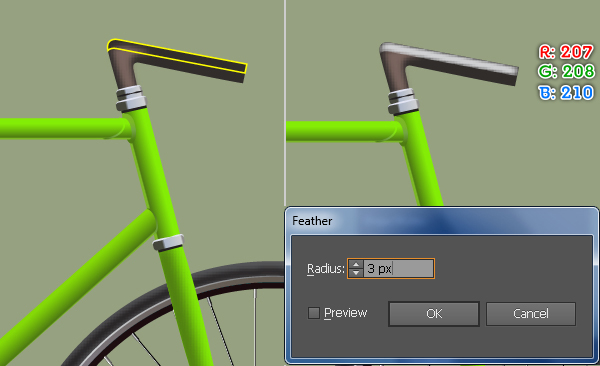
Once your object is drawn, fill it with R=207, G=208, B=210 and then apply a 3px Feather effect to the resulting shape.
Next using the Pen Tool (P) create an object and fill it with the linear gradient as you see in the sixth and the seventh images.
Then reselect the three newly created shapes and group (Ctrl +G) them.
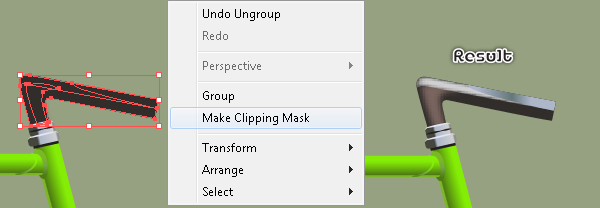
Now select the first shape created in this step, make a copy of it and then bring the copy to front.
Keep the copy selected, hold down the Shift key and click on the newly created group, then go to Object > Clipping Mask > Make (Ctrl +7).
Step 24
Using the Rectangle Tool (M) create a red rectangle and place it as shown below.
Then fill this rectangle with the linear gradient as you see in the second image and send the resulting rectangle to back.
Pick the Rounded Rectangle Tool and create three rectangles, then place them in the positions as shown in the third image.
Fill these three newly created rectangles with the linear gradient as you see in the fourth image.
With the Line Segment Tool (\) create two horizontal lines with a 2px stroke (R=35, G=31, B=32) and then place them in the positions as shown in the fifth image.
Now reselect all objects created in this step (except the first rectangle) and group (Ctrl +G) them.
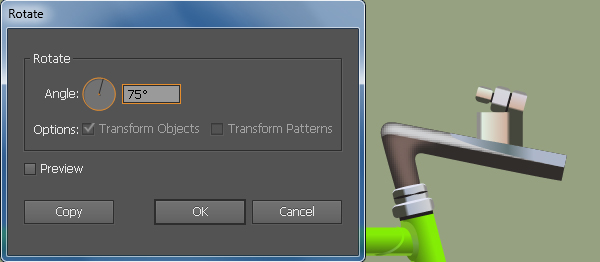
Next rotate the newly created group to an angle of about 75 degrees and place it in the position shown the final image, then send it to back.

Step 25
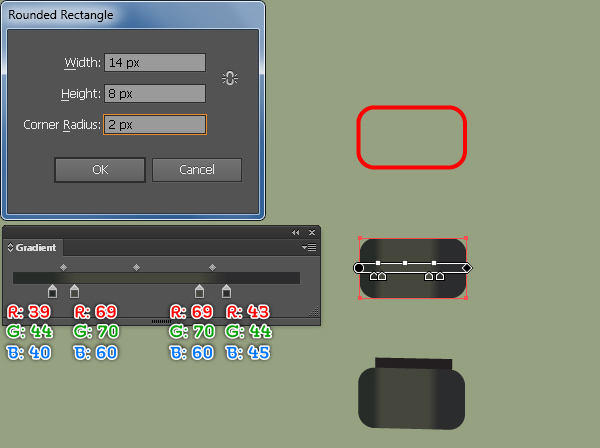
Pick the Rounded Rectangle Tool and click on the artboard. In the Rounded Rectangle dialog box, enter the data shown below and click OK, then fill the newly created rectangle with the linear gradient.
Next create a horizontal line with a 1px black stroke and place it in the position shown in the third image.
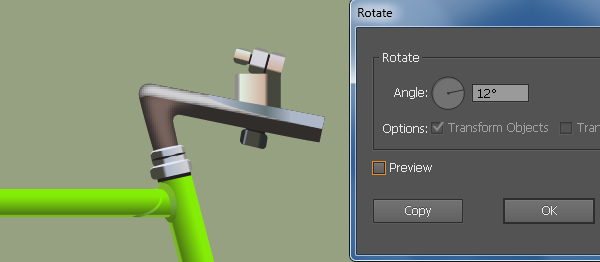
Now select and group the two objects created in this step, then rotate this group to an angle of about 12 degrees and place it in the position shown in the final image.
Step 26
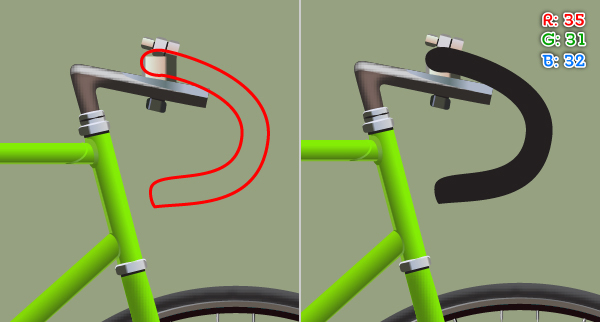
With the Pen Tool (P) create an object as shown below and then fill it with R=35, G=31, B=32.
Continue with the Pen Tool (P) create a curved path as you see in the third image.
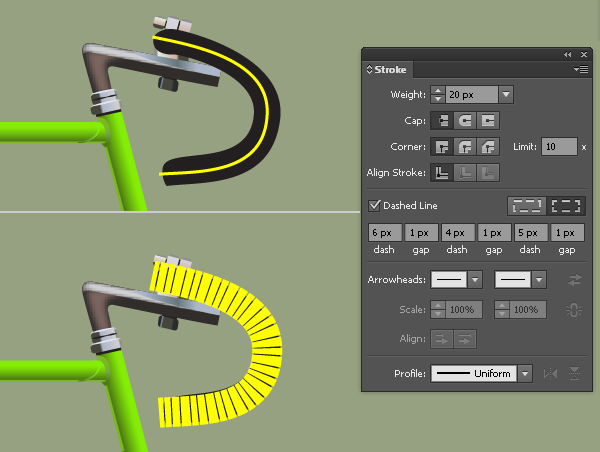
Once your path is drawn, reselect it, then open the Stroke palette (Window > Stroke) and set the values as you see in the fourth image.
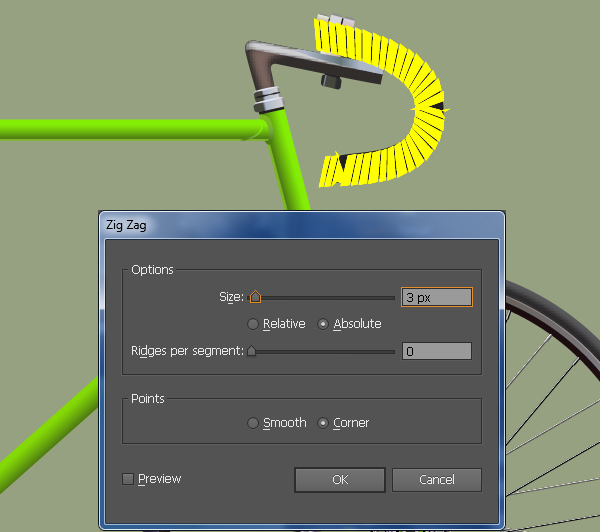
Keep the result selected and go to Effect > Distort & Tranform > Zig Zag… Follow the data shown in the fifth image and click OK.
Go to Object > Expand Appearance. Next go to Object > Expand… Click OK when the Expand dialog box appears.
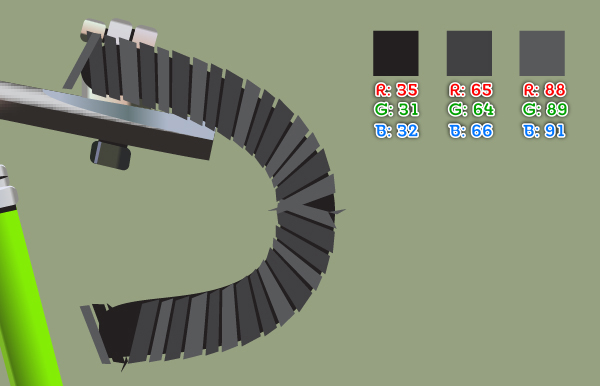
Now replace the existing color of the shapes of the resulting group as you see in the sixth image.
After you are done replacing the color of the shapes, reselect the first shape created in this step and make a copy of it, then bring this copy to front.
Keep the copy selected, hold down the Shift and click on the group created in this step, then go to Object > Clipping Mask > Make (Ctrl +7).
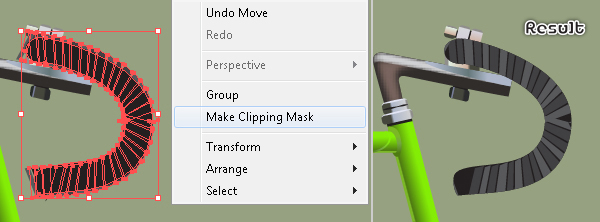
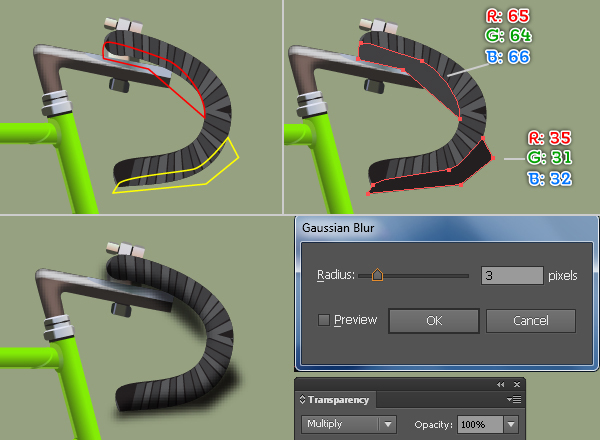
Step 27
To give a more realistic look I’m going to be adding some hard shadows on the handle bars.
With the Pen Tool (P) create two objects as shown below.
Once your objects are drawn, fill the red object with R=65, G=64, B=66 and then fill the remaining object with R=35, G=31, B=32.
Next apply a 3px Gaussian Blur effect to the two new shapes, then change the Blending Mode of them to Multiply.
Keep the resulting shapes selected, press (Ctrl +X) to cut them, then double-click on the clipping set created in step 26 and press (Ctrl +F) to paste these two shapes that were cut in this step.
Next double-click anywhere outside of the clipping set. Create an object and then place it in the position as you see in the seventh image.
Finally fill it with the radial gradient as shown in the final image.
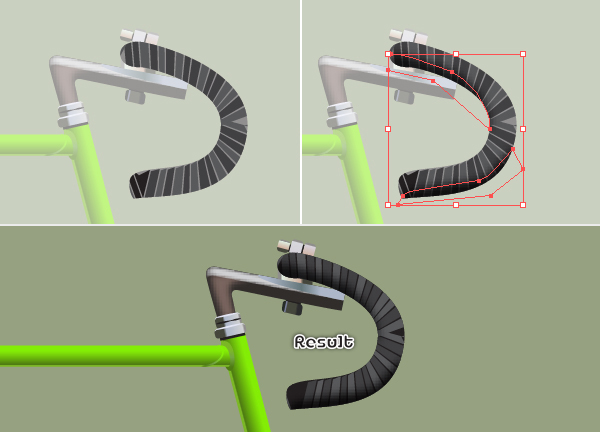
Step 28
Now, follow the sequence of images and repeat the same process as the previous steps to draw another handle bar.
Next send this handle bar to back. In the end your bicycle should look roughly like the fourth image.

Step 29
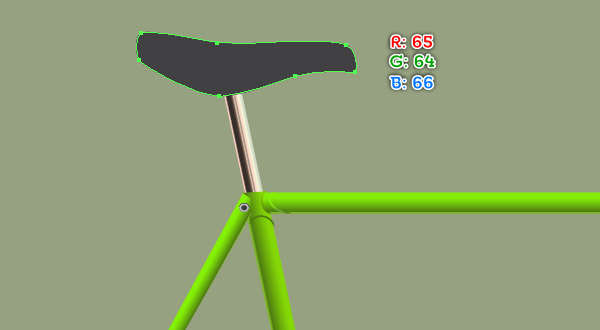
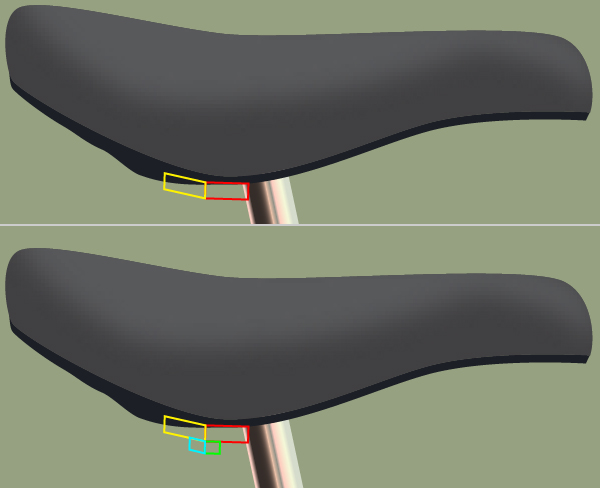
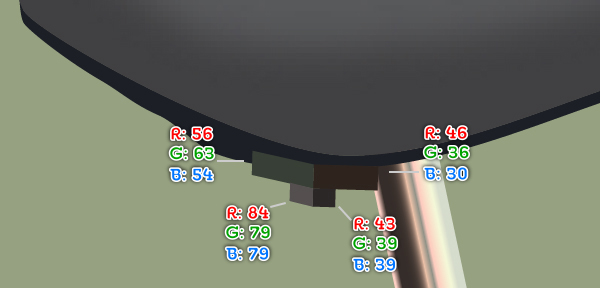
Let’s work on the creation of the saddle.
Using the Pen Tool (P) create a shape (R=65, G=64, B=66) as shown below.
Create another object as you see in the second image, then fill this object with R=88, G=89, B=91 and apply a 3px Gaussian Blur effect to the resulting shape.
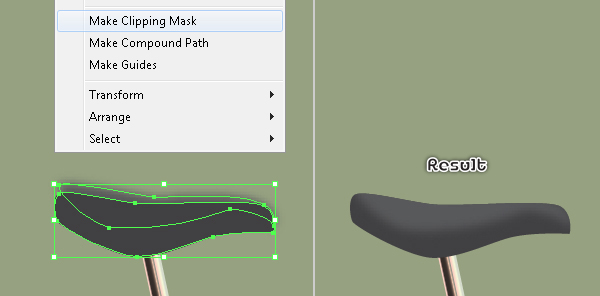
Now reselect the first shape created in this step and make a copy of it, then bring the copy to front (Ctrl +Shift +Right Square Bracket).
Keep this copy selected, hold down the Shift key and click on the shape with blur effect applied in this step, then go to Object > Clipping Mask > Make (Ctrl +7).

Step 30
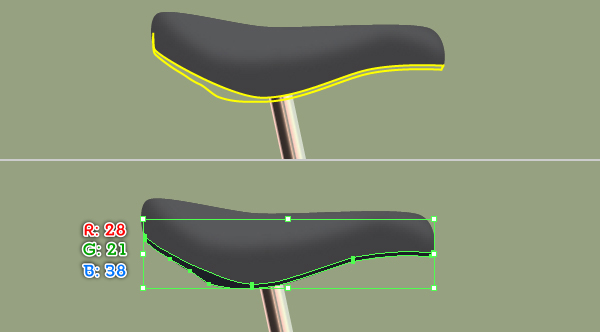
Now, follow the sequence of images and draw some details for the saddle similar to the ones shown below. In the end your bicycle should look like the final image shown.
Step 31
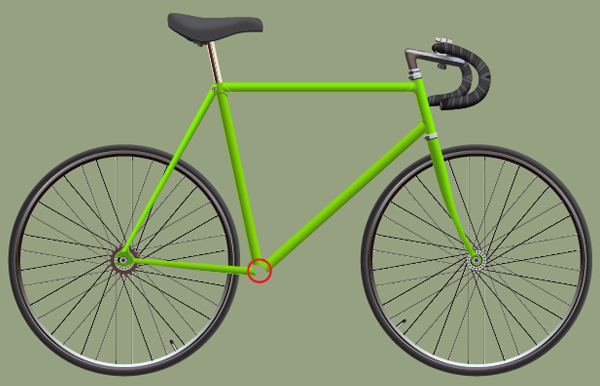
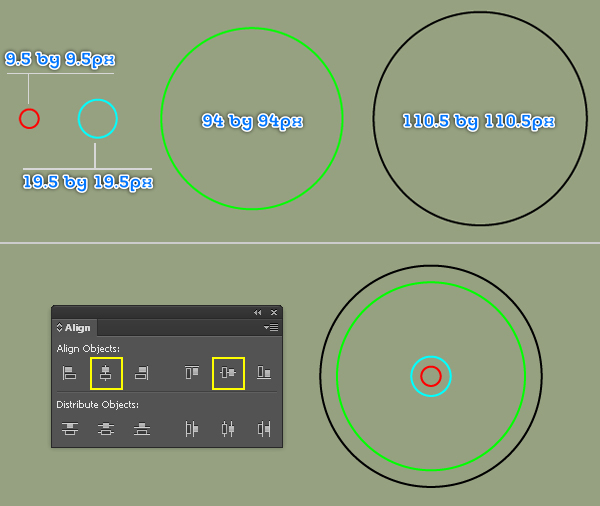
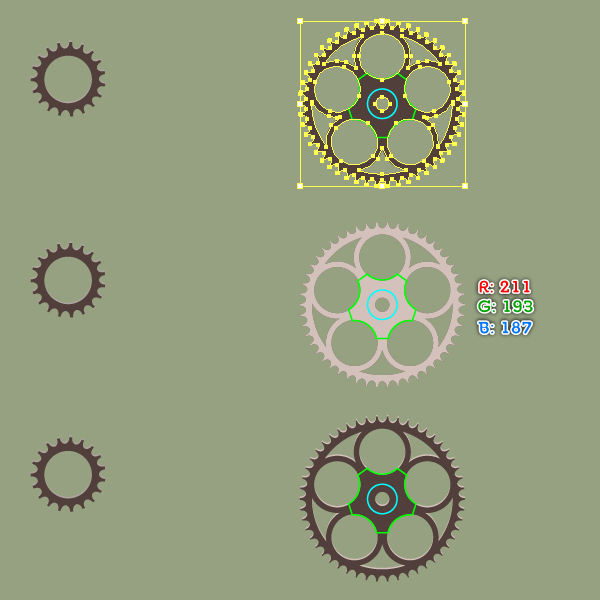
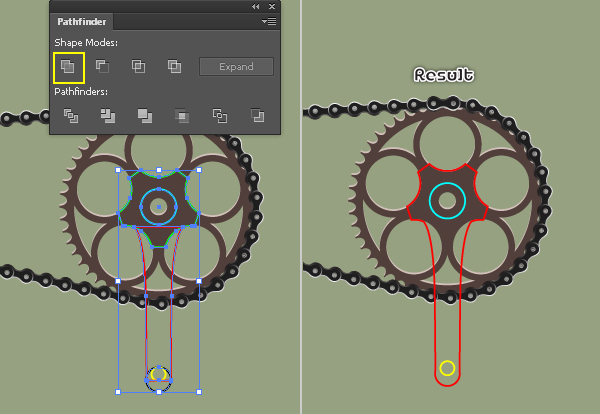
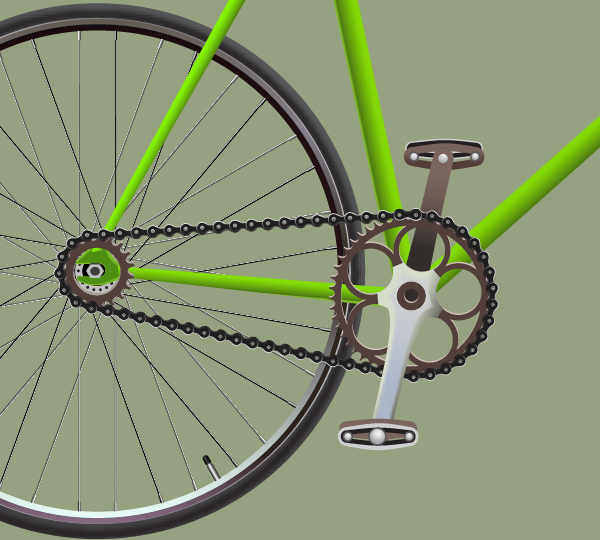
It’s time to draw the chainring.
Pick the Ellipse Tool (L) and create four ellipses with dimensions:
- 9.5 by 9.5px
- 19.5 by 19.5px
- 94 by 94px
- 110.5 by 110.5px
Reselect these four ellipses, open the Align palette (Window > Align) and click on the Vertical Align Center button, then click on the Horizontal Align Center button.
Continue with the Ellipse Tool (L) create a 6 by 9px ellipse.
Make a copy of this ellipse and move the copy 21px to the right.
Reselect the two newly created ellipses and go to Object > Blend > Blend Option… Follow the data as you see in the third image and click OK.
Go to Object > Blend > Make (Ctrl +Alt +B).
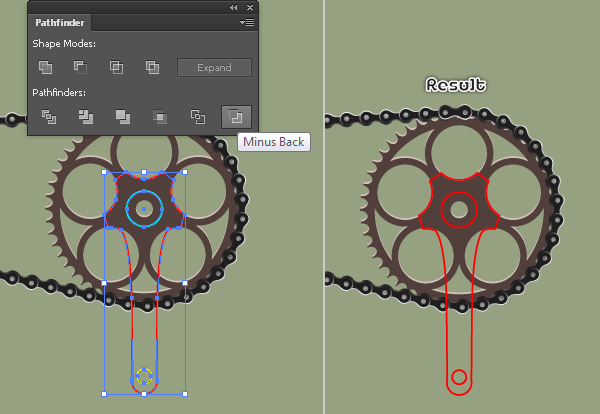
Step 32
Before you continue, select the black ellipse and make a copy of it.
Next select the top anchor point of the black ellipse and click on the "Cut path at selected anchor points" button from the Properties bar.
This makes this ellipse become an open path. Reselect this path and the blended object created in step 31, then go to Object > Blend > Replace Spine.
Make sure that the result is still selected and go to Object > Expand… Click OK when the Expand dialog box appears.
Keep the result selected, hold down the Shift key and click on the remaining black ellipse. Next open the Pathfinder palette (Window > Pathfinder) and click on the Minus Front button, then fill the resulting object with black.
Step 33
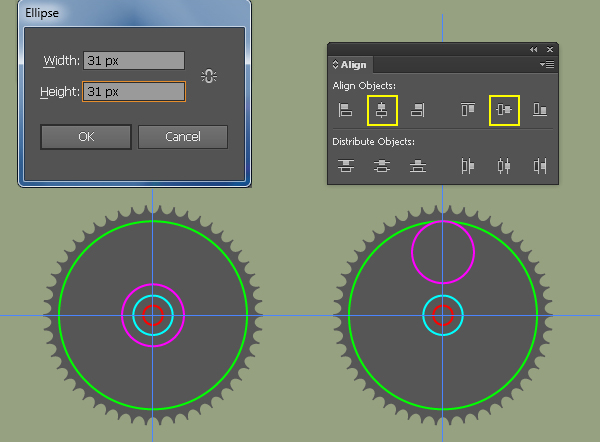
With the Ellipse Tool (L) create a 31 by 31px magenta ellipse.
Next drag a horizontal and vertical guide from the Rulers.
Now reselect the magenta, the green ellipse and the two newly created guides, then click on the green ellipse again (to fix its position).
Open the Align palette (Window > Align), click on the Horizontal Align Center button and then click on the Vertical Align Center button.
Next select the magenta ellipse and move it up to the position shown in the second image.
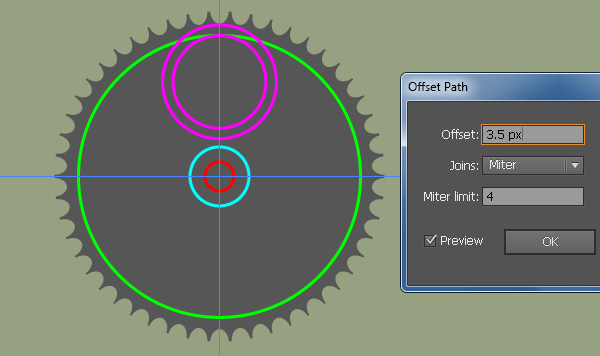
Make sure that the magenta is still selected and go to Object > Path > Offset Path… Enter a 3.5 px Offset and click OK.
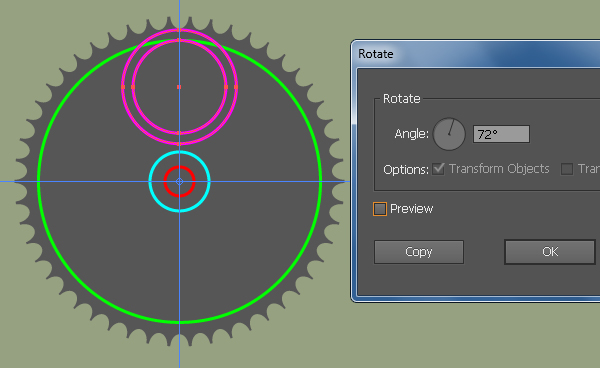
Now reselect the two magenta ellipses, pick the Rotate Tool (R) and hold down the Alt key, then click on the intersection point of the two new guides.
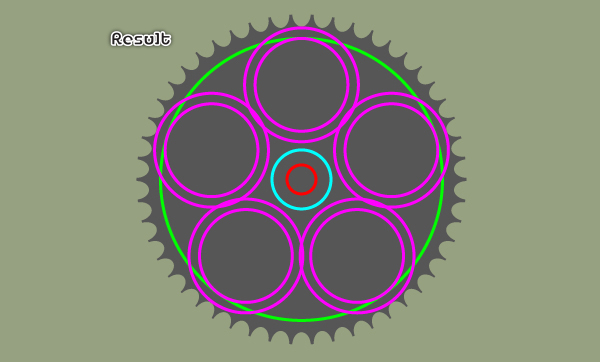
In the Rotate dialog box, enter 72 in the Angle box and click Copy, then press (Ctrl +D) three times to get the result as you see in the final image below.
Step 34
Select the five bigger magenta ellipses and the green ellipse.
Next open the Pathfinder palette (Window > Pathfinder) and click on the Minus Front button.
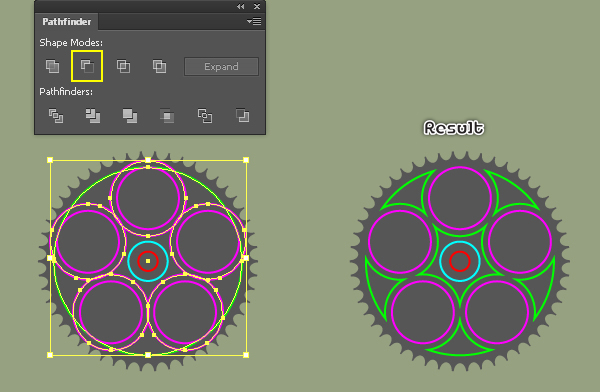
Now select all objects created from the beginning of step 31 to this time (except the turquoise ellipse and the green object with the star shape), then click on the Minus Front button.
Next send the resulting shape to back (Ctrl +Shift +Left Square Bracket).
Step 35
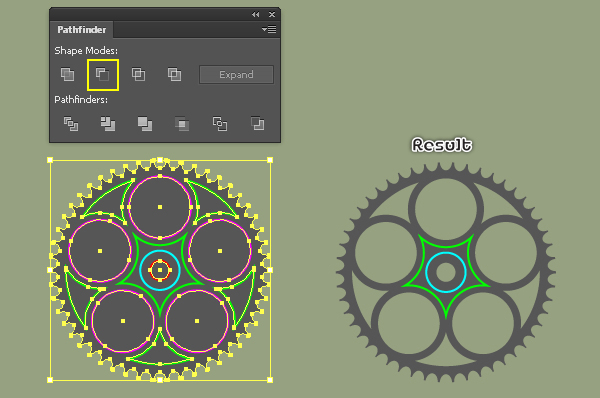
Select the green object with star shape and go to Object > Path > Offset Path… Enter a 4px Offset and click OK, then reselect the green object with star shape and remove it.
Now select all objects created from beginning of step 31 to this time and place them in the position you see in the third image.
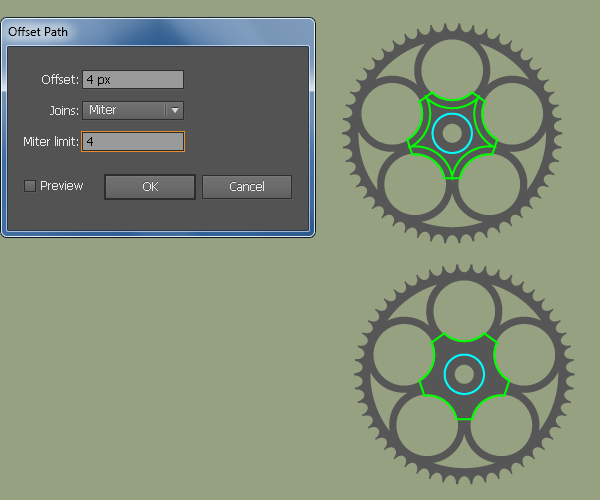
Next replace the existing color of the shape created in step 34 with R=81, G=63, B=59.
Make a copy (Ctrl +C, Ctrl +F) of the resulting shape, then replace the existing color of the copy with R=211, G=193, B=187 and move this shape 1px up.
Finally hide it behind the shape created in step 34.
Step 36
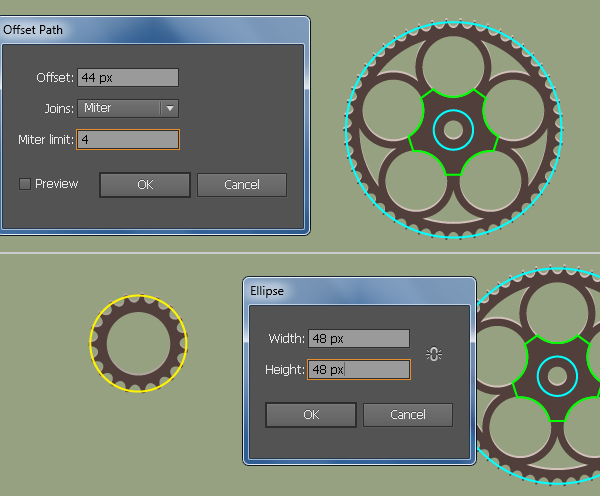
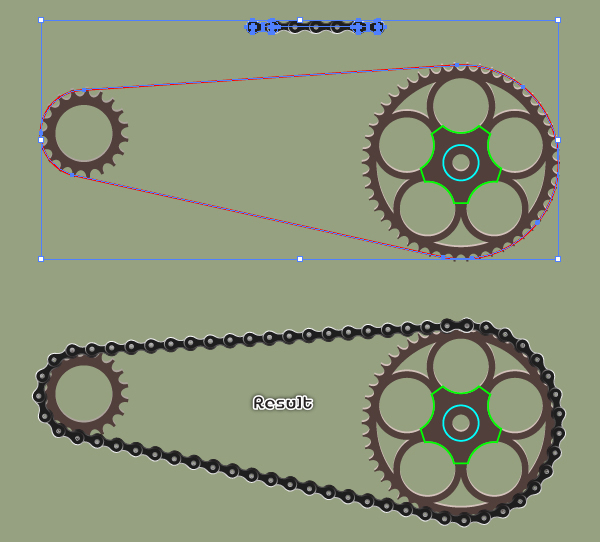
We will continue with the chain.
Select the turquoise ellipse and go to Object > Path > Offset Path… Enter a 44 px Offset and click OK.
With the Ellipse Tool (L) create a 48 by 48px yellow ellipse and then place it in the correct position as you see in the second image.
Next using the Pen Tool (P) create two red paths as shown in the third image.
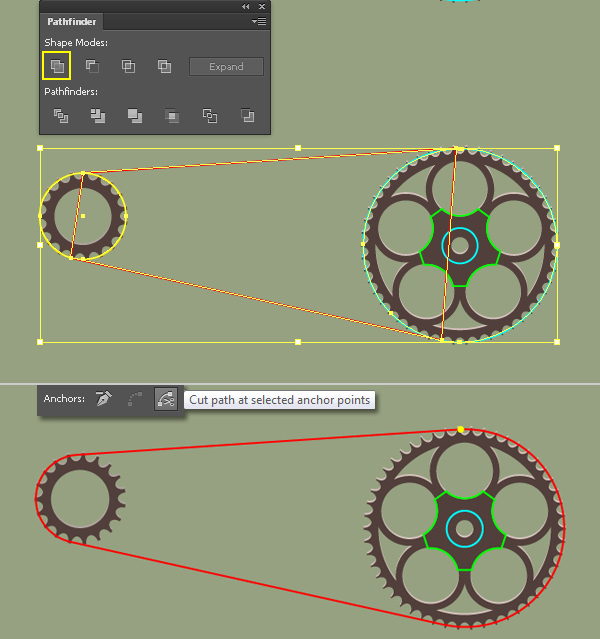
Once your paths are drawn, reselect them and right click on the artboard, then select the Join section from the drop-down menu.
Next right click on the artboard again, then select the Join section. Now reselect the yellow, the turquoise ellipse and the newly created red object. Then open the Pathfinder palette (Window > Pathfinder) and click on the Unite button.
Finally select the anchor point highlighted with yellow of the resulting object and then click on the "Cut path at selected anchor points" button from the Properties bar.
This makes the red object become an open path.
Step 37
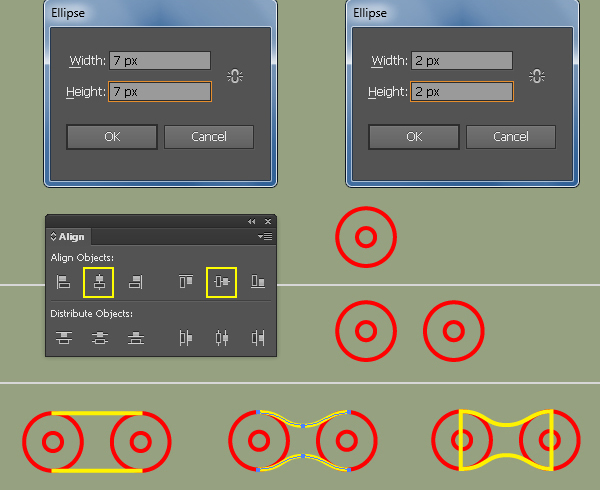
Pick the Ellipse Tool (L) and create two ellipses with dimensions: 7 by 7px and 2 by 2px.
Reselect these two ellipses, open the Align palette (Window > Align) and click on the Vertical Align Center button, then click on the Horizontal Align Center button.
Make sure that these two ellipses are still selected and make a copy (Ctrl +C, Ctrl +F) of them, then move the copies 11px to the right.
Pick the Pen Tool (P) and create two yellow paths as you see in the third image.
Next add an anchor point in the middle point of each path you’ve drawn.
With the help of the Convert Anchor Point Tool (Shift +C) adjust the shape of these two paths as you see in the fourth image.
After you are done adjusting the shape of the two paths, reselect them and right click on the artboard, then select the Join section from the drop-down menu.
Next right click on the artboard again, then select the Join section.
Step 38
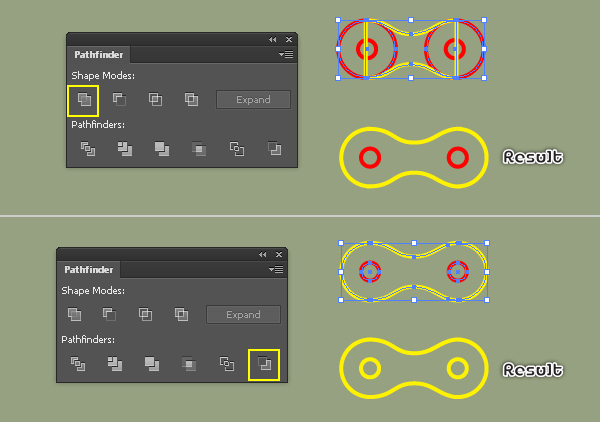
Select the two bigger red ellipses and the yellow object. Then open the Pathfinder palette (Window > Pathfinder) and click on the Unite button.
Keep the resulting object selected, hold down the Shift key and click on the two remaining red ellipses, then click on the Minus Back button.
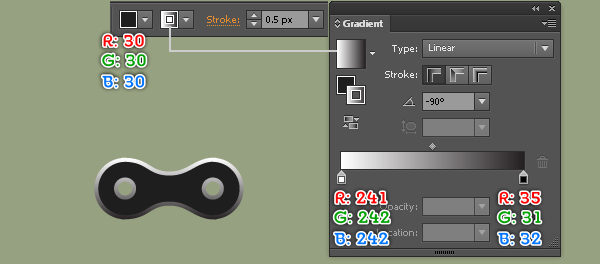
Fill the resulting object with R=30, G=30, B=30 and add a 0.5px stroke (apply the linear gradient within stroke).
Step 39
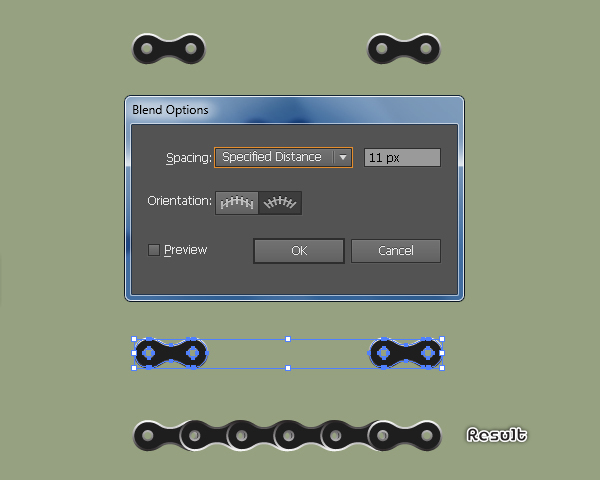
Make a copy (Ctrl +C, Ctrl +F) of the shape created in step 38 and then move the copy 60px to the right.
Reselect these two shapes and go to Object > Blend > Blend Option… Follow the data as you see in the second image and click OK.
Go to Object > Blend > Make (Ctrl +Alt +B). Reselect the blended object and the red path created in step 36, then go to Object > Blend > Replace Spine.
The chain is ready and looks like the final image.
Step 40
It’s time to draw the crank arms.
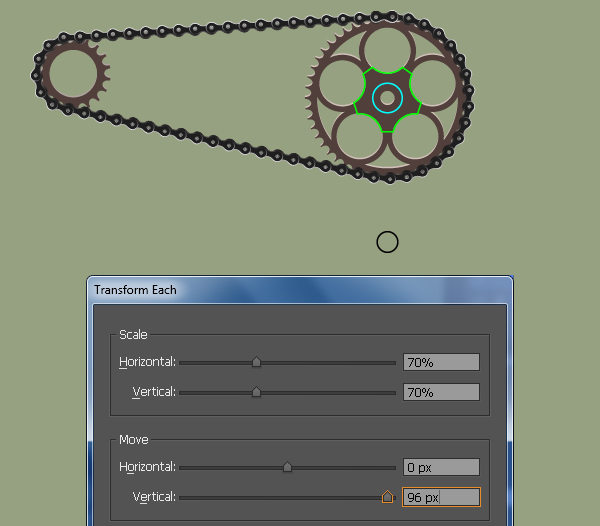
Select the turquoise ellipse and go to the Object > Transform > Transform Each… Follow the data shown below and click Copy.
Replace the existing color of the new ellipse with black.
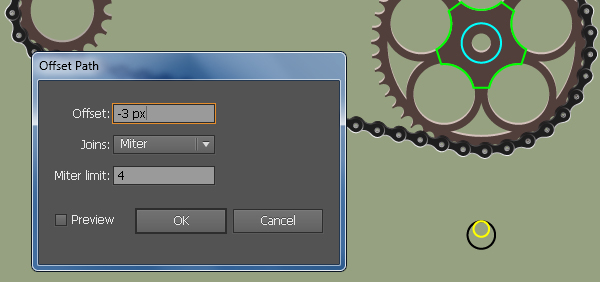
Keep this ellipse selected and go to Object > Path > Offset Path… Enter a -3px Offset and click OK.
Then replace the existing color of the newly created ellipse with yellow and move it up to the position as you see in the second image.
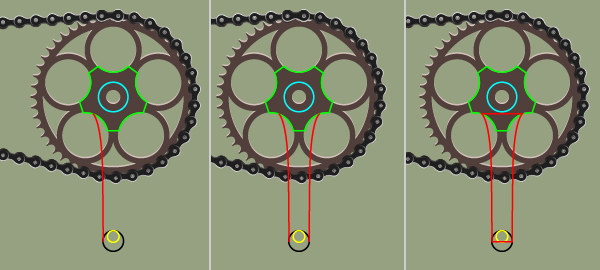
With the Pen Tool (P) create a red curved path as show in the third image.
Reselect the red path and go to Object > Transform > Reflect. Check the Vertical box then click on the Copy button.
Select the resulting path, drag it to the right and place it as shown in the fourth image.
Now reselect the two red curved paths and right click on the artboard, then select the Join section from the drop-down menu.
Next right click on the artboard again, then select the Join section.
Step 41
Before you continue, select the turquoise ellipse and make a copy of it.
Now reselect a turquoise ellipse, the green object, the red object and the black ellipse, then click on the Unite button from the Pathfinder palette.
Make sure that the resulting object is still selected, hold down the Shift key and click on the remaining turquoise ellipse and the yellow ellipse, then click on the Minus Back button from the Pathfinder palette.
Finally fill the resulting object with the linear gradient as shown in the final image.
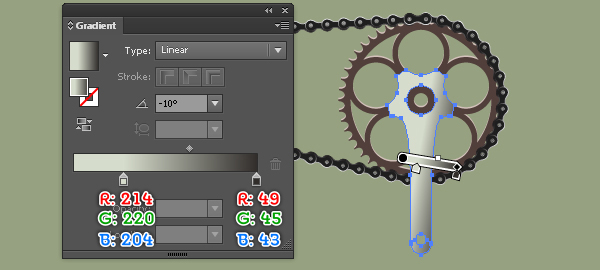
Step 42
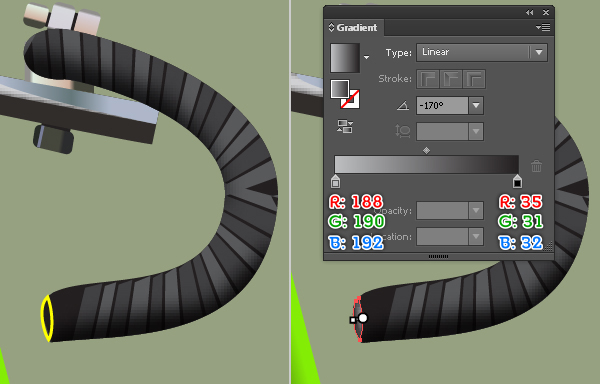
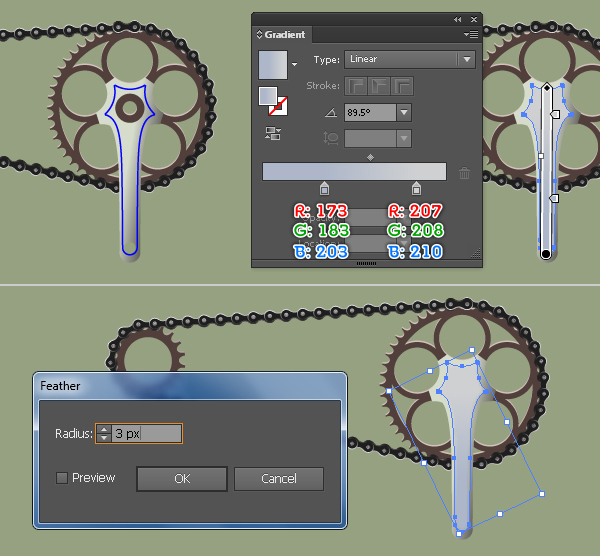
With the Pen Tool (P) create a blue object and then fill it with the linear gradient as shown below.
Next apply a 3px Feather effect for the resulting shape.
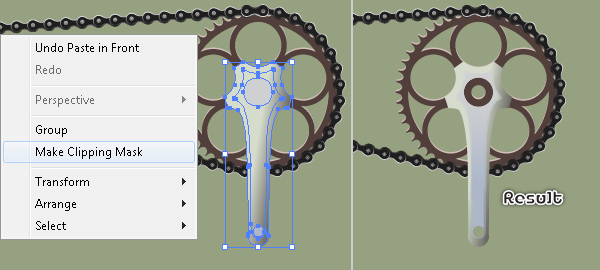
Now reselect the shape created in step 41 and make a copy of it, then bring the copy to front.
Keep the copy selected, hold down the Shift key and click on the shape with Feather effect applied in this step, then go to Object > Clipping Mask > Make (Ctrl +7).
Step 43
Next comse the remaining crank arm.
With the help of the Pen Tool (P) along with the Ellipse Tool (L) create two objects and then place them in the positions shown below.
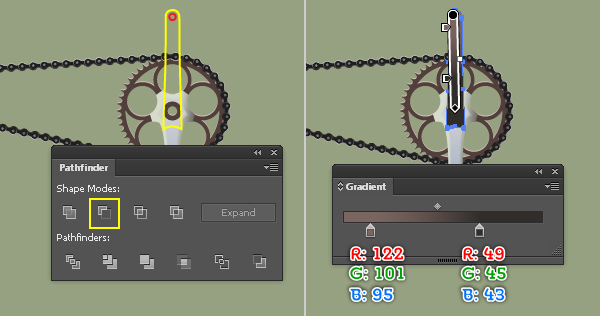
Reselect the two newly created objects, then open the Pathfinder palette (Window > Pathfinder) and click on the Minus Front button.
Next fill the resulting object with the linear gradient as you see in the fourth image.
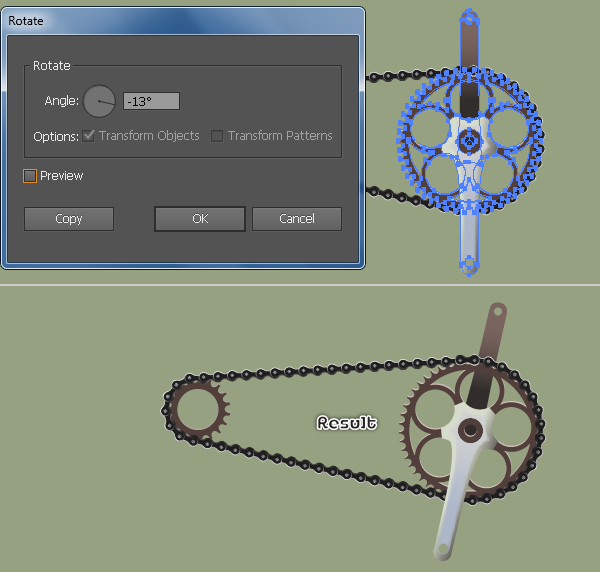
Finally select all shapes as shown in the fifth image below and rotate them to angle of about -13 degrees.
Step 44
Let’s work on the creation of the pedals.
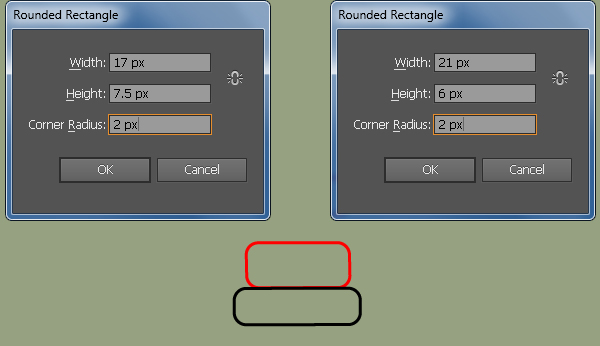
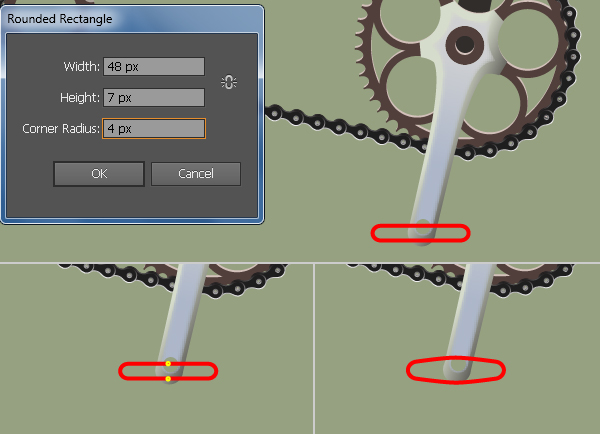
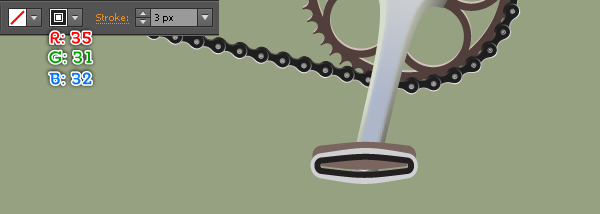
Pick the Rounded Rectangle Tool and click on the artboard. In the Rounded Rectangle dialog box, enter the data as shown below and click OK.
Next add two anchor points at points highlighted with yellow for the newly created rectangle.
Reselect the two newly created anchor points and click on the "Convert selected anchor points to smooth" button from the Properties bar.
Now select the upper anchor point and move it 3px up, then select the remaining anchor point and move it 3px down.
After you are done adjusting the shape of the red object, reselect it and change the stroke weight to 5px , then replace the existing stroke color with R=207, G=208, B=210.
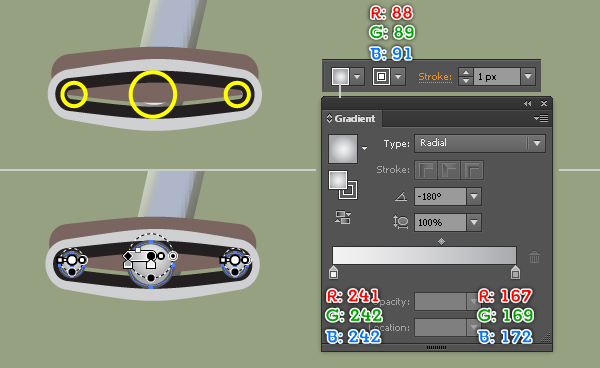
Make sure that the resulting object is still selected and go to Object > Transform > Scale… Check Non-Uniform, enter 96 in the Horizontal box and enter 70 in the Vertical box, then click Copy.
Make a copy of the new object and then hide the copy.
Now replace the existing stroke color of the new object with R=122, G=101, B=95 and move it 5px up, then hide it behind the original object.
Finally press (Ctrl +Alt +3) to show the object hidden in this step, then change the stroke weight to 3px and replace the existing stroke color with black.

Step 45
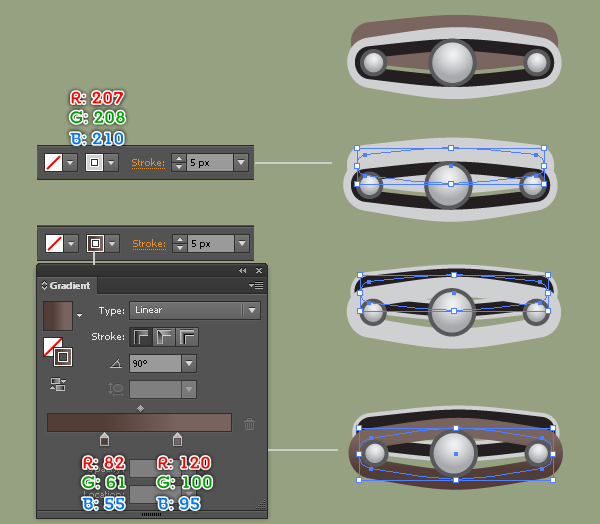
Using the Ellipse Tool (L) create three ellipses and place them in the positions shown below.
Reselect these ellipses and fill them with the radial gradient as you see in the second image, then add a 1px stroke (R=88, G=89, B=91).
We are done with the pedal for the moment.
Step 46
We will continue with the remaining pedal.
Select all objects of the first pedal and make a copy of them, then place the copies to the new position.
Now select the brown object of the new pedal and replace the existing stroke color with R=207, G=208, B=210.
Next select the black object and move it 5px up, then press (Ctrl +Left Square Bracket) once to send it backward.
Select the remaining white object and replace the existing stroke color with the linear gradient as you see in the fourth image.
Finally select all objects of this pedal and send them to back (Ctrl +Shift +Left Square Bracket), then place them in the position shown in the final image.
Step 47
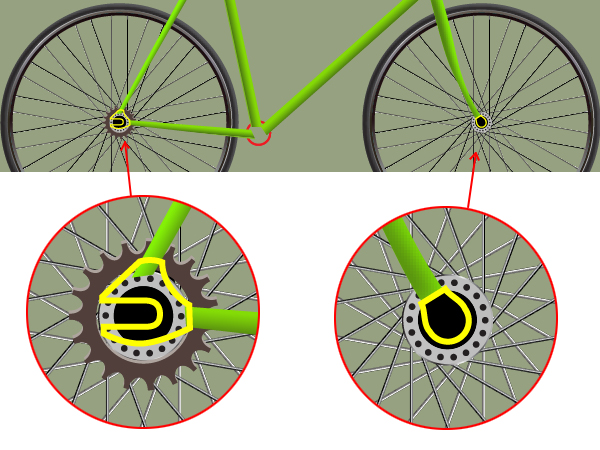
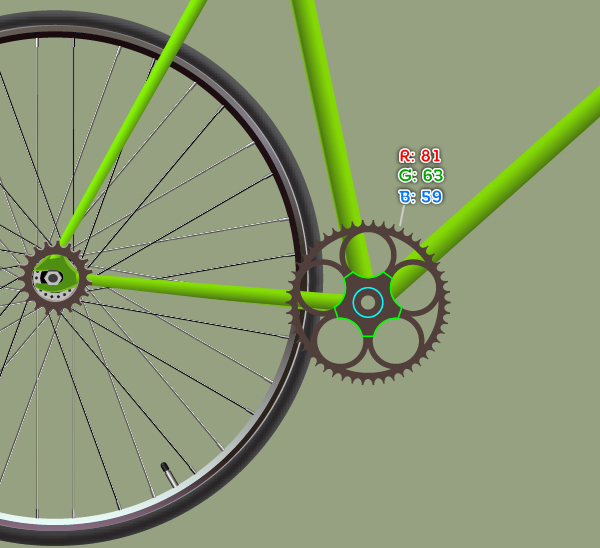
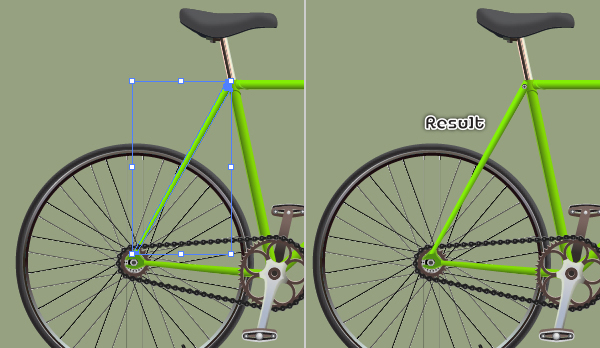
Select the cog and hide it behind the seatstay and the chainstay.
Next select the seatstay and bring it to front.
Finally select the left crank arm and the left pedal, then send them to back.
The bicycle is ready and looks like the final image.
Step 48
Let’s work on the creation of a nice background.
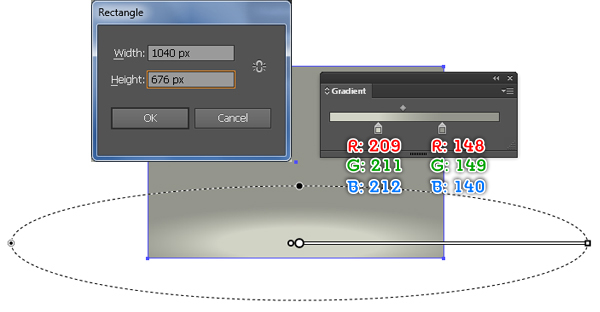
Pick the Rectangle Tool (M) and create a 1040 by 676px rectangle, then fill it with the radial gradient as shown below.
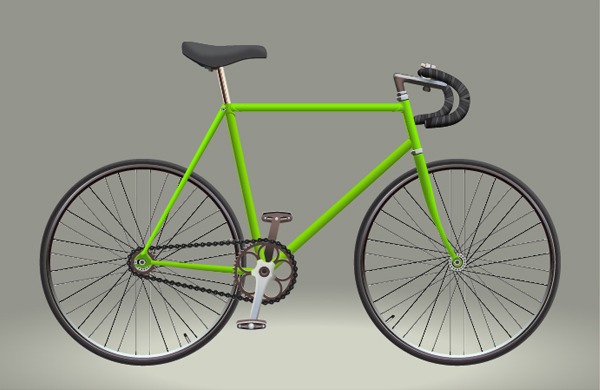
Next place your bicycle into the newly created background.
Step 49
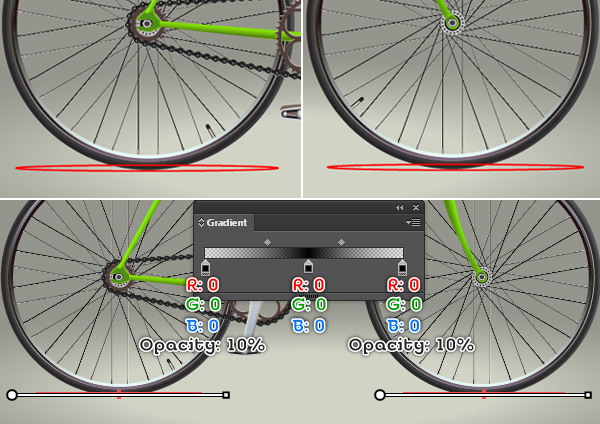
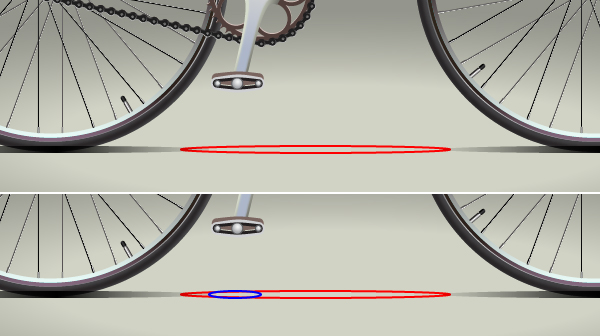
To give a more realistic look I’m going to be adding some shadows for our bicycle.
First create two ellipses and place them in the positions as you see in the first and the second images.
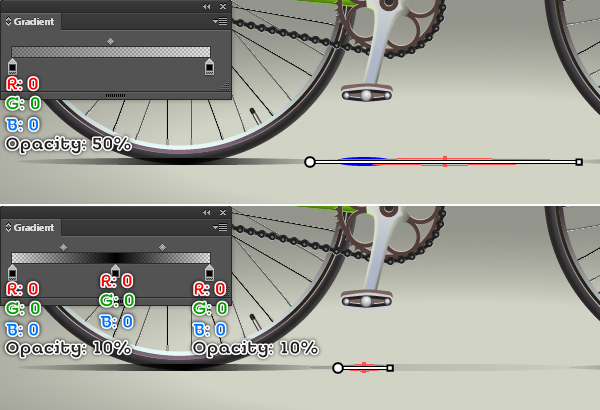
Reselect these two ellipses and fill them with the linear gradient as shown in the third image.
Continue with the Ellipse Tool (L) create two ellipses and then place them in the positions as you see in the fourth and the fifth images.
Next fill these two newly created ellipses with the linear gradient as shown in the sixth and the seventh images.
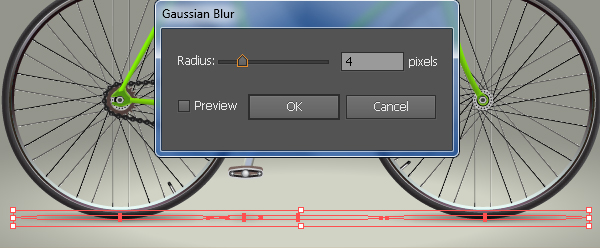
Finally reselect all ellipses created in this step and apply a 4px Gaussian Blur effect to them, then hide them behind the bicycle.
And We’re Done!
