In the following tutorial you will learn how to create a simple logo in Adobe Illustrator.
Final Image
As always, this is the final image that we’ll be creating:

Tutorial Details
- Program: Adobe Illustrator CS5
- Estimated Completion Time: 1 hour 30 minutes
- Difficulty: Beginner – Intermediate
Resources
Step 1
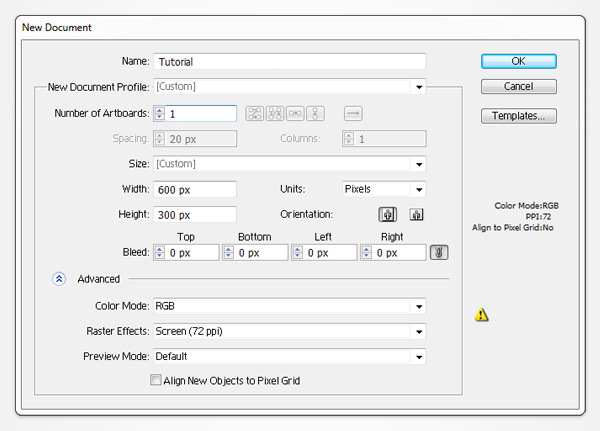
Open Illustrator and hit Control + N to create a new document. Enter 600 in the width box and 300 in the height box then click on the Advanced button. Select RGB, Screen (72ppi) and make sure that the “Align New Objects to Pixel Grid” box is unchecked before you click OK.
Step 2
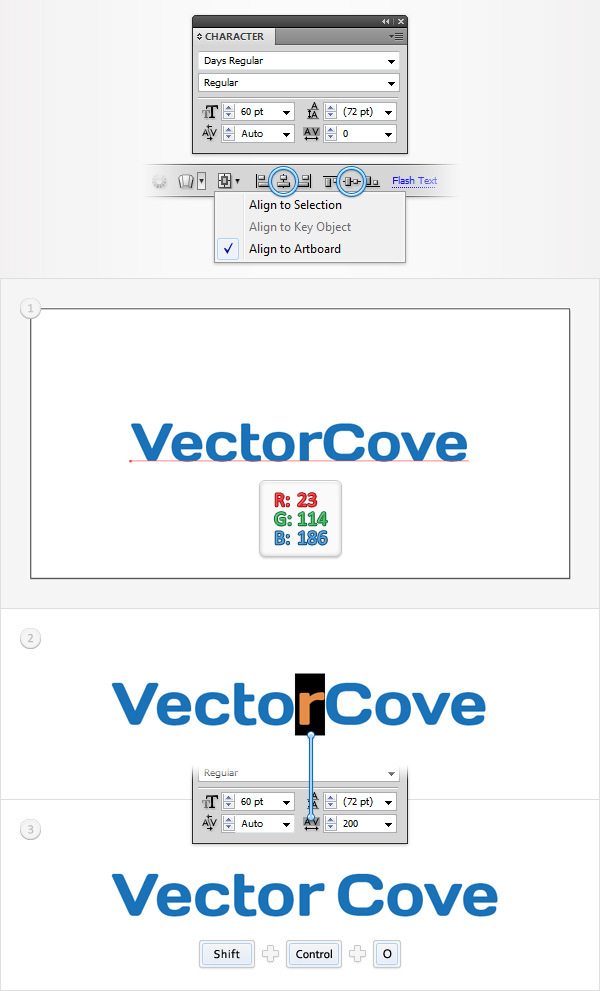
Pick the Type Tool(T), click anywhere inside your document and add the “VectorCove” piece of text. Use the Days Regular font, with the size set at 60pt and the color at R=23 G=114 B=186.
Make sure that your text is selected and move to the top bar. Check Align to Artboard then simply click on the Horizontal Align Center and Vertical Align Center buttons.
Keep focusing on the text, select the “r”, move to the Character panel and set the tracking to 200. This should add some extra space between the “r” and the next letter. In the end things should look like in the third image below.
Make sure that your text is still selected and simply go to Type > Create Outline ( Shift + Control + O ).
Step 3
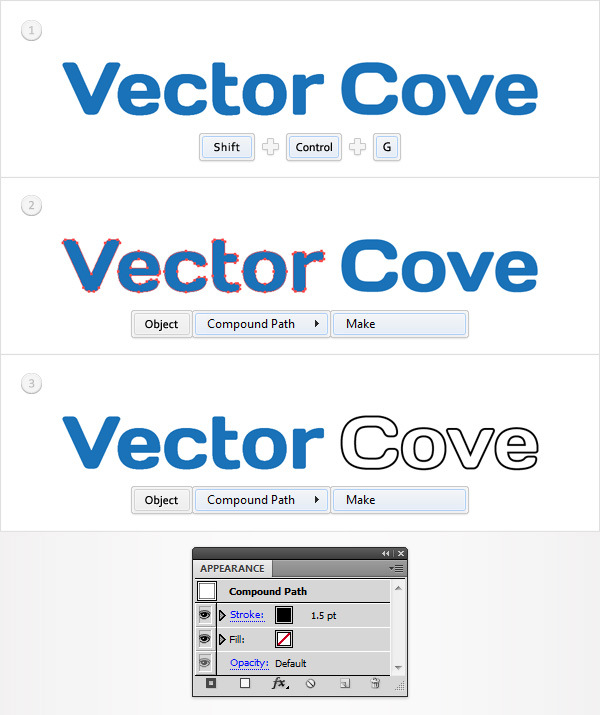
Focus on the Layers panel, select the group made in the previous step and ungroup it (Shift + Control + G).
Select the six shapes that make up the word “Vector” and turn them into a compound path (Object > Compound Path > Make or Control + 8 ).
Select the other four shapes and do the same thing (Control + 8).
Select this second compound path and focus on the Appearance panel. First, remove the color from the fill then add a 1.5pt, black stroke.
Step 4
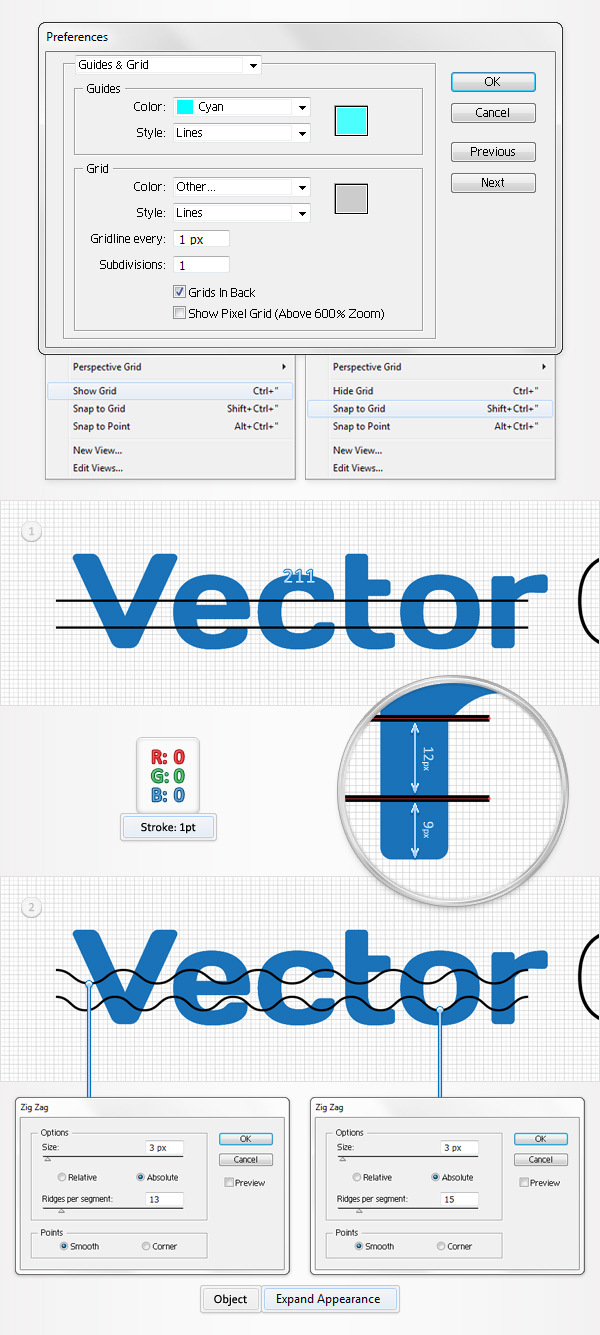
Turn on the Grid (View > Grid) and the Snap to Grid (View > Snap to Grid). You’ll need a grid every 1px. Simply go to Edit > Preferences > Guides & Grid, enter 1 in the Gridline every box and 1 in the Subdivisions box.
You can also open the Info panel (Window > Info) for a live preview with the size and position of your shapes. Do not forget to set the unit of measurement to pixels from Edit > Preferences > Unit > General. All these options will significantly increase your work speed.
Focus on the “Vector” compound path, select the Pen Tool(P), and draw two, 211px horizontal paths. Add a 1pt, black stroke for these new shapes and place them as shown in the first image below.
The Snap to Grid should ease your work. Select the top path and go to Effect > Distort & Transform > Zig Zag. Enter the properties shown below in the left window and click OK.
Move to the bottom path, select it and go to Effect > Distort & Transform > Zig Zag. Enter the properties shown below in the right window and click OK.
Reselect both paths and go to Object > Expand Appearance.
Step 5
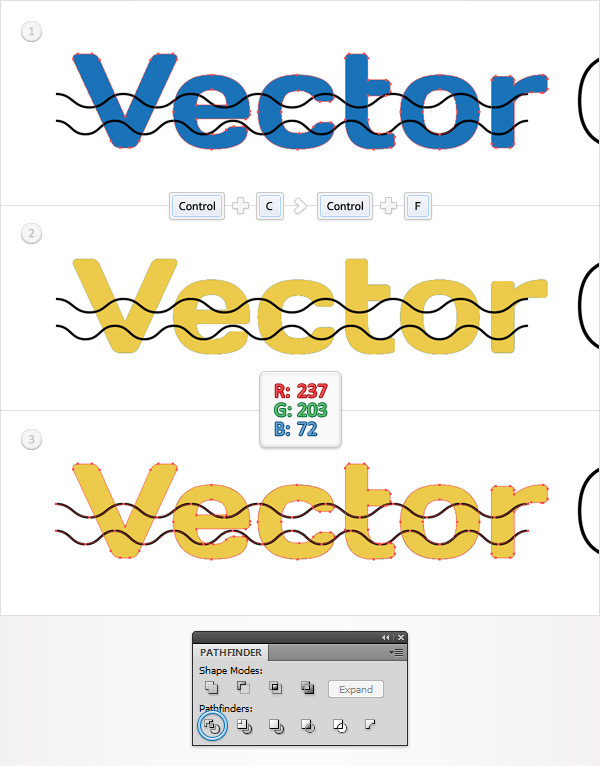
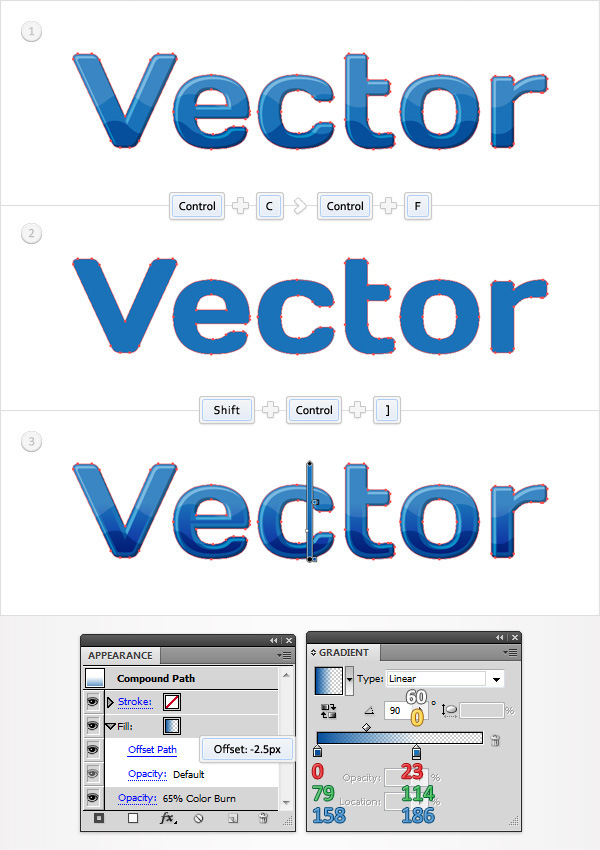
Disable the Grid (View > Hide Grid) and the Snap to Grid (View > Snap to Grid). Select the “Vector” compound path and make a copy in front (Control + C > Control + F).
Select this copy and replace the blue used for the fill with R=237 G=203 B=72.
Select this yellow compound path along with the two paths made in the previous step, open the Pathfinder panel and click on the Divide button.
Step 6
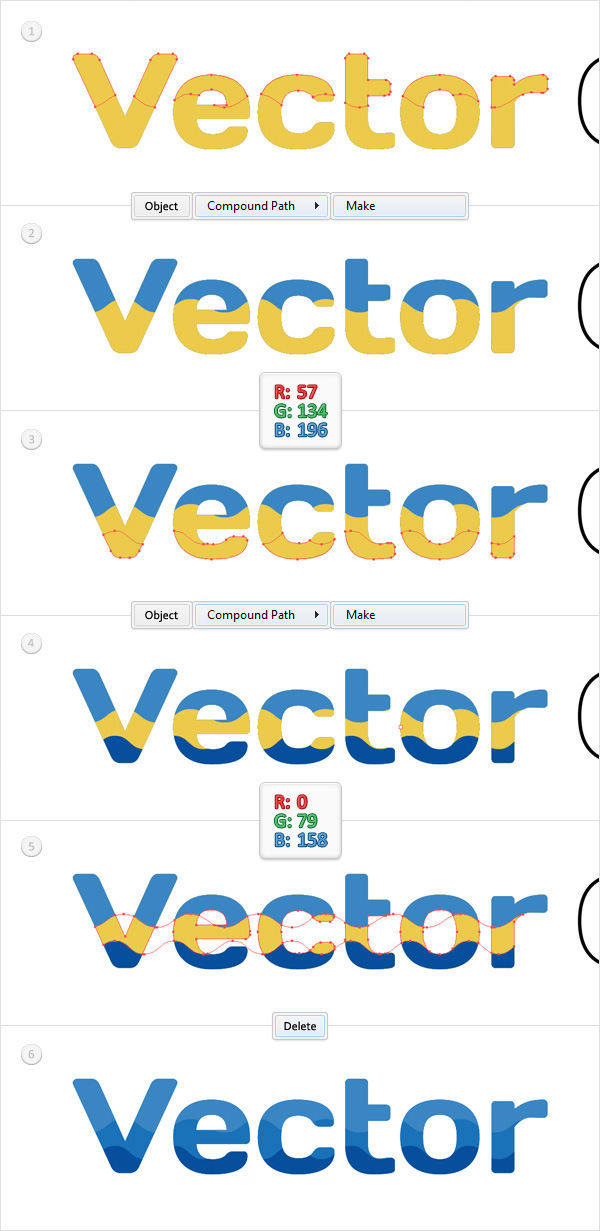
Focus on the Layers panel and open the group of shapes made in the previous step.
Select the shapes highlighted in the first image and turn them into a compound path (Control + 8). Select it, fill it with R=57 G=134 B =196 and drag it outside the group.
Return to the group, select the shapes highlighted in the third image and turn them into a new compound path (Control + 8). Select it, fill it with R=0 G=79 B =158 and drag it outside the group.
Back to the group, simply select it and hit the Delete key on your keyboard. In the end things should look like in the sixth image below.
Step 7
Go to Edit > Preferences > General and make sure that the Keyboard Increment is set at 1px.
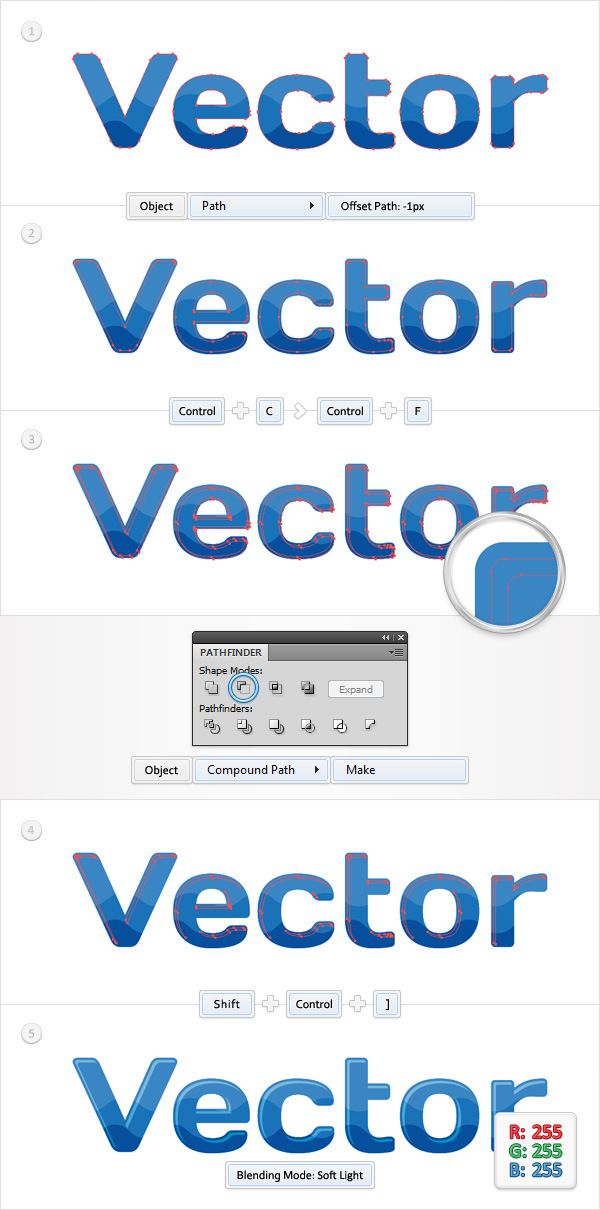
Select the “Vector” compound path and go to Object > Path > Offset Path. Enter a -1px Offset and click OK.
Select the resulting shape and make a copy in front (Control + C > Control + F). Select it and move it 1px down and 1px to the right using the arrow keys on your keyboard.
Reselect both shapes made in this step and click on the Minus Front button from the Pathfinder panel.
Select the resulting group of shapes, turn it into a compound path (Control + 8) and bring it to front (Shift + Control + ] ). Fill it with white and change the blending mode to Soft Light.
Step 8
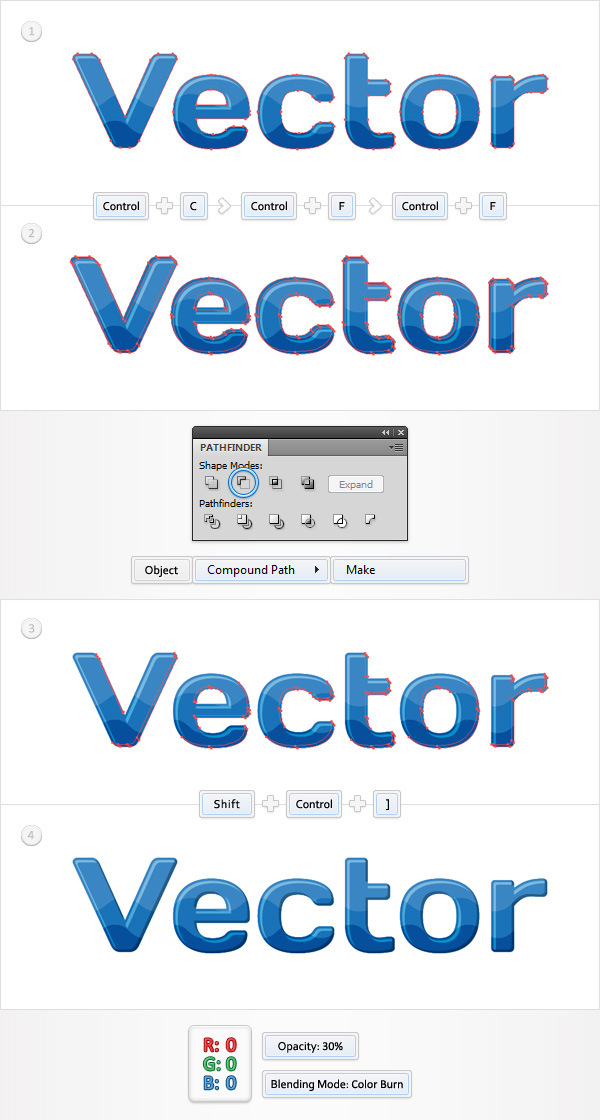
Select the “Vector” compound path and make two copies in front (Control + C > Control + F > Control + F).
Select the top copy and move it 1px up and 1px to the left.
Reselect both copies and click on the Minus Front button from the Pathfinder panel.
Select the resulting group of shapes, turn it into a compound path (Control + 8) and bring it to front (Shift + Control + ] ). Fill it with black, change the blending mode to Color Burn and lower its opacity to 30%.
Step 9
Select the “Vector” compound path, make a copy in front (Control + C > Control + F) and bring it to front (Shift + Control + ] ).
Make sure that this new copy stays selected and focus on the Appearance panel.
Select the fill, replace the flat color with the linear gradient shown below, lower its opacity to 65%, change the blending mode to Color Burn and go to Effect > Path > Offset Path. Enter a -2.5pt Offset and click OK. The white number from the gradient image stands for location percentage and the yellow zero stands for opacity percentage.
Step 10
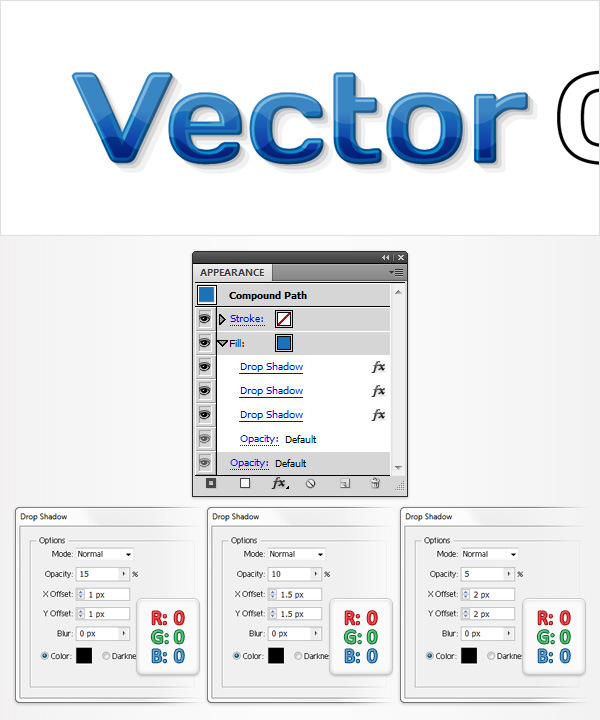
Select the “Vector” compound path, focus on the Appearance panel, select the fill and go to Effect > Stylize > Drop Shadow. Enter the properties shown in the left window, click OK.
Go again to Effect > Stylize > Drop Shadow. Enter the properties shown in the middle window, click OK.
Go one more time to Effect > Stylize > Drop Shadow. Enter the properties shown in the right window and click OK.
Step 11
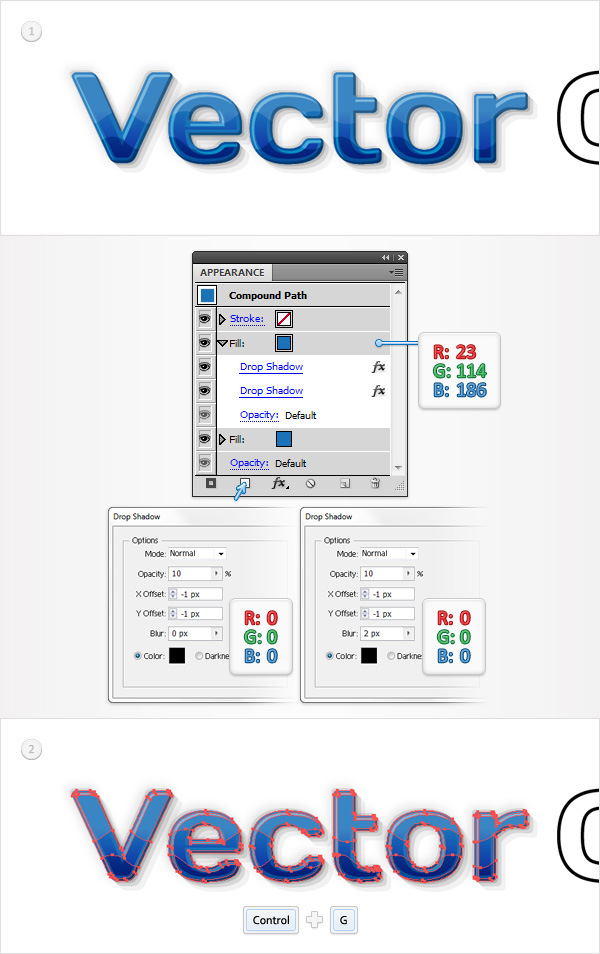
Reselect the “Vector” compound path, focus on the Appearance panel and add a second fill using the Add New Fill button (pointed by the little blue arrow).
Select this new fill, set the color to R=23 G=114 B=186 and go to Effect > Stylize > Drop Shadow. Enter the properties shown in the left window, click OK.
Go again to Effect > Stylize > Drop Shadow. Enter the properties shown in the right window and click OK.
Reselect this “Vector” compound path along with the five compound paths made in the last seven steps and group them (Control + G). Move to the Layers panel and lock this group.
Step 12
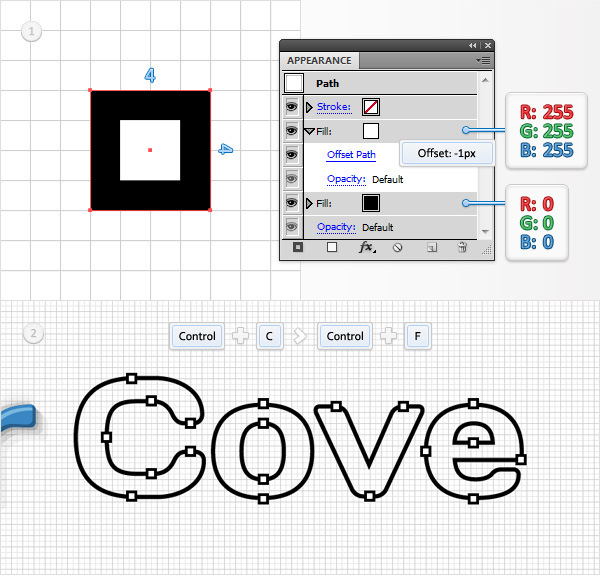
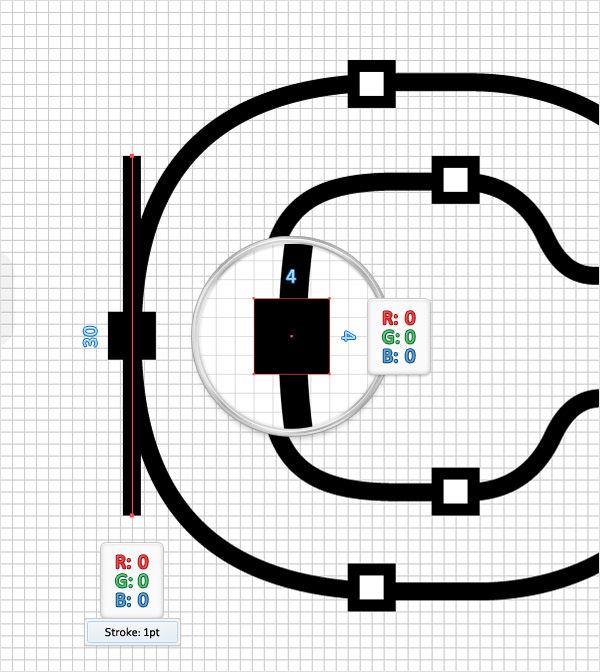
Enable the Grid (View > Show Grid) and the Snap to Grid (View > Snap to Grid). Pick the Rectangle, create a 4px square and fill it with black.
Select this new shape, focus on the Appearance panel and add a second fill. Select it, set the color to white and go to Effect > Path > Offset Path. Enter a -1px Offset and click OK.
Multiply this little square (Control + C > Control + F) and spread the copies as shown in the second image. Again, the Snap to Grid will ease your work.
Step 13
Focus on the left side of the “C”. Pick the Rectangle Tool(M), create a 4px square, fill it with black and place it as shown below.
Switch to the Pen Tool(P), draw a 30px, vertical path and place it as shown in the following image. Add a 1pt, black stroke for this new path.
Step 14
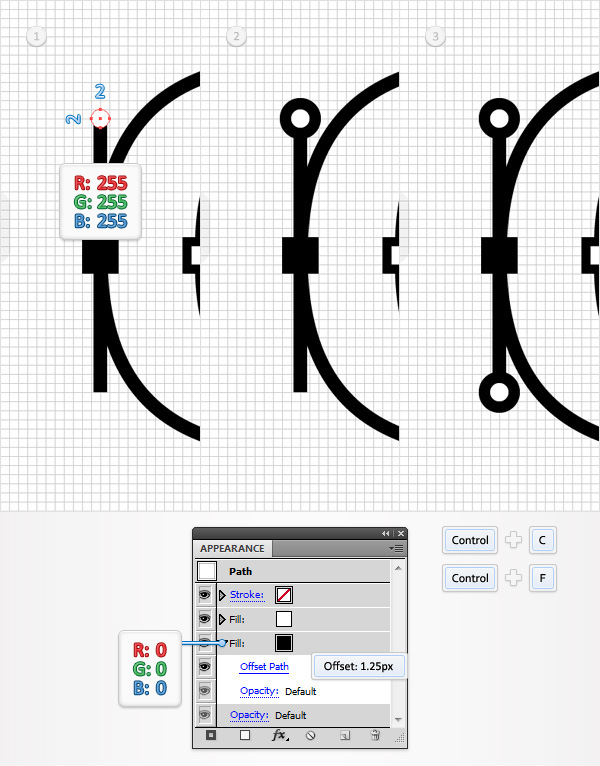
Pick the Ellipse Tool(L), create a 3px circle, fill it with white and place it as shown in the first image.
Select this new shape, add a second fill and drag it in the bottom of the Appearance panel.
Select it, set the color to black and go to Effect > Path > Offset Path. Enter a 1.25px Offset and click OK.
Make a copy of this circle (Control + C > Control + F), select it, drag it down and place it as shown in the third image.
Step 15
Disable the Grid (View > Hide Grid) and the Snap to Grid (View > Snap to Grid).
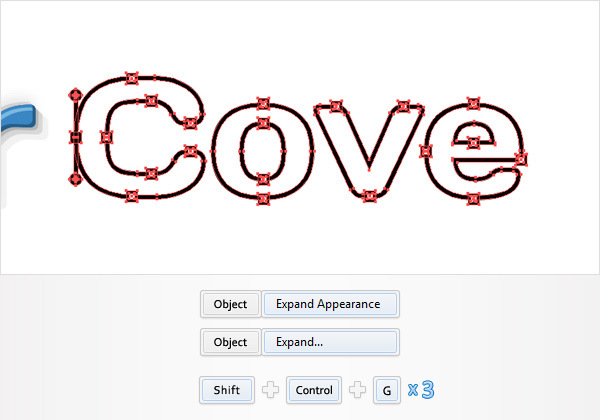
Select the “Cove” compound path along with all the shapes made in the last three steps, go to Object > Expand Appearance then go to Object > Expand.
Move to the Layers panel, select the resulting group of shapes and hit Shift + Control + G three times to get rid of all those groups and subgroups.
Step 16
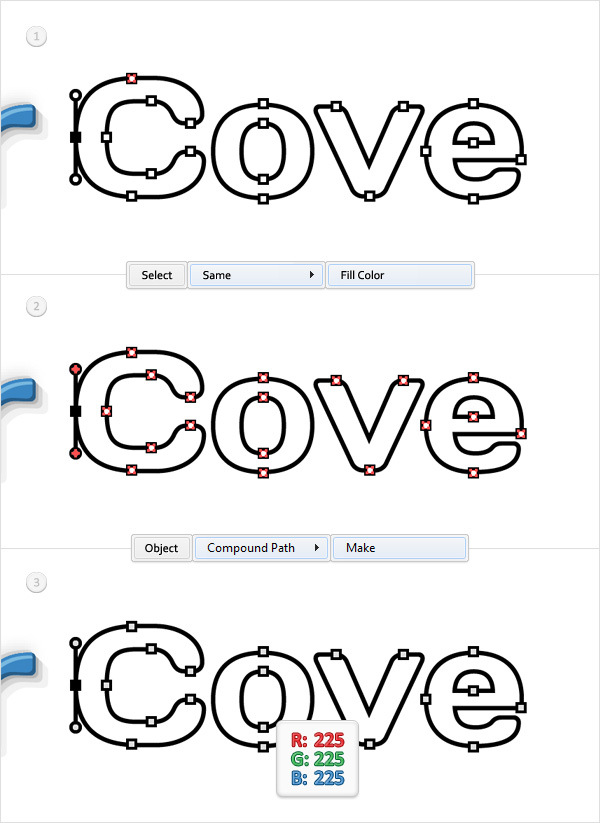
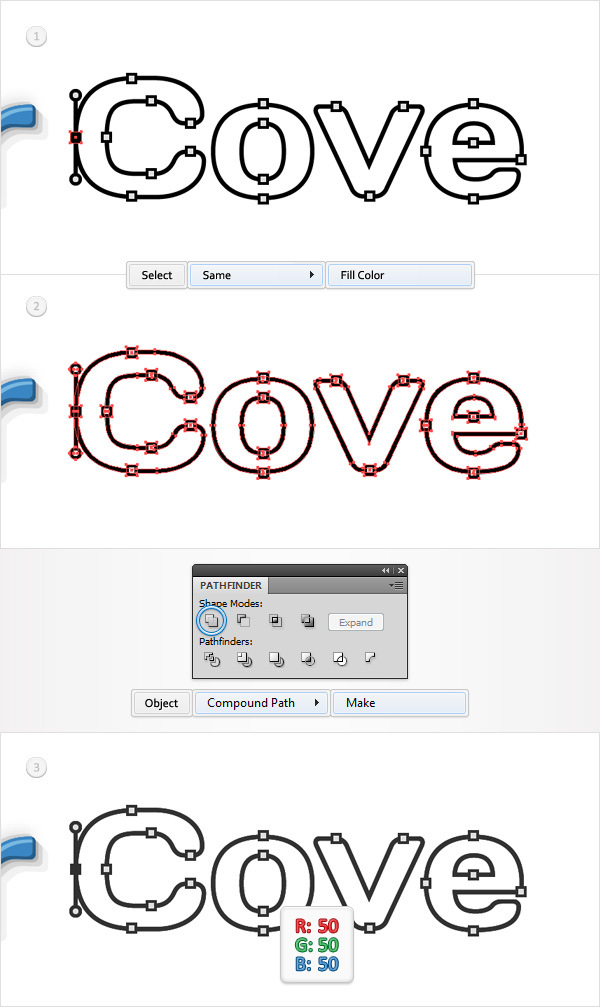
Select one of those little, white shapes and go to Select > Same > Fill Color. Obviously, this will auto-select all the shapes with a white fill. Once you have all those shapes selected simply turn them into a compound path (Control + 8).
Select it and replace the white used for the fill with R=225 G=225 B=225.
Step 17
Keep focusing on the “Cove”, select one of the black shapes and go to Select > Same > Fill Color.
Click on the Unite button from the Pathfinder panel then go to Object > Compound Path > Make (Control + 8). Select this new compound path and replace the black with R=50 G=50 B=50.
Step 18
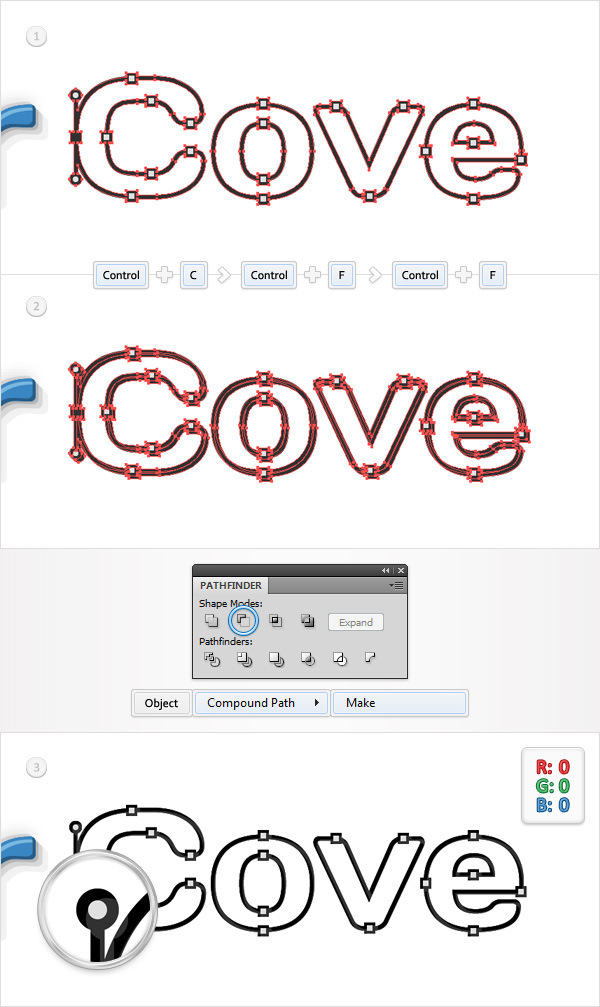
Select the compound path made in the previous step and make two copies in front (Control + C > Control + F > Control + F).
Select the top copy and move it 1px down and 1px to the right.
Reselect both copies and click on the Minus Front button from the Pathfinder panel.
Select the resulting group of shapes, turn it into a compound path (Control + 8) and fill it with black.
Step 19
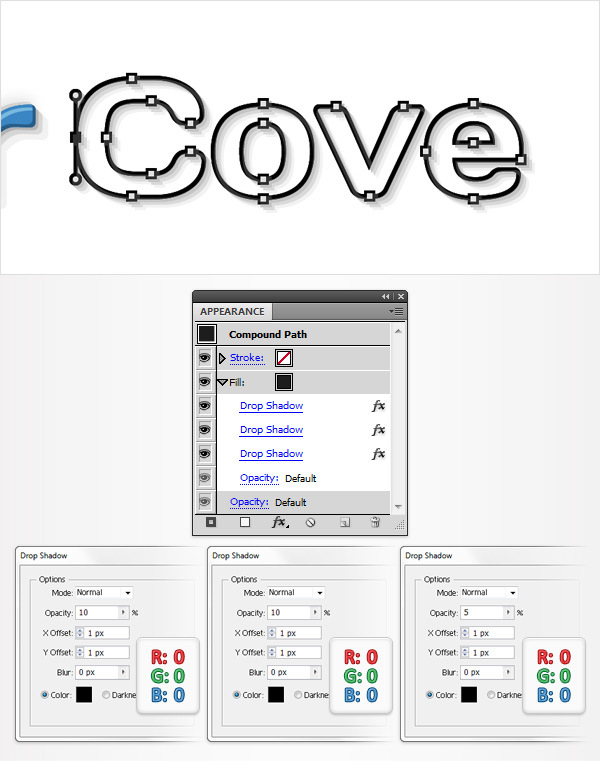
Reselect the compound path made in the Step 17, focus on the Appearance panel, select the fill and add the three Drop Shadow effects shown in the following image.
Step 20
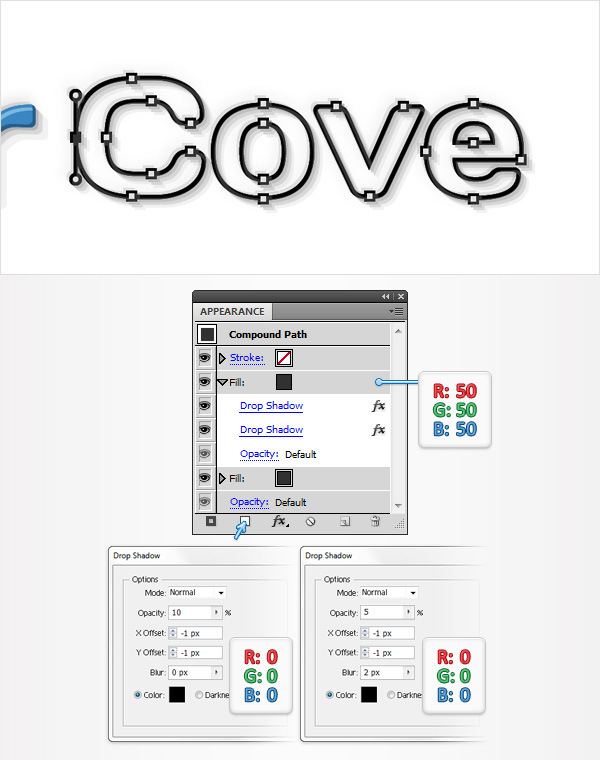
Reselect the compound path made in Step 17, focus on the Appearance panel and add a second fill using the Add New Fill button. Select this new fill, set the color at R=50 G=50 B=50 then add the two Drop Shadow effects shown in the following image.
Conclusion
Here is how your final result should look.
