In the following tutorial you will learn how to create an editable, 3D text in Adobe Illustrator.
For starters you will learn how to create a simple background and how to easily place it in the center of your artboard. Next, you will learn how to add your piece of text and how to edit it. Using two simple blends and some basic effects you will learn how to create the 3D effect. Finally, taking full advantage of the Appearance panel and using a built-in pattern you will learn how add subtle highlights.
Final Image
As always, this is the final image that we’ll be creating:

Tutorial Details
- Program: Adobe Illustrator CC
- Estimated Completion Time: 45 minutes
- Difficulty: Beginner-Intermediate
Step 1
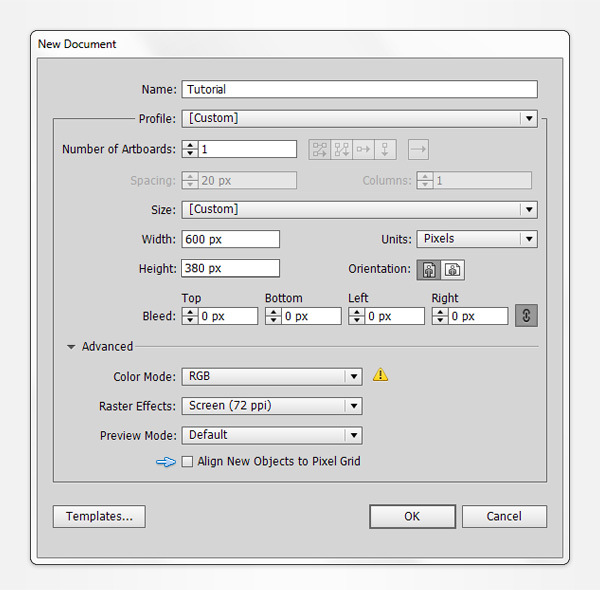
Hit Control + N to create a new document. Select Pixels from the Units drop-down menu, enter 600 in the width box and 380 in the height box then click on the Advanced button and enter the properties shown in the following image.
Step 2
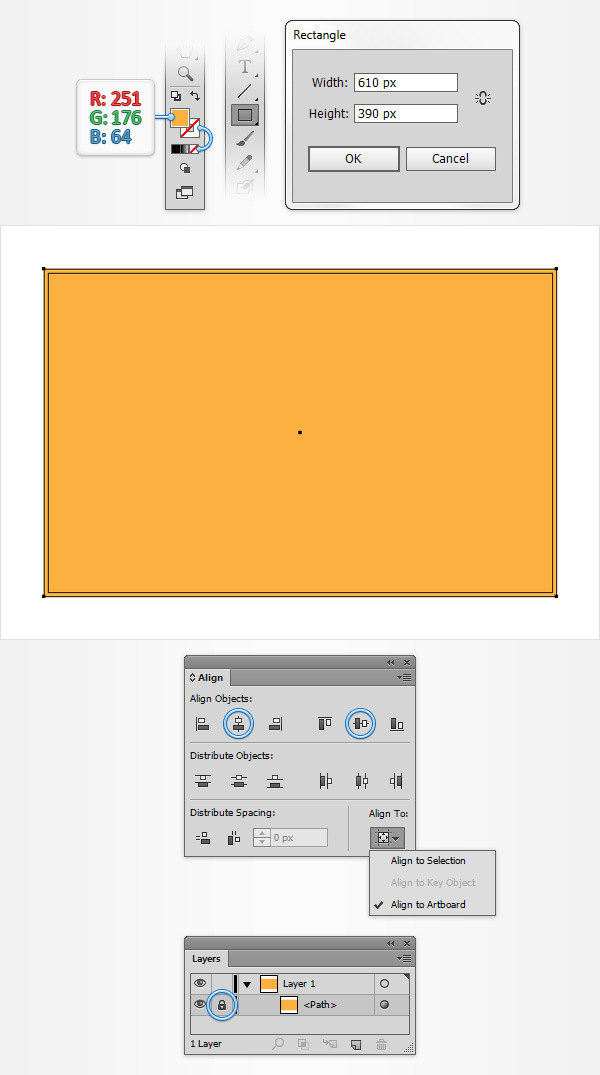
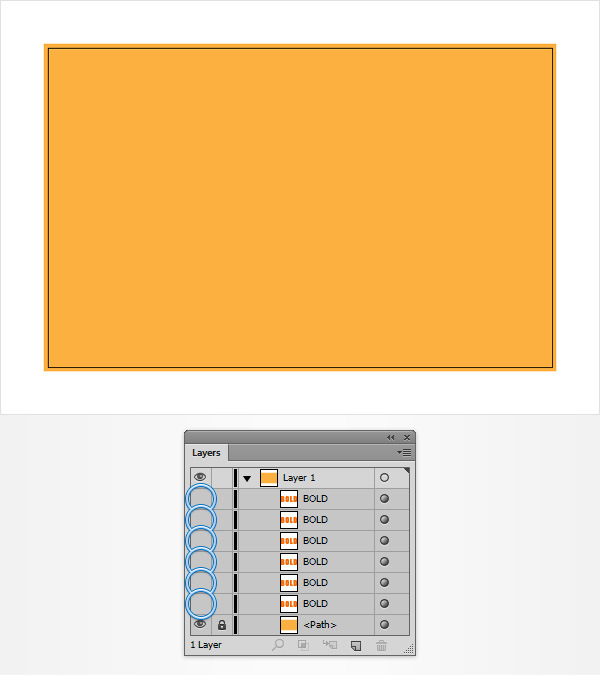
Pick the Rectangle Tool (M), focus on your Toolbar, remove the color from the stroke then select the fill and set its color to R=251 G=176 B=64. Simply click on your artboard to open the Rectangle window, enter 610 in the Width box and 390 in the Height box then click the OK button.
Next, you need to center this orange rectangle, so open the Align panel (Window > Align). Set the aligning to Artboard (open the fly out menu and go to Show Options if you can’t see the Align To section as shown in the following image) then simply click the Horizontal Align Center and Vertical Align Center buttons. In the end your rectangle should cover the entire artboard as shown in the following image.
Move to the Layers panel (Window > Layers), open the existing layer and lock your shape to make sure that you don’t accidentally select/move it.
Step 3
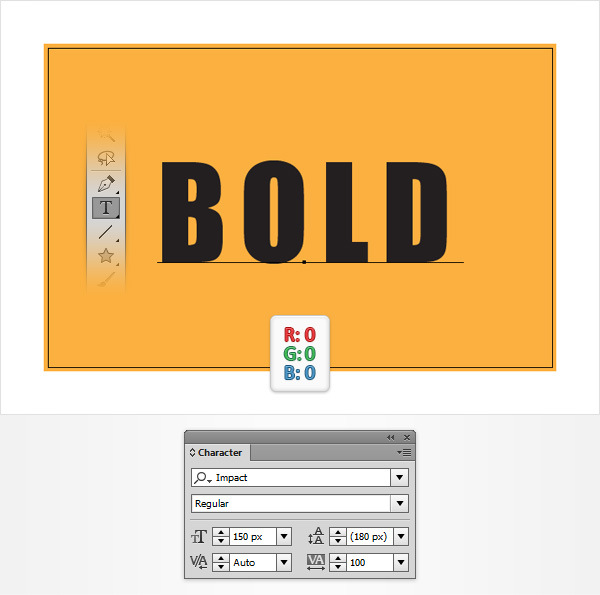
Open the Character panel (Window > Type > Character), pick the Type Tool (T), simply click on your artboard and add your black piece of text. Use the Impact font with the size at 150px and the tracking at 100.
Step 4
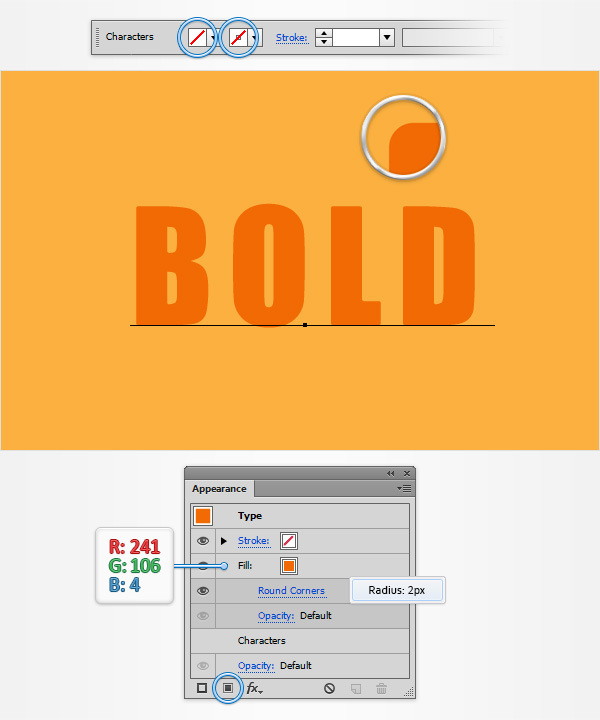
Reselect your piece of text, focus on the control panel and simply remove that black from the fill color. This should make your piece of text invisible. Make sure that it stays selected, open the Appearance panel and simply add a new fill using the Add New Fill button (indicated by the blue circle in the following image).
Select the newly added fill, set the color to R=241 G=106 B=4 and go to Effect > Stylize > Rounded Corners. Enter a 2px radius and click OK.
Step 5
Make sure that your piece of text is selected and make five copies in front (Control + C > Control + F).
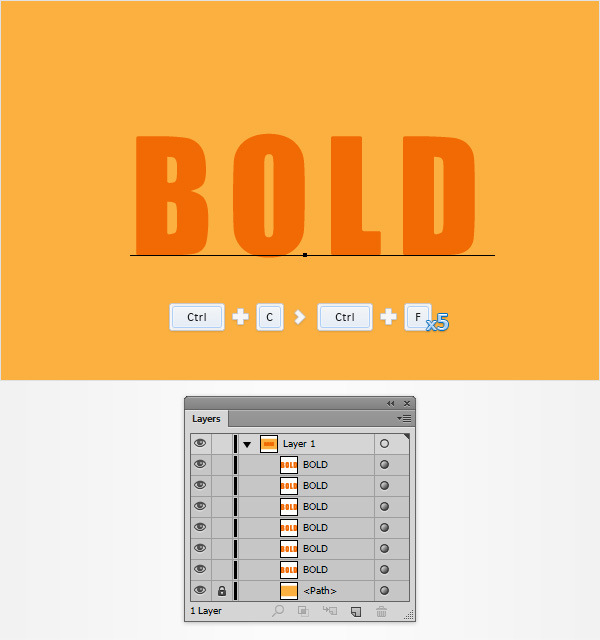
Step 6
Focus on the Layers panel and simply turn off the visibility for your six pieces of text.
Step 7
Focus on the Layers panel and turn on the visibility for your bottom piece of text. Select it and go to Object > Transform > Move. Enter 30 in the Vertical and Horizontal boxes then click the OK button.
Make sure that your visible piece of text is still selected, focus on the Appearance panel and simply click on that "Opacity" piece of text to open the Transparency fly-out panel. Lower the Opacity to 0% and this should make your text completely invisible.

Step 8
Focus on the Layers panel, move up to the next piece of text and turn on its visibility. Make sure that this new piece of text is selected, move to the Appearance panel and lower its Opacity to 15%.

Step 9
Focus on your Toolbar and simply click on the Blend Tool to open the Blend Options window. Select Specified Steps from the Spacing drop-down menu, enter 50 in that white box then click the OK button.
Make sure that your two, visible pieces of text are selected and simply hit Alt-Control-B (or go to Object > Blend > Make) to create a new blend. Move to the Layers panel and simply lock your blend.
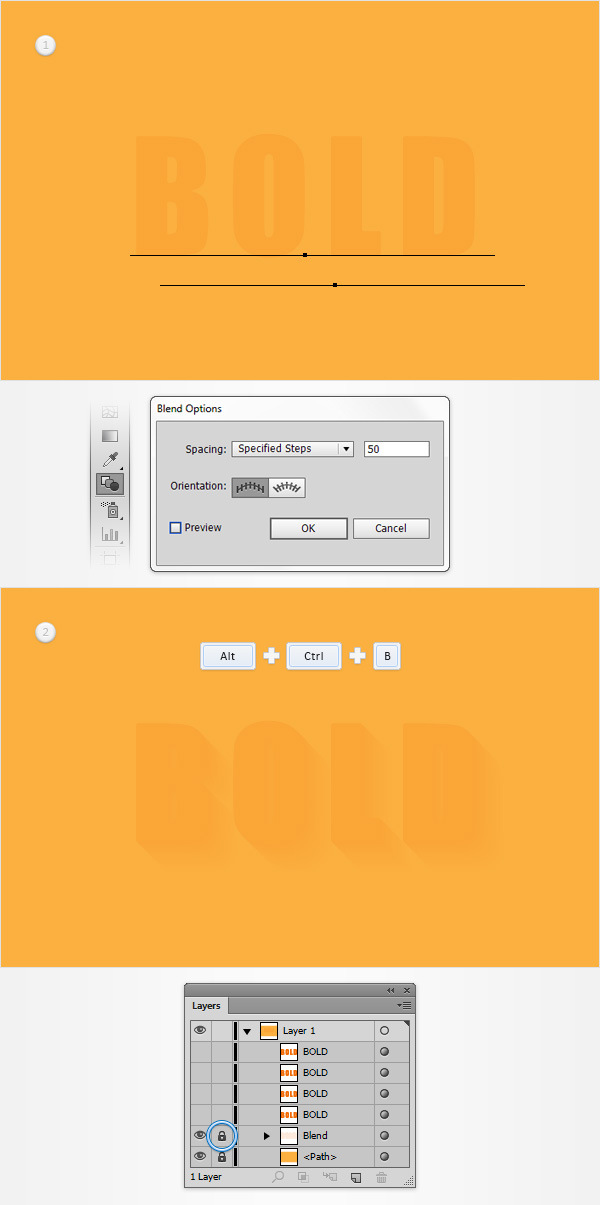
Step 10
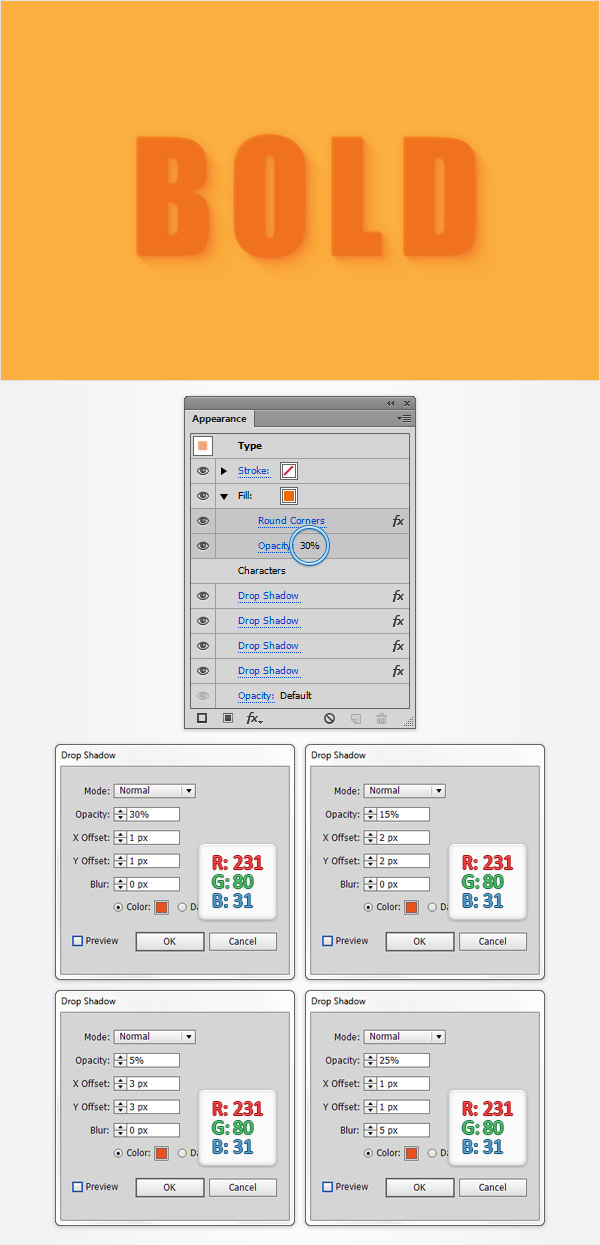
Focus on the Layers panel and simply turn on the visibility for the piece of text that’s placed above your locked blend. Select it, focus on the Appearance panel, select the existing fill and lower its Opacity to 30%.
Make sure that your visible piece of text stays selected and keep focusing on the Appearance panel. Select the entire Type (simply click on the "Type" piece of text from the top of the Appearance panel) and go to Effect > Stylize > Drop Shadow. Enter the properties shown in the top, left window (in the following image) and click OK.
Go again to Effect > Stylize > Drop Shadow. Enter the properties shown in the top, right window and click OK.
Go once again to Effect > Stylize > Drop Shadow. Enter the properties shown in the bottom, left window and click OK.
Go one more time to Effect > Stylize > Drop Shadow. Enter the properties shown in the bottom, right window and click OK. Once you’re done move to the Layers panel and simply lock the piece of text edited in this step.
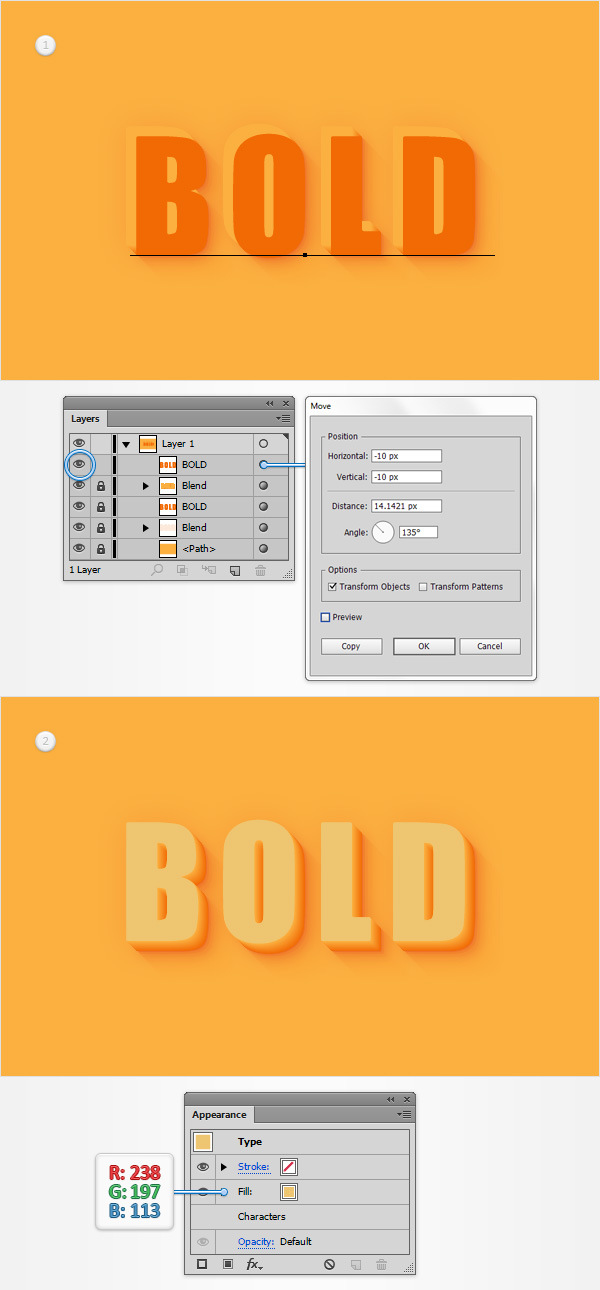
Step 11
Focus on the Layers panel and turn on the visibility for the next two pieces of text as shown in the following image. Select the top one and go to Object > Transform > Move. Enter -10 in the Vertical and Horizontal boxes then click the OK button.
Make sure that this moved piece of text stays selected, focus on the Appearance panel, select the fill and replace the existing color with R=251 G=176 B=64.

Step 12
Reselect the two visible piece of text and simply hit Alt + Control + B to create a new blend. In the end things should look like in the second image.

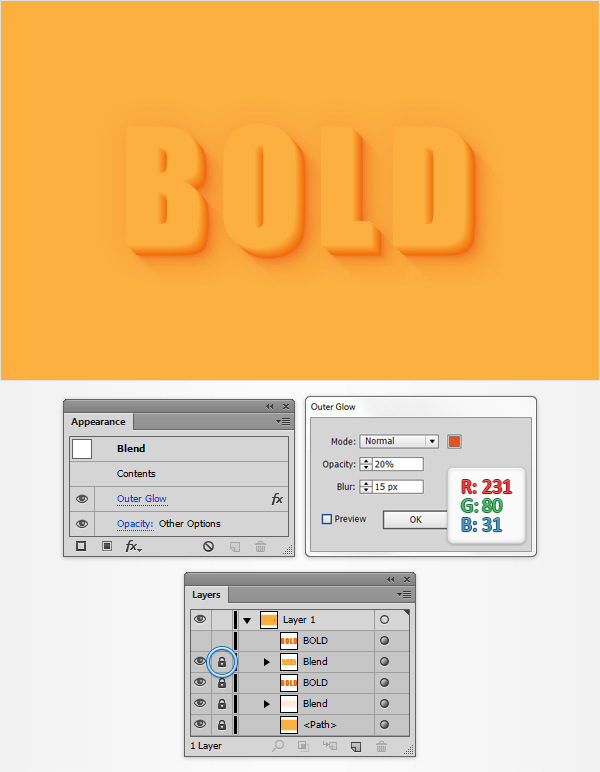
Step 13
Make sure that the blend made in the previous step is still selected and go to Effect > Stylize > Outer Glow. Enter the properties shown in the following image and click OK. Move to the Layers panel and simply lock this new blend.
Step 14
Focus on the Layers panel and turn on the visibility for the remaining invisible piece of text. Select it and go to Object > Transform > Move. Enter -10 in the Vertical and Horizontal boxes then click the OK button.
Make sure that this moved piece of text stays selected, focus on the Appearance panel, select the fill and replace the existing color with R=238 G=197 B=113.
Step 15
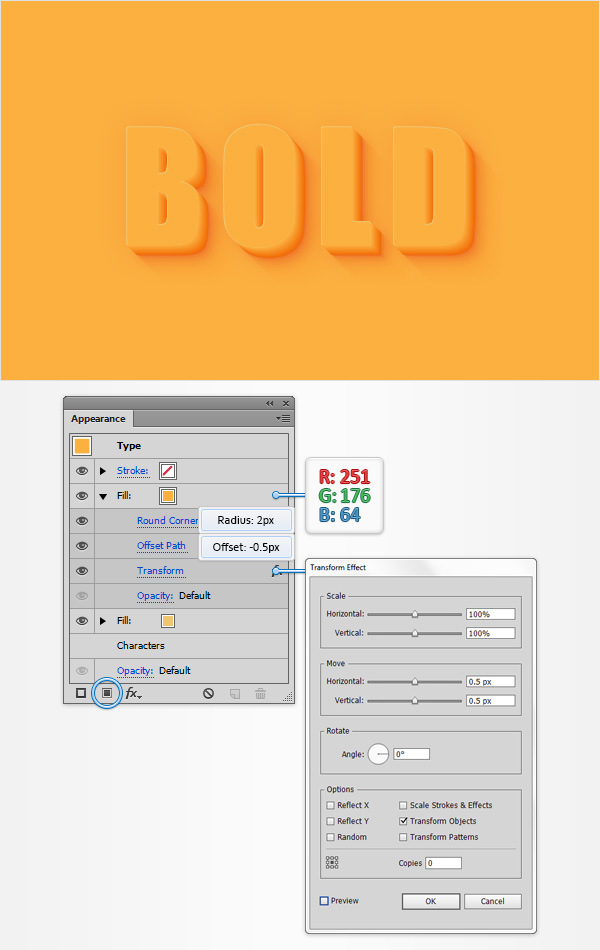
Make sure that your top piece of text stays selected, focus on the Appearance panel and add a second fill using that same Add New Fill button. Select your new fill, set the color to R=251 G=176 B=64 and go to Effect > Stylize > Rounded Corners. Enter a 2px radius and click OK.
Go to Effect > Path > Offset Path. Enter a -0.5px offset, click OK and go to Effect > Distort & Transform > Transform. Enter the properties shown in the following image and click OK.
Step 16
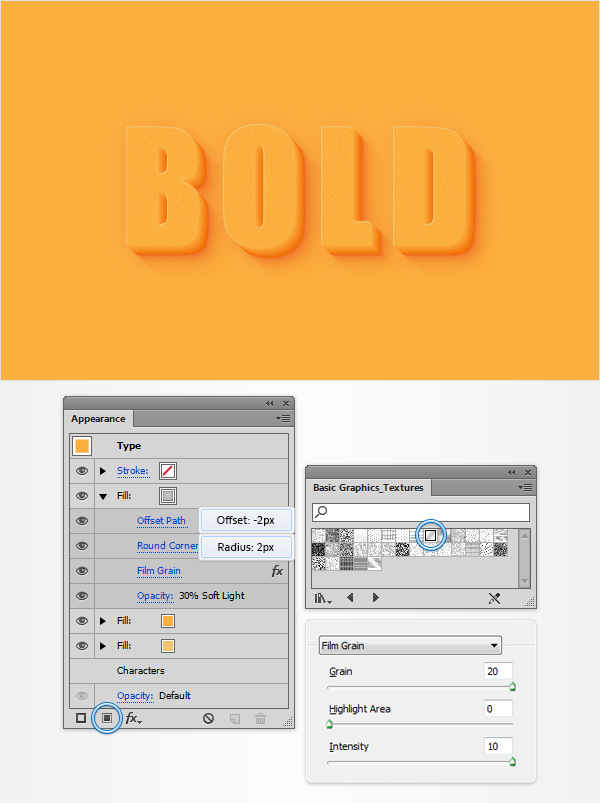
Make sure that your top piece of text stays selected, focus on the Appearance panel and add a third fill using that same Add New Fill button.
You will need a built-in pattern for this new fill, so go to the Swatches panel (Window > Swatches), open the fly-out menu and go to Open Swatch Library > Patterns > Basic Graphics > Basic Graphics_Textures. A new window with a set of built-in patterns should open.
Make sure that the third fill is still selected, add the “Diagonal Lines” pattern, lower its Opacity to 30%, change the Blending Mode to Soft Light and go to Effect > Path > Offset Path. Enter a -2px offset and click OK.
Go to Effect > Stylize > Rounded Corners. Enter a 2px radius, click OK and go to Effect > Artistic > Film Grain. Enter the properties shown below, click OK and you’re done.
Step 17
Finally, simply unlock all your pieces of text and use the Type Tool (T) to edit your text.

And We’re Done!
Here is how it should look. I hope you’ve enjoyed this tutorial and can apply these techniques in your future projects.
