Follow this tutorial and learn how to create a vector ice cream cone in Adobe Illustrator.
We’ll start with the shape of the cone and the waffle pattern and after that, we’ll draw the layers of ice cream in three flavors: chocolate, mango and berries. Sounds delicious? Let’s begin!
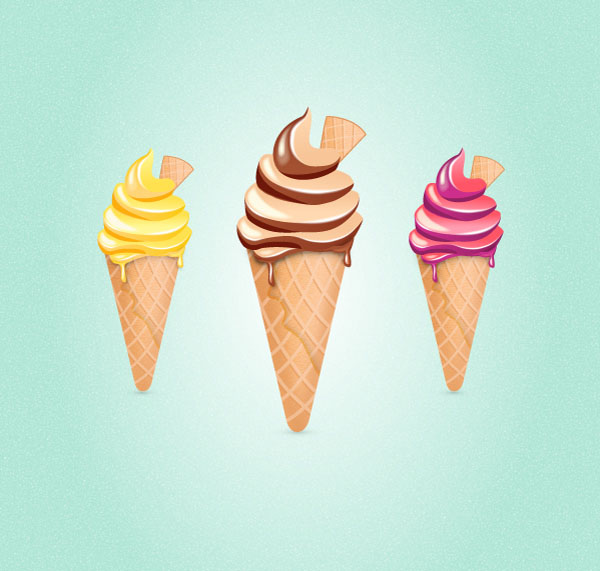
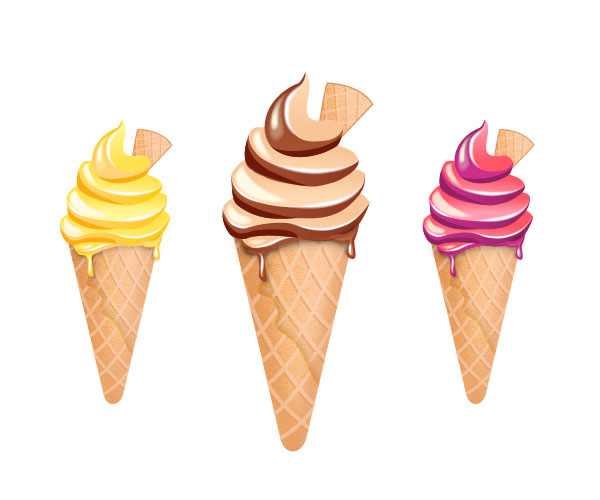
Final Image
As always, this is the final image that we’ll be creating:
Tutorial Details
- Program: Adobe Illustrator CS5
- Estimated Completion Time: 1 hour
- Difficulty: Beginner-Intermediate
Step 1
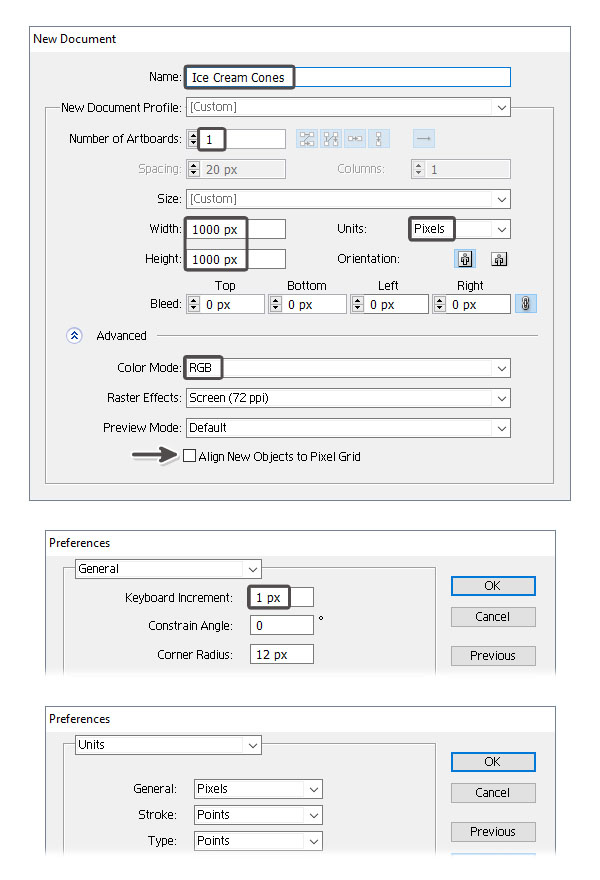
Launch Illustrator and go to File > New in order to open a blank document. Type a name for your file and set up the dimensions then select Pixels as Units and RGB as Color Mode. Also, uncheck Align New Objects to Pixel Grid. Next, go to Edit > Preferences > General and set the Keyboard Increment to 1 px and while there, also go to Units and make sure that they are set as in the following image. I usually work with these settings and they will help you throughout the drawing process.
Step 2
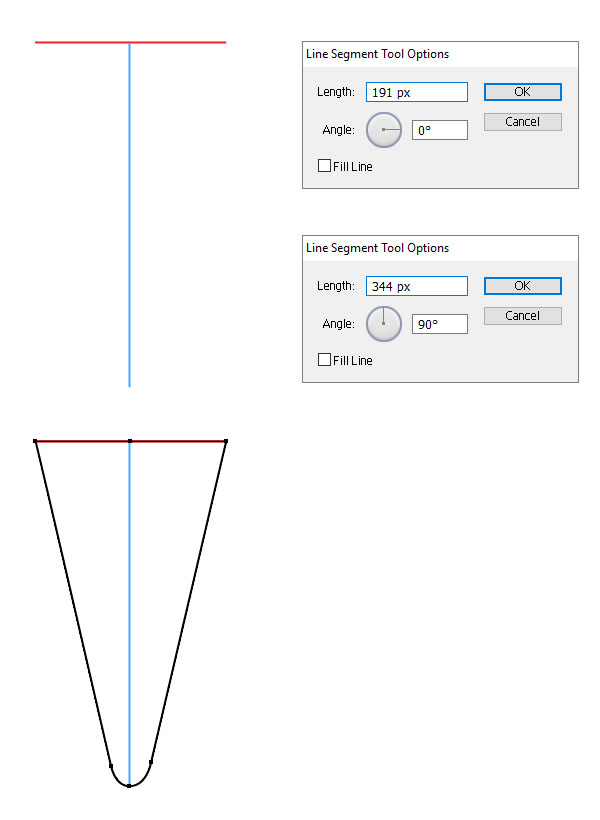
First, grab the Line Segment Tool (\). Draw a horizontal line having 191 px in length and after that, a vertical line having 344 px in length. Use these two lines as guide lines and draw the shape of the cone like in the following image.
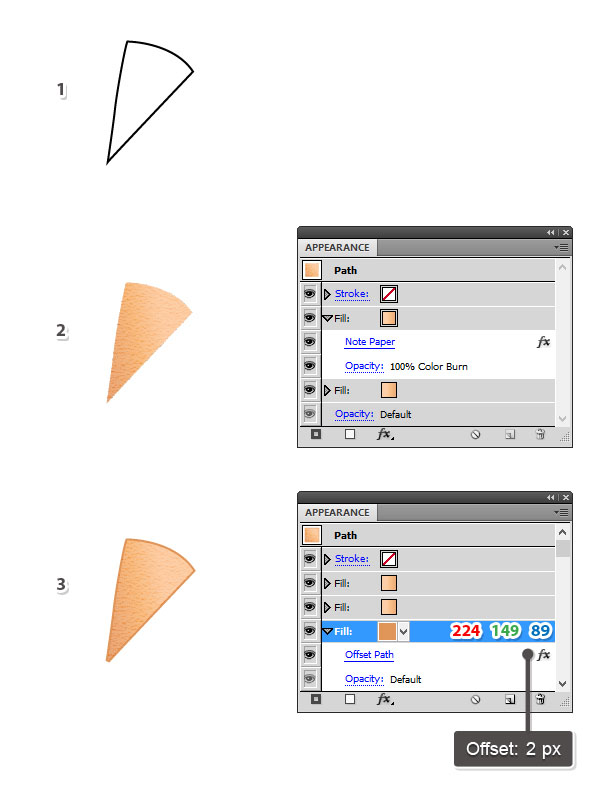
Step 3
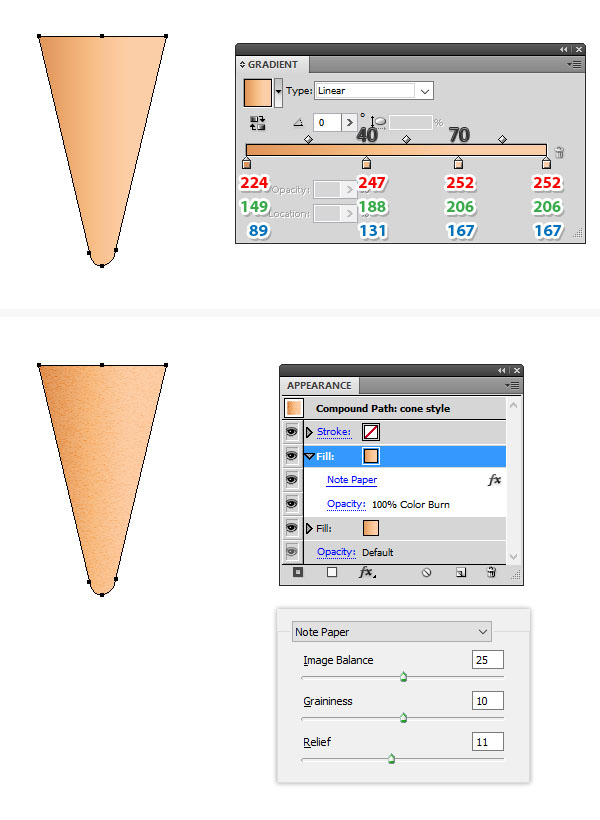
Use the linear gradient shown to fill the cone shape. While the cone stays selected, go to the Appearance panel and press Add New Fill in order to add a new Fill attribute above the first. Keep the existing gradient and then go to Effect > Sketch > Note Paper and apply the settings shown. Set this Fill to Blending Mode Color Burn.
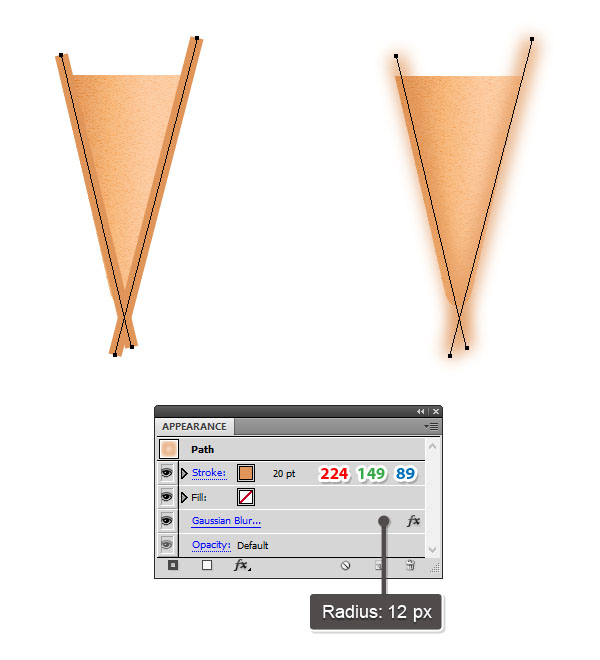
Step 4
Next, use the Pen Tool (P) or the Line Segment Tool (\) and draw two straight paths following the sides of the cone. Give them a 20 pt Stroke using a light brown color. While the paths are still selected, go to Effect > Blur > Gaussian Blur and apply a Radius of 12 px for both.
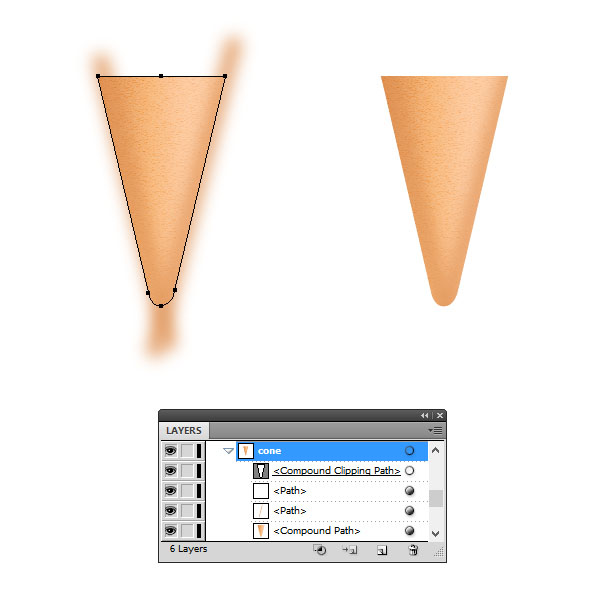
Step 5
Select the cone shape and then Copy and Paste in Place (Shift-Control-V) in order to get a copy of it. Set this copy to stroke-none and fill-none by deleting all existing appearances. Now, select everything on your Artboard and go to Object > Clipping Mask > Make (Control-7).
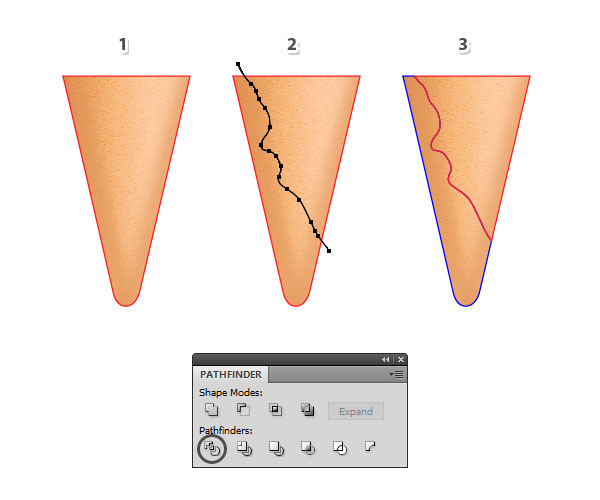
Step 6
Select the cone shape and then Copy and Paste in Place (Shift-Control-V) again in order to get another copy of it (1). Next, take the Pencil Tool (N) and draw a random wavy path over the cone like in the image below (2). Select the copy of the cone along with the wavy path and press Divide in the Pathfinder panel. As a result you will get two separate shapes (3).
I will name the blue shape “cone-left” and the red shape “cone-right”. Keep handy a few copies of these shapes because you will need them throughout the tutorial.
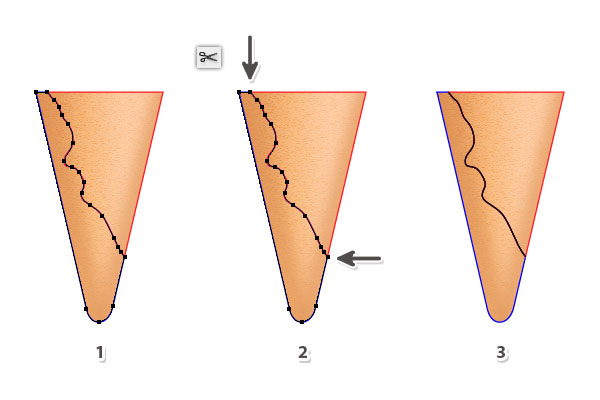
Step 7
Select “cone-left” and then Copy and Paste in Front (Control-F) in order to get a copy of it (1). While the copy stays selected, grab the Scissors Tool (C) and click on the two anchor points indicated to cut the shape. Keep only the wavy segment and delete the other piece because you don’t need it (3).
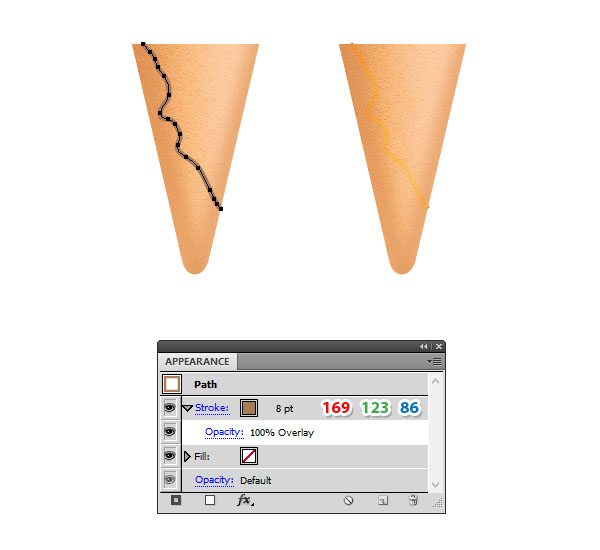
Step 8
Select the path that you got in the previous step and give it a 8 pt Stroke using brown. Set the Blending Mode to Overlay.
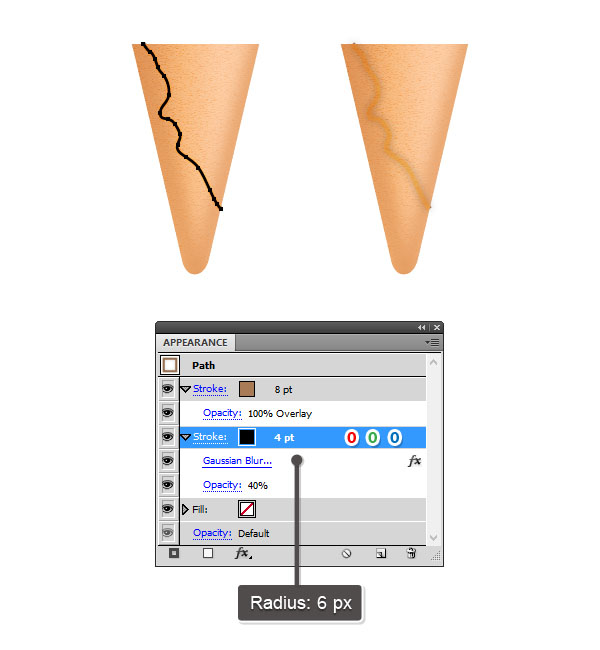
Step 9
With the wavy path still selected, go to the Appearance panel and press Add New Stroke. Set the Weight to 4 pt and the color to black and then drag this Stroke attribute below the first. Go to Effect > Blur > Gaussian Blur and apply a Radius of 6 px; then reduce the Opacity to 40%.
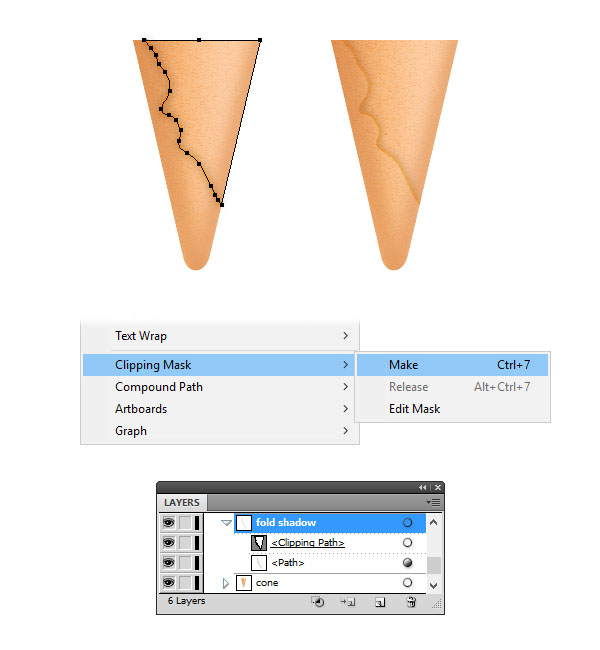
Step 10
Let’s create a mask. Select “cone-right” and then Copy and Paste in Place (Shift-Control-V) to get a copy of it. Set this copy to stroke-none and fill-none. Now, select the wavy path along with this copy and go to Object > Clipping Mask > Make (Control-7). You can name the resulting group “fold shadow”.
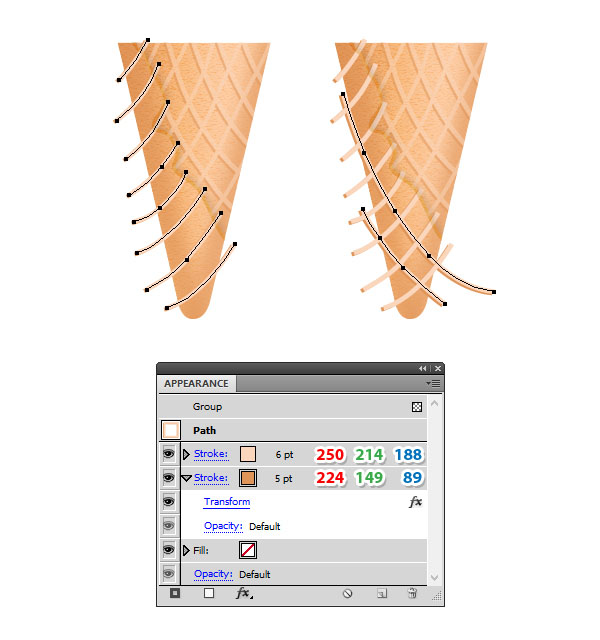
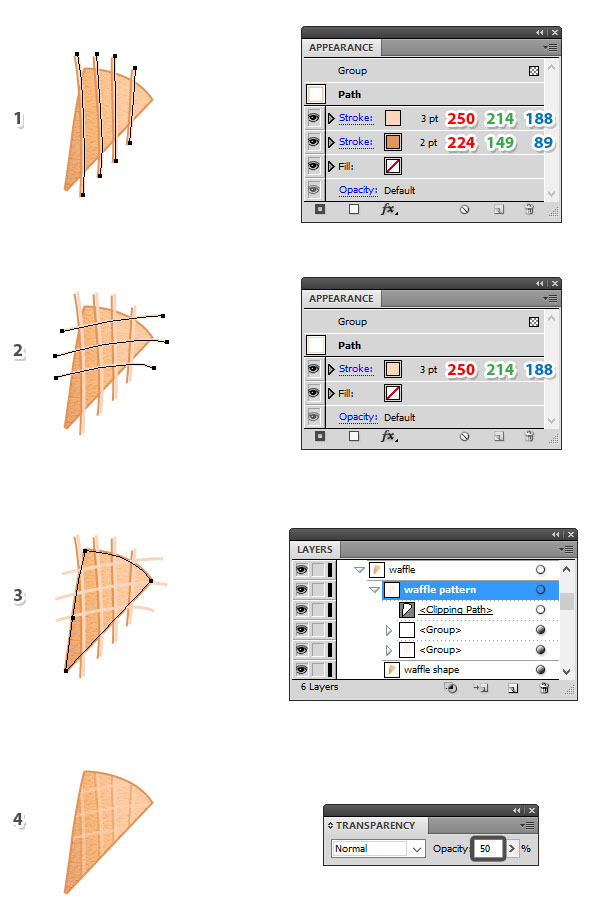
Step 11
It’s time to create the pattern on the cone. Use the Pen Tool (P) or the Pencil Tool (N) and draw about five curved paths over the “cone-right”. Give them a 6 pt Stroke using the beige color indicated. Press Add New Stroke in the Appearance panel to add a new stroke below the first one. Select a 5 pt Stroke using light brown; then go to Effect > Distort & Transform > Transform and apply the settings shown below. When you are done, Group (Control-G) these five paths.

Step 12
Next, draw other six curved paths over the “cone-right” but in the opposite direction. Give them a 5 pt Stoke using the beige color indicated. After that, Group (Control-G) these six paths.

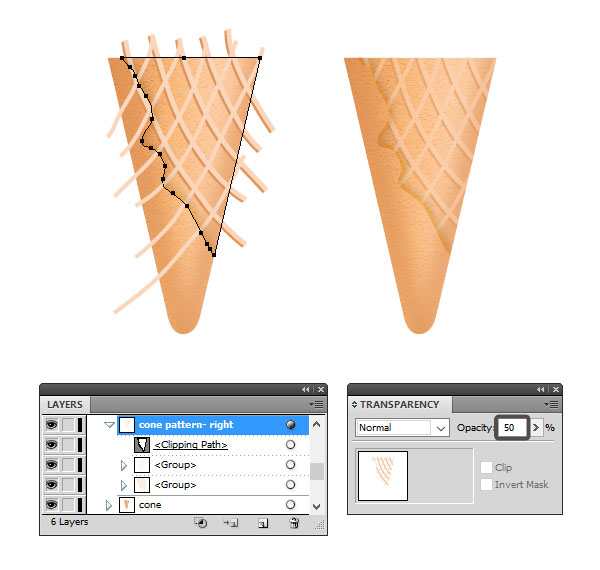
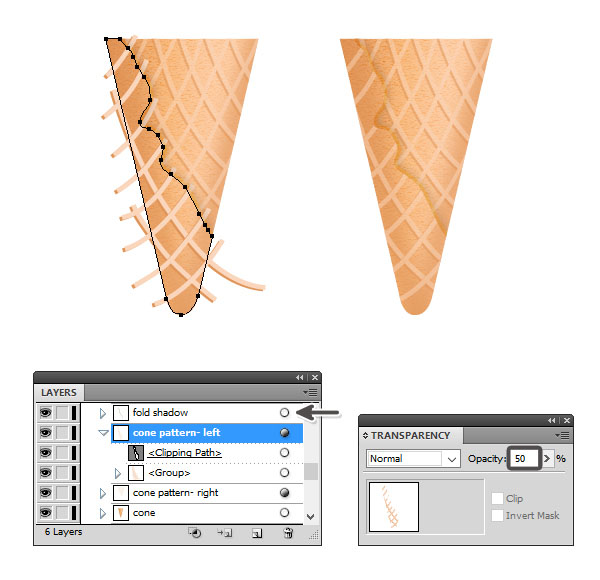
Step 13
At this step you’ll need a copy of the “cone-right”. Set the copy to stroke-none and fill-none and bring it in front of everything by going to Object > Arrange > Bring to Front (Shift-Control-]). Now, select this copy along with the two groups of curved paths and go to Object > Clipping Mask > Make (Control-7). Reduce the Opacity for the resulting group to 50%.
Step 14
Following the technique explained above, you can now create the pattern on the left side of the cone. Draw the curved paths over the “cone-left” as shown below and use the same settings from earlier. After you are done, Group (Control-G) all these paths.
Step 15
To create the mask, you’ll need a copy of the “cone-left”. Set the copy to stroke-none and fill-none and bring it in front of everything by going to Object > Arrange > Bring to Front (Shift-Control-]). Now, select this copy along with the group of curved paths and go to Object > Clipping Mask > Make (Control-7). Reduce the Opacity for the resulting group to 50%.
If at this point, the fold shadow got lost along the way and you are not able to see it, locate the group in the Layers panel and drag it above the cone pattern.
Step 16
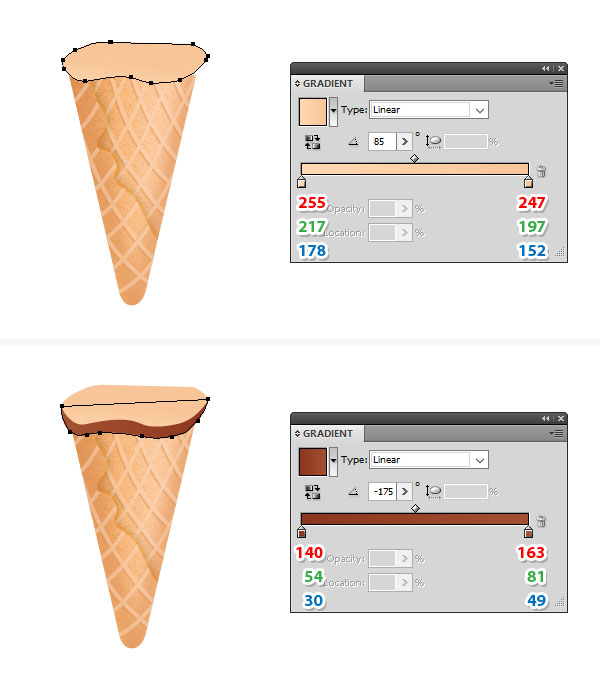
The cone is ready now so let’s continue with the chocolate ice cream. Take the Pen Tool (P) and draw a shape like below above the cone. Fill it with the linear gradient shown.
Draw the next shape, fill it with the chocolate gradient and send it behind the first shape.
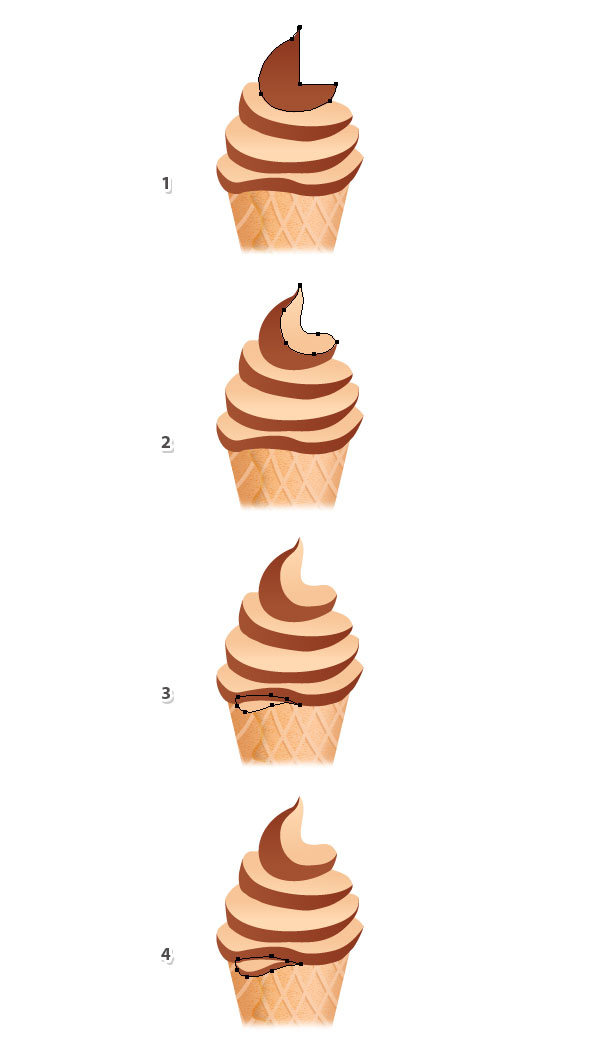
Step 17
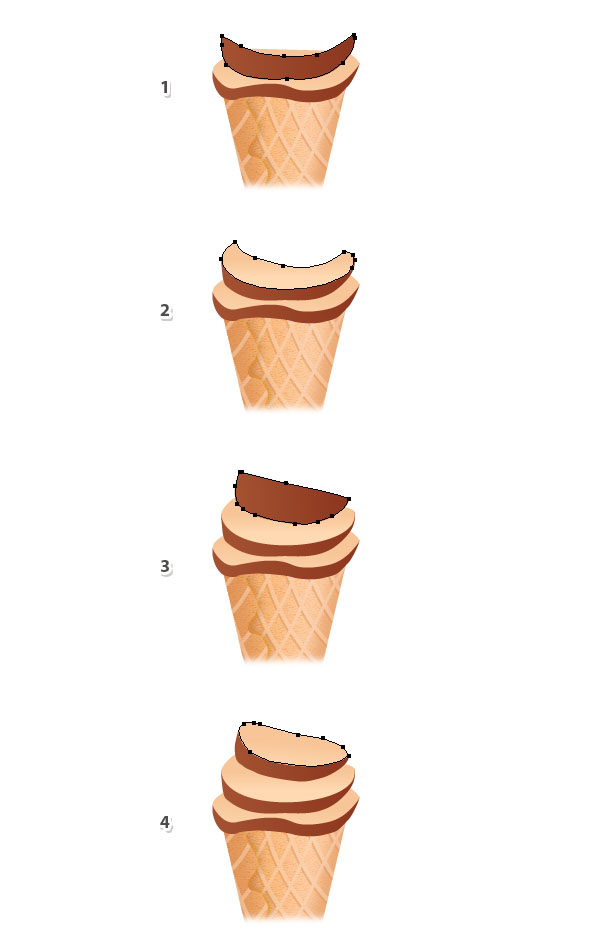
Follow the sequence of images and draw the next layers of ice cream. Take your time but don’t forget that it’s just ice cream so you don’t have to be too precise.
Step 18
Now, draw the top of the ice cream (1-2) and after that, the two shapes at the bottom where the ice cream will melt (3-4).
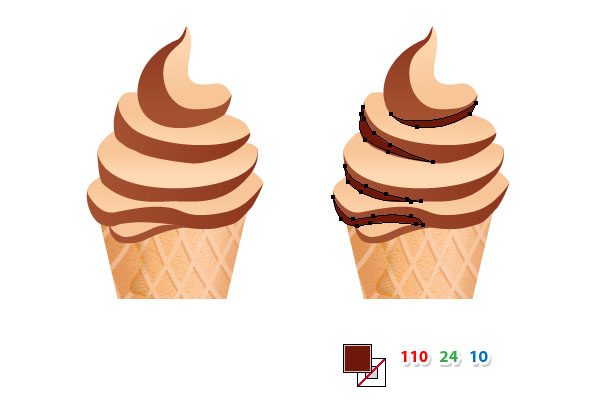
Step 19
To add some dimension, draw a thinner shape on each layer and use a darker shade of brown to fill the shapes.
Step 20
Let’s add some shine. Grab the Pen Tool (P) and draw a moon-like shape on each layer in the left side. Fill these shapes with the color indicated and then go to Effect > Stylize > Feather. Apply a Radius of 5 px for the bigger shapes and 4 px for the smaller shapes.
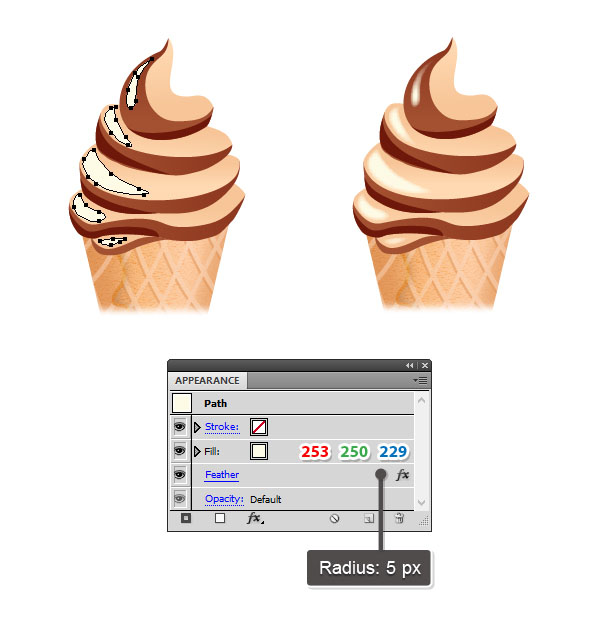
Step 21
Draw a bigger shape on the top of the ice cream in the left side. Fill it with the same color; then go to Effect > Stylize > Feather and apply a Radius of 7 px. Reduce the Opacity to 35% and send this shape behind the smaller one.
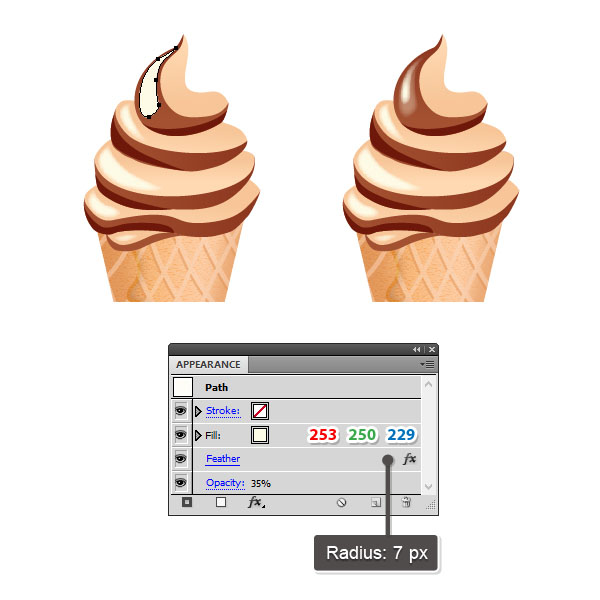
Step 22
Use the Pen Tool (P) to draw the shape of the melting ice cream, one in the left side and one in the right side like in the following image (1). Continue with two similar but slightly smaller shapes on top and use the lighter gradient to fill them (2). You can see the final result in the image below (3).
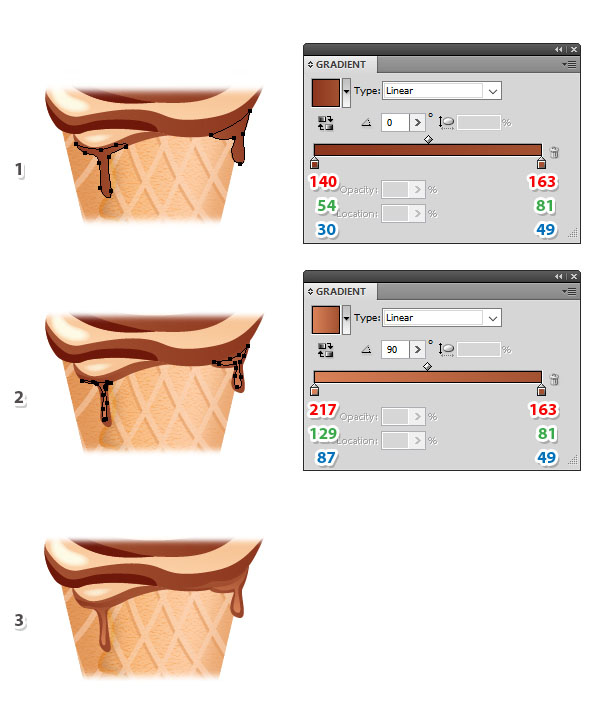
Step 23
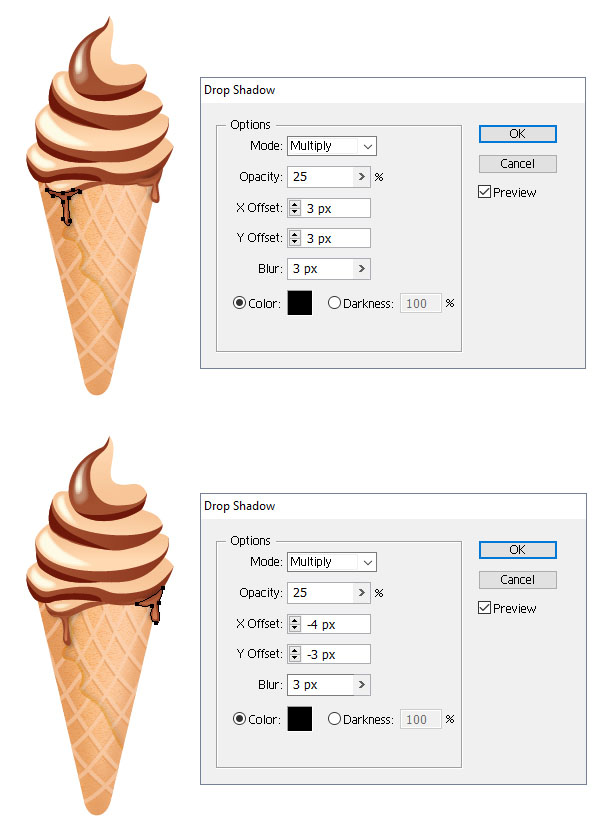
Focus on the melting drop in the left side and select only the bigger shape. Go to Effect > Stylize > Drop Shadow and apply the settings shown.
Next, focus on the melting drop in the right side, select only the bigger shape and apply the Drop Shadow effect again using the settings shown.
Step 24
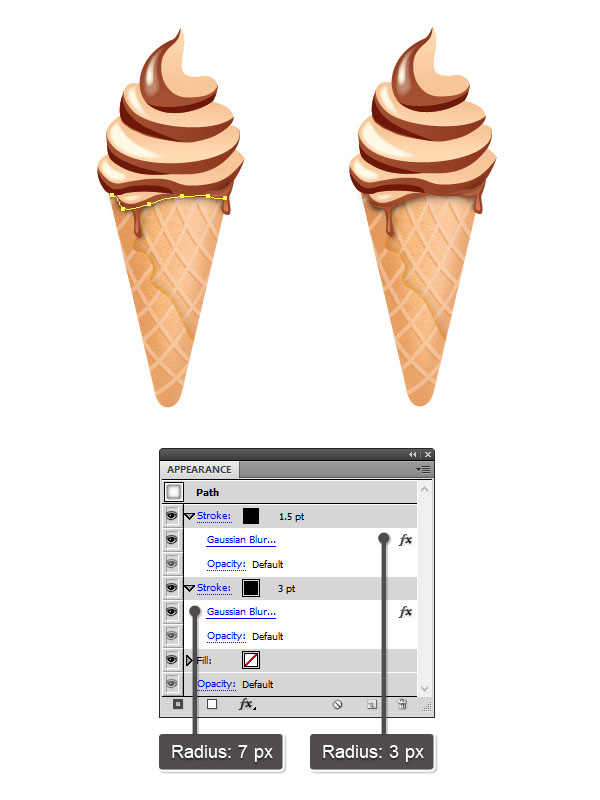
Grab the Pen Tool (P) or the Pencil Tool (N) and draw a path following the bottom edge of the ice cream. Select a 1.5 pt black Stroke and then go to Effect > Blur > Gaussian Blur and apply a Radius of 3 px. Add a New Stroke below the first, select a 3 pt black Stroke and then apply a 7 px Gaussian Blur. Move this path behind the ice cream layers but in front of the cone and you’ll get the shadow underneath.
Step 25
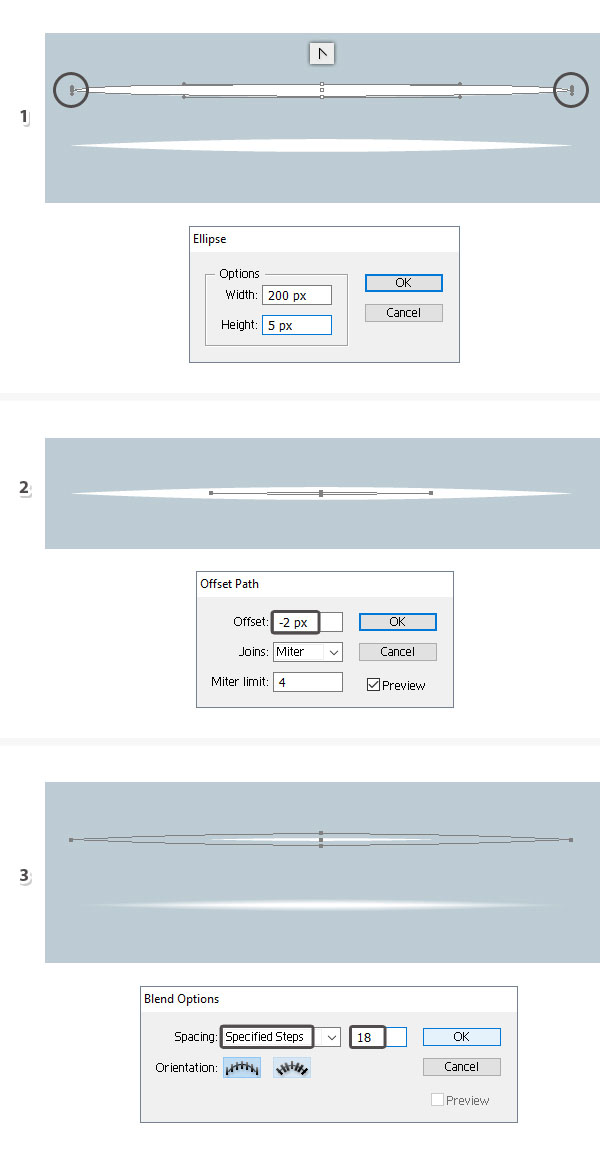
Let’s create a custom Highlight Art Brush. First, take the Ellipse Tool (L) and draw a 200 x 5 px ellipse filled with white. Switch to the Convert Anchor Point Tool (Shift-C) and click once on the two end points in order to remove the handles and to obtain the pointed ends (1).
With the ellipse still selected, go to Object > Path > Offset Path and apply an Offset of -2 px. As a result, you will get a smaller ellipse in the center (2).
Set the Opacity of the bigger ellipse to 0% but keep the Opacity of the smaller ellipse to 100%. Select both shapes, go to Object > Blend > Blend Options and choose 18 Specified Steps. Hit OK and then go back to Object > Blend > Make (Alt-Control-B) (3).
Drag the resulting blend group into the Brushes panel and choose New Art Brush. Type “Highlight Art Brush” as the name, leave the rest of the settings as they are and just hit OK.
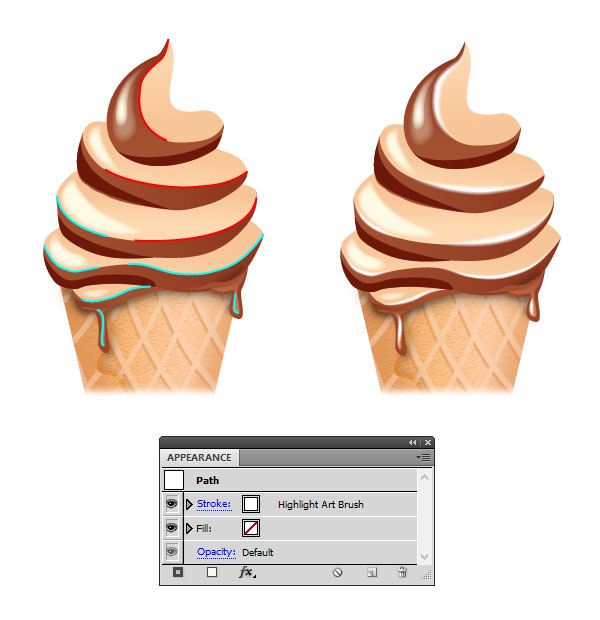
Step 26
Use the Pen Tool (P) or the Paintbrush Tool (B) to draw a few paths following the edge between the ice cream layers and also a path on each melting drop. Stroke these paths with the Highlight Art Brush. Set the Weight to 2 pt for the red paths and to 1 pt for the blue paths. This will add smoothness and extra shine to the chocolate ice cream.
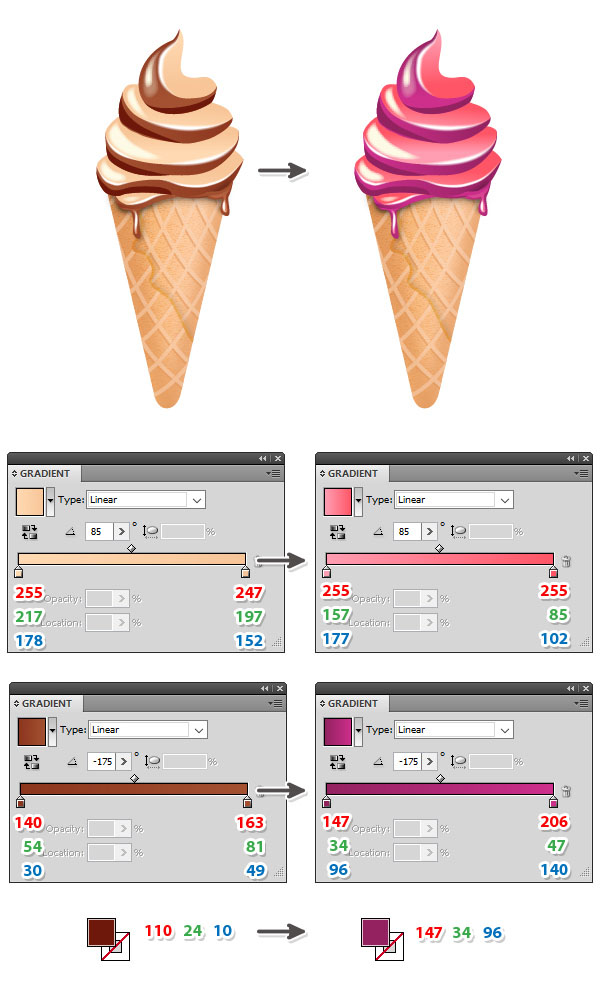
Step 27
At this point the chocolate ice cream cone is ready. You can easily create other delicious ice cream flavors by making a few changes.
First, make a copy of the chocolate ice cream cone. Replace the two gradients used for the chocolate layers with the pink and purple gradients shown below. When you are done, select the four thinner shapes filled with dark brown and change the color to purple. You just obtained the berries ice cream cone.
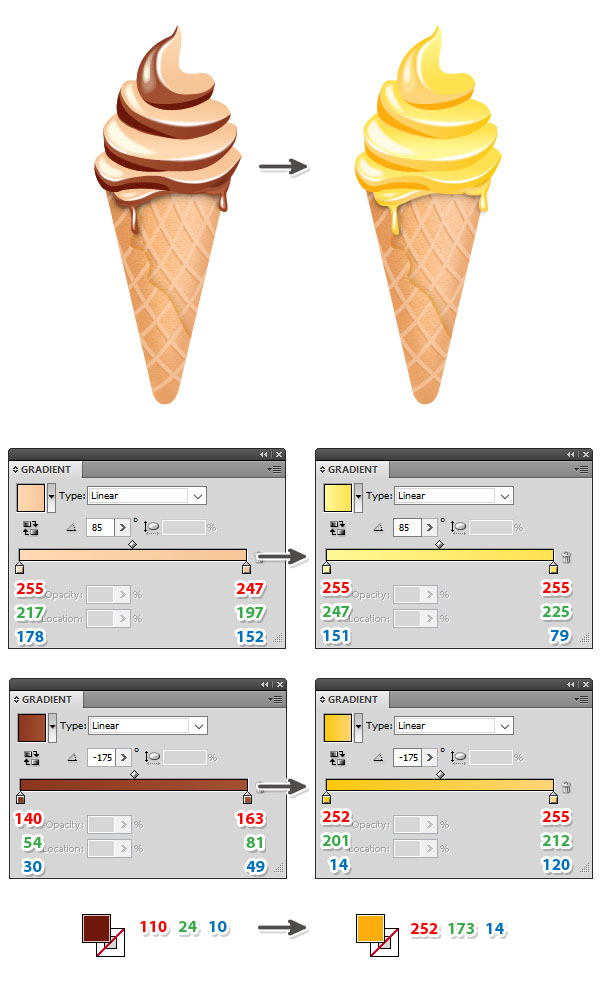
Step 28
To create the mango ice cream cone, first make another copy of the chocolate ice cream. Replace the two chocolate gradients with the new gradients and for the thinner shapes filled with dark brown choose a darker shade of yellow as the fill color.
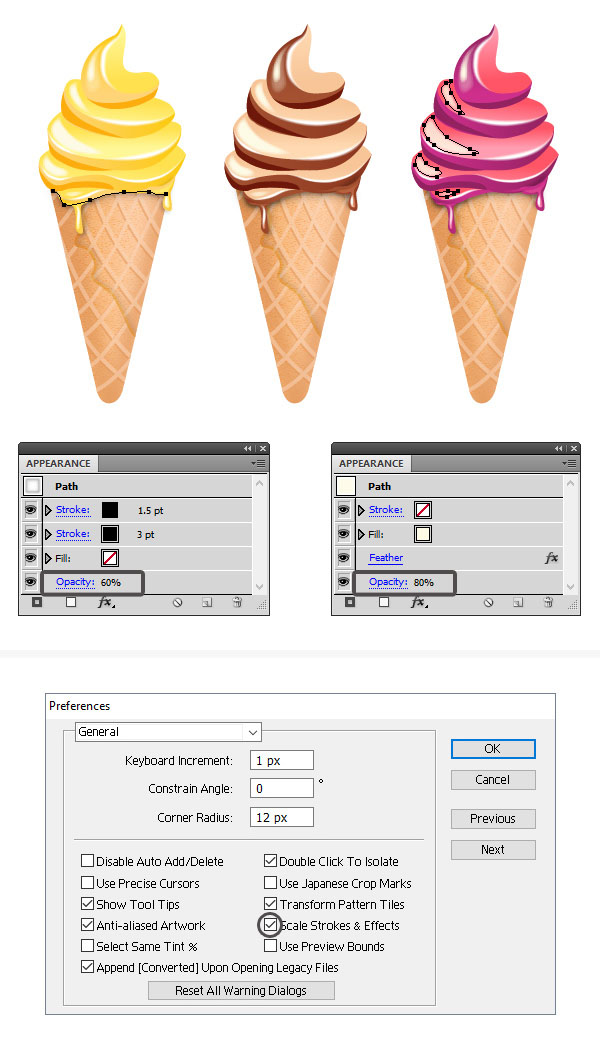
Step 29
Here are the three ice cream cones. Because the mango ice cream is lighter in color, you can select the shadow-path below the ice cream layers and reduce the Opacity to 60% to make it more discreet. Because the berries ice cream is darker in color, you can select the four shine-shapes and reduce the Opacity to 80% to make them less strong.
If you want to scale the ice cream cones, go to Edit > Preferences > General and make sure that Scale Strokes & Effects is checked before you do so.
Step 30
As decoration for the ice cream cones you can create a piece of waffle. First, draw a triangle-like shape with the Pen Tool (P) (1). Use the same gradient and apply the same settings as for the cone (2). Add a New Fill at the bottom of the Appearance panel and use light brown as the color. Go to Effect > Path > Offset Path and apply an Offset of 2 px in order to create the border around (3).
Step 31
To create the pattern on the waffle, use the same technique explained for the cone. Draw the lines over the waffle and use the settings shown (1-2). Next, select the waffle shape and then Copy and Paste in Place (Shift-Control-V) in order to get a copy of it. Set this copy to stroke-none and fill-none. Select this copy along with the group of lines and go to Object > Clipping Mask > Make (Control-7) (3). Reduce the Opacity for the group of lines to 50% and you are done (4).
Step 32
Move the piece of waffle next to the ice cream but send it behind it. Make two copies for the other ice cream cones and you can also scale them without problems.
Awesome work!
Here is the final image with the chocolate, mango and berries ice cream cones. I hope you enjoyed this tutorial and that you learned new things today. Be creative and create other delicious flavors, the possibilities are endless.
