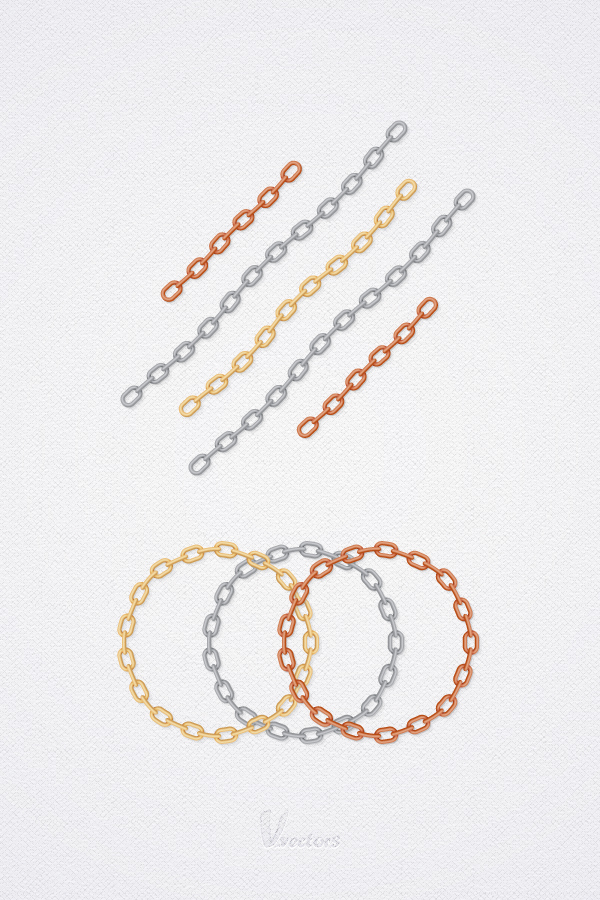
In the following tutorial you will learn how to create a simple chain pattern brush in Adobe Illustrator.
Final Image
As always, this is the final image that we’ll be creating:

Tutorial Details
- Program: Adobe Illustrator CS5
- Estimated Completion Time: 45 minutes
- Difficulty: Beginner-Intermediate
Step 1
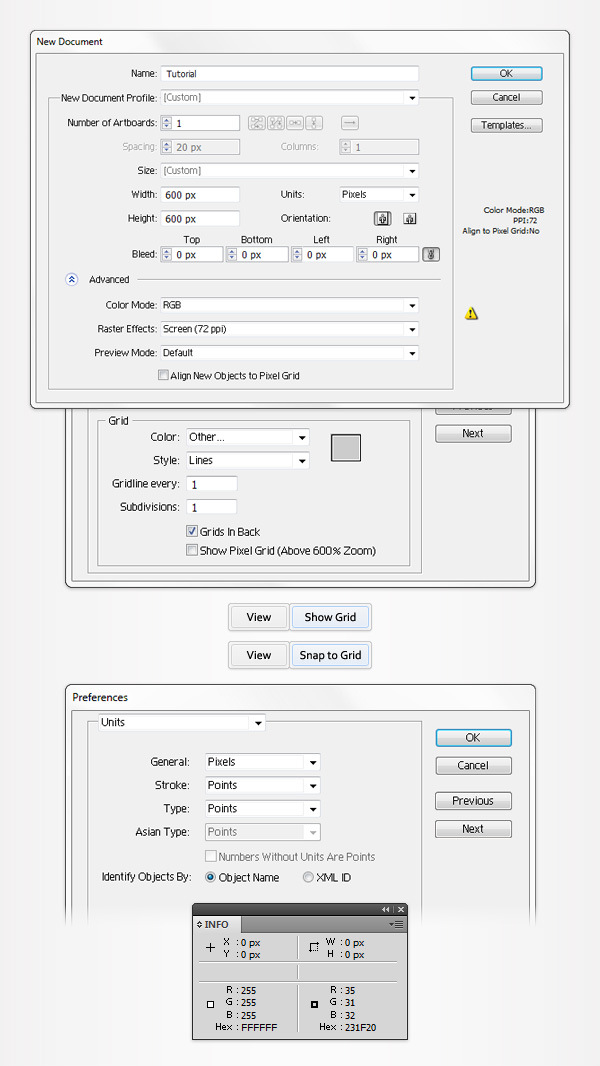
Hit Command + N to create a new document. Enter 600 in the width and height boxes then click on the Advanced button. Select RGB, Screen (72ppi) and make sure that the Align New Objects to Pixel Grid box is unchecked before your click OK.
Enable the Grid (View > Show Grid) and the Snap to Grid (View > Snap to Grid). You’ll need a grid every 1px, so simply go to Edit > Preferences > Guides > Grid, enter 1 in the Gridline every box and 1 in the Subdivisions box.
You should also open the Info panel (Window > Info) for a live preview with the size and position of your shapes. Do not forget to set the unit of measurement to pixels from Edit > Preferences > Units > General. All these options will significantly increase your work speed.
Step 2
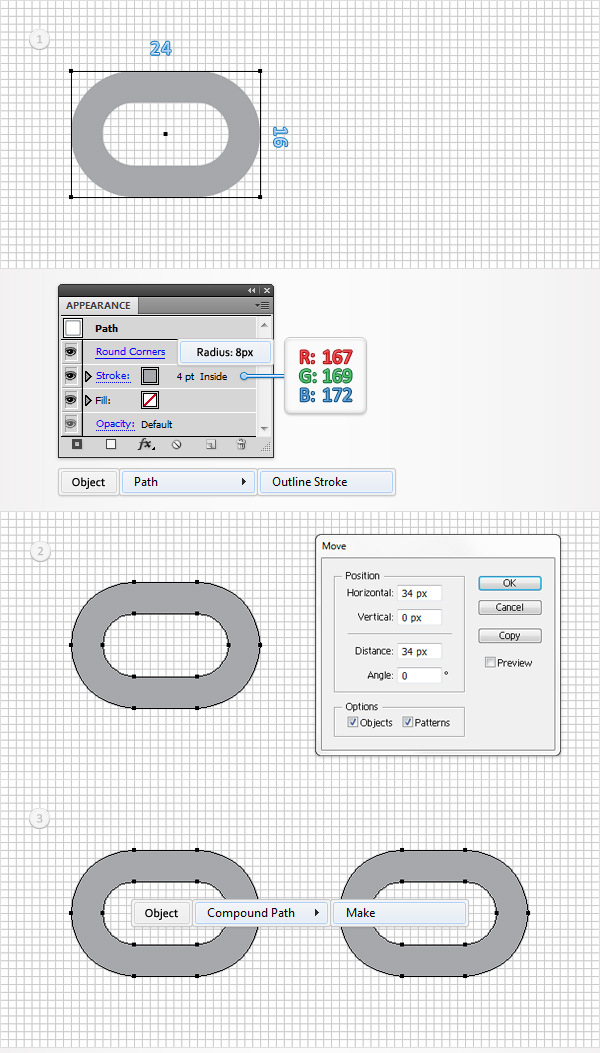
Using the Rectangle Tool (M), create a 24 by 16px shape. Select it and focus on the Appearance panel (Window > Appearance).
Remove the color from the fill then add a 4pt stroke, align it to inside and set the color to R=167 G=169 B=172.
Make sure that your rectangle is still selected and go to Effect > Stylize > Rounded Corners. Enter an 8px radius and click OK.
Go to Object > Path > Outline Stroke. Select the resulting compound path and go to Object > Transform > Move (Shift + CTRL + M). Enter "34" in the Horizontal box and click the Copy button.
Select both shapes created so far and turn them into a single compound path (Object > Compound Path > Make or CTRL + 8.
Move to the Layers panel (Window > Layers), double click on the existing compound path and name it "chainLinks".
Step 3
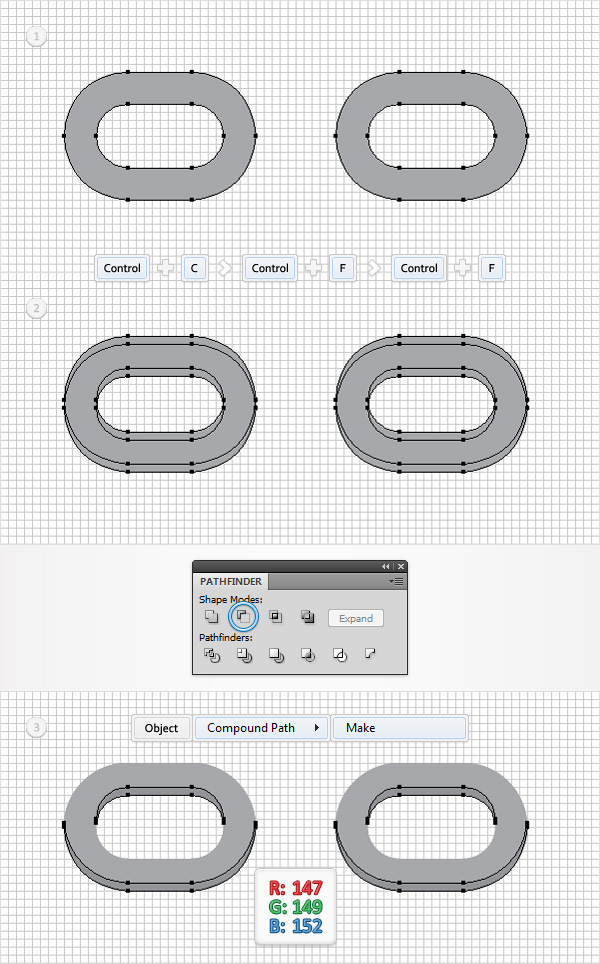
Select "chainLinks" and make two copies in front (CTRL + C > CTRL + F > CTRL + F). Select the top copy and hit the up arrow once to move it 1px up.
Reselect both copies, open the Pathfinder panel (Window > Pathfinder) and click on the Minus Front button. Select the resulting group of shapes, turn it into a compound path (CTRL + 8) and set its fill color to R=147 G=149 B=152.
Step 4
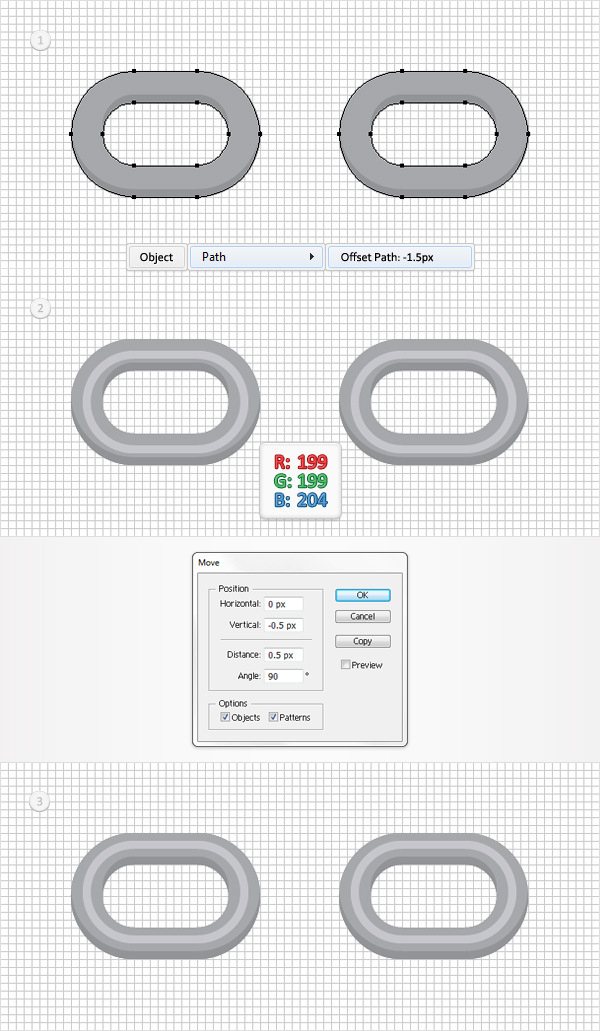
Select "chainLinks" and go to Object > Path > Offset Path. Enter a -1.5px Offset and click OK.
Select the resulting shape and go to Object > Transform > Move. Simply enter "-0.5" in the Vertical box and click OK.
Step 5
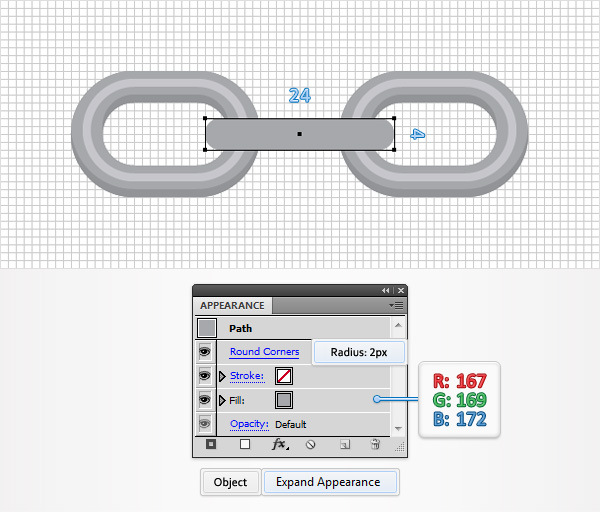
Using the Rectangle Tool (M), create a 24 by 4px shape, set the fill color to R=167 G=169 B=172 and place it as shown in the following image.
Make sure that this new rectangle stays selected and go to Effect > Stylize > Rounded Corners. Enter a 2px radius and click OK.
Go to Object > Expand Appearance. Move to the Layers panel, double click on the resulting shape and name it "chainLink".
Step 6
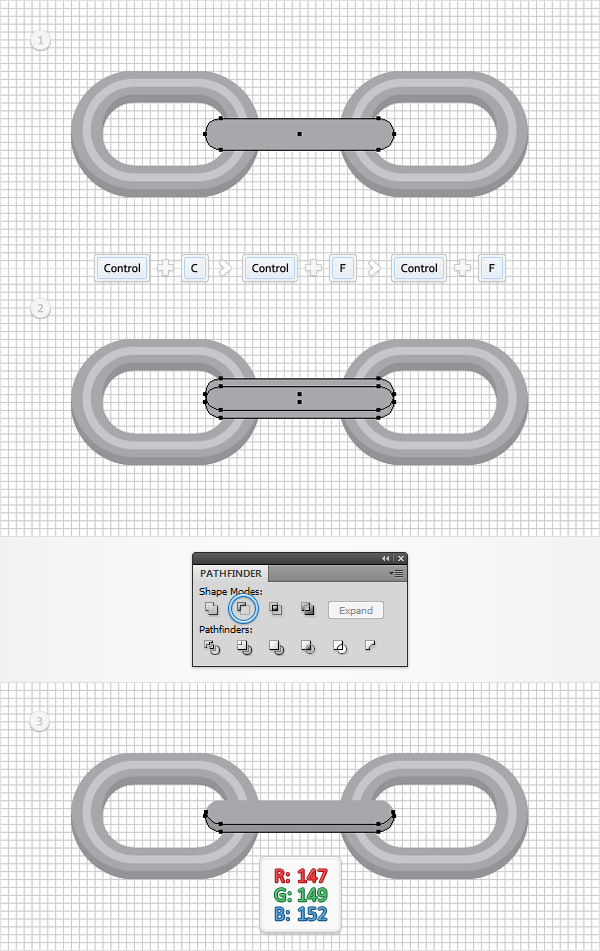
Select "chainLink" and make two copies in front (CTRL + C > CTRL + F > CTRL + F). Select the top copy and move it 1px up.
Reselect both copies and click on the Minus Front button from the Pathfinder panel. Fill the resulting shape with R=147 G=149 B=152.
Step 7
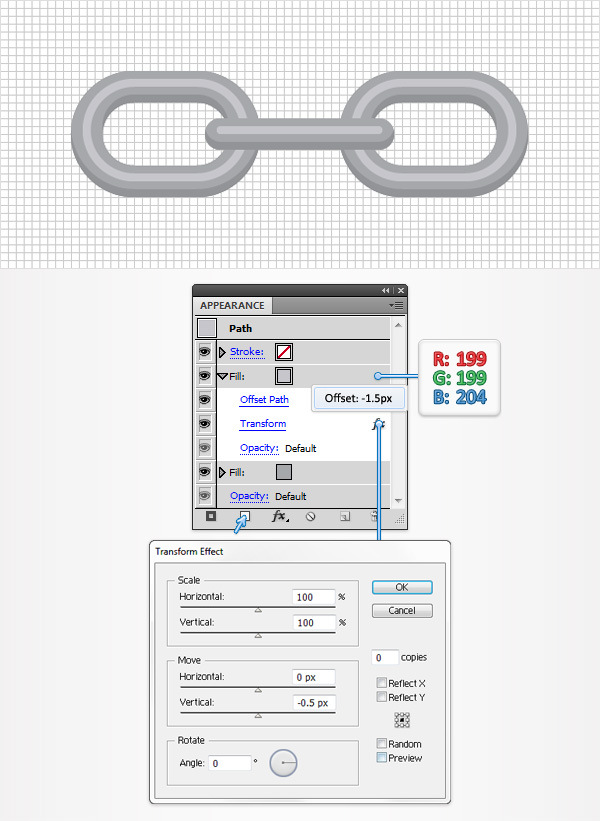
Select "chainLink", focus on the Appearance panel and add a second fill using the Add New Fill button (pointed by the little, blue arrow in the following image).
Select this new fill, set the color to R=199 G=199 B=204 and go to Effect > Path > Offset Path. Enter a -1.5px Offset and click OK.
Go to Effect > Distort & Transform > Transform. Enter the properties shown in the following image and click OK.
Step 8
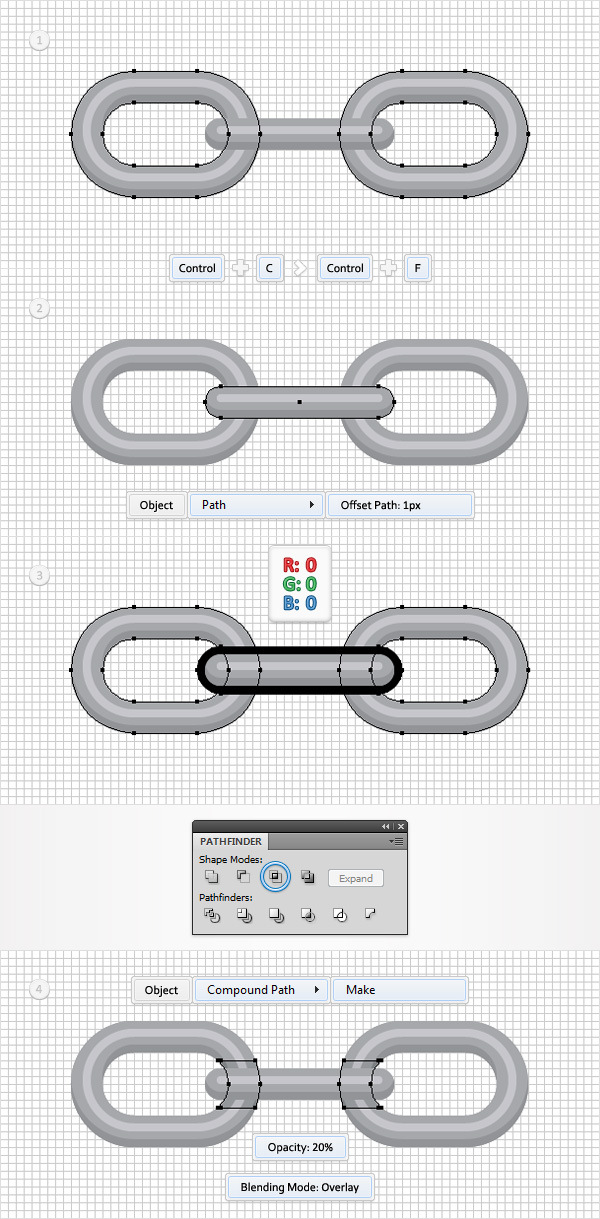
Duplicate "chainLinks" (CTRL + C > CTRL + F) then select "chainLink" and go to Object > Path > Offset Path. Enter a 1px Offset and click OK.
Select the resulting shape and focus on the Appearance panel. Remove the top fill then select the remaining fill and replace the existing color with black (R=0 G=0 B=0).
Select both shapes made in this step and click on the Intersect button from the Pathfinder panel. Turn the resulting group of shapes into a compound path (CTRL + 8), make sure that it’s filled with black, lower its Opacity to 20% and change the Blending Mode to Overlay.
Step 9
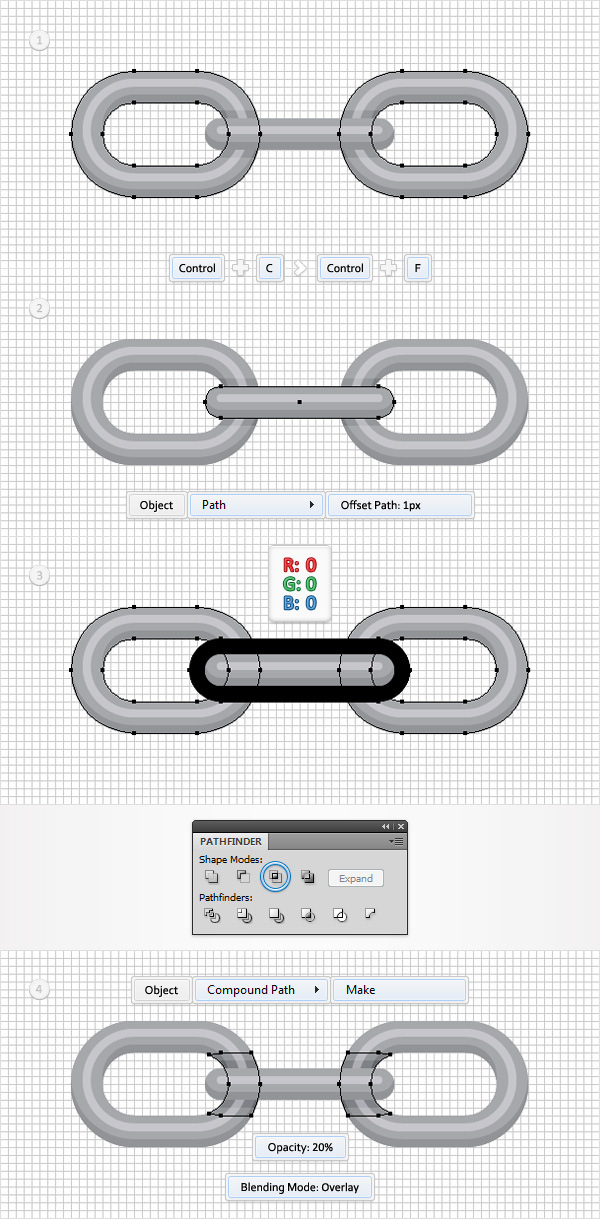
Duplicate "chainLinks" (CTRL + C > CTRL + F) then select "chainLink" and go to Object > Path > Offset Path. Enter a 2px Offset and click OK. Select the resulting shape and focus on the Appearance panel. Remove the top fill then select the remaining fill and replace the existing color with black (R=0 G=0 B=0). Select both shapes made in this step and click on the Intersect button from the Pathfinder panel. Turn the resulting group of shapes into a compound path (CTRL + 8), lower its Opacity to 20% and change the Blending Mode to Overlay.
Step 10
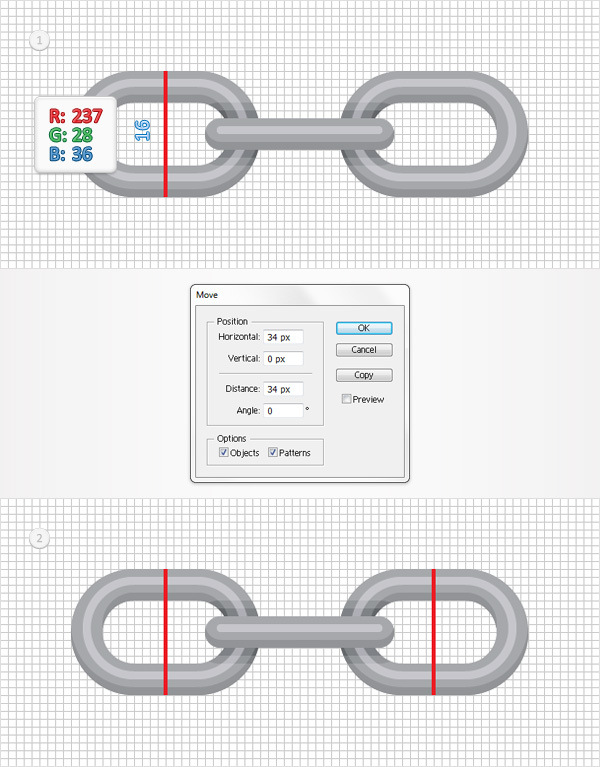
Using the Pen Tool (P), create a 16px, vertical path. Add a simple, red stoke for this path, place it as shown in the first image.
Go to Object > Transform > Move. Enter "34" in the Horizontal box and click the Copy button.
Step 11
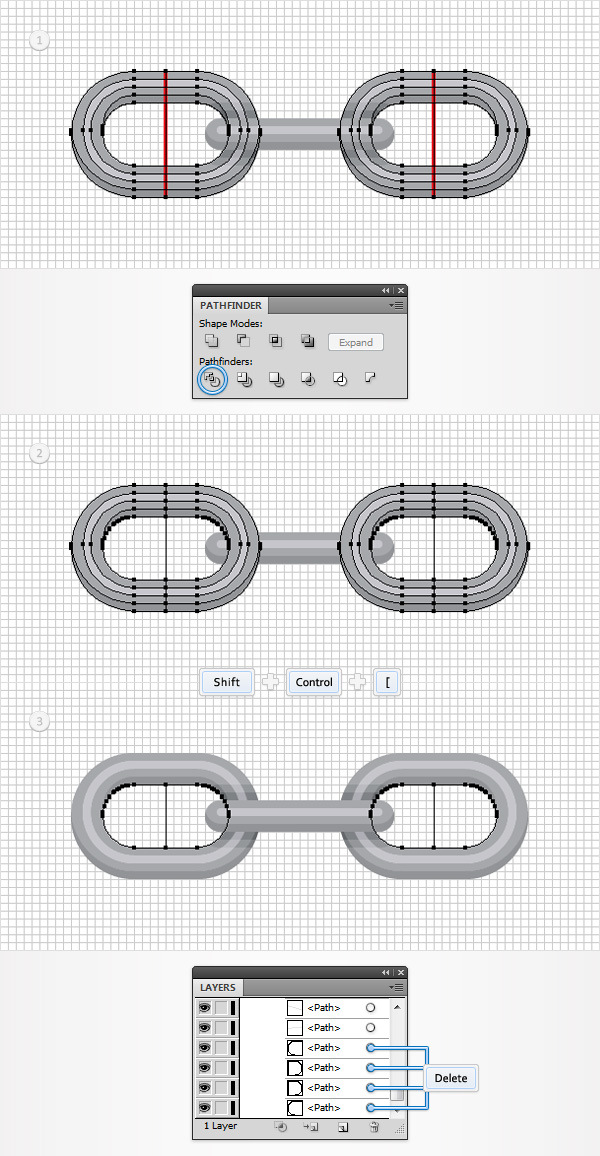
Select both red paths along with the three compound paths that make up the left and right chain links and click on the Divide button from the Pathfinder panel.
Make sure that the resulting group of shapes is selected, send it to back (Shift + CTRL + [ ) and focus on the Layers panel. Open this new group, scroll to the bottom and delete the last four vector shapes (shapes with no color set for the fill or the stroke).
Step 12
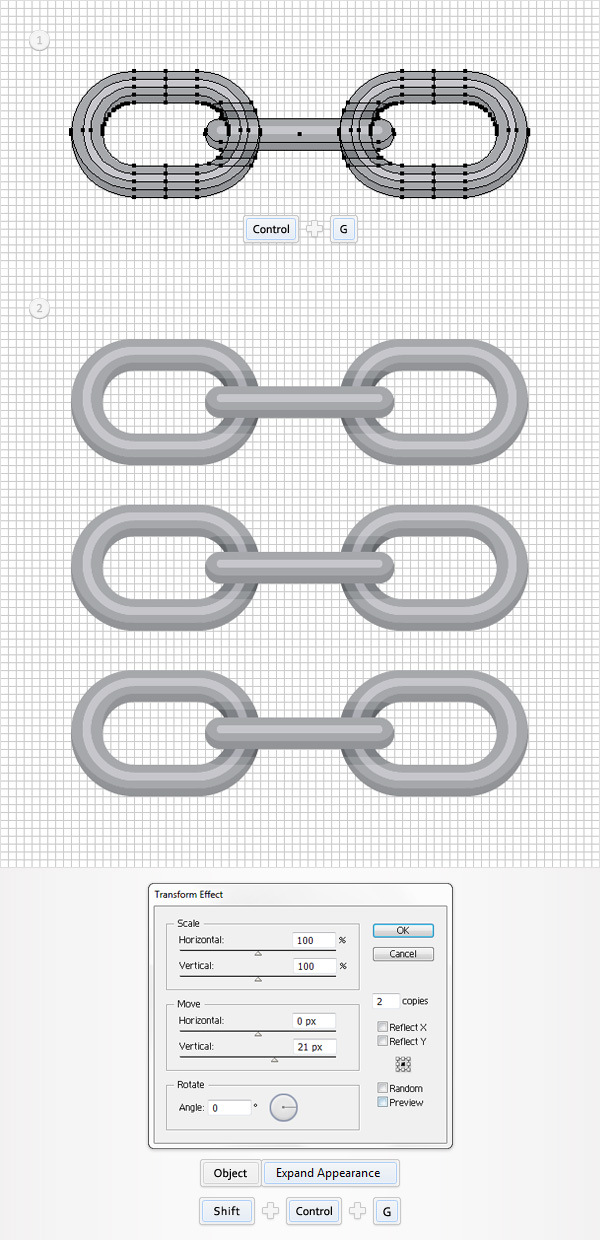
Select all the shapes created so far, group them (CTRL + G) and go to Effect > Distort & Transform > Transform. Enter the properties shown in the following image and click OK.
Go to Object > Expand Appearance. Move to the Layers panel, make sure that the resulting group of shapes is selected and hit Shift + CTRL + G once. In the end you should get three simple groups, one for each chain piece.
Step 13
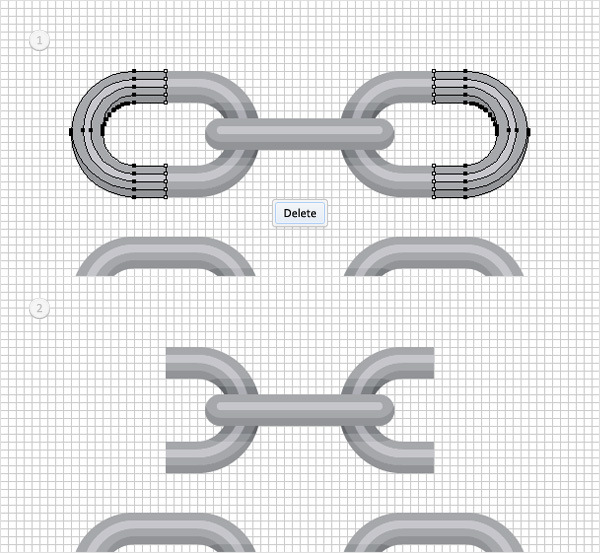
Focus on the top chain group and pick the Direct Selection Tool (A). Click and drag to roughly select the left half of the left chain link then simply hit the Delete key from your keyboard twice.
Move to the right chain link and delete the right half. In the end things should look like in the second image.
Step 14
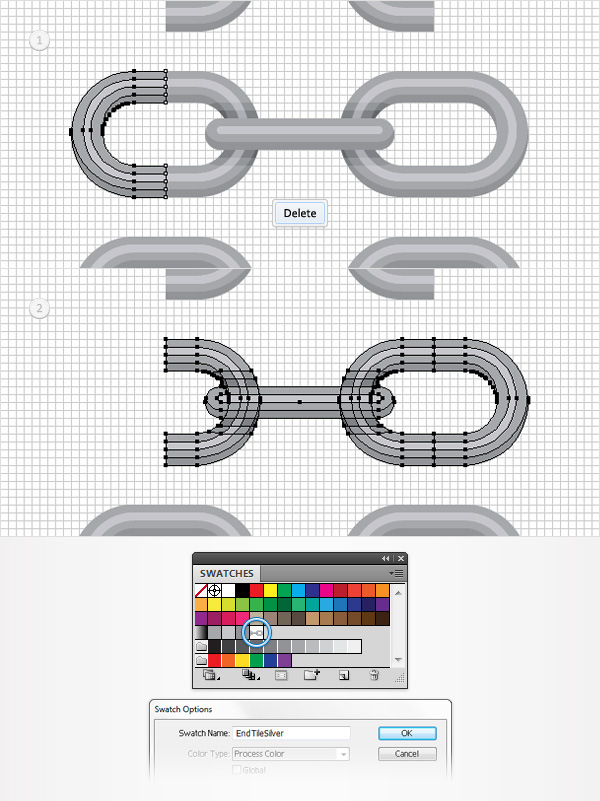
Move down to the next group and make sure that the Direct Selection Tool (A) is still active. Select the shapes that make up the left half of the left chain link and simply delete them.
Select the remaining shapes that make up this second group and simply drag them inside the Swatches panel (Window > Swatches) to turn them into a pattern. Once you get your pattern you can remove the entire group. Focus on the Swatches panel, double click on your new pattern and name it "EndTileSilver".
Step 15
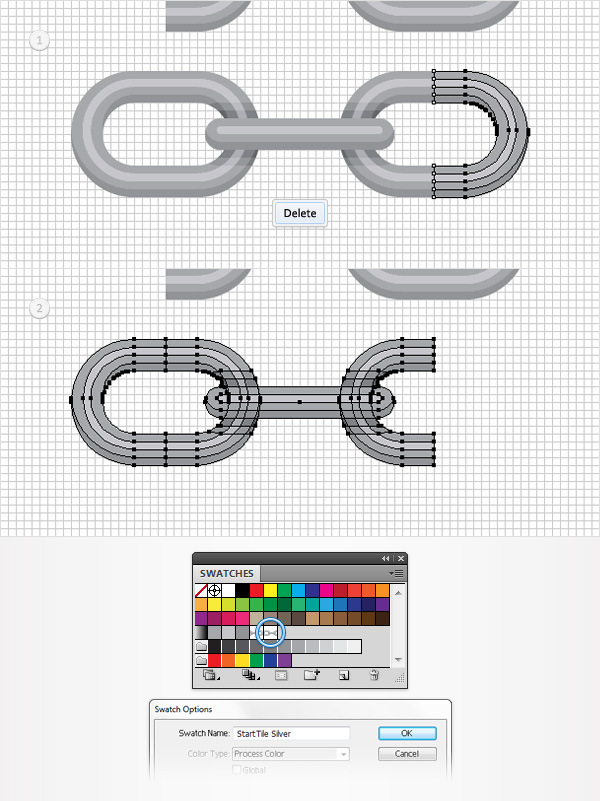
Move to the bottom group and make sure that the Direct Selection Tool (A) is still active. Select the shapes that make up the right half of the right chain link and simply delete them.
Select the remaining shapes that make up this group and them into a new pattern. Once you get this second pattern you can remove the entire group. Focus on the Swatches panel, double click on this new pattern and name it "StartTileSilver".
Step 16
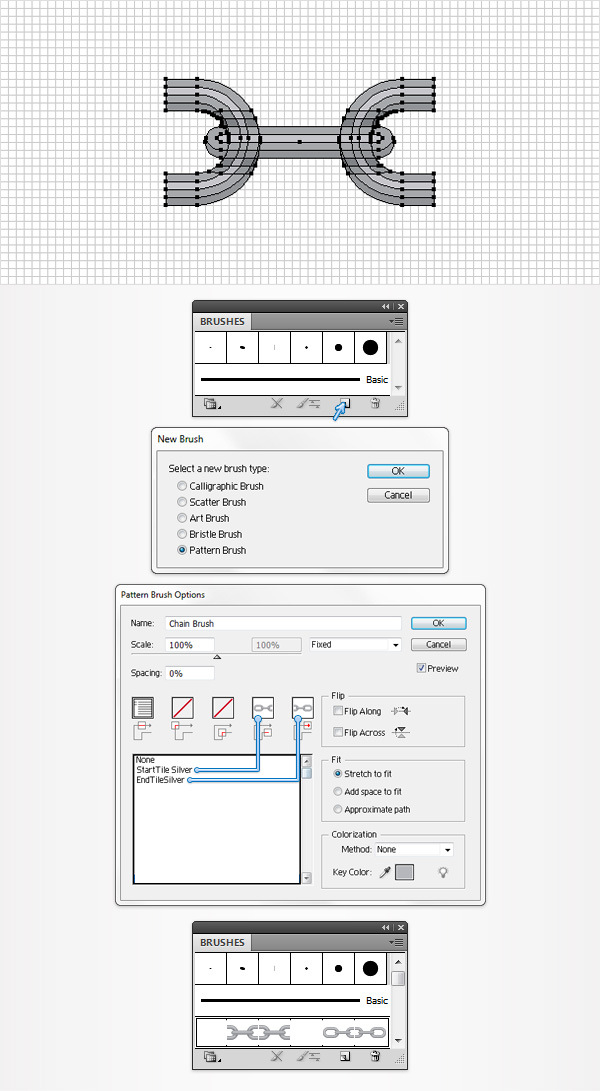
Select the remaining group, open the Brushes panel (Window > Brushes) and hit the Add New Brush button (pointed by the little, blue arrow in the following image). Check the Pattern Brush box and click OK to open the Pattern Brush Options window. Pick a name for your new brush (Chain Brush) and enter all the properties shown in the following image.
Select the Start Tile thumbnail and add the "StartTileSilver" pattern then select the End Tile thumbnail and add the "EndTileSilver" pattern. Once you click the OK button your new pattern brush should show up inside the Brushes panel.
Step 17
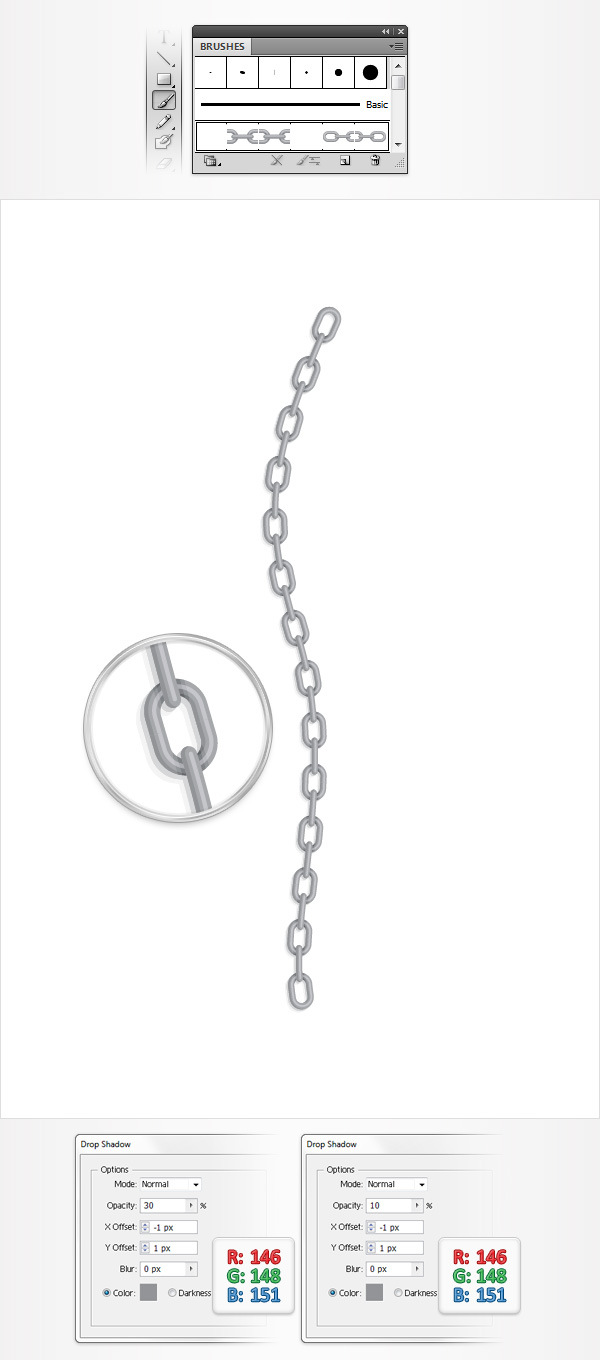
Disable the Snap to Grid (View >Snap to Grid). Pick the Brush Tool (B), select your Chain Brush from the Brushes panel and simply draw a path. For extra depth you can add some simple Drop Shadow effects. Make sure that your path is still selected.
Go to Effect > Stylize > Drop Shadow. Enter the properties shown in the left window (in the following image), click OK and go again to Effect > Stylize > Drop Shadow. Enter the properties shown in the right window and click OK.
Step 18
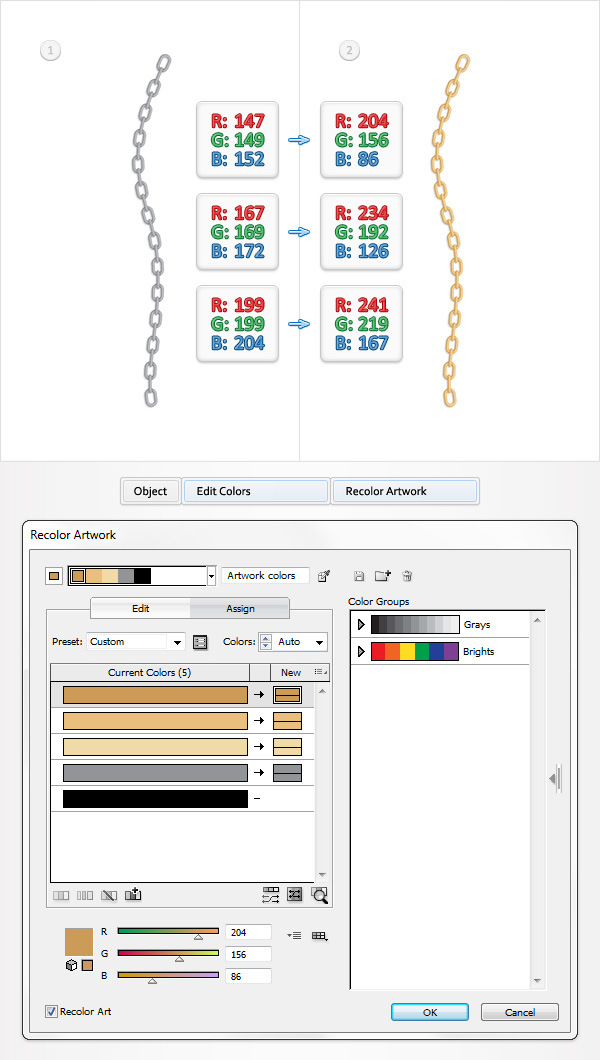
Finally, here’s how you can easily recolor your piece of chain. Make sure that it’s selected and go to Object > Edit Colors > Recolor Artwork.
Focus on the Assign section, make sure that Recolor Art box is checked then simply replace R=147 G=149 B=152 with R=204 G=156 B=86, R=167 G=169 B=172 with R=234 G=192 B=126 and R=199 G=199 B=204 with R=241 G=219 B=167. Click the OK button and your piece of chain should turn golden. Also, this new golden chain pattern brush will show up inside your Brushes panel.
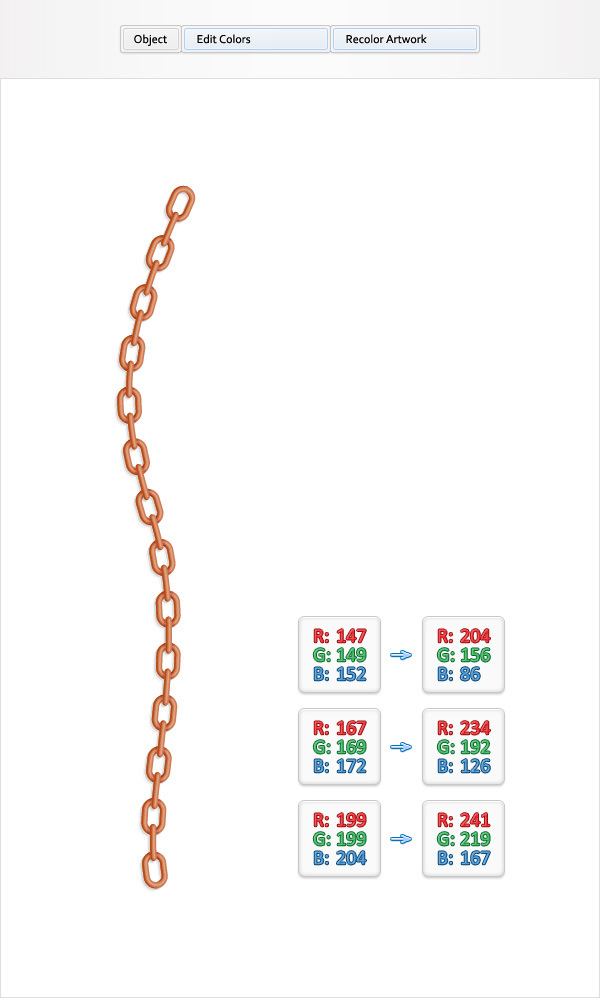
Here are the colors that you should use for the bronze version.
And We’re Done!
Here is how it should look. I hope you’ve enjoyed this tutorial and can apply these techniques in your future projects.
