In the following steps you will learn how to create a billiard table text effect in Adobe Illustrator.
For starters you will learn how to create the main shapes using basic tools along with some basic vector shape building techniques. Next we’ll work with colors and adding some effects along with the wood textures for the text. Finally, we’ll add some highlights and shadows on some key places of the letters to give them a more realistic look. Let’s begin!
Final Image
As always, this is the final image that we’ll be creating:
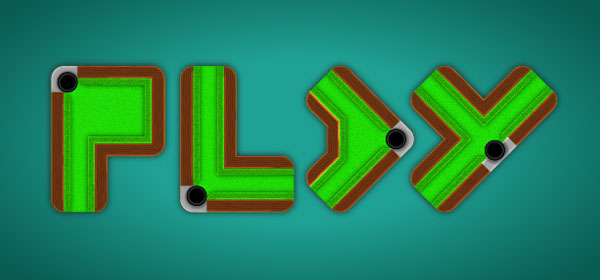
Tutorial Details
- Program: Adobe Illustrator CS6
- Estimated Completion Time: 120 minutes
- Difficulty: Beginner-Intermediate
Step 1
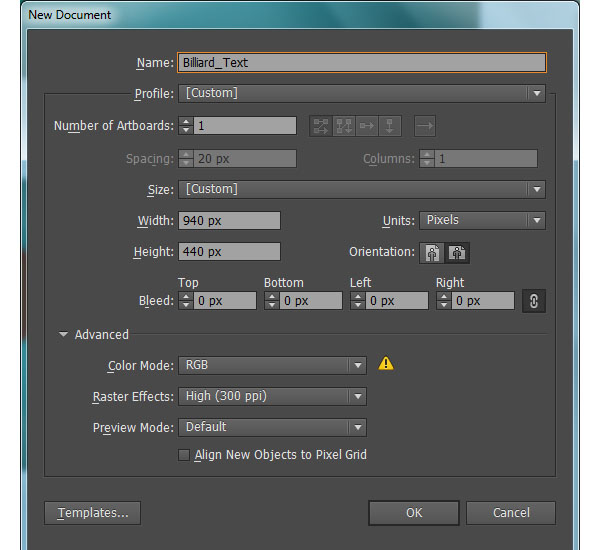
Launch Illustrator and then press (Ctrl + N) to create a New document. Select Pixels from the Units drop-down menu, enter 940 in the width box and 440 in the height box then click on the Advanced button. Select RGB, Screen (72ppi) and make sure that the Align New Objects to Pixel Grid box is unchecked before you click OK.
Step 2
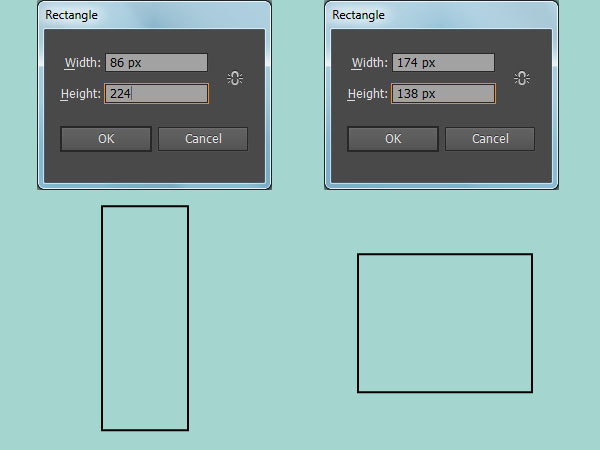
First of all, we’ll create the main shapes of the letters. Pick the Rectangle Tool (M) and create two rectangles with dimensions: 86 by 224px and 174 by 138px.
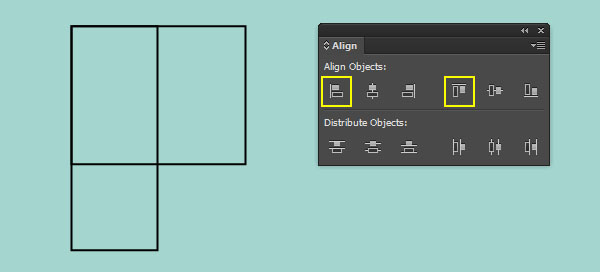
Select the two newly created rectangles, open the Align palette (Window > Align) and click on the Horizontal Align Left button, then click on the Vertical Align Top button.
We are done with the main shape of the letter "P" for the moment.
Step 3
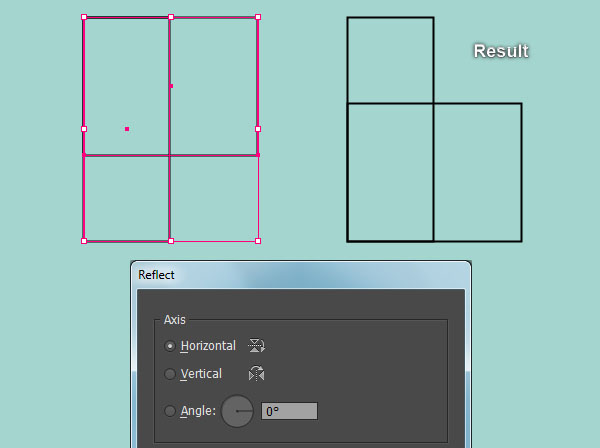
Next comes the letter "L". Select two rectangles of the letter "P" and make a copy (Ctrl +C, Ctrl +F) of them, then place these copies to another position.
Keep the newly created rectangles selected and double-click on the icon of the Reflect Tool from the Toolbar. In the Reflect dialog box, check Horizontal and click OK.
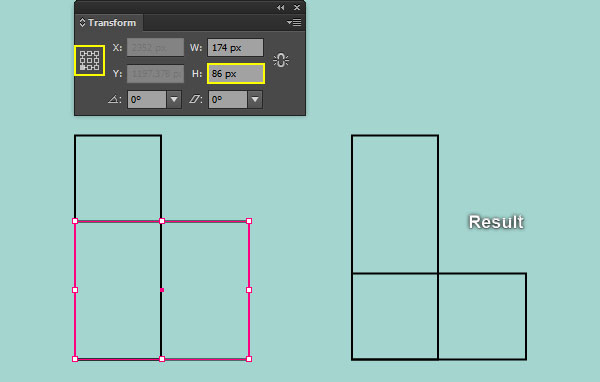
Now select the bigger rectangle, open the Transform palette (Window > Transform) and set the transfer reference point to bottom-left, then then change H to 86px.
The main shape of the letter "L" is ready and looks like in the last image.
Step 4
We are going to create the letter "A".
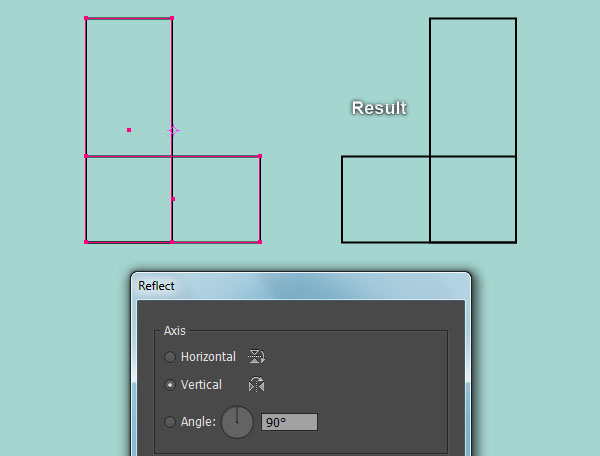
Select two rectangles of the letter "L" and make a copy (Ctrl +C, Ctrl +F) of them, then place these copies to another position.
Keep the newly created rectangles selected and double-click on the icon of the Reflect from the Toolbar. In the Reflect dialog box, check the Vertical and click OK.
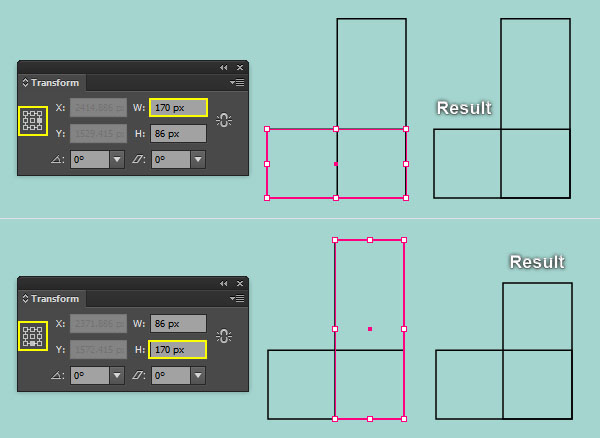
Now select the smaller rectangle, open the Transform palette (Window > Transform) and set the transfer reference point to middle-right, then change W to 170px.
Next select the remaining rectangle, set the transfer reference point to bottom-center and change H to 170px.
We are done with the main shape of the letter "A" for the moment.
Step 5
It’s time to create the main shape of the letter "Y".
Select two rectangles of the letter "A" and make a copy (Ctrl +C, Ctrl +F) of them, then place these copies to another position.
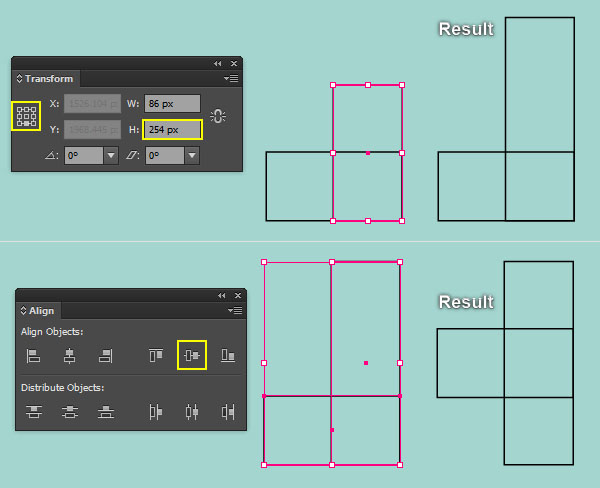
Now select the higher rectangle, open the Transform palette (Window > Transform) and set the transfer reference point to bottom-center, then change H to 254px.
Next select two rectangles of the letter "Y", open the Align palette (Window > Align) and click on the Vertical Align Center button. The main shape of the letter "Y" is ready and looks like in the last image.
Step 6
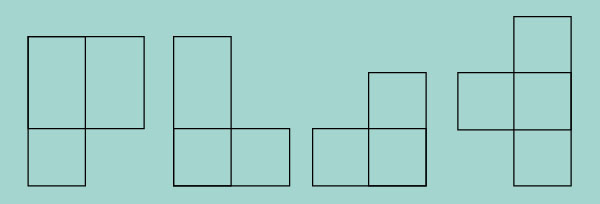
At this point your letters should look like in the next image. Now select all rectangles of the four letters and make a copy (Ctrl +C, Ctrl +F) of them, then press (Ctrl +3) to hide these copies.
Step 7
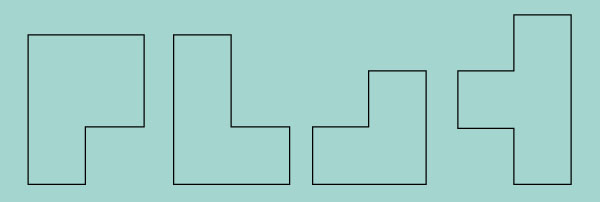
Focus on the letter "P", select two rectangles of this letter, then open the Pathfinder palette (Window > Pathfinder) and click on the Unite button.
The resulting object should look like the second image below.
Likewise, repeat the same thing for the three remaining letters.
You should end up with something like in the last image.

Step 8
Show the Rulers (View > View Rulers > Show Ruler) or (Ctrl +R).
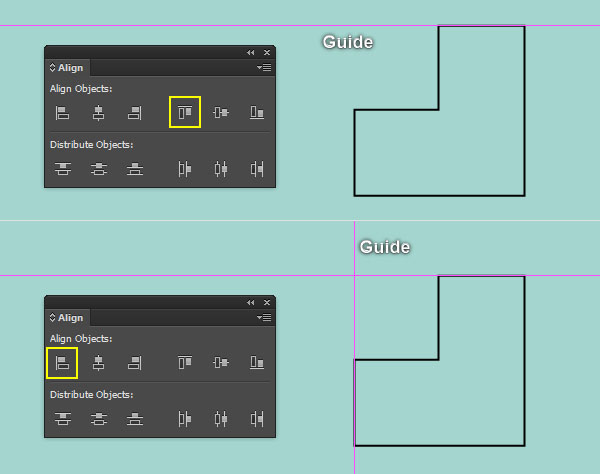
Next drag a horizontal and vertical guide from the Rulers (if the guides locked, go to the View > Guides > Lock Guides) or (Ctrl +Alt + ;).
Select the object of the letter "A", hold down the Shift key, click on the horizontal guide, release the Shift key and then click on the object of the letter "A" again (to fixed its position).
Next open the Align palette (Window > Align) and click on the Vertical Align Top button.
Now reselect the object of the letter "A", hold down the Shift key, click on the vertical guide, release the Shift key and click on the object of the letter "A" again, then click on the Horizontal Align Left button from the Align palette.
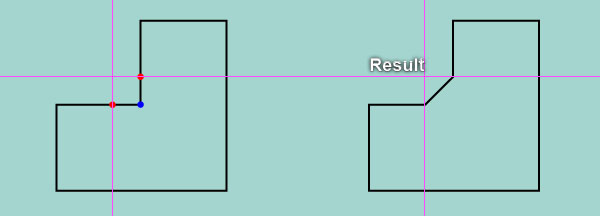
Focus on the third image, pick the Add Anchor Point Tool (+) and add two anchor points in the points highlighted with red of the object of the letter "A".
Next select the anchor point highlighted with blue and remove it.
In the end your letter "A" should look like the last image shown.
Step 9
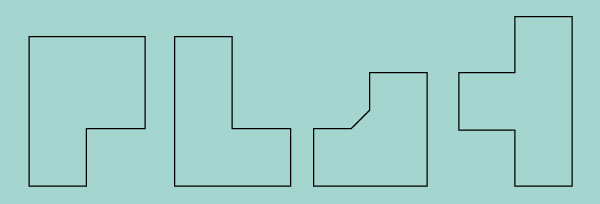
At this point your text should look like in the next image:
Step 10
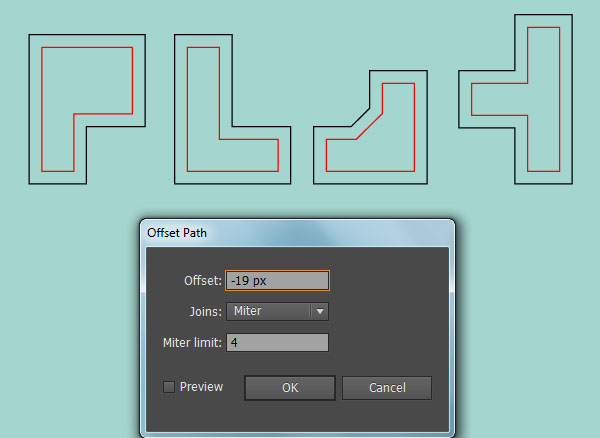
Select four objects of the letters and go to the Object > Path > Offset Path… Enter a -19px Offset and click OK, then replace the existing stroke color of the newly created objects with red.
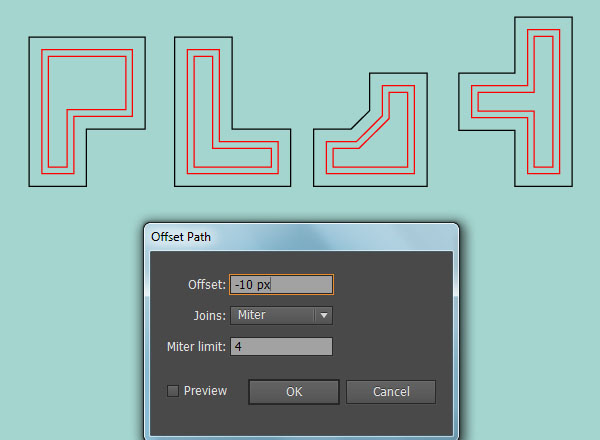
Make sure that the four red objects are still selected and go to the Object > Path > Offset Path… Enter a -10px Offset and click OK.
Now select and remove the black objects of the letters "P", "L" and "Y".
Next select the black object of the letter "A" and replace the existing stroke color with blue.

Step 11
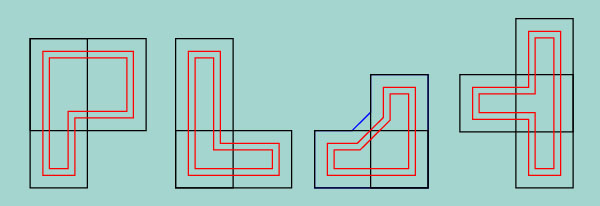
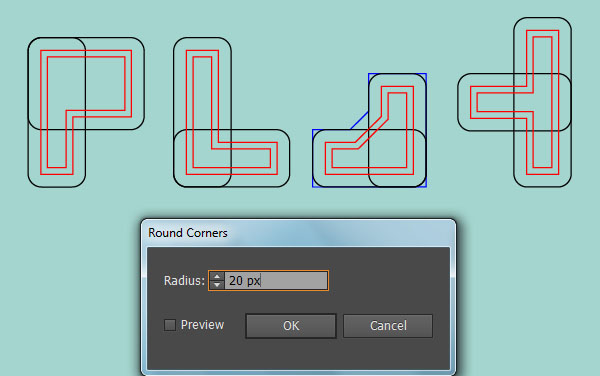
Before you continue, press (Ctrl +Alt +3) to show all rectangles hidden in step 6. Keep these rectangles selected and go to the Effect > Stylize > Round Corners… Enter a 20px Radius and click OK.
Make sure that the resulting rectangles are still selected and go to the Object > Expand Appearance.
Step 12
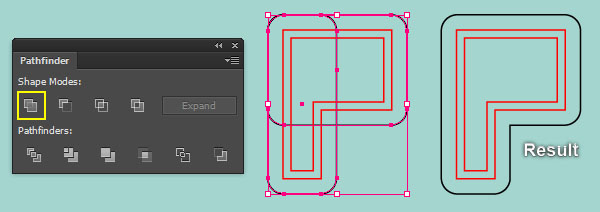
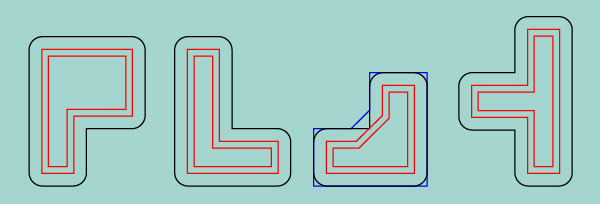
Focus on the letter "P", select two black rounded rectangles, then open the Pathfinder palette (Window > Pathfinder) and click on the Unite button.
The resulting object should look like the second image below.
Likewise, repeat the same thing for the three remaining letters.
Step 13
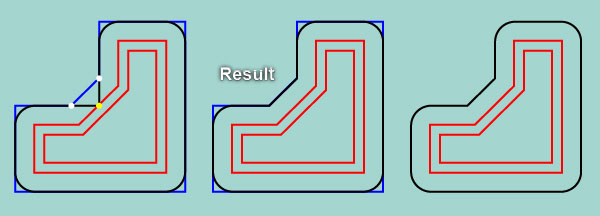
Now focus on the letter "A", pick the Add Anchor Point Tool (+) and add two anchor points in the points highlighted with white of the black object.
Next select the anchor point highlighted with yellow and remove it.
Then select and remove the blue object of the letter "A".
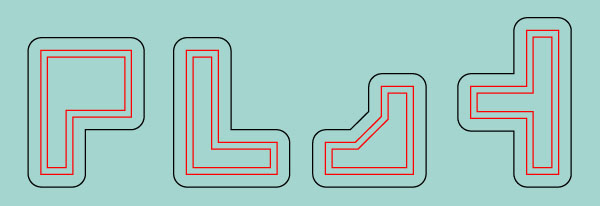
At this point your text should look like in the last image.
Step 14
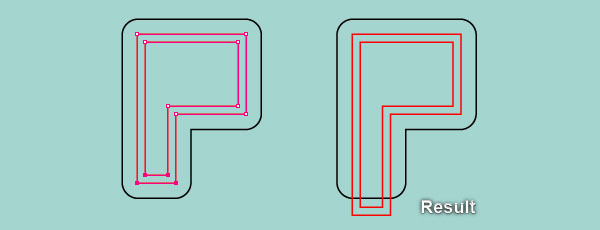
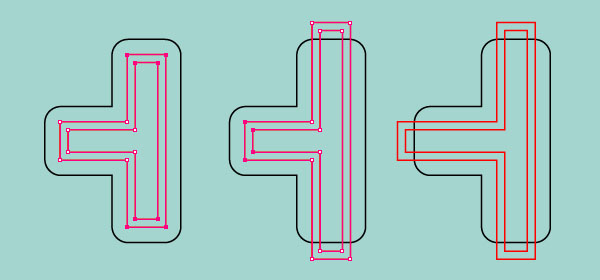
Focus on the letter "P", with the Direct Selection Tool (A), select four bottom anchor points highlighted with magenta and move them 40px down.
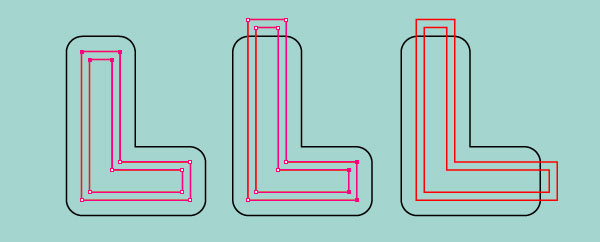
Next comes the letter "L", select the four top anchor points highlighted with magenta and move them 40px up.
Then select the four right anchor points highlighted with magenta and move them 40px to the right.
Likewise, follow the sequence of images and repeat the same process as the previous steps for the two remaining letters.

Step 15
You should end up with something like this:
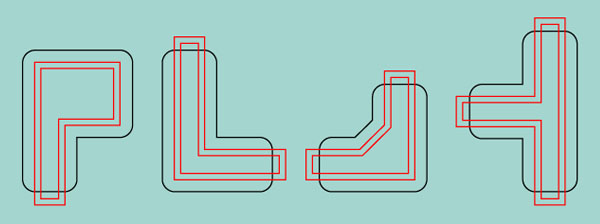
Step 16
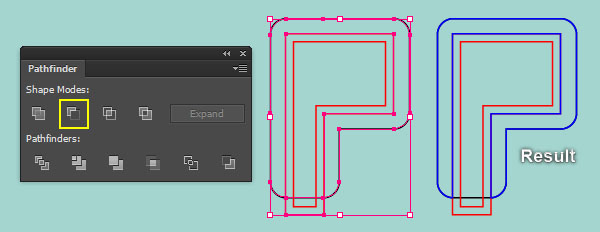
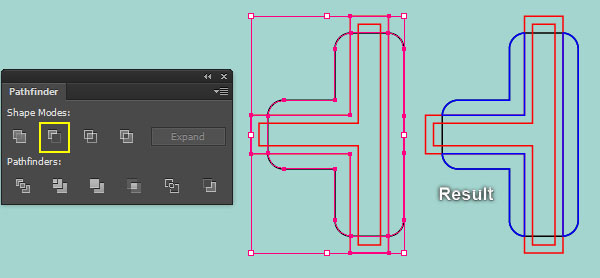
Focus on the letter "P", select the black object and the bigger red object, then make a copy (Ctrl +C, Ctrl +F) of them.
Still having these copies selected, open the Pathfinder palette (Window > Pathfinder) and click on the Minus Front button, then replace the existing stroke color of the newly created object with blue.
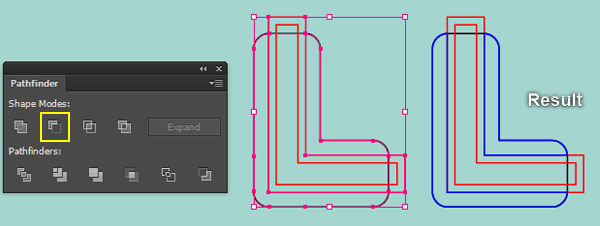
Next come the letter "L", select the black object and the bigger red object, then make a copy (Ctrl +C, Ctrl +F) of them.
Having these copies selected and click on the Minus Front button from the Pathfinder palette, then press (Ctrl +Shift +G) to ungroup the newly created group.
Keep the two newly created objects selected and then replace the existing stroke color of them with blue.
Likewise, follow the sequence of images and repeat the same process as the previous steps for the two remaining letters.

Step 17
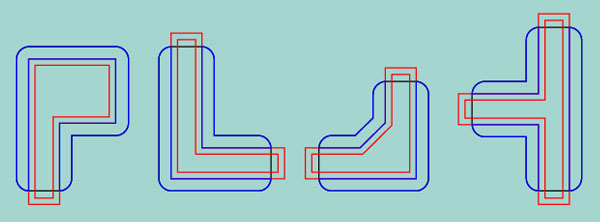
At this point your text should look like in the next image:
Step 18
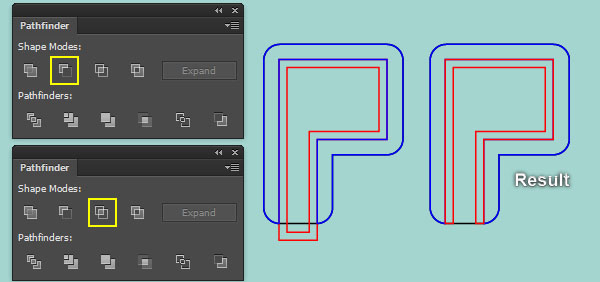
Focus on the letter "P", select the black object and make a copy(Ctrl +C, Ctrl +F) of it.
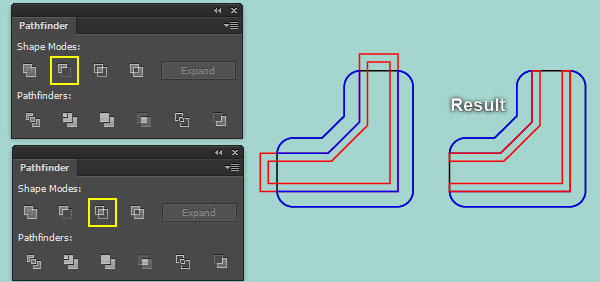
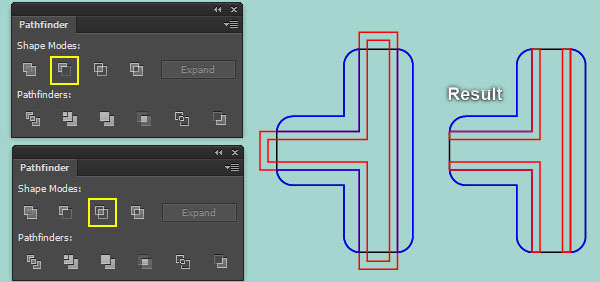
Now select the two red objects, open the Pathfinder palette (Window > Pathfinder) and click on the Minus Front button.
Keep the resulting object selected, hold down the Shift key and click on a black object, then click on the Intersect button from the Pathfinder palette.
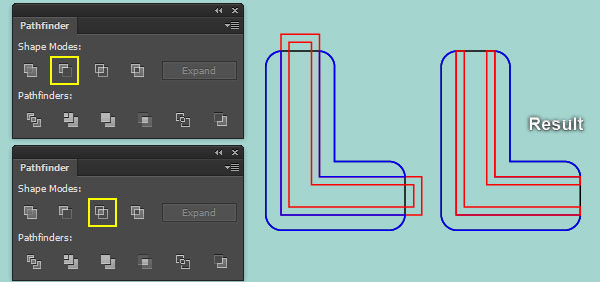
Next comes the letter "L", select the black object and make a copy(Ctrl +C, Ctrl +F) of it.
Then select the two red objects and click on the Minus Front button.
Keep the resulting object selected, hold down the Shift key, click on a black object and click on the Intersect button, then press (Ctrl +Shift +G) to ungroup the newly created group.
Likewise, follow the sequence of images and repeat the same process as the previous steps for the two remaining letters.
Step 19
At this point your letters should look like in the next image.
Now select all blue and red objects of the four letters and make a copy (Ctrl +C, Ctrl +F) of them, then press (Ctrl +3) to hide these copies.

Step 20
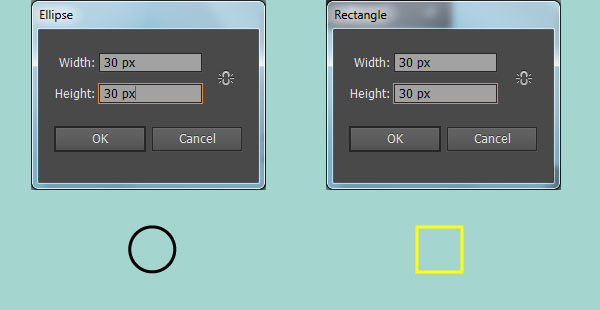
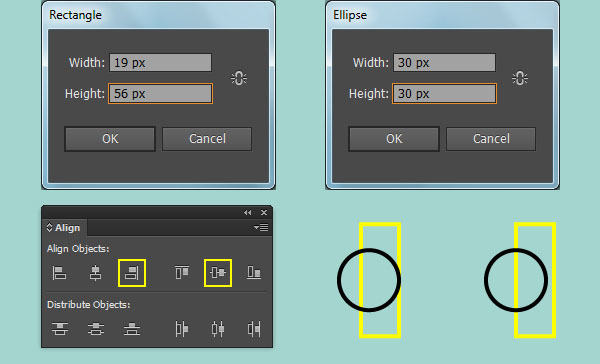
Pick the Ellipse Tool (L) and create a 30 by 30px ellipse.
Next pick the Rectangle Tool (M) and create a 30 by 30px rectangle.
Select the two objects created in this step, open the Align palette (Window > Align) and click on the Horizontal Align Center button, then click on the Vertical Align Center button.
Now focus on the next to last image, pick the Add Anchor Point Tool (+) and add two anchor points in the points highlighted with red of the newly created rectangle.
Then select the anchor point highlighted blue and remove it.
Finally select and group (Ctrl +G) the two objects created in this step.


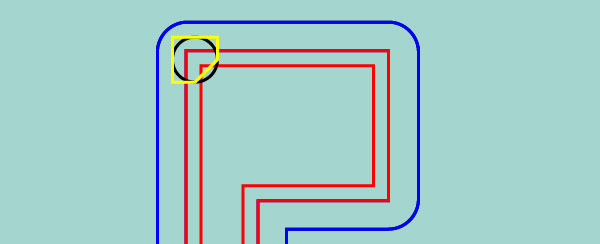
Step 21
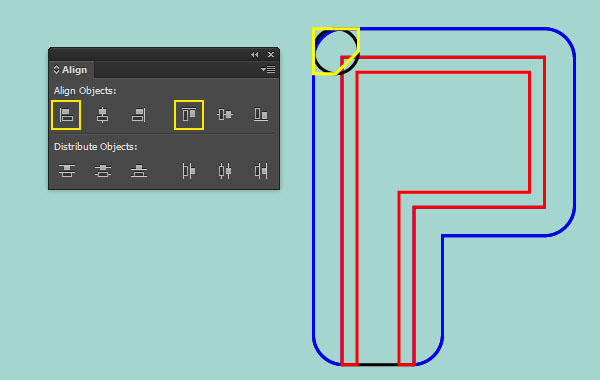
With the help of the Selection Tool (V), select the group created in step 20, hold down the Shift key, click on the blue object of the letter "P", release the Shift key and click on the blue object again (to fixed its position).
Open the Align palette (Window > Align) and click on the Horizontal Align Left button, then click on the Vertical Align Top button.
Next reselect the group created in step 20, move it 10px down and 10px to the right.
Finally ungroup (Ctrl +Shift +G) this group.
Step 22
Select the two top anchor points of the yellow object and move them 20px up.
Next select the two left anchor points of this object and move them 20px to the left.
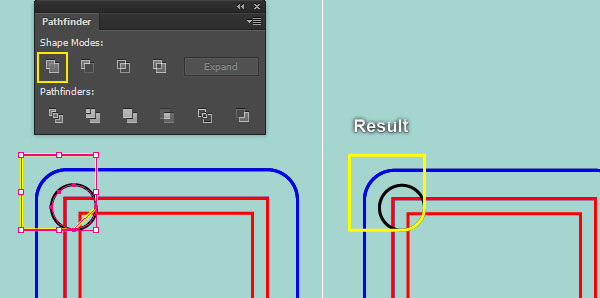
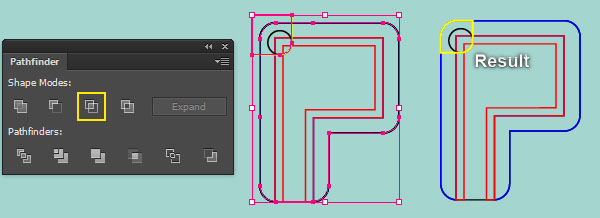
Now select the black ellipse and make a copy (Ctrl +C, Ctrl +F) of it. Keep the copy selected, hold down the Shift key and click on the yellow object.
Open the Pathfinder palette (Windown > Pathfinder) and click on the Unite button.
With the Selection Tool (V), select the black object and make a copy (Ctrl +C, Ctrl +F) of it.
Make sure that the copy is still selected, hold down the Shift key and click on the yellow object, then click on the Intersect button from the Pathfinder palette.

Step 23
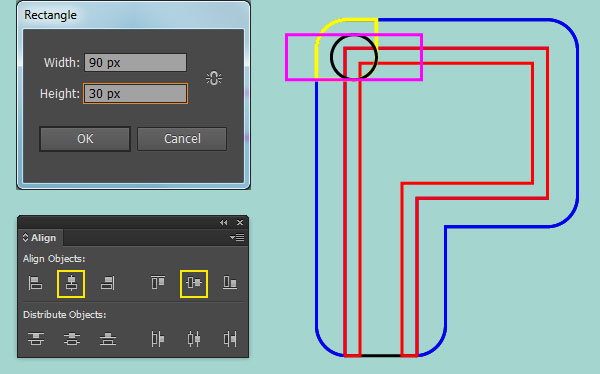
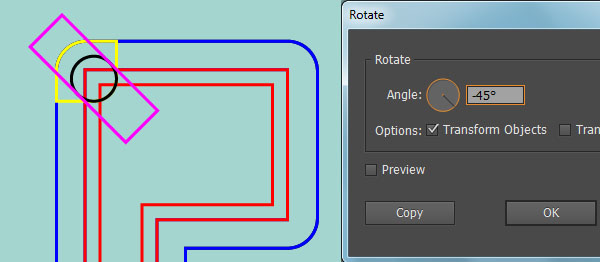
Pick the Rectangle Tool (M) and make a magenta rectangle of 90 by 30px size.
With the help of the Selection Tool (V), select the black ellipse, hold down the Shift key, click on the newly created rectangle, release the Shift key and click on the black ellipse again (to fix its position).
Open the Align palette (Window > Align) and click on the Horizontal Align Center button, then click on the Vertical Align Center button.
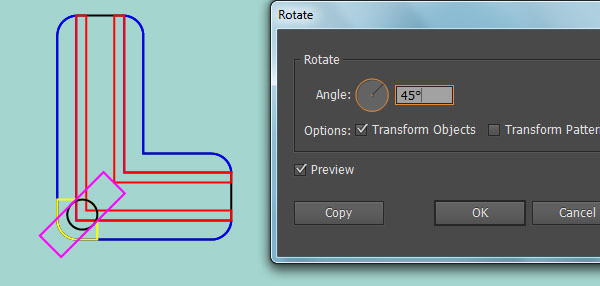
Reselect the magenta rectangle and double-click on the icon of the Rotate Tool from the Toolbar.
In the Rotate dialog box, enter a -45 degrees Angle and click OK.
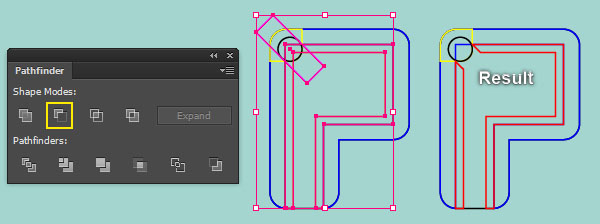
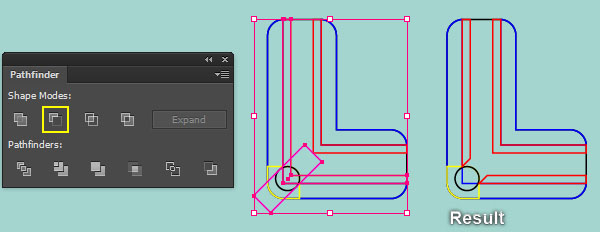
Keep the resulting object selected, hold down the Shift key and click on the red object. Open the Pathfinder palette (Window > Pathfinder) and click on the Front Minus button, then press (Ctrl +Shift +G) to ungroup the newly created group.
Step 24
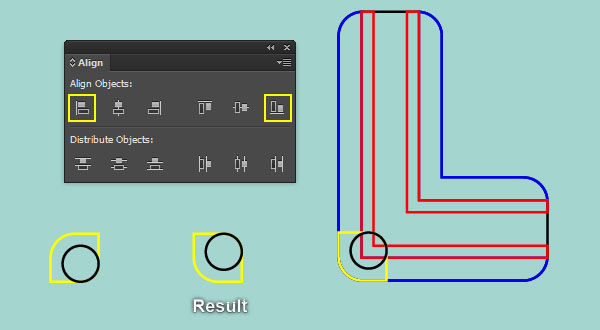
Select the black ellipse and the yellow object of the letter "P" and make a copy (Ctrl +C, Ctrl +F) of them, then place these copies to another position.
Keep the two newly created objects selected and double-click on the icon of the Reflect Tool from the Toolbar.
In the Reflect dialog box, check Horizontal and click OK, then press (Ctrl +G) to group the two resulting objects.
With the help of the Selection Tool (V), select the blue object of the letter "L", hold down the Shift key, click on the group created in this step, release the Shift key and click on the blue object again (to fix its position).
Open the Align palette (Window > Align) and click on the Horizontal Align Left button, then click on the Vertical Align Button button.
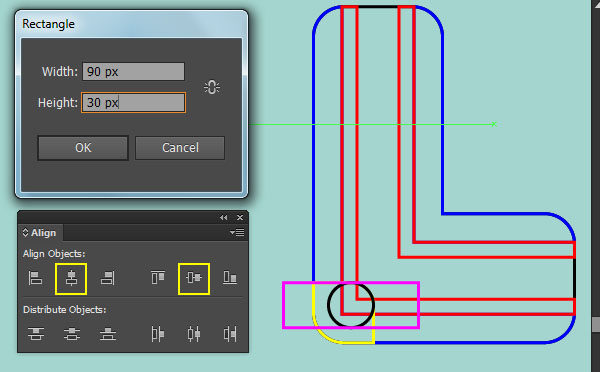
Next repeat the same process as in step 23, create a magenta rectangle of 90 by 30px size, then arrange this object by aligning and rotating it like you see in the second and the third images.
Finally, select the magenta rectangle and the left red object of the letter "L" and click on the Minus Front button from the Pathfinder palette, then press (Ctrl +Shift +G) to ungroup the newly created group.
Step 25
We will continue with the letter "A". Select the black ellipse and the yellow object of the letter "L" and make a copy (Ctrl +C, Ctrl +F) of them, then place these copies to another position.
Keep the two newly created objects selected and double-click on the icon of the Reflect Tool from the Toolbar.
In the Reflect dialog box, check Vertical and click OK, then press (Ctrl +G) to group the two resulting objects.
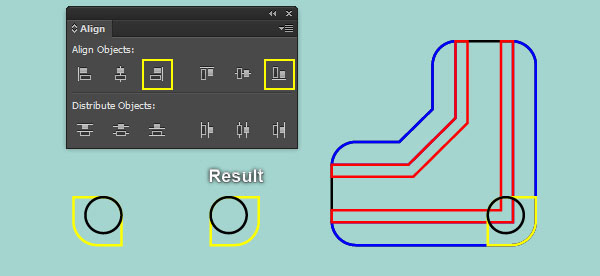
With the Selection Tool (V), select the right blue object of the letter "A", hold down the Shift key, click on the group created in this step, release the Shift key and click on the right blue object again (to fix its position).
Open the Align palette (Window > Align) and click on the Horizontal Align Right button, then click on the Vertical Align Button button.
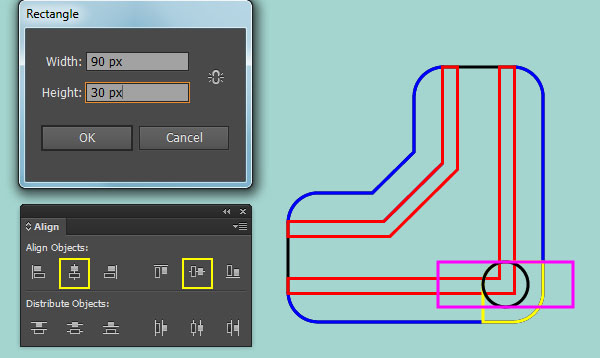
Next repeat the same process as in step 23, create a magenta rectangle of 90 by 30px size and arrange this rectangle by aligning it like you see in the second image.
Then rotate this magenta rectangle to an angle of about -45 degrees.
Finally, select the magenta rectangle and the right red object of the letter "A" and click on the Minus Front button from the Pathfinder palette, then press (Ctrl +Shift +G) to ungroup the newly created group.

Step 26
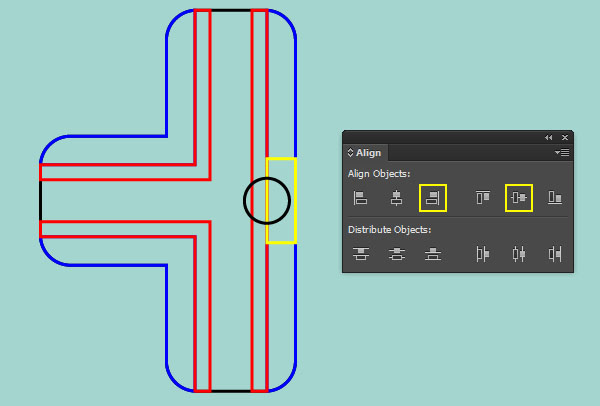
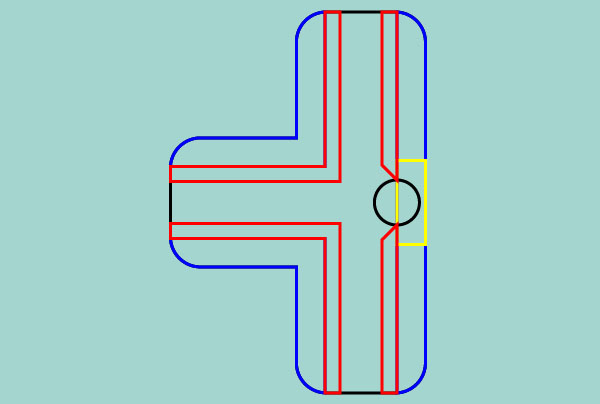
With the help of the Rectangle Tool (M) and the Ellipse Tool (L), create two objects as you see in the image below.
Reselect these two newly created objects, open the Align palette (Window > Align) and click on the Horizontal Align Right button, then click on the Vertical Align Center button.
Reselect the black ellipse and move it 4px to the left. Keep the black ellipse selected, hold down the Shift key and click on the yellow rectangle, then press (Ctrl +G) to group them.
Make sure that the newly created group is still selected, hold down the Shift key, click on the right blue object of the letter "Y", release the Shift key and click on the right blue object again.
Open the Align palette (Window > Align) and click on the Horizontal Align Right button, then click on the Vertical Align Center button.
Finally reselect the group created in this step and press (Ctrl +Shift +G) to ungroup it.
Step 27
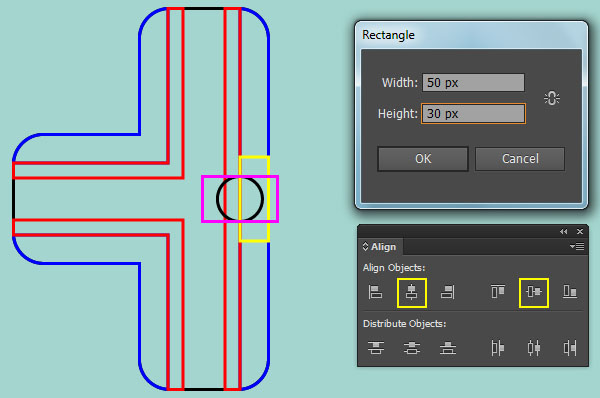
With the Rectangle Tool (M), create a magenta rectangle of 50 by 30px size.
Having the magenta rectangle selected, hold down the Shift key, click on the black ellipse of the letter "Y", release the Shift key and click on the black ellipse again.
Open the Align palette (Window > Align) and click on the Horizontal Align Center button, then click on the Vertical Align Center button.
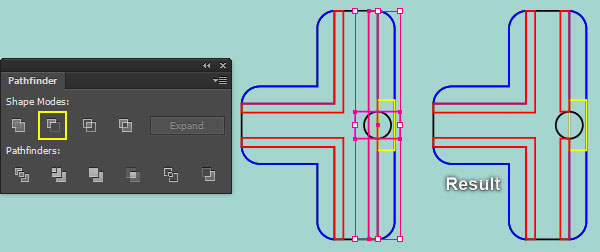
Reselect the magenta and the right red rectangles of the letter "Y", then open the Pathfinder palette (Window > Pathfinder) and click on the Minus Front button.
Next press (Ctrl +Shift +G) to ungroup the newly created group.
Now focus on the upper red rectangle, select the bottom-left anchor point of this rectangle and move it 10px up.
Next select the top-left anchor point of the remaining red rectangle and move it 10px down.
Step 28
At this point your text should look like in the next image:

Step 29
Before you continue, select all blue objects of the four letters and bring them to front (Ctrl +Shift +Right Square Bracket).
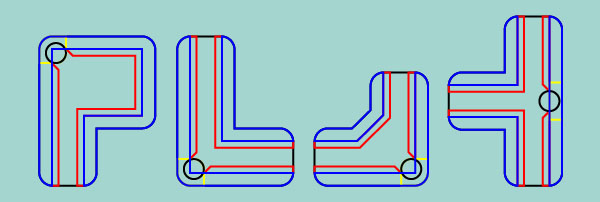
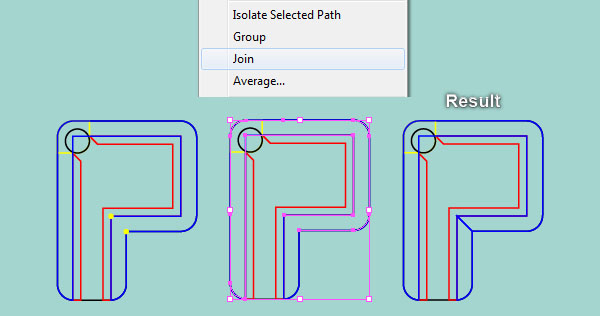
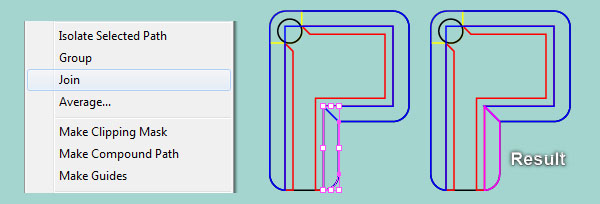
Focus on the letter"P", pick the Direct Selection Tool (A) along with the Shift key, select the two anchor points highlighted with yellow, then click on the "Cut path at selected anchor points" icon from the Propertise bar.
This makes the blue object become two paths. Now select the upper path, right-click on the artboard and then select the Join section from the drop-down menu.
Next select the remaining blue path and right-click on the artboard, then select the Join section.
Finally replace the existing stroke color of the resulting object with magenta.
Step 30
Next comes the letter "L".
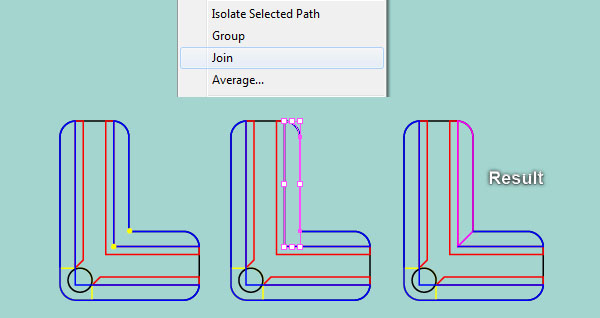
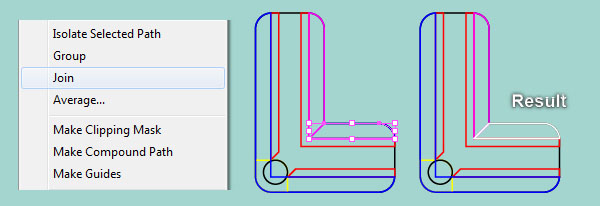
Pick the Direct Selection Tool (A) along with the Shift key, select two anchor points highlighted with yellow of the smaller blue object, then click on the "Cut path at selected anchor points" icon from the Propertise bar.
This makes the blue object become two paths. Now select the upper blue path, right-click on the artboard and select the Join section from the drop-down menu, then replace the existing stroke color of the resulting object with magenta.
Next select the remaining blue path and right-click on the artboard, then select the Join section.
Finally replace the existing stroke color of the resulting object with white.
Step 31
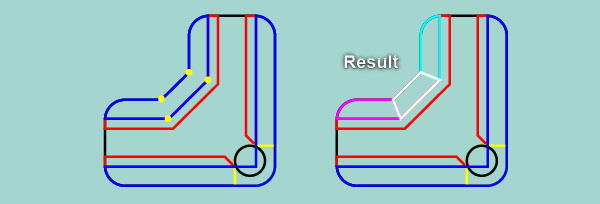
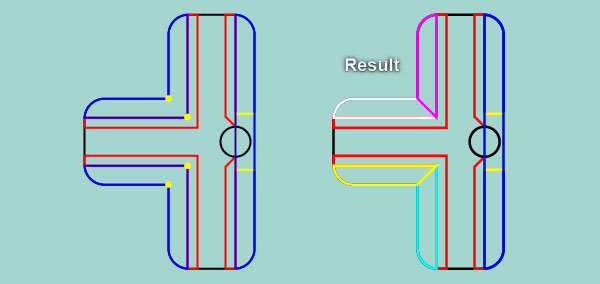
Likewise, follow the sequence of images and repeat the same process as the previous steps for the two remaining letters.
Step 32
You should end up with something like this:

Step 33
Select four black objects of the four letters and remove their strokes, then fill them with green (# 16BF04).
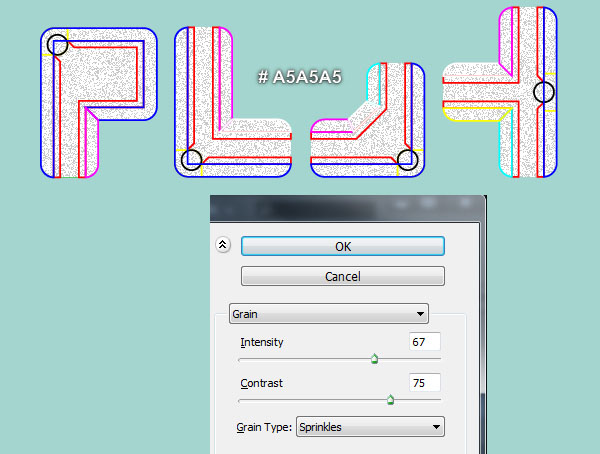
Keep these green shapes selected and make a copy (Ctrl +C, Ctrl +F) of them, then replace the existing color of the copies with grey (# A5A5A5).
Make sure that the resulting shapes are still selected and go to Effect > Texture > Grain… Follow the data as you see in the second image and click OK.
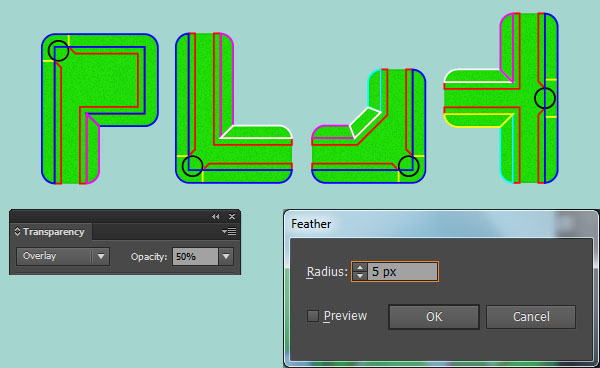
Having the resulting shapes selected, go to Effect > Stylize > Feather… Enter a 5px Radius and click OK.
Keep the resulting shapes selected and change the Blending Mode to Overlay, then lower the Opacity to 50%.

Step 34
Let’s work on creating wood textures on our letters.
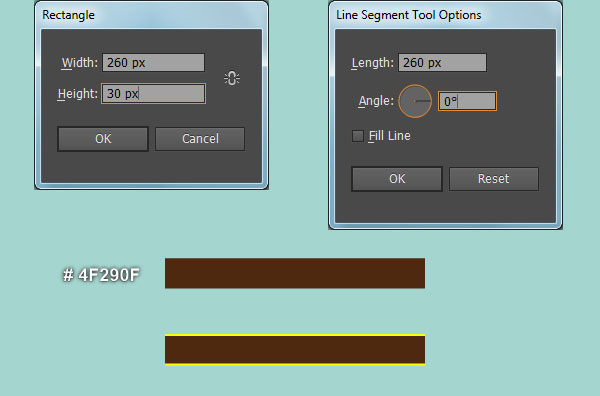
Pick the Rectangle Tool (M) and create a dark brown (# 4F290F) rectangle of 260 by 30px size.
Next using the Line Segment Tool (\) create a horizontal line of length 260px, with a 2px yellow stroke and no fill.
Make a copy (Ctrl +C, Ctrl +F) of the newly created line, then place these two lines to the positions as shown in the second image.
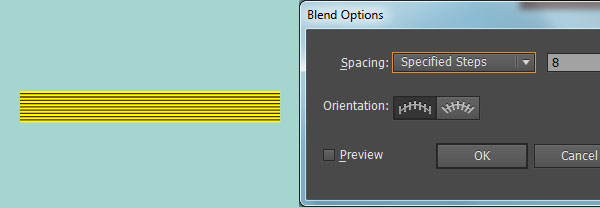
Now reselect the two horizontal lines created in this step and go to Object > Blend > Blend Options… Follow the data as you see in the third image and click OK.
Go to Object > Blend > Make (Ctrl +Alt +B). Keep the blended object selected and go to Object > Expand.
Click OK when the Expand dialog box appears.
Keep the resulting group selected, open the Expand dialog box again and click OK.
Next replace the existing fill color of the newly created group with lighter brown (# 703312).
Finally select all objects created in this step and group (Ctrl +G) them.

Step 35
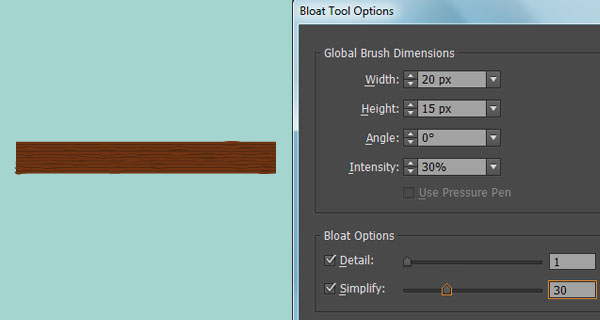
Pick the Bloat Tool (found under the Width Tool). Next double-click on the icon of the Bloat Tool from the Toolbar.
In the Bloat Tool Options dialog box, enter the data as you see in the image and then click OK.
With the Bloat Tool, click or drag over some positions of the group created in step 34 to distort this group. You should end up with something like the first image.
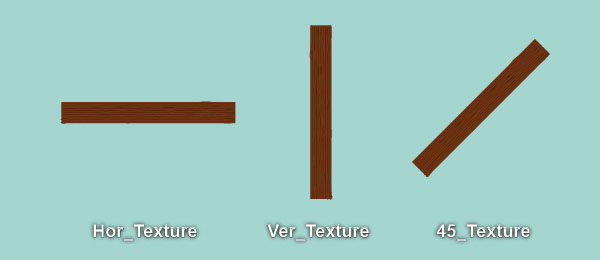
We are done with the wood texture group for the moment. Name this group "Hor_Texture". Now make two copies of this group.
Reselect a copy and rotate it to an angle of about 90 degrees, then name the resulting group "Ver_Texture".
Finally select the remaning copy and rotate it to an angle of about 45 degrees, then name the resulting group "45_Texture".
Step 36
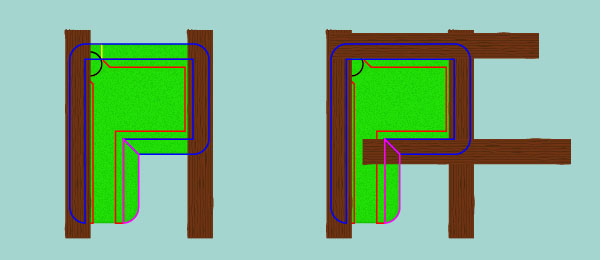
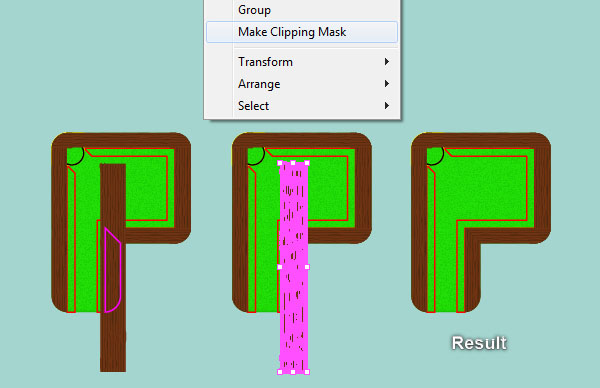
Select the two groups "Ver_Texture" and "Hor_Texture", then make two copies of them. Before you continue, select the blue and the magenta objects of the letter "P" and bring them to front (Ctrl +Shift +Right Square Bracket).
Now place the four new groups created in this step to the positions as you see in the first and the second images.
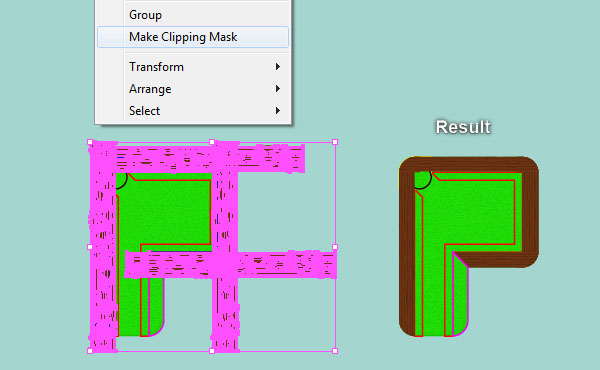
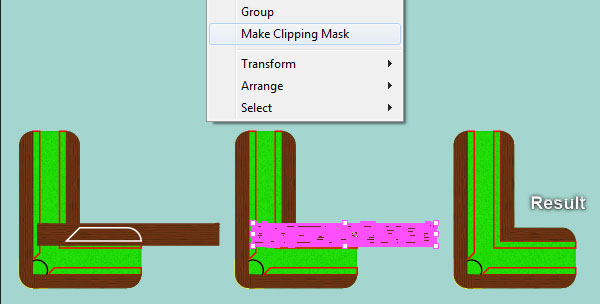
Next select the blue object and four newly created groups, right-click on the artboard and then select the Make Clipping Mask section from the drop-down menu.
The clipping set should look like the fourth image below.
Select the group "Ver_Texture" and make a copy of it, then place this copy to the position as shown in the fifth image.
Finally select the newly created group and the magenta object, then right-click on the artboard and select the Make Clipping Mask section.
You should end up with something like the last image below.
Step 37
Next comes the letter "L".
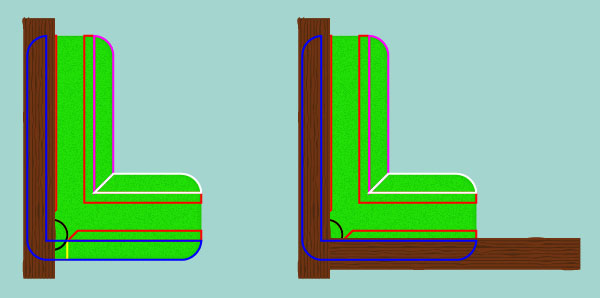
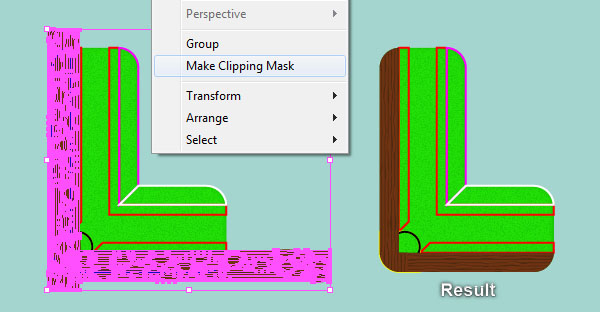
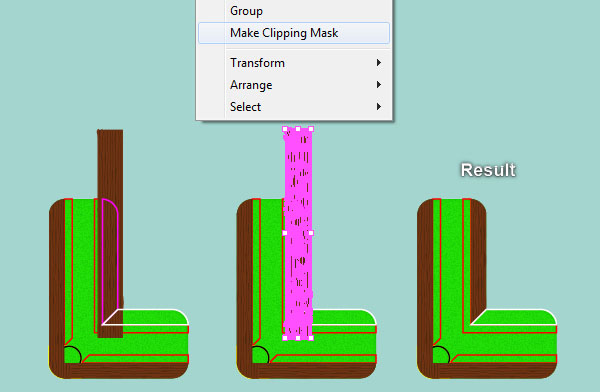
Select the two groups "Ver_Texture" and "Hor_Texture", then make a copy of them. Before you continue, select the blue, the magenta and the white objects of the letter "L" and bring them to front (Ctrl +Shift +Right Square Bracket).
Now place the two new groups created in this step to the positions as you see in the first and the second images.
Next select the blue object and two newly created groups, right-click on the artboard and then select the Make Clipping Mask section from the drop-down menu. Continue select the group "Ver_Texture" and make a copy of it, then place this copy to the position as shown in the fifth image.
Keep the newly created group selected, hold down the Shift and click on the magenta object, then right-click on the artboard and select the Make Clipping Mask section.
Next select the group "Hor_Texture" and make a copy of it, then place this copy to the position as shown in the eighth image.
Keep the newly created group selected, hold down the Shift key and click on the white object, then right-click on the artboard and select the Make Clipping Mask section. You should end up with something like the last image below.
Step 38
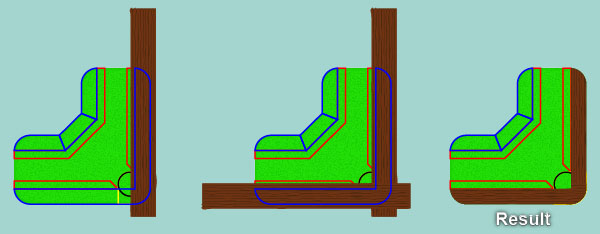
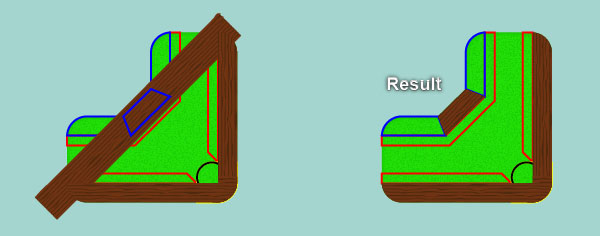
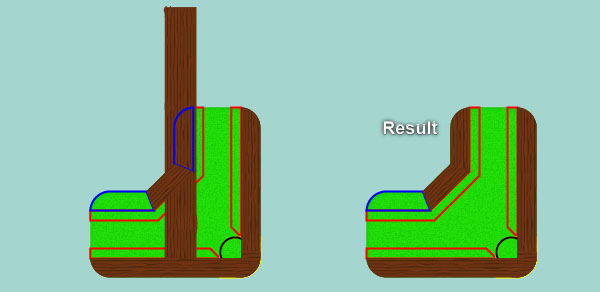
Now, follow the sequence of images and repeat the same process as the previous steps for the letter "A".
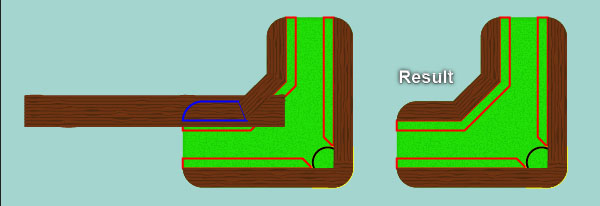
Step 39
Next comes the letter "Y".
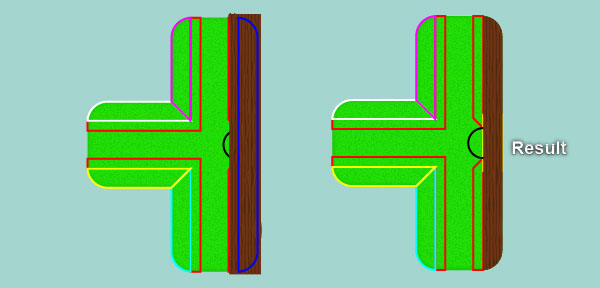
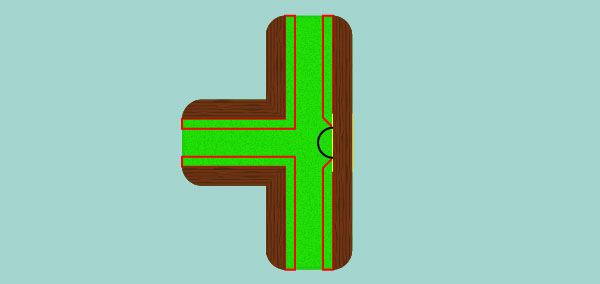
Step 40
You should end up with something like this:

Step 41
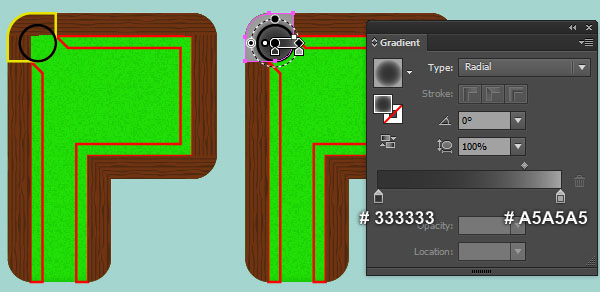
Before you continue, select all black ellipses and yellow objects of the four letters, then bring them to front (Ctrl +Shift +Right Square Bracket).
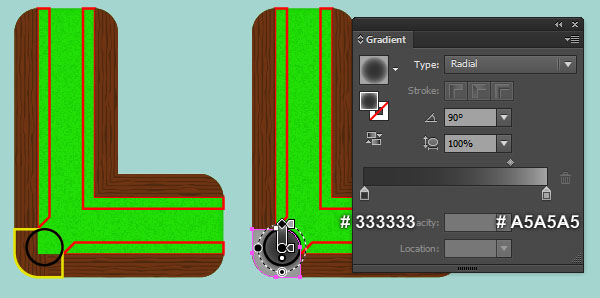
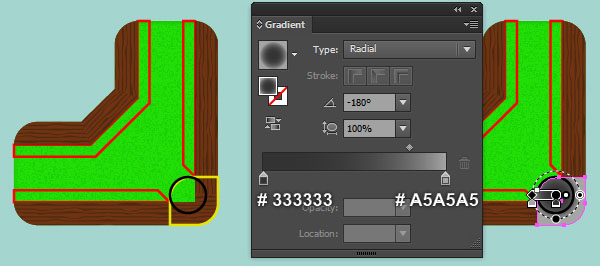
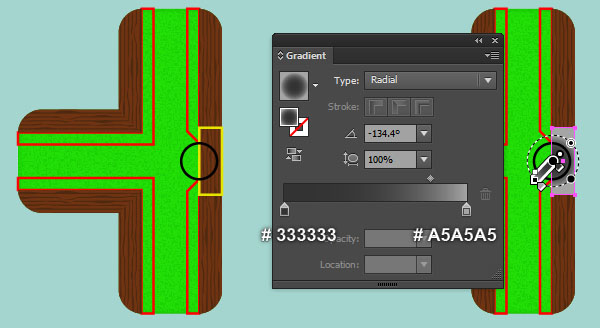
Now focus on the letter "P", select the yellow object and remove its stroke, then fill this object with the radial gradient as shown below.
Likewise, follow the sequence of images and apply a radial gradient for the yellow objects of the three remaining letters.
Step 42
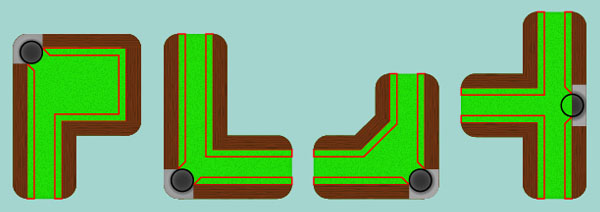
At this point your text should look like in the next image:
Step 43
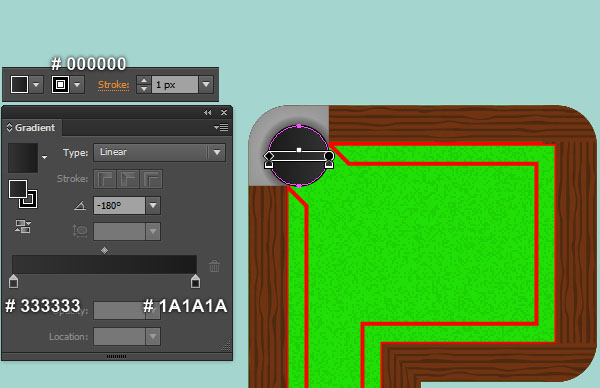
Focus on the letter "P", select the black ellipse and fill it with a linear gradient as shown below.
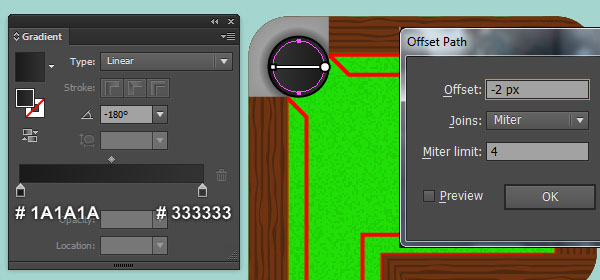
Make sure that the resulting ellipse is still selected and go to the Object > Path > Offset Path… Enter a -2px Radius and click OK.
Remove the stroke of the newly created ellipse and replace the existing fill color of it with a new linear gradient as you see in the second image.
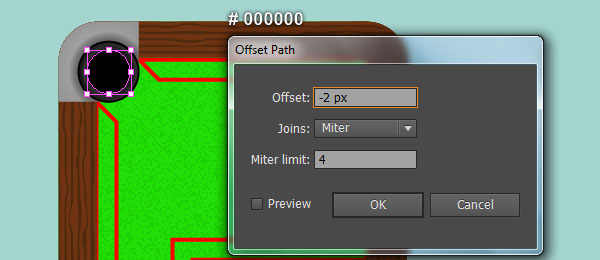
Keep the resulting ellipse selected and open the Offset Path dialog box again. Enter a -2px Radius and click OK.
Finally replace the existing color of the newly created ellipse with black (# 000000).
Step 44
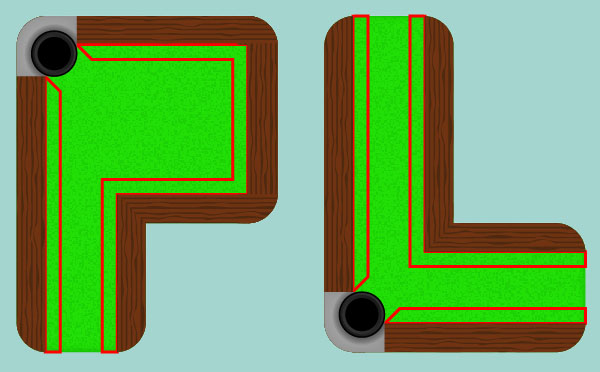
Likewise, repeat the same process asin step 43 for the three remaining letters.
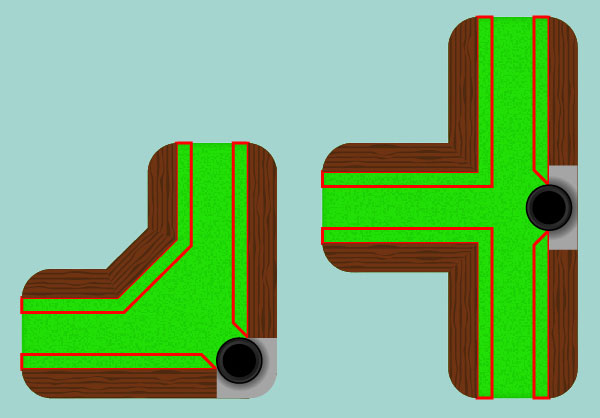
In the end your letters should look like the images shown.
Step 45
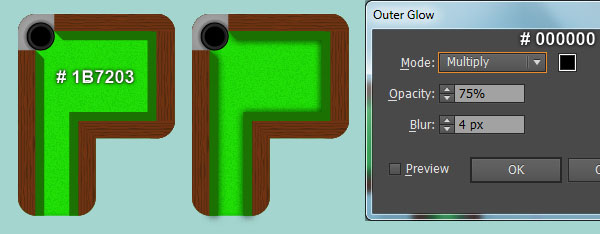
Focus on the letter "P", select the two red objects and remove their strokes, then fill these objects with dark green (# 1B7203).
Keep these two newly created shapes selected and go to the Effect > Stylize > Outer Glow… Follow the data as you see in the second image and click OK.
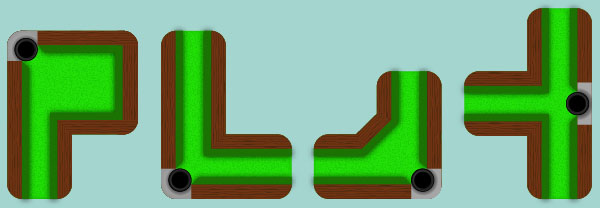
Now select all the red objects of the three remaining letters, then pick the Eyedropper Tool (I) and click on the dark green shape with glow effect applied in this step. At this point your text should look like in the last image below.
Step 46
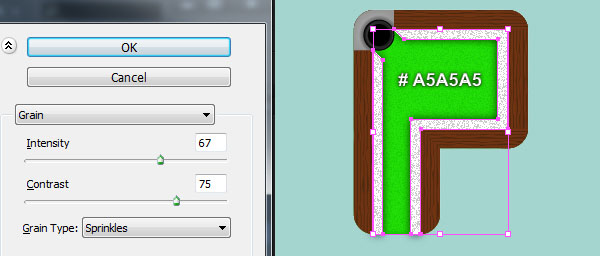
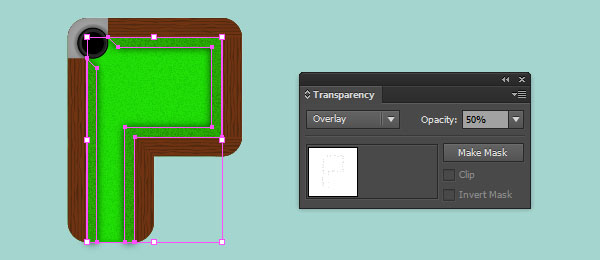
Focus on the letter "P", select the two dark green shapes with glow effect applied in step 45 and make a copy (Ctrl +C, Ctrl +F) of them, then replace the existing color of these copies with grey (# A5A5A5).
Keep the resulting shapes selected, open the Appearance palette (Window > Appearance) and remove the Outer Glow section.
Make sure that the resulting shapes are still selected and go to the Effect > Texture > Grain… Follow the data as you see in the first image and click OK.
Finally change the Blending Mode to Overlay and reduce their Opacity to 50%.
Step 47
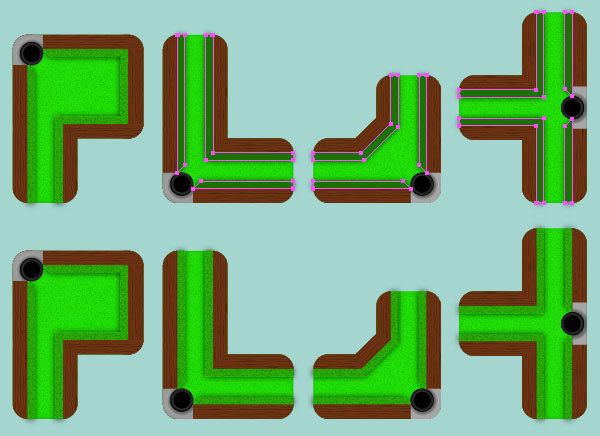
Select all dark green shapes with Glow effect applied in step 45 of the three remaining letters, then make a copy (Ctrl +C, Ctrl +F) of them.
Keep these copies selected, then pick the Eyedropper Tool (I) and click on the shape with Grain effect applied in step 46 of the letter "P". At this point your text should look like in the last image below.
Step 48
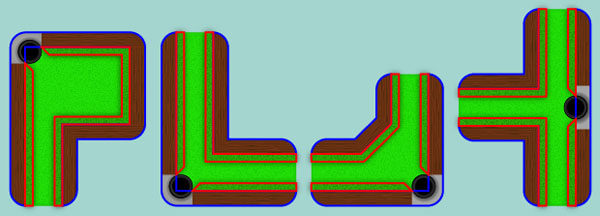
Before you continue, press (Ctrl +Alt +3) to show all blue and red objects hidden in step 19, then bring them to front (Ctrl +Shift +Right Square Bracket).
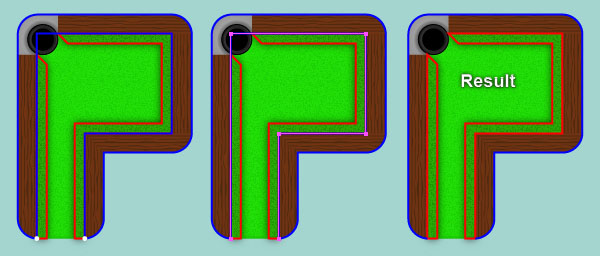
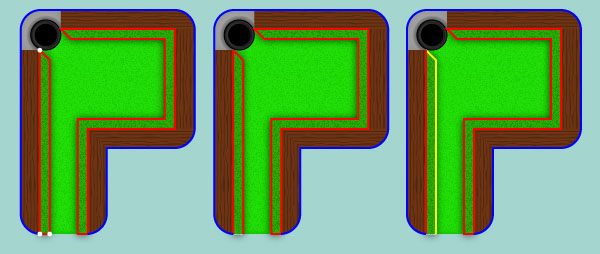
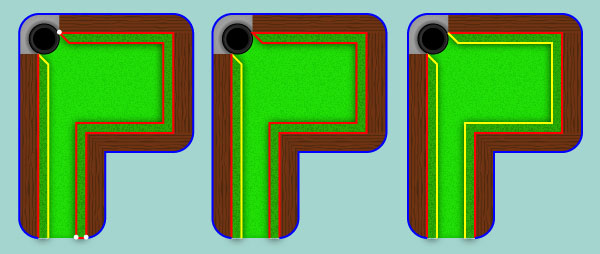
Now focus on the letter "P", select the two anchor points highlighted with white of the blue object and then click on the "Cut path at selected anchor points" button from the Properties bar.
This makes the blue object become two paths. Select the blue object as shown in the third image and remove it.
Next comes the left red object of the letter "P". Select the three anchor points highlighted with white and then click on the "Cut path at selected anchor points" button.
This makes the left red object become three paths. Select the bottom path and remove it.
Next select the right red path and replace the existing stroke color with yellow.
Likewise, repeat the same thing for the remaining red object of the letter "P".
In the end your letter "P" should look like the final image shown.
Step 49
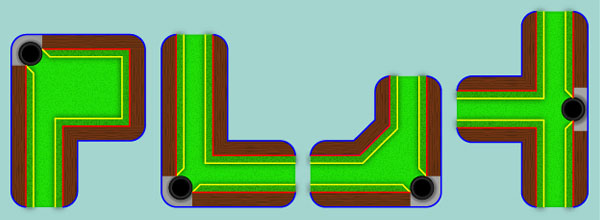
Repeat the same process as in step 48 for the three remaining letters.
You should end up with something like this:
Step 50
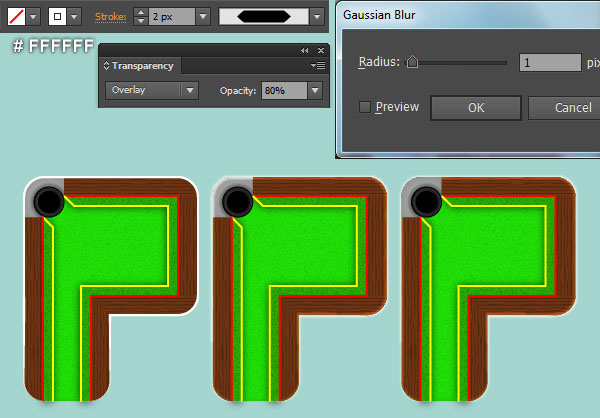
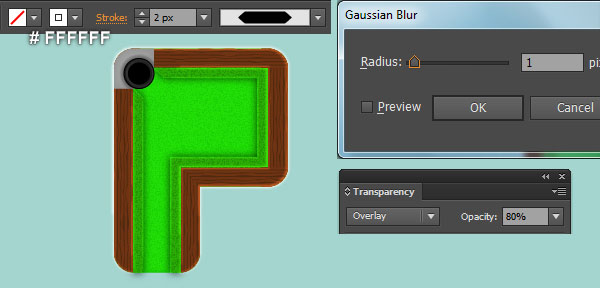
Focus on the letter "P", select the blue path, replace the existing stroke color with white (# FFFFFF) and change the stroke weight to 2px, then apply Width Profile 3 for the resulting path.
Keep this path selected and go to the Effect > Blur > Gaussian Blur… Enter a 1px Radius and click OK.
Change the Blending Mode of the resulting path to Overlay and reduce its Opacity to 80%, then hide this path behind the shape created in step 41 of the letter "P".
Likewise, repeat the same process as the previous steps for the blue paths of the three remaining letters.
Step 51
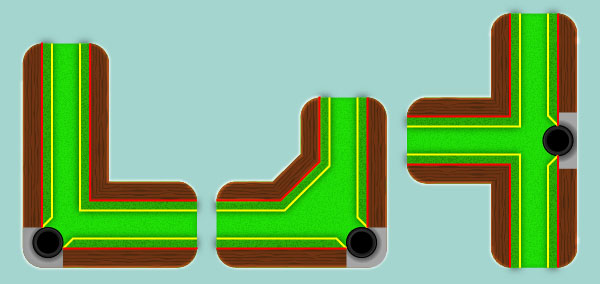
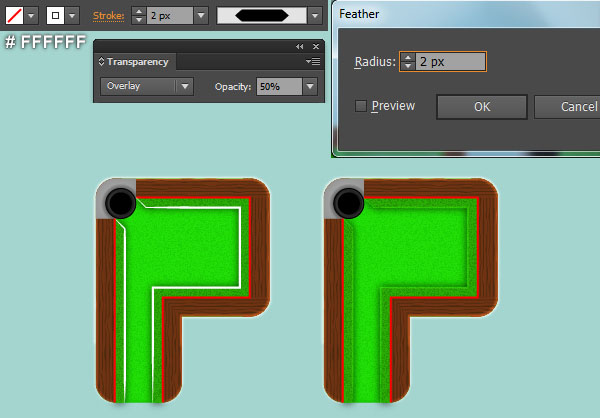
Focus on the letter "P", select the yellow path, replace the existing stroke color with white (# FFFFFF) and change the stroke weight to 2px, then apply Width Profile 3 for the resulting path.
Keep this path selected, apply a 2px Feather effect then set it to Blending Mode Overlay and reduce the Opacity to 50%.
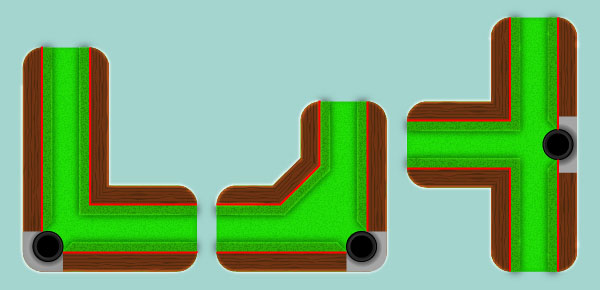
Likewise, repeat the same process as the previous steps for the yellow paths of the three remaining letters.
Step 52
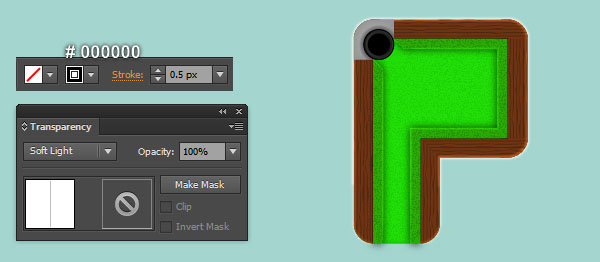
Select the two red paths of the letter "P", replace the existing stroke color of these paths with black (# 000000) and change the stroke weight to 0.5px, then set the Blending Mode to Soft Light.
Make sure that the resulting paths are still selected and make a copy (Ctrl +C, Ctrl +F) of them.
Replace the existing stroke color of the two newly created paths with white (# FFFFFF), then change the stroke weight to 2px and apply Width Profile 3 for the resulting paths.
Keep these two paths selected, apply a 1px Gaussian Blur effect to them, then change the Blending Mode to Overlay and reduce their Opacity to 80%.
Step 53
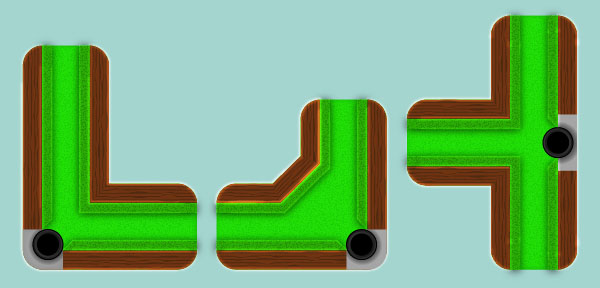
Likewise, repeat the same process as in step 52 for the red paths of the three remaining letters.
Step 54
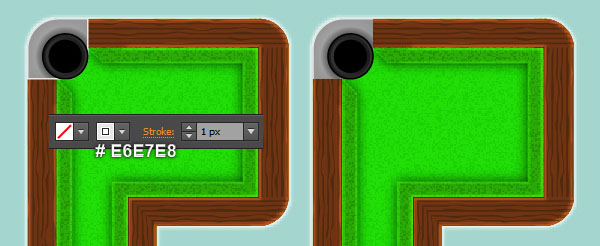
Focus on the letter "P", select the shape created in step 41 and make a copy (Ctrl +C, Ctrl +F) of it.
Remove the fill color of this copy and then add a 1px white stroke (# E6E7E8).
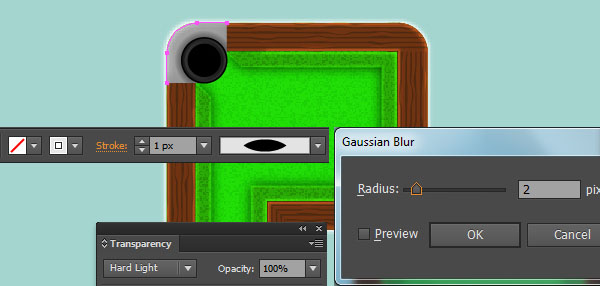
Now select the top-right and the bottom-left anchor points of the newly created object, then click on the "Cut path at selected anchor points" button from the Properties bar.
This makes the white object become two paths. Select and remove the lower path.
Next select the remaining path, then apply Width Profile 1 and a 2px Gaussian Blur effect to this path.
Keep the resulting path selected and change the Blending Mode to Hard Light.
Step 55
Likewise, repeat the same process as the previous steps for the three remaining letters.
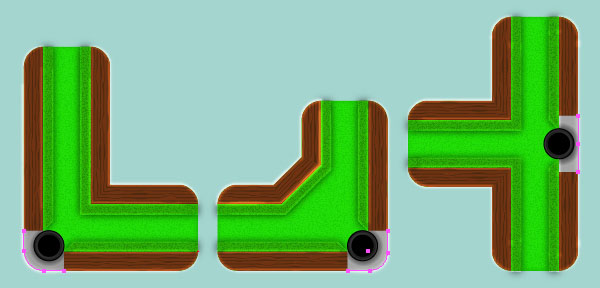
Step 56
To give a more realistic look I’m going to be adding shadows to the letters.
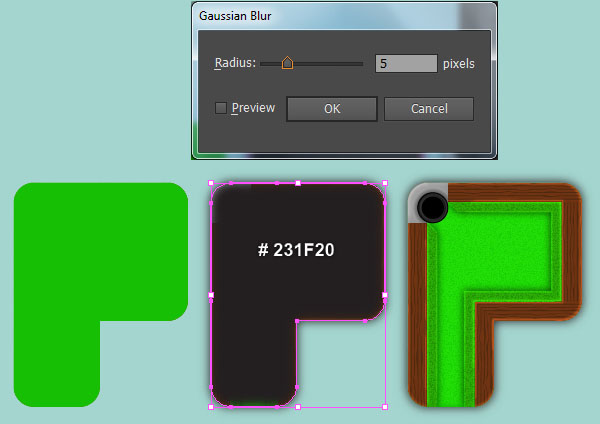
Focus on the letter "P", select the green shape created in step 33 and make a copy (Ctrl +C, Ctrl +F) of it, then bring the copy to front (Ctrl +Shift +Right Square Bracket).
Replace the existing color of the newly created shape with black (# 231F20) and apply a 5px Gaussian Blur effect to this shape, then send it to back (Ctrl +Shift +Left Square Bracket).
Likewise, repeat the same process as the previous steps for the three remaining letters.
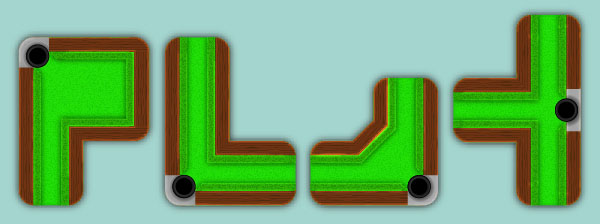
In the end your text should look like the last image shown.
Step 57
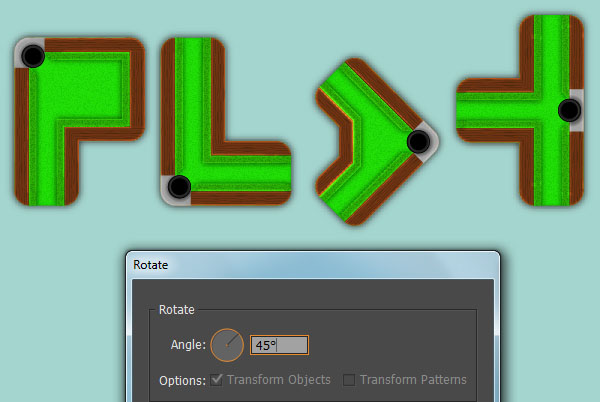
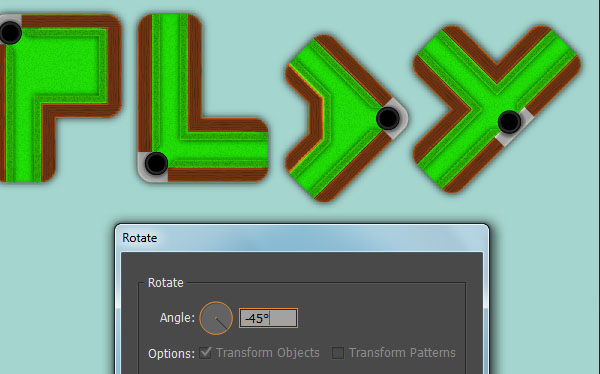
Select and group (Ctrl +G) all objects of the letter "A", then go to the Object > Transform > Rotate… Enter a 45 degrees Angle and click OK.
Next select and group all objects of the letter "Y", then rotate this group to an angle of about -45 degrees.
Step 58
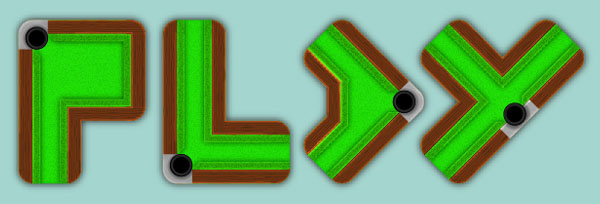
Arrange all the four letters as shown here.
Step 59
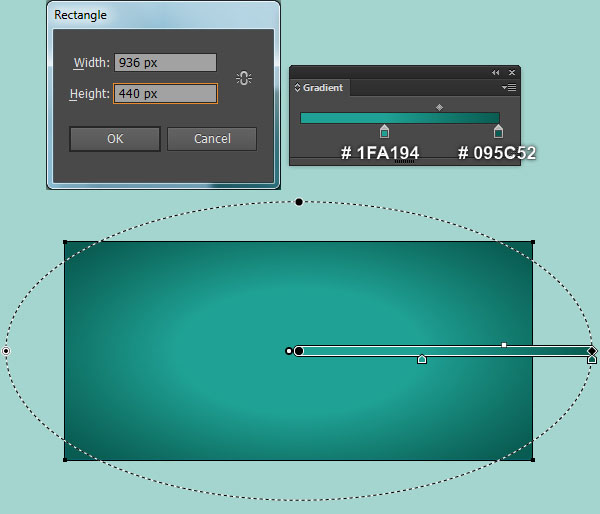
We’re done with the text. It’s time for the background now. Pick the Rectangle Tool (M) and create a 936 by 440px rectangle, then fill it with a radial gradient as shown below.
The last thing to do is place your letters into this newly created background.
And We’re Done!
