In this new tutorial you will learn how to draw two yummy jam filled cookies in Adobe Illustrator.
You will use effects like Texturizer, Film Grain and a bunch of Art and Scatter Brushes to create a realistic texture for the cookie along with a custom powder sugar brush that will be useful in other projects as well. This tutorial is full of details and surely you will learn some new techniques. Let’s start!
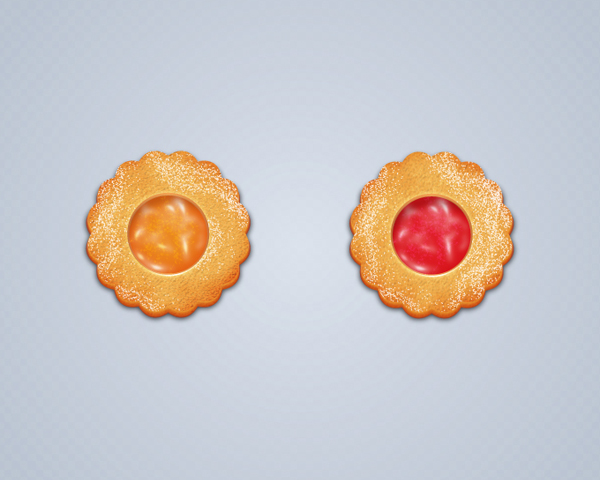
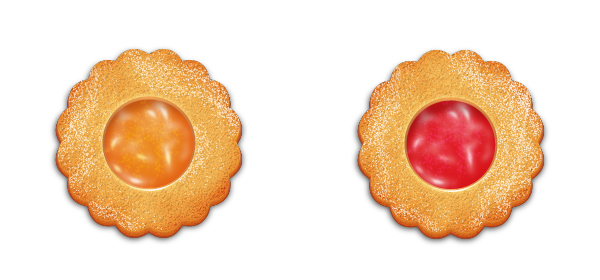
Final Image
As always, this is the final image that we’ll be creating:
Tutorial Details
- Program: Adobe Illustrator CS5+
- Estimated Completion Time: 1 hour 20 minutes
- Difficulty: Beginner-Intermediate
Step 1
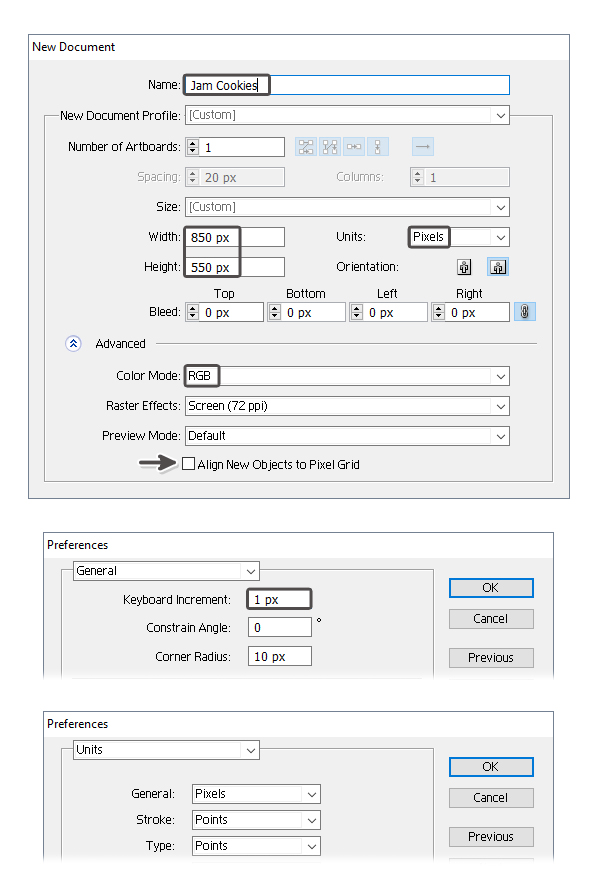
Launch Illustrator and go to File > New in order to open a blank document. Type a name for your file and set up the dimensions then select Pixels as Units and RGB as Color Mode. Also, uncheck Align New Objects to Pixel Grid. Next, go to Edit > Preferences > General and set the Keyboard Increment to 1 px and while there, also go to Units and make sure that they are set as in the following image. I usually work with these settings and they will help you throughout the drawing process.
Step 2
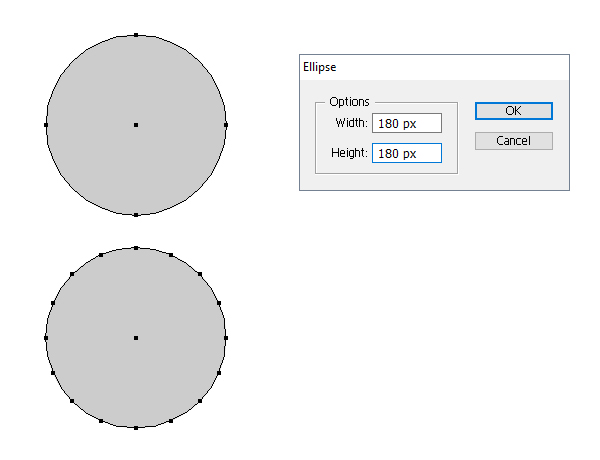
Grab the Ellipse Tool (L) and draw a 180 x 180 px ellipse on you artboard. While the circle stays selected, go to Object > Path > Add Anchor Points two times in order to add more points on the path.
Step 3
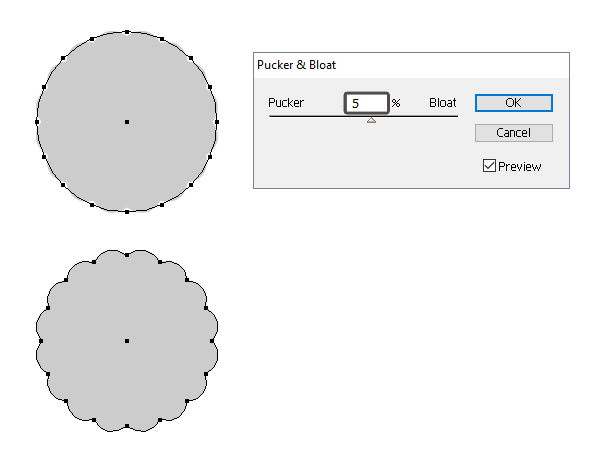
With the circle selected, go to Effect > Distort & Transform > Pucker & Bloat and apply a 5% Bloat effect. After that, choose Expand Appearance from the Object menu to expand this effect.
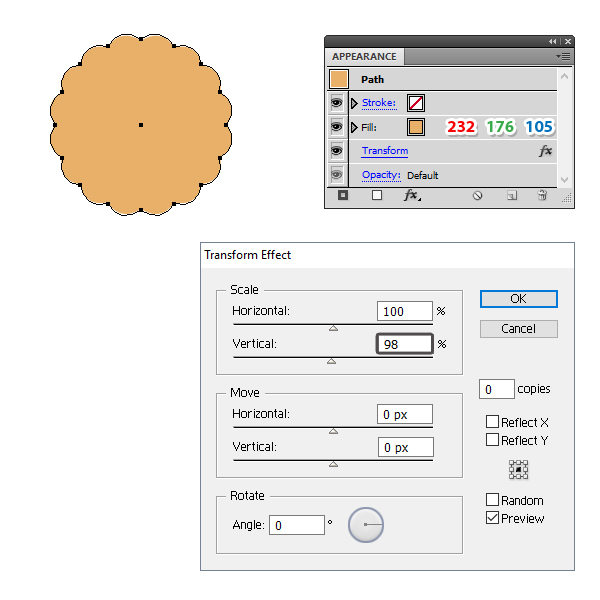
Step 4
Fill the cookie shape with the color indicated; then go to Effect > Distort & Transform > Transform and apply a 98% Vertical Scale.
Step 5
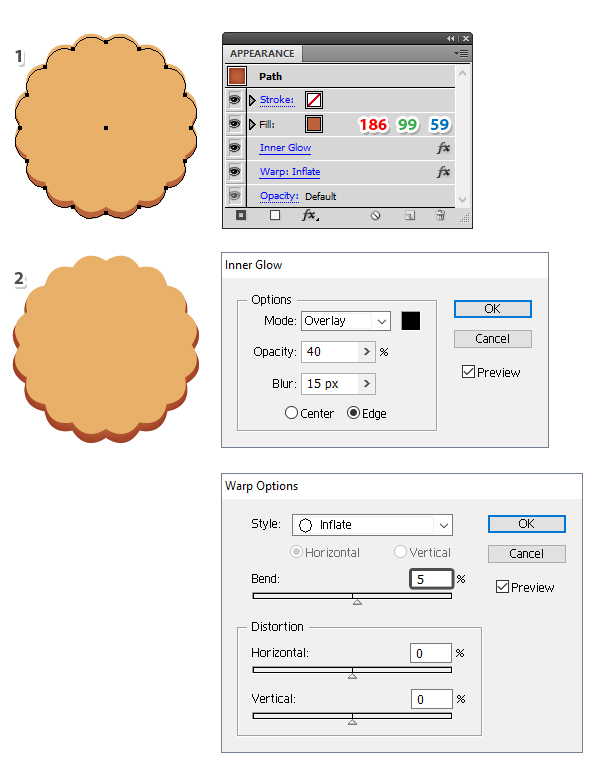
Copy and Paste in Back (Control-B) the cookie shape and first remove the Transform effect. Change the fill color to brown and move this copy about 5 px downwards by pressing the Down Arrow key on your keyboard five times (1). Next, go to Effect > Stylize > Inner Glow and apply the settings shown; then go to Effect > Warp > Inflate and apply a 5% Bend (2).
Step 6
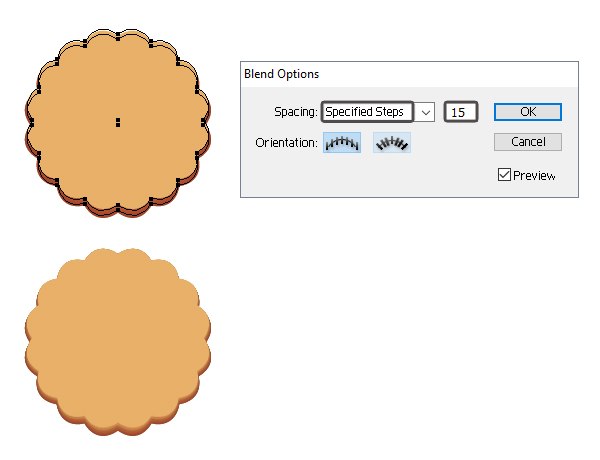
While both shapes stay selected, go to Object > Blend > Blend Options. Choose 15 Specified Steps and then go back to Object > Blend > Make (Alt-Control-B).
Step 7
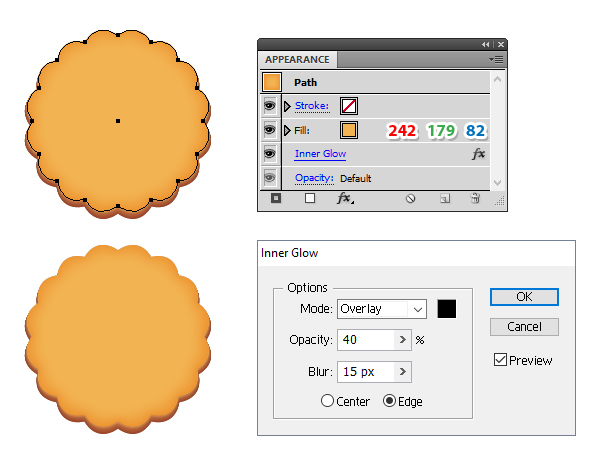
Select using the Direct Selection Tool (A) the first cookie shape from the blend-group and then Copy and Paste in Place (Shift-Control-V). First, remove the Transform effect. Change the fill color and after that, apply the Inner Glow effect.
Step 8
With this shape still selected, go to the Appearance panel and add a New Fill at the top. Use white as the fill color; then go to Effect > Artistic > Film Grain and apply the settings shown. Set the Blending Mode to Soft Light and reduce the Opacity to 25% but only for this Fill attribute.
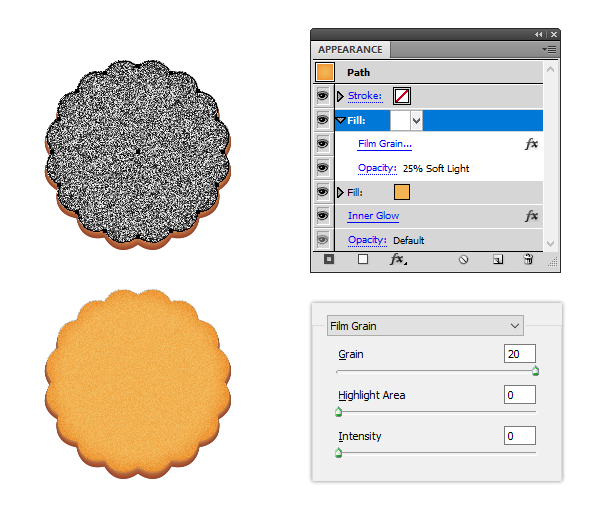
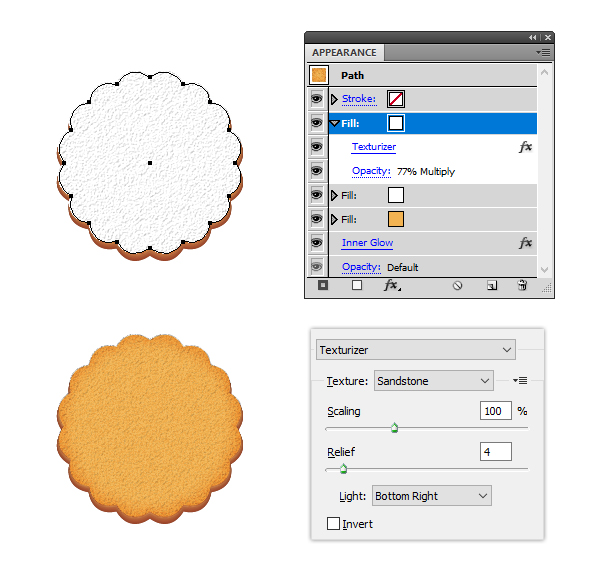
Step 9
With this shape still selected, add a New Fill at the top of the Appearance panel. Go to Effect > Texture > Texturizer and apply the settings shown. Set this Fill attribute to Blending Mode Multiply and 77% Opacity.
Step 10
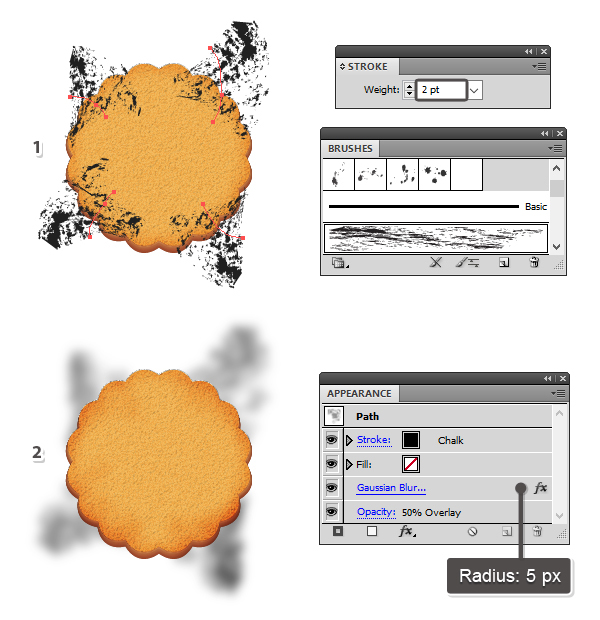
Use the Pen Tool (P) or the Pencil Tool (N) to draw four paths like in the image below (1). Stroke them with the Chalk Art Brush that you can find in the Brush Libraries Menu > Artistic > Artistic_ChalkCharcoalPencil and increase the Stroke Weight to 2 pt (1).
Next, go to Effect > Blur > Gaussian Blur and apply a Radius of 5 px. Set the Blending Mode to Overlay and reduce the Opacity to 50% for all four paths. As a result you will get slightly browned edges for the cookie (2).
Step 11
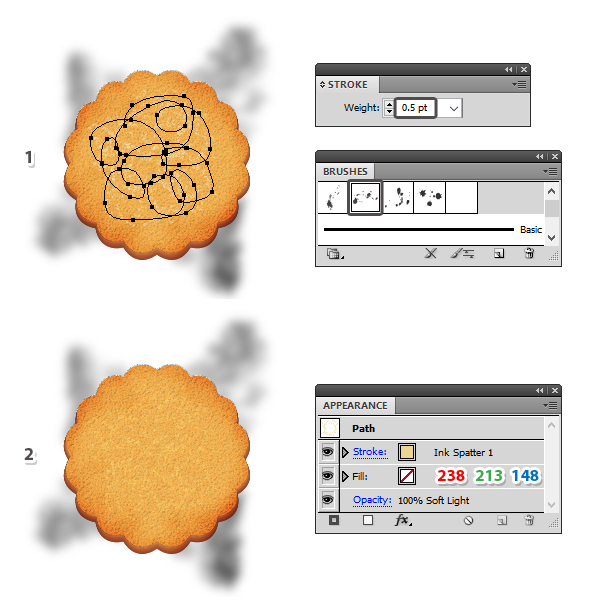
Use the Pencil Tool (N) to draw a random swirl path in the middle of the cookie (1). Stroke it with the Ink Spatter 1 Scatter Brush that you can find in the Brush Libraries Menu > Artistic > Artistic_Ink. Reduce the Stroke Weight to 0.5 pt and use the color indicated. Finally, set the Blending Mode to Soft Light (2).
Step 12
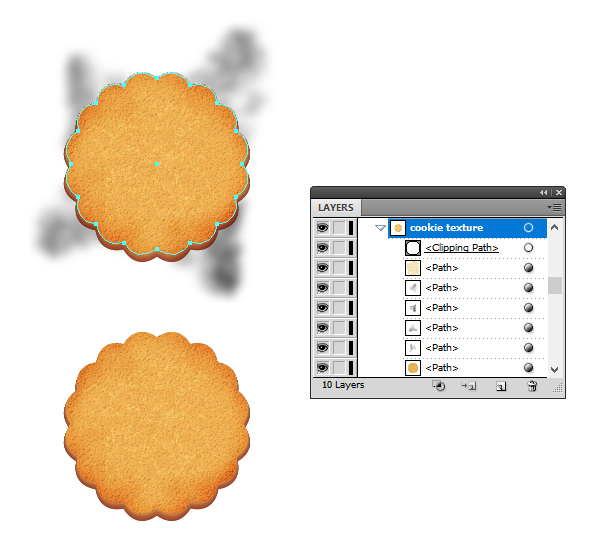
Select the cookie shape and then Copy and Paste in Place (Shift-Control-V) to make a copy of it in front of everything. Remove all existing appearances (stroke-none, fill-none).
While this copy of the cookie stays selected, also select the shape with the Texturizer effect applied to it, the four paths stroked with the Chalk Art Brush and the swirl path from the previous step and go to Object > Clipping Mask > Make (Control-7). You can name the resulting group “cookie texture”.
Step 13
Select the shape with the Texturizer and Film Grain effects applied to it and then Copy and Paste in Place (Shift-Control-V) to make a copy in front of everything (1). Move it 5 px downwards by pressing the Down Arrow key five times to cover the front edge of the cookie.
Copy and Paste in Front (Control-F) this copy again, remove all existing appearances and use it to create a mask (2). You can name the resulting group “front edge texture” and set it to Blending Mode Soft Light (3).
Step 14
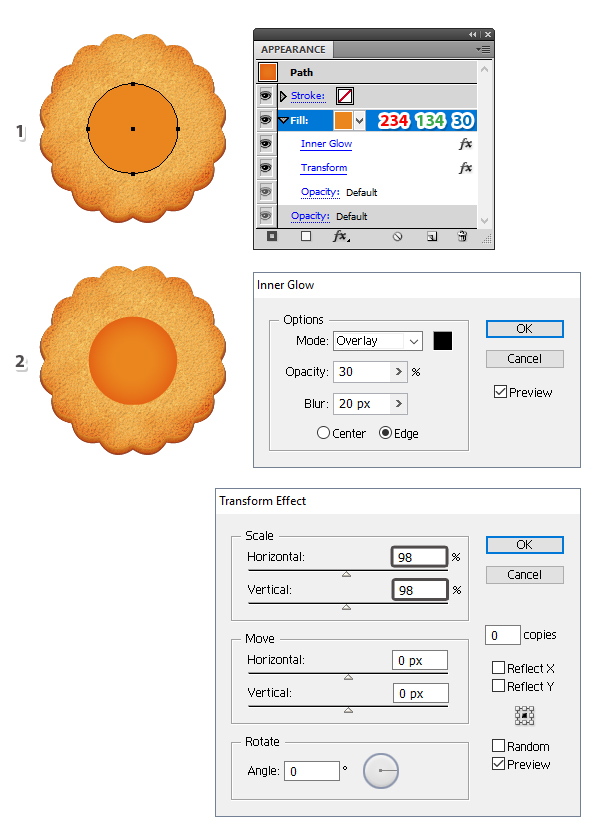
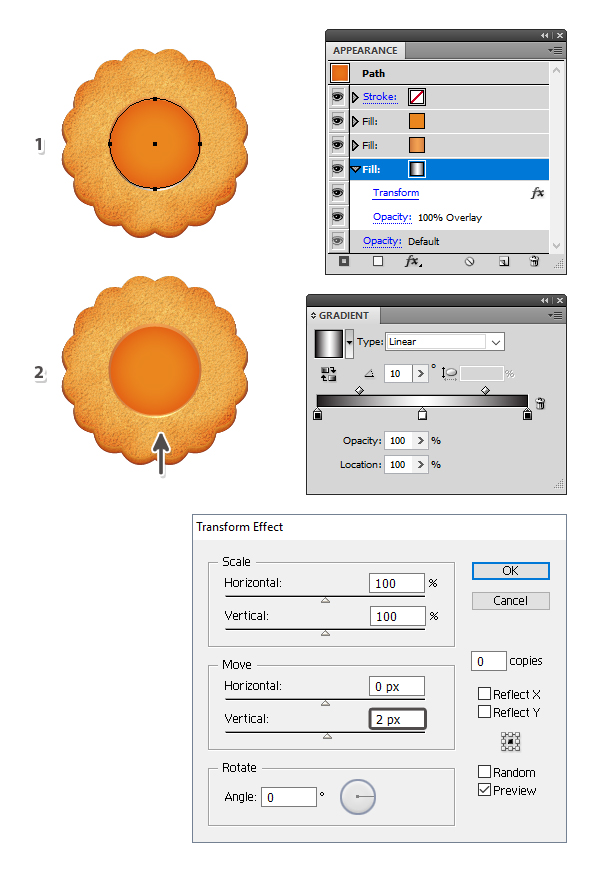
Grab the Ellipse Tool (L) and draw a 90 x 90 px circle in the center of the cookie and use orange as the fill color (1). While this Fill attribute stays selected in the Appearance panel, go to Effect > Stylize > Inner Glow and apply the settings shown. Next, go to Effect > Distort & Transform > Transform and scale this circle by 98% (2).
Step 15
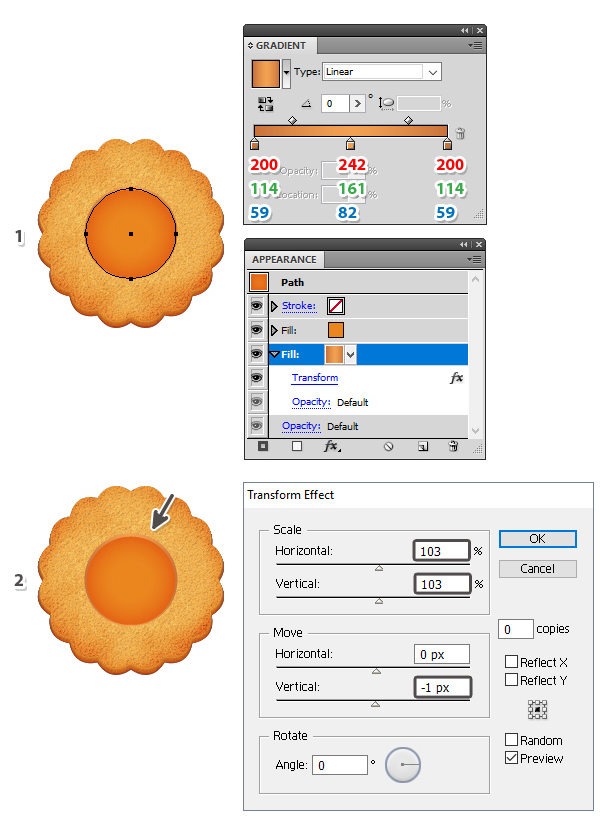
While the circle stays selected, add a New Fill at the bottom of the Appearance panel and use the linear gradient shown (1). Keep this Fill attribute selected and apply the Transform effect (2).
Step 16
With the circle still selected, add a New Fill at the bottom of the Appearance panel and use a simple black, white, black linear gradient (1). Apply the Transform effect and set this Fill attribute to Blending Mode Overlay. As a result you will a get a highlight at the bottom of the orange circle (2).
Step 17
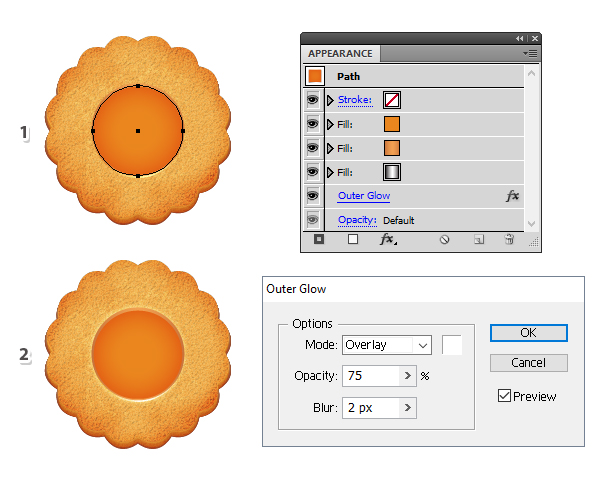
With the circle still selected, go to Effect > Stylize > Outer Glow and apply the settings shown.
Step 18
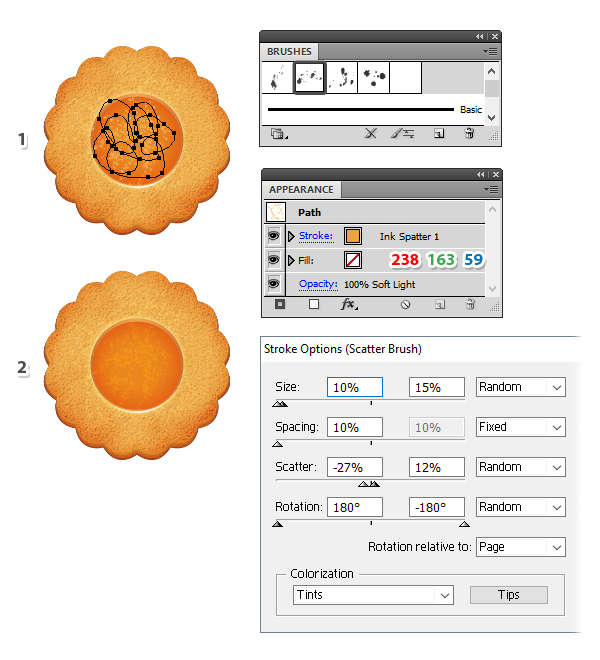
Let’s add some details. Grab the Pencil Tool (N) and draw a random path over the orange jam (1). Stroke it with the Ink Spatter 1 Scatter Brush and use orange as the stroke color. Open the Stroke Options window from the Appearance panel and change the settings as indicated to make the splats smaller and more crowded. Finally, set the Blending Mode to Soft Light (2).
Step 19
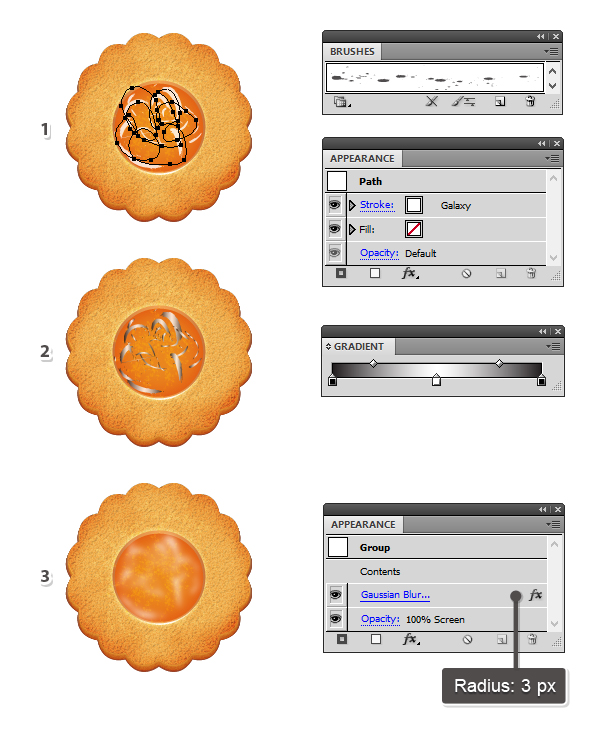
Copy and Paste in Front (Control-F) the path from the previous step and and remove the existing appearances. Stroke it with the Galaxy Art Brush that you can find in the Brush Libraries Menu > Artistic > Artistic_Ink and use white as the stroke color (1).
Now, choose Expand Appearance from the Object menu to expand the brush. Fill the resulting group with a simple black, white, black linear gradient (2); then go to Effect > Blur > Gaussian Blur and apply a Radius of 3 px. Set the Blending Mode to Screen (3).
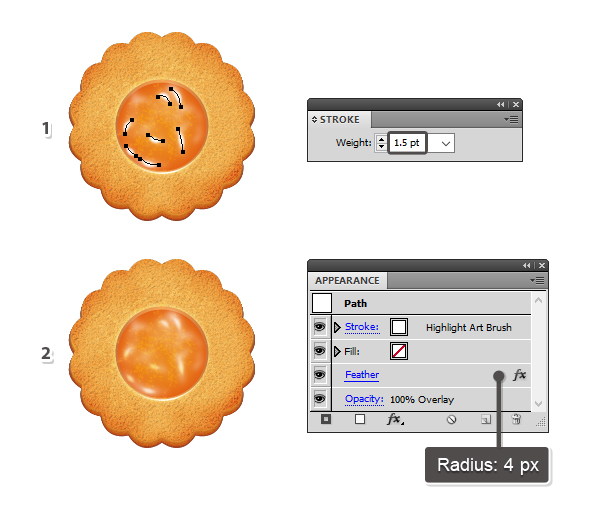
Step 20
To add extra shine on the orange jam, use the Pen Tool (P) to draw a few short slightly curved paths over the previous group. Stroke all of them with the Highlight Art Brush that I’ve shown how to create and save in another tutorial of mine How to Create an Ice Cream Cone in Adobe Illustrator at step 25. Increase the Stroke Weight to 1.5 pt (1).
While the paths stay selected, go to Effect > Stylize > Feather and apply a Radius of 4 px to make the strokes smoother. Set the Blending Mode to Overlay for all of them (2).
Step 21
Take the Pen Tool (P) and draw a curved path in the upper left side of the orange jam circle (1). Give it a 2 pt black Stroke and then apply a 5 px Gaussian Blur. Reduce the Opacity to 75% (2).

Step 22
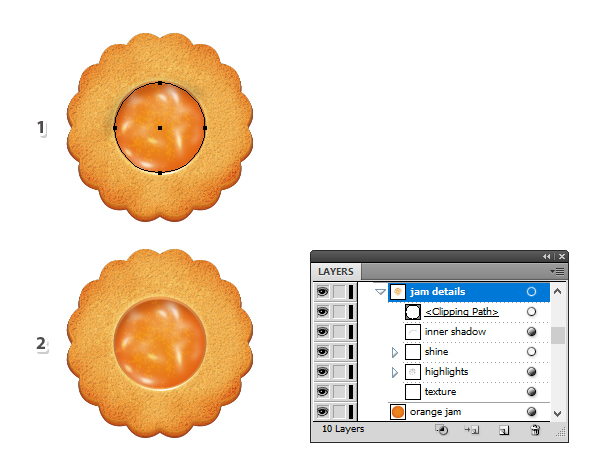
Select the orange circle and then Copy and Paste in Place (Shift-Control-V) to make a copy of it in front of everything. Remove all existing appearances (stroke-none, fill-none) (1).
Now, select all the stroked paths from the orange circle up to this point along with the copy of the circle and go to Object > Clipping Mask > Make (Control-7). You can name the resulting group “jam details” (2).
Step 23
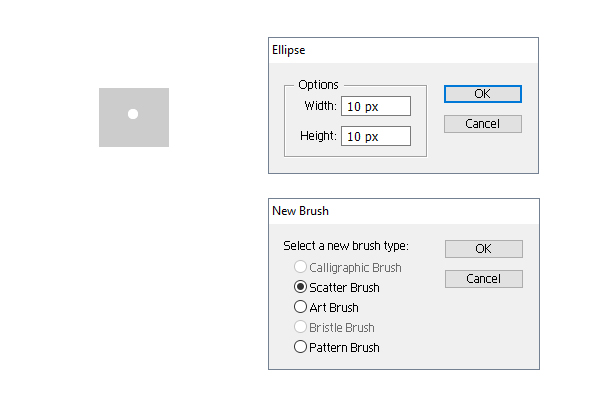
Use the Ellipse Tool (L) to draw a small 10 x 10 px circle filled with white. Drag it into the Brushes panel and choose New Scatter Brush. Leave the settings as they are and just type “Powder Sugar Scatter Brush” as the name.
Step 24
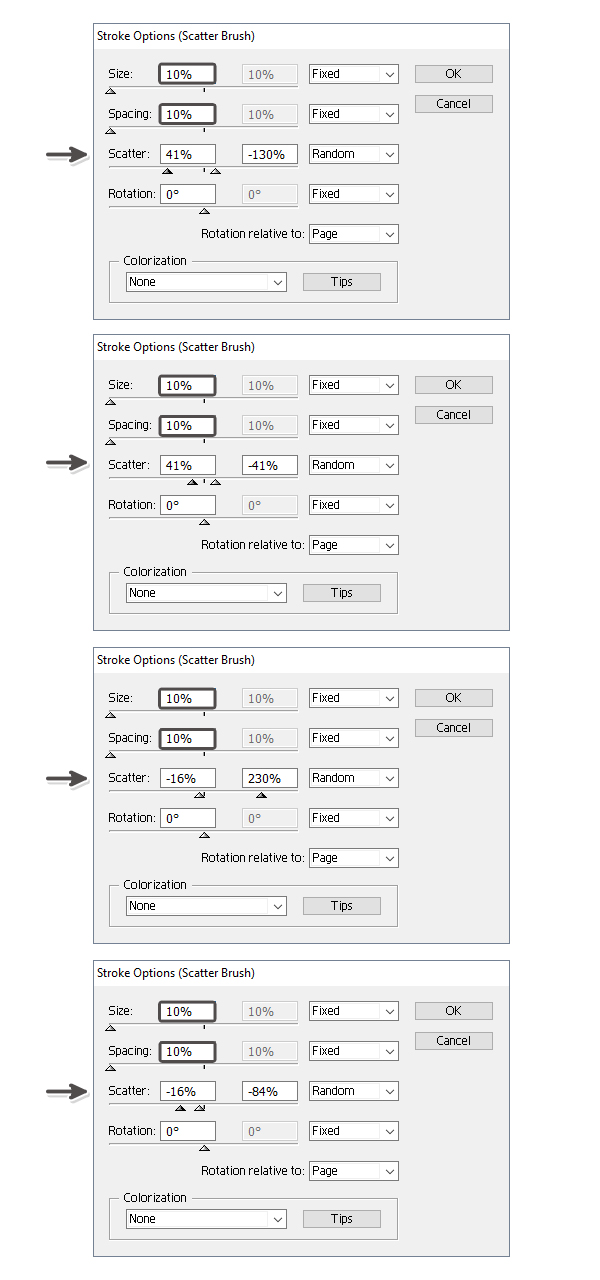
Use the Pen Tool (P) or the Pencil Tool (N) to draw a wavy path in the upper right side of the cookie and stroke it with the Powder Sugar Scatter Brush. Open the Stroke Options window and set the Size and Spacing to minimum (10%). You can choose different values for the Scatter settings and see how the end result will look like (1).
Add three more Stroke attributes in the Appearance panel and use the same brush. This will add more powder sugar on the cookie (2). Reduce the Opacity to 75% and see the image below for all the settings.
Once you are happy with the result, press the New Graphic Style icon at the bottom of the Graphic Styles panel to save it for later use.
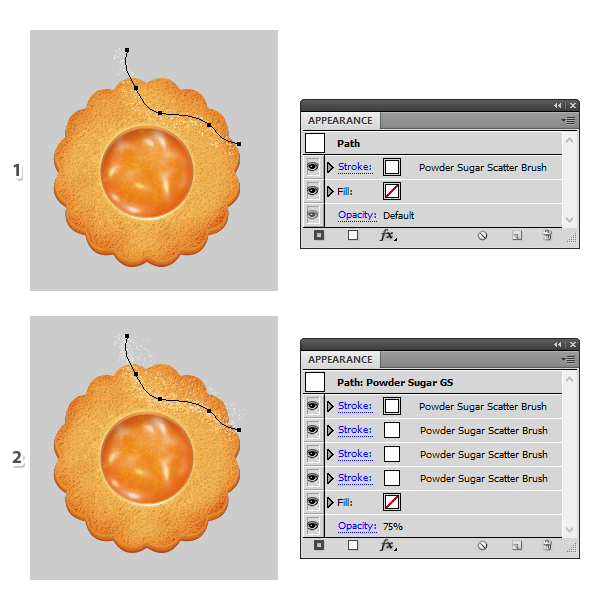
Here are the settings for the four Powder Sugar Scatter Brush strokes:
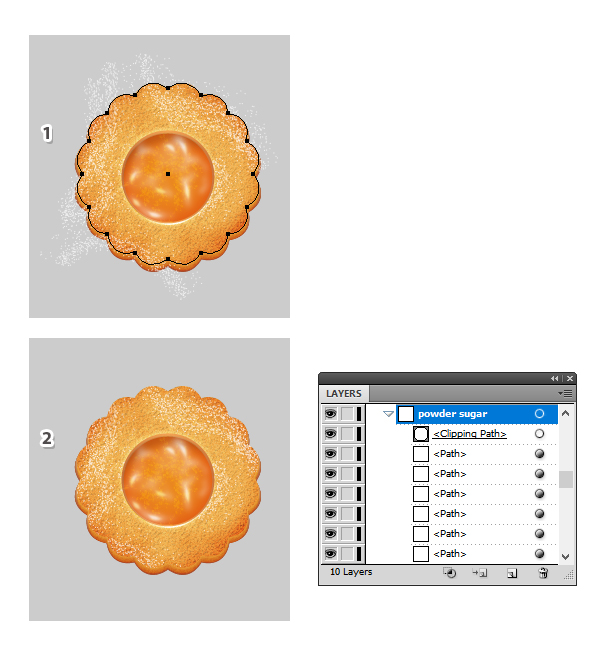
Step 25
Draw a new wavy path next to the first and simply select the Powder Sugar Graphic Style from the Graphic Styles panel to apply it (1). Continue to draw more paths, as many as you want depending on how much powder sugar you want to add on the cookie (2).

Step 26
Select the original cookie shape and then Copy and Paste in Place (Shift-Control-V) to make a copy of it in front of everything. Remove all existing appearances (1).
Now, select all the paths stroked with the Powder Sugar Scatter Brush along with the copy of the cookie and go to Object > Clipping Mask > Make (Control-7) (2).
Step 27
It’s time to create the shadow under the cookie. Select the second cookie shape from the blend-group and then Copy and Paste in Place (Shift-Control-V) to make a copy of it. First, remove the Inner Glow effect and then choose Expand Appearance from the Object menu in order to expand the Inflate effect (1).
Move this copy in a New Layer behind the cookie. Next, go to Effect > Stylize > Drop Shadow and apply the settings shown to obtain the shadow (2).

Step 28
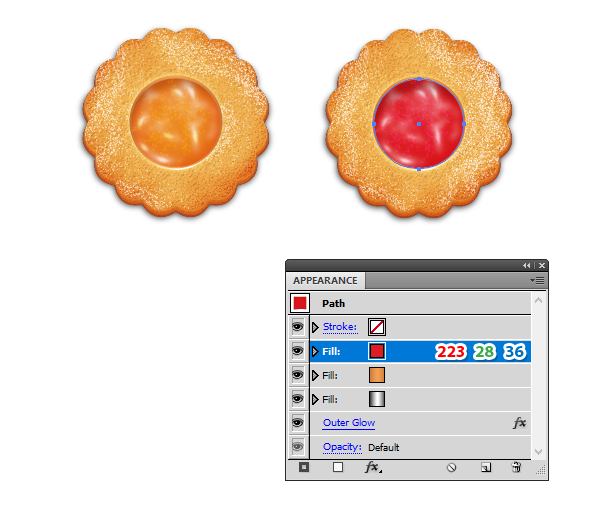
The orange jam cookie is ready at this point. If you want to create different colored jam cookies, first make a copy of the cookie and let’s make a few changes. Select the jam circle and replace the orange fill color at the top of the Appearance panel with a raspberry shade. Leave everything else the same.
Step 29
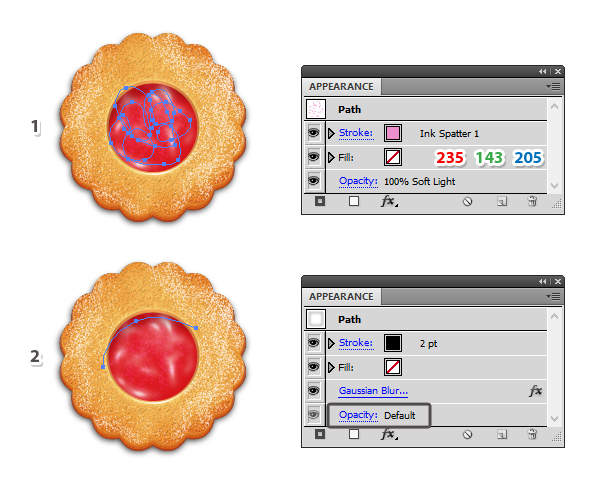
Next, select the random path stroked with the Ink Spatter 1 Scatter Brush and change the stroke color to pink (1).
Now, select the shadow path from the upper left side and bring the Opacity back to 100% because you are using a darker jam color this time (2).
Step 30
You can add more powder sugar on the raspberry jam cookie if you want but other than that both cookies are ready now.
Awesome work!
Here is the final image of the delicious jam filled cookies. I hope you enjoyed this tutorial and that you learned new techniques today.
